tow HONDA CIVIC HYBRID 2012 9.G Owners Manual
[x] Cancel search | Manufacturer: HONDA, Model Year: 2012, Model line: CIVIC HYBRID, Model: HONDA CIVIC HYBRID 2012 9.GPages: 313, PDF Size: 8.65 MB
Page 1 of 313
Contents
This owner’s manual should be considered a permanent part of the
vehicle and should remain with the vehicle when it is sold.
This owner’s manual covers all models of the Civic Hybrid. You may
find descriptions of equipment and features that are not on your
particular model.
Images throughout this owner’s manual (including the front cover)
represent features and equipment that are available on some, but
not all, models. Your particular mo del may not have some of these
features.
This owner's manual is for vehicles sold in the United States and
Canada.
The information and specifications in cluded in this publication were
in effect at the time of approval for printing. Honda Motor Co., Ltd.
reserves the right, however, to discontinue or change specifications
or design at any time without notice and without incurring any
obligation.2 Safe Driving P. 27
For Safe Driving P. 28 Seat Belts P. 32 Airbags P. 39
2Instrument Panel P. 69
Indicators P. 70 Gauges and Multi-Information Display P. 82
2Controls P. 101
Setting the Clock P. 102 Locking and Unlocking the Doors P. 103
Operating the Switches Around the Steering Wheel P. 117
Interior Lights/Interior Convenience Items P. 131
2Features P. 141
Audio System P. 142 Audio System Basic Operation* P. 145
Bluetooth® HandsFreeLink® P. 167
2 Driving P. 191
Before Driving P. 192 Towing a Trailer P. 197
Refueling P. 222 Fuel Economy P. 225
2Maintenance P. 227
Before Performing Maintenance P. 228 Maintenance Minder™ P. 231
Checking and Maintaining Wiper Blades P. 252
Climate Control System Maintenance P. 265
2Handling the Unexpected P. 271
Tools P. 272 If a Tire Goes Flat P. 273
Overheating P. 283 Indicator, Coming On/Blinking P. 285
2Information P. 293
Specifications P. 294 Identification Numbers P. 296
Emissions Testing P. 299 Warranty Coverages P. 301
CIVIC IMA_KAKC-31TR2600.book 0 ページ 2011年2月15日 火曜日 午前9時24分
Page 2 of 313
Contents
Child Safety P. 54Exhaust Gas Hazard P. 66Safety Labels P. 67Opening and Closing the Trunk P. 110 Security System P. 113 Opening and Closing the Windows P. 115
Adjusting the Mirrors P. 125 Adjusting the Seats P. 126
Climate Control System P. 137Audio Error Messages P. 162 General Information on the Audio System P. 164When Driving P. 198Braking P. 213Parking Your Vehicle P. 217
Accessories and Modifications P. 226Maintenance Under the Hood P. 235 Replacing Light Bulbs P. 247
Checking and Maintaining Tires P. 254 12 Volt Battery P. 263 Remote Transmitter Care P. 264
Cleaning P. 266Engine Does Not Start P. 279 Jump Starting P. 280Shift Lever Does Not Move P. 282
Fuses P. 289 Emergency Towing P. 292Devices that Emit Radio Waves P. 297 Reporting Safety Defects P. 298
Authorized Manuals P. 303 Customer Service Information P. 304
Quick Reference Guide
P. 2
Safe Driving
P. 27
Instrument Panel
P. 69
Controls
P. 101
Features
P. 141
Driving
P. 191
Maintenance
P. 227
Handling the Unexpected
P. 271
Information
P. 293
Index
P. 305
Page 15 of 313
14Quick Reference Guide
Controls
(P101)
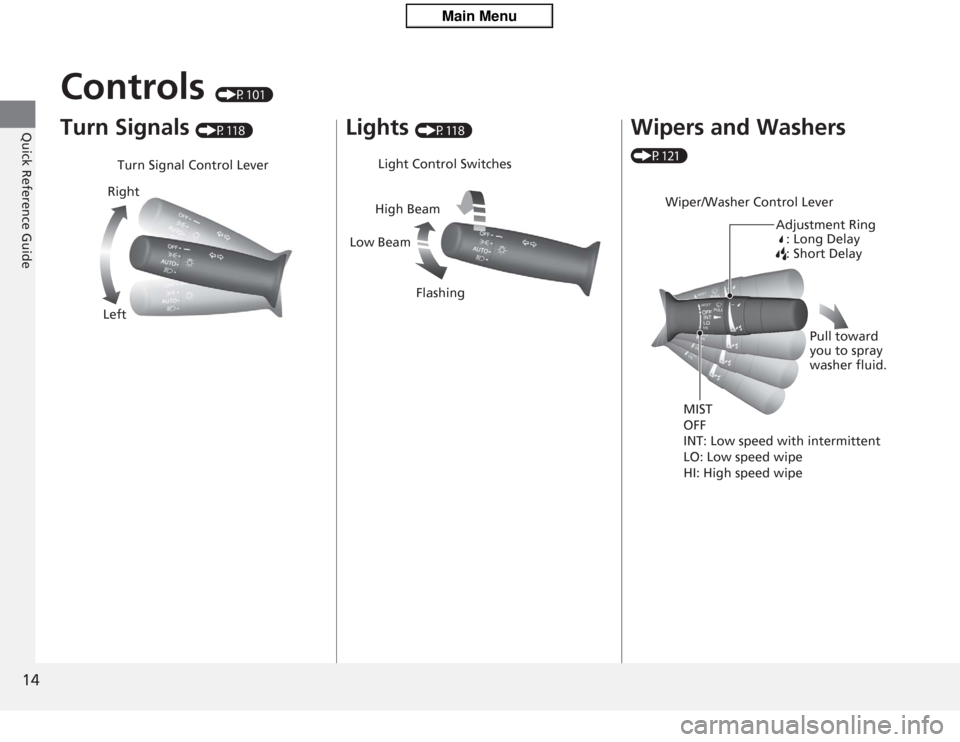
Turn Signals
(P118)
Turn Signal Control Lever
Right
Left
Lights
(P118)
Light Control Switches
Low Beam High Beam
Flashing
Wipers and Washers (P121)
Wiper/Washer Control Lever Adjustment Ring: Long Delay
: Short Delay
MIST
OFF
INT: Low speed with intermittent
LO: Low speed wipe
HI: High speed wipe Pull toward
you to spray
washer fluid.
Page 16 of 313
15Quick Reference Guide
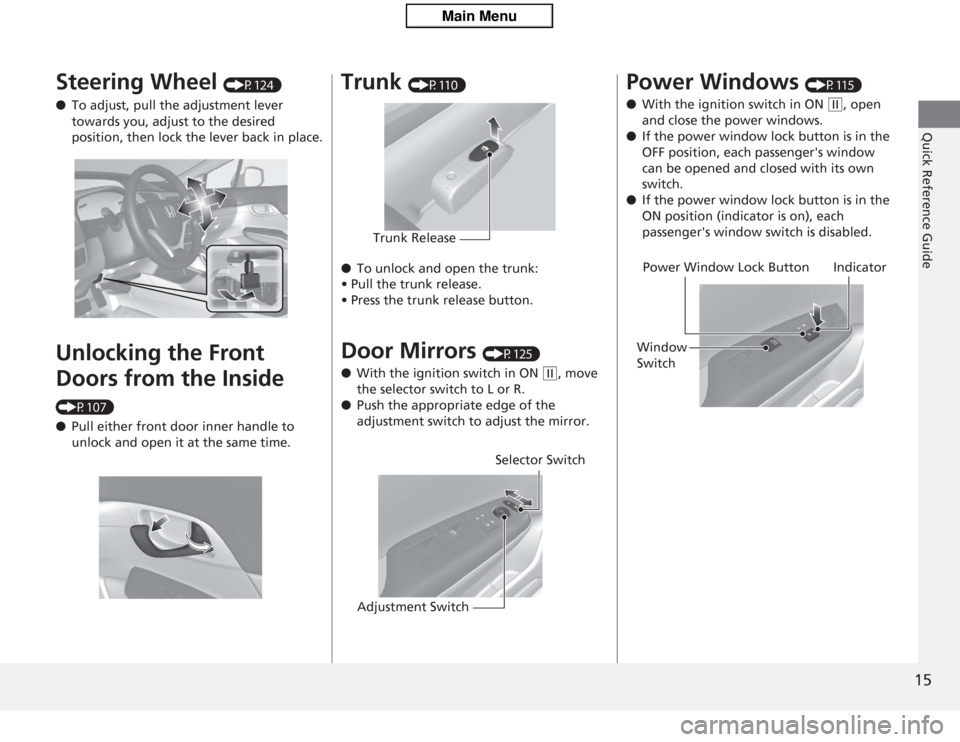
Steering Wheel
(P124)
● To adjust, pull th e adjustment lever
towards you, adjust to the desired
position, then lock the lever back in place.
Unlocking the Front
Doors from the Inside (P107)
● Pull either front door inner handle to
unlock and open it at the same time.
Trunk
(P110)
● To unlock and open the trunk:
• Pull the trunk release.
• Press the trunk release button.
Door Mirrors
(P125)
● With the ignition switch in ON
(w
, move
the selector switch to L or R.
● Push the appropriate edge of the
adjustment switch to adjust the mirror.
Trunk Release
Selector Switch
Adjustment Switch
Power Windows
(P115)
● With the ignition switch in ON
(w
, open
and close the power windows.
● If the power window lock button is in the
OFF position, each passenger's window
can be opened and closed with its own
switch.
● If the power window lock button is in the
ON position (indicator is on), each
passenger's window switch is disabled.
Power Window Lock Button
Window
Switch Indicator
Page 22 of 313

Quick Reference Guide21
Handling the Unexpected
(P271)
Flat Tire
(P273)
● Park in a safe location and replace the
flat tire with the compact spare tire in the
trunk.
Indicators Come On (P285)
●Identify the indicator and consult the
owner's manual.
Engine Won't Start
(P279)
● If the battery is dead, jump start using a
booster battery.
Blown Fuse
(P289)
● Check for a blown fuse if an electrical
device does not operate.
Overheating
(P283)
● Park in a safe location. If you do not see
steam under the hood, open the hood,
and let the engine cool down.
Emergency Towing
(P292)
● Call a professional towing service if you
need to tow your vehicle.
Page 45 of 313
44
uuAirbags uFront Airbags (SRS)
Safe Driving
■
When front airbags should not deploy
Minor frontal crashes: Front airbags were designed to supplement seat belts and
help save lives, not to prevent minor scrapes, or even broken bones that might occur
during a less than moderate-to-severe frontal crash.
Side impacts: Front airbags can provide protection when a sudden deceleration
causes a driver or front passenger to move towards the front of the vehicle. Side
airbags and side curtain airbags have been specifically designed to help reduce the
severity of injuries that can occur during a moderate-to-severe side impact which
can cause the driver or passenger to move towards the side of the vehicle.
Rear impacts: Head restraints and seat belts are your best protection during a rear
impact. Front airbags cannot provide any sig nificant protection and are not designed
to deploy in such collisions.
Rollovers: Seat belts and, in vehicles equipped with a rollover sensor, side airbags
and side curtain airbags offer the best protection in a rollover. Because front airbags could provide little if any protectio n, they are not designed to deploy during a
rollover.
■
When front airbags deploy with little or no visible damage
Because the airbag system senses s udden deceleration, a strong impact to the
vehicle framework or suspension might cause one or more of the airbags to deploy.
Examples include running into a curb, the edge of a hole, or other low fixed object
that causes a sudden deceleration in the vehicle chassis. Since the impact is
underneath the vehicle, damage may not be readily apparent.
■
When front airbags may not deploy, even though exterior damage
appears severe
Since crushable body parts absorb crash energy during an impact, the amount of
visible damage does not always indicate proper airbag operation. In fact, some
collisions can result in severe damage but no airbag deployment because the airbags
would not have been needed or would not have provided protection even if they
had deployed.
Page 48 of 313
47
uuAirbags uSide Airbags
Continued
Safe Driving
■
When a side airbag deploys with little or no visible damage
Because the airbag systems senses sudden acceleration, a strong impact to the side
of the vehicle's framework can cause a side airbag to deploy. In such cases, there
may be little or no damage, but the side impact sensors detected a severe enough
impact to deploy the airbag.
■
When a side airbag may not deploy, even though visible damage appears
severe
It is possible for a side airbag to not deploy during an impact that results in
apparently severe damage. This can occur when the point of impact was towards
the far front or rear of the vehicle, or wh en the vehicle's crushable body parts
absorbed most of the crash energy. In ei ther case, the side airbag would not have
been needed nor provided protection even if it had deployed.
Page 122 of 313
121
uuOperating the Switches Around the Steering Wheel uWipers and Washers
Controls
Wipers and Washers
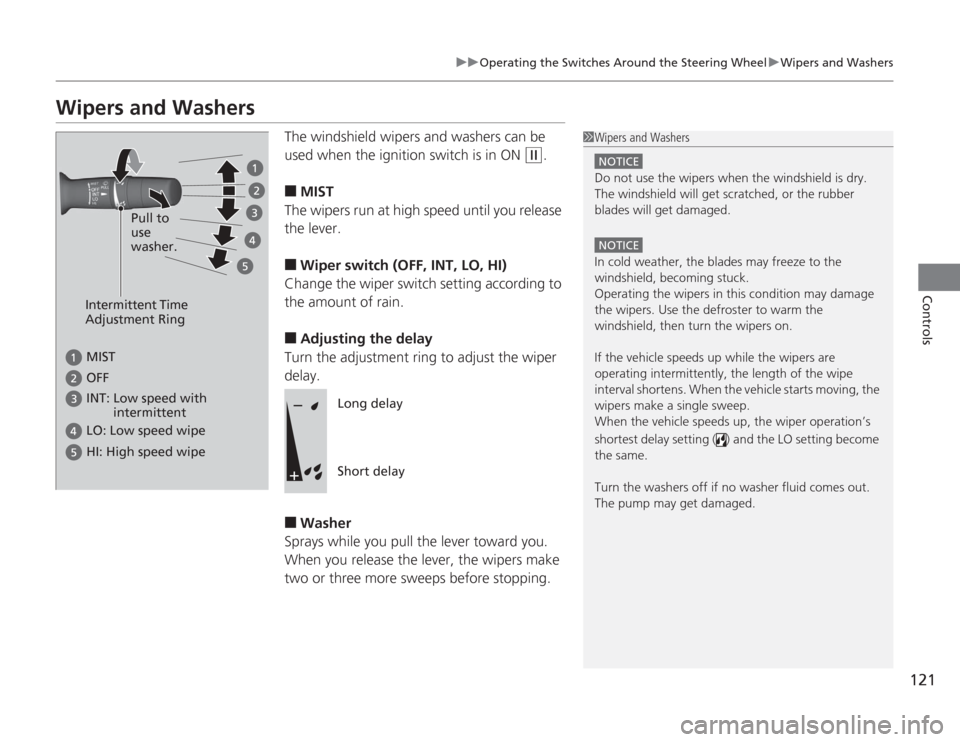
The windshield wipers and washers can be
used when the ignition switch is in ON
(w
.
■
MIST
The wipers run at high speed until you release
the lever.
■
Wiper switch (OFF, INT, LO, HI)
Change the wiper switch setting according to
the amount of rain.
■
Adjusting the delay
Turn the adjustment ring to adjust the wiper
delay.
■
Washer
Sprays while you pull the lever toward you.
When you release the lever, the wipers make
two or three more sweeps before stopping.
1 Wipers and Washers
NOTICEDo not use the wipers when the windshield is dry.
The windshield will get scratched, or the rubber
blades will get damaged.NOTICEIn cold weather, the blades may freeze to the
windshield, becoming stuck.
Operating the wipers in this condition may damage
the wipers. Use the defroster to warm the
windshield, then turn the wipers on.
If the vehicle speeds up while the wipers are
operating intermitte ntly, the length of the wipe
interval shortens. When the vehicle starts moving, the
wipers make a single sweep.
When the vehicle speeds up, the wiper operation’s
shortest delay setting ( ) and the LO setting become
the same.
Turn the washers off if no washer fluid comes out.
The pump may get damaged.
Intermittent Time
Adjustment Ring
MIST INT: Low speed with
intermittent OFF LO: Low speed wipe HI: High speed wipe
Pull to
use
washer.
Long delay
Short delay
Page 192 of 313
191
Driving
This chapter discusses driving, refueling, and information on items such as accessories.
Before DrivingDriving Preparation .......................... 192
Maximum Load Limit........................ 195
Towing a Trailer Towing Your Vehicle ........................ 197
When Driving Starting the Engine .......................... 198
Precautions While Driving................. 201
Automatic Transmission (CVT) .......... 202
Shifting ............................................ 203
Cruise Control ................................. 205
VSA
® (Vehicle Stability Assist), aka ESC
(Electronic Stability Control), System .. 208
TPMS (Tire Pressure Monitoring System) ... 210
Tire Pressure Monitoring System (TPMS) - Required Federal Explanation ......... 211
Braking Brake System ................................... 213
ABS (Anti-lock Brake System) ........... 215
Brake Assist System.......................... 216 Parking Your Vehicle
When Stopped ................................ 217
Auto Idle Stop ................................. 218
Parking ............................................ 221
Refueling Fuel Information .............................. 222
How to Refuel ................................. 223
Fuel Economy Improving Fuel Economy .................. 225
Accessories and Modifications Accessories ...................................... 226
Modifications................................... 226
Page 196 of 313
195
uuBefore Driving uMaximum Load Limit
Continued
Driving
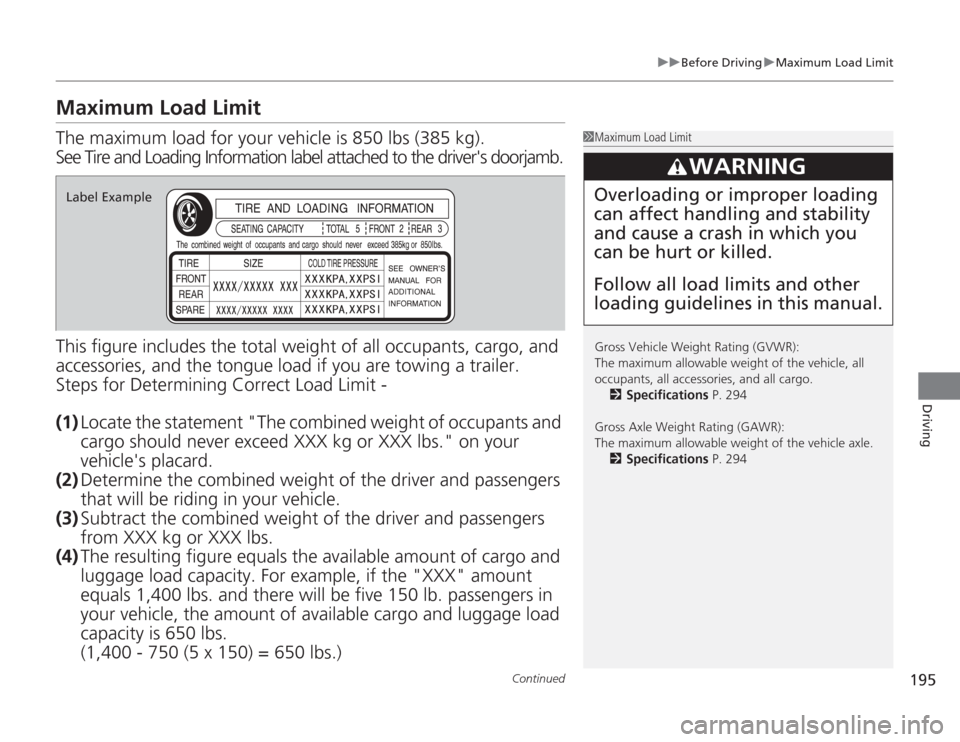
Maximum Load LimitThe maximum load for your vehicle is 850 lbs (385 kg).
See Tire and Loading Information label attached to the driver's doorjamb\
.
This figure includes the total weight of all occupants, cargo, and
accessories, and the tongue load if you are towing a trailer.
Steps for Determining Correct Load Limit -
(1) Locate the statement "The combined weight of occupants and
cargo should never exceed XXX kg or XXX lbs." on your
vehicle's placard.
(2) Determine the combined weight of the driver and passengers
that will be riding in your vehicle.
(3) Subtract the combined weight of the driver and passengers
from XXX kg or XXX lbs.
(4) The resulting figu re equals the availabl e amount of cargo and
luggage load capacity. For example, if the "XXX" amount
equals 1,400 lbs. an d there will be five 15 0 lb. passengers in
your vehicle, the amount of available carg o and luggage load
capacity is 650 lbs.
(1,400 - 750 (5 x 150) = 650 lbs.)
1 Maximum Load Limit
Gross Vehicle Weight Rating (GVWR):
The maximum allowable weight of the vehicle, all
occupants, all accessories, and all cargo.
2 Specifications P. 294
Gross Axle Weight Rating (GAWR):
The maximum allowable weight of the vehicle axle. 2 Specifications P. 294
3
WARNING
Overloading or improper loading
can affect handling and stability
and cause a crash in which you
can be hurt or killed.
Follow all load limits and other
loading guidelines in this manual.
Label Example