tire pressure HONDA CIVIC HYBRID 2013 9.G Owner's Manual
[x] Cancel search | Manufacturer: HONDA, Model Year: 2013, Model line: CIVIC HYBRID, Model: HONDA CIVIC HYBRID 2013 9.GPages: 346, PDF Size: 6.95 MB
Page 296 of 346

295
Handling the Unexpected
This chapter explains how to handle unexpected troubles.
Tools
Types of Tools .................................. 296
If a Tire Goes Flat
Temporarily Repairing a Flat Tire....... 297
Changing a Flat Tire ......................... 305
Engine Does Not Start
Checking the Engine ........................ 311
Jump Starting.................................... 312
Shift Lever Does Not Move.............. 314
Overheating
How to Handle Overheating ............. 315Indicator, Coming On/Blinking
If the Low Oil Pressure Indicator Comes
On................................................ 317If the 12 Volt Battery Charging System
Indicator Comes On ....................... 317
If the Malfunction Indicator Lamp Comes
On or Blinks ..................................... 318
If the Brake System Indicator (Red) Comes
On...................................................... 319If the EPS System Indicator Comes On .. 319If the IMA Indicator Comes On......... 320If the Low Tire Pressure/TPMS Indicator
Comes On or Blinks ....................... 320
Fuses
Fuse Locations ................................. 321
Inspecting and Changing Fuses ........ 323
Emergency Towing........................... 324
Page 298 of 346
297
Continued
Handling the Unexpected
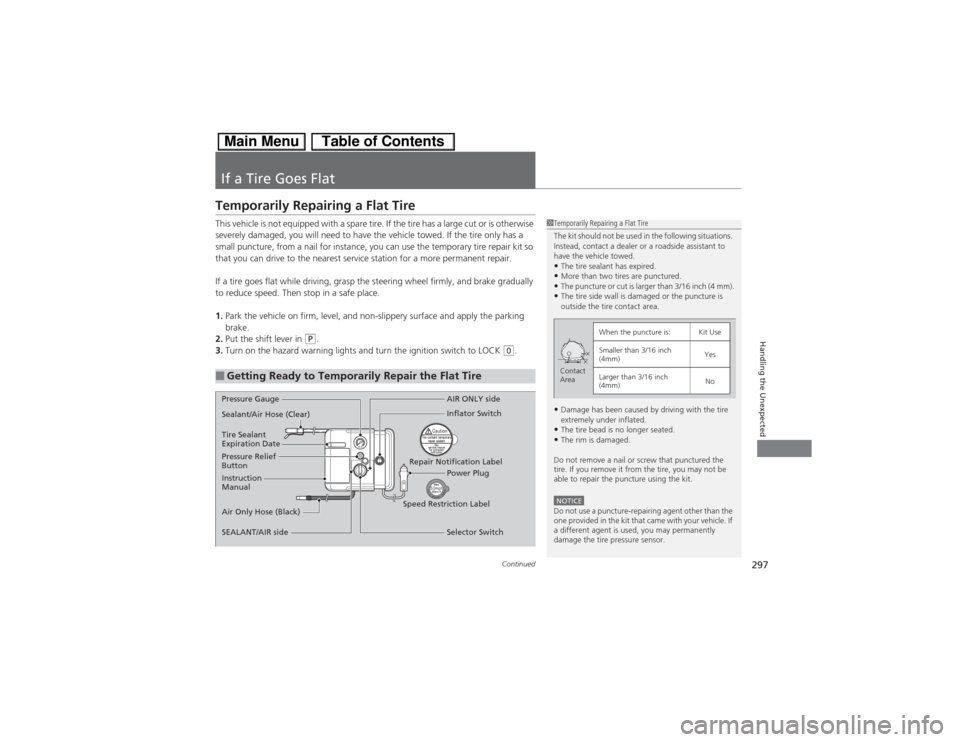
If a Tire Goes FlatTemporarily Repairing a Flat TireThis vehicle is not equipped with a spare tire. If the tire has a large cut or is otherwise
severely damaged, you will need to have the vehicle towed. If the tire only has a
small puncture, from a nail for instance, you can use the temporary tire repair kit so
that you can drive to the nearest service station for a more permanent repair.
If a tire goes flat while driving, grasp the steering wheel firmly, and brake gradually
to reduce speed. Then stop in a safe place.
1.Park the vehicle on firm, level, and non-slippery surface and apply the parking
brake.
2.Put the shift lever in
(P.
3.Turn on the hazard warning lights and turn the ignition switch to LOCK
(0.
■Getting Ready to Temporarily Repair the Flat Tire
1Temporarily Repairing a Flat Tire
The kit should not be used in the following situations.
Instead, contact a dealer or a roadside assistant to
have the vehicle towed.•The tire sealant has expired.•More than two tires are punctured.•The puncture or cut is larger than 3/16 inch (4 mm).•The tire side wall is damaged or the puncture is
outside the tire contact area.•Damage has been caused by driving with the tire
extremely under inflated.•The tire bead is no longer seated.•The rim is damaged.
Do not remove a nail or screw that punctured the
tire. If you remove it from the tire, you may not be
able to repair the puncture using the kit.NOTICEDo not use a puncture-repairing agent other than the
one provided in the kit that came with your vehicle. If
a different agent is used, you may permanently
damage the tire pressure sensor.
When the puncture is:
Kit Use
Smaller than 3/16 inch
(4mm)
Yes
Larger than 3/16 inch
(4mm)
No
Contact
Area
Pressure Gauge
Sealant/Air Hose (Clear)
Tire Sealant
Expiration Date
Pressure Relief
Button
Instruction
Manual
Air Only Hose (Black)
SEALANT/AIR sideAIR ONLY side
Inflator Switch
Repair Notification Label
Power Plug
Speed Restriction Label
Selector Switch
Page 301 of 346
uuIf a Tire Goes FlatuTemporarily Repairing a Flat Tire
300Handling the Unexpected
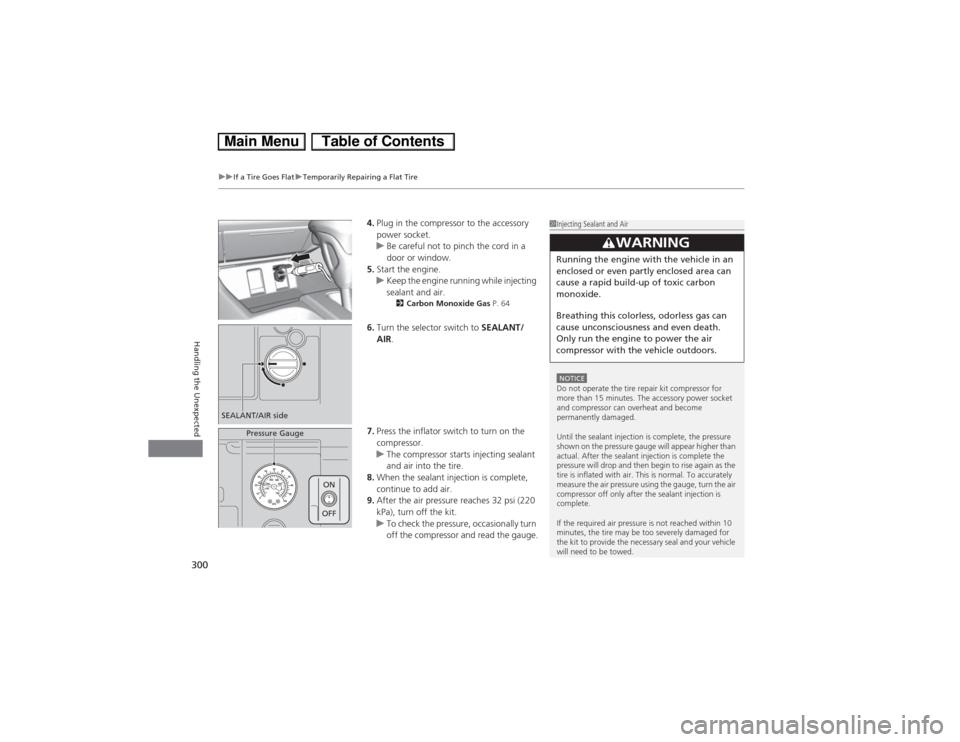
4.Plug in the compressor to the accessory
power socket.
uBe careful not to pinch the cord in a
door or window.
5.Start the engine.
uKeep the engine running while injecting
sealant and air.
2Carbon Monoxide Gas P. 64
6.Turn the selector switch to SEALANT/
AIR.
7.Press the inflator switch to turn on the
compressor.
uThe compressor starts injecting sealant
and air into the tire.
8.When the sealant injection is complete,
continue to add air.
9.After the air pressure reaches 32 psi (220
kPa), turn off the kit.
uTo check the pressure, occasionally turn
off the compressor and read the gauge.
1Injecting Sealant and AirNOTICEDo not operate the tire repair kit compressor for
more than 15 minutes. The accessory power socket
and compressor can overheat and become
permanently damaged.
Until the sealant injection is complete, the pressure
shown on the pressure gauge will appear higher than
actual. After the sealant injection is complete the
pressure will drop and then begin to rise again as the
tire is inflated with air. This is normal. To accurately
measure the air pressure using the gauge, turn the air
compressor off only after the sealant injection is
complete.
If the required air pressure is not reached within 10
minutes, the tire may be too severely damaged for
the kit to provide the necessary seal and your vehicle
will need to be towed.
3
WARNING
Running the engine with the vehicle in an
enclosed or even partly enclosed area can
cause a rapid build-up of toxic carbon
monoxide.
Breathing this colorless, odorless gas can
cause unconsciousness and even death.
Only run the engine to power the air
compressor with the vehicle outdoors.
SEALANT/AIR side
Pressure Gauge
ON
OFF
Page 302 of 346
Continued
301
uuIf a Tire Goes FlatuTemporarily Repairing a Flat Tire
Handling the Unexpected
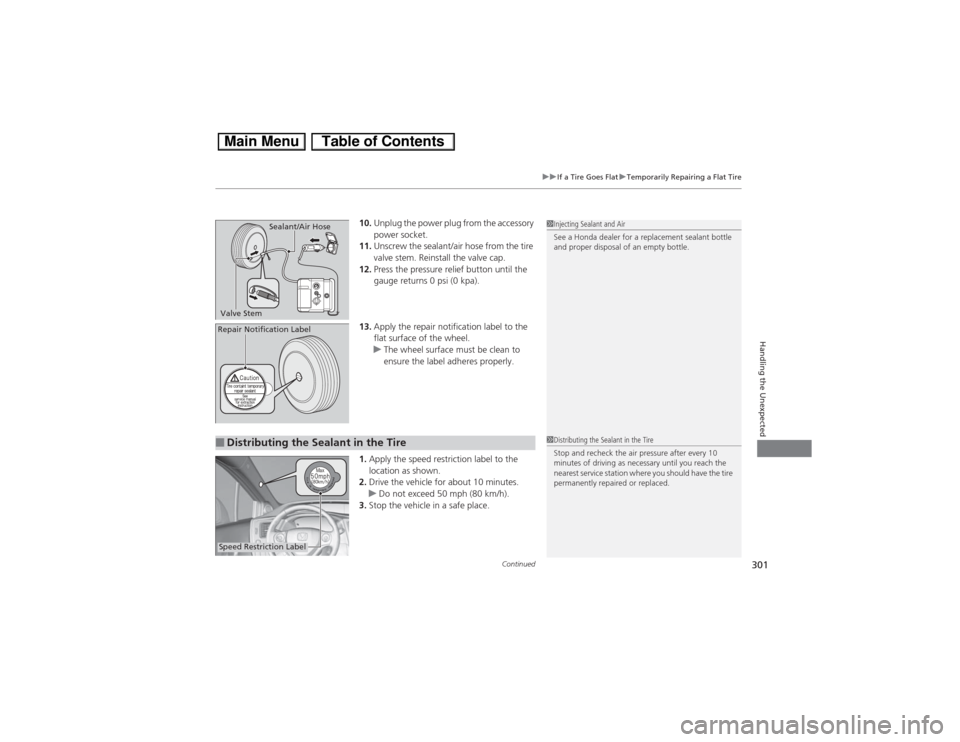
10.Unplug the power plug from the accessory
power socket.
11.Unscrew the sealant/air hose from the tire
valve stem. Reinstall the valve cap.
12.Press the pressure relief button until the
gauge returns 0 psi (0 kpa).
13.Apply the repair notification label to the
flat surface of the wheel.
uThe wheel surface must be clean to
ensure the label adheres properly.
1.Apply the speed restriction label to the
location as shown.
2.Drive the vehicle for about 10 minutes.
uDo not exceed 50 mph (80 km/h).
3.Stop the vehicle in a safe place.
1Injecting Sealant and Air
See a Honda dealer for a replacement sealant bottle
and proper disposal of an empty bottle.
Valve StemSealant/Air HoseRepair Notification Label■Distributing the Sealant in the Tire
1Distributing the Sealant in the Tire
Stop and recheck the air pressure after every 10
minutes of driving as necessary until you reach the
nearest service station where you should have the tire
permanently repaired or replaced.
Speed Restriction Label
Page 303 of 346
uuIf a Tire Goes FlatuTemporarily Repairing a Flat Tire
302Handling the Unexpected
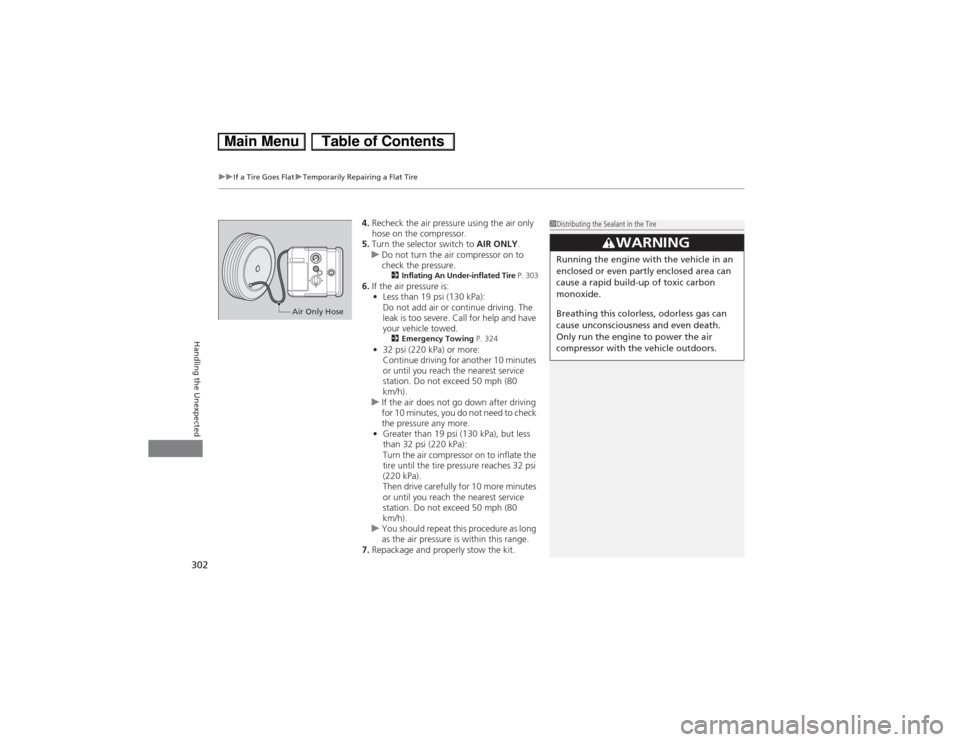
4.Recheck the air pressure using the air only
hose on the compressor.
5.Turn the selector switch to AIR ONLY.
uDo not turn the air compressor on to
check the pressure.
2Inflating An Under-inflated Tire P. 303
6.If the air pressure is:
•Less than 19 psi (130 kPa):
Do not add air or continue driving. The
leak is too severe. Call for help and have
your vehicle towed.
2Emergency Towing P. 324
•32 psi (220 kPa) or more:
Continue driving for another 10 minutes
or until you reach the nearest service
station. Do not exceed 50 mph (80
km/h).
uIf the air does not go down after driving
for 10 minutes, you do not need to check
the pressure any more.
•Greater than 19 psi (130 kPa), but less
than 32 psi (220 kPa):
Turn the air compressor on to inflate the
tire until the tire pressure reaches 32 psi
(220 kPa).
Then drive carefully for 10 more minutes
or until you reach the nearest service
station. Do not exceed 50 mph (80
km/h).
uYou should repeat this procedure as long
as the air pressure is within this range.
7.Repackage and properly stow the kit.
1Distributing the Sealant in the Tire
3
WARNING
Running the engine with the vehicle in an
enclosed or even partly enclosed area can
cause a rapid build-up of toxic carbon
monoxide.
Breathing this colorless, odorless gas can
cause unconsciousness and even death.
Only run the engine to power the air
compressor with the vehicle outdoors.
Air Only Hose
Page 305 of 346
uuIf a Tire Goes FlatuTemporarily Repairing a Flat Tire
304Handling the Unexpected
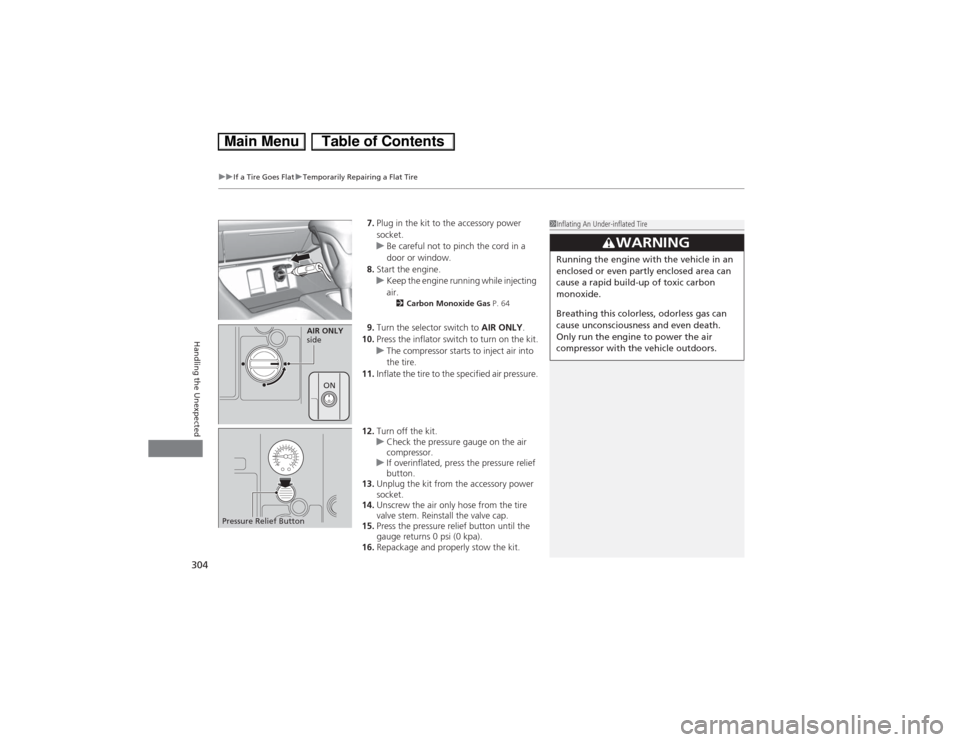
7.Plug in the kit to the accessory power
socket.
uBe careful not to pinch the cord in a
door or window.
8.Start the engine.
uKeep the engine running while injecting
air.
2Carbon Monoxide Gas P. 64
9.Turn the selector switch to AIR ONLY.
10.Press the inflator switch to turn on the kit.
uThe compressor starts to inject air into
the tire.
11.Inflate the tire to the specified air pressure.
12.Turn off the kit.
uCheck the pressure gauge on the air
compressor.
uIf overinflated, press the pressure relief
button.
13.Unplug the kit from the accessory power
socket.
14.Unscrew the air only hose from the tire
valve stem. Reinstall the valve cap.
15.Press the pressure relief button until the
gauge returns 0 psi (0 kpa).
16.Repackage and properly stow the kit.
1Inflating An Under-inflated Tire
3
WARNING
Running the engine with the vehicle in an
enclosed or even partly enclosed area can
cause a rapid build-up of toxic carbon
monoxide.
Breathing this colorless, odorless gas can
cause unconsciousness and even death.
Only run the engine to power the air
compressor with the vehicle outdoors.
AIR ONLY
side
ON
Pressure Relief Button
Page 306 of 346
305
uuIf a Tire Goes FlatuChanging a Flat Tire
Continued
Handling the Unexpected
Changing a Flat TireIf a tire goes flat while driving, grasp the steering wheel firmly, and brake gradually
to reduce speed. Then, stop in a safe place. Replace the flat tire with a compact
spare tire. Go to a dealer as soon as possible to have the full-size tire repaired or
replaced.
1.Park the vehicle on firm, level, non-slippery surface, and apply the parking brake.
2.Move the shift lever to
(P.
3.Set the parking brake.
4.Turn on the hazard warning lights and turn the ignition switch to LOCK
(0.
Models with optional compact spare tire
1Changing a Flat Tire
Follow compact spare precautions:
Periodically check the tire pressure of the compact
spare. It should be set to the specified pressure.
Specified Pressure: 60 psi (420 kPa, 4.2 kgf/cm
2)
When driving with the compact spare tire, keep the
vehicle speed under 50 mph (80 km/h). Replace with
a full-size tire as soon as possible.
The compact spare tire and wheel in your vehicle are
specifically for this model.
Do not use them with another vehicle.
Do not use another type of compact spare tire or
wheel with your vehicle.
Do not mount tire chains on a compact spare tire.
If a chain-mounted front tire goes flat, remove one of
the full-size rear tires and replace it with the compact
spare tire. Remove the flat front tire and replace it
with the full-size tire that was removed from the rear.
Mount the tire chains on the front tire.
Do not use a puncture-repairing agent other than the
Tire Repair Kit provided with your vehicle, as some
tire repair agents can cause damage to the pressure
sensors.
U.S. models only
Page 311 of 346
uuIf a Tire Goes FlatuChanging a Flat Tire
310Handling the Unexpected
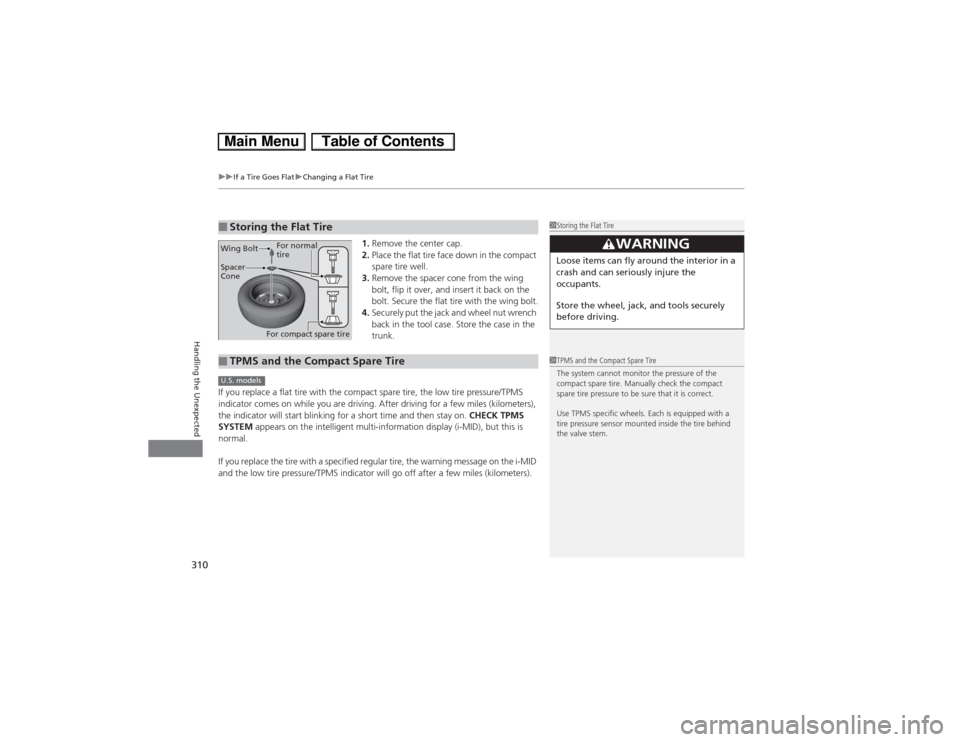
1.Remove the center cap.
2.Place the flat tire face down in the compact
spare tire well.
3.Remove the spacer cone from the wing
bolt, flip it over, and insert it back on the
bolt. Secure the flat tire with the wing bolt.
4.Securely put the jack and wheel nut wrench
back in the tool case. Store the case in the
trunk.
If you replace a flat tire with the compact spare tire, the low tire pressure/TPMS
indicator comes on while you are driving. After driving for a few miles (kilometers),
the indicator will start blinking for a short time and then stay on. CHECK TPMS
SYSTEM appears on the intelligent multi-information display (i-MID), but this is
normal.
If you replace the tire with a specified regular tire, the warning message on the i-MID
and the low tire pressure/TPMS indicator will go off after a few miles (kilometers).
■Storing the Flat Tire
1Storing the Flat Tire
3
WARNING
Loose items can fly around the interior in a
crash and can seriously injure the
occupants.
Store the wheel, jack, and tools securely
before driving.
Spacer
Cone Wing Bolt
For compact spare tireFor normal
tire■TPMS and the Compact Spare Tire
1TPMS and the Compact Spare Tire
The system cannot monitor the pressure of the
compact spare tire. Manually check the compact
spare tire pressure to be sure that it is correct.
Use TPMS specific wheels. Each is equipped with a
tire pressure sensor mounted inside the tire behind
the valve stem.
U.S. models
Page 321 of 346
320
uuIndicator, Coming On/BlinkinguIf the IMA Indicator Comes On
Handling the Unexpected
If the IMA Indicator Comes On
■Reasons for the indicator to come on
Comes on when there is a problem with the IMA system.■What to do when the indicator come on
Avoid high speeds and immediately get your vehicle inspected by a
dealer.
If the Low Tire Pressure/TPMS Indicator Comes On or Blinks
■Reasons for the indicator to come on or blink
A tire pressure is significantly low. If there is a problem with the TPMS or
the compact spare tire is installed, the indicator blinks for about one
minute, and then stays on.■What to do when the indicator comes on
Stop your vehicle in a safe place. Check the tire pressure and adjust the
pressure to the specified level. The specified tire pressure is on a label on
the driver side doorjamb.■What to do when the indicator blinks
Have the tire inspected by a dealer as soon as possible. If the compact
spare tire
* causes the indicator to blink, change the tire to a full-size tire.
The indicator goes off after driving for a few miles (kilometers).
U.S. models
1If the Low Tire Pressure/TPMS Indicator Comes On or BlinksNOTICEDriving on an extremely underinflated tire can cause
it to overheat. An overheated tire can fail. Always
inflate your tires to the prescribed level.
* Not available on all models
Page 328 of 346
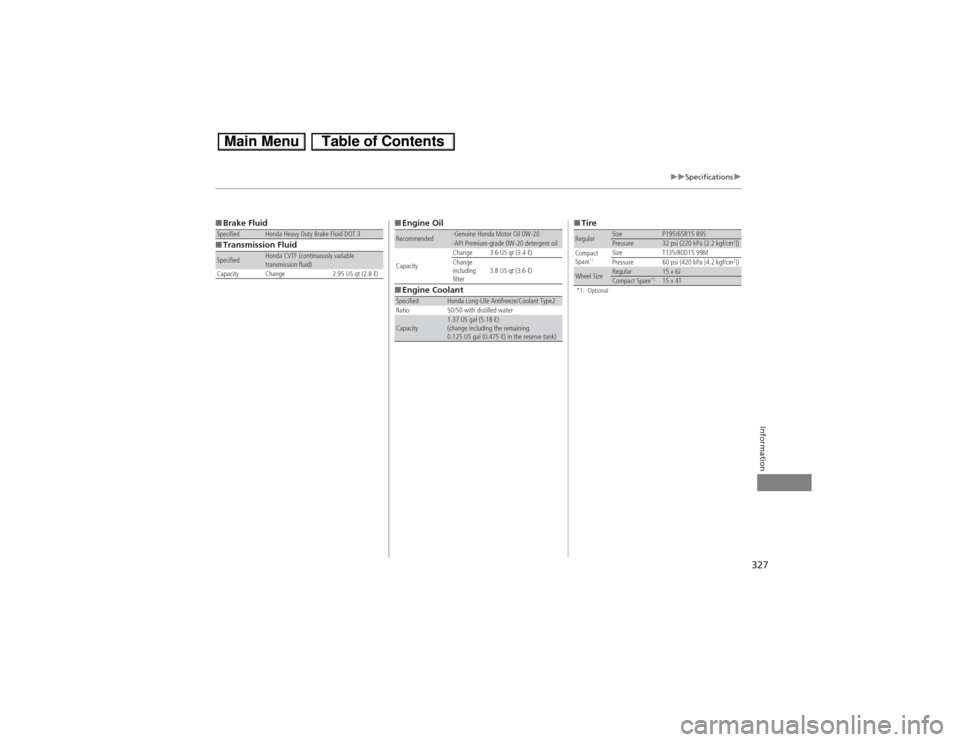
327
uuSpecificationsu
Information
■Brake Fluid
■Transmission FluidSpecified
Honda Heavy Duty Brake Fluid DOT 3
Specified
Honda CVTF (continuously variable
transmission fluid)
Capacity Change 2.95 US qt (2.8 ℓ)
■Engine Oil
■Engine CoolantRecommended
·Genuine Honda Motor Oil 0W-20·API Premium-grade 0W-20 detergent oil
CapacityChange 3.6 US qt (3.4 ℓ)
Change
including
filter3.8 US qt (3.6 ℓ)
Specified
Honda Long-Life Antifreeze/Coolant Type2
Ratio 50/50 with distilled water
Capacity
1.37 US gal (5.18 ℓ)
(change including the remaining
0.125 US gal (0.475 ℓ) in the reserve tank)
■Tire*1: OptionalRegular
Size
P195/65R15 89S
Pressure
32 psi (220 kPa [2.2 kgf/cm
2])
Compact
Spare
*1
Size T135/80D15 99M
Pressure 60 psi (420 kPa [4.2 kgf/cm
2])
Wheel Size
Regular
15 x 6J
Compact Spare
*115 x 4T