HONDA CLARITY ELECTRIC 2018 Owner's Manual (in English)
Manufacturer: HONDA, Model Year: 2018, Model line: CLARITY ELECTRIC, Model: HONDA CLARITY ELECTRIC 2018Pages: 559, PDF Size: 27.8 MB
Page 461 of 559
459
uuBefore Performing Maintenance uSafety When Performing Maintenance
Maintenance
Safety When Performing Maintenance
Some of the most important safe ty precautions are given here.
However, we cannot warn you of every conceivable hazard that can arise in
performing maintenance. Only you can decide whether you should perform a given
task.
• To reduce the possibility of fire or explos ion, keep cigarettes, sparks, and flames
away from the 12-volt battery and a ll High Voltage system related parts.
• Never leave rags, towels, or other flammable objects under the hood.
u Heat from the motor or the surrounding parts can ignite them, causing a fire.
• To clean parts, use a co mmercially available degreas er or parts cleaner, not
gasoline.
• Wear eye protection and protective clothing when working with the 12-volt
battery or compressed air.
• The vehicle must be in a stationary condition.
u Make sure your vehicle is parked on le vel ground, the parking brake is set, and
the power system is turned off.
• Be aware that hot parts can burn you.
u Make sure to let the power system cool thoroughly before touching vehicle
parts.
• Be aware that moving parts can injure you.
u Do not activate the power system unless instructed to do so.
Keep your hands and limbs away from moving parts.
■Maintenance Safety
■Vehicle Safety
1Safety When Performing Maintenance
3WARNING
Improperly maintaining this vehicle or
failing to correct a pr oblem before driving
can cause a crash in which you can be
seriously hurt or killed.
Always follow the inspection and
maintenance recommendations according
to the schedules in this owner’s manual.
3WARNING
Failure to properly follow maintenance
instructions and precautions can cause you
to be seriously hurt or killed.
Always follow the procedures and
precautions in this owner’s manual.
18 CLARITY ELECTRIC CSS-31TRV6100.book 459 ページ 2018年2月5日 月曜日 午後12時0分
Page 462 of 559
460
uuBefore Performing Maintenance uParts and Fluids Used in Maintenance Service
Maintenance
Parts and Fluids Used in Maintenance Service
The use of Honda genuine parts and fluids is recommended when maintaining and
servicing your vehicle. Honda genuine parts are manufactured according to the
same high quality standards used in Honda vehicles.
18 CLARITY ELECTRIC CSS-31TRV6100.book 460 ページ 2018年2月5日 月曜日 午後12時0分
Page 463 of 559
461Continued
Maintenance
Maintenance MinderTM
If the vehicle has maintenance items due within 30 days, you will see the
Maintenance Minder messages appear on the driver information interface every
time you set the power mode to ON. The messages notify you when to bring your
vehicle to an authorized Honda Clarity Electric dealer for indicated maintenance
services.
To Use Maintenance MinderTM
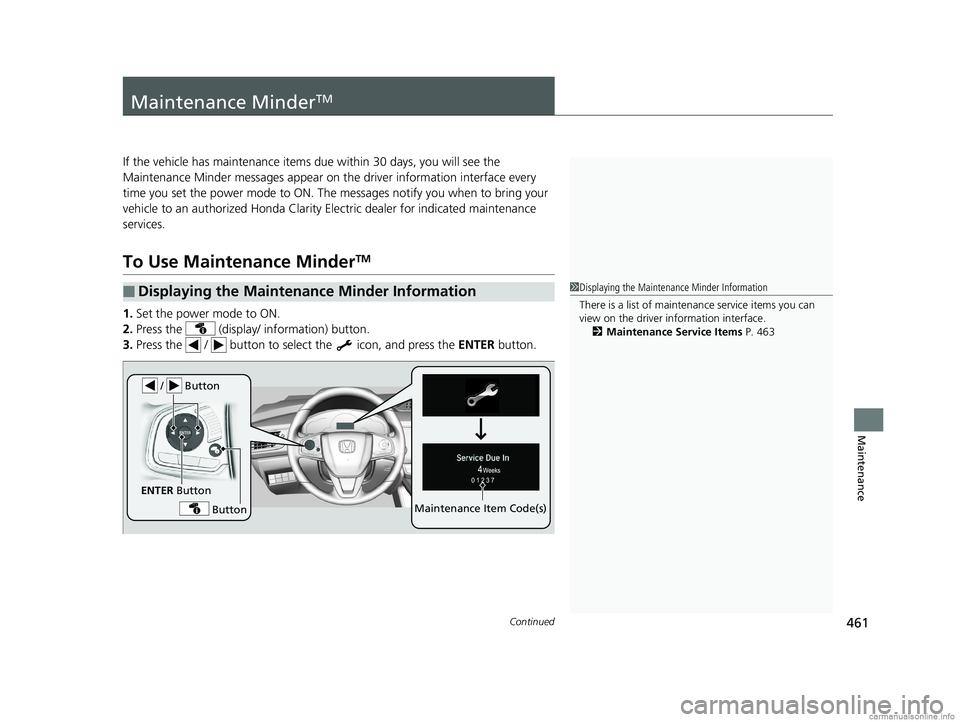
1. Set the power mode to ON.
2. Press the (display/ information) button.
3. Press the / button to select the icon, and press the ENTER button.
■Displaying the Maintenance Minder Information1Displaying the Maintena nce Minder Information
There is a list of maintenance service items you can
view on the driver in formation interface.
2 Maintenance Service Items P. 463
/ Button
Maintenance Item Code(s)
Button
ENTER Button
18 CLARITY ELECTRIC CSS-31TRV6100.book 461 ページ 2018年2月5日 月曜日 午後12時0分
Page 464 of 559
462
uuMaintenance MinderTMuTo Use Maintenance MinderTM
Maintenance
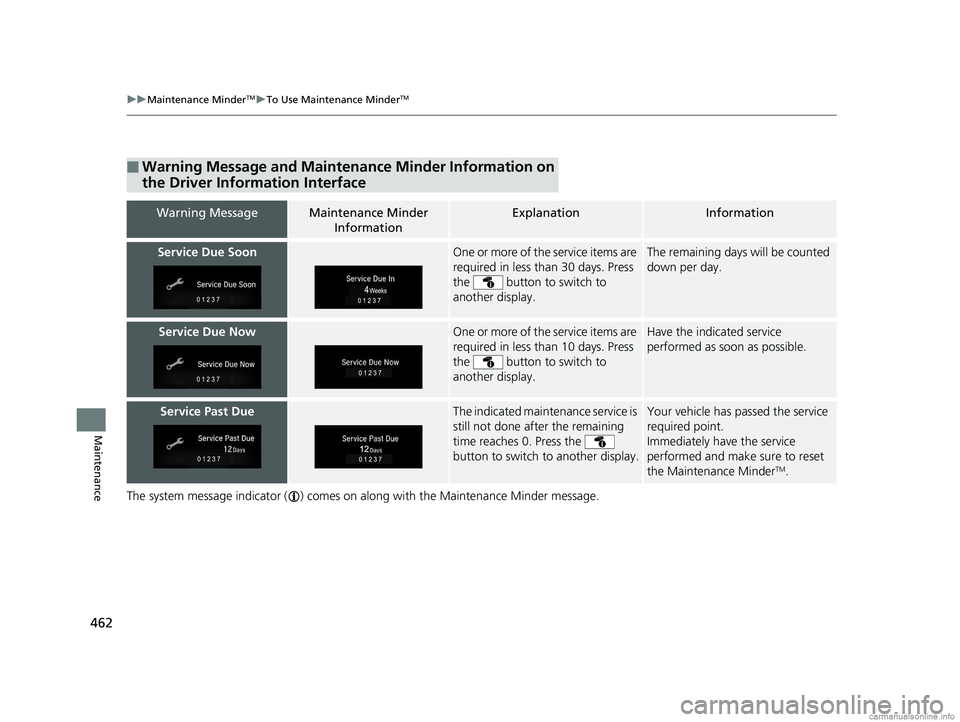
The system message indicator ( ) comes on al ong with the Maintenance Minder message.
■Warning Message and Maintenance Minder Information on
the Driver Information Interface
Warning MessageMaintenance Minder
InformationExplanationInformation
Service Due SoonOne or more of the service items are
required in less than 30 days. Press
the button to switch to
another display.The remaining days will be counted
down per day.
Service Due NowOne or more of the service items are
required in less than 10 days. Press
the button to switch to
another display.Have the indicated service
performed as soon as possible.
Service Past DueThe indicated maintenance service is
still not done after the remaining
time reaches 0. Press the
button to switch to another display.Your vehicle has passed the service
required point.
Immediately have the service
performed and make sure to reset
the Maintenance Minder
TM.
18 CLARITY ELECTRIC CSS-31TRV6100.book 462 ページ 2018年2月5日 月曜日 午後12時0分
Page 465 of 559
463
uuMaintenance MinderTMuTo Use Maintenance MinderTM
Continued
Maintenance
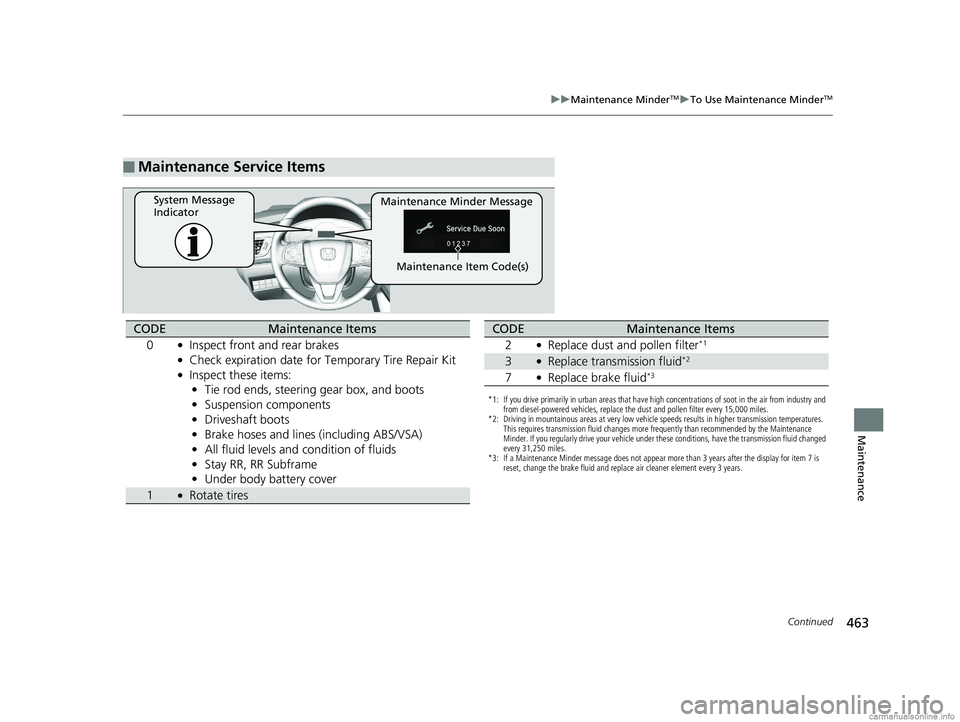
■Maintenance Service Items
Maintenance Minder Message
System Message
Indicator
Maintenance Item Code(s)
CODEMaintenance Items
0
●Inspect front and rear brakes●Check expiration date for Temporary Tire Repair Kit●Inspect these items: • Tie rod ends, steering gear box, and boots
• Suspension components
• Driveshaft boots
• Brake hoses and lines (including ABS/VSA)
• All fluid levels and condition of fluids
• Stay RR, RR Subframe
• Under body battery cover
1●Rotate tires
*1: If you drive primarily in urban areas that have high concentrations of soot in the air from industry and
from diesel-powered vehicles, replace the dust and pollen filter every 15,000 miles.
*2: Driving in mountainous areas at very low vehicle speeds results in higher transmission temperatures. This requires transmission fluid changes more frequently than recommended by the Maintenance
Minder. If you regularly drive your vehicle under these conditions, have the transmission fluid changed
every 31,250 miles.
*3: If a Maintenance Minder message does not appear more than 3 years after the display for item 7 is reset, change the brake fluid and replace air cleaner element every 3 years.
CODEMaintenance Items
2
●Replace dust and pollen filter*1
3●Replace transmission fluid*2
7●Replace brake fluid*3
18 CLARITY ELECTRIC CSS-31TRV6100.book 463 ページ 2018年2月5日 月曜日 午後12時0分
Page 466 of 559
uuMaintenance MinderTMuTo Use Maintenance MinderTM
464
Maintenance
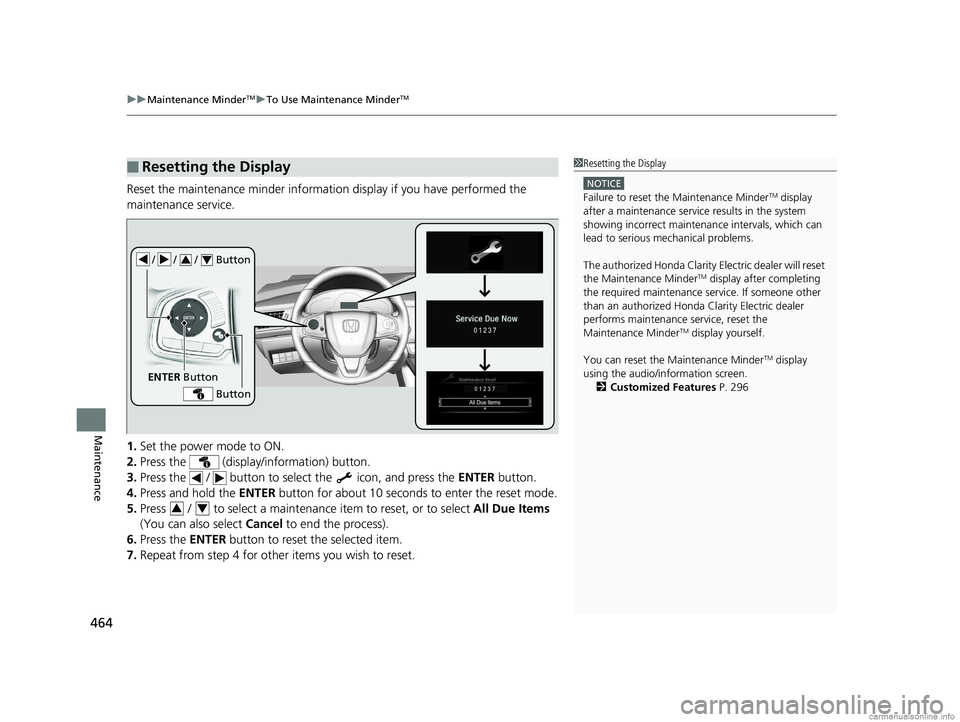
Reset the maintenance minder informat ion display if you have performed the
maintenance service.
1. Set the power mode to ON.
2. Press the (display/information) button.
3. Press the / button to sele ct the icon, and press the ENTER button.
4. Press and hold the ENTER button for about 10 seconds to enter the reset mode.
5. Press / to select a maintenance item to reset, or to select All Due Items
(You can also select Cancel to end the process).
6. Press the ENTER button to reset the selected item.
7. Repeat from step 4 for other items you wish to reset.
■Resetting the Display1Resetting the Display
NOTICE
Failure to reset the Maintenance MinderTM display
after a maintenance servic e results in the system
showing incorrect maintenance intervals, which can
lead to serious mechanical problems.
The authorized Honda Clarity Electric dealer will reset
the Maintenance Minder
TM display after completing
the required maintenance service. If someone other
than an authorized Honda Clarity Electric dealer
performs maintenance service, reset the
Maintenance Minder
TM display yourself.
You can reset the Maintenance Minder
TM display
using the audio/information screen. 2 Customized Features P. 296
/ / / Button34
ENTER Button
Button
34
18 CLARITY ELECTRIC CSS-31TRV6100.book 464 ページ 2018年2月5日 月曜日 午後12時0分
Page 467 of 559
465
Maintenance
Maintenance Under the Hood
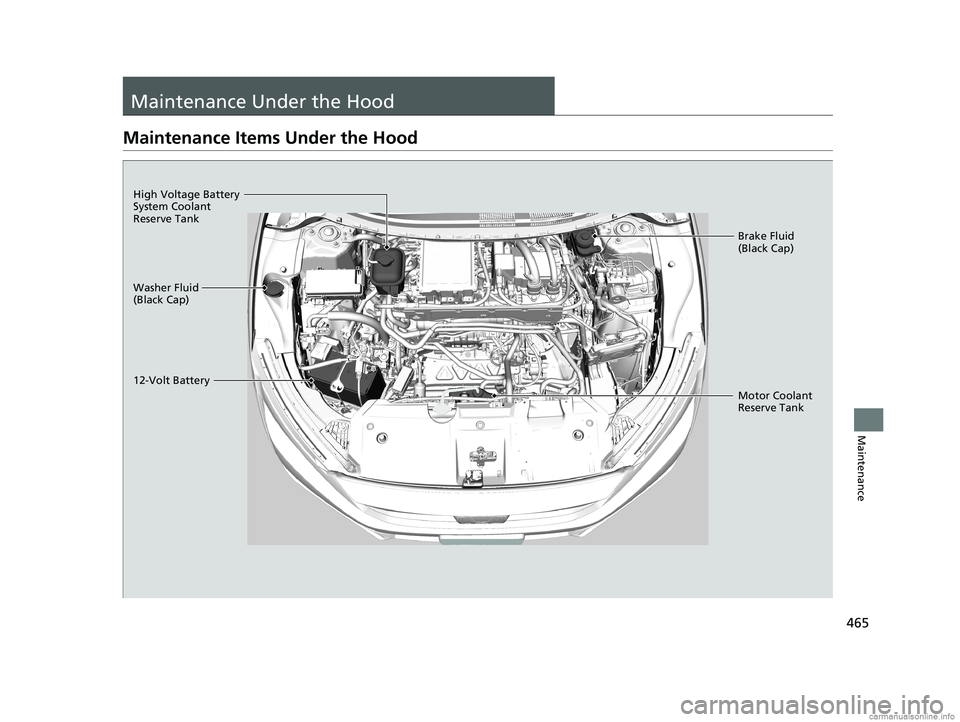
Maintenance Items Under the Hood
Washer Fluid
(Black Cap)
12-Volt BatteryBrake Fluid
(Black Cap)
Motor Coolant
Reserve Tank
High Voltage Battery
System Coolant
Reserve Tank
18 CLARITY ELECTRIC CSS-31TRV6100.book 465 ページ 2018年2月5日 月曜日 午後12時0分
Page 468 of 559
466
uuMaintenance Under the Hood uOpening the Hood
Maintenance
Opening the Hood
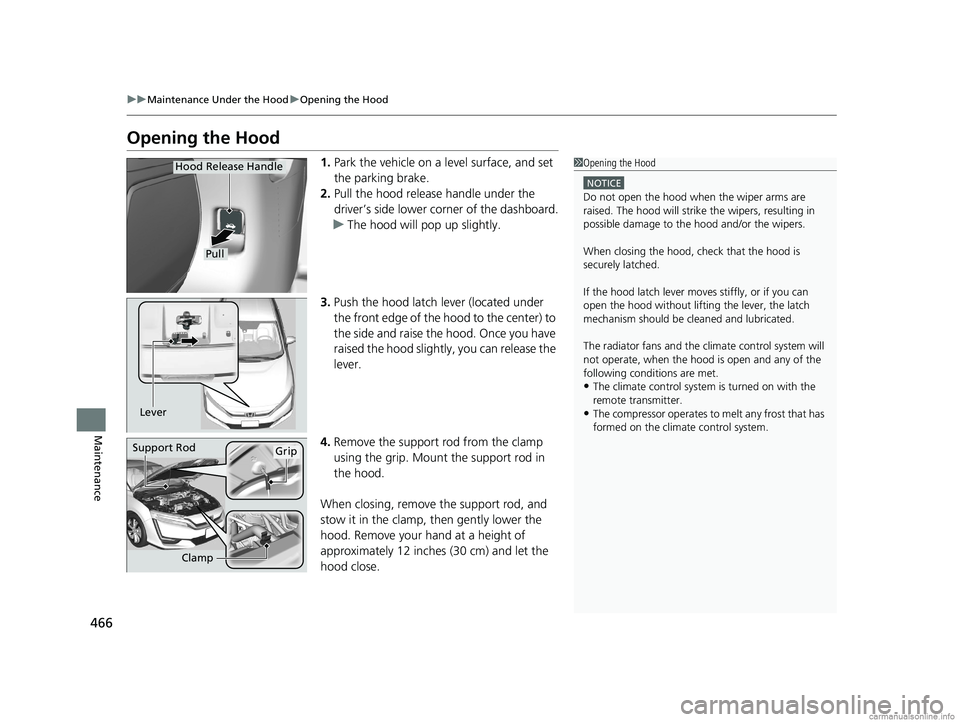
1. Park the vehicle on a level surface, and set
the parking brake.
2. Pull the hood release handle under the
driver’s side lower corner of the dashboard.
u The hood will pop up slightly.
3. Push the hood latch lever (located under
the front edge of the hood to the center) to
the side and raise the hood. Once you have
raised the hood slightly, you can release the
lever.
4. Remove the support rod from the clamp
using the grip. Mount the support rod in
the hood.
When closing, remove the support rod, and
stow it in the clamp, then gently lower the
hood. Remove your hand at a height of
approximately 12 inches (30 cm) and let the
hood close.1 Opening the Hood
NOTICE
Do not open the hood when the wiper arms are
raised. The hood will strike the wipers, resulting in
possible damage to the hood and/or the wipers.
When closing the hood, check that the hood is
securely latched.
If the hood latch lever moves stiffly, or if you can
open the hood without lifti ng the lever, the latch
mechanism should be cl eaned and lubricated.
The radiator fans and the climate control system will
not operate, when the hood is open and any of the
following conditions are met.
•The climate control system is turned on with the
remote transmitter.
•The compressor operates to melt any frost that has
formed on the climate control system.
Pull
Hood Release Handle
Lever
Support RodGrip
Clamp
18 CLARITY ELECTRIC CSS-31TRV6100.book 466 ページ 2018年2月5日 月曜日 午後12時0分
Page 469 of 559
467
uuMaintenance Under the Hood uCooling System
Maintenance
Cooling System
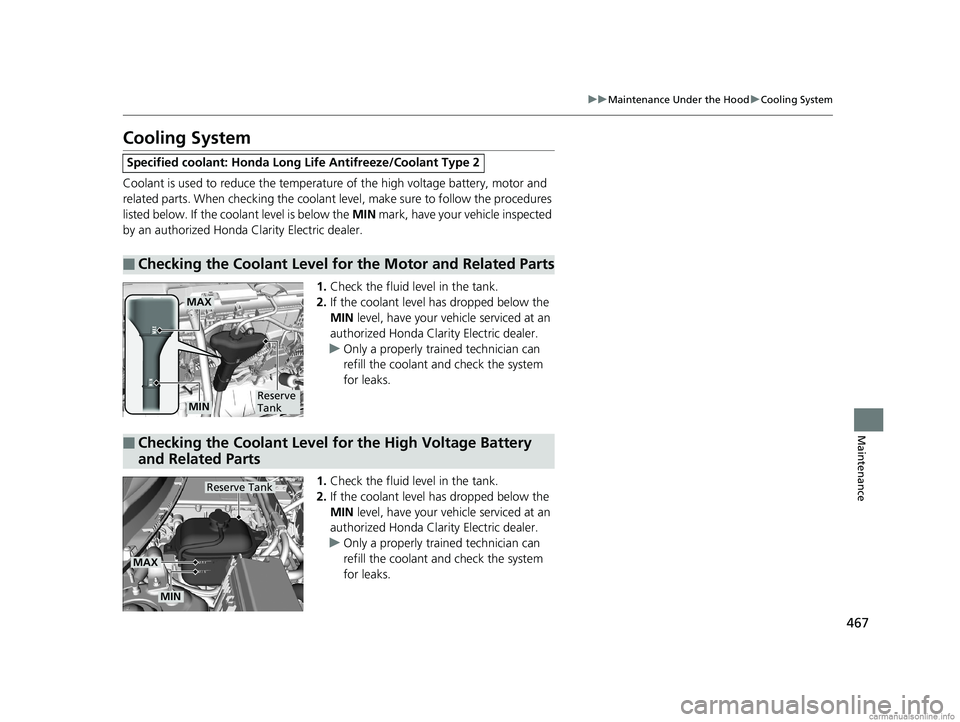
Coolant is used to reduce the temperat ure of the high voltage battery, motor and
related parts. When checking the coolant level, make sure to follow the procedures
listed below. If the cool ant level is below the MIN mark, have your vehicle inspected
by an authorized Honda Clarity Electric dealer.
1.Check the fluid level in the tank.
2. If the coolant level has dropped below the
MIN level, have your ve hicle serviced at an
authorized Honda Clar ity Electric dealer.
u Only a properly trained technician can
refill the coolant and check the system
for leaks.
1. Check the fluid level in the tank.
2. If the coolant level has dropped below the
MIN level, have your ve hicle serviced at an
authorized Honda Clar ity Electric dealer.
u Only a properly trained technician can
refill the coolant and check the system
for leaks.
Specified coolant: Ho nda Long Life Antifreeze/Coolant Type 2
■Checking the Coolant Level for the Motor and Related Parts
MAX
Reserve
TankMIN
■Checking the Coolant Level for the High Voltage Battery
and Related Parts
Reserve Tank
MAX
MIN
18 CLARITY ELECTRIC CSS-31TRV6100.book 467 ページ 2018年2月5日 月曜日 午後12時0分
Page 470 of 559
468
uuMaintenance Under the Hood uTransmission Fluid
Maintenance
Transmission Fluid
Have an authorized Honda Clarity Electric dealer check the fluid level and replace if
necessary.
Do not attempt to check or change the transmission fluid yourself.
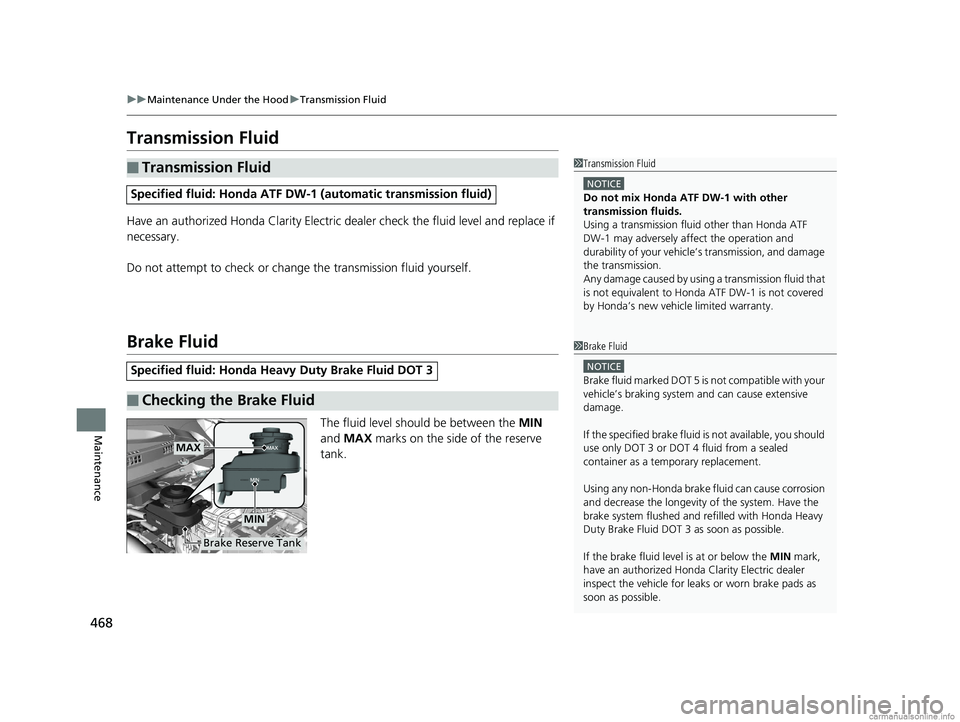
Brake Fluid
The fluid level should be between the MIN
and MAX marks on the side of the reserve
tank.
■Transmission Fluid
Specified fluid: Honda ATF DW-1 (automatic transmission fluid)
Specified fluid: Honda Heavy Duty Brake Fluid DOT 3
■Checking the Brake Fluid
1Transmission Fluid
NOTICE
Do not mix Honda ATF DW-1 with other
transmission fluids.
Using a transmission flui d other than Honda ATF
DW-1 may adversely af fect the operation and
durability of your vehicle’ s transmission, and damage
the transmission.
Any damage caused by usi ng a transmission fluid that
is not equivalent to Honda ATF DW-1 is not covered
by Honda’s new vehicle limited warranty.
1 Brake Fluid
NOTICE
Brake fluid marked DOT 5 is not compatible with your
vehicle’s braking system and can cause extensive
damage.
If the specified brake fluid is not available, you should
use only DOT 3 or DOT 4 fluid from a sealed
container as a temporary replacement.
Using any non-Honda brake fluid can cause corrosion
and decrease the longevity of the system. Have the
brake system flushed and re filled with Honda Heavy
Duty Brake Fluid DOT 3 as soon as possible.
If the brake fluid level is at or below the MIN mark,
have an authorized Honda Clarity Electric dealer
inspect the vehicle for leaks or worn brake pads as
soon as possible.
Brake Reserve Tank
MAX
MIN
18 CLARITY ELECTRIC CSS-31TRV6100.book 468 ページ 2018年2月5日 月曜日 午後12時0分