wipers HONDA CLARITY ELECTRIC 2018 Owner's Manual (in English)
[x] Cancel search | Manufacturer: HONDA, Model Year: 2018, Model line: CLARITY ELECTRIC, Model: HONDA CLARITY ELECTRIC 2018Pages: 559, PDF Size: 27.8 MB
Page 9 of 559
7
Quick Reference Guide
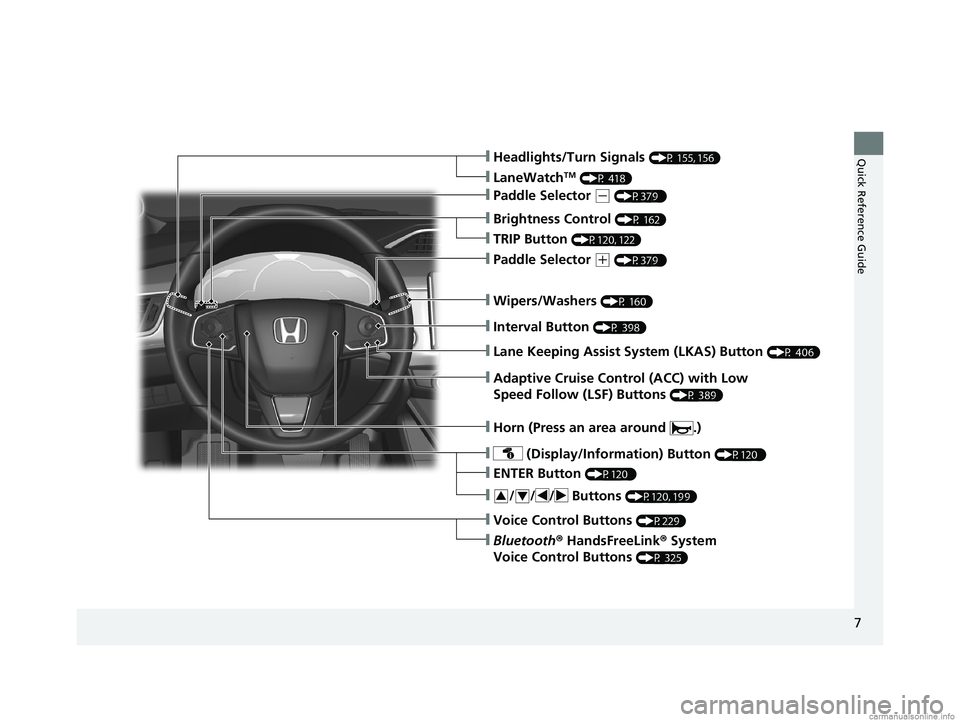
❙Wipers/Washers (P 160)
❙Headlights/Turn Signals (P 155, 156)
❙Brightness Control (P 162)
❙LaneWatchTM (P 418)
❙TRIP Button (P120, 122)
❙Interval Button (P 398)
❙Lane Keeping Assist System (LKAS) Button (P 406)
❙Adaptive Cruise Control (ACC) with Low
Speed Follow (LSF) Buttons
(P 389)
❙ (Display/Information) Button (P120 )
❙/ / / Buttons (P120, 199)34
❙ENTER Button (P120 )
❙Voice Control Buttons (P229)
❙Bluetooth® HandsFreeLink ® System
Voice Control Buttons
(P 325)
❙Horn (Press an area around .)
❙Paddle Selector (+ (P379 )
❙Paddle Selector (- (P379 )
18 CLARITY ELECTRIC CSS-31TRV6100.book 7 ページ 2018年2月5日 月曜日 午後12時0分
Page 12 of 559
Visual Index
10
Quick Reference Guide
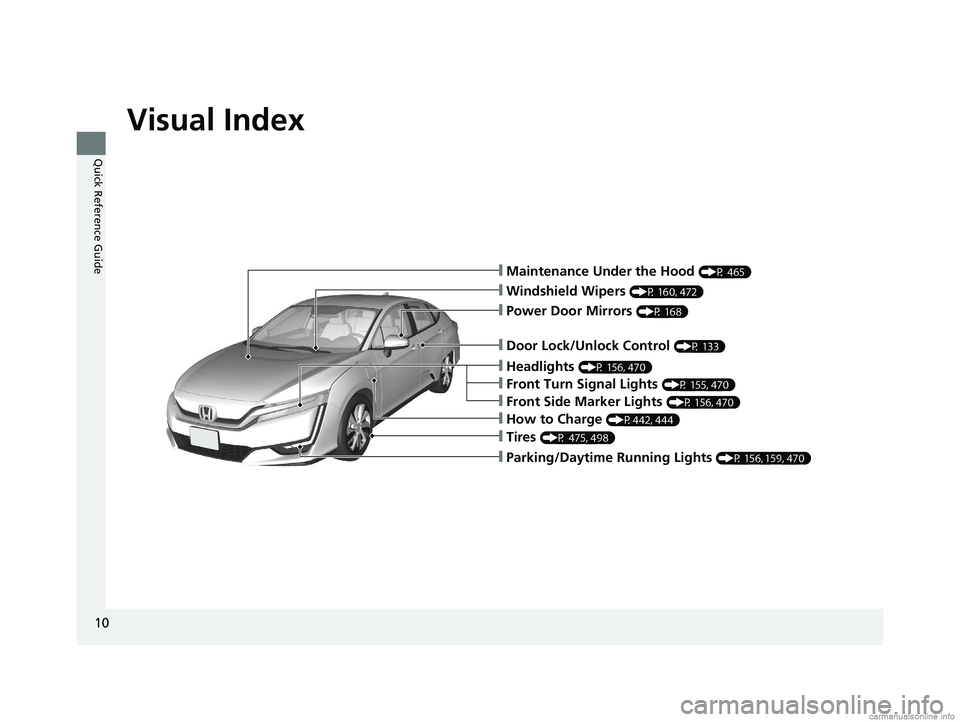
❙Maintenance Under the Hood (P 465)
❙Windshield Wipers (P 160, 472)
❙Tires (P 475, 498)
❙Door Lock/Unlock Control (P 133)
❙Power Door Mirrors (P 168)
❙Headlights (P 156, 470)
❙Front Turn Signal Lights (P 155, 470)
❙Parking/Daytime Running Lights (P 156, 159, 470)
❙Front Side Marker Lights (P 156, 470)
❙How to Charge (P442, 444)
18 CLARITY ELECTRIC CSS-31TRV6100.book 10 ページ 2018年2月5日 月曜日 午後12時0分
Page 27 of 559
25
Quick Reference Guide
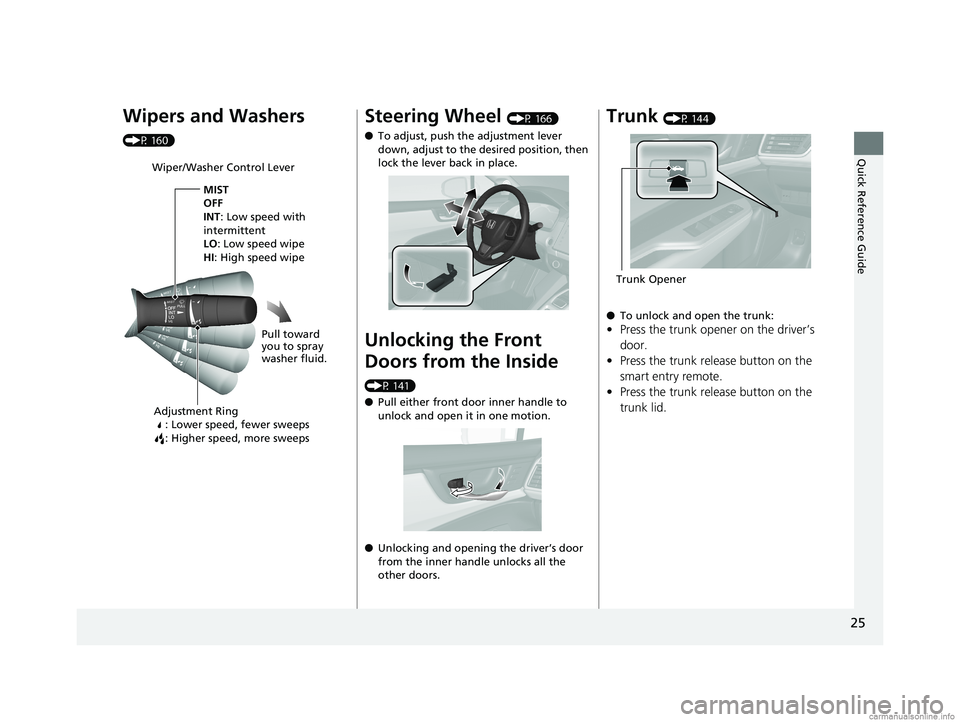
Wipers and Washers
(P 160)
Wiper/Washer Control LeverAdjustment Ring : Lower speed, fewer sweeps
: Higher speed, more sweeps
MIST
OFF
INT: Low speed with
intermittent
LO : Low speed wipe
HI: High speed wipe
Pull toward
you to spray
washer fluid.
Steering Wheel (P 166)
● To adjust, push the adjustment lever
down, adjust to the desired position, then
lock the lever back in place.
Unlocking the Front
Doors from the Inside
(P 141)
●Pull either front door inner handle to
unlock and open it in one motion.
● Unlocking and opening the driver’s door
from the inner handle unlocks all the
other doors.
Trunk (P 144)
● To unlock and open the trunk:
•Press the trunk opener on the driver’s
door.
• Press the trunk release button on the
smart entry remote.
• Press the trunk release button on the
trunk lid.
Trunk Opener
18 CLARITY ELECTRIC CSS-31TRV6100.book 25 ページ 2018年2月5日 月曜日 午後12時0分
Page 131 of 559
129
Controls
This chapter explains how to operate the various controls necessary for driving.
Clock.................................................. 130
Locking and Unlocking the Doors Key Types and Functions .................. 131
Low Smart Entry Remote Signal Strength .. 132Locking/Unlocking the Doors from the Outside .......................................... 133
Locking/Unlocking the Doors from the Inside ............................................. 140
Childproof Door Locks ..................... 142
Auto Door Locking/Unlocking .......... 143
Opening and Closing the Trunk ....... 144
Security System ................................ 147
Immobilizer System .......................... 147 Security System Alarm...................... 147
Opening and Closing the Windows ... 150
Operating the Switches Around the
Steering Wheel POWER Button................................. 152
Turn Signals ..................................... 155
Light Switches.................................. 156
Daytime Running Lights ................... 159
Wipers and Washers ........................ 160
Brightness Control ........................... 162
Rear Defogger/Heated Door Mirror Button........................................ 163
Driving Position Memory System ...... 164 Adjusting the Steering Wheel .......... 166
Adjusting the Mirrors ....................... 167
Interior Rearview Mirror ................... 167
Power Door Mirrors ......................... 168
Adjusting the Seats .......................... 169
Front Seats ...................................... 169
Interior Lights/Interior Convenience Items ................................................ 176
Interior Lights .................................. 176
Interior Convenience Items .............. 178
Climate Control System ................... 186
Using Automatic Climate Control .... 186
Automatic Climate Control Sensors ... 194
18 CLARITY ELECTRIC CSS-31TRV6100.book 129 ページ 2018年2月5日 月曜日 午後12時0分
Page 160 of 559
uuOperating the Switches Around the Steering Wheel uLight Switches
158
Controls
The headlights automatically co me on when the wipers are used several times within
a certain number of intervals wi th the headlight switch in AUTO.
The headlights automatically go off a few minutes later if the wipers are stopped.
The headlights, all other exterior lights, an d the instrument panel lights turn off 15
seconds after you set the power mode to VE HICLE OFF (LOCK), take the remote with
you, and close the driver's door.
If you set the power mode to VEHICLE OFF (LOCK) with the headlight switch on, but
do not open the door, the li ghts turn off after 10 minutes (3 minutes, if the switch
is in the AUTO position).
The lights turn on again when you unlock or open the driver’s door. If you unlock
the door, but do not open it within 15 seconds, the lights go off. If you open the
driver’s door, you will hear a lights on reminder chime.
■Headlight Integration with Wipers
■Automatic Lighting Off Feature
1Headlight Integration with Wipers
This feature activates while the headlights are off in
AUTO .
The instrument panel br ightness does not change
when the headlights come on.
At dark ambient light leve ls, the automatic lighting
control feature turns on the headlights, regardless of
the number of wiper sweeps.
You can turn the headlight integration with wipers
function on and off. 2 Customized Features P. 296
1Automatic Lighting Off Feature
You can change the headli ght auto off timer setting.
2 Customized Features P. 296
18 CLARITY ELECTRIC CSS-31TRV6100.book 158 ページ 2018年2月5日 月曜日 午後12時0分
Page 162 of 559
160
uuOperating the Switches Around the Steering Wheel uWipers and Washers
Controls
Wipers and Washers
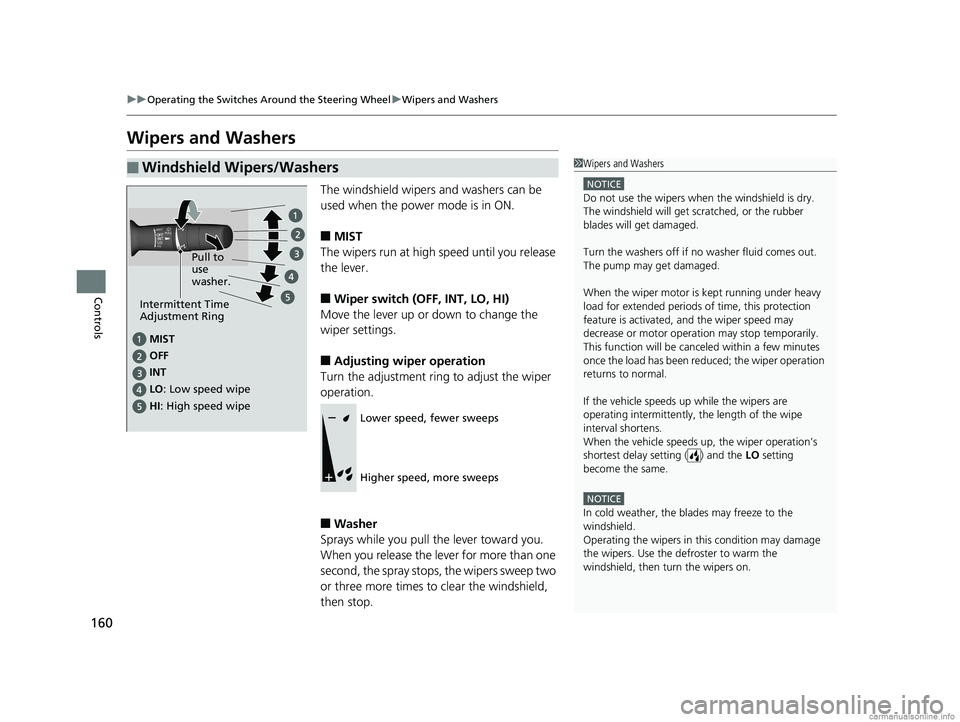
The windshield wipers and washers can be
used when the power mode is in ON.
■MIST
The wipers run at high speed until you release
the lever.
■Wiper switch (OFF, INT, LO, HI)
Move the lever up or down to change the
wiper settings.
■Adjusting wiper operation
Turn the adjustment ring to adjust the wiper
operation.
■Washer
Sprays while you pull the lever toward you.
When you release the lever for more than one
second, the spray stops, the wipers sweep two
or three more times to clear the windshield,
then stop.
■Windshield Wipers/Washers1 Wipers and Washers
NOTICE
Do not use the wipers when the windshield is dry.
The windshield will get sc ratched, or the rubber
blades will get damaged.
Turn the washers off if no washer fluid comes out.
The pump may get damaged.
When the wiper motor is kept running under heavy
load for extended periods of time, this protection
feature is activated, and the wiper speed may
decrease or motor operat ion may stop temporarily.
This function will be canceled within a few minutes
once the load has been reduced; the wiper operation
returns to normal.
If the vehicle speeds up while the wipers are
operating intermittently, the length of the wipe
interval shortens.
When the vehicle speeds up, the wiper operation’s
shortest delay setting ( ) and the LO setting
become the same.
NOTICE
In cold weather, the blades may freeze to the
windshield.
Operating the wipers in th is condition may damage
the wipers. Use the defroster to warm the
windshield, then turn the wipers on.
MIST
OFF
LO: Low speed wipe
HI : High speed wipe Pull to
use
washer.
INT
Intermittent Time
Adjustment Ring
Lower speed, fewer sweeps
Higher speed, more sweeps
18 CLARITY ELECTRIC CSS-31TRV6100.book 160 ページ 2018年2月5日 月曜日 午後12時0分
Page 163 of 559
161
uuOperating the Switches Around the Steering Wheel uWipers and Washers
Controls
1Wipers and Washers
If the wipers st op operating due to an obstacle such
as the build-up of snow, pa rk the vehicle in a safe
place.
Rotate the wiper switch to OFF, and set the power
mode to ACCESSORY or VEHICLE OFF (LOCK), then
remove the obstacle.
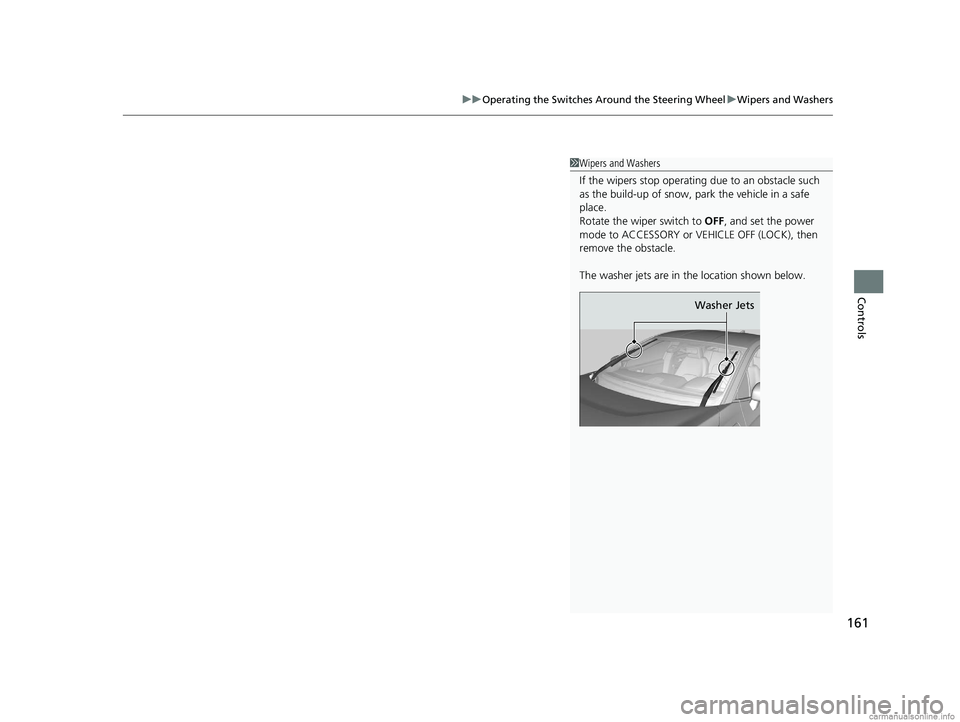
The washer jets are in the location shown below.
Washer Jets
18 CLARITY ELECTRIC CSS-31TRV6100.book 161 ページ 2018年2月5日 月曜日 午後12時0分
Page 388 of 559
uuWhen Driving uRoad Departure Mitigation (RDM) System
386
Driving
The system becomes ready to start sear ching for lane markings when all the
following conditions are met:
• The vehicle is traveling between about 45 and 90 mph (72 and 145 km/h).
• The vehicle is on a straight or slightly curved road.
• The turn signals are off.
• The brake pedal is not depressed.
• The wipers are not in continuous operation.
• The vehicle is not accelerating or braking, and the steering wheel is not being
turned.
• The system makes a determination that th e driver is not actively accelerating,
braking or steering.
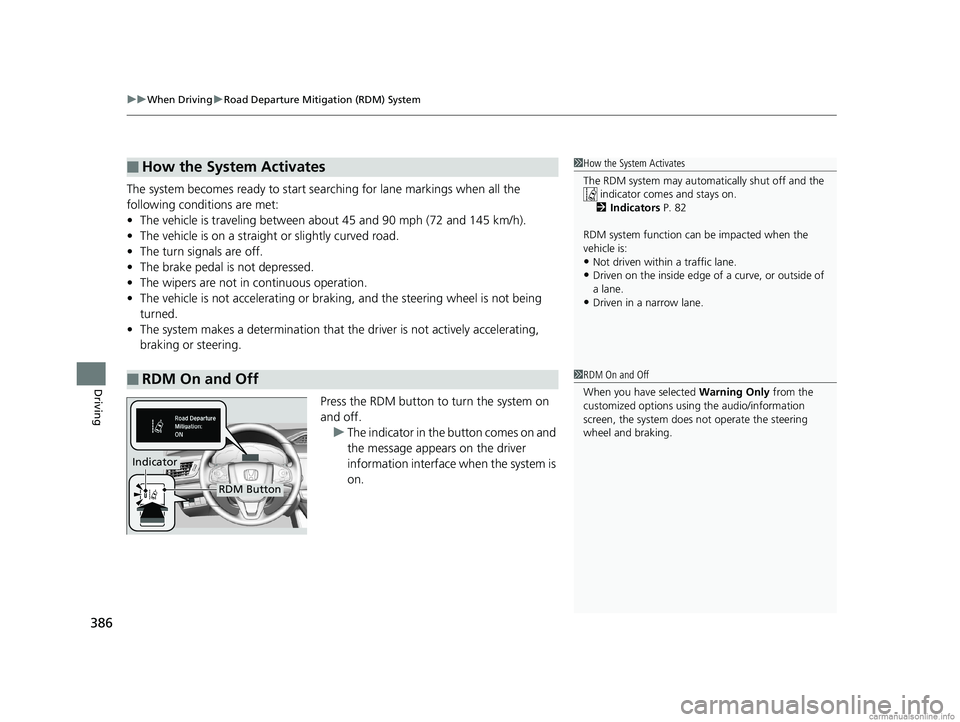
Press the RDM button to turn the system on
and off.u The indicator in the button comes on and
the message appears on the driver
information interface when the system is
on.
■How the System Activates
■RDM On and Off
1How the System Activates
The RDM system may automa tically shut off and the
indicator comes and stays on.
2 Indicators P. 82
RDM system function can be impacted when the
vehicle is:
•Not driven within a traffic lane.•Driven on the inside edge of a curve, or outside of
a lane.
•Driven in a narrow lane.
1 RDM On and Off
When you have selected Warning Only from the
customized options using the audio/information
screen, the system does not operate the steering
wheel and braking.
RDM Button
Indicator
18 CLARITY ELECTRIC CSS-31TRV6100.book 386 ページ 2018年2月5日 月曜日 午後12時0分
Page 408 of 559
uuWhen Driving uLane Keeping Assist System (LKAS)
406
Driving
The system can be used when the following conditions are met.
• The lane in which you are driving has dete ctable lane markers on both sides, and
your vehicle is in the center of the lane.
• The vehicle speed is between 45 and 90 mph (72 and 145 km/h).
• You are driving on a straight or slightly curved road.
• The turn signals are off.
• The brake pedal is not depressed.
• The wipers are not in continuous operation.
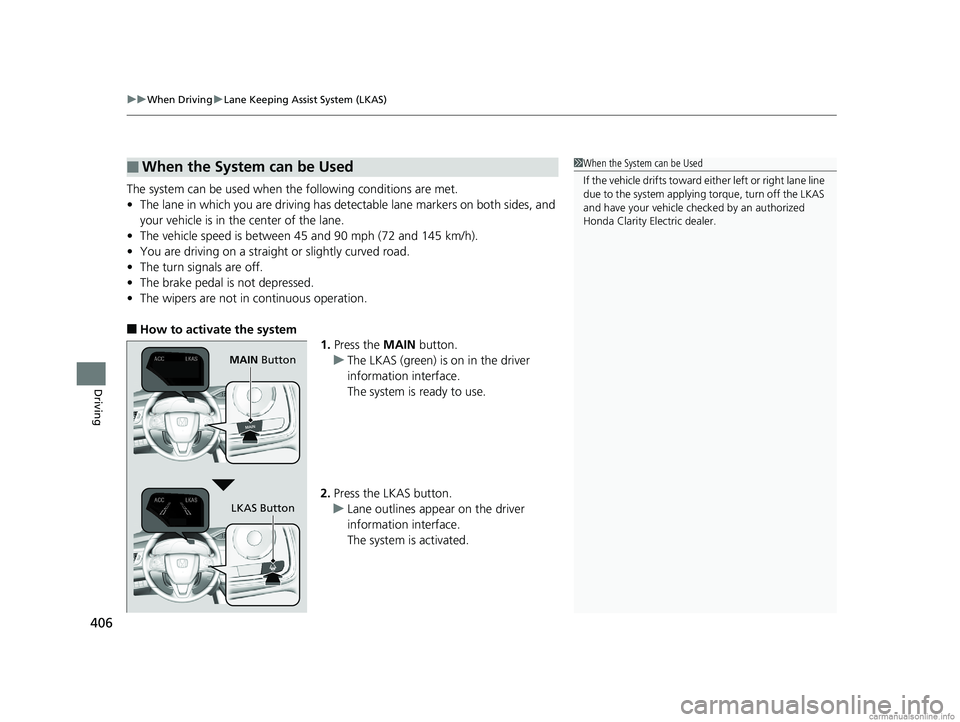
■How to activate the system
1.Press the MAIN button.
u The LKAS (green) is on in the driver
information interface.
The system is ready to use.
2. Press the LKAS button.
u Lane outlines appear on the driver
information interface.
The system is activated.
■When the System can be Used1When the System can be Used
If the vehicle drifts toward ei ther left or right lane line
due to the system applying torque, turn off the LKAS
and have your vehicle checked by an authorized
Honda Clarity Electric dealer.
MAIN Button
LKAS Button
18 CLARITY ELECTRIC CSS-31TRV6100.book 406 ページ 2018年2月5日 月曜日 午後12時0分
Page 410 of 559
408
uuWhen Driving uLane Keeping Assist System (LKAS)
Driving
■The system operation is suspended if
you:
• Set the wipers to continuous operation.
u Turning the wipers off resumes the
LKAS.
• Decrease the vehicle speed to about 40
mph (64 km/h) or less.
u Increasing the vehicle speed to about 45
mph (72 km/h) or more resumes the
LKAS.
• Depress the brake pedal.
u The LKAS resumes and starts detecting
the lane lines again once you release the
brake pedal.
■The LKAS may automatically be suspended when:
• The system fails to detect lane lines.
• The steering wheel is quickly turned.
• You fail to steer the vehicle.
• Driving through a sharp curve.
• Driving at a speed in excess of approximately 90 mph (145 km/h).
Once these conditions no longer exis t, the LKAS automatically resumes.
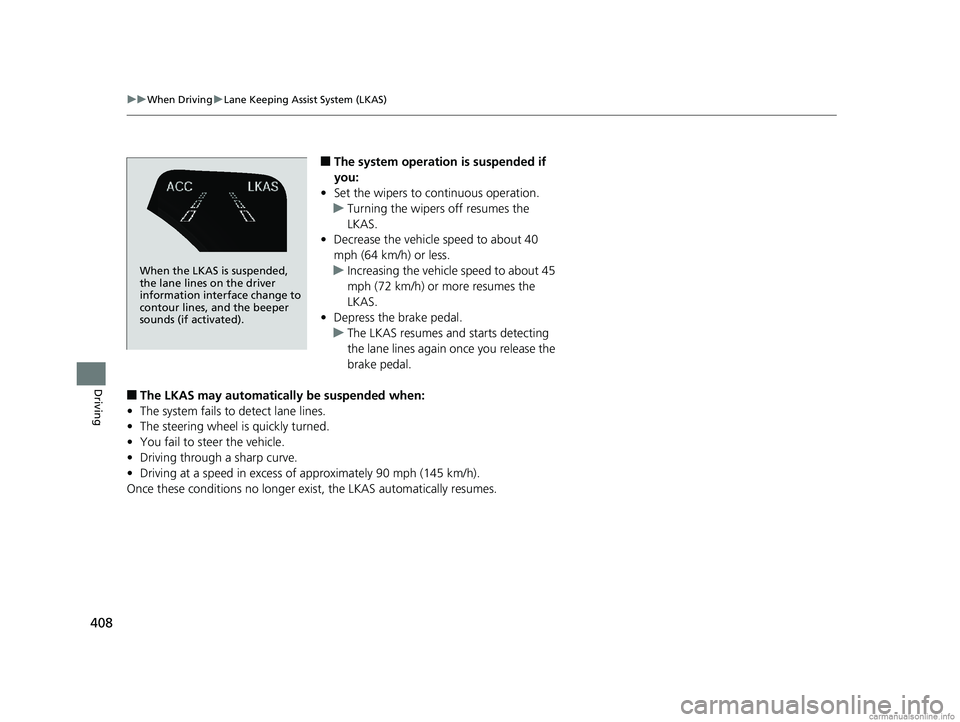
When the LKAS is suspended,
the lane lines on the driver
information interface change to
contour lines, and the beeper
sounds (if activated).
18 CLARITY ELECTRIC CSS-31TRV6100.book 408 ページ 2018年2月5日 月曜日 午後12時0分