HONDA CLARITY ELECTRIC 2018 Owner's Manual (in English)
Manufacturer: HONDA, Model Year: 2018, Model line: CLARITY ELECTRIC, Model: HONDA CLARITY ELECTRIC 2018Pages: 559, PDF Size: 27.8 MB
Page 451 of 559
449
uuCharging uControl Box
Continued
Driving
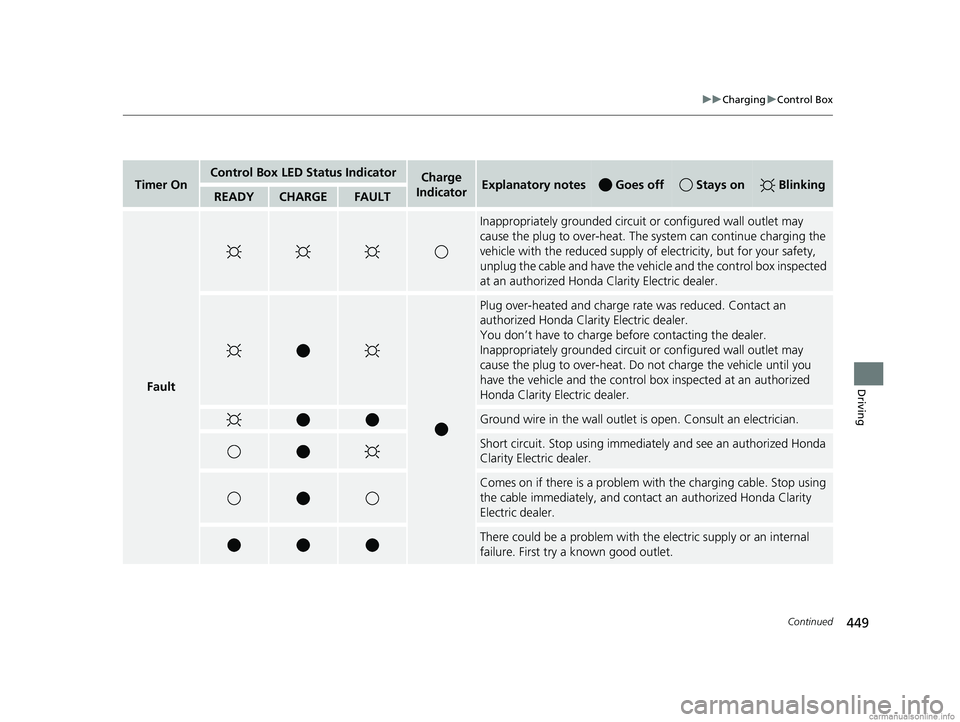
Timer OnControl Box LED Status IndicatorCharge
IndicatorExplanatory notes Goes off Stays on BlinkingREADYCHARGEFAULT
Fault
Inappropriately grounded circuit or configured wall outlet may
cause the plug to over-heat. The sy stem can continue charging the
vehicle with the reduced supply of electricity, but for your safety,
unplug the cable and have the vehicle and the control box inspected
at an authorized Honda Clarity Electric dealer.
Plug over-heated and charge rate was reduced. Contact an
authorized Honda Clarity Electric dealer.
You don’t have to charge be fore contacting the dealer.
Inappropriately grounded circuit or configured wall outlet may
cause the plug to over-heat. Do not charge the vehicle until you
have the vehicle and the control box inspected at an authorized
Honda Clarity Electric dealer.
Ground wire in the wall outlet is open. Consult an electrician.
Short circuit. Stop using immediat ely and see an authorized Honda
Clarity Electric dealer.
Comes on if there is a problem wi th the charging cable. Stop using
the cable immediately, and contac t an authorized Honda Clarity
Electric dealer.
There could be a problem with the electric supply or an internal
failure. First try a known good outlet.
18 CLARITY ELECTRIC CSS-31TRV6100.book 449 ページ 2018年2月5日 月曜日 午後12時0分
Page 452 of 559
450
uuCharging uControl Box
Driving
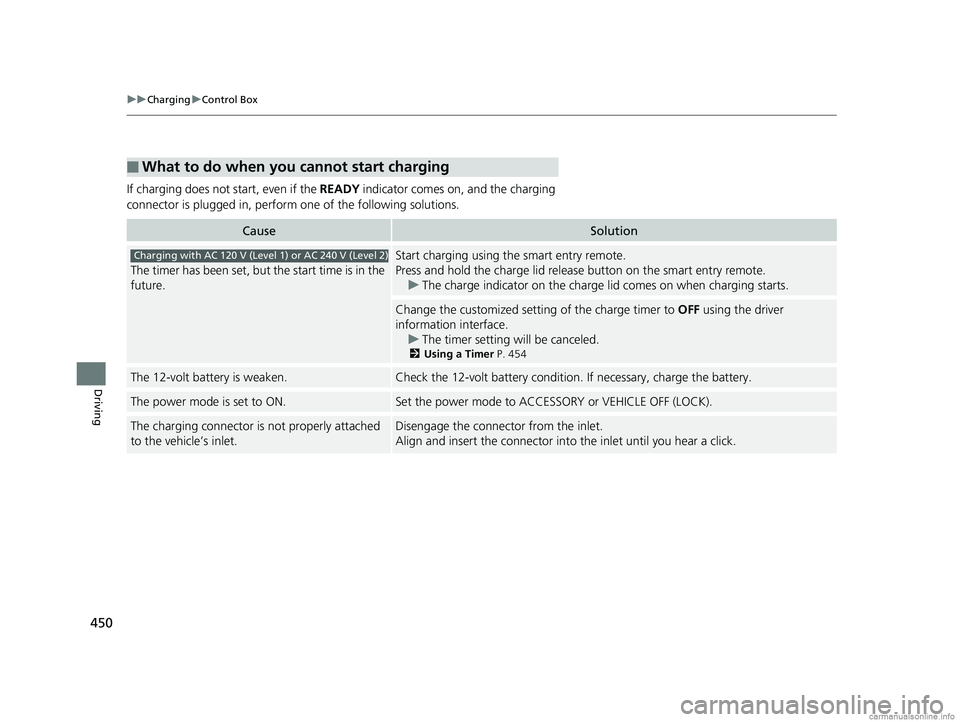
If charging does not start, even if the READY indicator comes on, and the charging
connector is plugged in, perform one of the following solutions.
■What to do when you cannot start charging
CauseSolution
The timer has been set, but the start time is in the
future.
Start charging using the smart entry remote.
Press and hold the charge lid releas e button on the smart entry remote.
u The charge indicator on the charge lid comes on when charging starts.
Change the customized setting of the charge timer to OFF using the driver
information interface.
u The timer setting will be canceled.
2Using a Timer P. 454
The 12-volt battery is weaken.Check the 12-volt battery condition. If necessary, charge the battery.
The power mode is set to ON.Set the power mode to ACCESS ORY or VEHICLE OFF (LOCK).
The charging connector is not properly attached
to the vehicle’s inlet.Disengage the connector from the inlet.
Align and insert the connector into the inlet until you hear a click.
Charging with AC 120 V (Level 1) or AC 240 V (Level 2)
18 CLARITY ELECTRIC CSS-31TRV6100.book 450 ページ 2018年2月5日 月曜日 午後12時0分
Page 453 of 559
451
uuCharging uControl Box
Continued
Driving
Note: The charging equipment provided with this vehicle has been tested and found
to comply with the limits for a Class B digital device, pursuant to part 15 of the FCC
Rules.
These limits are designed to provide reasonable protection against harmful
interference in a residential installation.
This equipment generates, uses and can ra diate radio frequency energy and, if not
installed and used in ac cordance with the instructions, may cause harmful
interference to radio communications.
However, there is no guarantee that interference will not oc cur in a particular
installation.
If this equipment does cause harmful interfe rence to radio or television reception,
which can be determined by turning the equipment off and on, the user is
encouraged to try to correct the interfe rence by one or more of the following
measures:
• Reorient or relocate the receiving antenna.
• Increase the separation between the equipment and receiver.
• Connect the equipment into an outlet on a circuit different from that to which
the receiver is connected.
• Consult the dealer or an experien ced radio/TV technician for help.
18 CLARITY ELECTRIC CSS-31TRV6100.book 451 ページ 2018年2月5日 月曜日 午後12時0分
Page 454 of 559
452
uuCharging uControl Box
Driving
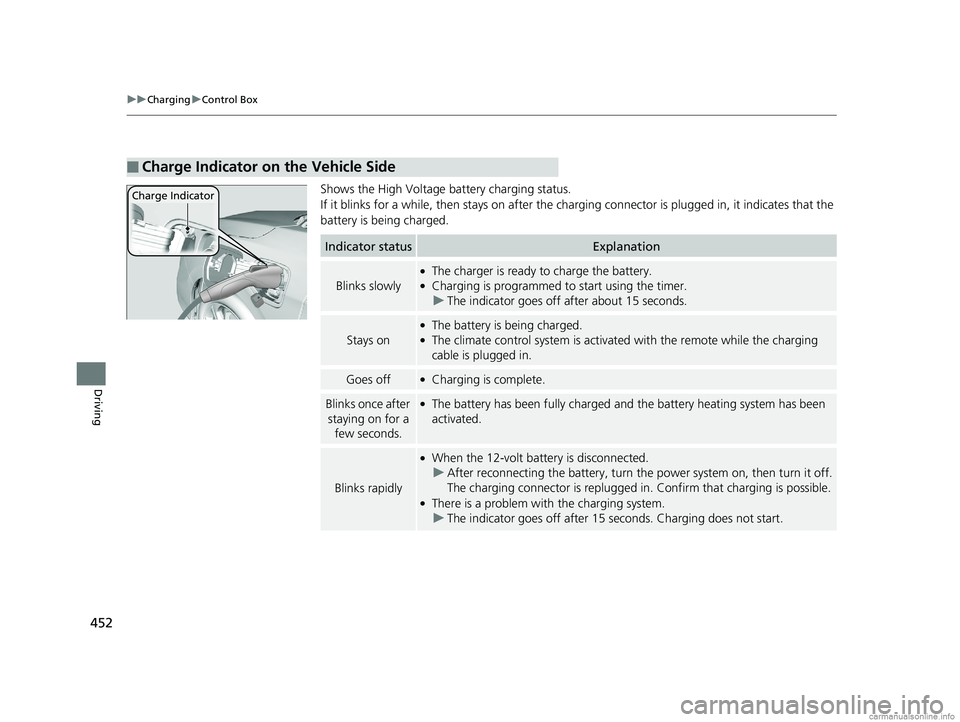
Shows the High Voltage battery charging status.
If it blinks for a while, then st ays on after the charging connector is plugged in, it indicates that the
battery is being charged.
■Charge Indicator on the Vehicle Side
Charge Indicator
Indicator statusExplanation
Blinks slowly
●The charger is ready to charge the battery.●Charging is programmed to start using the timer. u The indicator goes off after about 15 seconds.
Stays on
●The battery is being charged.●The climate control system is activate d with the remote while the charging
cable is plugged in.
Goes off●Charging is complete.
Blinks once after
staying on for a few seconds.●The battery has been fully charged and the battery heating system has been
activated.
Blinks rapidly
●When the 12-volt battery is disconnected.u After reconnecting the batt ery, turn the power system on, then turn it off.
The charging connector is replugged in. Confirm that charging is possible.
●There is a problem with the charging system.
u The indicator goes off after 15 seconds. Charging does not start.
18 CLARITY ELECTRIC CSS-31TRV6100.book 452 ページ 2018年2月5日 月曜日 午後12時0分
Page 455 of 559
453
uuCharging uHigh Voltage Battery
Driving
High Voltage Battery
The High Voltage battery gradually discharges even if the vehicle is not in use. As a
result, if your vehicle is parked for an ex tended period of time, the battery level may
get low. Keeping your vehicle’s battery level low can shorten the battery life,
negatively affecting the vehicle’s range. To maintain the battery while the vehicle is
not in use, recharge the battery at least once every three months.
The High Voltage battery life can also be affected by ambient temperature. In
particular, when it is cold outside, the ve hicle’s driving range can be reduced, and a
longer battery charging time is required. In addition, parking in extremely hot or cold
environments can accelerate battery drain.
To help extend the lifespan of the battery , it is recommended that you fully charge
the battery each time prior to driving.
■Battery Warming System
Designed to prevent the temperature of the battery from dropping when outside
temperatures drop, thereby maintainin g starting and running efficiency.
If the vehicle is plugged in when outside temperatures are low, the battery warming
system will use the power from the ch arging equipment to maintain the
temperature of the battery until the next time the vehicle is driven.
1 High Voltage Battery
The High Voltage battery dr ains over time, and under
some conditions, drains fast er. When the battery life
is shortened, this cha nges the vehicle’s driving
distance.
1 Battery Warming System
If the vehicle is left unplug ged in cold temperatures,
the temperature of the ba ttery will drop, possibly
resulting in a loss of running efficiency.
If left for an extended period of time in extremely
cold temperatures, the vehicle may not start. We
recommend that you plug in your vehicle when you
are parking or storing your vehicle in cold
temperatures.
18 CLARITY ELECTRIC CSS-31TRV6100.book 453 ページ 2018年2月5日 月曜日 午後12時0分
Page 456 of 559
454
uuCharging uUsing a Timer
Driving
Using a Timer
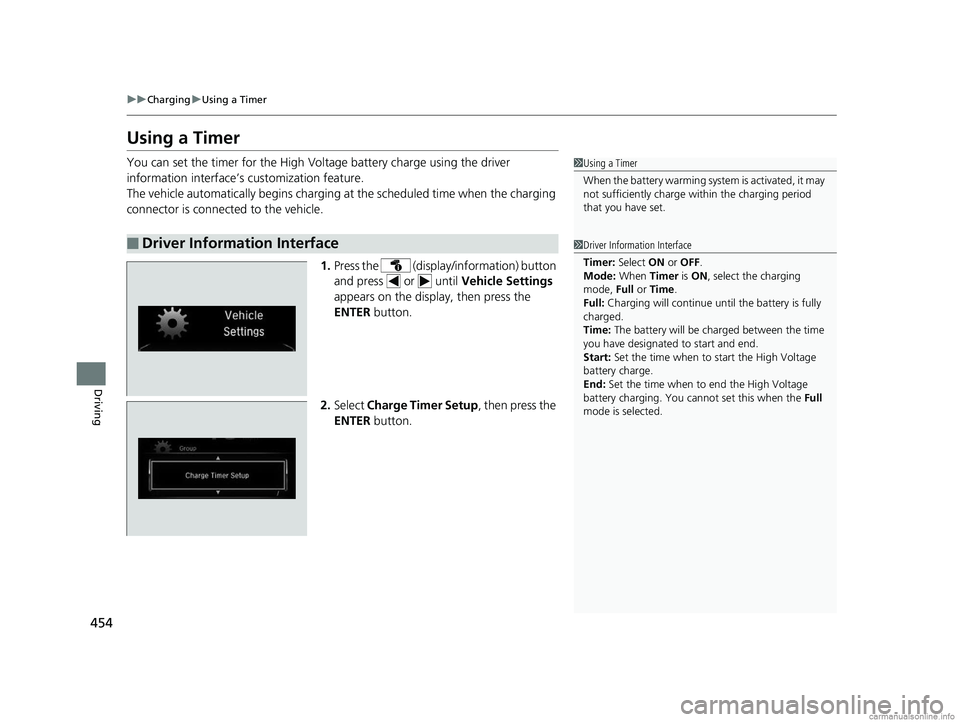
You can set the timer for the High Volt age battery charge using the driver
information interface’s customization feature.
The vehicle automatically begins charging at the scheduled time when the charging
connector is connected to the vehicle.
1.Press the (display/information) button
and press or until Vehicle Settings
appears on the display, then press the
ENTER button.
2. Select Charge Timer Setup, then press the
ENTER button.
■Driver Information Interface
1Using a Timer
When the battery warming system is activated, it may
not sufficiently charge within the charging period
that you have set.
1 Driver Information Interface
Timer: Select ON or OFF.
Mode: When Timer is ON , select the charging
mode, Full or Time .
Full: Charging will continue unt il the battery is fully
charged.
Time: The battery will be ch arged between the time
you have designated to start and end.
Start: Set the time when to start the High Voltage
battery charge.
End: Set the time when to end the High Voltage
battery charging. You cannot set this when the Full
mode is selected.
18 CLARITY ELECTRIC CSS-31TRV6100.book 454 ページ 2018年2月5日 月曜日 午後12時0分
Page 457 of 559
455
uuCharging uUsing a Timer
Driving
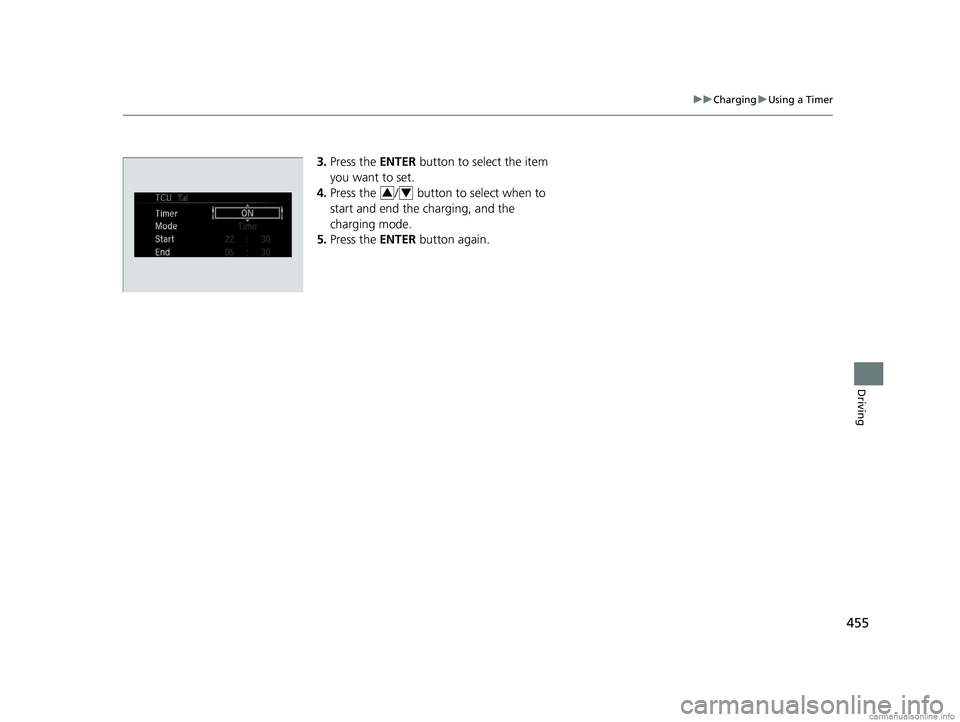
3. Press the ENTER button to select the item
you want to set.
4. Press the / button to select when to
start and end the charging, and the
charging mode.
5. Press the ENTER button again.
34
18 CLARITY ELECTRIC CSS-31TRV6100.book 455 ページ 2018年2月5日 月曜日 午後12時0分
Page 458 of 559
456
Driving
Energy Economy
Improving Energy Economy
Achieving energy economy is dependent on several factors, including driving
conditions, load weight, driving habits, and vehicle condition.
Depending on these and other factors, you may not achieve the rated energy
economy of this vehicle.
You can optimize your energy economy wi th proper maintenance of your vehicle.
Always maintain your vehicle in accord ance with the messages displayed on the
driver information interface.
• Maintain the specified tire pressure.
• Do not load the vehicl e with excess cargo.
• Keep your vehicle clean. A buildup of snow or mud on your vehicle’s underside
adds weight and increases wind resistance.
■Maintenance and Energy Economy
18 CLARITY ELECTRIC CSS-31TRV6100.book 456 ページ 2018年2月5日 月曜日 午後12時0分
Page 459 of 559
457
Maintenance
This chapter discusses basic maintenance.
Before Performing MaintenanceInspection and Maintenance ............ 458
Safety When Performing Maintenance...459
Parts and Fluids Used in Maintenance Service ........................................... 460
Maintenance Minder
TM..................... 461
Maintenance Under the Hood Maintenance Items Under the Hood .. 465
Opening the Hood ........................... 466
Cooling System ................................ 467
Transmission Fluid ............................ 468
Brake Fluid ....................................... 468 Refilling Window Wa
sher Fluid......... 469
Replacing Light Bulbs ....................... 470
Checking and Maintaining Wiper
Blades .......................................... 472
Checking and Maintaining Tires
Checking Tires ................................. 475
Tire and Loading Information Label .. 476
Tire Labeling .................................... 476
DOT Tire Quality Grading (U.S. Vehicles).. 478
Wear Indicators................................ 480
Tire Service Life ................................ 480
Tire and Wheel Replacement............ 481 Tire Rotation .................................... 482
Winter Tires ..................................... 483
12-Volt Battery ................................. 484
Remote Transmitter Care Replacing the Button Battery ........... 486
Climate Control System Maintenance.. 487
CleaningInterior Care .................................... 488
Exterior Care.................................... 490
Accessories and Modifications ........ 494
18 CLARITY ELECTRIC CSS-31TRV6100.book 457 ページ 2018年2月5日 月曜日 午後12時0分
Page 460 of 559
458
Maintenance
Before Performing Maintenance
Inspection and Maintenance
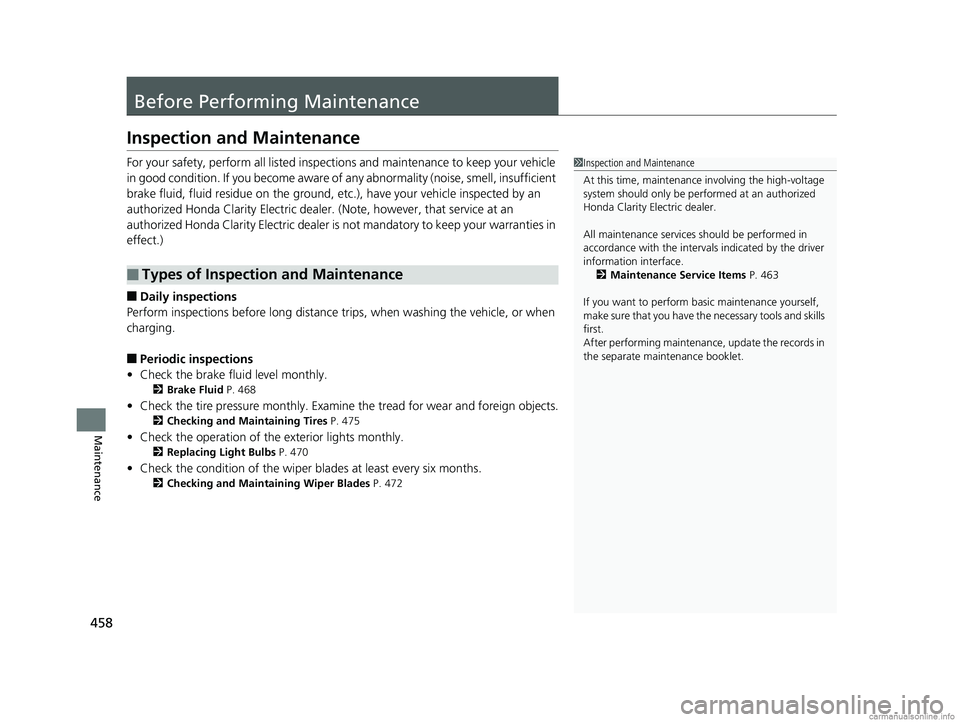
For your safety, perform all listed inspections and maintenance to keep your vehicle
in good condition. If you become aware of any abnormality (noise, smell, insufficient
brake fluid, fluid residue on th e ground, etc.), have your vehicle inspected by an
authorized Honda Clarity Electric dealer. (Note, however, that service at an
authorized Honda Clarity Elec tric dealer is not mandatory to keep your warranties in
effect.)
■Daily inspections
Perform inspections before long distance tri ps, when washing the vehicle, or when
charging.
■Periodic inspections
• Check the brake fluid level monthly.
2 Brake Fluid P. 468
•Check the tire pressure monthly. Examin e the tread for wear and foreign objects.
2Checking and Maintaining Tires P. 475
•Check the operation of the exterior lights monthly.
2 Replacing Light Bulbs P. 470
•Check the condition of the wiper bl ades at least every six months.
2Checking and Maintaining Wiper Blades P. 472
■Types of Inspection and Maintenance
1Inspection and Maintenance
At this time, maintenance involving the high-voltage
system should only be perf ormed at an authorized
Honda Clarity Electric dealer.
All maintenance services should be performed in
accordance with the intervals indicated by the driver
information interface. 2 Maintenance Service Items P. 463
If you want to perform basic maintenance yourself,
make sure that you have th e necessary tools and skills
first.
After performing ma intenance, update the records in
the separate maintenance booklet.
18 CLARITY ELECTRIC CSS-31TRV6100.book 458 ページ 2018年2月5日 月曜日 午後12時0分