clock HONDA CLARITY ELECTRIC 2019 Owner's Manual (in English)
[x] Cancel search | Manufacturer: HONDA, Model Year: 2019, Model line: CLARITY ELECTRIC, Model: HONDA CLARITY ELECTRIC 2019Pages: 559, PDF Size: 28.11 MB
Page 6 of 559
Contents
This owner’s manual should be considered a permanent part of the
vehicle and should remain with the vehicle when it is sold.
This owner’s manual covers all models of your vehicle. You may find
descriptions of equipment and features that are not on your
particular model.
Images throughout this owner’s manu al (including the front cover)
represent features and equipment that are available on some, but
not all, models. Your particular mo del may not have some of these
features.
The information and specifications in cluded in this publication were
in effect at the time of approval for printing. Honda Motor Co., Ltd.
reserves the right, however, to discontinue or change specifications
or design at any time without notice and without incurring any
obligation.2 Safe Driving P. 39
For Safe Driving P. 40 Seat Belts P. 44 Airbags P. 52
2Instrument Panel P. 81
Indicators P. 82 Gauges and Driver Information Interface P. 116
2Controls P. 129
Clock P. 130 Locking and Unlocking the Doors P. 131
Operating the Switches Ar ound the Steering Wheel P. 152
Interior Lights/Interior Convenience Items P. 176
2 Features P. 195
Audio System P. 196 Audio System Basic Operation P. 202
Customized Features P. 296 HomeLink® Universal Transceiver P. 324
2 Driving P. 361
Before Driving P. 362 Towing a Trailer P. 367
Multi-View Rear Camera P. 440 Charging P. 442
2 Maintenance P. 459
Before Performing Maintenance P. 460 Maintenance MinderTM P. 463
Checking and Maintaining Wiper Blades P. 474
Climate Control System Main tenance P. 489 Cleaning P. 490
2Handling the Unexpected P. 499
If a Tire Goes Flat P. 500 Handling of the Jack P. 512
Indicator, Coming On/Blinking P. 520 Fuses P. 526
When You Cannot Disengage the Charging Connector P. 535
2Information P. 537
Specifications P. 538 Identification Numbers P. 540
Warranty Coverages P. 543 Authorized Manuals P. 545
19 CLARITY BEV-31TRV6200.book 4 ページ 2018年10月29日 月曜日 午前10時54分
Page 26 of 559
24
Quick Reference Guide
Controls (P 129)
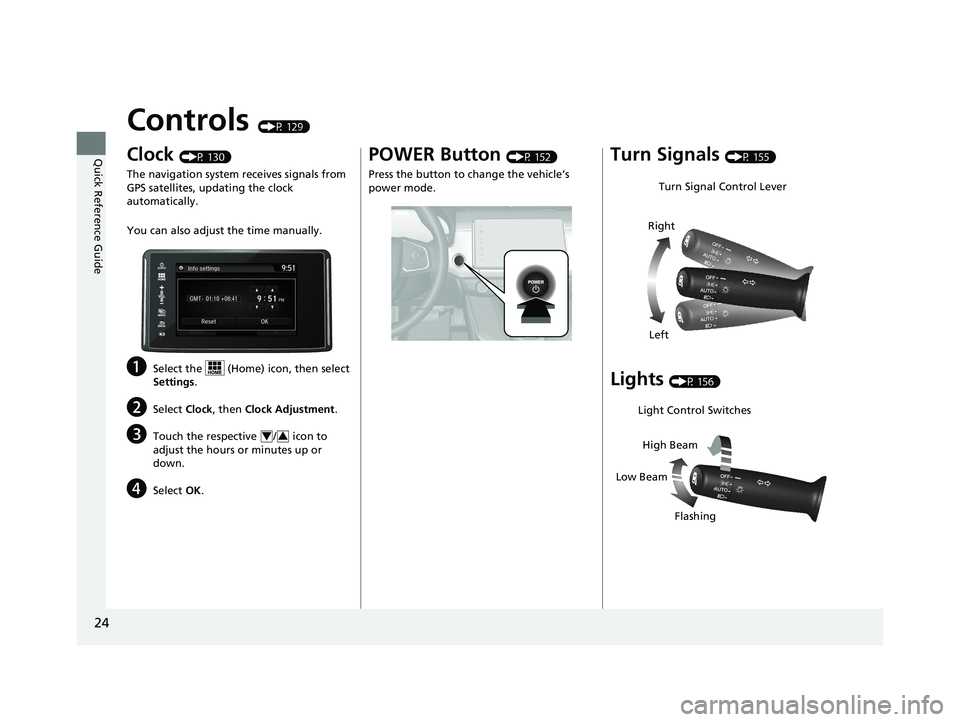
Clock (P 130)
The navigation system receives signals from
GPS satellites, updating the clock
automatically.
You can also adjust the time manually.
aSelect the (Home) icon, then select
Settings .
bSelect Clock, then Clock Adjustment .
cTouch the respective / icon to
adjust the hours or minutes up or
down.
dSelect OK.
43
POWER Button (P 152)
Press the button to change the vehicle’s
power mode.Turn Signals (P 155)
Lights (P 156)
Turn Signal Control Lever
Right
Left
Light Control Switches
Low Beam High Beam
Flashing
19 CLARITY BEV-31TRV6200.book 24 ページ 2018年10月29日 月曜日 午前10時54分
Page 131 of 559
129
Controls
This chapter explains how to operate the various controls necessary for driving.
Clock.................................................. 130
Locking and Unlocking the Doors Key Types and Functions .................. 131
Low Smart Entry Remote Signal Strength .. 132Locking/Unlocking the Doors from the Outside .......................................... 133
Locking/Unlocking the Doors from the Inside ............................................. 140
Childproof Door Locks ..................... 142
Auto Door Locking/Unlocking .......... 143
Opening and Closing the Trunk ....... 144
Security System ................................ 147
Immobilizer System .......................... 147 Security System Alarm...................... 147
Opening and Closing the Windows ... 150
Operating the Switches Around the
Steering Wheel POWER Button................................. 152
Turn Signals ..................................... 155
Light Switches.................................. 156
Daytime Running Lights ................... 159
Wipers and Washers ........................ 160
Brightness Control ........................... 162
Rear Defogger/Heated Door Mirror Button........................................ 163
Driving Position Memory System ...... 164 Adjusting the Steering Wheel .......... 166
Adjusting the Mirrors ....................... 167
Interior Rearview Mirror ................... 167
Power Door Mirrors ......................... 168
Adjusting the Seats .......................... 169
Front Seats ...................................... 169
Interior Lights/Interior Convenience Items ................................................ 176
Interior Lights .................................. 176
Interior Convenience Items .............. 178
Climate Control System ................... 186
Using Automatic Climate Control .... 186
Automatic Climate Control Sensors ... 194
19 CLARITY BEV-31TRV6200.book 129 ページ 2018年10月29日 月曜日 午前10時54分
Page 132 of 559
130
Controls
Clock
Adjusting the Clock
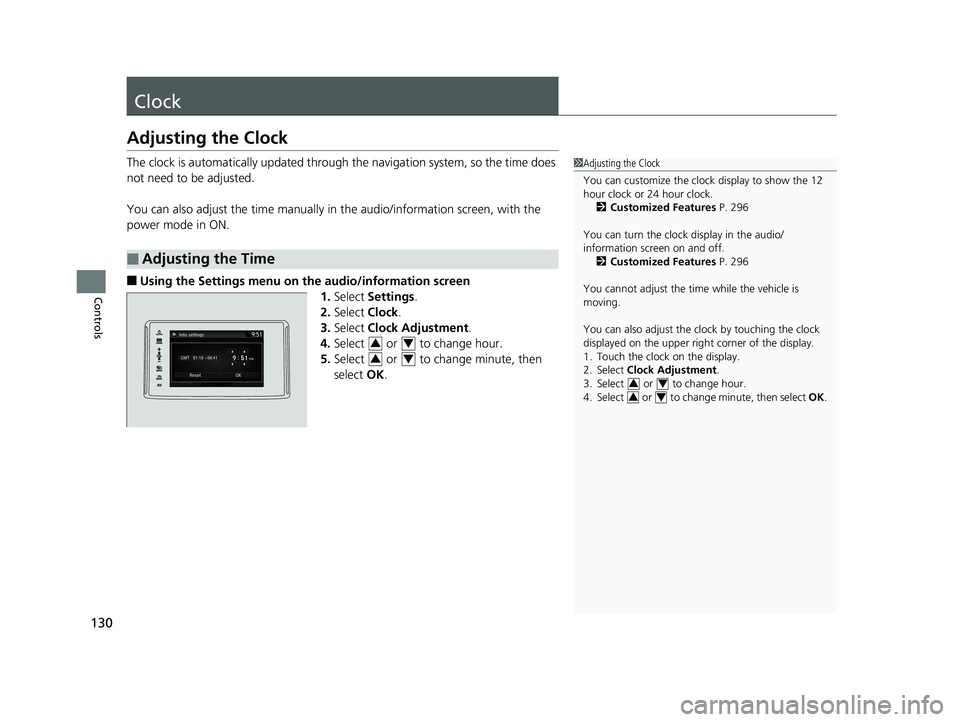
The clock is automatically updated through the navigation system, so the time does
not need to be adjusted.
You can also adjust the time manually in the audio/information screen, with the
power mode in ON.
■Using the Settings menu on th e audio/information screen
1. Select Settings .
2. Select Clock.
3. Select Clock Adjustment .
4. Select or to change hour.
5. Select or to change minute, then
select OK.
■Adjusting the Time
1Adjusting the Clock
You can customize the clock display to show the 12
hour clock or 24 hour clock.
2 Customized Features P. 296
You can turn the clock display in the audio/
information screen on and off. 2 Customized Features P. 296
You cannot adjust the time while the vehicle is
moving.
You can also adjust the clock by touching the clock
displayed on the upper right corner of the display.
1. Touch the clock on the display.
2. Select Clock Adjustment .
3. Select or to change hour.
4. Select or to change minute, then select OK.
34
34
34
34
19 CLARITY BEV-31TRV6200.book 130 ページ 2018年10月29日 月曜日 午前10時54分
Page 207 of 559
Continued205
uuAudio System Basic Operation uAudio/Information Screen
Features
■Info
Displays Trip Computer or Clock/Wallpaper . Select on the Info Menu screen
to see all available options: Trip Computer, Voice Info, Clock/Wallpaper ,
System/Device Information and Vehicle energy .
Trip Computer :
• Current Drive tab: Displays the current trip information.
• History of Trip A tab: Displays information for the three previous drives. The
information is stored every time you reset Trip A.
To delete the history manually, select Delete history on the History of Trip A
tab. The confirmation message appears on the screen, then select Yes.
Voice Info : Displays a list of all voice commands.
Clock/Wallpaper : Displays the clock and wallpaper.
System/Device Information :
• System Info : Displays the software version of the audio system.
• USB Info : Displays the memory usage of the USB device.
Vehicle energy :
Displays the ener gy flow screen.
2Energy flow screen P. 207
■Audio
Displays the current audio information.
1 Audio/Information Screen
Touchscreen operation
•Use simple gestures - in cluding touching, swiping
and scrolling - to operate certain audio functions.
•Some items may be grayed out during driving to
reduce the potential for distraction.
•You can select them when the vehicle is stopped or
use voice commands.
•Wearing gloves may limit or prevent touchscreen
response.
You can change the touchs creen sensitivity setting.
2 Customized Features P. 296
19 CLARITY BEV-31TRV6200.book 205 ページ 2018年10月29日 月曜日 午前10時54分
Page 215 of 559
Continued213
uuAudio System Basic Operation uAudio/Information Screen
Features
You can change, store, and delete the wa llpaper on the audio/information screen.
■Import wallpaper
You can import up to five images, one at a time, for wallpaper from a USB flash
drive.
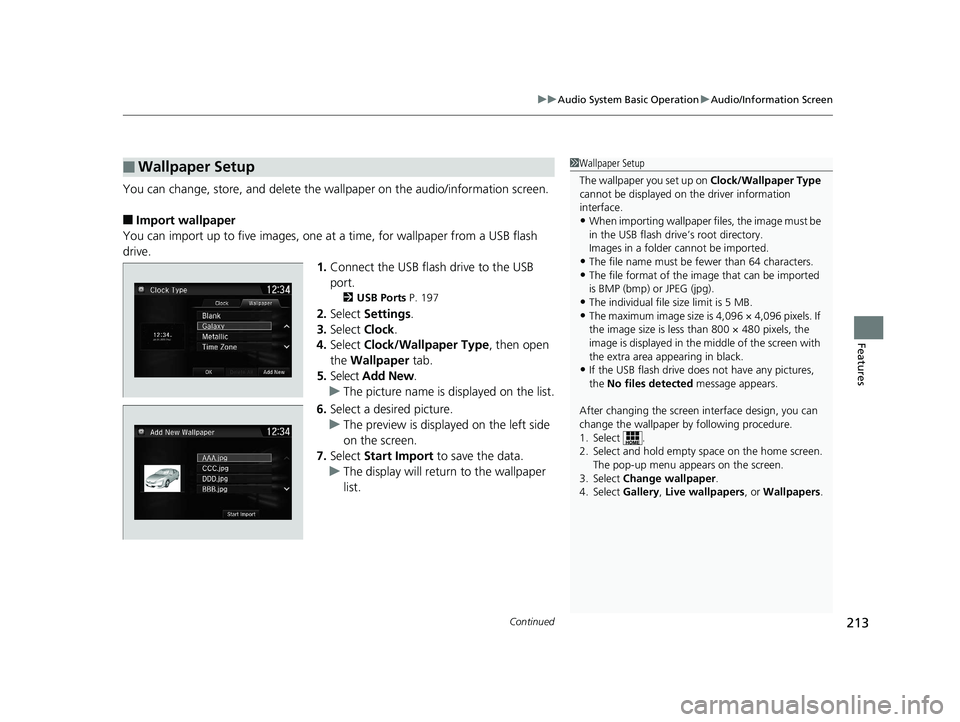
1.Connect the USB flash drive to the USB
port.
2 USB Ports P. 197
2.Select Settings .
3. Select Clock.
4. Select Clock/Wallpaper Type , then open
the Wallpaper tab.
5. Select Add New .
u The picture name is displayed on the list.
6. Select a desired picture.
u The preview is displayed on the left side
on the screen.
7. Select Start Import to save the data.
u The display will return to the wallpaper
list.
■Wallpaper Setup1Wallpaper Setup
The wallpaper you set up on Clock/Wallpaper Type
cannot be displayed on th e driver information
interface.
•When importing wallpaper files, the image must be
in the USB flash drive’s root directory.
Images in a folder cannot be imported.
•The file name must be fewer than 64 characters.•The file format of the im age that can be imported
is BMP (bmp) or JPEG (jpg).
•The individual file size limit is 5 MB.•The maximum image size is 4,096 × 4,096 pixels. If
the image size is less than 800 × 480 pixels, the
image is displayed in the middle of the screen with
the extra area appearing in black.
•If the USB flash drive doe s not have any pictures,
the No files detected message appears.
After changing the screen interface design, you can
change the wallpaper by following procedure.
1. Select .
2. Select and hold empty space on the home screen. The pop-up menu appears on the screen.
3. Select Change wallpaper .
4. Select Gallery , Live wallpapers , or Wallpapers .
19 CLARITY BEV-31TRV6200.book 213 ページ 2018年10月29日 月曜日 午前10時54分
Page 216 of 559
uuAudio System Basic Operation uAudio/Information Screen
214
Features
■Select wallpaper
1. Select Settings .
2. Select Clock.
3. Select Clock/Wallpaper Type , then open the Wallpaper tab.
u The screen changes to the wallpaper list.
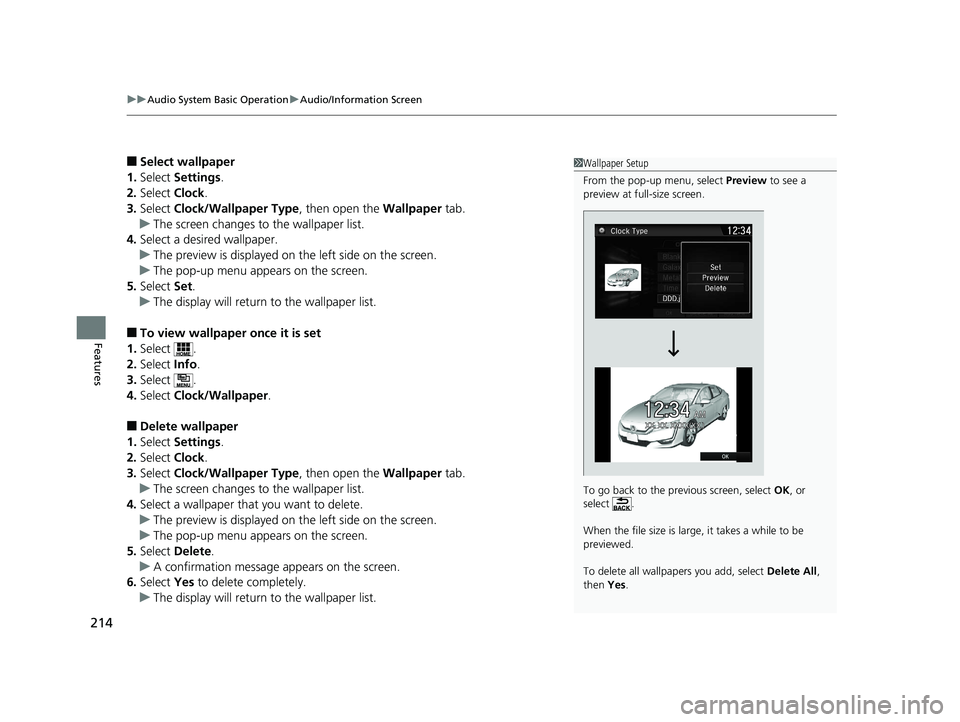
4. Select a desired wallpaper.
u The preview is displayed on the left side on the screen.
u The pop-up menu appears on the screen.
5. Select Set.
u The display will return to the wallpaper list.
■To view wallpaper once it is set
1. Select .
2. Select Info.
3. Select .
4. Select Clock/Wallpaper .
■Delete wallpaper
1. Select Settings .
2. Select Clock.
3. Select Clock/Wallpaper Type , then open the Wallpaper tab.
u The screen changes to the wallpaper list.
4. Select a wallpaper that you want to delete.
u The preview is displayed on the left side on the screen.
u The pop-up menu appears on the screen.
5. Select Delete.
u A confirmation message appears on the screen.
6. Select Yes to delete completely.
u The display will return to the wallpaper list.
1Wallpaper Setup
From the pop-up menu, select Preview to see a
preview at full-size screen.
To go back to the previous screen, select OK, or
select .
When the file size is large, it takes a while to be
previewed.
To delete all wallpapers you add, select Delete All,
then Yes.
19 CLARITY BEV-31TRV6200.book 214 ページ 2018年10月29日 月曜日 午前10時54分
Page 299 of 559
297
uuCustomized Features u
Continued
Features
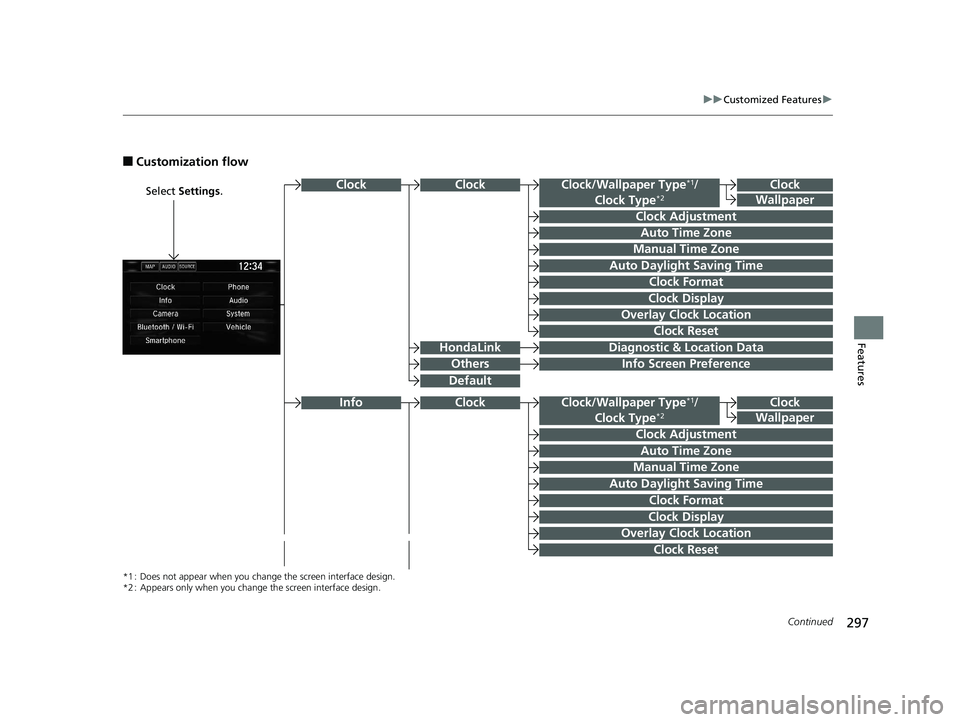
■Customization flow
Select Settings .Clock
Wallpaper
Clock Adjustment
Clock Format
Auto Time Zone
Manual Time Zone
Auto Daylight Saving Time
Clock Display
Overlay Clock Location
Info Screen Preference
Clock
Wallpaper
Clock Adjustment
Clock Format
Auto Time Zone
Manual Time Zone
Auto Daylight Saving Time
Clock Display
Overlay Clock Location
Clock Reset
*1 : Does not appear when you chan ge the screen interface design.
*2 : Appears only when you change the screen interface design.
Diagnostic & Location Data
Clock Reset
Clock/Wallpaper Type*1/
Clock Type*2
Clock/Wallpaper Type*1/
Clock Type*2
Default
Clock
Others
HondaLink
ClockClock
Info
19 CLARITY BEV-31TRV6200.book 297 ページ 2018年10月29日 月曜日 午前10時54分
Page 303 of 559
301
uuCustomized Features u
Continued
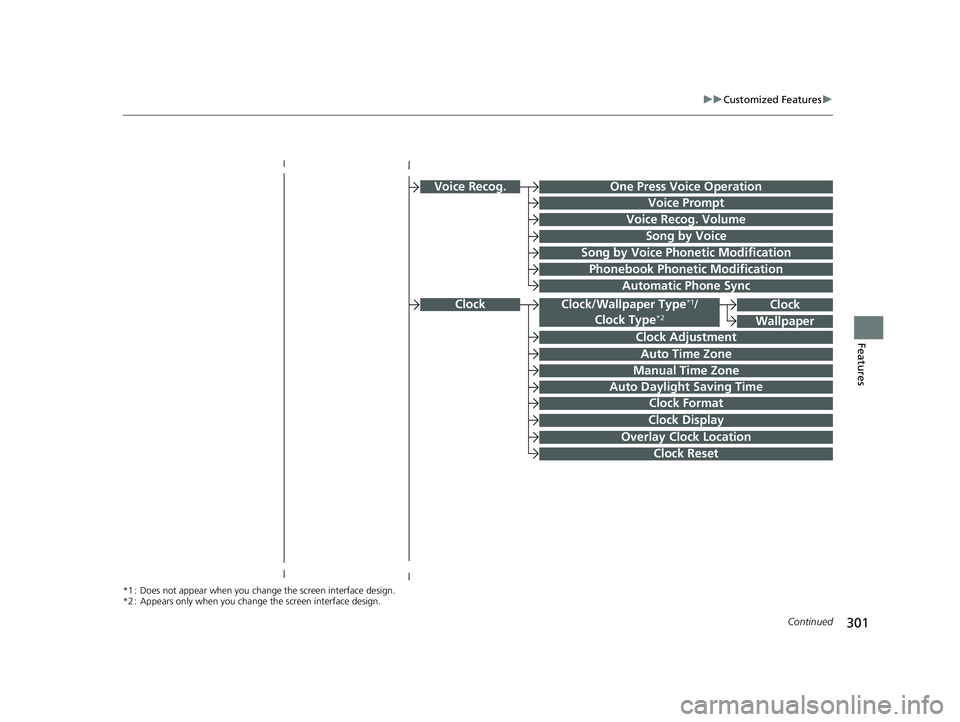
FeaturesClock Adjustment
Clock Format
Auto Time Zone
Manual Time Zone
Auto Daylight Saving Time
Clock Display
Overlay Clock Location
Clock Reset
Clock
Wallpaper
*1 : Does not appear when you chan ge the screen interface design.
*2 : Appears only when you change the screen interface design.
Clock/Wallpaper Type*1/
Clock Type*2Clock
Voice Prompt
Voice Recog. Volume
Song by Voice
Song by Voice Phonetic Modification
Phonebook Phonetic Modification
Automatic Phone Sync
One Press Voice OperationVoice Recog.
19 CLARITY BEV-31TRV6200.book 301 ページ 2018年10月29日 月曜日 午前10時54分
Page 307 of 559
305
uuCustomized Features u
Continued
Features
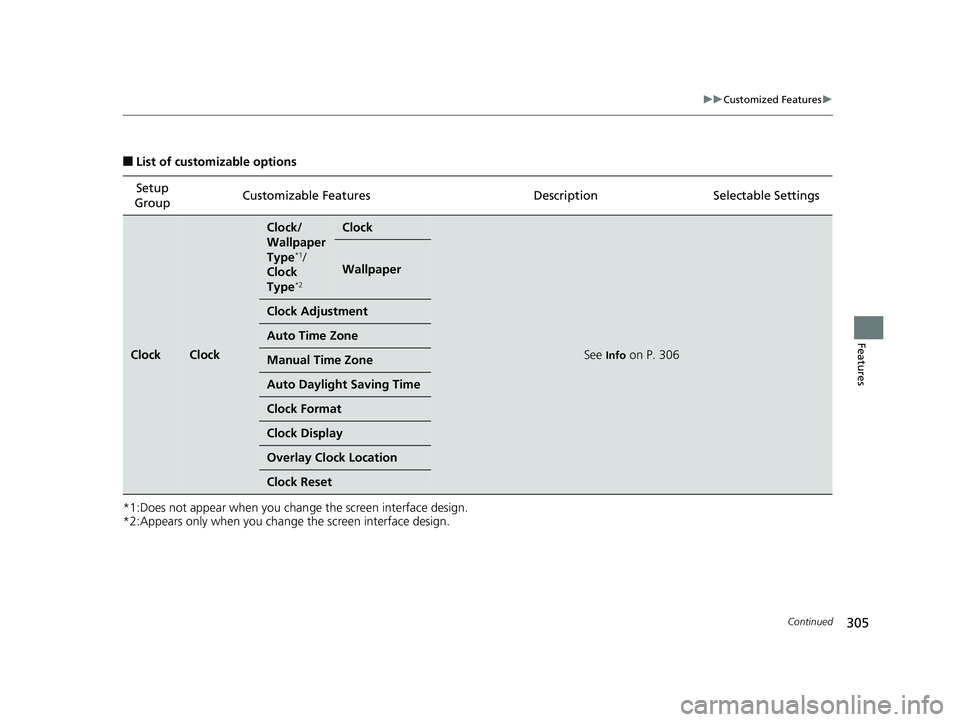
■List of customizable options
*1:Does not appear when you chan ge the screen interface design.
*2:Appears only when you change the screen interface design.
Setup
Group Customizable Features Desc
ription Selectable Settings
ClockClock
Clock/
Wallpaper
Type
*1/
Clock
Type
*2
Clock
See Info on P. 306
Wallpaper
Clock Adjustment
Auto Time Zone
Manual Time Zone
Auto Daylight Saving Time
Clock Format
Clock Display
Overlay Clock Location
Clock Reset
19 CLARITY BEV-31TRV6200.book 305 ページ 2018年10月29日 月曜日 午前10時54分