clock HONDA CR-V 2000 RD1-RD3 / 1.G User Guide
[x] Cancel search | Manufacturer: HONDA, Model Year: 2000, Model line: CR-V, Model: HONDA CR-V 2000 RD1-RD3 / 1.GPages: 322, PDF Size: 4.64 MB
Page 241 of 322
Light
s
5 . Instal l th e ne w bul b in th e socket.
6. Inser t th e socke t bac k int o th e
rea r sid e marke r ligh t assembly .
Tur n it clockwis e t o loc k i t i n place .
7 . Tes t th e light s t o mak e sur e th e
ne w bul b is working .
8 . Pu t th e mudguar d bac k i n plac e
an d secur e i t wit h th e thre e
screws .
Replacin
g a High-moun t Brak e
Ligh t Bul b
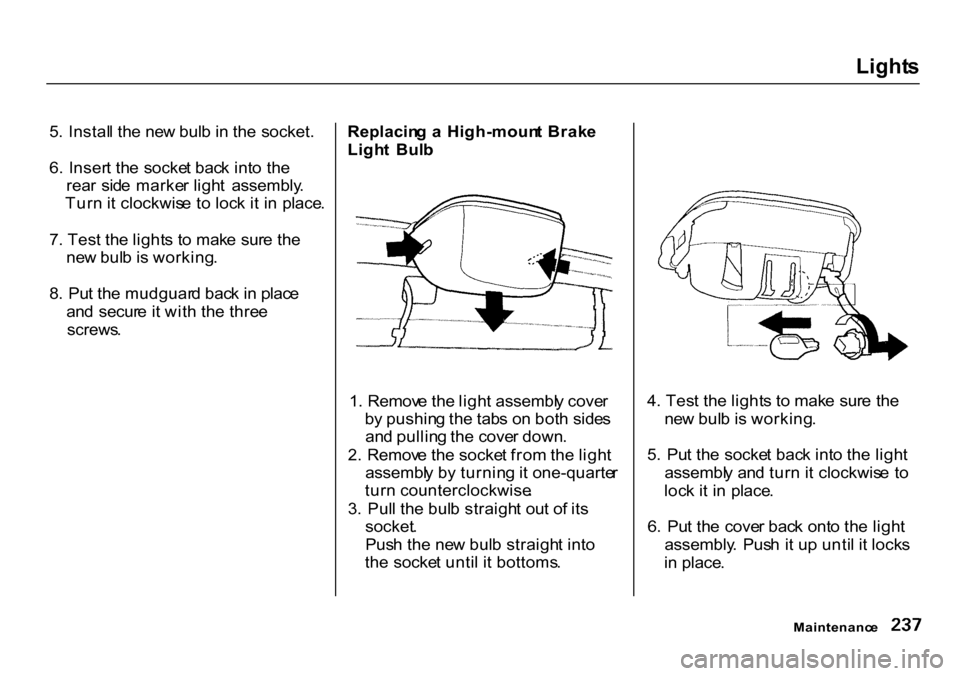
1 . Remov e th e ligh t assembl y cove r
b y pushin g th e tab s o n bot h side s
an d pullin g th e cove r down .
2 . Remov e th e socke t fro m th e ligh t
assembl y b y turnin g it one-quarte r
tur n counterclockwise .
3 . Pul l th e bul b straigh t ou t o f it s
socket .
Pus h th e ne w bul b straigh t int o
th e socke t unti l i t bottoms . 4
. Tes t th e light s t o mak e sur e th e
ne w bul b is working .
5 . Pu t th e socke t bac k int o th e ligh t
assembl y an d tur n i t clockwis e t o
loc k i t i n place .
6 . Pu t th e cove r bac k ont o th e ligh t
assembly . Pus h i t u p unti l i t lock s
i n place .
Maintenanc e
Page 255 of 322
Changin
g a Fla t Tir e
CLIP S
STOP
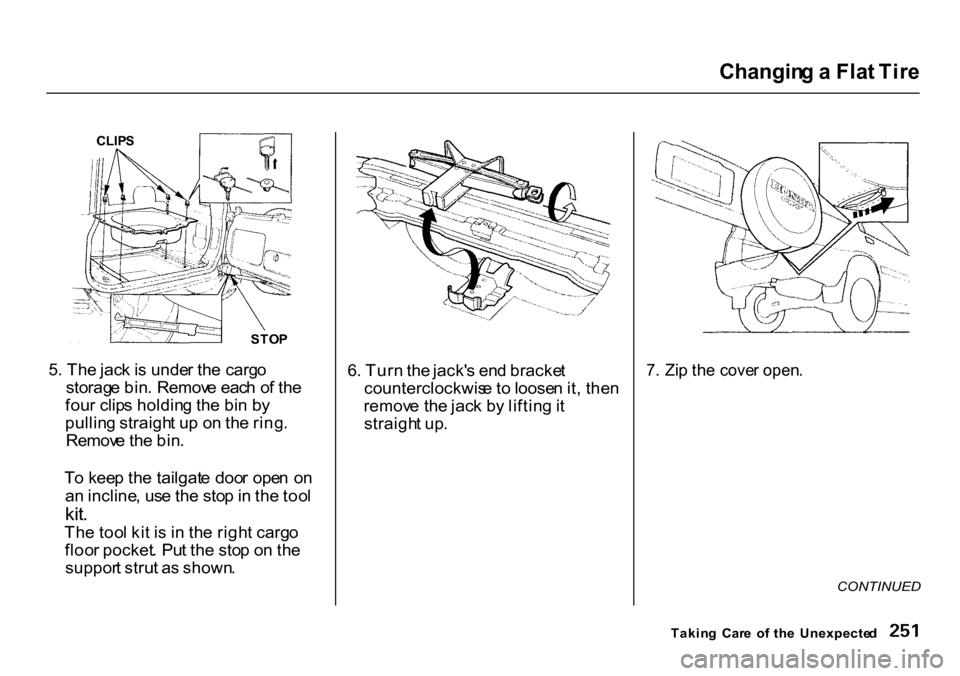
5 . Th e jac k is unde r th e carg o
storag e bin . Remov e eac h o f th e
fou r clip s holdin g th e bi n b y
pullin g straigh t u p o n th e ring .
Remov e th e bin .
T o kee p th e tailgat e doo r ope n o n
a n incline , us e th e sto p in th e too l
kit .
Th e too l ki t i s i n th e righ t carg o
floo r pocket . Pu t th e sto p o n th e
suppor t stru t a s shown . 6
. Tur n th e jack' s en d bracke t
counterclockwis e to loose n it , the n
remov e th e jac k b y liftin g it
straigh t up .
7
. Zi p th e cove r open .
CONTINUED
Takin g Car e o f th e Unexpecte d
Page 257 of 322
Changin
g a Fla t Tir e
JACKIN G POIN T
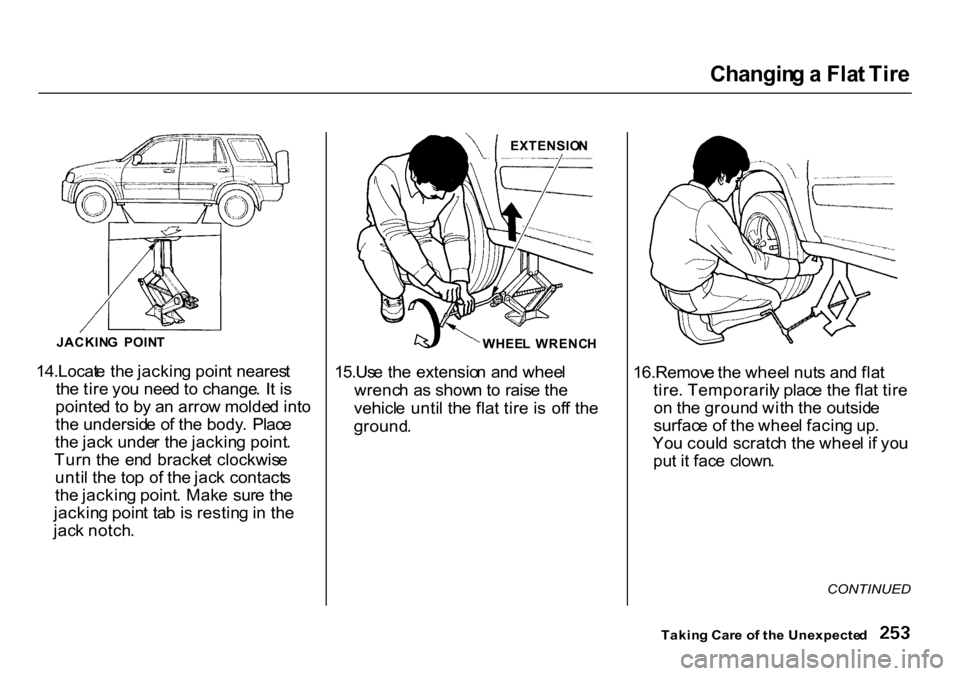
14.Locat e th e jackin g poin t neares t
th e tir e yo u nee d to change . I t i s
pointe d t o b y a n arro w molde d int o
th e undersid e o f th e body . Plac e
th e jac k unde r th e jackin g point .
Tur n th e en d bracke t clockwis e
unti l th e to p o f th e jac k contact s
th e jackin g point . Mak e sur e th e
jackin g poin t ta b is restin g in th e
jac k notch . EXTENSIO
N
WHEE L WRENC H
15.Us e th e extensio n an d whee l
wrenc h a s show n to rais e th e
vehicl e unti l th e fla t tir e i s of f th e
ground . 16.Remov
e th e whee l nut s an d fla t
tire . Temporaril y plac e th e fla t tir e
o n th e groun d wit h th e outsid e
surfac e o f th e whee l facin g up .
Yo u coul d scratc h th e whee l i f yo u
pu t i t fac e clown .
CONTINUED
Takin g Car e o f th e Unexpecte d
Page 267 of 322
I
f You r Engin e Overheat s
6 . Loo k fo r an y obviou s coolan t leaks ,
suc h a s a spli t radiato r hose .
Everythin g i s stil l extremel y hot ,
s o us e caution . I f yo u fin d a leak , i t
mus t b e repaire d befor e yo u
continu e drivin g (se e Emergenc y
Towin g o n pag e 27 3 ) .
7 . I f yo u don' t fin d a n obviou s leak ,
chec k th e coolan t leve l i n th e
radiato r reserv e tan k (se e pag e
144 ). I f th e leve l i s belo w th e
MI N mark ,
ad
d coolan t t o halfwa y
betwee n th e MI N an d MA X marks .
8 . I f ther e wa s n o coolan t i n th e
reserv e tank , yo u ma y als o hav e t o
ad d coolan t t o th e radiator . Le t th e
engin e coo l dow n unti l th e pointe r
reache s th e middl e o f th e tempera -
tur e gauge , o r lower , befor e check -
in g th e radiator . 9
. Usin g glove s o r a larg e heav y
cloth , tur n th e radiato r ca p
counterclockwise , withou t pushin g
down , t o th e firs t stop . Thi s
release s an y remainin g pressur e i n
th e coolin g system . Afte r th e
pressur e releases , pus h dow n o n
th e ca p an d tur n i t unti l i t come s
off .
10
. Star t th e engin e an d se t th e
temperatur e contro l dia l t o
maximum . Ad d coolan t t o th e
radiato r u p t o th e bas e o f th e fille r
neck . I f yo u d o no t hav e th e
prope r coolan t mixtur e available ,
yo u ca n ad d plai n water .
Remembe r t o hav e th e coolin g
syste m draine d an d refille d wit h
th e prope r mixtur e a s soo n a s yo u
can .
11.Pu t th e radiato r ca p bac k o n
tightly . Ru n th e engin e an d watc h
th e temperatur e gauge . I f i t goe s
bac k t o th e re d mark , th e engin e
need s repair . (Se e Emergenc y
Towin g o n pag e 27 3 . )
12.I f th e temperatur e stay s normal ,
chec k th e coolan t leve l i n th e
radiato r reserv e tank . I f i t ha s
gon e down , ad d coolan t t o th e
MA X mark . Pu t th e ca p bac k o n
tightly .
Takin g Car e o f th e Unexpecte d
Removin
g th e radiato r ca p
whil e th e engin e is ho t ca n
caus e th e coolan t t o spra y out ,
seriousl y scaldin g you .
Alway s le t th e engin e an d
radiato r coo l dow n befor e
removin g th e radiato r cap .
Page 301 of 322
Inde
x
Engin e Oil.................................. . 14 8
Fuses.......................................... . 26 9
Manua l Transmissio n Flui d .... . 20 8
Powe r Steerin g Fluid................ . 21 1
Rea r Differentia l Fluid............. . 20 9
Checklist , Befor e Driving............ . 15 3
Childproo f Doo r Locks.................. . 7 5
Chil d Safety..................................... . 2 1
Cleaner , Air................................... . 21 2
Cleanin g
Aluminu m Wheels.................... . 24 3
Carpeting................................... . 24 5
Exterior...................................... . 24 2
Fabric......................................... . 24 5
Interior....................................... . 24 5
Sea t Belts................................... . 24 0
Vinyl........................................... . 24 5
Windows.................................... . 24 6
Clock , Settin g th e ........................... . 8 7
Clutc h Fluid................................... . 21 1
C O in th e Exhaust........................ . 28 4
Col d Weather , Startin g in............ . 15 5
Consume r Information*............... . 28 7
Controls , Instrument s and............. . 5 1
Coolan t
Adding........................................ . 20 1
Checking....................................
. 14 4
Prope r Solution......................... . 20 1
Replacing................................... . 20 3
Temperatur e Gauge................... . 5 7
Corrosio n Protection.................... . 24 7
Crankcas e Emissio n Contro l
System........................................ . 28 4
Cruis e Contro l Operatio n .............. . 6 6
Custome r Relation s Office.......... . 28 8
DANGER , Explanatio n of................ . i i
Dashboard....................................... . 5 2
Daytim e Runnin g Lights................ . 6 0
Dea d Battery , Wha t t o Do........... . 26 0
Defects , Reportin g Safety............ . 29 2
Defo g an d Defrost........................ . 10 3
Defogger , Rea r Window................ . 6 3
Defrostin g th e Windows.............. . 10 3
DEXRON ®
II I Automati c
Transmissio n Fluid................... . 20 7
Dimensions.................................... . 27 8
Dimmin g th e Headlights............... . 6 0
Dipstic k
Automati c Transmission.......... . 20 7
Engin
e Oil.................................. . 14 3
Directiona l Signals.......................... . 6 1
Disabled , Towin g You r Ca r If..... . 27 3
Dis c Brak e Wea r Indicators........ . 16 4
Disposa l o f Use d Oil..................... . 20 0
Door s
Lockin g an d Unlocking.............. . 7 0
Powe r Doo r Locks...................... . 7 1
DO T Tir e Qualit y Grading.......... . 28 0
Downshifting , 5-spee d Manua l
Transmission............................. . 15 6
Driv e Belts..................................... . 22 0
Driving........................................... . 15 1
Economy.................................... . 14 5
I n Ba d Weather......................... . 16 8
I n Foreig n Countries................ . 28 3
Drivin g Guidelines........................ . 15 2
CONTINUED
Page 306 of 322
Inde
x
Sea t Belt s
Syste m Components................... . 4 2
Tethe r Attachmen t Points......... . 4 0
Us e Durin g Pregnancy............... . 1 9
Wearin g a Lap/Shoulde r Belt... . 1 5
Wearin g th e La p Belt................. . 1 6
Seats , Adjustin g the........................ . 7 7
Seria l Number............................... . 27 6
Servic e Intervals........................... . 18 8
Servic e Manual*........................... . 29 3
Servic e Statio n Procedures......... . 14 1
Settin g th e Clock............................ . 8 7
Shiftin g
Th e Automati c Transmissio n . . 15 8
Th e 5-spee d Manua l
Transmission......................... . 15 6
Shif t Leve r Positio n Indicator..... . 15 8
Shif t Loc k Release........................ . 16 2
Sid e Marke r Lights , Bul b
Replacemen t in......................... . 23 3
Signalin g Turns............................... . 6 1
Sno w Tires..................................... . 22 6
Solvent-typ e Cleaners................... . 24 2
Soun d System................................ . 10 6
Spar k Plugs , Replacing................ . 21 3
Specification s Charts.................... . 27 8
Spee
d Control.................................. . 6 6
Speedometer................................... . 5 6
SRS , Additiona l Information.......... . 4 5
Additiona l Safet y Precautions... . 4 8
Ho w th e Automati c Sea t Bel t
Tensioner s Work.................... . 4 7
Ho w th e SR S Indicato r Ligh t
Works....................................... . 4 7
Ho w You r Airbag s Work........... . 4 5
SR S Components........................ . 4 5
SR S Service.................................. . 4 8
SR S Indicator............................. . 47 , 5 4
STAR T (Ignitio n Ke y Position).... . 7 0
Startin g th e Engine....................... . 15 4
I n Col d Weathe r a t Hig h
Altitude.................................. . 15 5
Wit h a Dea d Battery................ . 26 0
Stea m Comin g fro m Engine........ . 26 2
Steerin g Whee l
Adjustment.................................. . 6 4
Anti-thef t Colum n Lock............. . 7 0
Stere o Soun d System................... . 10 6
Storag e Box..................................... . 9 1
Storin g You r Vehicle.................... . 23 9
Supplementa l Restrain t System...... . 9
Servic e Precautions.................... . 4 8
Servicing......................................
. 4 8
SR S Indicator......................... . 47 , 5 4
Syste m Components................... . 4 5
Tensioners , Sea t Belts............... . 4 7
Syntheti c Oil.................................. . 19 8
Tachometer..................................... . 5 6
Tailgat e
Openin g the................................. . 7 5
Ope n Indicator............................ . 5 5
Taillights , Changin g Bulb s in...... . 23 4
Takin g Car e o f th e Unexpecte d . . 24 9
Tap e Player........................... . 112 , 13 3
Technica l Description s
Emissio n Contro l Systems....... . 28 4
Thre e Wa y Catalyti c
Converter............................... . 28 6
Temperatur e Gauge....................... . 5 7
Tensioners , Sea t Belt s ................... . 4 7
Tethe r Attachmen t Points............. . 4 0
Thre e Wa y Catalyti c Converter.. . 28 4
Time , Settin g the............................ . 8 7
Timin g Belt.................................... . 22 1
Tir e Chains.................................... . 22 7
Page 312 of 322
Audio Syste m
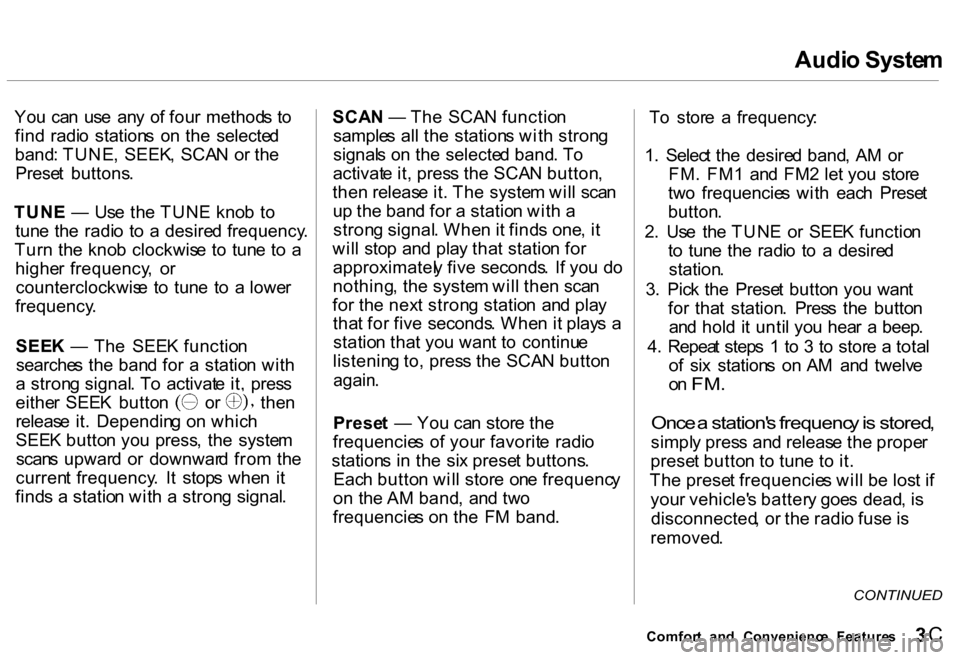
You ca n us e an y o f fou r method s t o
fin d radi o station s o n th e selecte d
band : TUNE , SEEK , SCA N o r th e
Prese t buttons .
TUN E — Us e th e TUN E kno b t o
tun e th e radi o t o a desire d frequency .
Tur n th e kno b clockwis e t o tun e t o a
highe r frequency , o r
counterclockwis e t o tun e t o a lowe r
frequency .
SEE K — Th e SEE K functio n
searche s th e ban d fo r a statio n wit h
a stron g signal . T o activat e it , pres s
either SEE K butto n o r the n
releas e it . Dependin g o n whic h
SEE K butto n yo u press , th e syste m
scan s upwar d o r downwar d fro m th e
curren t frequency . I t stop s whe n i t
find s a statio n wit h a stron g signal . SCA
N — Th e SCA N functio n
sample s al l th e station s wit h stron g
signal s o n th e selecte d band . T o
activat e it , pres s th e SCA N button ,
the n releas e it . Th e syste m wil l sca n
u p th e ban d fo r a statio n wit h a
stron g signal . Whe n it find s one , i t
wil l sto p an d pla y tha t statio n fo r
approximatel y fiv e seconds . I f yo u d o
nothing , th e syste m wil l the n sca n
fo r th e nex t stron g statio n an d pla y
tha t fo r fiv e seconds . Whe n i t play s a
statio n tha t yo u wan t t o continu e
listenin g to , pres s th e SCA N butto n
again.
Prese t — Yo u ca n stor e th e
frequencie s o f you r favorit e radi o
station s i n th e si x prese t buttons .
Eac h butto n wil l stor e on e frequenc y
o n th e A M band , an d tw o
frequencie s o n th e F M band . T
o stor e a frequency :
1 . Selec t th e desire d band , A M o r
FM . FM 1 an d FM 2 le t yo u stor e
tw o frequencie s wit h eac h Prese t
button .
2 . Us e th e TUN E o r SEE K functio n
t o tun e th e radi o t o a desire d
station .
3 . Pic k th e Prese t butto n yo u wan t
fo r tha t station . Pres s th e butto n
an d hol d i t unti l yo u hea r a beep .
4 . Repea t step s 1 to 3 to stor e a tota l
o f si x station s o n A M an d twelv e
o n
FM .
Once a station' s frequenc y is stored ,
simply pres s an d releas e th e prope r
prese t butto n t o tun e t o it .
Th e prese t frequencie s wil l b e los t i f
you r vehicle' s batter y goe s dead , i s
disconnected , o r th e radi o fus e is
removed .
CONTINUED
Comfor t an d Convenienc e Feature s
C