lock HONDA CR-V 2000 RD1-RD3 / 1.G User Guide
[x] Cancel search | Manufacturer: HONDA, Model Year: 2000, Model line: CR-V, Model: HONDA CR-V 2000 RD1-RD3 / 1.GPages: 322, PDF Size: 4.64 MB
Page 36 of 322
Protectin
g Childre n
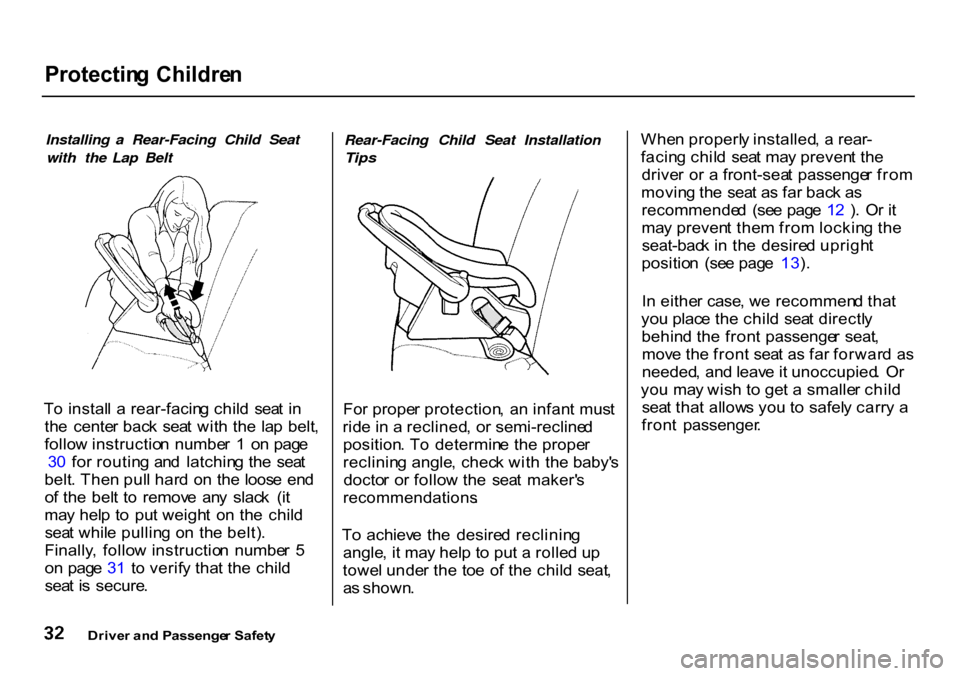
Installing a Rear-Facing Child Seat with the Lap Belt
T o instal l a rear-facin g chil d sea t i n
th e cente r bac k sea t wit h th e la p belt ,
follo w instructio n numbe r 1 on pag e
3 0 fo r routin g an d latchin g th e sea t
belt . The n pul l har d o n th e loos e en d
o f th e bel t t o remov e an y slac k (i t
ma y hel p t o pu t weigh t o n th e chil d
sea t whil e pullin g o n th e belt) .
Finally , follo w instructio n numbe r 5
o n pag e 3 1 t o verif y tha t th e chil d
sea t i s secure . Rear-Facing Child Seat Installation
Tips
Fo r prope r protection , a n infan t mus t
rid e in a reclined , o r semi-recline d
position . T o determin e th e prope r
reclinin g angle , chec k wit h th e baby' s
docto r o r follo w th e sea t maker' s
recommendations .
T o achiev e th e desire d reclinin g
angle , i t ma y hel p t o pu t a rolle d u p
towe l unde r th e to e o f th e chil d seat ,
a s shown . Whe
n properl y installed , a rear -
facin g chil d sea t ma y preven t th e
drive r o r a front-sea t passenge r fro m
movin g th e sea t a s fa r bac k a s
recommende d (se e pag e 1 2 ) . O r i t
ma y preven t the m fro m lockin g th e
seat-bac k i n th e desire d uprigh t
positio n (se e pag e 13 ).
I n eithe r case , w e recommen d tha t
yo u plac e th e chil d sea t directl y
behin d th e fron t passenge r seat ,
mov e th e fron t sea t a s fa r forwar d a s
needed , an d leav e it unoccupied . O r
yo u ma y wis h t o ge t a smalle r chil d
sea t tha t allow s yo u t o safel y carr y a
fron t passenger .
Drive r an d Passenge r Safet y
Page 38 of 322
Protectin
g Childre n
I f i t i s necessar y t o pu t a forward -
facin g chil d sea t i n th e front , mov e
th e vehicl e sea t a s fa r t o th e rea r a s
possible , b e sur e th e chil d sea t i s
firml y secure d t o th e vehicle , an d
tha t th e chil d is properl y strappe d in
th e seat .
Installing a Child Seat with a Lap/
Shoulder Belt
Th e lap/shoulde r belt s i n th e oute r
bac k an d fron t passenge r seatin g
position s hav e a lockin g mechanis m
tha t mus t b e activate d t o secur e a
chil d seat .
Th e followin g page s provid e
instruction s o n ho w to secur e a
forward-facin g chil d sea t wit h thi s
typ e o f sea t belt .
Se e pag e 3 6 fo r ho w to secur e a
forward-facin g chil d sea t i n th e
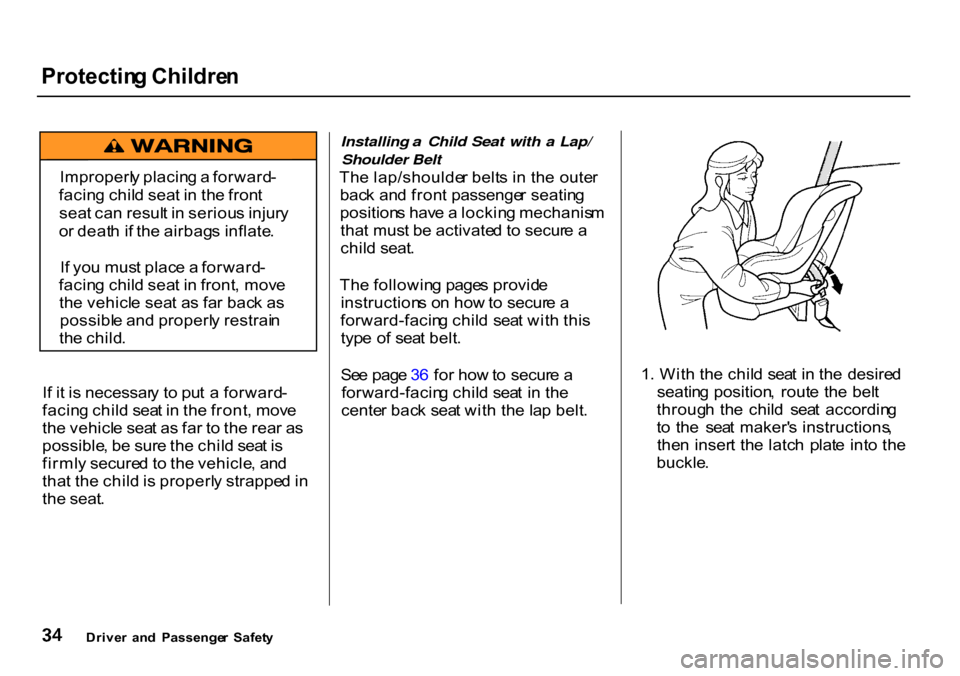
cente r bac k sea t wit h th e la p belt . 1
. Wit h th e chil d sea t i n th e desire d
seatin g position , rout e th e bel t
throug h th e chil d sea t accordin g
t o th e sea t maker' s instructions ,
the n inser t th e latc h plat e int o th e
buckle .
Drive r an d Passenge r Safet y
Improperl
y placin g a forward -
facin g chil d sea t i n th e fron t
sea t ca n resul t i n seriou s injur y
o r deat h if th e airbag s inflate .
I f yo u mus t plac e a forward -
facin g chil d sea t i n front , mov e
th e vehicl e sea t a s fa r bac k a s
possibl e an d properl y restrai n
th e child .
Page 39 of 322
Protectin
g Childre n
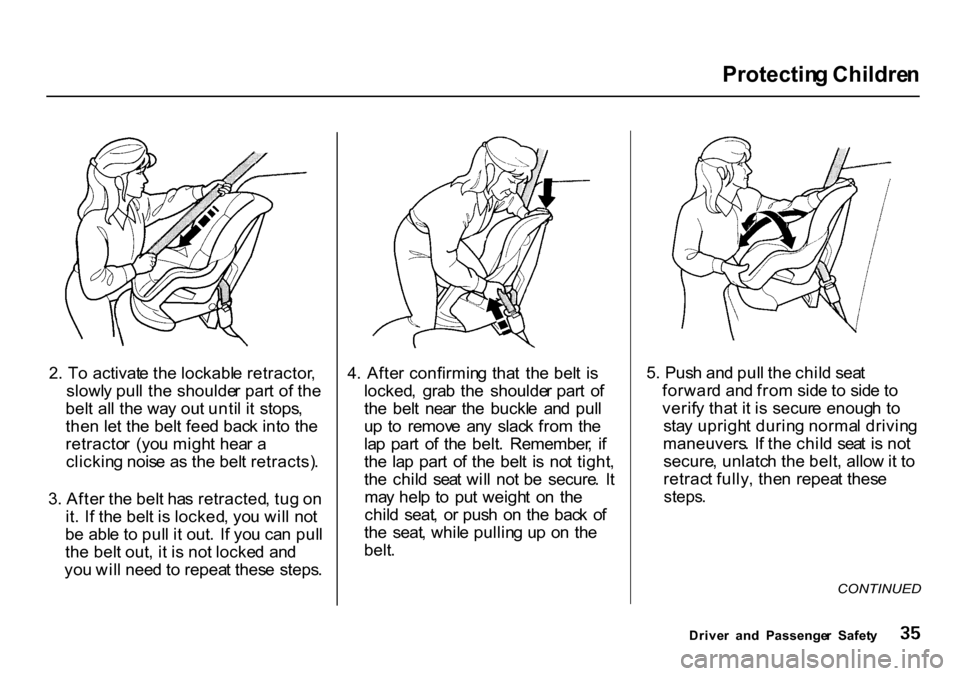
2 . T o activat e th e lockabl e retractor ,
slowl y pul l th e shoulde r par t o f th e
bel t al l th e wa y ou t unti l i t stops ,
the n le t th e bel t fee d bac k int o th e
retracto r (yo u migh t hea r a
clickin g nois e a s th e bel t retracts) .
3 . Afte r th e bel t ha s retracted , tu g o n
it . I f th e bel t i s locked , yo u wil l no t
b e abl e t o pul l i t out . I f yo u ca n pul l
th e bel t out , i t i s no t locke d an d
yo u wil l nee d t o repea t thes e steps .4
. Afte r confirmin g tha t th e bel t i s
locked , gra b th e shoulde r par t o f
th e bel t nea r th e buckl e an d pul l
u p t o remov e an y slac k fro m th e
la p par t o f th e belt . Remember , i f
th e la p par t o f th e bel t i s no t tight ,
th e chil d sea t wil l no t b e secure . I t
ma y hel p t o pu t weigh t o n th e
chil d seat , o r pus h o n th e bac k o f
th e seat , whil e pullin g u p o n th e
belt . 5
. Pus h an d pul l th e chil d sea t
forwar d an d fro m sid e t o sid e t o
verif y tha t i t i s secur e enoug h t o
sta y uprigh t durin g norma l drivin g
maneuvers . I f th e chil d sea t i s no t
secure , unlatc h th e belt , allo w it t o
retrac t fully , the n repea t thes e
steps .
CONTINUED
Drive r an d Passenge r Safet y
Page 40 of 322
Protectin
g Childre n
T o deactivat e th e lockin g
mechanis m in orde r t o remov e a
chil d seat , unlatc h th e buckle ,
unrout e th e sea t belt , an d le t th e bel t
full y retract .
Installing a Child Seat with the Lap
Belt
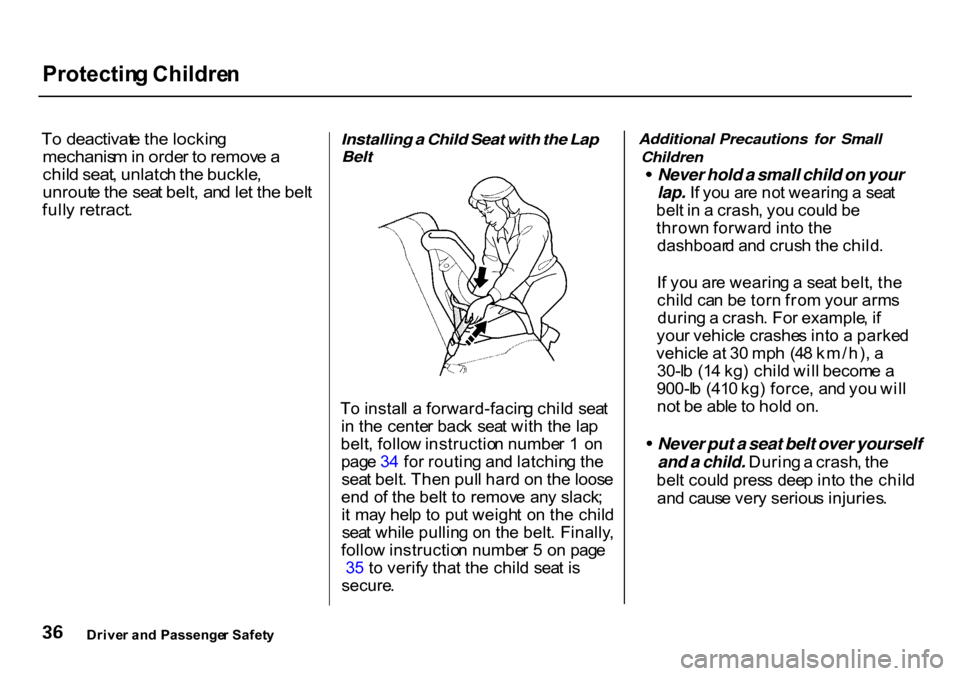
T o instal l a forward-facin g chil d sea t
i n th e cente r bac k sea t wit h th e la p
belt , follo w instructio n numbe r 1 o n
pag e 3 4 fo r routin g an d latchin g th e
sea t belt . The n pul l har d o n th e loos e
en d o f th e bel t t o remov e an y slack ;
i t ma y hel p t o pu t weigh t o n th e chil d
sea t whil e pullin g o n th e belt . Finally ,
follo w instructio n numbe r 5 o n pag e
3 5 t o verif y tha t th e chil d sea t i s
secure .
Additional Precautions for Small
Children
Never hold a small child on your
lap. I
f yo u ar e no t wearin g a sea t
bel t i n a crash , yo u coul d b e
throw n forwar d int o th e
dashboar d an d crus h th e child .
I f yo u ar e wearin g a sea t belt , th e
chil d ca n b e tor n fro m you r arm s
durin g a crash . Fo r example , i f
you r vehicl e crashe s int o a parke d
vehicl e a t 3 0 mp h (4 8 km/h) , a
30-l b (1 4 kg ) chil d wil l becom e a
900-l b (41 0 kg ) force , an d yo u wil l
no t b e abl e to hol d on .
Never put a seat belt over yourself
and a child. Durin g a crash , th e
bel t coul d pres s dee p int o th e chil d
an d caus e ver y seriou s injuries .
Drive r an d Passenge r Safet y
Page 46 of 322
Additiona
l Informatio n Abou t You r Sea t Belt s
Sea t Bel t Syste m Component s
You r sea t bel t syste m include s lap /
shoulde r belt s i n th e fron t seat s an d
th e oute r bac k seats , an d a la p bel t i n
th e cente r bac k seat .
Th e sea t bel t syste m als o
include s a ligh t o n th e
instrumen t pane l t o remin d yo u an d
you r passenger s t o faste n you r belts .
I f th e driver' s sea t bel t i s no t
fastene d befor e th e ignitio n is turne d
O N (II) , th e ligh t wil l com e o n an d a
beepe r wil l als o sound . Th e beepe r
wil l sto p afte r a fe w seconds , bu t th e
ligh t wil l sta y o n unti l th e driver' s
sea t bel t i s fastened .
Lap/Shoulde
r Bel t
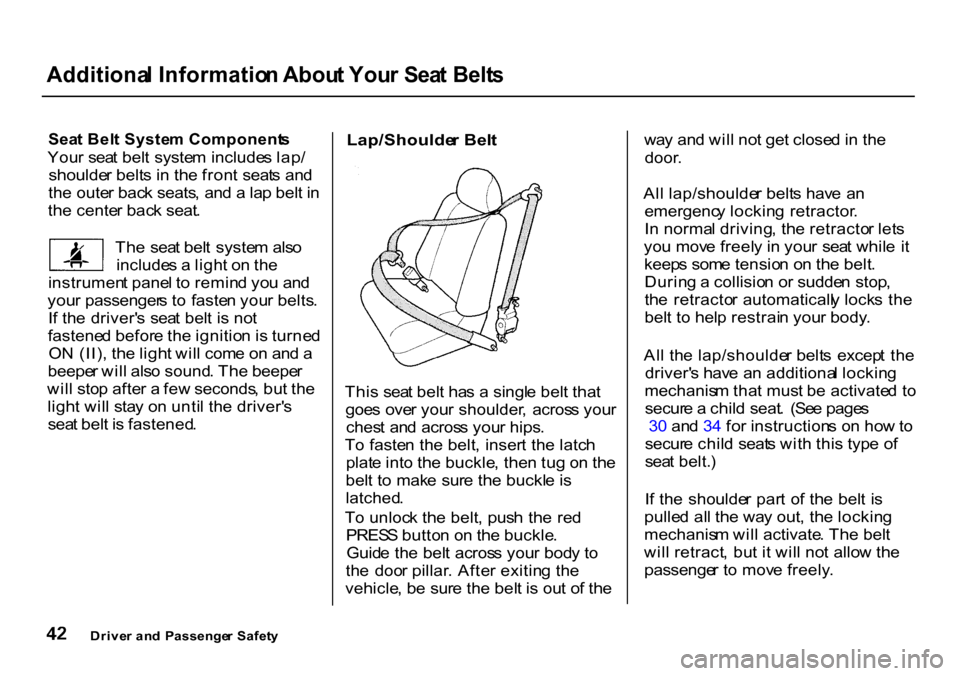
Thi s sea t bel t ha s a singl e bel t tha t
goe s ove r you r shoulder , acros s you r
ches t an d acros s you r hips .
T o faste n th e belt , inser t th e latc h
plat e int o th e buckle , the n tu g o n th e
bel t t o mak e sur e th e buckl e is
latched .
T o unloc k th e belt , pus h th e re d
PRES S butto n o n th e buckle .
Guid e th e bel t acros s you r bod y t o
th e doo r pillar . Afte r exitin g th e
vehicle , b e sur e th e bel t i s ou t o f th e wa
y an d wil l no t ge t close d in th e
door .
Al l lap/shoulde r belt s hav e a n
emergenc y lockin g retractor .
I n norma l driving , th e retracto r let s
yo u mov e freel y i n you r sea t whil e i t
keep s som e tensio n o n th e belt .
Durin g a collisio n o r sudde n stop ,
th e retracto r automaticall y lock s th e
bel t t o hel p restrai n you r body .
Al l th e lap/shoulde r belt s excep t th e
driver' s hav e a n additiona l lockin g
mechanis m tha t mus t b e activate d t o
secur e a chil d seat . (Se e page s
3 0 an d 3 4 fo r instruction s o n ho w to
secur e chil d seat s wit h thi s typ e o f
sea t belt. )
I f th e shoulde r par t o f th e bel t i s
pulle d al l th e wa y out , th e lockin g
mechanis m wil l activate . Th e bel t
wil l retract , bu t i t wil l no t allo w th e
passenge r t o mov e freely .
Drive r an d Passenge r Safet y
Page 47 of 322
Additiona
l Informatio n Abou t You r Sea t Belt s
T o deactivat e th e lockin g
mechanism , unlatc h th e buckl e an d
le t th e sea t bel t full y retract . T o
refaste n th e belt , pul l i t ou t onl y a s
fa r a s needed .
Se e pag e 1 5 fo r instruction s o n ho w
t o wea r th e lap/shoulde r bel l
properly .
La p Bel t
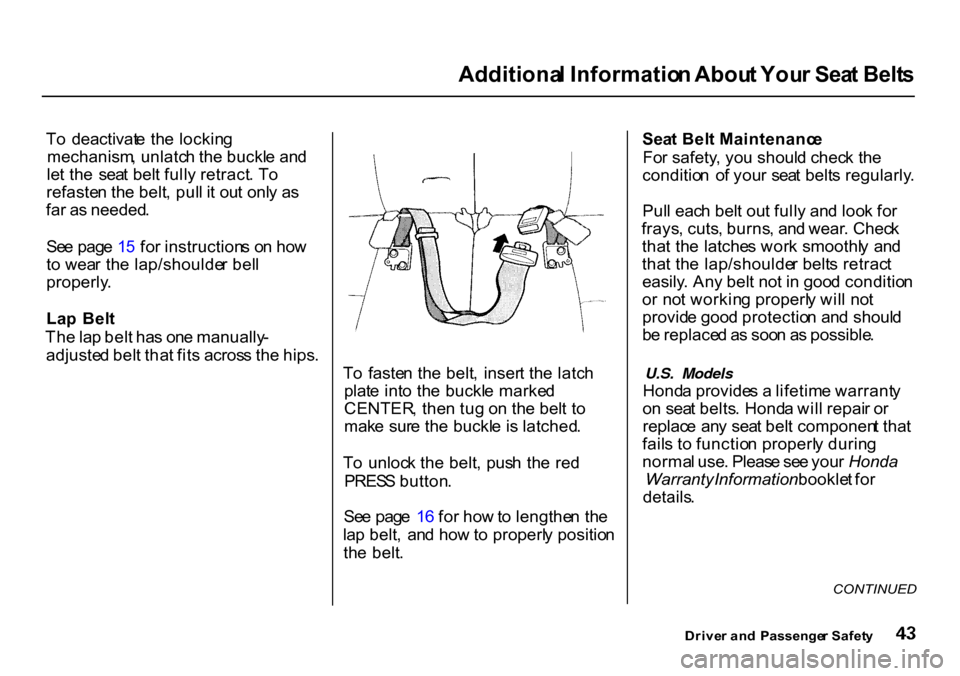
Th e la p bel t ha s on e manually -
adjuste d bel t tha t fit s acros s th e hips .
To faste n th e belt , inser t th e latc h
plat e int o th e buckl e marke d
CENTER , the n tu g o n th e bel t t o
mak e sur e th e buckl e is latched .
T o unloc k th e belt , pus h th e re d
PRES S button .
Se e pag e 1 6 fo r ho w to lengthe n th e
la p belt , an d ho w to properl y positio n
th e belt . Sea
t Bel t Maintenanc e
Fo r safety , yo u shoul d chec k th e
conditio n o f you r sea t belt s regularly .
Pul l eac h bel t ou t full y an d loo k fo r
frays , cuts , burns , an d wear . Chec k
tha t th e latche s wor k smoothl y an d
tha t th e lap/shoulde r belt s retrac t
easily . An y bel t no t i n goo d conditio n
o r no t workin g properl y wil l no t
provid e goo d protectio n an d shoul d
b e replace d a s soo n a s possible .
U.S. Models
Hond a provide s a lifetim e warrant y
o n sea t belts . Hond a wil l repai r o r
replac e an y sea t bel t componen t tha t
fail s t o functio n properl y durin g
norma l use . Pleas e se e you r Honda
Warranty Information booklet fo r
details .
CONTINUED
Drive r an d Passenge r Safet y
Page 50 of 322
Additiona
l Informatio n Abou t You r SR S
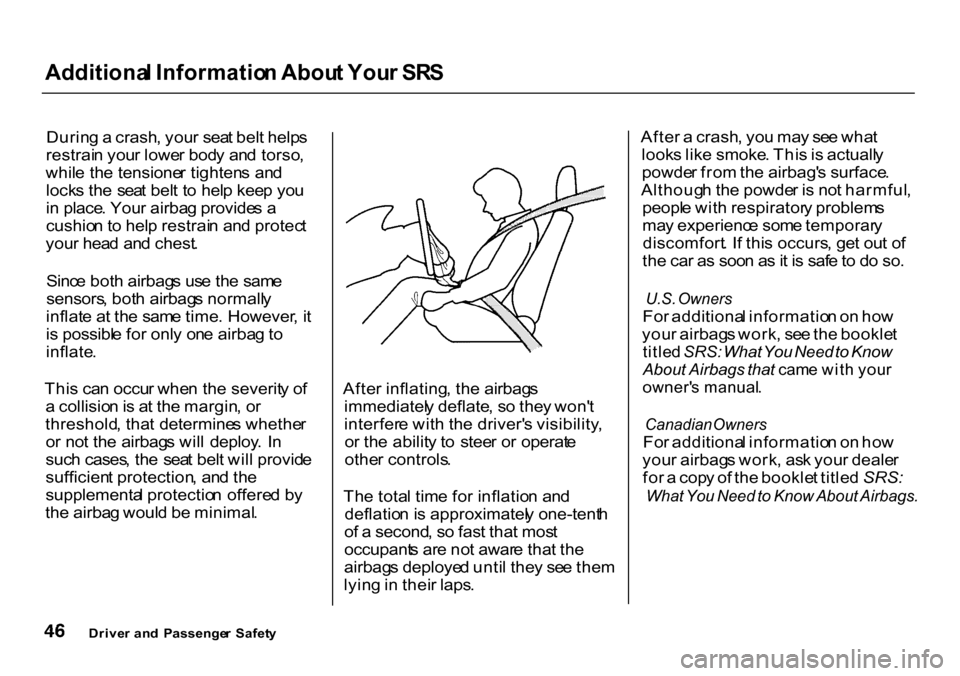
Durin g a crash , you r sea t bel t help s
restrai n you r lowe r bod y an d torso ,
whil e th e tensione r tighten s an d
lock s th e sea t bel t t o hel p kee p yo u
i n place . You r airba g provide s a
cushio n to hel p restrai n an d protec t
you r hea d an d chest .
Sinc e bot h airbag s us e th e sam e
sensors , bot h airbag s normall y
inflat e a t th e sam e time . However , i t
i s possibl e fo r onl y on e airba g to
inflate .
Thi s ca n occu r whe n th e severit y o f
a collisio n is a t th e margin , o r
threshold , tha t determine s whethe r
o r no t th e airbag s wil l deploy . I n
suc h cases , th e sea t bel t wil l provid e
sufficien t protection , an d th e
supplementa l protectio n offere d b y
th e airba g woul d be minimal . Afte
r inflating , th e airbag s
immediatel y deflate , s o the y won' t
interfer e wit h th e driver' s visibility ,
o r th e abilit y t o stee r o r operat e
othe r controls .
Th e tota l tim e fo r inflatio n an d
deflatio n is approximatel y one-tent h
o f a second , s o fas t tha t mos t
occupant s ar e no t awar e tha t th e
airbag s deploye d unti l the y se e the m
lyin g in thei r laps . Afte
r a crash , yo u ma y se e wha t
look s lik e smoke . Thi s is actuall y
powde r fro m th e airbag' s surface .
Althoug h th e powde r i s no t harmful ,
peopl e wit h respirator y problem s
ma y experienc e som e temporar y
discomfort . I f thi s occurs , ge t ou t o f
th e ca r a s soo n a s it i s saf e to d o so .
U.S. Owners
Fo r additiona l informatio n o n ho w
you r airbag s work , se e th e bookle t
title d SRS: What You Need to Know
About Airbags that came wit h you r
owner' s manual .
Canadian Owners
Fo r additiona l informatio n o n ho w
you r airbag s work , as k you r deale r
fo r a cop y o f th e bookle t title d SRS:
What You Need to Know About Airbags.
Drive r an d Passenge r Safet y
Page 55 of 322
Instrument
s an d Control s
Thi s sectio n give s informatio n abou t
th e control s an d display s tha t
contribut e to th e dail y operatio n o f
you r Honda . Al l th e essentia l
control s ar e withi n eas y reach .
Contro l Locations........................... . 5 2
Indicato r Lights............................... . 5 3
Gauges............................................. . 5 6
Speedometer............................... . 5 6
Tachometer................................. . 5 6
Odometer..................................... . 5 6
Tri p Meter................................... . 5 6
Fue l Gauge.................................. . 5 7
Temperatur e Gauge................... . 5 7
Maintenanc e Require d
Indicator................................... . 5 8
Control s Nea r th e Steerin g
Wheel....................................... . 5 9
Headlights................................... . 6 0 Daytim
e Runnin g Lights............ . 6 0
Instrumen t Pane l Brightness.... . 6 1
Tur n Signals................................ . 6 1
Windshiel d Wipers..................... . 6 2
Windshiel d Washers.................. . 6 2
Rea r Windo w Wipe r an d
Washer..................................... . 6 3
Hazar d Warning.......................... . 6 3
Rea r Windo w Defogger............. . 6 3
Steerin g Whee l Adjustment...... . 6 4
Steerin g Whee l Control s ............... . 6 6
Cruis e Control............................. . 6 6
Key s an d Locks............................... . 6 9
Keys.............................................. 69
Ignitio n Switch............................ . 6 9
Doo r Locks.................................. . 7 0
Powe r Doo r Locks...................... . 7 1
Remot e Transmitter................... . 7 2
Childproo f Doo r Locks.............. . 7 5
Tailgate........................................ . 7 5
Glov e Box.................................... . 7 7
Seats................................................. . 7 7
Fron t Sea t Adjustments............. . 7 7
Driver' s Sea t Heigh t
Adjustment.............................. . 7 8
Hea d Restraints.......................... . 7 9
Rea
r Seat-bac k Adjustment....... . 8 0
Rea r Sea t Armrest...................... . 8 0
Reclinin g th e Fron t an d
Rea r Seat-backs...................... . 8 1
Foldin g Rea r Seat....................... . 8 2
Powe r Windows.............................. . 8 4
Mirrors............................................. . 8 5
Adjustin g th e Powe r Mirrors.... . 8 6
Parkin g Brake................................. . 8 6
Digita l Clock.................................... . 8 7
Cente r Table.................................... . 8 7
Beverag e Holder............................. . 8 8
Built-i n Table................................... .
89
Cente r Pocket................................. .
9
1
Storag e Box..................................... . 9 1
Carg o Floo r Pockets....................... . 9 2
Accessor y Powe r Socket............... . 9 2
Tailgat e Pocket............................... . 9 3
Carg o Hooks...........,.,,..,,,.,...,,,........ . 9 3
Ashtrays........................................... . 9 4
Interio r Lights................................. . 9 4
Ceilin g Light................................ . 9 4
Spotlights..................................... 95
Carg o Are a Light........................ . 9 5
Ignitio n Switc h Light.................. . 9 5
Instrument s an d Control s
Page 59 of 322
Indicato
r Light s
U.S .
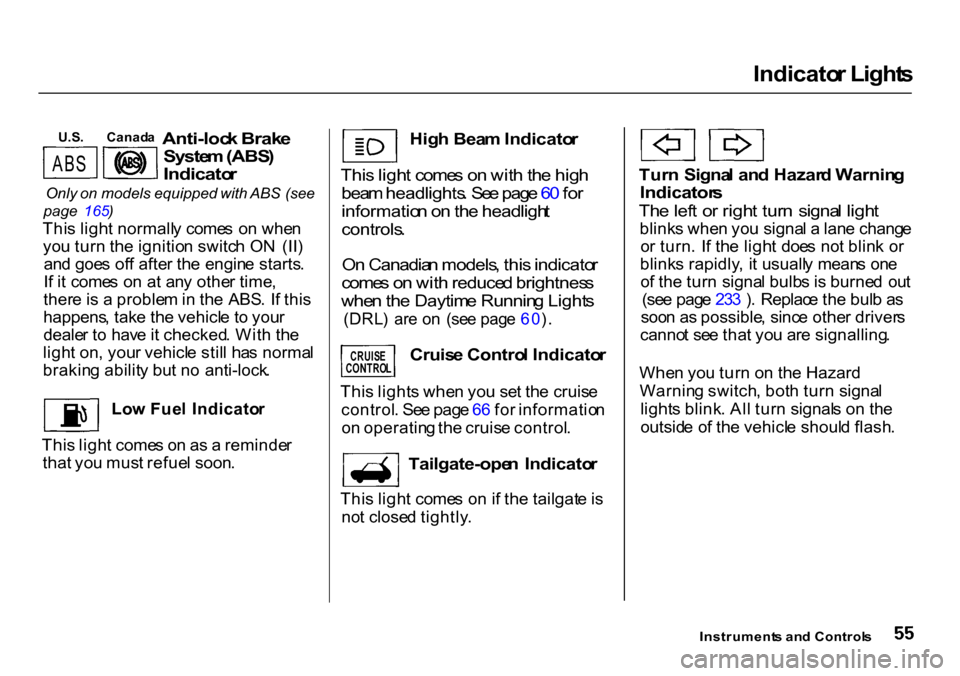
Anti-lock Brak e
Syste m (ABS )
Indicato r
Only on models equipped with ABS (see
page 165 )
Thi s ligh t normall y come s o n whe n
yo u tur n th e ignitio n switc h O N (II )
an d goe s of f afte r th e engin e starts .
I f i t come s o n a t an y othe r time ,
ther e is a proble m in th e ABS . I f thi s
happens , tak e th e vehicl e t o you r
deale r t o hav e it checked . Wit h th e
ligh t on , you r vehicl e stil l ha s norma l
brakin g abilit y bu t n o anti-lock .
Lo w Fue l Indicato r
Thi s ligh t come s o n a s a reminde r
tha t yo u mus t refue l soon .
Hig
h Bea m Indicato r
Thi s ligh t come s o n wit h th e hig h
bea m headlights . Se e pag e 6 0 fo r
informatio n o n th e headligh t
controls .
O n Canadia n models , thi s indicato r
come s o n wit h reduce d brightnes s
whe n th e Daytim e Runnin g Light s
(DRL ) ar e o n (se e pag e 60 ).
Cruis e Contro l Indicato r
Tailgate-ope n Indicato r
Thi s ligh t come s o n if th e tailgat e is
no t close d tightly .
Tur
n Signa l an d Hazar d Warnin g
Indicator s
Th e lef t o r righ t tur n signa l ligh t
blink s whe n yo u signa l a lan e chang e
o r turn . I f th e ligh t doe s no t blin k o r
blink s rapidly , i t usuall y mean s on e
o f th e tur n signa l bulb s i s burne d ou t
(se e pag e 23 3 ) . Replac e th e bul b a s
soo n a s possible , sinc e othe r driver s
canno t se e tha t yo u ar e signalling .
Whe n yo u tur n o n th e Hazard
Warnin g switch , bot h tur n signa l
light s blink . Al l tur n signal s o n th e
outsid e o f th e vehicl e shoul d flash .
Instrument s an d Control s
Canad
a
AB S
CRUISE
CONTRO L
Thi s light s whe n yo u se t th e cruis e
control . Se e pag e 6 6 fo r informatio n
o n operatin g th e cruis e control .
Page 69 of 322
Control
s Nea r th e Steerin g Whee l
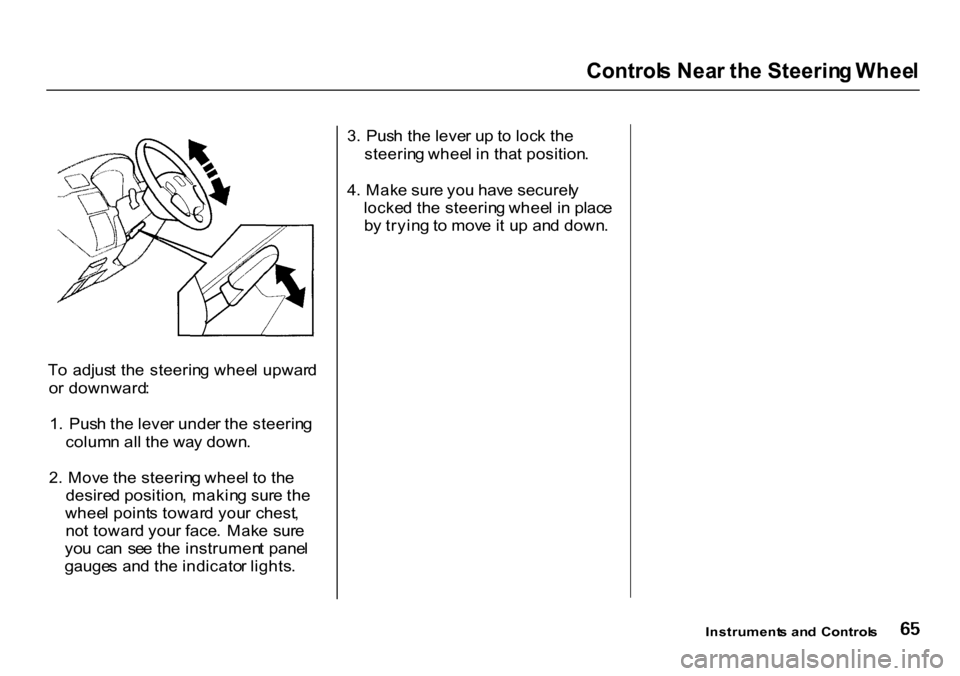
T o adjus t th e steerin g whee l upwar d
o r downward :
1 . Pus h th e leve r unde r th e steerin g
colum n al l th e wa y down .
2 . Mov e th e steerin g whee l t o th e
desire d position , makin g sur e th e
whee l point s towar d you r chest ,
no t towar d you r face . Mak e sur e
yo u ca n se e th e instrumen t pane l
gauge s an d th e indicato r lights . 3
. Pus h th e leve r u p to loc k th e
steerin g whee l i n tha t position .
4 . Mak e sur e yo u hav e securel y
locke d th e steerin g whee l i n plac e
b y tryin g to mov e it u p an d down .
Instruments an d Control s