wire HONDA CR-V 2000 RD1-RD3 / 1.G Workshop Manual
[x] Cancel search | Manufacturer: HONDA, Model Year: 2000, Model line: CR-V, Model: HONDA CR-V 2000 RD1-RD3 / 1.GPages: 1395, PDF Size: 35.62 MB
Page 1338 of 1395
)
From page 24-39(D)
DASHBOARD wlRE hARNESS
5P CONNECTON
DASHBOARO WIRE HARI{ESS
5P CONI{EC'OR
)From page 24-39iE)
c509
Terminal side of male lerminals
SRS MAIN HABN€SS3P CONNECTOR
)
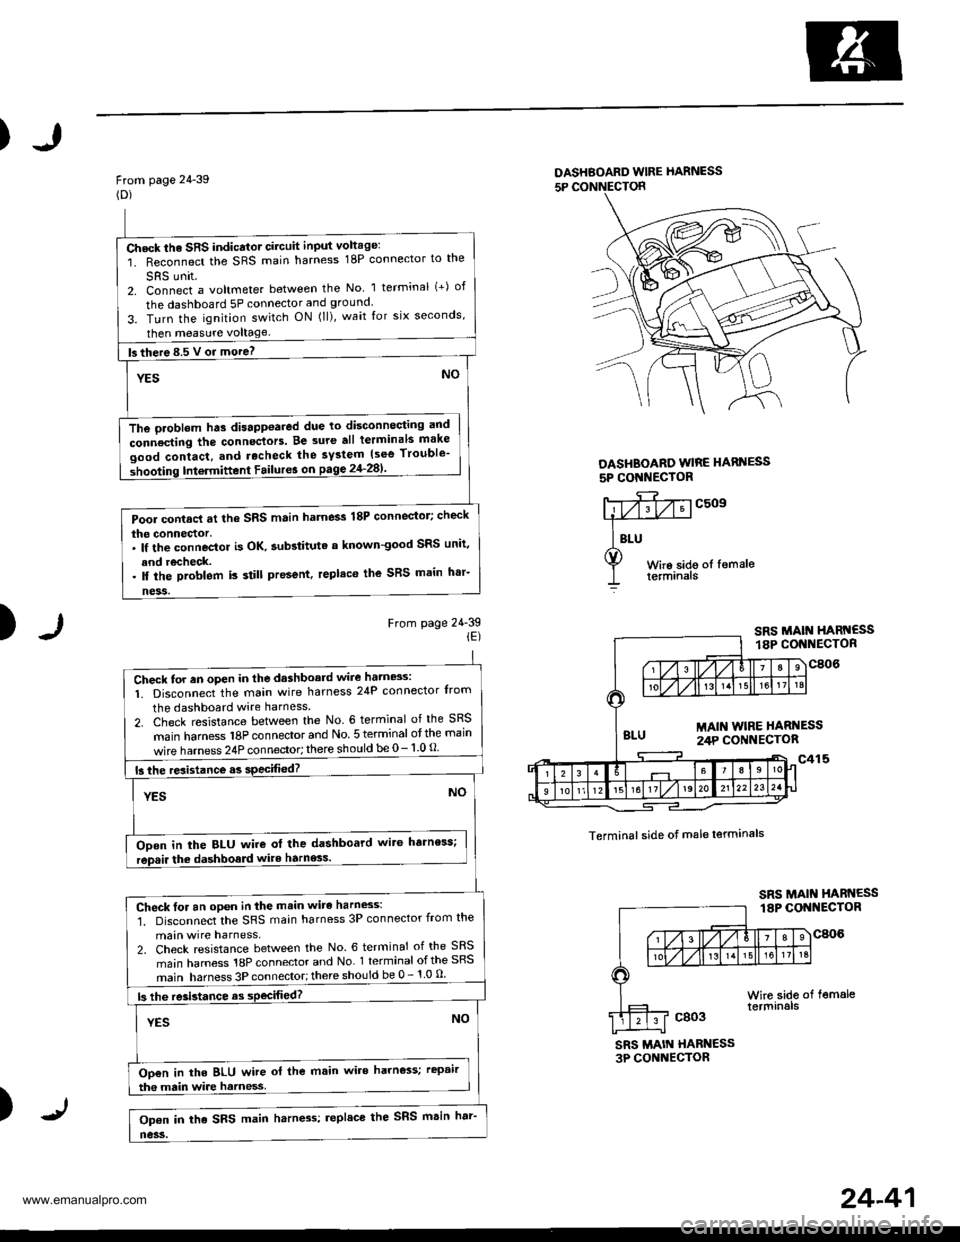
Check the SRS indicator circuit input voltage:
1. Reconnect the SRS main harness 18P connector to the
SRS unit2. Connect a voltmeter between the No 1 terminal (+) of
the dashboard 5P connector and ground.
3. Turn the ignition switch ON (ll), wait for six seconds,
then measure voltage
fs there 8.5 V or more? -
YESNO
The oroblem hts disappoared due to disconnocting and
connecting the connectors. Be 3ure all terminals make
good contact, and rocheck the system {see Trouble'
shooting Intermittent Failur6 on pagg 2'l-281'
Pool contacl at the SRS main harness 18P connector; check
the connector.. lf the connoctor is OK. aubstituta a known-good SRS unit,
and recheck.. ll the problem is still present, replaco the SRS main h'r-
ness.
Check for an oPen in the dashboard wire hatn8s:
1. Disconnect the main wire harness 24P connector Irom
the dashboard wire harness
2. Check resistance between the No. 6 terminal of the SRS
main hamess 18P connector and No 5 terminal otthe main
wire harness 24P connector; there should be 0- 1 0 O
15 the resistance.s specified?
YESNO
ODen in the BLU wire ot the dashboard wit6 harness;
rep.ir the dashboald wite harness.
Check for an open in the main wirc harness:'1. Disconnect the SRS main harness 3P connector from the
main wire harness,2. Check resistance between the No. 6 terminal of the SRS
main harness 18P connector and No 1 terminal ofthe SRS
main harness 3P connector;there should be 0 - 1 0 u
|3 lhe re3istance as sPecifiod?
YESNO
Oo€n in the BLU wire ol the main wire harness; rcpair
tha main wire harness
Op€n in the SRS main harn4s; replace the SRS msin har'
no3s.
24-41
www.emanualpro.com
Page 1340 of 1395
)
Ftom page 24-42(A)
SRS MAIN HARNESS 18P CONNECTOR
)
1B)fo page 24-44
(c)
To page 24-45
Wire side of lemale lerminals
DASHBOAED WIRE HARNESS5P CONNECTOR
DASHEOARD WIRE HARNESS5P CONNECTOR
c509
)(cont'd)
SRS UNIT
SRS MAIN HARNESS
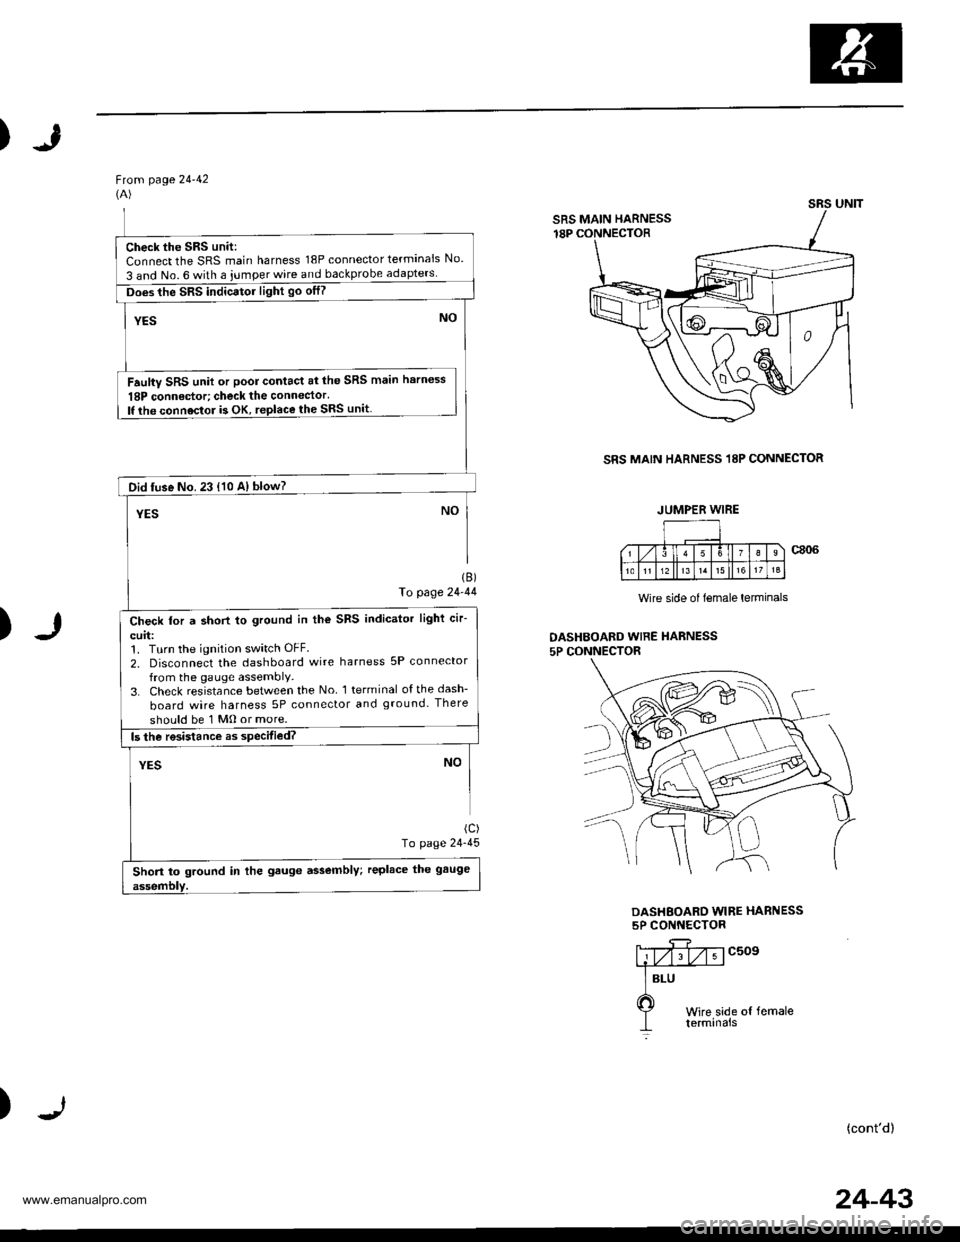
Check the SRS unit:Connect the SRS main harness 18P connector terminals No.
3 and No. 6 with a iumper wire and backprobe
Does the SRS indicator light go otf?
Faulty SRS unit or poor contact at the SRS main harness
18P connedor; check the connector.lf the connoctor is OK, replace the SRS unit
Did tuse No. 23 {10 A} blow?
Check for a short to ground in the SRS indicator light cir-
curl:1. Turn the ignition switch OFF.
2, Disconnect the dashboard wire harness 5P connector
from the gauge assembly,3. Check resistance between the No l terminal ofthedash-
board wire harness 5P connector and ground. There
should be 1 Mo or more.
Short to ground in the gauge assembly; replace the gauge
JUMPER WIRE
24-43
www.emanualpro.com
Page 1341 of 1395
Troubleshooting
The SRS Indicator Light Doesn't Go Off -'99 - 00 models (cont,d)
From page 24,43DASHBOARD WIRE HARNESS5P CONNECTOR(B)
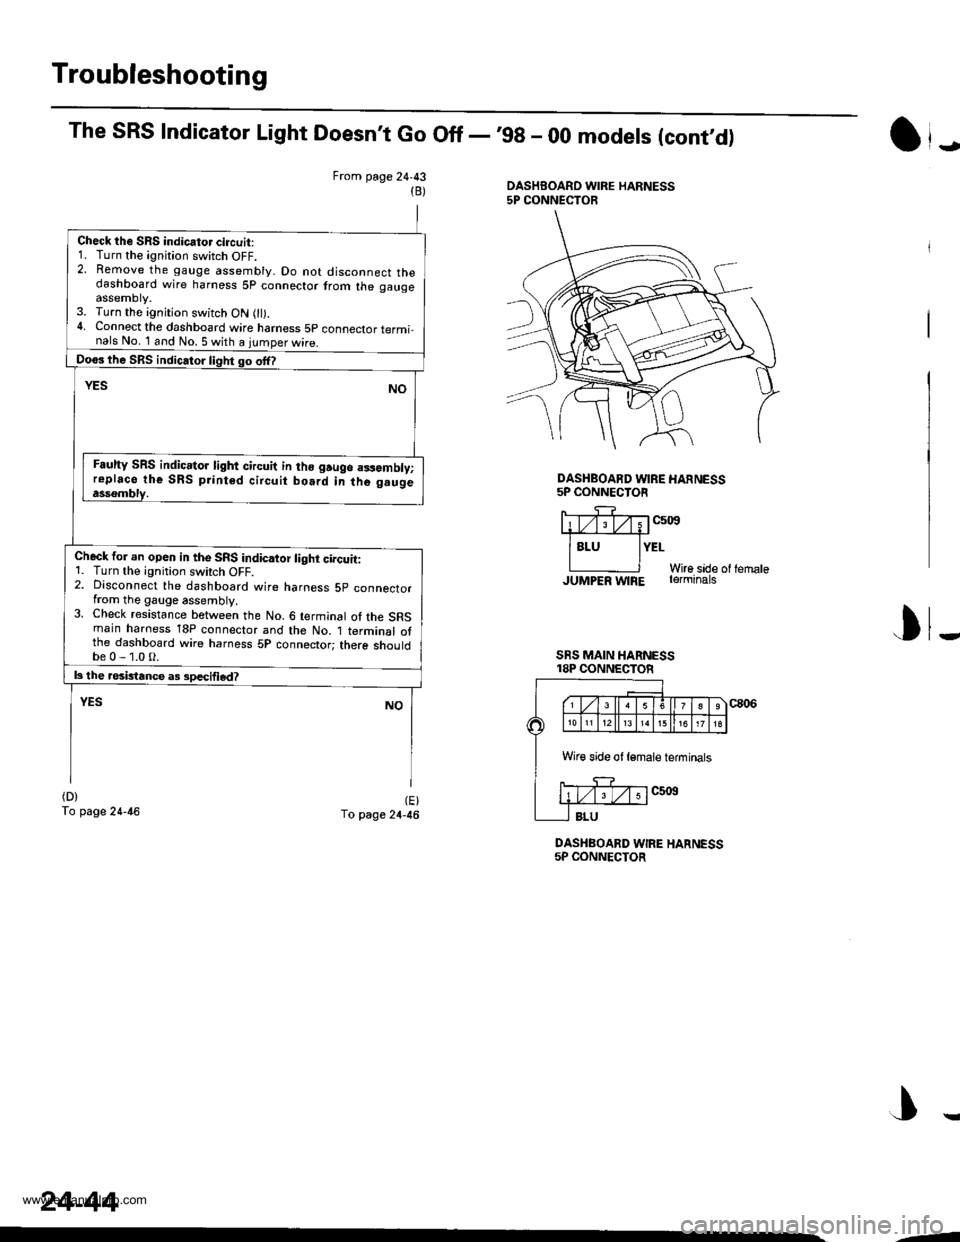
Check the SRS indicator circuit:1. Turn the ignition switch OFF.2. Remove the gauge assembly. Do not disconnect thedashboard wire harness 5p connector trom the gaugeassemDty.3. Turn the ignition switch ON 0l).4. Connect the dashboard wire hamess 5p connector terminals No. 1 and No. 5 with a iumoer wire.
Doos lhe SRS indic.tor light go offl
YESNO
Fauhy SRS indic.tor light circuit in lho gruge a3samblv;replaco the SRS print6d circuit bo.rd in the g.ugeassombly.
Check for an opeo in the SRS indicaior light circuit:1. Turn the ignition swirch OFF.2. Disconnect the dashboard wire harness 5p connectorfrom the gauge assembly.3. Check resistance between the No. 6 terminal of the SRSmain haroess 18P connector and the No. 1 terminal otthe dashboard wire harness 5P connector; there shouldbe0-1.0O.
|3 the rosbtance a3 sDecified?
YESNO
(D)
To page 24-46(E)To page 24-46
DASHBOARD WIRE HARNESS5P CONNECTOR
J
DASHBOARD WIRE HANNESS5P CONNECTOR
liTv;Tv;1c5i0s#
lsru lYErWire sade ol lernaleJUMPER w|RE rerminats
I
SRS MAIN HARNESS18P CONNECTOR
J
Wir€ side ot lemale ieminals
24-44
,-
www.emanualpro.com
Page 1342 of 1395
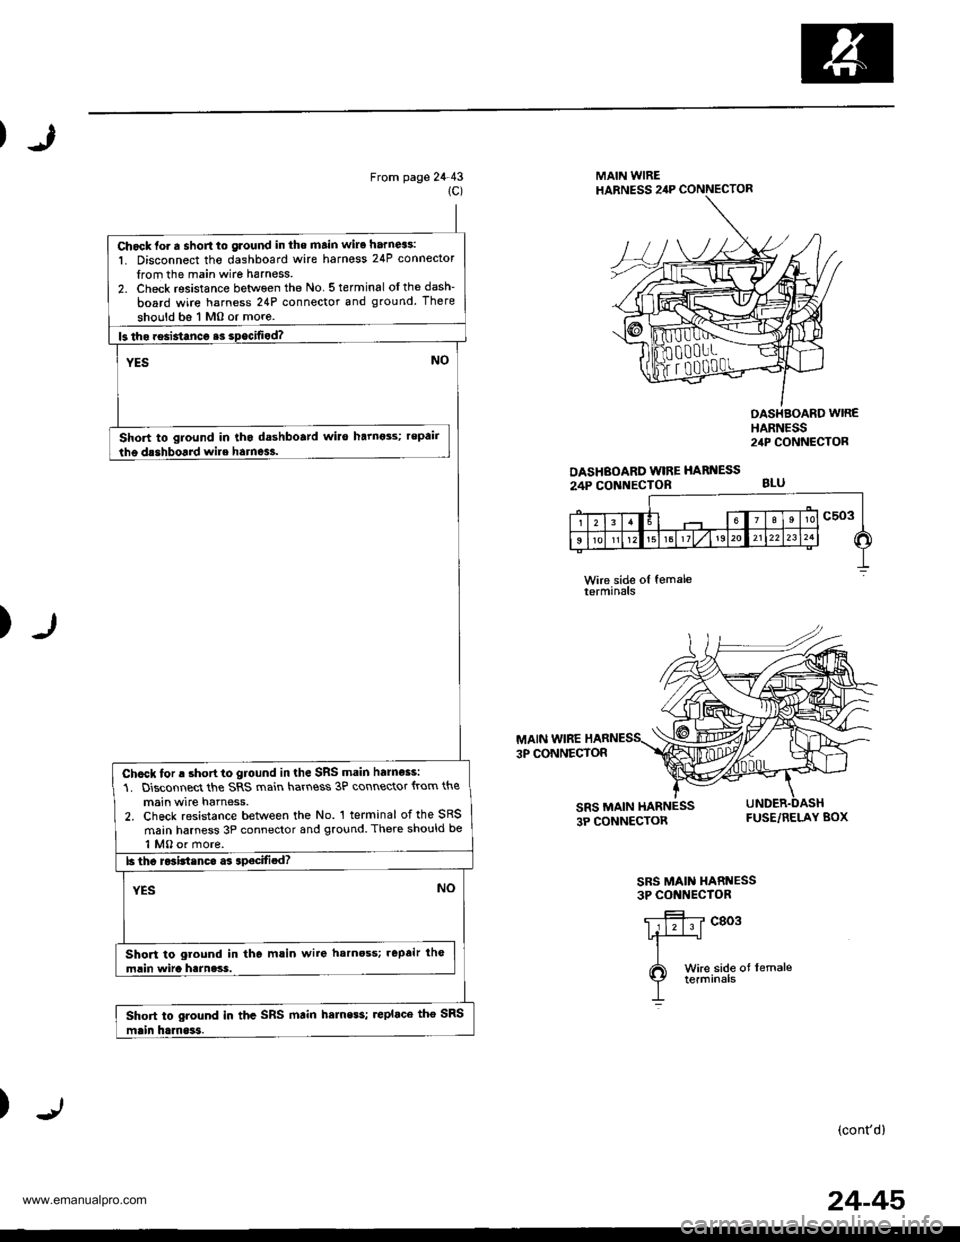
Chock fo. a short to glound in tho main wire harn63:
1. Disconnect tho dashboard wire harnoss 24P connector
from the main wire harness.2. Check resistance between the No 5terminal oIthedash-
board wire harness 24P connector and ground. There
should bs 1 Mo or more.
Short to ground in tho dashboatd wilo harnots; repair
Chcck for a short to ground in the SRS main harnoss:
1. Disconnect the SRS main hart\ess 3P connector {rom the
main wire harness,2. Check resistance between the No. 1 terminal of the SRS
main harness 3P connector and ground. There should be
1 MO or more.
Short to ground in the mlin wire harnoss; .epair lh€
mlin wira harness.
Short to ground in thc SRS mtin hemess; replace tho SRS
J
From page 24-431C)
MAIN WIREHABNESS 2,lP CONNECTOR
OASHBOARD WIRE HARI{ESS
24P CONNECTOR
OASHBOARD WIREHARNESS2,rP CONNECTOR
BLU
)
MAIN WIRE3P CONNECTOR
cToR FUSE/RELAY BOX
SRS MAIN HARNESS3P CONIIECTOR
c803
)(cont'd)
24-45
www.emanualpro.com
Page 1343 of 1395
Troubleshooting
The SRS Indicator Light Doesn't Go Off -,99 - 00 models (cont,d)
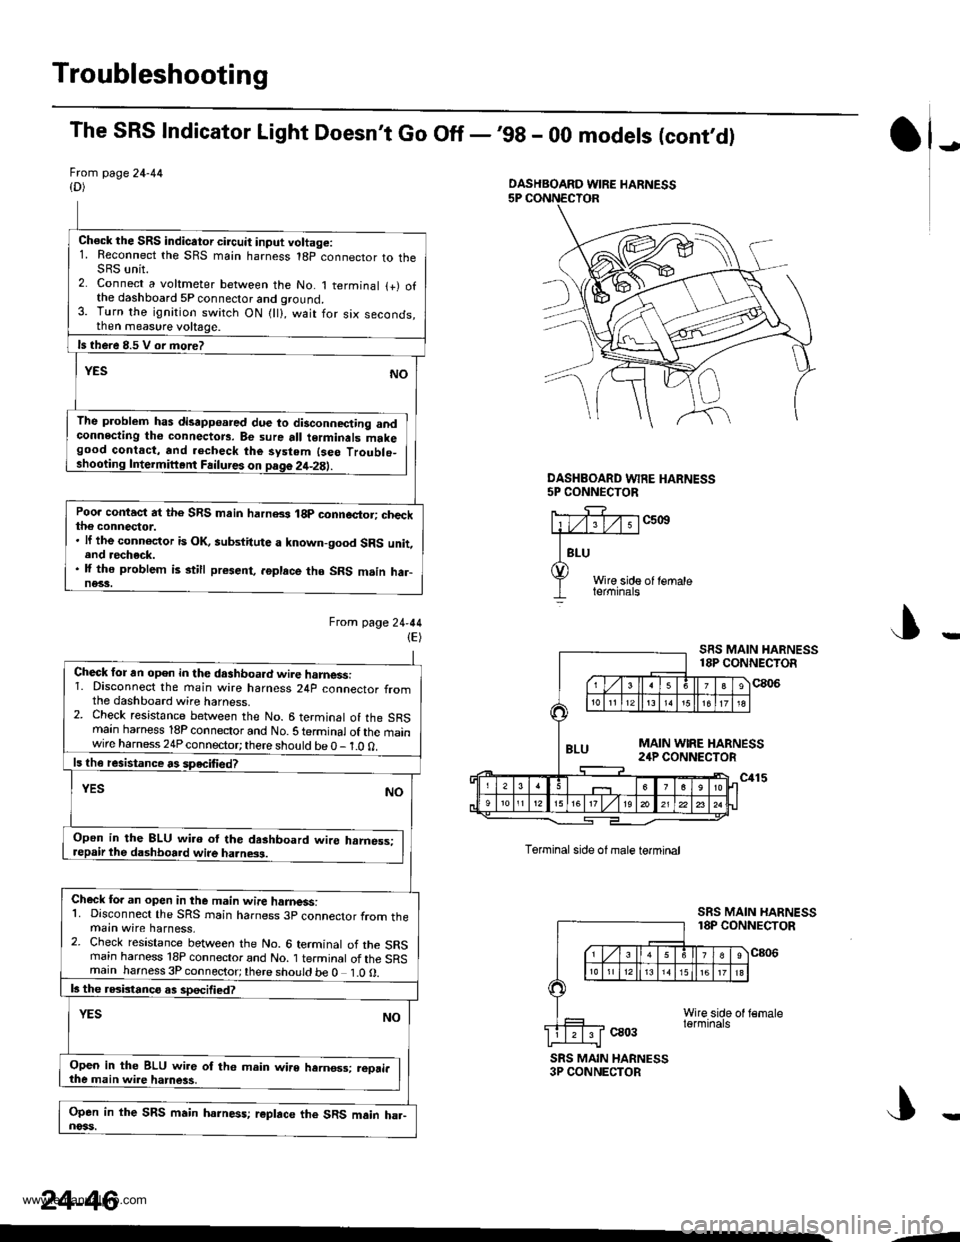
Frcm page 24-44{D)
Ch€ck the SRS indicator circuit input voltage:1. Reconnect the SRS main harness 18p connector to theSRS unit.2. Connect a voltmeter between the No. 1 terminal {+) ofthe dashboard 5P connector and ground.3. Turn the ignition switch ON {ll}, wait for six seconds,then measure voltage.
ls there 8.5 V or more?
YESNO
The problem has disapp€ared due to disconnecting andconnecting tho connectors. Be sure all terminals makegood contact, and .echeck the system {seo Troublo_shooting Intermiftent Failures on page 2it-2E).
Poo. contact at the SRS main harn8s 18p connector; checkthe connector.. lf the connoctor is OK, aubstitute a known-good SRS unit,end recheck.. lf the problem is still present, .6place tho SRS m.in har-ne33.
Ftom lage24-44(E)
J)
DASHEOARD WFE HARNESS5P CONNECTOR
c5ott
Wire side of lemaleterminals
J
Torminal side ol male termtnal
ca03
SRS MAIN HARNESS18P CONNECTOR
c806
SRS MAIN HARNESS3P CONNECTOR
DASHBOARD WIRE HARNESS
Check for an open in the dashboa.d wire harnessi1. Disconnect the main wire harness 24p connector fromthe dashboard wire harness.2. Check resistance between the No. 6 terminal of the SRSmain harness 18P connector and No. S te.minal of the mainwire harness 24P connector; there should be 0 - 1.0 0.
ls th€ resistance rs speciliedT
YESNO
Open in the 8LU wi.o ol the dashboard wire hrmess:repair the dashboard wire ha.ness.
Check fo. an open in the m.in wire hamess:1. Disconnect the SRS rnain harness 3p connector from themain wire harness,2. Check resistance between the No. 6 terminal of the SRSrnain harness 18P connector and No. 1 terminal of the SRSmain harness 3P connector;there should be 0 1.0O.
b the rGbtanco as sDecified?
NOYES
Open in the BLU wir6 of th6 main wire hernos3; reori.the main wire hamess,
Open in the SRS main harness; r€place the SRS main ha.-noss.
24-46
--
www.emanualpro.com
Page 1350 of 1395
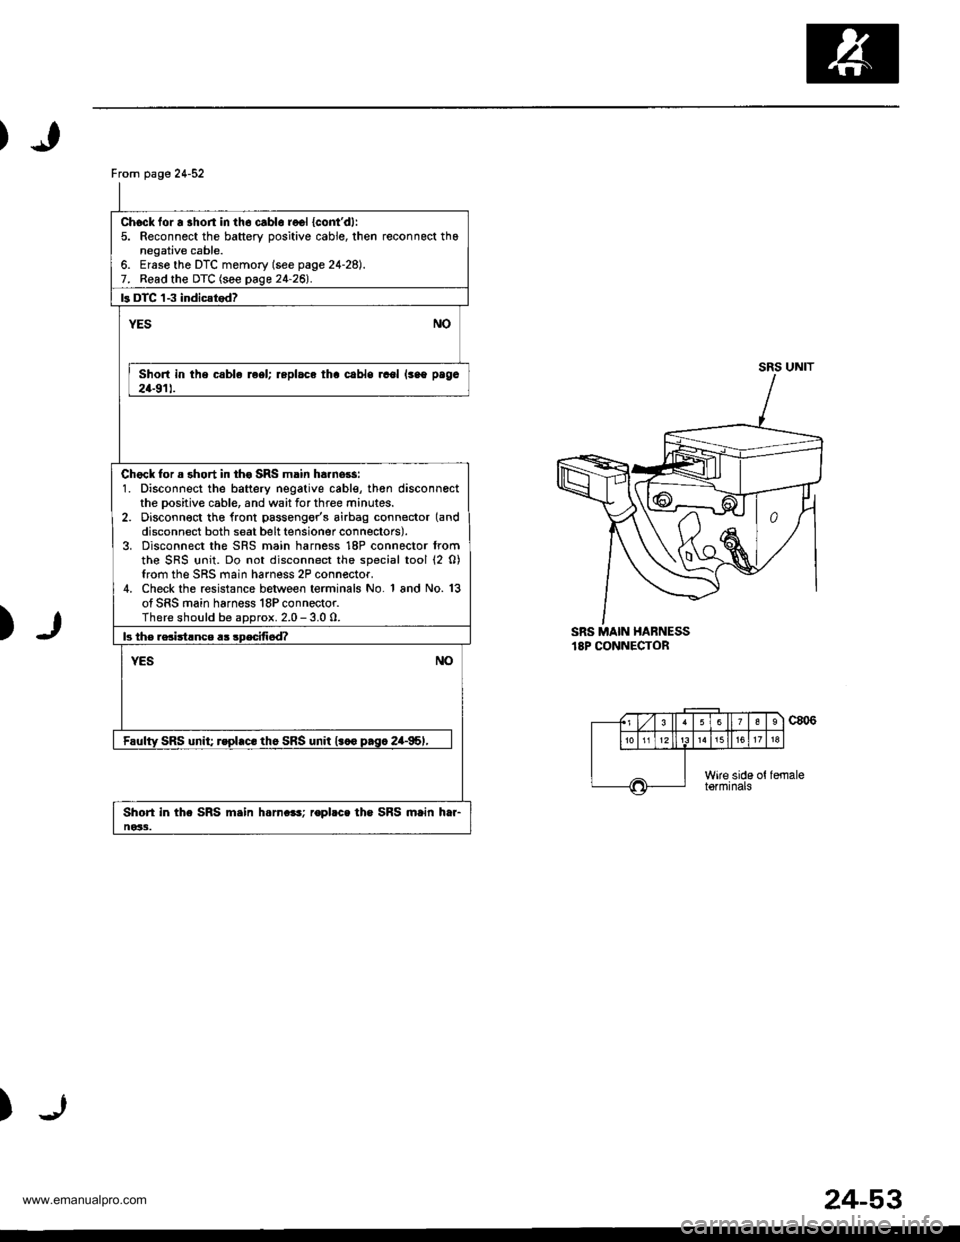
From page 24-52
Chock for a shon in th6 cablo recl {cont'dl:5. Reconnect the battery oositive cable, then reconnect thanegative cable.6. Ersse the DTC memory (see page 24-28).7. Read the DTC (see page 24-26l'.
ls DTC 'l-3 indic{tod?
NOYES
Short in the csble reel; replace tha cabls rcol lsao paga
24-911.
Chock for a short in th€ SRS main ha.nors:1. Disconnect the battery negative cable, th€n disconnectthe Dositive cable, and wait for three minutes.2. Disconn€ct tho lront passengor's airbag connector (and
disconnect both seat belt tensioner connectors).3. Disconnect the SRS main harness 18P connector fromthe SRS {rnit. Do not disconnect the special tool (2 0)from the SRS main harness 2P connector.4. Check the resistance between terminals No. 1 and No. 13of SRS main harness 18P connector.There should be aDorox. 2.0 - 3.0 0.
b th€ rsciitlnce a3 sDecifi6d?
NOYES
Faulty SRS unit; rspl.c. th6 SRS unit l.co p.sc 2a-95,,
Shori in the SRS m.in h.rn.e!; ropbce the SRS main htr-ne33.
SRS UNIT
)SRS MAIN HABNESS18P CONNECTOR
c806
)
(., Lzl 3 ll63
1518
Wire side ottormrnats
24-53
www.emanualpro.com
Page 1358 of 1395
)
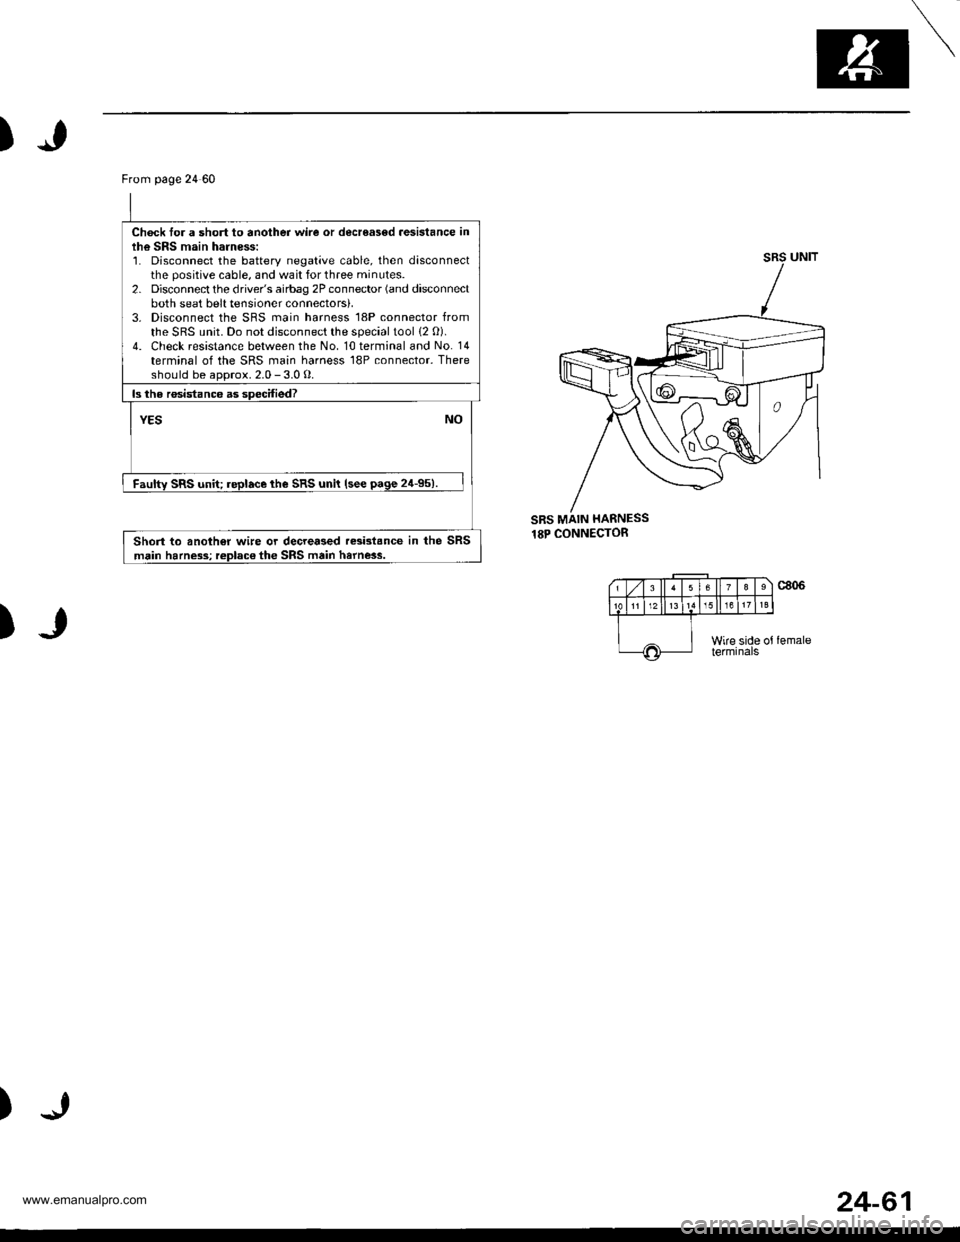
SRS MAIN HARNESS18P CONNECTOR
)
)
From page 24 60
Ch6ck tor a short to another wire or decreasod aGsistance inlh€ SRS main harness:1. Disconnect the battery negative cable, then disconnectthe positive cable, and wait for three minutes.2. Disconnect the driver's airbag 2P connector (and disconnectboth seat belt tensioner connectors).3. Disconnect the SRS main harness '18P connector fromthe SRS unit. Do not disconnect the special tool (2 O).4. Check resistance between the No. 10 terminal and No. 14terminal of the SRS main harness 18P connector. Thereshould be aoorox. 2.0 - 3.0 0.
ls the rosistanc6 as specified?
YESNO
Faultv SRS unit; replace lhe SRS unit lsee page 24-95).
Short to anothor wire or decre.sed re3i3t.nce in the SRSmain harness; replac€ the SRS main harn*s.
24-61
www.emanualpro.com
Page 1363 of 1395
Troubleshooting
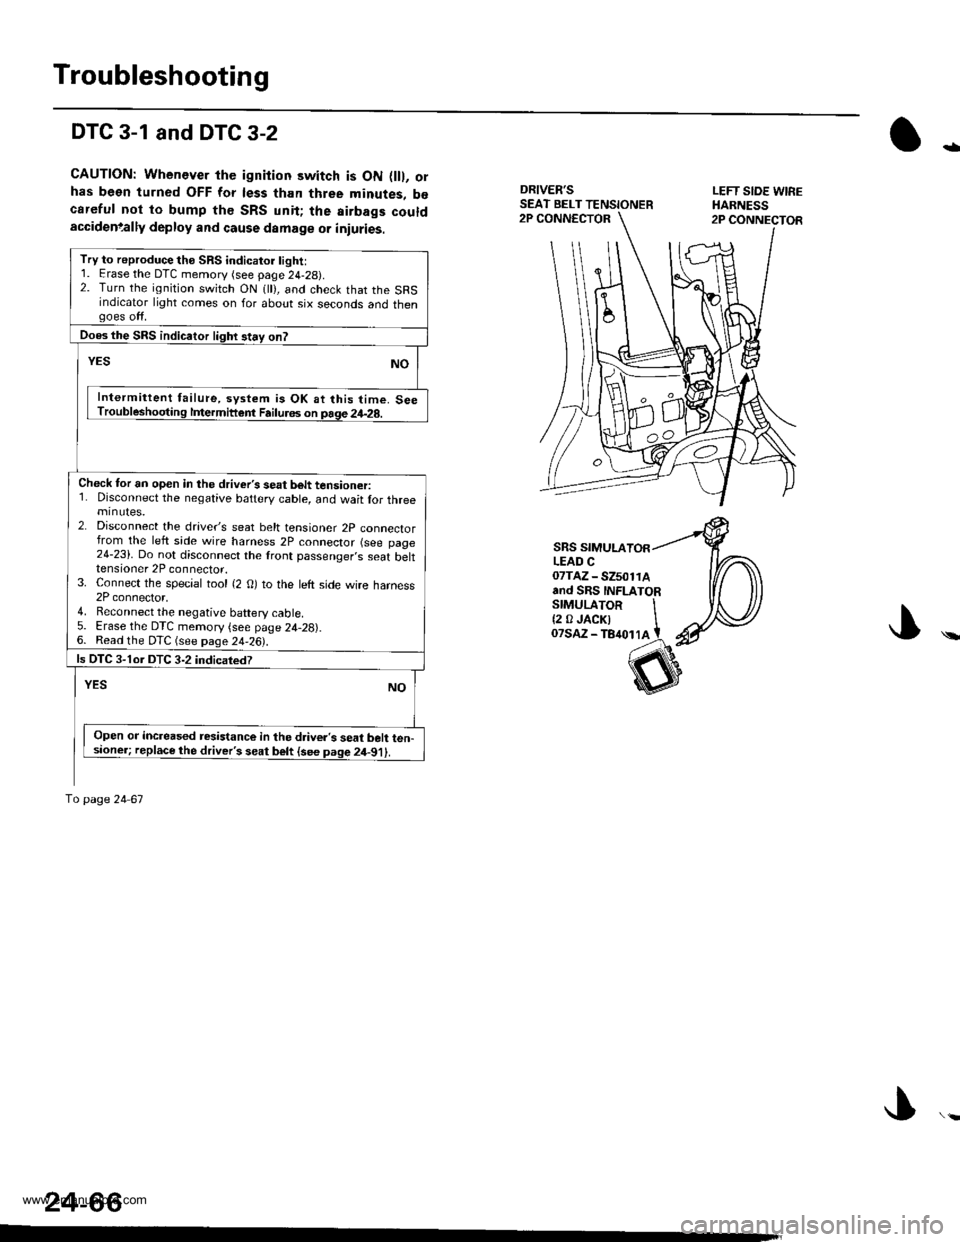
DTC 3-1 and DTC 3-2
CAUTION: Whenever the ignition switch is ON flll, orhas been turned OFF for less than three minutes, b€careful not to bump th€ SRS unit; the airbags couldaccidenlally deploy and cause damage or iniuries.
DRIVER'SSEAT BELT TENSIONERLEFT SIOE WIREHARNESS2P CONNECTOR2P CONNECTOR
-
\
SRS SIMULALEAD C07TAZ - SZ501rAand SRS INFLATORSTMULAToR It2 0JACKI IoTsaz - TB4ot lA t
24-66
Try to reproduce the SRS indicatoi light:1. Erase the DTC memory (see page 24-29).2. Turn the ignition switch ON 1 ), and check that the SRSindicator light comes on for about six seconds and thengoes off.
Does the SRS indicaior lighr stay on?
YESNO
Intermittent failure, system is OK at this time. SeeTroubleshooting lfiermittent Failu.6s on page 24-28.
Check tor an open in the driver's seat b6lt tensioner:1. Disconnect the negative battery cable, and wait lor threeminutes.2. Disconnect the drave/s seat belt tensioner 2p connectorfrom the left side wire harness 2P connector (see page24-23). Do not disconnect the lront passenger,s seat belttensioner 2P connector.3. Connect the special tool {2 O) to the left side wire harness2P connector,4. Reconnect the negative baftery cable5. Erase the DTC memory {see page 24,28).6. Read the DTC (see page 24-26).
ls OTC 3-1or DTC 3-2 indicatedT
YESNO
Open or increased resistance in the d.iver's seat belt ten-sioner; replace the driver's seat belt {see page 2il-91).
To page 24 67
www.emanualpro.com
Page 1364 of 1395
)
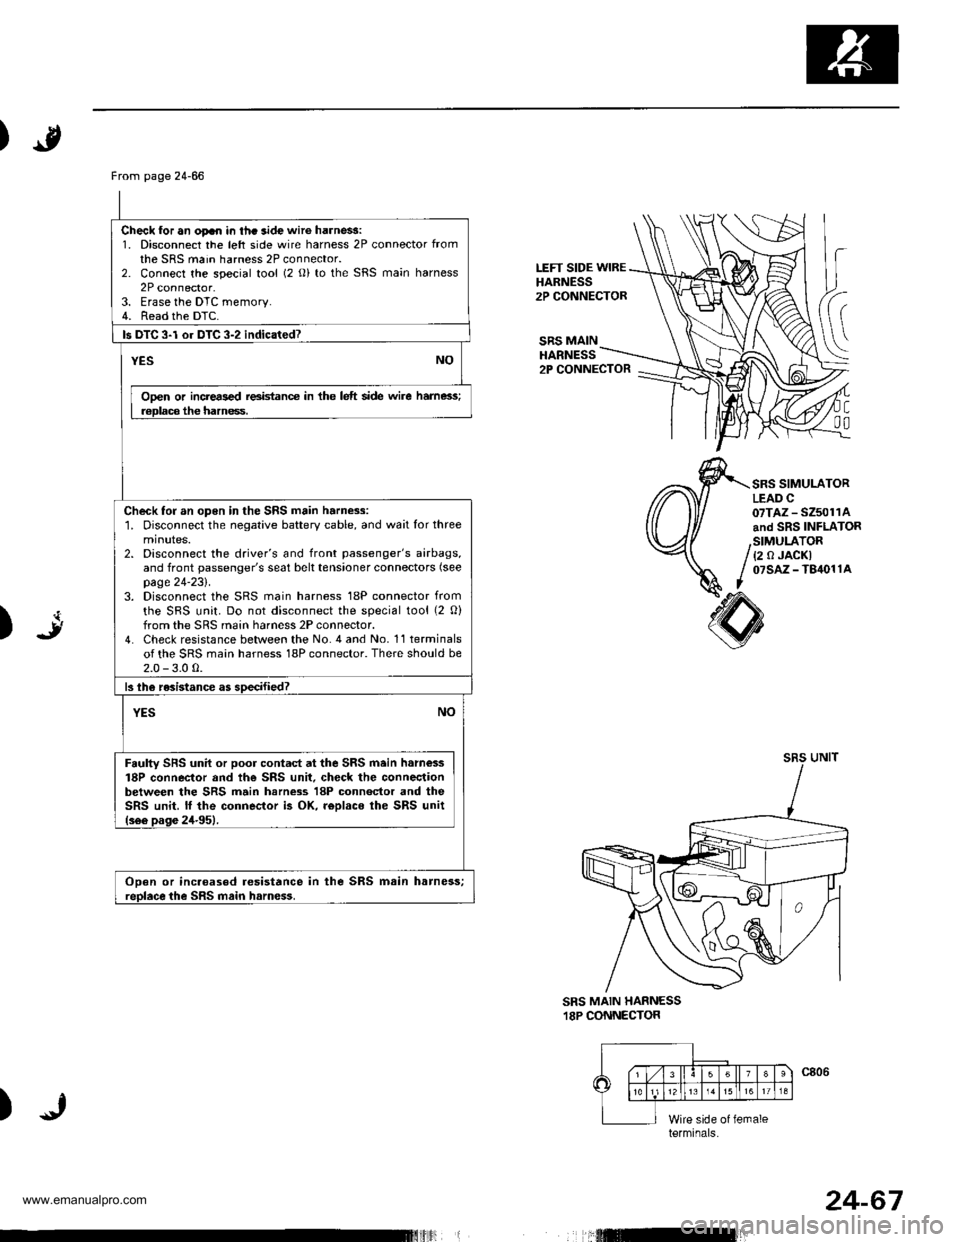
LEFT SIDE WIREHARNESS2P CONNECTOR
SRS MAINHARNESS2P CONNECTOR
C
00
SRS SIMULATORLEAD C07TAZ - SZ5011Aand SRS INFLATOR
{2 0 JACKI07sAz - T84011A
art)
sRsUNIT
SRS MAIN HARNESS.I8P CONNECTOR
)
From page 24-66
Check for an oFn in thc aide wir6 harne$:1. Disconnect the left side wire harness 2P connector fromthe SRS main harness 2P connector.2. Connect the special tool (2 o) to the SRS main harness2P connector.3. Erase the DTC memory.4. Read the DTC.
ls DTC 3-l or DTC 3-2 indicated?
YESNO
Ooen or incrers€d reeidance in the lelt side wire hame3s;r€Dlaca the hamess.
Check for an open in the SRS main harness:1. Disconnect the negative battery cable, and wait for threeminutes.2. Disconnect the driver's and front passenger's airbags,and front passenger's seat belt tensioner connectors (see
page 24-231.3. Disconnect the SRS main harness 18P connector from
the SRS unit. Do not disconnect the special tool (2 O)from the SRS main harness 2P connector.4. Check resistance between the No. 4 and No. 11 terminalsof the SRS main harness 18P connector. There should be2.0 - 3.0 0.
13lhe resistance as soecified?
NOYES
Faulty SFS unil or poor contad at the SRS main h.m€ss18P connector and th€ SRS unit. check the connectionbetween the SRS main harn$s 18P connector and theSRS unit. lf the connector i3 OK. r€Dlaco ihe SRS unit(s66 pas6 24-951.
ODen or incaoased resistance in the SRS msin harness;reolace the SRS main harn€ss.
terminals
24-67
www.emanualpro.com
Page 1365 of 1395
Troubleshooting
DTC 3-3
CAUTION; Whenever the ignition switch is ON llll, or
has b€on turned OFF for l6ss than three minutes, be
carelul not to bump the SRS unit; the airbags could
accidontally deploy and cause damage or iniuries.
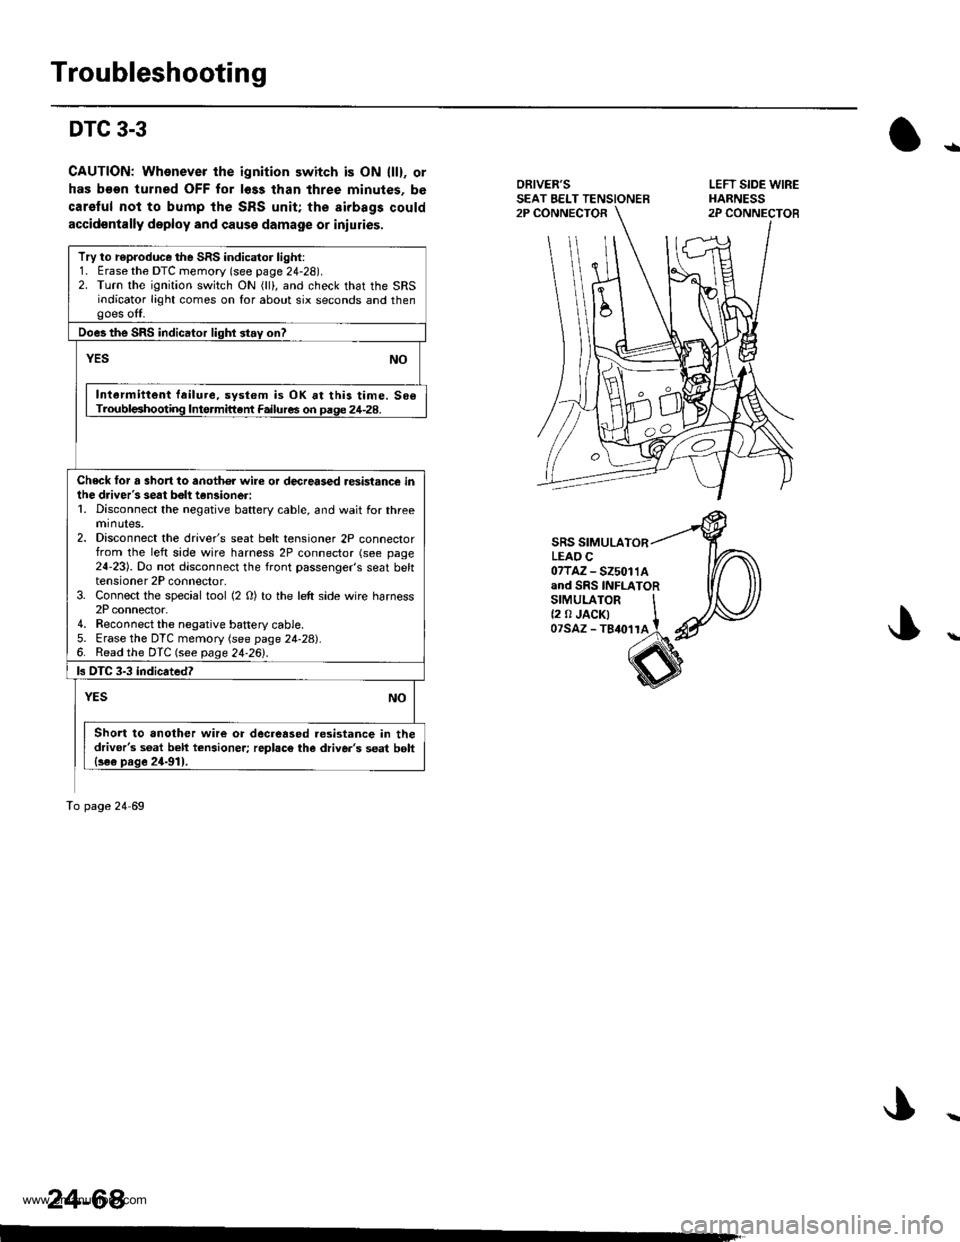
ORIVER'SSEAT EELT TENSIONER2P CONNECTOR
SRS SIMULATORLEAO C07TAZ-525011Aand SRS INFLATORsrMULAroR It2 0 JACK| tozsAz - ls{orra !
s
Try to r€produce the SRS indicator light:1. Erase the DTC memory (see page 24-28).2. Turn the ignition switch ON (lll, and check that the SRSindicator light comes on for about six seconds and thengoes off.
Does the SRS indicator lighl stay on?
YESNO
Intarmittent failure, system is OK at this time. 506Troubl€shooting Intormittant Failures on paqe 24-28.
Check tor a 3hort to anoth€r wire or decreased resistance inihe driver's seat bolt tan3ioneri1. Disconnect the negative battery cable, and wait for threeminutes,2. Disconnect the driver's seat belt tensioner 2P connectorfrom the left side wire harness 2P connector (see page24-23). Do not disconnect the front passenger's seat belttensioner 2P connector,3. Connect the special tool (2 O) to the left side wire harness2P connector.4. Reconnect the negative battery cable5. Erase the DTC memory (see page 24-28).6. Read the DTC (see page 24.26l'.
ls DTC 3-3 indicated?
NOYES
Short to another wire or decreased.esistance in thedriver's s6at beh tcnsioner; replac€ the diive.'s seat bolt{se€ prge 24-911.
To page 24 69
24-64
LEFT SIDE WIREHARNESS2P CONNECTOB
ra
www.emanualpro.com