ECO mode HONDA CR-V 2013 RM1, RM3, RM4 / 4.G User Guide
[x] Cancel search | Manufacturer: HONDA, Model Year: 2013, Model line: CR-V, Model: HONDA CR-V 2013 RM1, RM3, RM4 / 4.GPages: 361, PDF Size: 6.58 MB
Page 75 of 361
74
uuIndicatorsu
Instrument Panel
IndicatorNameOn/BlinkingExplanation
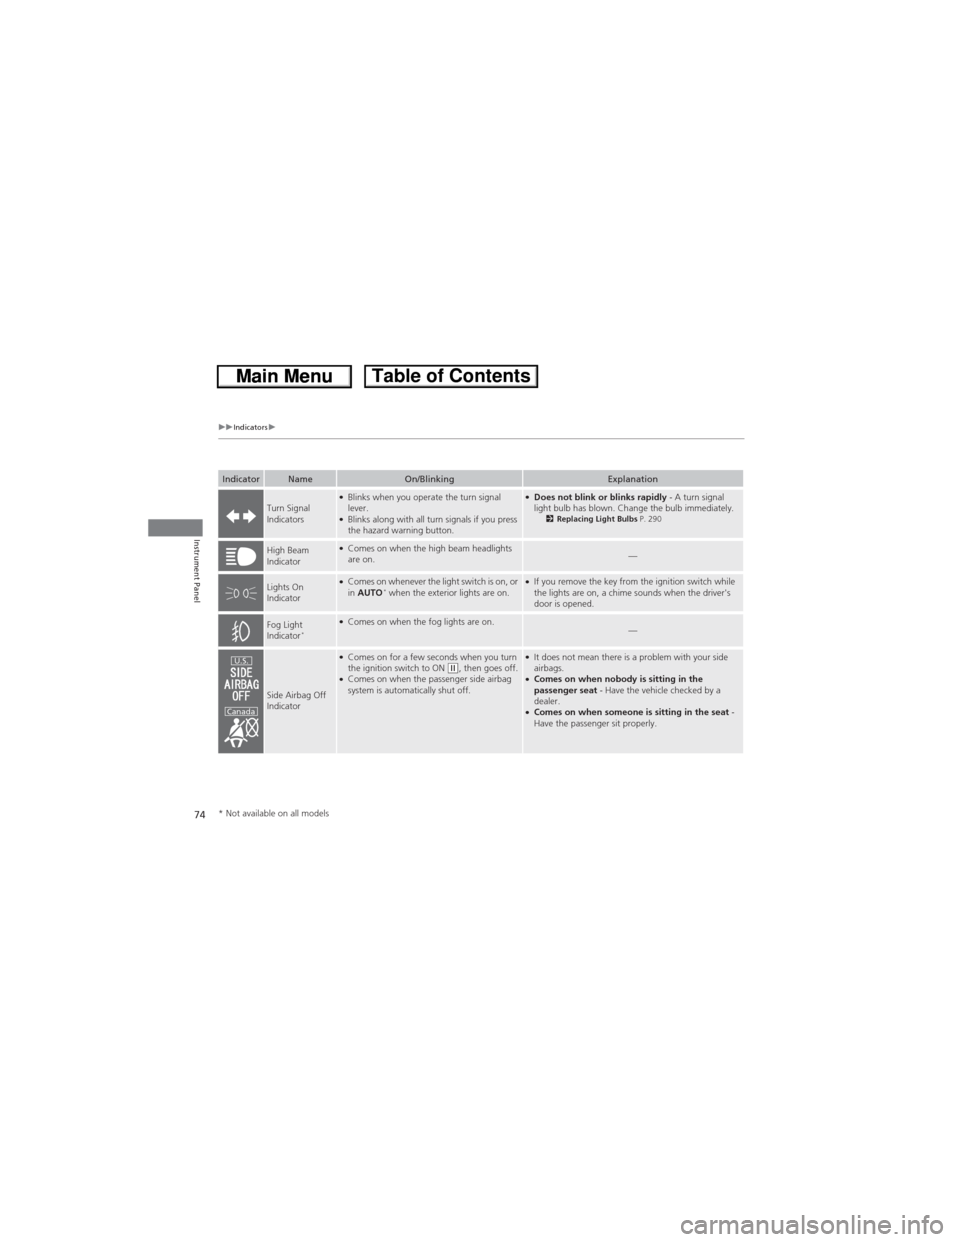
Turn Signal
Indicators●Blinks when you operate the turn signal
lever.
●Blinks along with all turn signals if you press
the hazard warning button.
●Does not blink or blinks rapidly - A turn signal
light bulb has blown. Change the bulb immediately.
2Replacing Light Bulbs P. 290
High Beam
Indicator●Comes on when the high beam headlights
are on.—
Lights On
Indicator●Comes on whenever the light switch is on, or
in AUTO* when the exterior lights are on.●If you remove the key from the ignition switch while
the lights are on, a chime sounds when the driver's
door is opened.
Fog Light
Indicator*●Comes on when the fog lights are on.—
Side Airbag Off
Indicator
●Comes on for a few seconds when you turn
the ignition switch to ON (w, then goes off.●Comes on when the passenger side airbag
system is automatically shut off.
●It does not mean there is a problem with your side
airbags.
●Comes on when nobody is sitting in the
passenger seat - Have the vehicle checked by a
dealer.
●Comes on when someone is sitting in the seat -
Have the passenger sit properly.
U.S.
Canada
* Not available on all models
Page 76 of 361
75
uuIndicatorsu
Continued
Instrument Panel
IndicatorNameOn/BlinkingExplanation
Immobilizer
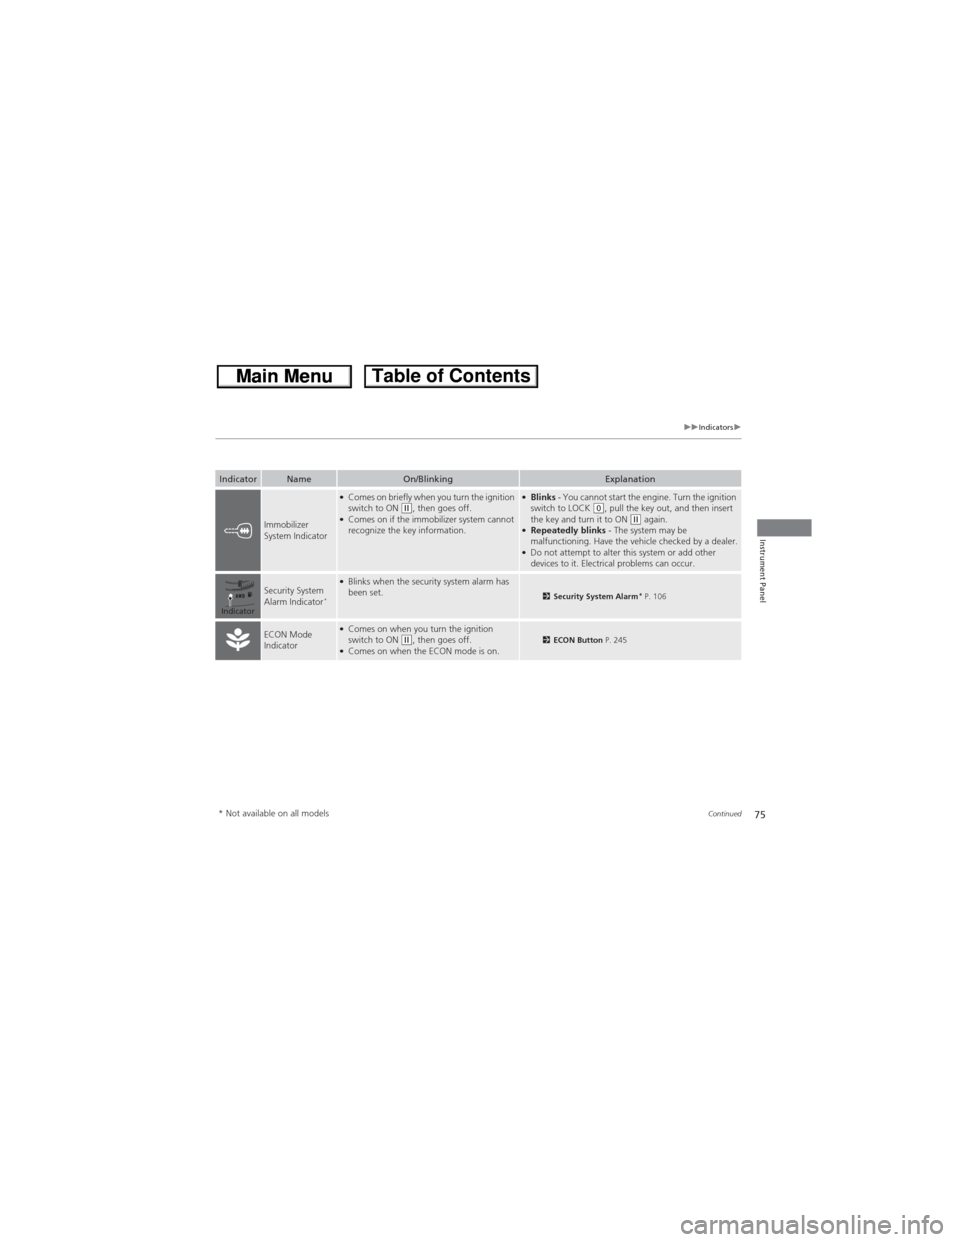
System Indicator
●Comes on briefly when you turn the ignition
switch to ON (w, then goes off.●Comes on if the immobilizer system cannot
recognize the key information.
●Blinks - You cannot start the engine. Turn the ignition
switch to LOCK (0, pull the key out, and then insert
the key and turn it to ON (w again.●Repeatedly blinks - The system may be
malfunctioning. Have the vehicle checked by a dealer.
●Do not attempt to alter this system or add other
devices to it. Electrical problems can occur.
Security System
Alarm Indicator*
●Blinks when the security system alarm has
been set.2Security System Alarm* P. 106
ECON Mode
Indicator●Comes on when you turn the ignition
switch to ON (w, then goes off.●Comes on when the ECON mode is on.2ECON Button P. 245
Indicator
* Not available on all models
Page 88 of 361
87
uuGauges and DisplaysuMulti-Information Display
Continued
Instrument Panel
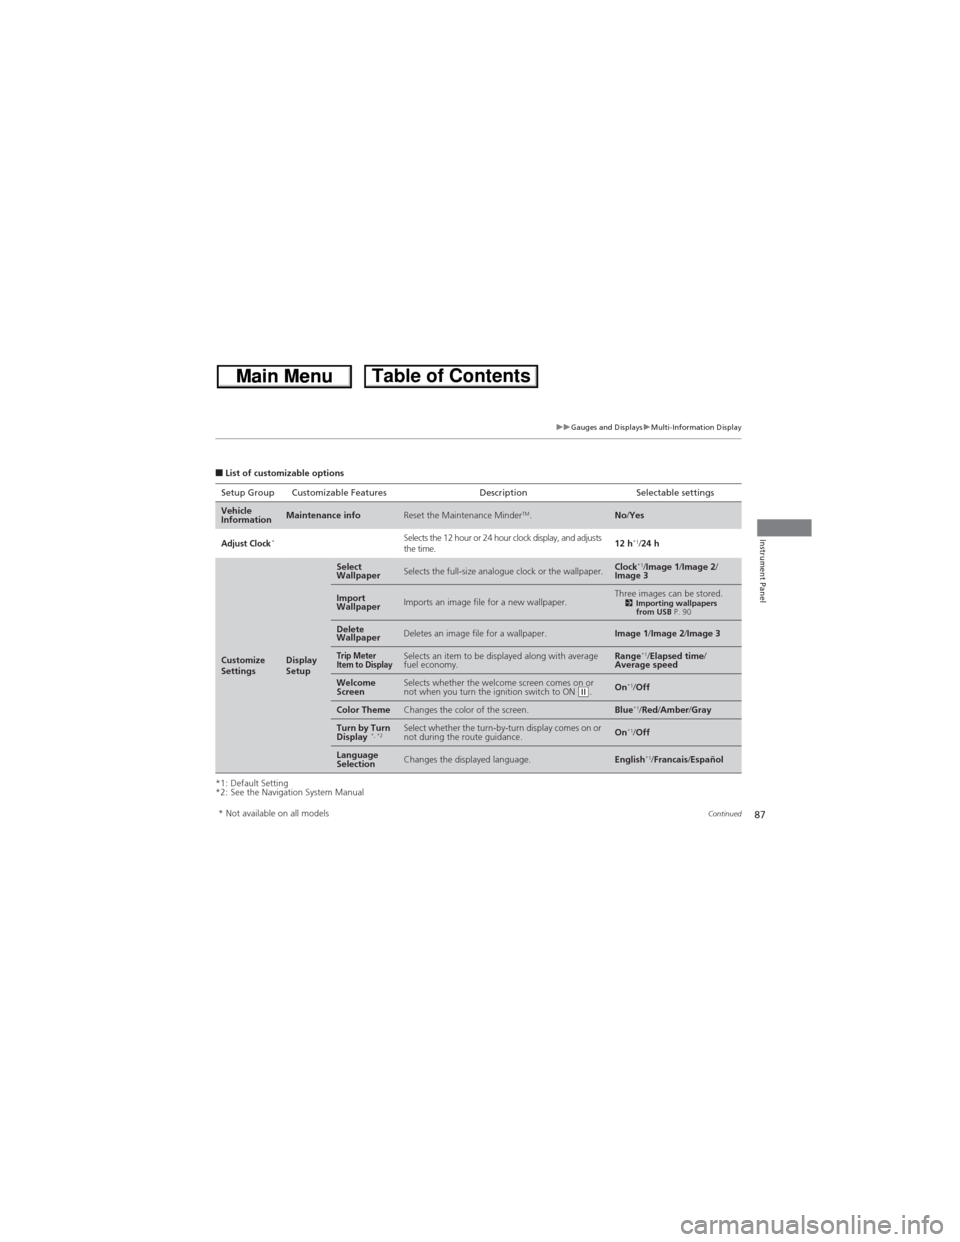
■List of customizable options
*1: Default Setting
*2: See the Navigation System ManualSetup Group Customizable Features Description Selectable settings
Vehicle
InformationMaintenance infoReset the Maintenance MinderTM.No/Yes
Adjust Clock*Selects the 12 hour or 24 hour clock display, and adjusts
the time.12 h*1/24 h
Customize
SettingsDisplay
Setup
Select
WallpaperSelects the full-size analogue clock or the wallpaper.Clock*1/Image 1/Image 2/
Image 3
Import
WallpaperImports an image file for a new wallpaper.Three images can be stored.2Importing wallpapers
from USB P. 90
Delete
WallpaperDeletes an image file for a wallpaper.Image 1/Image 2/Image 3
Trip Meter
Item to DisplaySelects an item to be displayed along with average
fuel economy.Range*1/Elapsed time/
Average speed
Welcome
ScreenSelects whether the welcome screen comes on or
not when you turn the ignition switch to ON (w.On*1/Off
Color ThemeChanges the color of the screen.Blue*1/Red/Amber/Gray
Turn by Turn
Display *, *2Select whether the turn-by-turn display comes on or
not during the route guidance.On*1/Off
Language
SelectionChanges the displayed language.English*1/Francais/Español
* Not available on all models
Page 89 of 361
88
uuGauges and DisplaysuMulti-Information Display
Instrument Panel
*1: Default SettingSetup Group Customizable Features Description Selectable settings
Customize
Settings
Trip
Computer
Setup
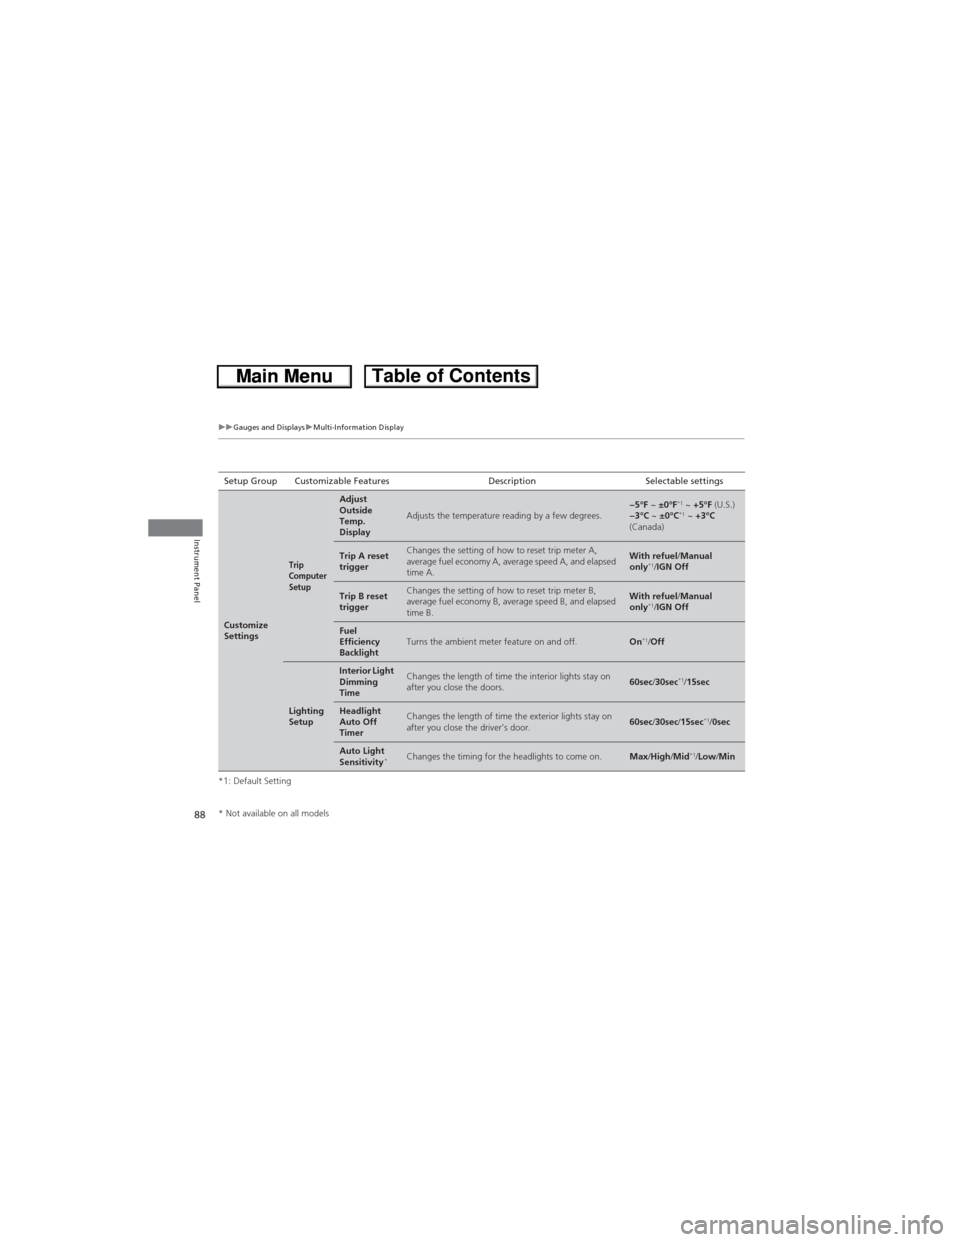
Adjust
Outside
Temp.
Display
Adjusts the temperature reading by a few degrees.−5°F ~ ±0°F*1 ~ +5°F (U.S.)
−3°C ~ ±0°C*1 ~ +3°C
(Canada)
Trip A reset
triggerChanges the setting of how to reset trip meter A,
average fuel economy A, average speed A, and elapsed
time A.With refuel/Manual
only*1/IGN Off
Trip B reset
triggerChanges the setting of how to reset trip meter B,
average fuel economy B, average speed B, and elapsed
time B.With refuel/Manual
only*1/IGN Off
Fuel
Efficiency
BacklightTurns the ambient meter feature on and off.On*1/Off
Lighting
Setup
Interior Light
Dimming
TimeChanges the length of time the interior lights stay on
after you close the doors.60sec/30sec*1/15sec
Headlight
Auto Off
TimerChanges the length of time the exterior lights stay on
after you close the driver’s door.60sec/30sec/15sec*1/0sec
Auto Light
Sensitivity*Changes the timing for the headlights to come on.Max/High/Mid*1/Low/Min
* Not available on all models
Page 100 of 361
99
uuLocking and Unlocking the DoorsuLocking/Unlocking the Doors from the Outside
Continued
Controls
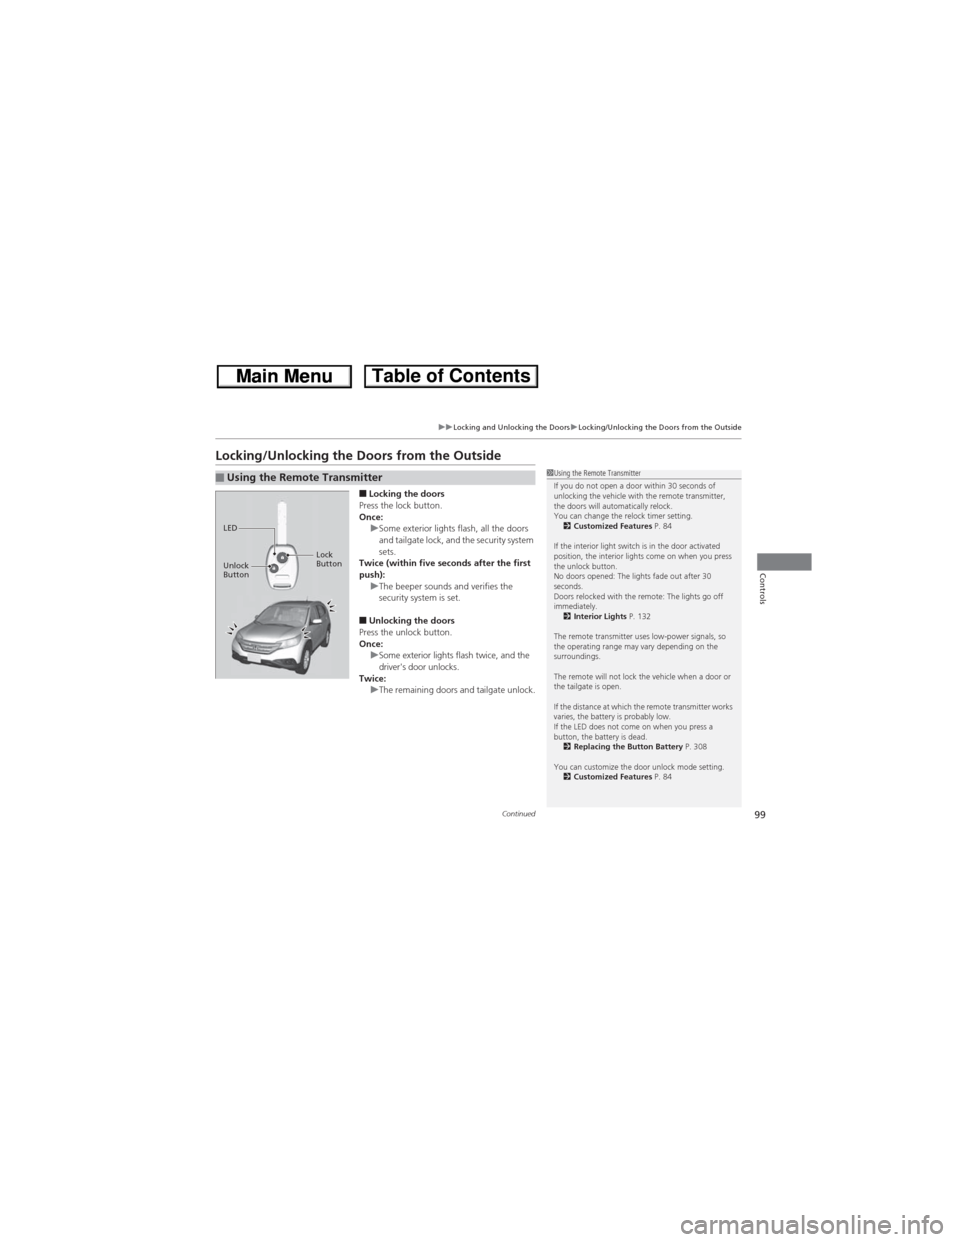
Locking/Unlocking the Doors from the Outside
■Locking the doors
Press the lock button.
Once:
uSome exterior lights flash, all the doors
and tailgate lock, and the security system
sets.
Twice (within five seconds after the first
push):
uThe beeper sounds and verifies the
security system is set.
■Unlocking the doors
Press the unlock button.
Once:
uSome exterior lights flash twice, and the
driver's door unlocks.
Twice:
uThe remaining doors and tailgate unlock.
■Using the Remote Transmitter1Using the Remote Transmitter
If you do not open a door within 30 seconds of
unlocking the vehicle with the remote transmitter,
the doors will automatically relock.
You can change the relock timer setting.
2Customized Features P. 84
If the interior light switch is in the door activated
position, the interior lights come on when you press
the unlock button.
No doors opened: The lights fade out after 30
seconds.
Doors relocked with the remote: The lights go off
immediately.
2Interior Lights P. 132
The remote transmitter uses low-power signals, so
the operating range may vary depending on the
surroundings.
The remote will not lock the vehicle when a door or
the tailgate is open.
If the distance at which the remote transmitter works
varies, the battery is probably low.
If the LED does not come on when you press a
button, the battery is dead.
2Replacing the Button Battery P. 308
You can customize the door unlock mode setting.
2Customized Features P. 84
LED
Unlock
ButtonLock
Button
Page 101 of 361
uuLocking and Unlocking the DoorsuLocking/Unlocking the Doors from the Outside
100
Controls
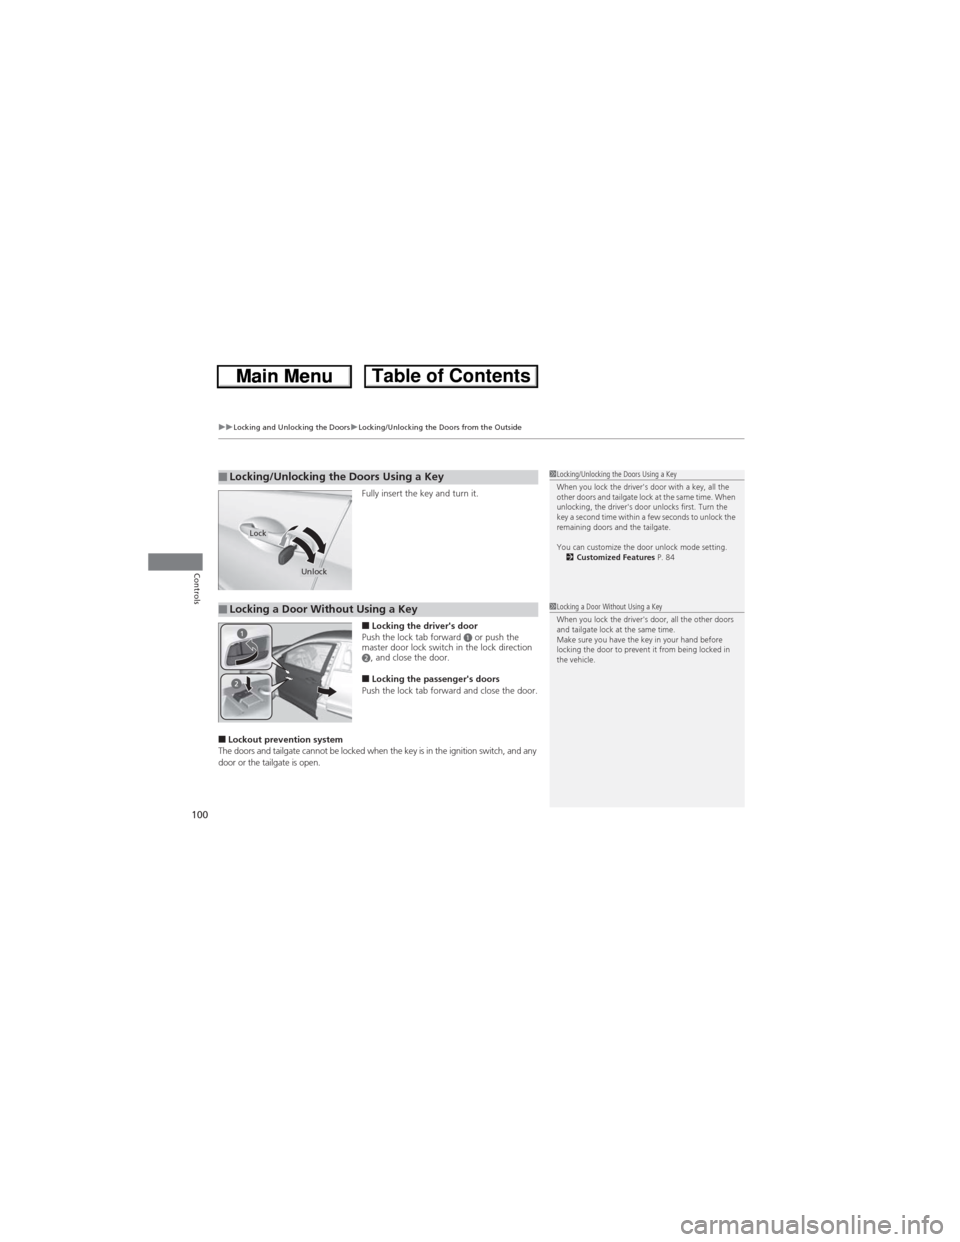
Fully insert the key and turn it.
■Locking the driver's door
Push the lock tab forward a or push the
master door lock switch in the lock direction
b, and close the door.
■Locking the passenger's doors
Push the lock tab forward and close the door.
■Lockout prevention system
The doors and tailgate cannot be locked when the key is in the ignition switch, and any
door or the tailgate is open.
■Locking/Unlocking the Doors Using a Key1Locking/Unlocking the Doors Using a Key
When you lock the driver's door with a key, all the
other doors and tailgate lock at the same time. When
unlocking, the driver's door unlocks first. Turn the
key a second time within a few seconds to unlock the
remaining doors and the tailgate.
You can customize the door unlock mode setting.
2Customized Features P. 84
Lock
Unlock
■Locking a Door Without Using a Key1Locking a Door Without Using a Key
When you lock the driver's door, all the other doors
and tailgate lock at the same time.
Make sure you have the key in your hand before
locking the door to prevent it from being locked in
the vehicle.
Page 108 of 361
107
uuSecurity SystemuSecurity System Alarm*
Controls
■Setting the security system alarm
The security system alarm automatically sets when the following conditions have
been met:
•The ignition switch is in LOCK
(0, and the key has been removed from the
ignition switch.
•The hood and tailgate are closed.
•All doors and tailgate are locked with the key or the remote transmitter.
■When the security system alarm sets
The security system alarm indicator in the instrument panel blinks. When the
blinking interval changes after about 15 seconds, the security system alarm is set.
■To cancel the security system alarm
The security system alarm is canceled when the vehicle is unlocked using the key or
remote transmitter, or the ignition switch is turned to ON
(w. The security system
alarm indicator goes off at the same time.
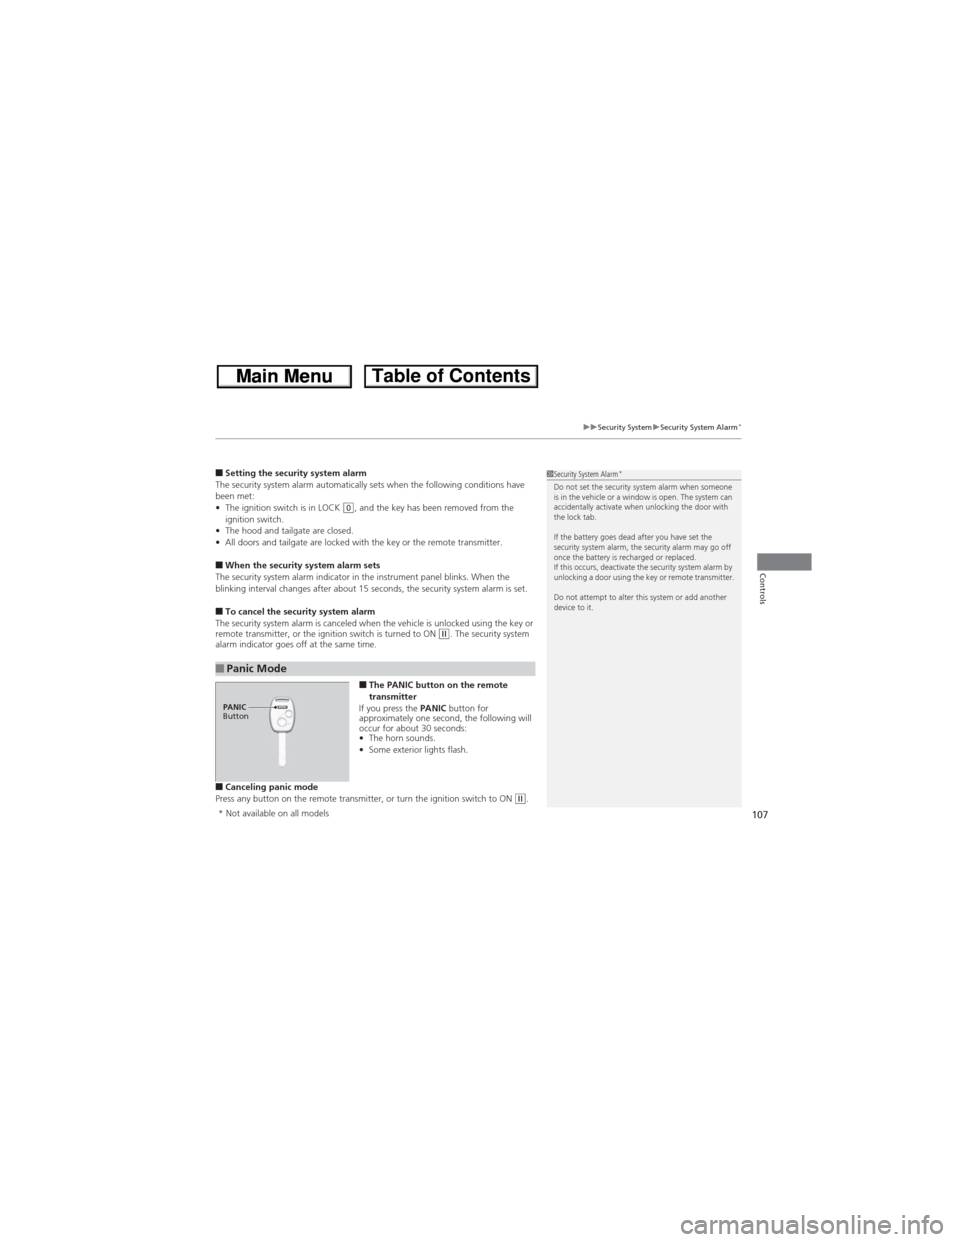
■The PANIC button on the remote
transmitter
If you press the PANIC button for
approximately one second, the following will
occur for about 30 seconds:
•The horn sounds.
•Some exterior lights flash.
■Canceling panic mode
Press any button on the remote transmitter, or turn the ignition switch to ON (w.
■Panic Mode
1Security System Alarm*Do not set the security system alarm when someone
is in the vehicle or a window is open. The system can
accidentally activate when unlocking the door with
the lock tab.
If the battery goes dead after you have set the
security system alarm, the security alarm may go off
once the battery is recharged or replaced.
If this occurs, deactivate the security system alarm by
unlocking a door using the key or remote transmitter.
Do not attempt to alter this system or add another
device to it.
PANIC
Button
* Not available on all models
Page 114 of 361
113
uuOperating the Switches Around the Steering WheeluLight Switches
Controls
Automatic lighting control can be used when
the ignition switch is in ON (w.
When you turn the light switch to AUTO, the
headlights and other exterior lights will switch
on and off automatically depending on the
ambient brightness.
uYou can change the auto light sensitivity
setting.
2Customized Features P. 84
The headlights, all other exterior lights, and the instrument panel lights turn off
within 15 seconds after you remove the key and close the driver's door.
uYou can change the headlight auto off timer setting.
2Customized Features P. 84
If you turn the ignition switch to LOCK (0 with the headlight switch on, but do not
open the door, the lights turn off after 10 minutes (three minutes, if the switch is in
the AUTO position).
The lights turn on again when you unlock or open the driver's door. If you unlock
the door, but do not open it within 15 seconds, the lights go off. If you open the
driver's door, you will hear a lights on reminder chime.
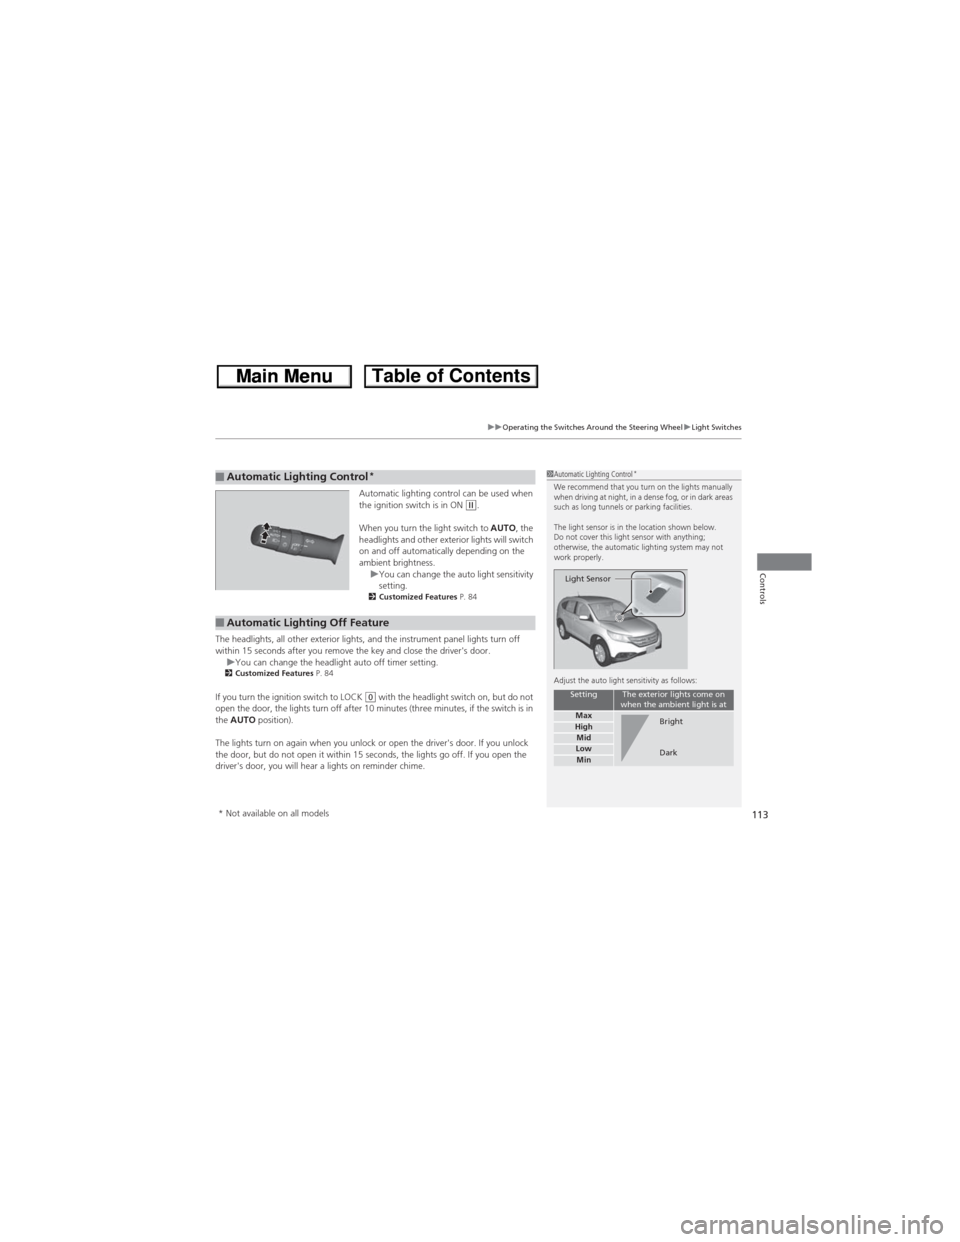
■Automatic Lighting Control*1Automatic Lighting Control*We recommend that you turn on the lights manually
when driving at night, in a dense fog, or in dark areas
such as long tunnels or parking facilities.
The light sensor is in the location shown below.
Do not cover this light sensor with anything;
otherwise, the automatic lighting system may not
work properly.
Adjust the auto light sensitivity as follows:
SettingThe exterior lights come on
when the ambient light is at
MaxHighMidLowMin
Light Sensor
Bright
Dark
■Automatic Lighting Off Feature
* Not available on all models
Page 116 of 361
115
uuOperating the Switches Around the Steering WheeluWipers and Washers
Continued
Controls
Wipers and Washers
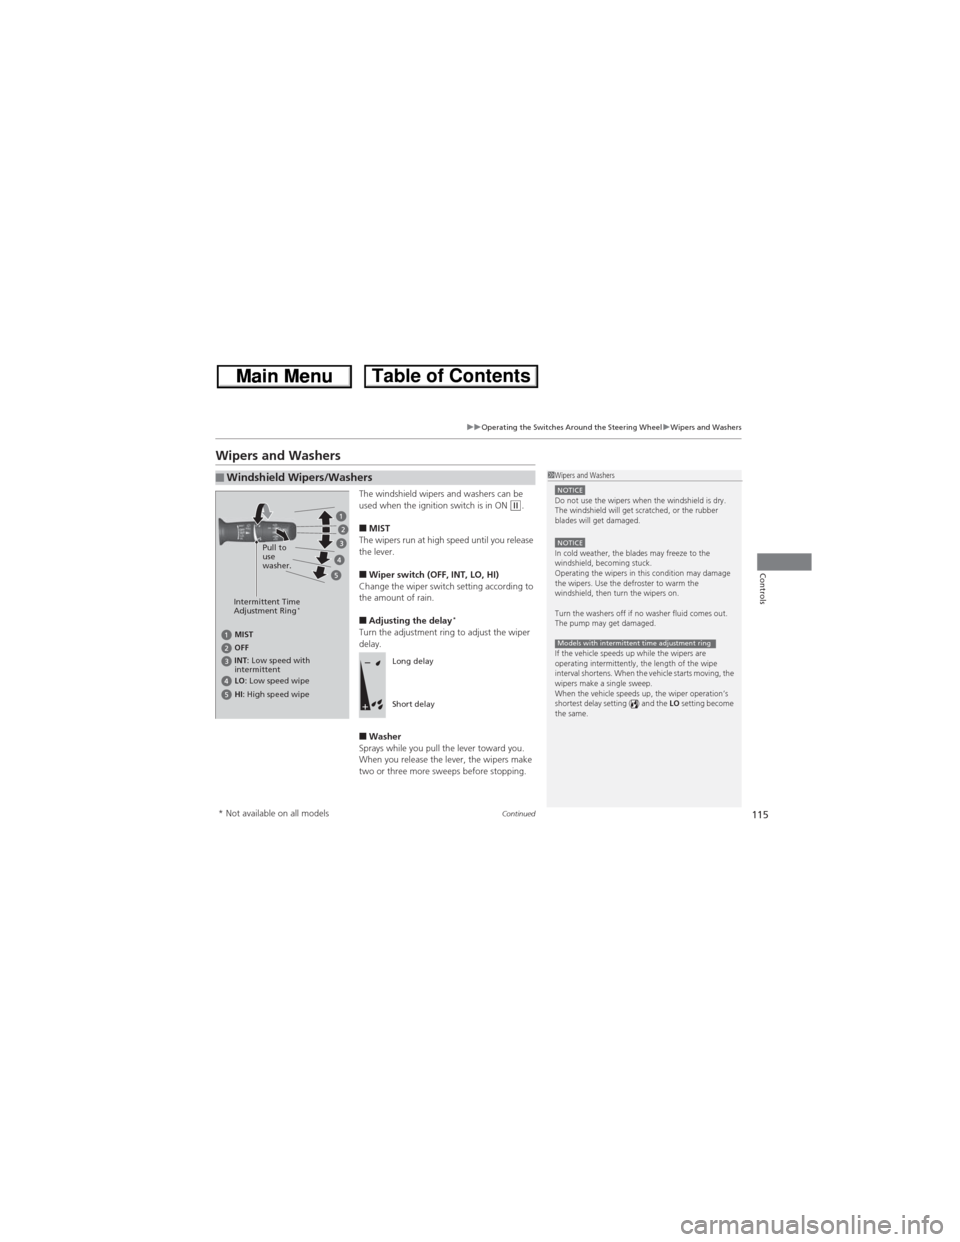
The windshield wipers and washers can be
used when the ignition switch is in ON (w.
■MIST
The wipers run at high speed until you release
the lever.
■Wiper switch (OFF, INT, LO, HI)
Change the wiper switch setting according to
the amount of rain.
■Adjusting the delay*Turn the adjustment ring to adjust the wiper
delay.
■Washer
Sprays while you pull the lever toward you.
When you release the lever, the wipers make
two or three more sweeps before stopping.
■Windshield Wipers/Washers1Wipers and WashersNOTICEDo not use the wipers when the windshield is dry.
The windshield will get scratched, or the rubber
blades will get damaged.
NOTICEIn cold weather, the blades may freeze to the
windshield, becoming stuck.
Operating the wipers in this condition may damage
the wipers. Use the defroster to warm the
windshield, then turn the wipers on.
Turn the washers off if no washer fluid comes out.
The pump may get damaged.
If the vehicle speeds up while the wipers are
operating intermittently, the length of the wipe
interval shortens. When the vehicle starts moving, the
wipers make a single sweep.
When the vehicle speeds up, the wiper operation’s
shortest delay setting ( ) and the LO setting become
the same.
Models with intermittent time adjustment ring
Intermittent Time
Adjustment Ring*
MIST
INT: Low speed with
intermittent OFF
LO: Low speed wipe
HI: High speed wipePull to
use
washer.
Long delay
Short delay
* Not available on all models
Page 123 of 361
122
Controls
Adjusting the Seats
Adjusting the Seat Positions
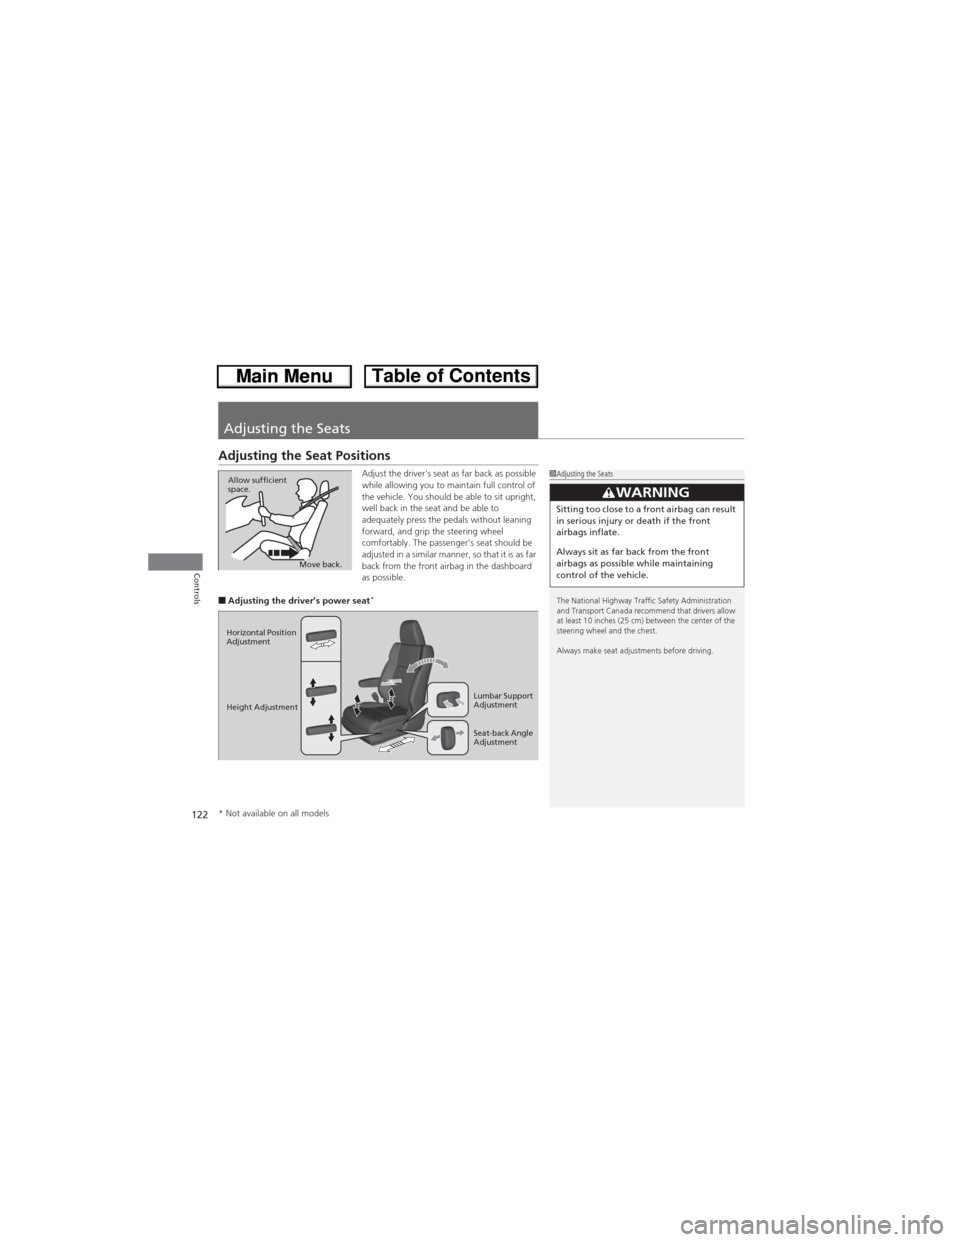
Adjust the driver's seat as far back as possible
while allowing you to maintain full control of
the vehicle. You should be able to sit upright,
well back in the seat and be able to
adequately press the pedals without leaning
forward, and grip the steering wheel
comfortably. The passenger's seat should be
adjusted in a similar manner, so that it is as far
back from the front airbag in the dashboard
as possible.
■Adjusting the driver’s power seat*
1Adjusting the Seats
The National Highway Traffic Safety Administration
and Transport Canada recommend that drivers allow
at least 10 inches (25 cm) between the center of the
steering wheel and the chest.
Always make seat adjustments before driving.
3WARNINGSitting too close to a front airbag can result
in serious injury or death if the front
airbags inflate.
Always sit as far back from the front
airbags as possible while maintaining
control of the vehicle.
Move back. Allow sufficient
space.
Horizontal Position
Adjustment
Height Adjustment
Seat-back Angle
Adjustment Lumbar Support
Adjustment
* Not available on all models