ECO mode HONDA CR-V 2013 RM1, RM3, RM4 / 4.G Owner's Manual
[x] Cancel search | Manufacturer: HONDA, Model Year: 2013, Model line: CR-V, Model: HONDA CR-V 2013 RM1, RM3, RM4 / 4.GPages: 361, PDF Size: 6.58 MB
Page 145 of 361
uuHeating and Cooling System*uUsing Vents, Heating and A/C
144
Controls
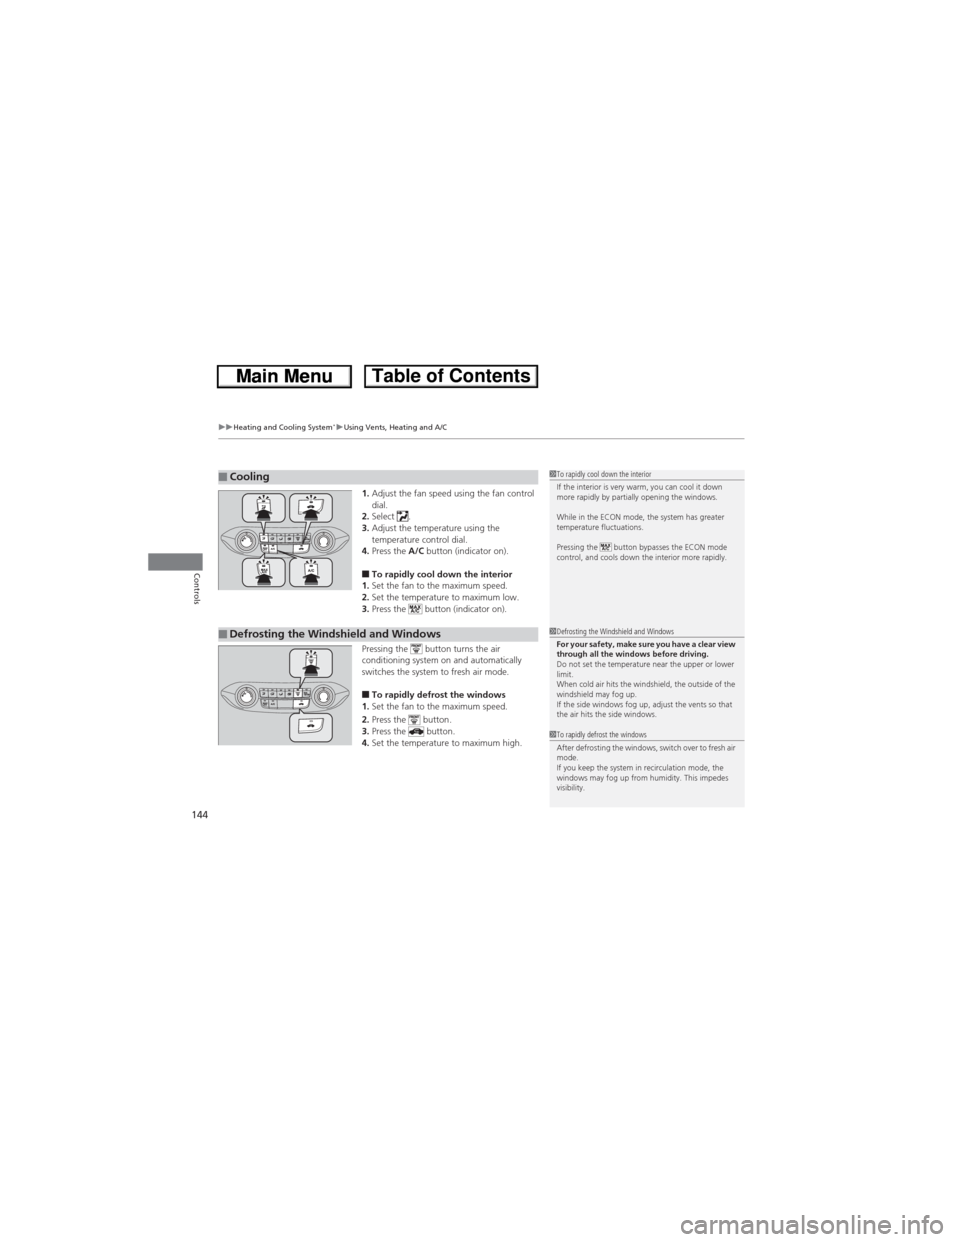
1.Adjust the fan speed using the fan control
dial.
2.Select .
3.Adjust the temperature using the
temperature control dial.
4.Press the A/C button (indicator on).
■To rapidly cool down the interior
1.Set the fan to the maximum speed.
2.Set the temperature to maximum low.
3.Press the button (indicator on).
Pressing the button turns the air
conditioning system on and automatically
switches the system to fresh air mode.
■To rapidly defrost the windows
1.Set the fan to the maximum speed.
2.Press the button.
3.Press the button.
4.Set the temperature to maximum high.
■Cooling1To rapidly cool down the interior
If the interior is very warm, you can cool it down
more rapidly by partially opening the windows.
While in the ECON mode, the system has greater
temperature fluctuations.
Pressing the button bypasses the ECON mode
control, and cools down the interior more rapidly.
■Defrosting the Windshield and Windows1Defrosting the Windshield and Windows
For your safety, make sure you have a clear view
through all the windows before driving.
Do not set the temperature near the upper or lower
limit.
When cold air hits the windshield, the outside of the
windshield may fog up.
If the side windows fog up, adjust the vents so that
the air hits the side windows.
1To rapidly defrost the windows
After defrosting the windows, switch over to fresh air
mode.
If you keep the system in recirculation mode, the
windows may fog up from humidity. This impedes
visibility.
Page 146 of 361
145Continued
Controls
Climate Control System*
Using Automatic Climate Control
The automatic climate control system maintains the interior temperature you select.
The system also selects the proper mix of heated or cooled air that raises or lowers
the interior temperature to your preference as quickly as possible.
Use the system when the engine is running.
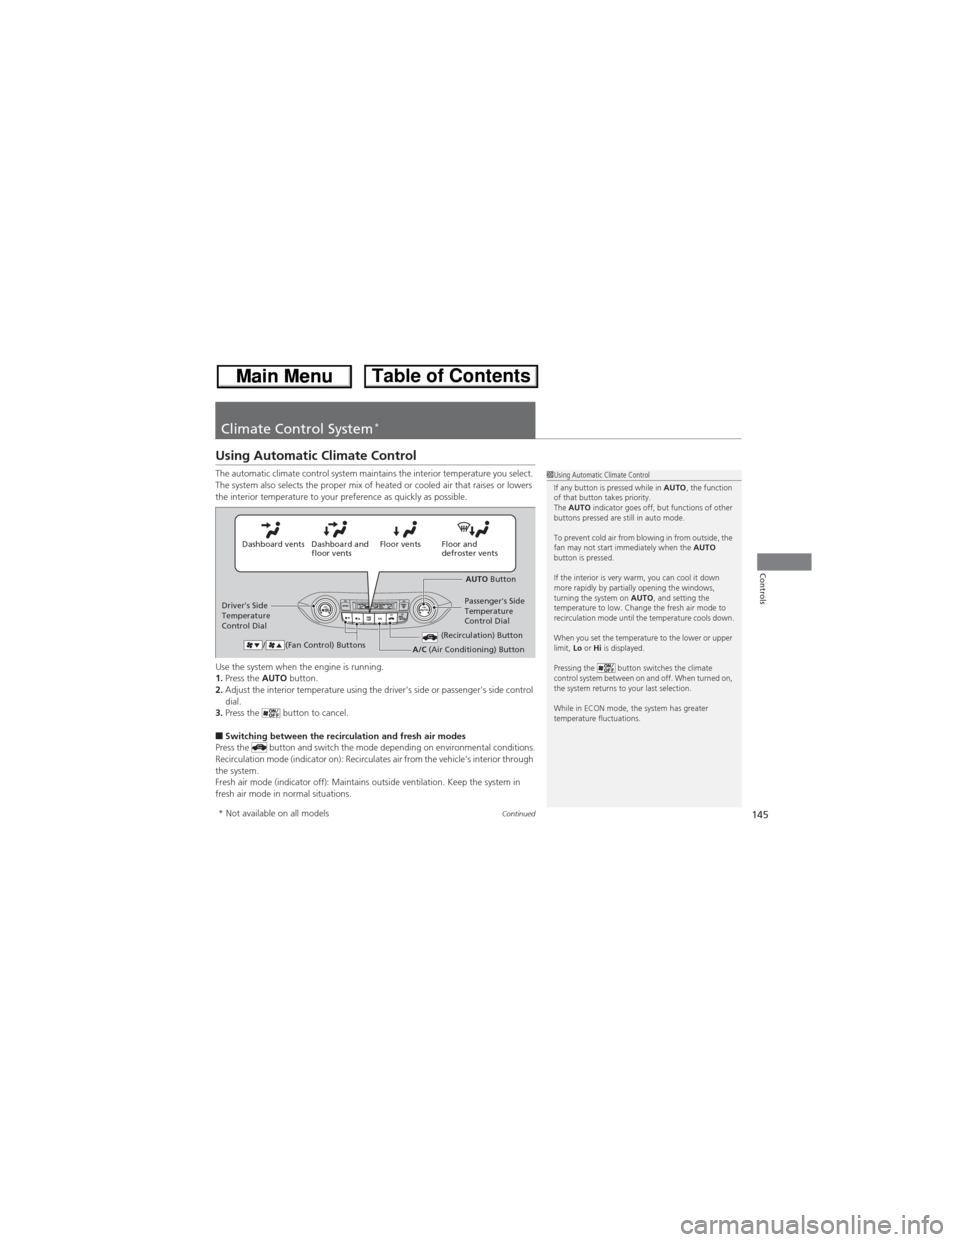
1.Press the AUTO button.
2.Adjust the interior temperature using the driver's side or passenger's side control
dial.
3.Press the button to cancel.
■Switching between the recirculation and fresh air modes
Press the button and switch the mode depending on environmental conditions.
Recirculation mode (indicator on): Recirculates air from the vehicle’s interior through
the system.
Fresh air mode (indicator off): Maintains outside ventilation. Keep the system in
fresh air mode in normal situations.
1Using Automatic Climate Control
If any button is pressed while in AUTO, the function
of that button takes priority.
The AUTO indicator goes off, but functions of other
buttons pressed are still in auto mode.
To prevent cold air from blowing in from outside, the
fan may not start immediately when the AUTO
button is pressed.
If the interior is very warm, you can cool it down
more rapidly by partially opening the windows,
turning the system on AUTO, and setting the
temperature to low. Change the fresh air mode to
recirculation mode until the temperature cools down.
When you set the temperature to the lower or upper
limit, Lo or Hi is displayed.
Pressing the button switches the climate
control system between on and off. When turned on,
the system returns to your last selection.
While in ECON mode, the system has greater
temperature fluctuations.
Floor and
defroster vents Floor vents Dashboard and
floor vents Dashboard vents
AUTO Button
Driver's Side
Temperature
Control DialPassenger's Side
Temperature
Control Dial
/ (Fan Control) Buttons
(Recirculation) ButtonA/C (Air Conditioning) Button
* Not available on all models
Page 152 of 361
151
uuAudio SystemuUSB Adapter Cable
Features
USB Adapter Cable
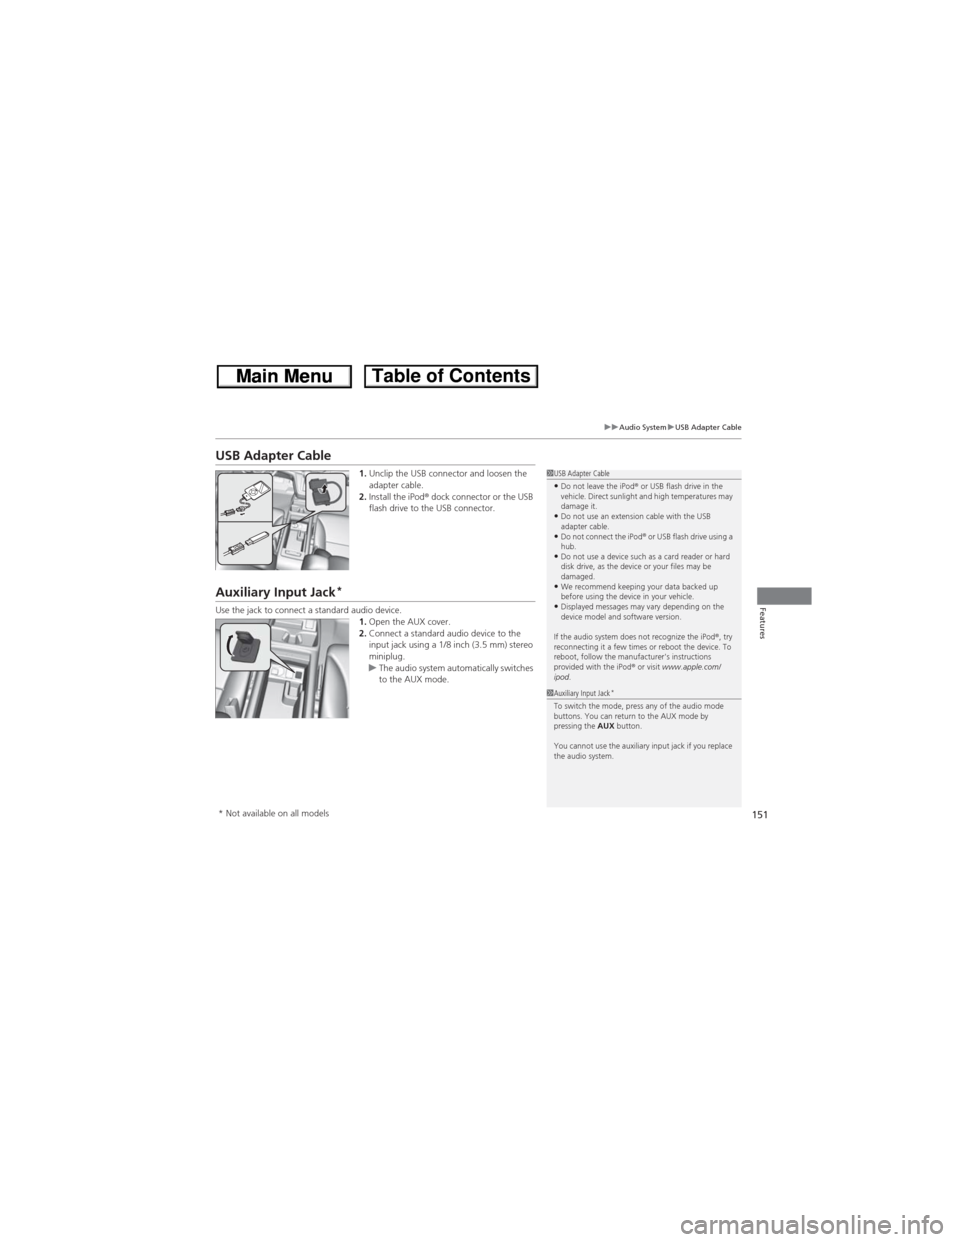
1.Unclip the USB connector and loosen the
adapter cable.
2.Install the iPod® dock connector or the USB
flash drive to the USB connector.
Auxiliary Input Jack*
Use the jack to connect a standard audio device.
1.Open the AUX cover.
2.Connect a standard audio device to the
input jack using a 1/8 inch (3.5 mm) stereo
miniplug.
uThe audio system automatically switches
to the AUX mode.
1USB Adapter Cable•Do not leave the iPod® or USB flash drive in the
vehicle. Direct sunlight and high temperatures may
damage it.
•Do not use an extension cable with the USB
adapter cable.
•Do not connect the iPod®
or USB flash drive using a
hub.
•Do not use a device such as a card reader or hard
disk drive, as the device or your files may be
damaged.
•We recommend keeping your data backed up
before using the device in your vehicle.
•Displayed messages may vary depending on the
device model and software version.
If the audio system does not recognize the iPod®, try
reconnecting it a few times or reboot the device. To
reboot, follow the manufacturer's instructions
provided with the iPod® or visit www.apple.com/
ipod.
1Auxiliary Input Jack*To switch the mode, press any of the audio mode
buttons. You can return to the AUX mode by
pressing the AUX button.
You cannot use the auxiliary input jack if you replace
the audio system.
* Not available on all models
Page 157 of 361
156
uuAudio System Basic OperationuPlaying AM/FM Radio
Features
Playing AM/FM Radio
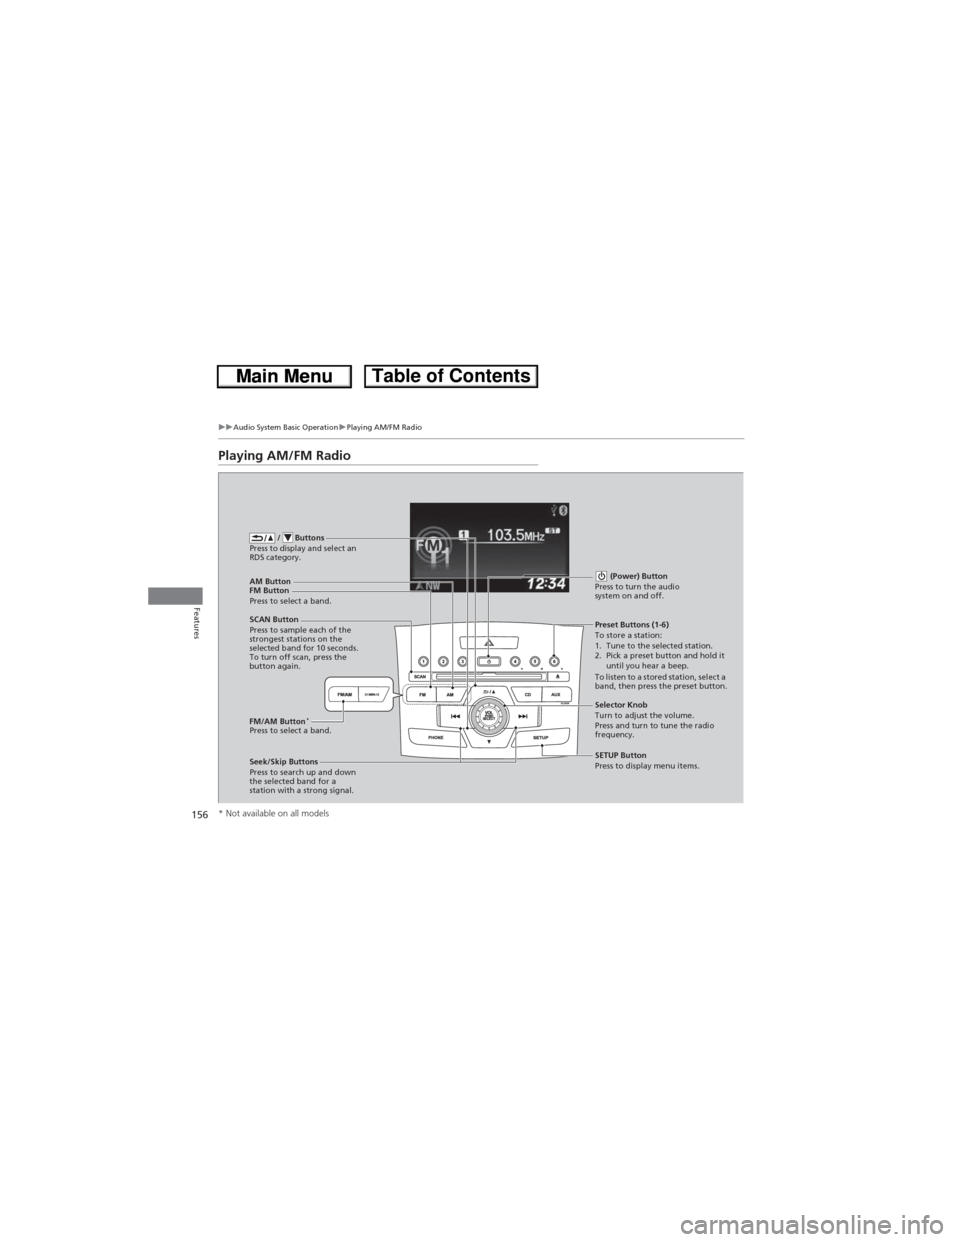
FM Button / Buttons
Press to display and select an
RDS category.
SCAN Button
Press to sample each of the
strongest stations on the
selected band for 10 seconds.
To turn off scan, press the
button again. (Power) Button
Press to turn the audio
system on and off.Preset Buttons (1-6)
To store a station:
1. Tune to the selected station.
2. Pick a preset button and hold it
until you hear a beep.
To listen to a stored station, select a
band, then press the preset button.
Seek/Skip Buttons
Press to search up and down
the selected band for a
station with a strong signal.SETUP Button
Press to display menu items. Selector Knob
Turn to adjust the volume.
Press and turn to tune the radio
frequency. AM Button
Press to select a band.
FM/AM Button
*Press to select a band.
* Not available on all models
Page 160 of 361
159
uuAudio System Basic OperationuPlaying XM® Radio*
Continued
Features
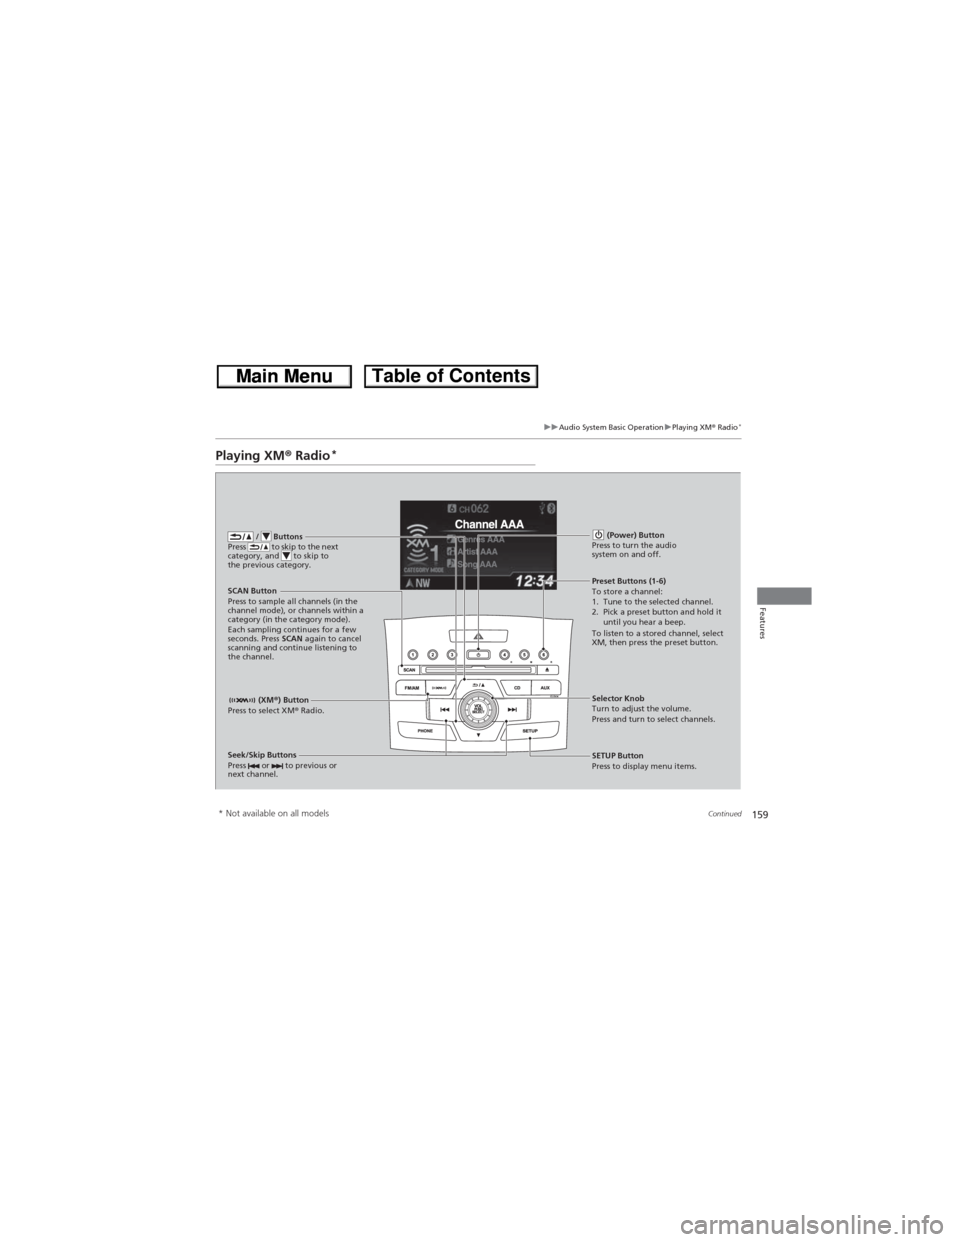
Playing XM® Radio*
/ Buttons
Press to skip to the next
category, and to skip to
the previous category.
(XM®) Button
Press to select XM® Radio.
(Power) Button
Press to turn the audio
system on and off.
Seek/Skip Buttons
Press or to previous or
next channel.SETUP Button
Press to display menu items. Selector Knob
Turn to adjust the volume.
Press and turn to select channels. Preset Buttons (1-6)
To store a channel:
1. Tune to the selected channel.
2. Pick a preset button and hold it
until you hear a beep.
To listen to a stored channel, select
XM, then press the preset button. SCAN Button
Press to sample all channels (in the
channel mode), or channels within a
category (in the category mode).
Each sampling continues for a few
seconds. Press SCAN again to cancel
scanning and continue listening to
the channel.
* Not available on all models
Page 163 of 361
uuAudio System Basic OperationuPlaying a CD
162
Features
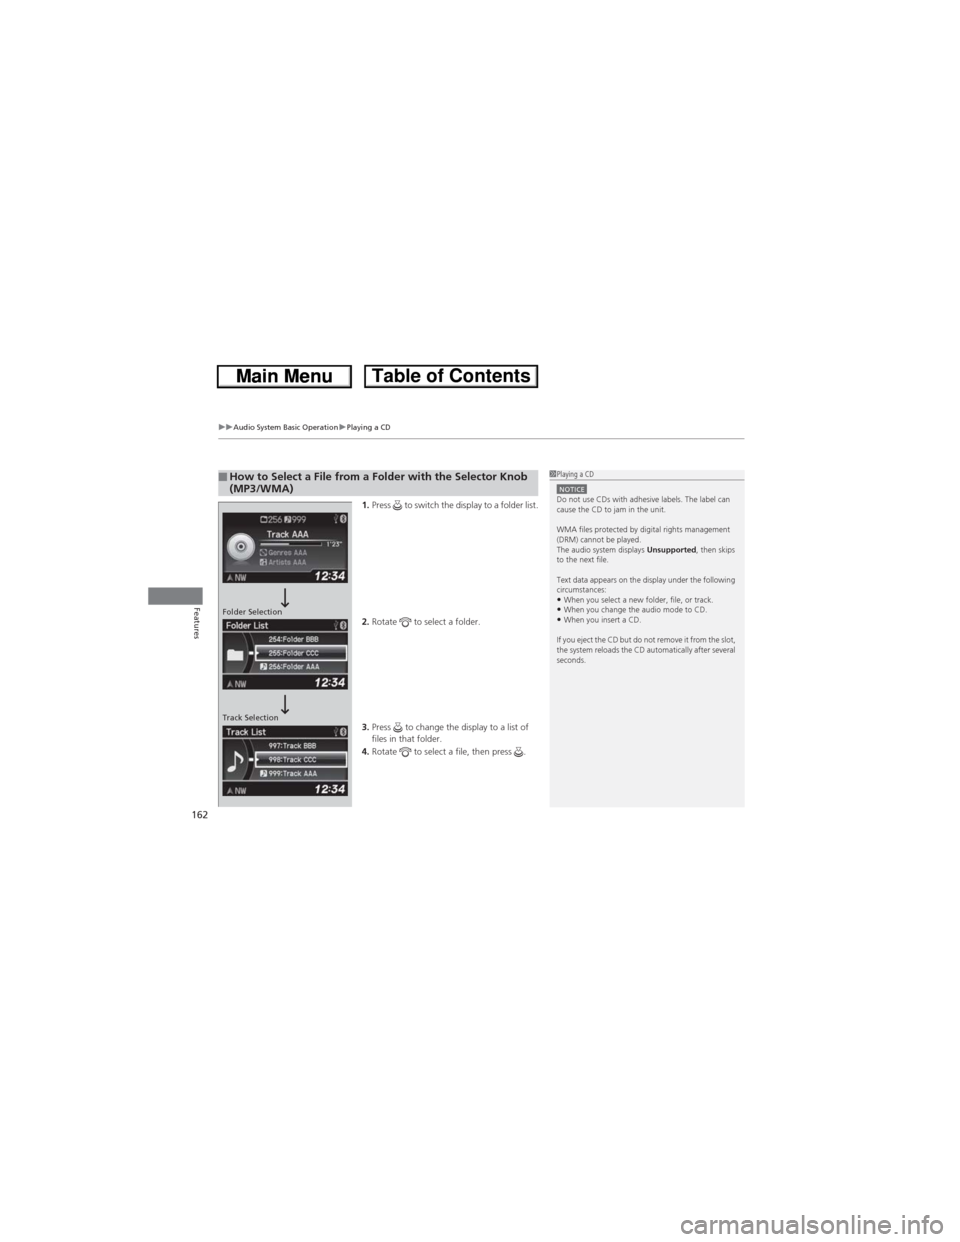
1.Press to switch the display to a folder list.
2.Rotate to select a folder.
3.Press to change the display to a list of
files in that folder.
4.Rotate to select a file, then press .
■How to Select a File from a Folder with the Selector Knob
(MP3/WMA)1Playing a CDNOTICEDo not use CDs with adhesive labels. The label can
cause the CD to jam in the unit.
WMA files protected by digital rights management
(DRM) cannot be played.
The audio system displays Unsupported, then skips
to the next file.
Text data appears on the display under the following
circumstances:
•When you select a new folder, file, or track.•When you change the audio mode to CD.•When you insert a CD.
If you eject the CD but do not remove it from the slot,
the system reloads the CD automatically after several
seconds.Folder Selection
Track Selection
Page 174 of 361
173
uuAudio System Basic OperationuPlaying Bluetooth® Audio
Features
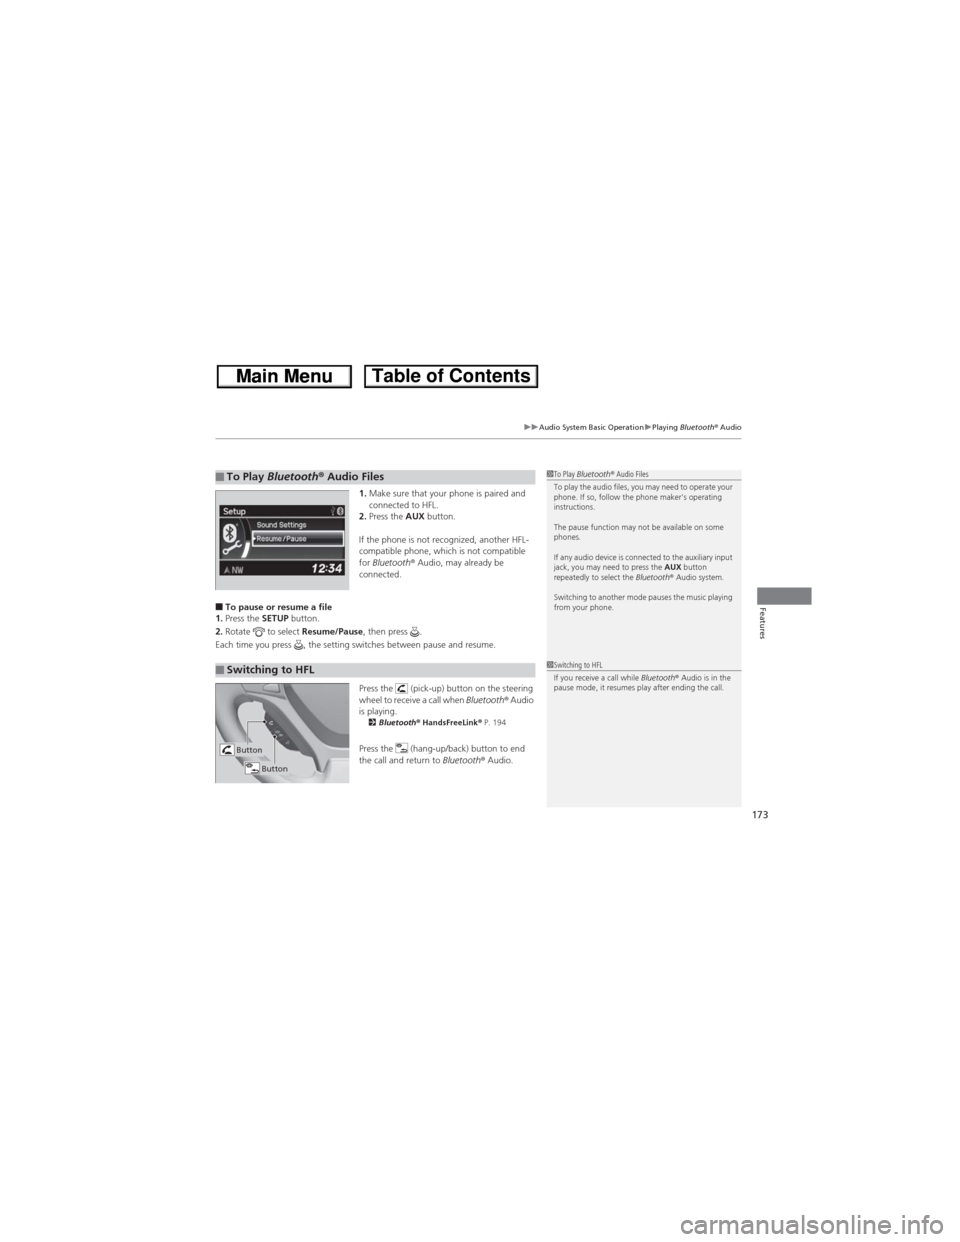
1.Make sure that your phone is paired and
connected to HFL.
2.Press the AUX button.
If the phone is not recognized, another HFL-
compatible phone, which is not compatible
for Bluetooth® Audio, may already be
connected.
■To pause or resume a file
1.Press the SETUP button.
2.Rotate to select Resume/Pause, then press .
Each time you press , the setting switches between pause and resume.
Press the (pick-up) button on the steering
wheel to receive a call when Bluetooth® Audio
is playing.
2Bluetooth® HandsFreeLink® P. 194
Press the (hang-up/back) button to end
the call and return to Bluetooth® Audio.
■To Play Bluetooth® Audio Files1To Play Bluetooth® Audio Files
To play the audio files, you may need to operate your
phone. If so, follow the phone maker's operating
instructions.
The pause function may not be available on some
phones.
If any audio device is connected to the auxiliary input
jack, you may need to press the AUX button
repeatedly to select the Bluetooth® Audio system.
Switching to another mode pauses the music playing
from your phone.
■Switching to HFL1Switching to HFL
If you receive a call while Bluetooth® Audio is in the
pause mode, it resumes play after ending the call.
Button
Button
Page 182 of 361
Continued181
uuRear Entertainment System*uOperating the System
Features
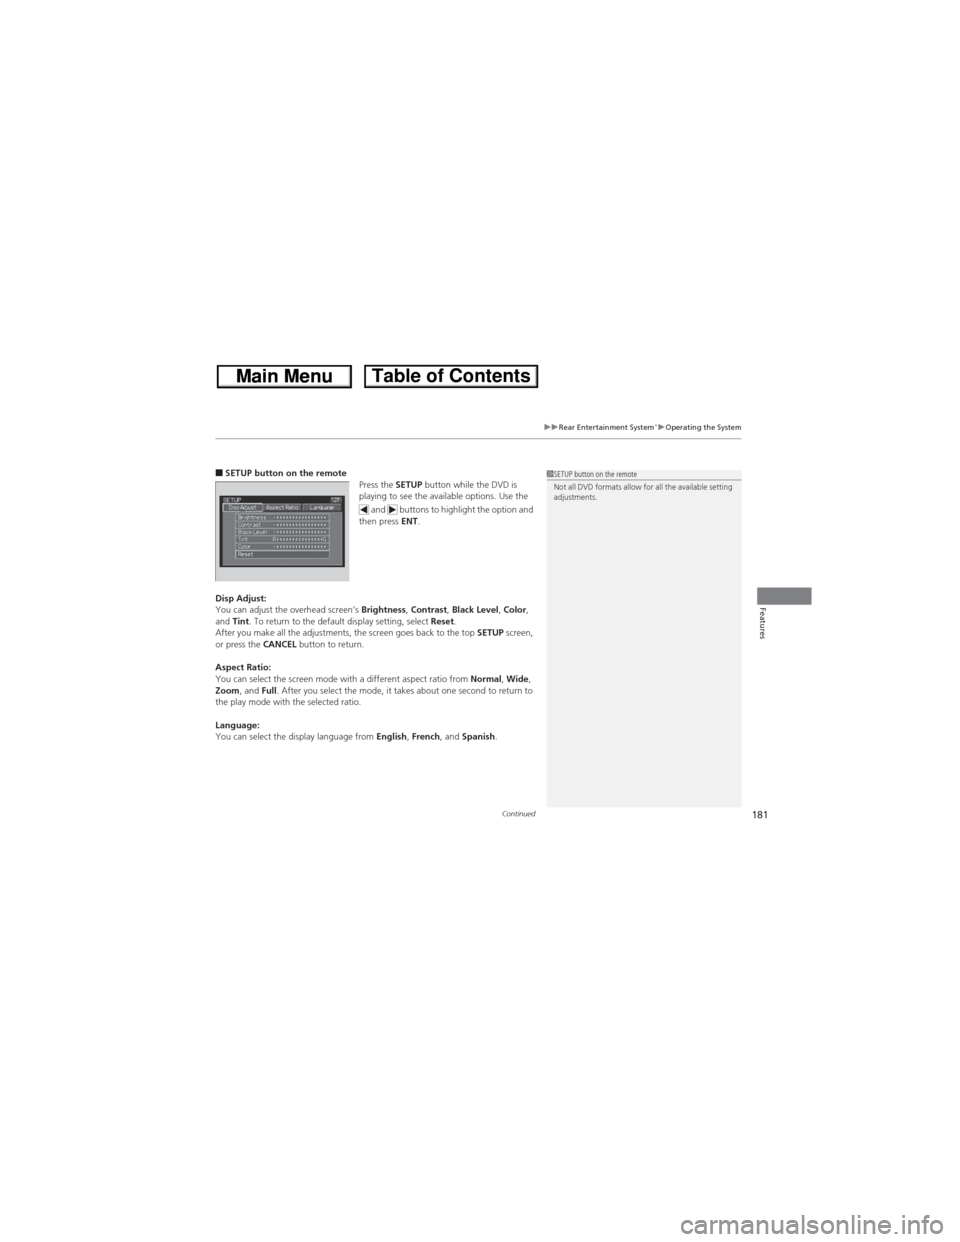
■SETUP button on the remote
Press the SETUP button while the DVD is
playing to see the available options. Use the
and buttons to highlight the option and
then press ENT.
Disp Adjust:
You can adjust the overhead screen’s Brightness, Contrast, Black Level, Color,
and Tint. To return to the default display setting, select Reset.
After you make all the adjustments, the screen goes back to the top SETUP screen,
or press the CANCEL button to return.
Aspect Ratio:
You can select the screen mode with a different aspect ratio from Normal, Wide,
Zoom, and Full. After you select the mode, it takes about one second to return to
the play mode with the selected ratio.
Language:
You can select the display language from English, French, and Spanish.1SETUP button on the remote
Not all DVD formats allow for all the available setting
adjustments.
Page 194 of 361
193
uuGeneral Information on the Audio SystemuCompatible iPod®, iPhone® and USB Flash Drives
Features
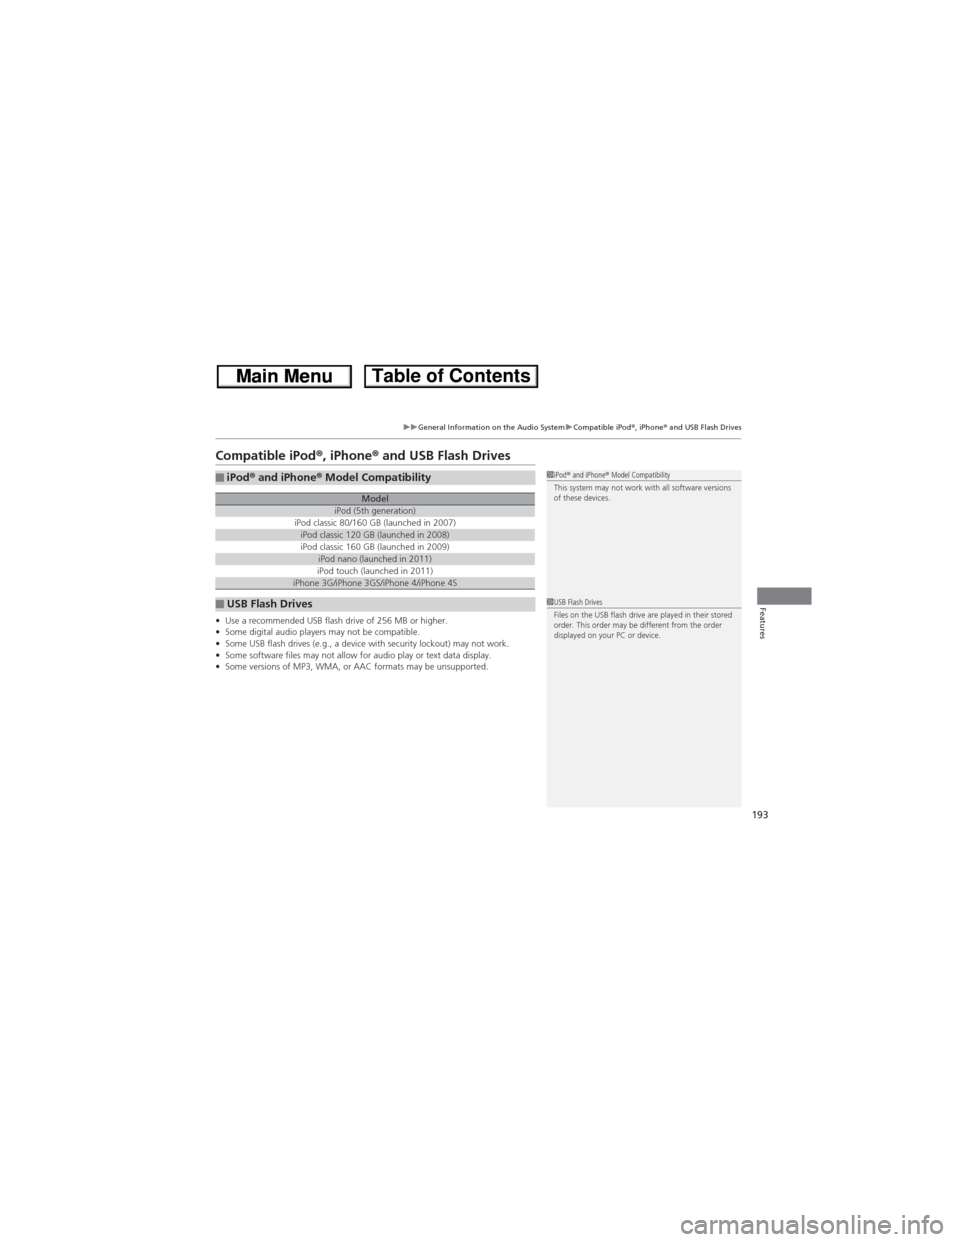
Compatible iPod®, iPhone® and USB Flash Drives
•Use a recommended USB flash drive of 256 MB or higher.
•Some digital audio players may not be compatible.
•Some USB flash drives (e.g., a device with security lockout) may not work.
•Some software files may not allow for audio play or text data display.
•Some versions of MP3, WMA, or AAC formats may be unsupported.
■iPod® and iPhone® Model Compatibility
ModeliPod (5th generation)iPod classic 80/160 GB (launched in 2007)iPod classic 120 GB (launched in 2008)iPod classic 160 GB (launched in 2009)iPod nano (launched in 2011)iPod touch (launched in 2011)iPhone 3G/iPhone 3GS/iPhone 4/iPhone 4S
■USB Flash Drives
1iPod® and iPhone® Model Compatibility
This system may not work with all software versions
of these devices.
1USB Flash Drives
Files on the USB flash drive are played in their stored
order. This order may be different from the order
displayed on your PC or device.
Page 226 of 361
225
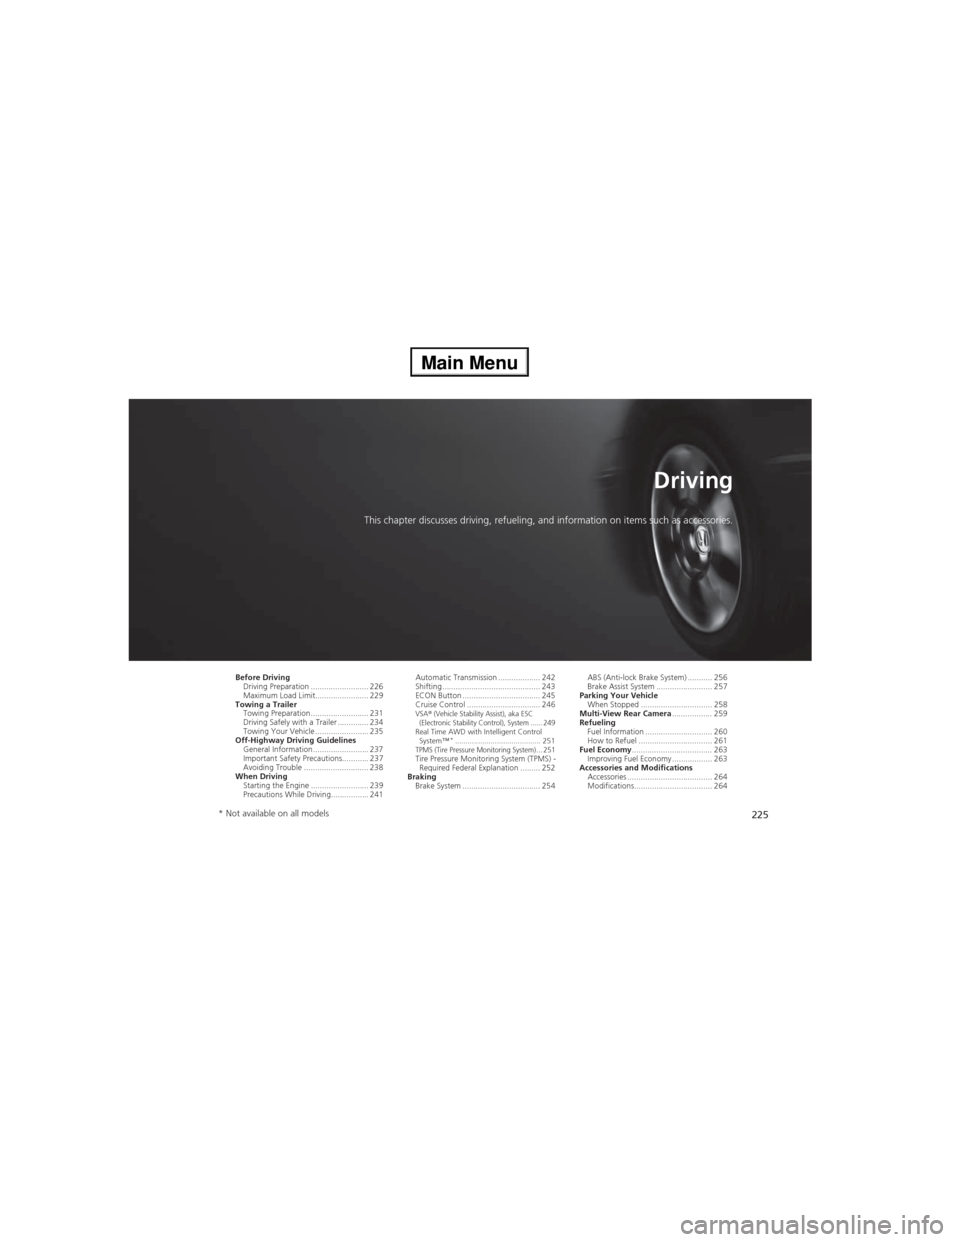
Driving
This chapter discusses driving, refueling, and information on items such as accessories.
Before Driving
Driving Preparation .......................... 226
Maximum Load Limit........................ 229
Towing a Trailer
Towing Preparation .......................... 231
Driving Safely with a Trailer .............. 234
Towing Your Vehicle ........................ 235
Off-Highway Driving Guidelines
General Information ......................... 237
Important Safety Precautions............ 237
Avoiding Trouble ............................. 238
When Driving
Starting the Engine .......................... 239
Precautions While Driving................. 241Automatic Transmission ................... 242
Shifting ............................................ 243
ECON Button ................................... 245
Cruise Control ................................. 246
VSA® (Vehicle Stability Assist), aka ESC
(Electronic Stability Control), System ...... 249
Real Time AWD with Intelligent Control
System™*......................................... 251TPMS (Tire Pressure Monitoring System) ... 251Tire Pressure Monitoring System (TPMS) -
Required Federal Explanation ......... 252
Braking
Brake System ................................... 254ABS (Anti-lock Brake System) ........... 256
Brake Assist System ......................... 257
Parking Your Vehicle
When Stopped ................................ 258
Multi-View Rear Camera.................. 259
Refueling
Fuel Information .............................. 260
How to Refuel ................................. 261
Fuel Economy.................................... 263
Improving Fuel Economy .................. 263
Accessories and Modifications
Accessories ...................................... 264
Modifications................................... 264
* Not available on all models