buttons HONDA CR-V 2016 RM1, RM3, RM4 / 4.G Quick Guide
[x] Cancel search | Manufacturer: HONDA, Model Year: 2016, Model line: CR-V, Model: HONDA CR-V 2016 RM1, RM3, RM4 / 4.GPages: 80, PDF Size: 7.99 MB
Page 33 of 80
58 || 59
AUDIO AND CONNECTIVITY
AUDIO AND CONNECTIVITY
Models with one display
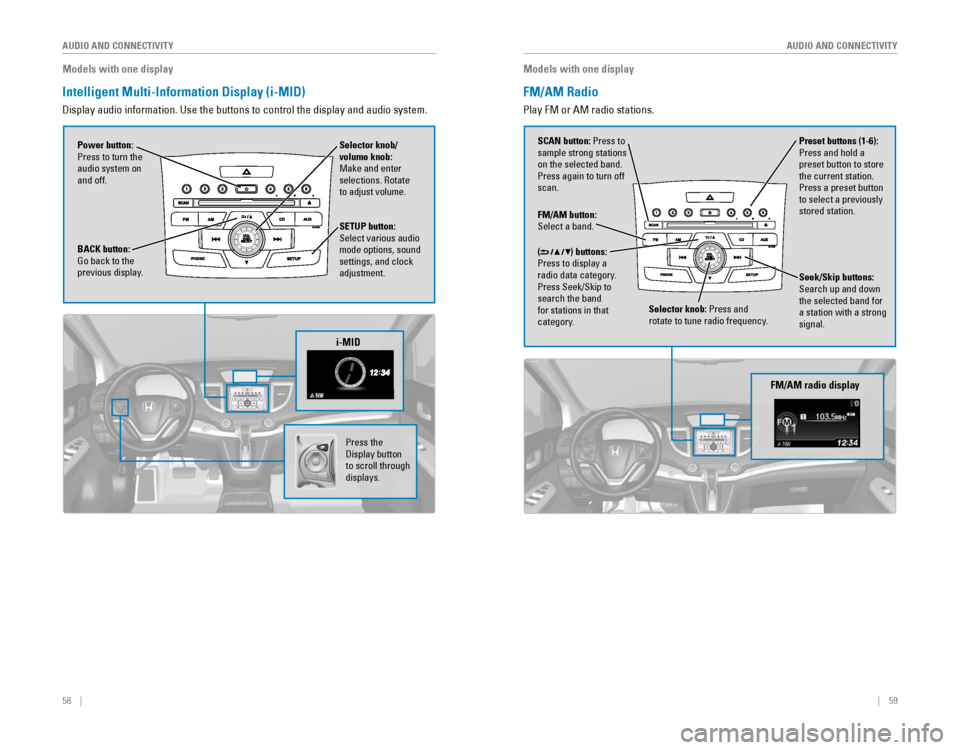
Intelligent Multi-Information Display (i-MID)
Display‚ÄÇaudio‚ÄÇinformation.‚ÄÇUse‚ÄÇthe‚ÄÇbuttons‚ÄÇto‚ÄÇcontrol‚ÄÇthe‚ÄÇdisplay‚ÄÇand‚ÄÇaudio‚ÄÇsystem.
Selector knob/
volume knob:
Make and enter
selections. Rotate
to adjust volume.
Power button:
Press to turn the
audio system on
and off.
SETUP button:
Select various audio
mode options, sound
settings, and clock
adjustment.
BACK button: Go‚ÄÇback‚ÄÇto‚ÄÇthe‚ÄÇprevious display.
i-MID
Press the Display‚ÄÇbutton‚ÄÇto scroll through
displays.
Models with one display
FM/AM Radio
Play FM or AM radio stations.
FM/AM button: Select‚ÄÇa‚ÄÇband.
Preset buttons (1-6):
Press and hold a
preset‚ÄÇbutton‚ÄÇto‚ÄÇstore‚ÄÇthe current station. Press‚ÄÇa‚ÄÇpreset‚ÄÇbutton‚ÄÇto select a previously
stored station.
Seek/Skip buttons:
Search up and down
the‚ÄÇselected‚ÄÇband‚ÄÇfor‚ÄÇa station with a strong
signal.
Selector knob: Press and rotate‚ÄÇto‚ÄÇtune‚ÄÇradio‚ÄÇfrequency.
SCAN button: Press to
sample strong stations
on‚ÄÇthe‚ÄÇselected‚ÄÇband.‚ÄÇPress again to turn off
scan.
(
) buttons:
Press to display a
radio data category.
Press‚ÄÇSeek/Skip‚ÄÇto‚ÄÇsearch‚ÄÇthe‚ÄÇband‚ÄÇfor stations in that
category.
FM/AM radio display
Page 34 of 80
60 || 61
AUDIO AND CONNECTIVITY
AUDIO AND CONNECTIVITY
Models with one display
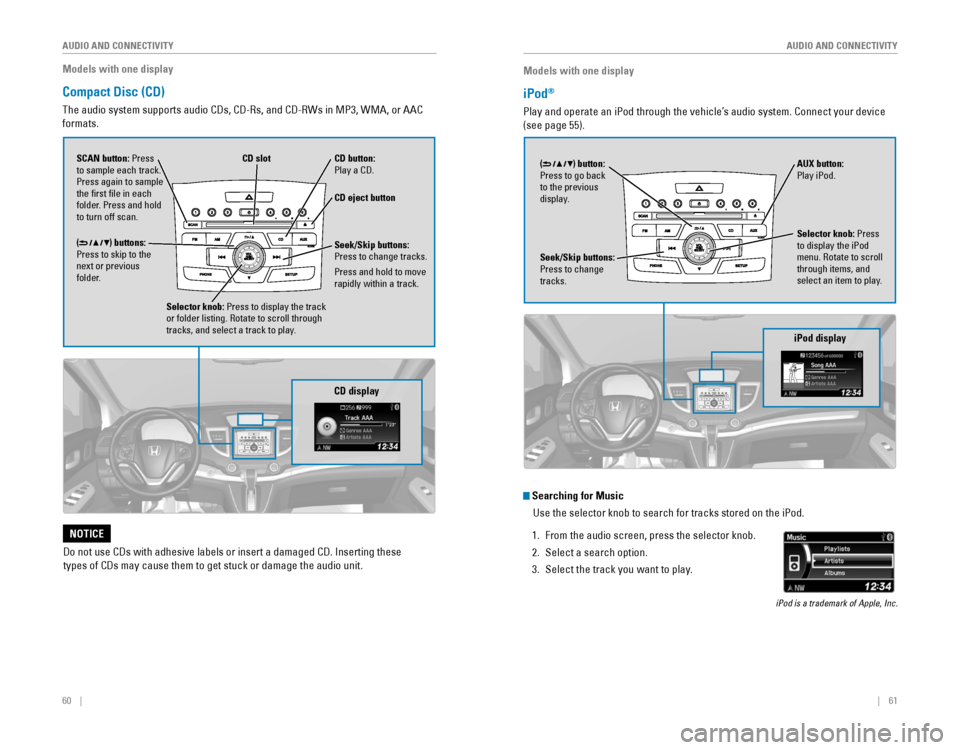
Compact Disc (CD)
The‚ÄÇaudio‚ÄÇsystem‚ÄÇsupports‚ÄÇaudio‚ÄÇCDs,‚ÄÇCD-Rs,‚ÄÇand‚ÄÇCD-RWs‚ÄÇin‚ÄÇMP3,‚ÄÇWMA,‚ÄÇor‚ÄÇAAC‚ÄÇ
formats.
CD eject button
CD slotCD button: Play‚ÄÇa‚ÄÇCD.
Do‚ÄÇnot‚ÄÇuse‚ÄÇCDs‚ÄÇwith‚ÄÇadhesive‚ÄÇlabels‚ÄÇor‚ÄÇinsert‚ÄÇa‚ÄÇdamaged‚ÄÇCD.‚ÄÇInserting‚ÄÇthese‚ÄÇ
types‚ÄÇof‚ÄÇCDs‚ÄÇmay‚ÄÇcause‚ÄÇthem‚ÄÇto‚ÄÇget‚ÄÇstuck‚ÄÇor‚ÄÇdamage‚ÄÇthe‚ÄÇaudio‚ÄÇunit.
NOTICE
Selector knob: Press to display the track
or folder listing. Rotate to scroll through
tracks, and select a track to play.
CD display
() buttons:
Press to skip to the
next or previous
folder. SCAN button: Press
to sample each track.
Press again to sample
the first file in each
folder. Press and hold
to turn off scan.Seek/Skip buttons:
Press to change tracks.
Press and hold to move
rapidly within a track.
Models with one display
iPod®
Play and operate an iPod through the vehicle’s audio system. Connect your device
(see page 55).
iPod display
Seek/Skip buttons:
Press to change
tracks. AUX button:
Play iPod.
Selector knob: Press
to display the iPod
menu. Rotate to scroll
through items, and
select an item to play.
() button: Press‚ÄÇto‚ÄÇgo‚ÄÇback‚ÄÇto the previous
display.
Searching for Music
Use‚ÄÇthe‚ÄÇselector‚ÄÇknob‚ÄÇto‚ÄÇsearch‚ÄÇfor‚ÄÇtracks‚ÄÇstored‚ÄÇon‚ÄÇthe‚ÄÇiPod.
1. From‚ÄÇthe‚ÄÇaudio‚ÄÇscreen,‚ÄÇpress‚ÄÇthe‚ÄÇselector‚ÄÇknob.
2. Select a search option.
3. Select the track you want to play.
iPod‚ÄÇis‚ÄÇa‚ÄÇtrademark‚ÄÇof‚ÄÇApple,‚ÄÇInc.
Page 35 of 80
62 || 63
AUDIO AND CONNECTIVITY
AUDIO AND CONNECTIVITY
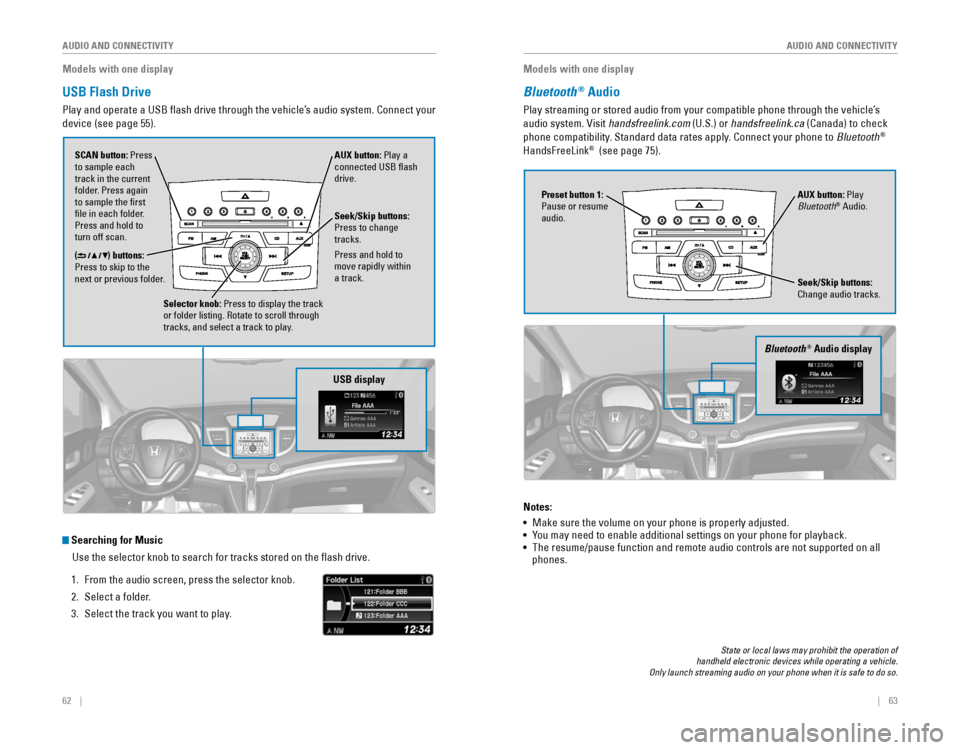
Searching for Music
Use‚ÄÇthe‚ÄÇselector‚ÄÇknob‚ÄÇto‚ÄÇsearch‚ÄÇfor‚ÄÇtracks‚ÄÇstored‚ÄÇon‚ÄÇthe‚ÄÇflash‚ÄÇdrive.
1. From‚ÄÇthe‚ÄÇaudio‚ÄÇscreen,‚ÄÇpress‚ÄÇthe‚ÄÇselector‚ÄÇknob.
2. Select a folder.
3. Select the track you want to play.
Models with one display
USB Flash Drive
Play and operate a USB flash drive through the vehicle’s audio system. Connect your
device (see page 55).
Selector knob: Press to display the track
or folder listing. Rotate to scroll through
tracks, and select a track to play.
() buttons:
Press to skip to the
next or previous folder. SCAN button: Press
to sample each
track in the current
folder. Press again
to sample the first
file in each folder.
Press and hold to
turn off scan. AUX button: Play a
connected USB flash
drive.
USB display
Seek/Skip buttons:
Press to change
tracks.
Press and hold to
move rapidly within
a track.
Models with one display
Bluetooth® Audio
Play streaming or stored audio from your compatible phone through the vehicle’s 
audio system. Visit handsfreelink.com (U.S.) or handsfreelink.ca (Canada) to check
phone compatibility. Standard data rates apply. Connect your phone to Bluetooth®
HandsFreeLink®  (see page 75).
Seek/Skip buttons:
Change audio tracks. AUX button: Play
Bluetooth
® Audio.
Preset button 1:
Pause or resume
audio.
Bluetooth® Audio display
Notes:
•  Make sure the volume on your phone is properly adjusted.
• 
You may need to enable additional settings on your phone for playback.• The resume/pause function and remote audio controls are not supported on all phones.
State‚ÄÇor‚ÄÇlocal‚ÄÇlaws‚ÄÇmay‚ÄÇprohibit‚ÄÇthe‚ÄÇoperation‚ÄÇof‚ÄÇ‚ÄÇhandheld‚ÄÇelectronic‚ÄÇdevices‚ÄÇwhile‚ÄÇoperating‚ÄÇa‚ÄÇvehicle.‚ÄÇOnly‚ÄÇlaunch‚ÄÇstreaming‚ÄÇaudio‚ÄÇon‚ÄÇyour‚ÄÇphone‚ÄÇwhen‚ÄÇit‚ÄÇis‚ÄÇsafe‚ÄÇto‚ÄÇdo‚ÄÇso.
Page 36 of 80
64‚ÄÇ‚ÄÇ‚ÄÇ‚ÄÇ|| 65
AUDIO AND CONNECTIVITY
AUDIO AND CONNECTIVITY
Models with one display
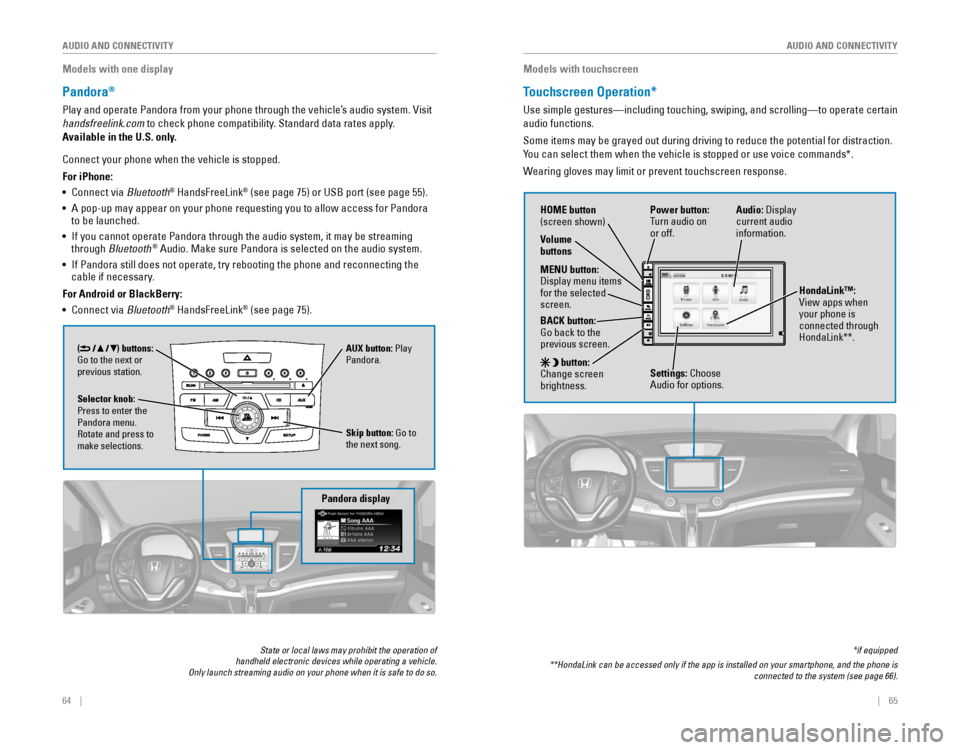
Pandora®
Play and operate Pandora from your phone through the vehicle’s audio system. Visit
handsfreelink.com
‚ÄÇto‚ÄÇcheck‚ÄÇphone‚ÄÇcompatibility.‚ÄÇStandard‚ÄÇdata‚ÄÇrates‚ÄÇapply.
Available in the U.S. only.
Connect your phone when the vehicle is stopped.
For iPhone:
•  Connect via Bluetooth
® HandsFreeLink® (see page 75) or USB port (see page 55).
• A pop-up may appear on your phone requesting you to allow access for Pandora to be launched.
• If you cannot operate Pandora through the audio system, it may be streaming through Bluetooth® Audio. Make sure Pandora is selected on the audio system.
• 
If‚ÄÇPandora‚ÄÇstill‚ÄÇdoes‚ÄÇnot‚ÄÇoperate,‚ÄÇtry‚ÄÇrebooting‚ÄÇthe‚ÄÇphone‚ÄÇand‚ÄÇreconnecting‚ÄÇthe cable‚ÄÇif‚ÄÇnecessary.‚ÄÇ
For Android or BlackBerry:
•  Connect via Bluetooth® HandsFreeLink® (see page 75).
Pandora display
Skip button: Go to
the next song.
Selector knob:
Press to enter the
Pandora menu.
Rotate and press to
make selections. AUX button: Play
Pandora.
() buttons:
Go to the next or
previous station.
State‚ÄÇor‚ÄÇlocal‚ÄÇlaws‚ÄÇmay‚ÄÇprohibit‚ÄÇthe‚ÄÇoperation‚ÄÇof‚ÄÇ‚ÄÇhandheld‚ÄÇelectronic‚ÄÇdevices‚ÄÇwhile‚ÄÇoperating‚ÄÇa‚ÄÇvehicle.‚ÄÇOnly‚ÄÇlaunch‚ÄÇstreaming‚ÄÇaudio‚ÄÇon‚ÄÇyour‚ÄÇphone‚ÄÇwhen‚ÄÇit‚ÄÇis‚ÄÇsafe‚ÄÇto‚ÄÇdo‚ÄÇso.
Models with touchscreen
Touchscreen Operation*
Use simple gestures—including touching, swiping, and scrolling—to \
operate certain
audio functions.
Some‚ÄÇitems‚ÄÇmay‚ÄÇbe‚ÄÇgrayed‚ÄÇout‚ÄÇduring‚ÄÇdriving‚ÄÇto‚ÄÇreduce‚ÄÇthe‚ÄÇpotential‚ÄÇfor‚ÄÇdistraction.‚ÄÇ
You‚ÄÇcan‚ÄÇselect‚ÄÇthem‚ÄÇwhen‚ÄÇthe‚ÄÇvehicle‚ÄÇis‚ÄÇstopped‚ÄÇor‚ÄÇuse‚ÄÇvoice‚ÄÇcommands*.
Wearing gloves may limit or prevent touchscreen response.
*if‚ÄÇequipped
**HondaLink‚ÄÇcan‚ÄÇbe‚ÄÇaccessed‚ÄÇonly‚ÄÇif‚ÄÇthe‚ÄÇapp‚ÄÇis‚ÄÇinstalled‚ÄÇon‚ÄÇyour‚ÄÇsmartphone,‚ÄÇand‚ÄÇthe‚ÄÇphone‚ÄÇis‚ÄÇconnected‚ÄÇto‚ÄÇthe‚ÄÇsystem‚ÄÇ(see‚ÄÇpage‚ÄÇ66).
Power button:
Turn audio on
or off.
HOME button
(screen shown)
MENU button:
Display‚ÄÇmenu‚ÄÇitems‚ÄÇfor the selected
screen.
BACK button:
Go‚ÄÇback‚ÄÇto‚ÄÇthe‚ÄÇprevious screen.
button:
Change screen
brightness. Settings: Choose
Audio for options. HondaLink‚Ñ¢:
View apps when
your phone is
connected through
HondaLink**.
Audio:
‚ÄÇDisplay‚ÄÇcurrent audio
information.
Volume
buttons
Page 43 of 80
78‚ÄÇ‚ÄÇ‚ÄÇ‚ÄÇ||‚ÄÇ‚ÄÇ‚ÄÇ‚ÄÇ79
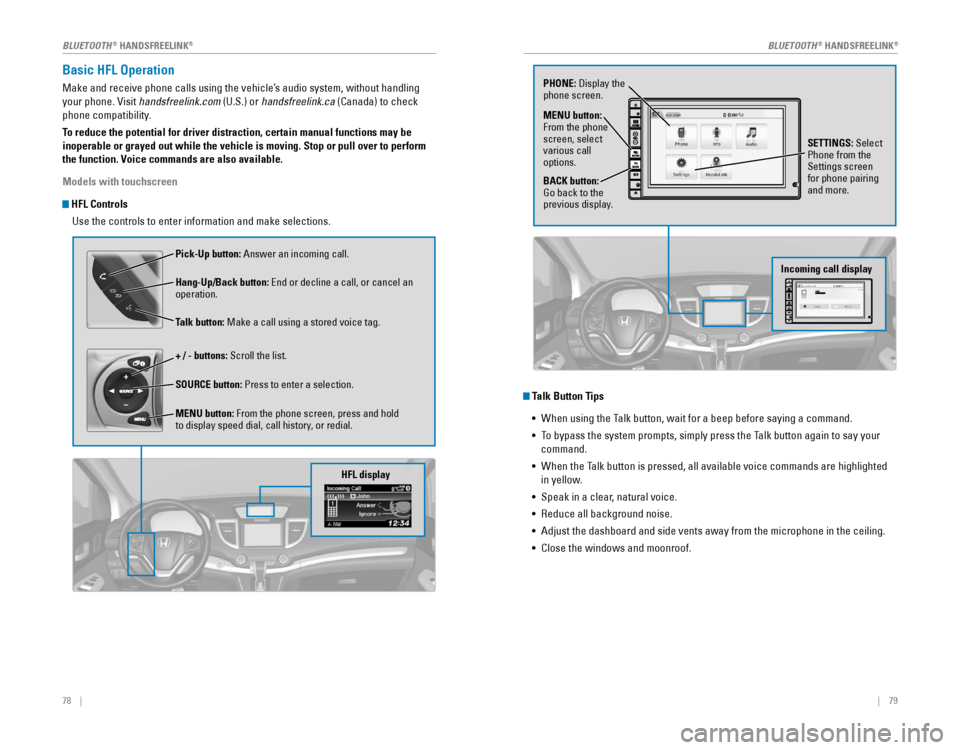
Basic HFL Operation
Make and receive phone calls using the vehicle’s audio system, without handling
your phone. Visit handsfreelink.com (U.S.) or handsfreelink.ca (Canada) to check
phone‚ÄÇcompatibility.
To reduce the potential for driver distraction, certain manual functions \
may be
inoperable or grayed out while the vehicle is moving. Stop or pull over \
to perform
the function. Voice commands are also available.
Models with touchscreen
HFL Controls
Use the controls to enter information and make selections.
Pick-Up button: Answer an incoming call.
Hang-Up/Back button:
‚ÄÇEnd‚ÄÇor‚ÄÇdecline‚ÄÇa‚ÄÇcall,‚ÄÇor‚ÄÇcancel‚ÄÇan‚ÄÇoperation.
Talk button: Make a call using a stored voice tag.
+ / - buttons: Scroll the list.
SOURCE button: Press to enter a selection.
MENU button: From the phone screen, press and hold
to display speed dial, call history, or redial.
HFL display
Talk Button Tips
• 
When‚ÄÇusing‚ÄÇthe‚ÄÇTalk‚ÄÇbutton,‚ÄÇwait‚ÄÇfor‚ÄÇa‚ÄÇbeep‚ÄÇbefore‚ÄÇsaying‚ÄÇa‚ÄÇcommand.
• To bypass the system prompts, simply press the Talk button again to say your 
command.
• 
When‚ÄÇthe‚ÄÇTalk‚ÄÇbutton‚ÄÇis‚ÄÇpressed,‚ÄÇall‚ÄÇavailable‚ÄÇvoice‚ÄÇcommands‚ÄÇare‚ÄÇhighlighted‚ÄÇ
in yellow.
•  Speak in a clear, natural voice.
• 
Reduce‚ÄÇall‚ÄÇbackground‚ÄÇnoise.
• Adjust the dashboard and side vents away from the microphone in the ceiling.
•  Close the windows and moonroof.
PHONE:‚ÄÇDisplay‚ÄÇthe‚ÄÇphone screen.
MENU button:
From the phone
screen, select
various call
options.
BACK button:
Go‚ÄÇback‚ÄÇto‚ÄÇthe‚ÄÇprevious display. SETTINGS: Select
Phone from the
Settings screen
for phone pairing
and more.
Incoming call display
BLUETOOTH® HANDSFREELINK®BLUETOOTH® HANDSFREELINK®
Page 46 of 80
| 85
NAVIGATION84‚ÄÇ‚ÄÇ‚ÄÇ‚ÄÇ|
Models with touchscreen
HondaLink‚Ñ¢ Assist
Automatically connect and talk to an operator who can locate your vehicl\
e and send
emergency help in the event of a collision. Visit www.hondalink.com (U.S.) or honda.
ca/hondalinkassist (Canada) for more information.
1. Make sure your phone is on and paired to Bluetooth®
HandsFreeLink® (see page 80).
2. Select Call Now, or the system automatically
connects after 10 seconds. The vehicle information
and its position are sent to the operator.
3. Select Talk Now to immediately talk to the operator.
4.‚ÄÇWhen the call is complete, select Hang Up or press
the‚ÄÇHang‚ÄÇUp/Back‚ÄÇbutton‚ÄÇon‚ÄÇthe‚ÄÇsteering‚ÄÇwheel.
Learn how to enter a destination and operate the navigation system.
Basic Navigation Operation
A‚ÄÇreal-time‚ÄÇnavigation‚ÄÇsystem‚ÄÇuses‚ÄÇGPS‚ÄÇand‚ÄÇa‚ÄÇmap‚ÄÇdatabase‚ÄÇto‚ÄÇshow‚ÄÇyour‚ÄÇcurrent‚ÄÇ
location and help guide you to a desired destination. You can operate the system
using voice commands or the touchscreen.
To reduce the potential for driver distraction, certain manual functions \
may be
inoperable or grayed out while the vehicle is moving. Voice commands are always
available.
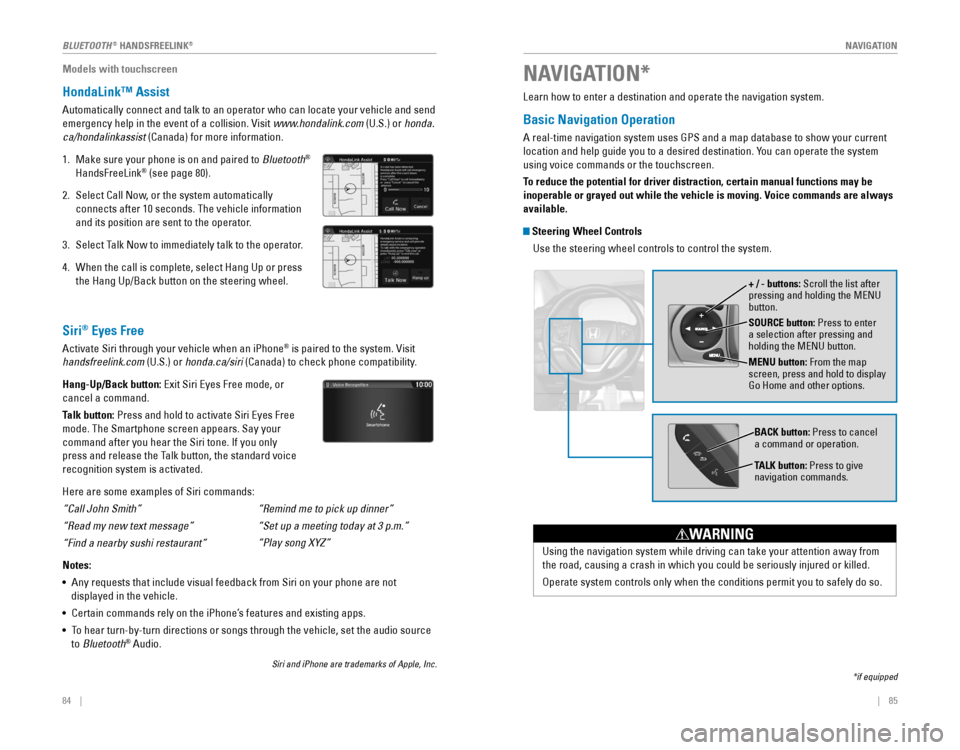
Steering Wheel Controls
Use the steering wheel controls to control the system.
NAVIGATION*
*if‚ÄÇequipped
SOURCE button: Press to enter
a selection after pressing and
holding‚ÄÇthe‚ÄÇMENU‚ÄÇbutton.
MENU button: From the map
screen, press and hold to display
Go Home and other options. + / - buttons: Scroll the list after
pressing‚ÄÇand‚ÄÇholding‚ÄÇthe‚ÄÇMENU‚ÄÇbutton.
Using the navigation system while driving can take your attention away f\
rom
the‚ÄÇroad,‚ÄÇcausing‚ÄÇa‚ÄÇcrash‚ÄÇin‚ÄÇwhich‚ÄÇyou‚ÄÇcould‚ÄÇbe‚ÄÇseriously‚ÄÇinjured‚ÄÇor‚ÄÇkilled.
Operate system controls only when the conditions permit you to safely do\
so.
WARNING
BACK button: Press to cancel
a command or operation.
TALK button: Press to give
navigation commands.
Siri® Eyes Free
Activate Siri through your vehicle when an iPhone® is paired to the system. Visit
handsfreelink.com (U.S.) or honda.ca/siri
‚ÄÇ(Canada)‚ÄÇto‚ÄÇcheck‚ÄÇphone‚ÄÇcompatibility.
Hang-Up/Back button: Exit‚ÄÇSiri‚ÄÇEyes‚ÄÇFree‚ÄÇmode,‚ÄÇor‚ÄÇ
cancel a command.
Talk button:
Press‚ÄÇand‚ÄÇhold‚ÄÇto‚ÄÇactivate‚ÄÇSiri‚ÄÇEyes‚ÄÇFree‚ÄÇ
mode. The Smartphone screen appears. Say your
command‚ÄÇafter‚ÄÇyou‚ÄÇhear‚ÄÇthe‚ÄÇSiri‚ÄÇtone.‚ÄÇIf‚ÄÇyou‚ÄÇonly‚ÄÇ
press‚ÄÇand‚ÄÇrelease‚ÄÇthe‚ÄÇTalk‚ÄÇbutton,‚ÄÇthe‚ÄÇstandard‚ÄÇvoice‚ÄÇ
recognition system is activated.
Here are some examples of Siri commands:
“Call John Smith”
“Read my new text message”
“Find a nearby sushi restaurant”
Notes:
• 
Any‚ÄÇrequests‚ÄÇthat‚ÄÇinclude‚ÄÇvisual‚ÄÇfeedback‚ÄÇfrom‚ÄÇSiri‚ÄÇon‚ÄÇyour‚ÄÇphone‚ÄÇare‚ÄÇnot‚ÄÇ
displayed in the vehicle.
•  Certain commands rely on the iPhone’s features and existing apps.
• 
To‚ÄÇhear‚ÄÇturn-by-turn‚ÄÇdirections‚ÄÇor‚ÄÇsongs‚ÄÇthrough‚ÄÇthe‚ÄÇvehicle,‚ÄÇset‚ÄÇthe‚ÄÇaudio‚ÄÇsource‚ÄÇ
to Bluetooth® Audio.
Siri‚ÄÇand‚ÄÇiPhone‚ÄÇare‚ÄÇtrademarks‚ÄÇof‚ÄÇApple,‚ÄÇInc.
“Remind me to pick up dinner”
“Set
 up a meeting today at 3 p.m.”
“Play
 song XYZ”
BLUETOOTH® HANDSFREELINK®
Page 57 of 80
106 ||‚ÄÇ‚ÄÇ‚ÄÇ‚ÄÇ107
DRIVING
DRIVING
*if‚ÄÇequipped
Collision Mitigation Braking System‚Ñ¢ (CMBS‚Ñ¢)*
Can alert you when a potential frontal collision with a vehicle or pedes\
trian is
determined‚ÄÇand‚ÄÇreduce‚ÄÇyour‚ÄÇvehicle‚ÄÇspeed‚ÄÇwhen‚ÄÇa‚ÄÇcollision‚ÄÇis‚ÄÇdeemed‚ÄÇunavoidable‚ÄÇ
to‚ÄÇhelp‚ÄÇminimize‚ÄÇcollision‚ÄÇseverity.
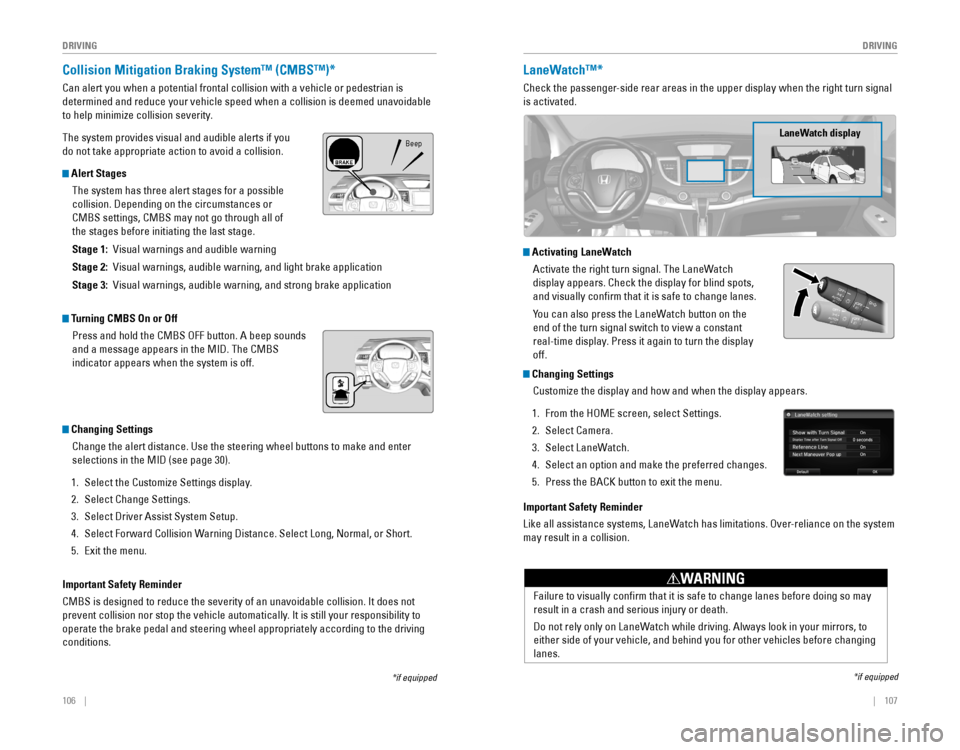
The‚ÄÇsystem‚ÄÇprovides‚ÄÇvisual‚ÄÇand‚ÄÇaudible‚ÄÇalerts‚ÄÇif‚ÄÇyou‚ÄÇ
do not take appropriate action to avoid a collision.
Alert Stages
The‚ÄÇsystem‚ÄÇhas‚ÄÇthree‚ÄÇalert‚ÄÇstages‚ÄÇfor‚ÄÇa‚ÄÇpossible‚ÄÇ
collision.‚ÄÇDepending‚ÄÇon‚ÄÇthe‚ÄÇcircumstances‚ÄÇor‚ÄÇ
CMBS settings, CMBS may not go through all of
the‚ÄÇstages‚ÄÇbefore‚ÄÇinitiating‚ÄÇthe‚ÄÇlast‚ÄÇstage.
Stage 1:‚ÄÇ‚ÄÇVisual‚ÄÇwarnings‚ÄÇand‚ÄÇaudible‚ÄÇwarning
Stage 2:‚ÄÇ‚ÄÇVisual‚ÄÇwarnings,‚ÄÇaudible‚ÄÇwarning,‚ÄÇand‚ÄÇlight‚ÄÇbrake‚ÄÇapplication
Stage 3:‚ÄÇ‚ÄÇVisual‚ÄÇwarnings,‚ÄÇaudible‚ÄÇwarning,‚ÄÇand‚ÄÇstrong‚ÄÇbrake‚ÄÇapplication
Beep
LaneWatch‚Ñ¢*
Check the passenger-side rear areas in the upper display when the right turn signal
is activated.
LaneWatch display
Activating LaneWatch
Activate the right turn signal. The LaneWatch
display‚ÄÇappears.‚ÄÇCheck‚ÄÇthe‚ÄÇdisplay‚ÄÇfor‚ÄÇblind‚ÄÇspots,‚ÄÇ
and visually confirm that it is safe to change lanes.
You‚ÄÇcan‚ÄÇalso‚ÄÇpress‚ÄÇthe‚ÄÇLaneWatch‚ÄÇbutton‚ÄÇon‚ÄÇthe‚ÄÇ
end of the turn signal switch to view a constant
real-time display. Press it again to turn the display
off.
*if‚ÄÇequipped
Turning CMBS On or Off
Press‚ÄÇand‚ÄÇhold‚ÄÇthe‚ÄÇCMBS‚ÄÇOFF‚ÄÇbutton.‚ÄÇA‚ÄÇbeep‚ÄÇsounds‚ÄÇ
and‚ÄÇa‚ÄÇmessage‚ÄÇappears‚ÄÇin‚ÄÇthe‚ÄÇMID.‚ÄÇThe‚ÄÇCMBS‚ÄÇ
indicator appears when the system is off.
Changing Settings
Change‚ÄÇthe‚ÄÇalert‚ÄÇdistance.‚ÄÇUse‚ÄÇthe‚ÄÇsteering‚ÄÇwheel‚ÄÇbuttons‚ÄÇto‚ÄÇmake‚ÄÇand‚ÄÇenter‚ÄÇ
selections‚ÄÇin‚ÄÇthe‚ÄÇMID‚ÄÇ(see‚ÄÇpage‚ÄÇ30).
1. Select‚ÄÇthe‚ÄÇCustomize‚ÄÇSettings‚ÄÇdisplay.
2. Select Change Settings.
3. Select‚ÄÇDriver‚ÄÇAssist‚ÄÇSystem‚ÄÇSetup.
4.‚ÄÇSelect‚ÄÇForward‚ÄÇCollision‚ÄÇWarning‚ÄÇDistance.‚ÄÇSelect‚ÄÇLong,‚ÄÇNormal,‚ÄÇor‚ÄÇShort.
5. Exit‚ÄÇthe‚ÄÇmenu.
Important Safety Reminder
CMBS‚ÄÇis‚ÄÇdesigned‚ÄÇto‚ÄÇreduce‚ÄÇthe‚ÄÇseverity‚ÄÇof‚ÄÇan‚ÄÇunavoidable‚ÄÇcollision.‚ÄÇIt‚ÄÇdoes‚ÄÇnot‚ÄÇ
prevent‚ÄÇcollision‚ÄÇnor‚ÄÇstop‚ÄÇthe‚ÄÇvehicle‚ÄÇautomatically.‚ÄÇIt‚ÄÇis‚ÄÇstill‚ÄÇyour‚ÄÇresponsibility‚ÄÇto‚ÄÇ
operate‚ÄÇthe‚ÄÇbrake‚ÄÇpedal‚ÄÇand‚ÄÇsteering‚ÄÇwheel‚ÄÇappropriately‚ÄÇaccording‚ÄÇto‚ÄÇthe‚ÄÇdriving‚ÄÇ
conditions.
Failure‚ÄÇto‚ÄÇvisually‚ÄÇconfirm‚ÄÇthat‚ÄÇit‚ÄÇis‚ÄÇsafe‚ÄÇto‚ÄÇchange‚ÄÇlanes‚ÄÇbefore‚ÄÇdoing‚ÄÇso‚ÄÇmay‚ÄÇ
result in a crash and serious injury or death.
Do‚ÄÇnot‚ÄÇrely‚ÄÇonly‚ÄÇon‚ÄÇLaneWatch‚ÄÇwhile‚ÄÇdriving.‚ÄÇAlways‚ÄÇlook‚ÄÇin‚ÄÇyour‚ÄÇmirrors,‚ÄÇto‚ÄÇ
either‚ÄÇside‚ÄÇof‚ÄÇyour‚ÄÇvehicle,‚ÄÇand‚ÄÇbehind‚ÄÇyou‚ÄÇfor‚ÄÇother‚ÄÇvehicles‚ÄÇbefore‚ÄÇchanging‚ÄÇ
lanes.
WARNING
Changing Settings
Customize‚ÄÇthe‚ÄÇdisplay‚ÄÇand‚ÄÇhow‚ÄÇand‚ÄÇwhen‚ÄÇthe‚ÄÇdisplay‚ÄÇappears.
1. From‚ÄÇthe‚ÄÇHOME‚ÄÇscreen,‚ÄÇselect‚ÄÇSettings.
2. Select Camera.
3. Select LaneWatch.
4.‚ÄÇSelect an option and make the preferred changes.
5. Press‚ÄÇthe‚ÄÇBACK‚ÄÇbutton‚ÄÇto‚ÄÇexit‚ÄÇthe‚ÄÇmenu.
Important Safety Reminder
Like all assistance systems, LaneWatch has limitations. Over-reliance on the system
may result in a collision.
Page 61 of 80
114‚ÄÇ‚ÄÇ‚ÄÇ‚ÄÇ|| 115
HANDLING THE UNEXPECTED
HANDLING THE UNEXPECTED
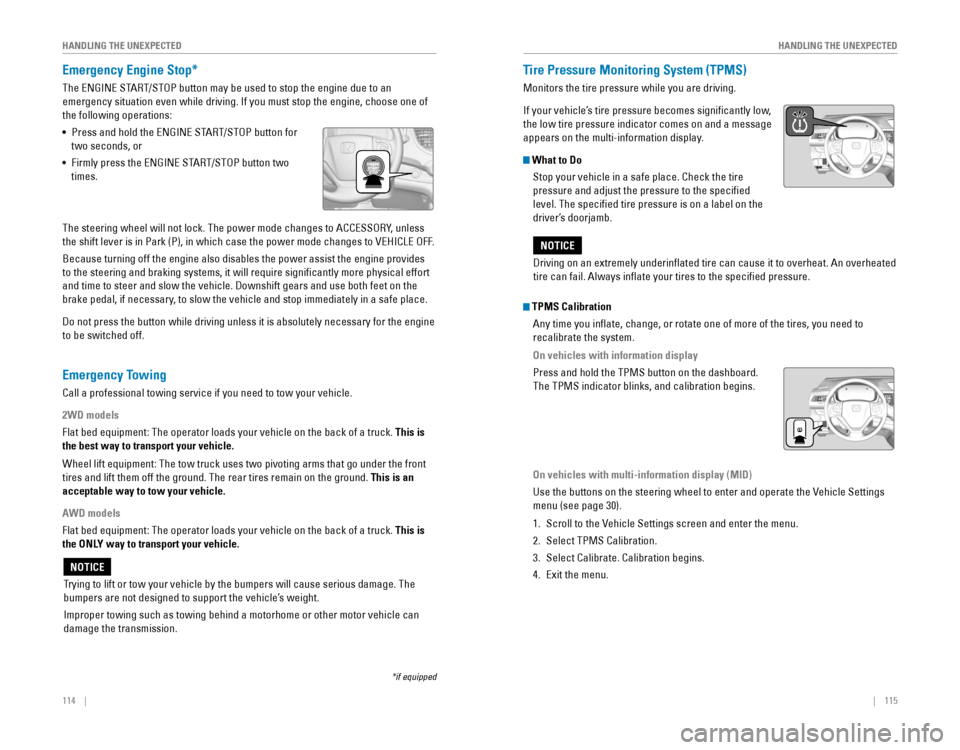
Emergency Engine Stop*
The‚ÄÇENGINE‚ÄÇSTART/STOP‚ÄÇbutton‚ÄÇmay‚ÄÇbe‚ÄÇused‚ÄÇto‚ÄÇstop‚ÄÇthe‚ÄÇengine‚ÄÇdue‚ÄÇto‚ÄÇan‚ÄÇ
emergency‚ÄÇsituation‚ÄÇeven‚ÄÇwhile‚ÄÇdriving.‚ÄÇIf‚ÄÇyou‚ÄÇmust‚ÄÇstop‚ÄÇthe‚ÄÇengine,‚ÄÇchoose‚ÄÇone‚ÄÇof‚ÄÇ
the following operations:
• 
Press‚ÄÇand‚ÄÇhold‚ÄÇthe‚ÄÇENGINE‚ÄÇSTART/STOP‚ÄÇbutton‚ÄÇfor‚ÄÇ
two seconds, or
• 
Firmly‚ÄÇpress‚ÄÇthe‚ÄÇENGINE‚ÄÇSTART/STOP‚ÄÇbutton‚ÄÇtwo‚ÄÇ
times.
The‚ÄÇsteering‚ÄÇwheel‚ÄÇwill‚ÄÇnot‚ÄÇlock.‚ÄÇThe‚ÄÇpower‚ÄÇmode‚ÄÇchanges‚ÄÇto‚ÄÇACCESSORY,‚ÄÇunless‚ÄÇ
the‚ÄÇshift‚ÄÇlever‚ÄÇis‚ÄÇin‚ÄÇPark‚ÄÇ(P),‚ÄÇin‚ÄÇwhich‚ÄÇcase‚ÄÇthe‚ÄÇpower‚ÄÇmode‚ÄÇchanges‚ÄÇto‚ÄÇVEHICLE‚ÄÇOFF.
Because‚ÄÇturning‚ÄÇoff‚ÄÇthe‚ÄÇengine‚ÄÇalso‚ÄÇdisables‚ÄÇthe‚ÄÇpower‚ÄÇassist‚ÄÇthe‚ÄÇengine‚ÄÇprovides‚ÄÇ
to‚ÄÇthe‚ÄÇsteering‚ÄÇand‚ÄÇbraking‚ÄÇsystems,‚ÄÇit‚ÄÇwill‚ÄÇrequire‚ÄÇsignificantly‚ÄÇmore‚ÄÇphysical‚ÄÇeffort‚ÄÇ
and‚ÄÇtime‚ÄÇto‚ÄÇsteer‚ÄÇand‚ÄÇslow‚ÄÇthe‚ÄÇvehicle.‚ÄÇDownshift‚ÄÇgears‚ÄÇand‚ÄÇuse‚ÄÇboth‚ÄÇfeet‚ÄÇon‚ÄÇthe‚ÄÇ
brake‚ÄÇpedal,‚ÄÇif‚ÄÇnecessary,‚ÄÇto‚ÄÇslow‚ÄÇthe‚ÄÇvehicle‚ÄÇand‚ÄÇstop‚ÄÇimmediately‚ÄÇin‚ÄÇa‚ÄÇsafe‚ÄÇplace.
Do‚ÄÇnot‚ÄÇpress‚ÄÇthe‚ÄÇbutton‚ÄÇwhile‚ÄÇdriving‚ÄÇunless‚ÄÇit‚ÄÇis‚ÄÇabsolutely‚ÄÇnecessary‚ÄÇfor‚ÄÇthe‚ÄÇengine‚ÄÇ
to‚ÄÇbe‚ÄÇswitched‚ÄÇoff.
*if‚ÄÇequipped
Trying‚ÄÇto‚ÄÇlift‚ÄÇor‚ÄÇtow‚ÄÇyour‚ÄÇvehicle‚ÄÇby‚ÄÇthe‚ÄÇbumpers‚ÄÇwill‚ÄÇcause‚ÄÇserious‚ÄÇdamage.‚ÄÇThe‚ÄÇ
bumpers are not designed to support the vehicle’s weight.
Improper‚ÄÇtowing‚ÄÇsuch‚ÄÇas‚ÄÇtowing‚ÄÇbehind‚ÄÇa‚ÄÇmotorhome‚ÄÇor‚ÄÇother‚ÄÇmotor‚ÄÇvehicle‚ÄÇcan‚ÄÇ
damage the transmission.
NOTICE
Tire Pressure Monitoring System (TPMS)
Monitors the tire pressure while you are driving.
If your vehicle’s tire pressure becomes significantly low, 
the low tire pressure indicator comes on and a message
appears on the multi-information display.
What to Do Stop your vehicle in a safe place. Check the tire
pressure and adjust the pressure to the specified
level.‚ÄÇThe‚ÄÇspecified‚ÄÇtire‚ÄÇpressure‚ÄÇis‚ÄÇon‚ÄÇa‚ÄÇlabel‚ÄÇon‚ÄÇthe‚ÄÇ
driver’s doorjamb.
Emergency Towing
Call a professional towing service if you need to tow your vehicle.
2WD models
Flat‚ÄÇbed‚ÄÇequipment:‚ÄÇThe‚ÄÇoperator‚ÄÇloads‚ÄÇyour‚ÄÇvehicle‚ÄÇon‚ÄÇthe‚ÄÇback‚ÄÇof‚ÄÇa‚ÄÇtruck.‚ÄÇThis is
the best way to transport your vehicle.
Wheel‚ÄÇlift‚ÄÇequipment:‚ÄÇThe‚ÄÇtow‚ÄÇtruck‚ÄÇuses‚ÄÇtwo‚ÄÇpivoting‚ÄÇarms‚ÄÇthat‚ÄÇgo‚ÄÇunder‚ÄÇthe‚ÄÇfront‚ÄÇ
tires and lift them off the ground. The rear tires remain on the ground.\
This is an
acceptable way to tow your vehicle.
AWD models
Flat‚ÄÇbed‚ÄÇequipment:‚ÄÇThe‚ÄÇoperator‚ÄÇloads‚ÄÇyour‚ÄÇvehicle‚ÄÇon‚ÄÇthe‚ÄÇback‚ÄÇof‚ÄÇa‚ÄÇtruck.‚ÄÇThis is
the ONLY way to transport your vehicle.
Driving‚ÄÇon‚ÄÇan‚ÄÇextremely‚ÄÇunderinflated‚ÄÇtire‚ÄÇcan‚ÄÇcause‚ÄÇit‚ÄÇto‚ÄÇoverheat.‚ÄÇAn‚ÄÇoverheated‚ÄÇ
tire can fail. Always inflate your tires to the specified pressure.
NOTICE
TPMS Calibration
Any time you inflate, change, or rotate one of more of the tires, you \
need to
recalibrate‚ÄÇthe‚ÄÇsystem.
On vehicles with information display
Press‚ÄÇand‚ÄÇhold‚ÄÇthe‚ÄÇTPMS‚ÄÇbutton‚ÄÇon‚ÄÇthe‚ÄÇdashboard.‚ÄÇ
The‚ÄÇTPMS‚ÄÇindicator‚ÄÇblinks,‚ÄÇand‚ÄÇcalibration‚ÄÇbegins.
On vehicles with multi-information display (MID)
Use‚ÄÇthe‚ÄÇbuttons‚ÄÇon‚ÄÇthe‚ÄÇsteering‚ÄÇwheel‚ÄÇto‚ÄÇenter‚ÄÇand‚ÄÇoperate‚ÄÇthe‚ÄÇVehicle‚ÄÇSettings‚ÄÇ
menu (see page 30).
1. Scroll to the Vehicle Settings screen and enter the menu.
2. Select‚ÄÇTPMS‚ÄÇCalibration.
3. Select‚ÄÇCalibrate.‚ÄÇCalibration‚ÄÇbegins.
4.‚ÄÇExit‚ÄÇthe‚ÄÇmenu.
Page 68 of 80
128 || 129
MAINTENANCE
MAINTENANCE
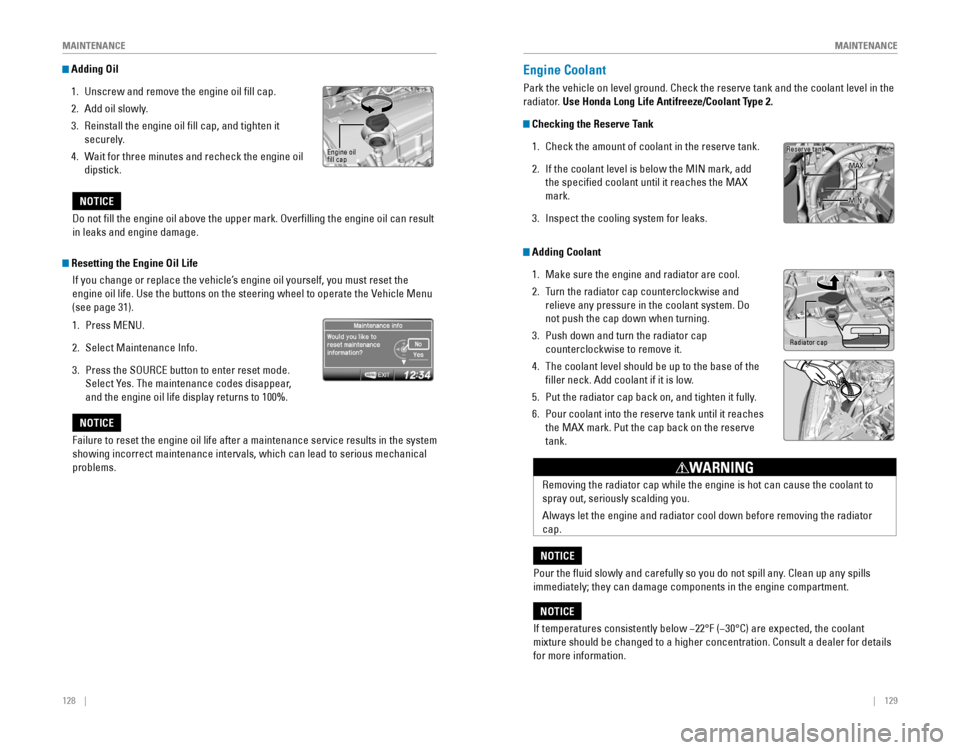
Adding Oil
1. Unscrew and remove the engine oil fill cap.
2. Add oil slowly.
3. Reinstall the engine oil fill cap, and tighten it
securely.
4.‚ÄÇWait for three minutes and recheck the engine oil
dipstick.Engine‚ÄÇoil‚ÄÇfill cap
Do‚ÄÇnot‚ÄÇfill‚ÄÇthe‚ÄÇengine‚ÄÇoil‚ÄÇabove‚ÄÇthe‚ÄÇupper‚ÄÇmark.‚ÄÇOverfilling‚ÄÇthe‚ÄÇengine‚ÄÇoil‚ÄÇcan‚ÄÇresult‚ÄÇ
in leaks and engine damage.
NOTICE
Failure to reset the engine oil life after a maintenance service results\
in the system
showing incorrect maintenance intervals, which can lead to serious mecha\
nical
problems.
NOTICE
Resetting the Engine Oil Life
If you change or replace the vehicle’s engine oil yourself, you must reset the 
engine‚ÄÇoil‚ÄÇlife.‚ÄÇUse‚ÄÇthe‚ÄÇbuttons‚ÄÇon‚ÄÇthe‚ÄÇsteering‚ÄÇwheel‚ÄÇto‚ÄÇoperate‚ÄÇthe‚ÄÇVehicle‚ÄÇMenu‚ÄÇ
(see page 31).
1. Press‚ÄÇMENU.
2. Select‚ÄÇMaintenance‚ÄÇInfo.
3. Press‚ÄÇthe‚ÄÇSOURCE‚ÄÇbutton‚ÄÇto‚ÄÇenter‚ÄÇreset‚ÄÇmode.
Select Yes. The maintenance codes disappear,
and‚ÄÇthe‚ÄÇengine‚ÄÇoil‚ÄÇlife‚ÄÇdisplay‚ÄÇreturns‚ÄÇto‚ÄÇ100%.
Engine Coolant
Park the vehicle on level ground. Check the reserve tank and the coolant\
level in the
radiator. Use Honda Long Life Antifreeze/Coolant Type 2.
Checking the Reserve Tank
1. Check the amount of coolant in the reserve tank.
2. If‚ÄÇthe‚ÄÇcoolant‚ÄÇlevel‚ÄÇis‚ÄÇbelow‚ÄÇthe‚ÄÇMIN‚ÄÇmark,‚ÄÇadd‚ÄÇ
the specified coolant until it reaches the MAX
mark.
3. Inspect‚ÄÇthe‚ÄÇcooling‚ÄÇsystem‚ÄÇfor‚ÄÇleaks.
If temperatures consistently below −22°F (−30°C) are expected, the coolant 
mixture‚ÄÇshould‚ÄÇbe‚ÄÇchanged‚ÄÇto‚ÄÇa‚ÄÇhigher‚ÄÇconcentration.‚ÄÇConsult‚ÄÇa‚ÄÇdealer‚ÄÇfor‚ÄÇdetails‚ÄÇ
for more information.
NOTICE
Reserve tank
MAX
MIN
Removing the radiator cap while the engine is hot can cause the coolant \
to
spray out, seriously scalding you.
Always‚ÄÇlet‚ÄÇthe‚ÄÇengine‚ÄÇand‚ÄÇradiator‚ÄÇcool‚ÄÇdown‚ÄÇbefore‚ÄÇremoving‚ÄÇthe‚ÄÇradiator‚ÄÇ
cap.
WARNING
Pour the fluid slowly and carefully so you do not spill any. Clean up any spills
immediately; they can damage components in the engine compartment.
NOTICE
Adding Coolant
1. Make sure the engine and radiator are cool.
2. Turn the radiator cap counterclockwise and
relieve‚ÄÇany‚ÄÇpressure‚ÄÇin‚ÄÇthe‚ÄÇcoolant‚ÄÇsystem.‚ÄÇDo‚ÄÇ
not push the cap down when turning.
3. Push down and turn the radiator cap
counterclockwise to remove it.
4.‚ÄÇThe‚ÄÇcoolant‚ÄÇlevel‚ÄÇshould‚ÄÇbe‚ÄÇup‚ÄÇto‚ÄÇthe‚ÄÇbase‚ÄÇof‚ÄÇthe‚ÄÇ
filler neck. Add coolant if it is low.
5. Put‚ÄÇthe‚ÄÇradiator‚ÄÇcap‚ÄÇback‚ÄÇon,‚ÄÇand‚ÄÇtighten‚ÄÇit‚ÄÇfully.
6. Pour coolant into the reserve tank until it reaches
the‚ÄÇMAX‚ÄÇmark.‚ÄÇPut‚ÄÇthe‚ÄÇcap‚ÄÇback‚ÄÇon‚ÄÇthe‚ÄÇreserve‚ÄÇ
tank.
Radiator cap
Page 79 of 80
150 || 151
INDEX
INDEX
INDEX
ABS .............................................................25ACC ...........................................................102
Accessory Power Socket ...............................55
Adaptive Cruise Control (ACC) ...............25, 102Airbags‚ÄÇ ...............................................................9Advanced‚ÄÇAirbags .........................................9Airbag‚ÄÇCare ...................................................14Airbag‚ÄÇSystem‚ÄÇComponents .......................13Airbag‚ÄÇSystem‚ÄÇIndicators ...........................11Front‚ÄÇAirbags‚ÄÇ(SRS) .......................................9Passenger‚ÄÇAirbag‚ÄÇOff‚ÄÇIndicator .................12Side‚ÄÇAirbags ..................................................10Side‚ÄÇCurtain‚ÄÇAirbags ....................................10
Supplemental Restraint System indicator
.............................................11
Air Conditioning System ..................................51
All‚ÄÇWheel‚ÄÇDrive‚ÄÇ(AWD) ....................................25Ambient‚ÄÇMeter................................................ 100
Anti-Lock Brake System (ABS) ................25, 99
Audio Commands ...........................................148
Audio Operation ...............................................55
Accessory Power Socket ...........................55Auxiliary‚ÄÇInput‚ÄÇJack .....................................56
Bluetooth® Audio ...................................63, 72Compact Disc (CD) .................................60, 69FM/AM Radio ..........................................59, 67HDMI Port ......................................................56
HondaLink‚Ñ¢ ..................................................66Intelligent‚ÄÇMulti-Information‚ÄÇDisplay
(i-MID) ................................................58
iPod® .......................................................61, 70Pandora® .................................................64, 73SiriusXM® Radio ...........................................68Sound .............................................................57
Steering Wheel Controls .............................56
Touchscreen Operation ..............................65USB‚ÄÇAdapter‚ÄÇCable ......................................55USB‚ÄÇFlash‚ÄÇDrive ......................................62,‚ÄÇ71USB Port ........................................................55Automatic‚ÄÇDimming‚ÄÇRearview‚ÄÇMirror ...........49
Automatic Rain-Sensing Wipers ...................42
AUX Commands .............................................. 149
Auxiliary‚ÄÇInput‚ÄÇJack .........................................56AWD‚ÄÇ .............................................................25Battery ...........................................................130
Bluetooth® Audio .......................................63, 72Bluetooth® Audio Commands ......................149
Bluetooth® HandsFreeLink® (HFL) .................74E-Mail  .............................................................83
HFL Controls ............................................74,‚ÄÇ78HondaLink‚Ñ¢ Assist ......................................84
Making a Call ..........................................76,‚ÄÇ81Pairing a Phone ......................................75,‚ÄÇ80
Siri® Eyes Free ..............................................84
SMS Text Messaging ............................77,‚ÄÇ83Speed‚ÄÇDial ...............................................76,‚ÄÇ82Talk Button Tips ............................................79
Brake Assist System ........................................ 99
Brake Fluid
......................................................130
Brake system ..............................................24,‚ÄÇ26Braking .............................................................99
Brightness Control ...........................................39Carbon‚ÄÇMonoxide‚ÄÇGas....................................... 4
Cargo Area Lights ............................................39
Changing a Flat Tire .......................................117
Changing Settings ......................................30, 31
Changing Wiper Blades ................................131
Charging system ............................................... 24
Childproof‚ÄÇDoor‚ÄÇLocks .....................................34
Child Safety .......................................................15
Child Seat ..........................................................17
Adding Security with a Tether ...................20LATCH-Compatible‚ÄÇChild‚ÄÇSeat ....................18
Selecting a Child Seat .................................17
Climate Control Commands ..........................147
Climate Control System ...................................52Clock .............................................................54
Collision Mitigation Braking System‚Ñ¢ (CMBS‚Ñ¢)
...................................25, 106Compact‚ÄÇDisc‚ÄÇ(CD) .....................................60, 69Compact‚ÄÇDisc‚ÄÇ(CD)‚ÄÇCommands ....................148Condition‚ÄÇIndicators ........................................26
Contact Us .......................................................142
Cruise Control ...........................................27,‚ÄÇ101Customer‚ÄÇInformation.................................... 141Customized‚ÄÇFeatures .......................................31Dashboard‚ÄÇControls .......................................... 2
Destination ........................................................88Detour‚ÄÇ .............................................................91Dialing‚ÄÇa‚ÄÇNumber .......................................76,‚ÄÇ81Door‚ÄÇMirrors .....................................................49Door‚ÄÇOperation .................................................34Doors‚ÄÇ .............................................................33Door/tailgate‚ÄÇopen ...........................................26DOT‚ÄÇTire‚ÄÇQuality‚ÄÇGrading ..............................137Driving‚ÄÇ .............................................................92
Adaptive Cruise Control (ACC) .................102
Braking ...........................................................99
Collision Mitigation Braking System‚Ñ¢ (CMBS‚Ñ¢)
.........................................106
Cruise Control .............................................101ENGINE‚ÄÇSTART/STOP‚ÄÇbutton .....................97
Ignition ...........................................................97Lane‚ÄÇDeparture‚ÄÇWarning‚ÄÇ(LDW) ..............104
Lane Keeping Assist System (LKAS) .......105
LaneWatch‚Ñ¢ ..............................................107 Maximum Load Limit
....................................94
Multi-View Rear Camera ..........................108
Power Mode .................................................97
Refueling ......................................................110
Shifting ...........................................................98
Towing a Trailer ............................................96Vehicle Stability Assist (VSA®) ................100Driving Position Memory System ..................48Eco Assist™ System ......................................100ECON Button ...................................................100ECON mode .......................................................27Electric Power Steering (EPS) .......................25Electronic Stability Control (ESC) ................100E-Mail  .............................................................83Emergency Engine Stop ................................114Emergency Towing ........................................114Engine and Fuel ..............................................140Engine Coolant................................................ 129Engine Oil......................................................... 127ENGINE START/STOP button .........................97Exterior lights ..............................................27, 40Fastening a Seat Belt ........................................7
Find Nearest Place ..........................................89
Find Place Commands ...................................145Flat Tire ...........................................................117
Floor Mats .........................................................46Fluids ...........................................................140FM/AM‚ÄÇRadio ..............................................59,‚ÄÇ67FM/AM‚ÄÇRadio‚ÄÇCommands .............................148
Fog lights .....................................................27,‚ÄÇ40Foot Brake .........................................................99Frequently‚ÄÇAsked‚ÄÇQuestions ........................141Front‚ÄÇAirbags‚ÄÇ(SRS) ...........................................9Front‚ÄÇDoor‚ÄÇInner‚ÄÇHandle .................................34
Front Seats ........................................................43
Front Wipers .....................................................41Fuel‚ÄÇInformation .............................................110
Fuse Locations ................................................ 120
Garage Opener
.................................................50HDMI‚ÄÇPort.......................................................... 56Headlight-Wiper‚ÄÇIntegration ..........................41
Head Restraints ................................................45
Heated Windshield Button .............................52High‚ÄÇbeams .......................................................27
Home Address ..................................................88
HomeLink® Garage Opener ............................50
HondaLink‚Ñ¢ ......................................................66
HondaLink‚Ñ¢ Assist ..........................................84
Honda Roadside Assistance ........................143Hood ...........................................................126Ignition‚ÄÇ .............................................................97i-MID‚ÄÇ .............................................................58
Immobilizer ........................................................27Info‚ÄÇbuttons .......................................................29Info‚ÄÇCommands............................................... 149
Information‚ÄÇDisplay..........................................28Instrument‚ÄÇPanel ..............................................24Intelligent‚ÄÇMulti-Information‚ÄÇDisplay
(i-MID) ................................................58Interior‚ÄÇLights.................................................... 39Intermittent‚ÄÇWipers..........................................41
iPod® .......................................................61, 70iPod® Commands ...........................................149
Jump Starting .................................................112Key .............................................................32Lane‚ÄÇDeparture‚ÄÇWarning‚ÄÇ(LDW) ............25,‚ÄÇ104Lane Keeping Assist System (LKAS) ....25, 105
LaneWatch‚Ñ¢ ..................................................107Lap/Shoulder‚ÄÇSeat‚ÄÇBelts ...................................5LATCH-Compatible‚ÄÇChild‚ÄÇSeat ........................18Light‚ÄÇBulbs....................................................... 140Lights .............................................................39LKAS .....................................................27,‚ÄÇ105Locking the Tailgate .........................................33Lock‚ÄÇTab .............................................................34Low fuel .............................................................26
Low oil pressure ...............................................24
Low tire pressure .............................................27
Maintenance ................................................... 123
Battery
.........................................................130
Brake Fluid ..................................................130Engine‚ÄÇCoolant ............................................129Engine‚ÄÇOil .....................................................127
Maintenance Minder‚Ñ¢ .......................26,‚ÄÇ124Safety Precautions ....................................123
Service Codes .............................................125
Under the Hood ..........................................126
Window Washer Fluid ...............................130
Making a Call ..............................................76,‚ÄÇ81Malfunction indicator lamp ............................25Malfunction‚ÄÇIndicators.................................... 24Map‚ÄÇDisplay‚ÄÇCommands ...............................144
Map Legend ......................................................90
Map Lights ......................................................... 39
Master‚ÄÇDoor‚ÄÇLock‚ÄÇSwitch ...............................34
Maximum Load Limit ........................................ 94
Mirrors .............................................................49
Moonroof ...........................................................38Multi-Information‚ÄÇDisplay ...............................29
Multi-View Rear Camera ..............................108
Navigation .........................................................85
Detour ............................................................91Display‚ÄÇand‚ÄÇControls ....................................86Entering‚ÄÇa‚ÄÇDestination .................................88
Find Nearest Place ......................................89
Home Address ..............................................88
Map Legend ..................................................90
Place Category .............................................89
Routing ...........................................................90
Steering Wheel Controls .............................85