ESP HONDA CR-V 2016 RM1, RM3, RM4 / 4.G Quick Guide
[x] Cancel search | Manufacturer: HONDA, Model Year: 2016, Model line: CR-V, Model: HONDA CR-V 2016 RM1, RM3, RM4 / 4.GPages: 80, PDF Size: 7.99 MB
Page 2 of 80
Devices That Emit Radio WavesThe following products and systems on your vehicle emit radio waves when\
in
operation:
•
Audio system • Immobilizer system
• Bluetooth® Audio • Remote transmitter
• Bluetooth® HandsFreeLink® • Smart Entry System*
• HomeLink® Universal Transceiver* • Tire Pressure Monitoring System
• Collision Mitigation Braking System™ (CMBS™)*
Each of the above complies with the appropriate requirements or the required
standards of the FCC (Federal Communications Commission) and Industry Canada,
described below:
As required by the FCC:
This device complies with Part 15 of the FCC rules. Operation is subject to the
following two conditions: (1) This device may not cause harmful interference, and
(2) this device must accept any interference received, including interference that
may cause undesired operation.
Changes or modifications not expressly approved by the party responsible for
compliance could void the user’s authority to operate the equipment.
As required by Industry Canada:
This device complies with Industry Canada Standard RSS-Gen/210/251/310.
Operation is subject to the following two conditions: (1) this device may not
cause interference, and (2) this device must accept any interference, including
interference that may cause undesired operation of the device.
California Perchlorate Contamination Prevention Act
The airbags, seat belt tensioners, and CR-type batteries in this vehicle may
contain perchlorate materials—special handling may apply. See www.dtsc.
ca.gov/hazardouswaste/perchlorate/ for more information.
California Proposition 65 Warning
WARNING: This product contains or emits chemicals known to the state of
California to cause cancer and birth defects or other reproductive harm.
DISCLOSURES
Event Data RecordersThis vehicle is equipped with an event data recorder (EDR). The main purpose of
an EDR is to record, in certain crash or near crash-like situations, such as an air
bag deployment or hitting a road obstacle, data that will assist in understanding
how a vehicle’s systems performed. The EDR is designed to record data related to
vehicle dynamics and safety systems for a short period of time, typicall\
y
30 seconds or less. The EDR in this vehicle is designed to record such d\
ata as:
• How various systems in your vehicle were operating;
• Whether or not the driver and passenger safety belts were buckled/fasten\
ed;
• How far (if at all) the driver was depressing the accelerator and/or b\
rake
pedal; and,
• How fast the vehicle was traveling.
These data can help provide a better understanding of the circumstances in
which crashes and injuries occur. NOTE: EDR data are recorded by your vehicle
only if a non-trivial crash situation occurs; no data are recorded by the EDR under
normal driving conditions and no personal data (e.g., name, gender, age, and
crash location) are recorded. However, other parties, such as law enforcement,
could combine the EDR data with the type of personally identifying data routinely
acquired during a crash investigation.
To read data recorded by an EDR, special equipment is required, and access to
the vehicle or the EDR is needed. In addition to the vehicle manufacturer, other
parties such as law enforcement that have the special equipment can read the
information if they have access to the vehicle or the EDR.
The data belong to the vehicle owner and may not be accessed by anyone else
except as legally required or with the permission of the vehicle owner.
Service Diagnostic Recorders
This vehicle is equipped with service-related devices that record information
about powertrain performance. The data can be used to verify emissions law
requirements and/or help technicians diagnose and solve service problems. It may
also be combined with data from other sources for research purposes, but
it remains confidential.
*if equipped
Page 5 of 80
2 || 3
S
AFETYVISUAL INDEX
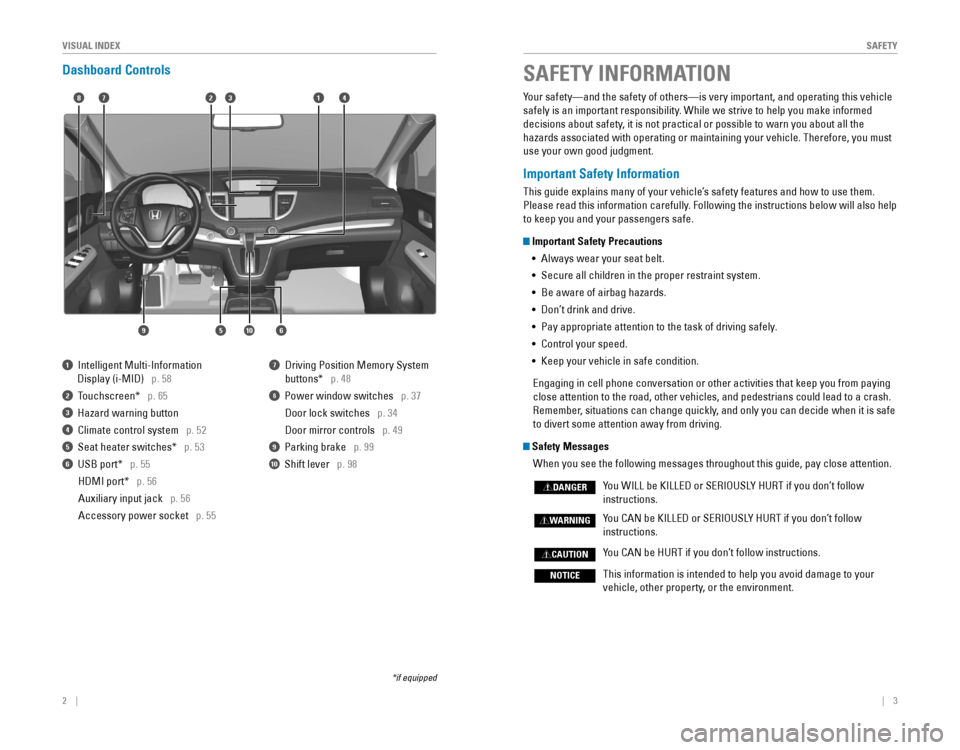
Dashboard Controls
1 Intelligent Multi-Information
Display (i-MID) p. 58
2 Touchscreen* p. 65
3 Hazard warning button
4 Climate control system p. 52
5 Seat heater switches* p. 53
6 USB port* p. 55
HDMI port* p. 56
Auxiliary input jack p. 56
Accessory power socket p. 55
7 Driving Position Memory System
buttons* p. 48
8 Power window switches p. 37
Door lock switches p. 34
Door mirror controls p. 49
9 Parking brake p. 99
10 Shift lever p. 98
*if equipped
Your safety—and the safety of others—is very important, and operati\
ng this vehicle
safely is an important responsibility. While we strive to help you make informed
decisions about safety, it is not practical or possible to warn you about all the
hazards associated with operating or maintaining your vehicle. Therefore, you must
use your own good judgment.
Important Safety Information
This guide explains many of your vehicle’s safety features and how to use them.
Please read this information carefully. Following the instructions below will also help
to keep you and your passengers safe.
Important Safety Precautions •
Always wear your seat belt.
• Secure all children in the proper restraint system.
•
Be aware of airbag hazards.
• Don’t drink and drive.
• Pay appropriate attention to the task of driving safely.
• Control your speed.
• Keep your vehicle in safe condition.
Engaging in cell phone conversation or other activities that keep you from paying
close attention to the road, other vehicles, and pedestrians could lead \
to a crash.
Remember, situations can change quickly, and only you can decide when it is safe
to divert some attention away from driving.
Safety Messages
When you see the following messages throughout this guide, pay close att\
ention.
You WILL be KILLED or SERIOUSLY HURT if you don’t follow
instructions.
You CAN be KILLED or SERIOUSLY HURT if you don’t follow
instructions.
You CAN be HURT if you don’t follow instructions.
This information is intended to help you avoid damage to your
vehicle, other property, or the environment.
DANGER
WARNING
CAUTION
NOTICE
SAFETY INFORMATION
18
56
4732
910
Page 11 of 80
14 || 15
S
AFETYSAFETY
Airbag Care
You do not need to, and should not, perform any maintenance on or replace\
any
airbag system components yourself. However, you should have your vehicle
inspected by a dealer in the following situations:
When the airbags have deployed
If an airbag has inflated, the control unit and other related parts must be replaced.
Similarly, once an automatic seat belt tensioner has been activated, it must be
replaced.
When the vehicle has been in a moderate-to-severe collision
Even if the airbags did not inflate, have your dealer inspect the following: the
driver’s seat position sensor, weight sensors in the passenger’s seat, front seat
belt tensioners, and each seat belt that was worn during the crash.
Do not remove or modify a front seat without first consulting a dealer
This would likely disable the driver’s seat position sensor or the weight sensors
in the passenger’s seat. If it is necessary to remove or modify a front seat to
accommodate a person with disabilities, contact a Honda dealer. For U.S.
vehicles, call Honda Automobile Customer Service at (800) 999-1009. For Canadian
vehicles, call Honda Canada Customer Relations at (888) 946-6329.
Child Safety
Each year, many children are injured or killed in vehicle crashes because they are
either unrestrained or not properly restrained. In fact, vehicle collisions are the
number one cause of death of children ages 12 and under.
The National Highway Traffic Safety Administration and Transport Canada
recommend that all children ages 12 and under be properly restrained in a rear seat.
Some states or provinces/territories have laws restricting where children may ride.
To reduce the number of child deaths and injuries, every state, Canadian province
and territory requires that infants and children be properly restrained when they ride
in a vehicle.
Protecting Child Passengers•
An inflating front or side airbag can injure or kill a child sitting in the front seat.
• A child in the front seat is more likely to interfere with the driver’s ability to
safely control the vehicle.
•
Statistics show that children of all sizes and ages are safer when they are
properly restrained in a rear seat.
•
Any child who is too small to wear a seat belt correctly must be restrained in an
approved child seat that is properly secured to the vehicle using either\
the lap
belt portion of the lap/shoulder belt or the lower anchors of the LATCH system.
• Never hold a child on your lap because it is impossible to protect them in the
event of a collision.
•
Never put a seat belt over yourself and a child. During a crash, the belt would
likely press deep into the child and cause serious or fatal injuries.
•
Never let two children use the same seat belt. Both children could be very
seriously injured in a crash.
•
Do not allow children to operate the doors, windows, or seat adjusters.
• Do not leave children in the vehicle unattended, especially in hot weather when
the inside of the vehicle can get hot enough to kill them. They could al\
so activate
vehicle controls, causing it to move unexpectedly.
Children who are unrestrained or improperly restrained can be seriously
injured or killed in a crash.
Any child too small for a seat belt should be properly restrained in a child
seat. A larger child should be properly restrained with a seat belt, using a
booster seat if necessary.
WARNING
Page 36 of 80
64 || 65
AUDIO AND CONNECTIVITY
AUDIO AND CONNECTIVITY
Models with one display
Pandora®
Play and operate Pandora from your phone through the vehicle’s audio system. Visit
handsfreelink.com
to check phone compatibility. Standard data rates apply.
Available in the U.S. only.
Connect your phone when the vehicle is stopped.
For iPhone:
• Connect via Bluetooth
® HandsFreeLink® (see page 75) or USB port (see page 55).
• A pop-up may appear on your phone requesting you to allow access for Pandora to be launched.
• If you cannot operate Pandora through the audio system, it may be streaming through Bluetooth® Audio. Make sure Pandora is selected on the audio system.
•
If Pandora still does not operate, try rebooting the phone and reconnecting the cable if necessary.
For Android or BlackBerry:
• Connect via Bluetooth® HandsFreeLink® (see page 75).
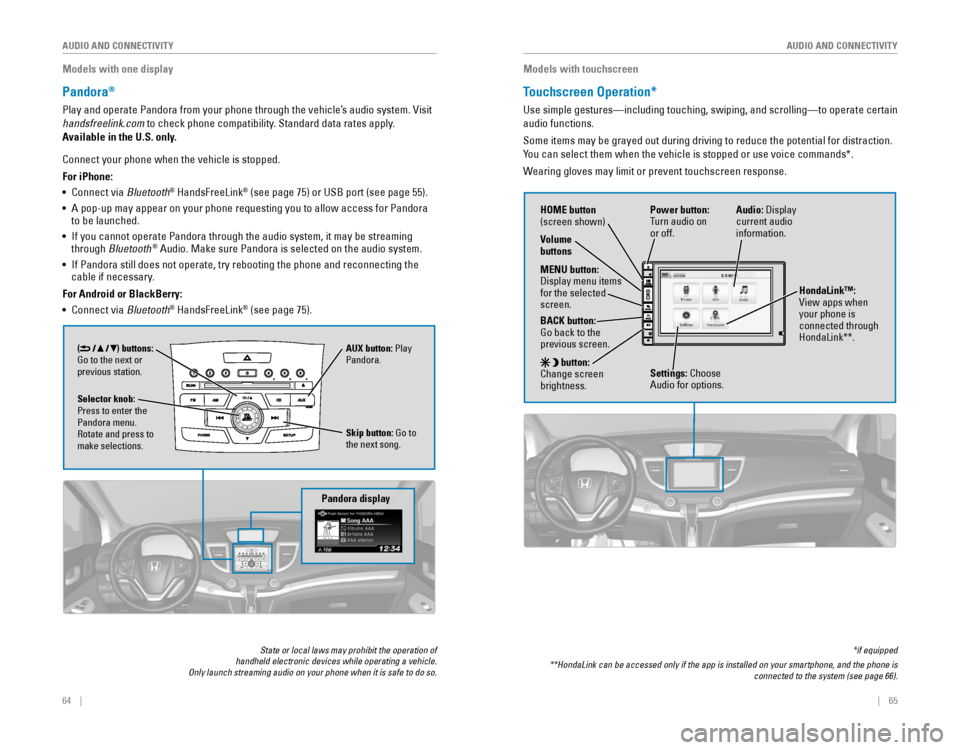
Pandora display
Skip button: Go to
the next song.
Selector knob:
Press to enter the
Pandora menu.
Rotate and press to
make selections. AUX button: Play
Pandora.
() buttons:
Go to the next or
previous station.
State or local laws may prohibit the operation of handheld electronic devices while operating a vehicle. Only launch streaming audio on your phone when it is safe to do so.
Models with touchscreen
Touchscreen Operation*
Use simple gestures—including touching, swiping, and scrolling—to \
operate certain
audio functions.
Some items may be grayed out during driving to reduce the potential for distraction.
You can select them when the vehicle is stopped or use voice commands*.
Wearing gloves may limit or prevent touchscreen response.
*if equipped
**HondaLink can be accessed only if the app is installed on your smartphone, and the phone is connected to the system (see page 66).
Power button:
Turn audio on
or off.
HOME button
(screen shown)
MENU button:
Display menu items for the selected
screen.
BACK button:
Go back to the previous screen.
button:
Change screen
brightness. Settings: Choose
Audio for options. HondaLink™:
View apps when
your phone is
connected through
HondaLink**.
Audio:
Display current audio
information.
Volume
buttons
Page 42 of 80
76 || 77
Models with one display
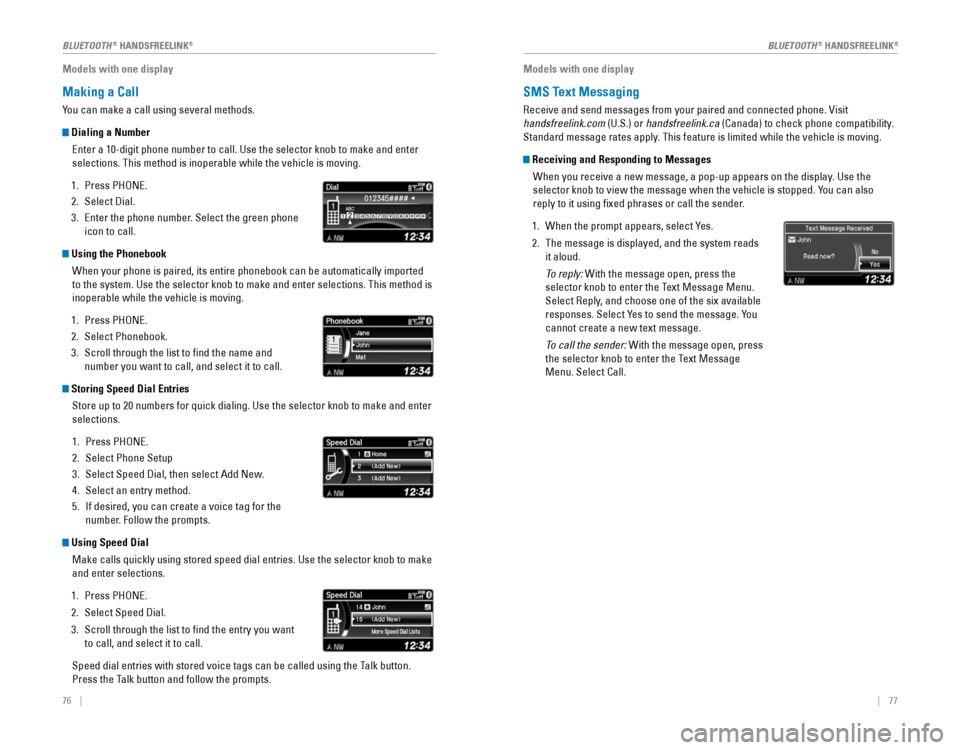
Making a Call
You can make a call using several methods.
Dialing a Number
Enter a 10-digit phone number to call. Use the selector knob to make and enter
selections. This method is inoperable while the vehicle is moving.
1. Press PHONE.
2. Select Dial.
3. Enter the phone number. Select the green phone
icon to call.
Using the Phonebook
When your phone is paired, its entire phonebook can be automatically imported
to the system. Use the selector knob to make and enter selections. This method is
inoperable while the vehicle is moving.
1. Press PHONE.
2. Select Phonebook.
3. Scroll through the list to find the name and
number you want to call, and select it to call.
Storing Speed Dial Entries
Store up to 20 numbers for quick dialing. Use the selector knob to make and enter
selections.
1. Press PHONE.
2. Select Phone Setup
3. Select Speed Dial, then select Add New.
4. Select an entry method.
5. If desired, you can create a voice tag for the
number. Follow the prompts.
Using Speed Dial
Make calls quickly using stored speed dial entries. Use the selector knob to make
and enter selections.
1. Press PHONE.
2. Select Speed Dial.
3. Scroll through the list to find the entry you want
to call, and select it to call.
Speed dial entries with stored voice tags can be called using the Talk button.
Press the Talk button and follow the prompts.
Models with one display
SMS Text Messaging
Receive and send messages from your paired and connected phone. Visit
handsfreelink.com (U.S.) or handsfreelink.ca
(Canada) to check phone compatibility.
Standard message rates apply. This feature is limited while the vehicle is moving.
Receiving and Responding to Messages
When you receive a new message, a pop-up appears on the display. Use the
selector knob to view the message when the vehicle is stopped. You can also
reply to it using fixed phrases or call the sender.
1. When the prompt appears, select Yes.
2. The message is displayed, and the system reads
it aloud.
To reply: With the message open, press the
selector knob to enter the Text Message Menu.
Select Reply, and choose one of the six available
responses. Select Yes to send the message. You
cannot create a new text message.
To call the sender: With the message open, press
the selector knob to enter the Text Message
Menu. Select Call.
BLUETOOTH® HANDSFREELINK®BLUETOOTH® HANDSFREELINK®
Page 45 of 80
82 || 83
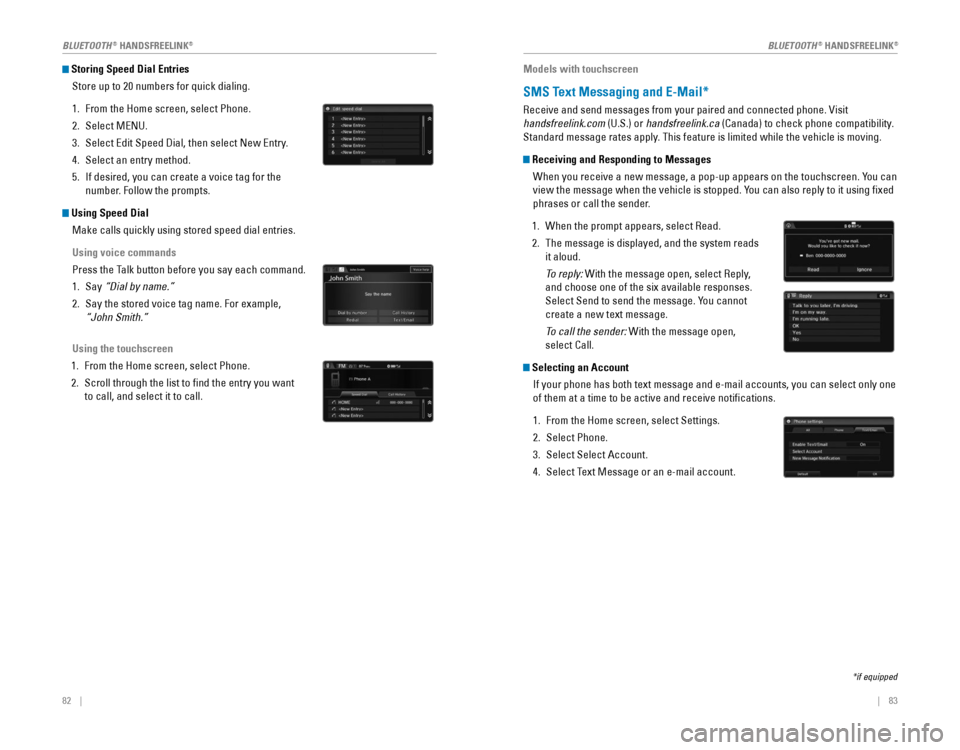
Storing Speed Dial Entries
Store up to 20 numbers for quick dialing.
1. From the Home screen, select Phone.
2. Select MENU.
3. Select Edit Speed Dial, then select New Entry.
4. Select an entry method.
5. If desired, you can create a voice tag for the
number. Follow the prompts.
Using Speed Dial
Make calls quickly using stored speed dial entries.
Using voice commands
Press the Talk button before you say each command.
1. Say “Dial by name.”
2. Say the stored voice tag name. For example,
“John Smith.”
Using the touchscreen
1. From the Home screen, select Phone.
2. Scroll through the list to find the entry you want
to call, and select it to call.
Models with touchscreen
SMS Text Messaging and E-Mail*
Receive and send messages from your paired and connected phone. Visit
handsfreelink.com (U.S.) or handsfreelink.ca
(Canada) to check phone compatibility.
Standard message rates apply. This feature is limited while the vehicle is moving.
Receiving and Responding to Messages
When you receive a new message, a pop-up appears on the touchscreen. You can
view the message when the vehicle is stopped. You can also reply to it using fixed
phrases or call the sender.
1. When the prompt appears, select Read.
2. The message is displayed, and the system reads
it aloud.
To reply: With the message open, select Reply,
and choose one of the six available responses.
Select Send to send the message. You cannot
create a new text message.
To call the sender: With the message open,
select Call.
Selecting an Account
If your phone has both text message and e-mail accounts, you can select only one
of them at a time to be active and receive notifications.
1. From the Home screen, select Settings.
2. Select Phone.
3. Select Select Account.
4. Select Text Message or an e-mail account.
*if equipped
BLUETOOTH® HANDSFREELINK®BLUETOOTH® HANDSFREELINK®
Page 56 of 80
104 || 105
DRIVING
DRIVING
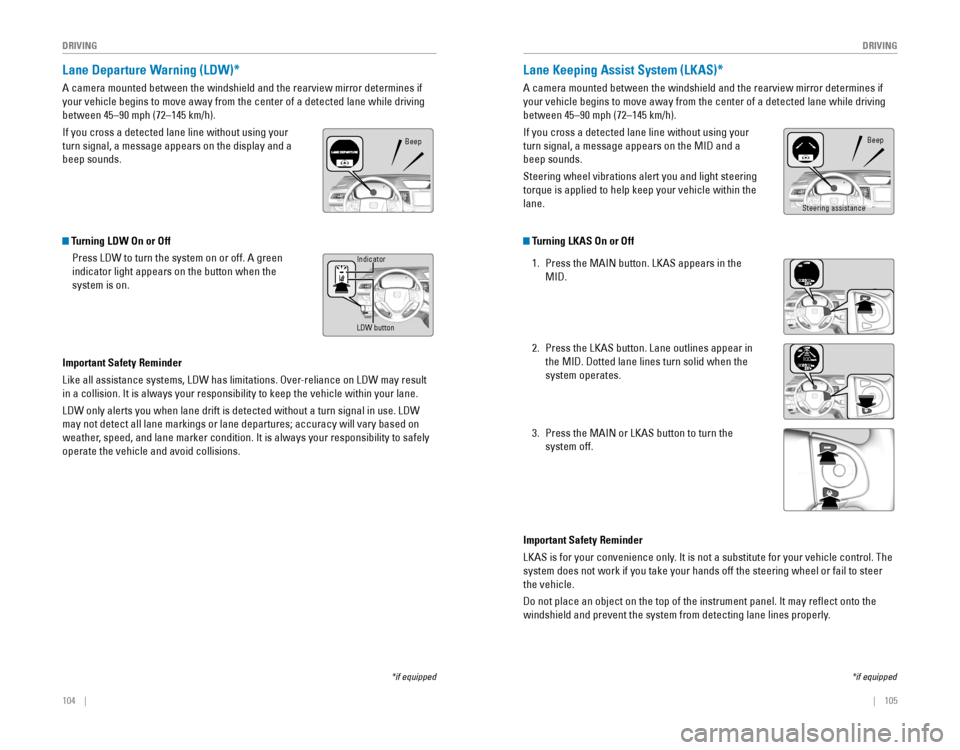
Lane Departure Warning (LDW)*
A camera mounted between the windshield and the rearview mirror determines if
your vehicle begins to move away from the center of a detected lane while driving
between 45–90 mph (72–145 km/h).
If you cross a detected lane line without using your
turn signal, a message appears on the display and a
beep sounds.
*if equipped
Beep
*if equipped
Lane Keeping Assist System (LKAS)*
A camera mounted between the windshield and the rearview mirror determines if
your vehicle begins to move away from the center of a detected lane while driving
between 45–90 mph (72–145 km/h).
If you cross a detected lane line without using your
turn signal, a message appears on the MID and a
beep sounds.
Steering wheel vibrations alert you and light steering
torque is applied to help keep your vehicle within the
lane.
Beep
Steering assistance
Turning LDW On or Off
Press LDW to turn the system on or off. A green
indicator light appears on the button when the
system is on.
Important Safety Reminder
Like all assistance systems, LDW has limitations. Over-reliance on LDW may result
in a collision. It is always your responsibility to keep the vehicle within your lane.
LDW only alerts you when lane drift is detected without a turn signal in use. LDW
may not detect all lane markings or lane departures; accuracy will vary based on
weather, speed, and lane marker condition. It is always your responsibility to safely
operate the vehicle and avoid collisions.
LDW button
Indicator
Turning LKAS On or Off
1. Press the MAIN button. LKAS appears in the
MID.
2. Press the LKAS button. Lane outlines appear in
the MID. Dotted lane lines turn solid when the
system operates.
3. Press the MAIN or LKAS button to turn the
system off.
Important Safety Reminder
LKAS is for your convenience only. It is not a substitute for your vehicle control. The
system does not work if you take your hands off the steering wheel or fa\
il to steer
the vehicle.
Do not place an object on the top of the instrument panel. It may reflect onto the
windshield and prevent the system from detecting lane lines properly.
Page 57 of 80
106 || 107
DRIVING
DRIVING
*if equipped
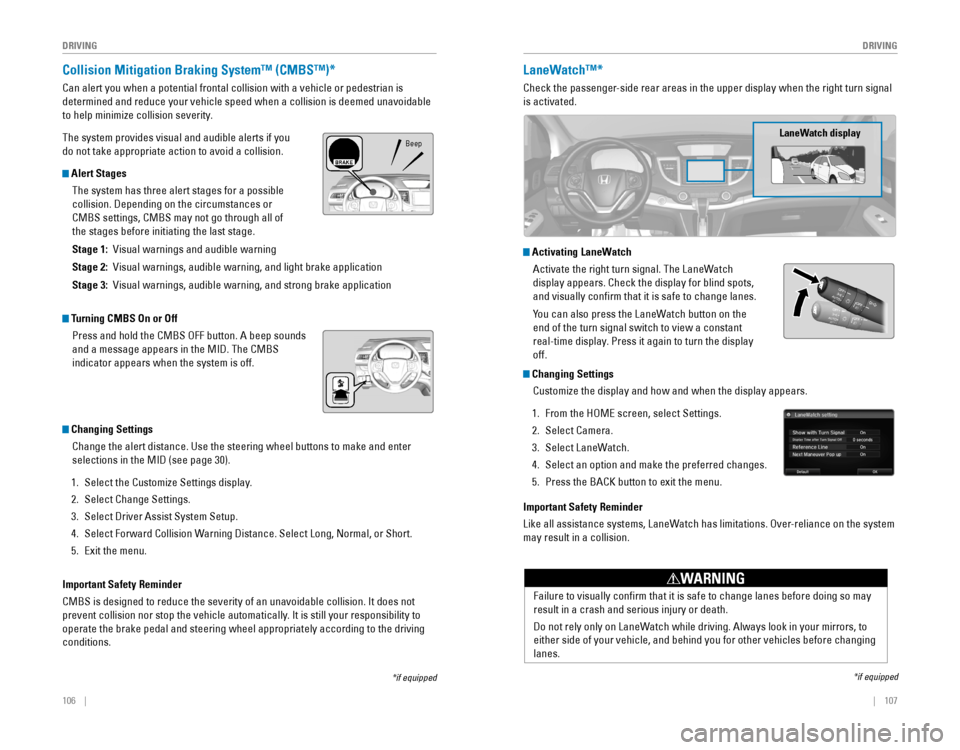
Collision Mitigation Braking System™ (CMBS™)*
Can alert you when a potential frontal collision with a vehicle or pedes\
trian is
determined and reduce your vehicle speed when a collision is deemed unavoidable
to help minimize collision severity.
The system provides visual and audible alerts if you
do not take appropriate action to avoid a collision.
Alert Stages
The system has three alert stages for a possible
collision. Depending on the circumstances or
CMBS settings, CMBS may not go through all of
the stages before initiating the last stage.
Stage 1: Visual warnings and audible warning
Stage 2: Visual warnings, audible warning, and light brake application
Stage 3: Visual warnings, audible warning, and strong brake application
Beep
LaneWatch™*
Check the passenger-side rear areas in the upper display when the right turn signal
is activated.
LaneWatch display
Activating LaneWatch
Activate the right turn signal. The LaneWatch
display appears. Check the display for blind spots,
and visually confirm that it is safe to change lanes.
You can also press the LaneWatch button on the
end of the turn signal switch to view a constant
real-time display. Press it again to turn the display
off.
*if equipped
Turning CMBS On or Off
Press and hold the CMBS OFF button. A beep sounds
and a message appears in the MID. The CMBS
indicator appears when the system is off.
Changing Settings
Change the alert distance. Use the steering wheel buttons to make and enter
selections in the MID (see page 30).
1. Select the Customize Settings display.
2. Select Change Settings.
3. Select Driver Assist System Setup.
4. Select Forward Collision Warning Distance. Select Long, Normal, or Short.
5. Exit the menu.
Important Safety Reminder
CMBS is designed to reduce the severity of an unavoidable collision. It does not
prevent collision nor stop the vehicle automatically. It is still your responsibility to
operate the brake pedal and steering wheel appropriately according to the driving
conditions.
Failure to visually confirm that it is safe to change lanes before doing so may
result in a crash and serious injury or death.
Do not rely only on LaneWatch while driving. Always look in your mirrors, to
either side of your vehicle, and behind you for other vehicles before changing
lanes.
WARNING
Changing Settings
Customize the display and how and when the display appears.
1. From the HOME screen, select Settings.
2. Select Camera.
3. Select LaneWatch.
4. Select an option and make the preferred changes.
5. Press the BACK button to exit the menu.
Important Safety Reminder
Like all assistance systems, LaneWatch has limitations. Over-reliance on the system
may result in a collision.
Page 62 of 80
116 || 117
HANDLING THE UNEXPECTED
HANDLING THE UNEXPECTED
Tire Pressure Monitoring System (TPMS) — Required Federal Explanatio\
n
U.S. models only
Each tire, including the spare (if provided), should be checked monthly
when cold and inflated to the inflation pressure recommended by the
vehicle manufacturer on the vehicle placard or tire inflation pressure\
label.
(If your vehicle has tires of a different size than the size indicated on the
vehicle placard or tire inflation pressure label, you should determine the
proper tire inflation pressure for those tires.)
As an added safety feature, your vehicle has been equipped
with a tire pressure monitoring system (TPMS) that illuminates
a low tire pressure telltale when one or more of your tires is
significantly under-inflated.
Accordingly, when the low tire pressure telltale illuminates, you should
stop and check your tires as soon as possible, and inflate them to the
proper pressure.
Driving on a significantly under-inflated tire causes the tire to overheat
and can lead to tire failure. Under-inflation also reduces fuel efficiency
and tire tread life, and may affect the vehicle’s handling and stopping
ability.
Please note that the TPMS is not a substitute for proper tire maintenance,
and it is the driver’s responsibility to maintain correct tire pressure, even
if under-inflation has not reached the level to trigger illumination of the
TPMS low tire pressure telltale.
Your vehicle has also been equipped with a TPMS malfunction indicator
to indicate when the system is not operating properly. The TPMS
malfunction indicator is combined with the low tire pressure telltale.
When the system detects a malfunction, the telltale will flash for
approximately one minute and then remain continuously illuminated. This \
sequence will continue upon subsequent vehicle start-ups as long as the
malfunction exists.
When the malfunction indicator is illuminated, the system may not be able
to detect or signal low tire pressure as intended.
TPMS malfunctions may occur for a variety of reasons, including the
installation of replacement or alternate tires or wheels on the vehicle \
that
prevent the TPMS from functioning properly.
Always check the TPMS malfunction telltale after replacing one or
more tires or wheels on your vehicle to ensure that the replacement
or alternate tires and wheels allow the TPMS to continue to function
properly.
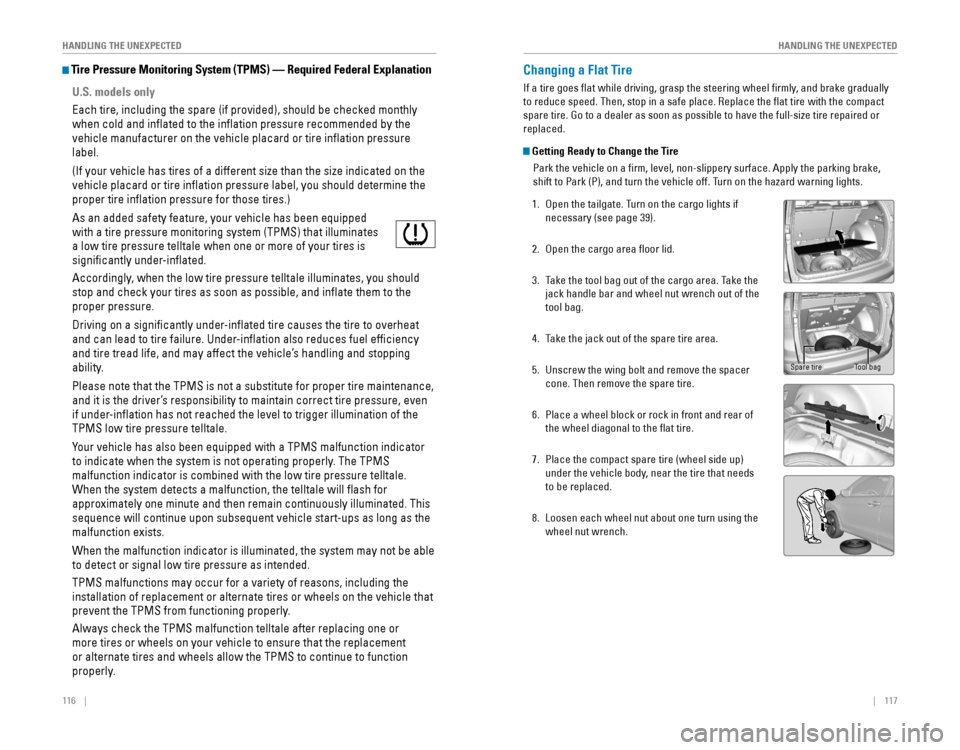
Changing a Flat Tire
If a tire goes flat while driving, grasp the steering wheel firmly, and brake gradually
to reduce speed. Then, stop in a safe place. Replace the flat tire wit\
h the compact
spare tire. Go to a dealer as soon as possible to have the full-size tire repaired or
replaced.
Getting Ready to Change the Tire
Park the vehicle on a firm, level, non-slippery surface. Apply the parking brake,
shift to Park (P), and turn the vehicle off. Turn on the hazard warning lights.
1. Open the tailgate. Turn on the cargo lights if
necessary (see page 39).
2. Open the cargo area floor lid.
3. Take the tool bag out of the cargo area. Take the
jack handle bar and wheel nut wrench out of the
tool bag.
4. Take the jack out of the spare tire area.
5. Unscrew the wing bolt and remove the spacer
cone. Then remove the spare tire.
6. Place a wheel block or rock in front and rear of
the wheel diagonal to the flat tire.
7. Place the compact spare tire (wheel side up)
under the vehicle body, near the tire that needs
to be replaced.
8. Loosen each wheel nut about one turn using the
wheel nut wrench.
Tool bagSpare tire
Page 73 of 80
138 || 139
MAINTENANCE
MAINTENANCE
Temperature
The temperature grades are A (the highest), B, and C, representing the\
tire’s
resistance to the generation of heat and its ability to dissipate heat when tested
under controlled conditions on a specified indoor laboratory test wheel. Sustained
high temperature can cause the material of the tire to degenerate and re\
duce
tire life, and excessive temperature can lead to sudden tire failure. Th\
e grade
C corresponds to a level of performance which all passenger car tires must
meet under the Federal Motor Vehicle Safety Standard No. 109. Grades B and
A represent higher levels of performance on the laboratory test wheel than the
minimum required by law.
WARNING: The temperature grade for this tire is established for a tire that
is properly inflated and not overloaded. Excessive speed, underinflation, or
excessive loading, either separately or in combination, can cause heat buildup
and possible tire failure.
Testing of Readiness Codes
Your vehicle has “readiness codes” as part of the onboard self-diagnostic system.
Some states refer to these codes as a test to see if your vehicle’s emissions
components are working properly. The codes may not be read if you go through the
testing just after the battery has gone dead or been disconnected.
To check if they are set, turn the vehicle on without starting the engine\
. The
malfunction indicator lamp will come on for several seconds. If it goes off, the
readiness codes are set. If it blinks five times, the readiness codes are not set.
If you are required to have your vehicle tested before the readiness codes are set,
prepare the vehicle for retesting by doing the following:
1. Fill the gas tank to approximately 3/4 full.
2. Park the vehicle and leave the engine off for 6 hours or more.
3. Make sure the ambient temperature is between 40°F and 95°F (4°C and 35°C).
4. Start the engine without touching the accelerator pedal, and let it idle\
for 20
seconds.
5. Keep the vehicle in Park (P). Increase the engine speed to 2,000 rpm, and hold it
there for about 3 minutes.
6. Let the engine idle with your foot off the accelerator for 20 seconds.
7. Select a nearby, lightly traveled major highway where you can maintain a speed
of 50 to 60 mph (80 to 97 km/h) for at least 20 minutes. Drive on the highway with
the vehicle in Drive. Do not use cruise control. When traffic allows, drive for 90
seconds without using the accelerator pedal. (Vehicle speed may vary slightly;
this is OK.) If you cannot do this for a continuous 90 seconds because of traffic
conditions, drive for at least 30 seconds, then repeat two more times (\
for a total of
90 seconds).
8. Drive in city/suburban traffic for at least 10 minutes. When traffic conditions
allow, let the vehicle coast for several seconds without using the accelerator
pedal or the brake pedal.
9. Park the vehicle and leave the engine off for 30 minutes.
The readiness codes are erased when the battery is disconnected, and set again
only after several days of driving under a variety of conditions.
If a testing facility determines that the readiness codes are not set, you may be
requested to return at a later date to complete the test, or see your dealer.