engine overheat HONDA CR-V 2016 RM1, RM3, RM4 / 4.G Quick Guide
[x] Cancel search | Manufacturer: HONDA, Model Year: 2016, Model line: CR-V, Model: HONDA CR-V 2016 RM1, RM3, RM4 / 4.GPages: 80, PDF Size: 7.99 MB
Page 4 of 80

| 1
VISUAL INDEX
Quickly locate items in the vehicle’s interior.
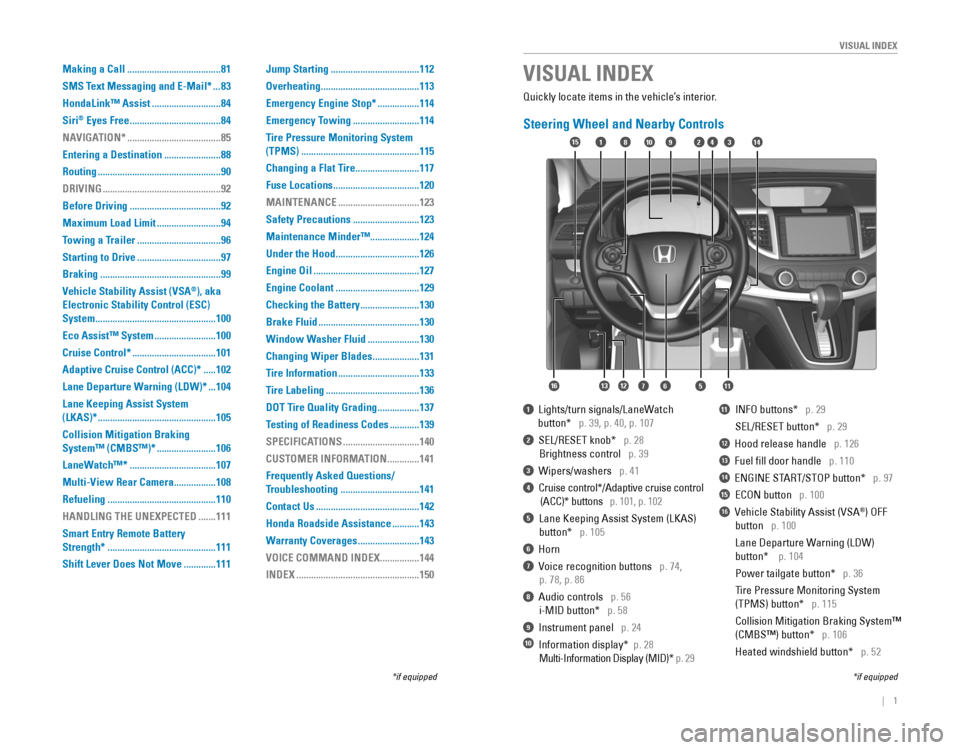
Steering Wheel and Nearby Controls
1‚ÄÇ‚ÄÇLights/turn‚ÄÇsignals/LaneWatch
‚ÄÇ‚ÄÇ‚ÄÇ‚ÄÇ‚ÄÇ‚ÄÇbutton*‚ÄÇ‚ÄÇ‚ÄÇp.‚ÄÇ39,‚ÄÇp.‚ÄÇ40,‚ÄÇp.‚ÄÇ107
2‚ÄÇ‚ÄÇSEL/RESET‚ÄÇknob*‚ÄÇ‚ÄÇ‚ÄÇp. 28
Brightness control p. 39
3‚ÄÇ‚ÄÇWipers/washers‚ÄÇ‚ÄÇ‚ÄÇp.‚ÄÇ41
4‚ÄÇ‚ÄÇCruise‚ÄÇcontrol*/Adaptive‚ÄÇcruise‚ÄÇcontrol‚ÄÇ‚ÄÇ
‚ÄÇ(ACC)*‚ÄÇbuttons‚ÄÇ‚ÄÇ‚ÄÇp. 101, p. 102
5 Lane Keeping Assist System (LKAS)
‚ÄÇbutton* p. 105
6 Horn
7‚ÄÇ‚ÄÇVoice‚ÄÇrecognition‚ÄÇbuttons‚ÄÇ‚ÄÇ‚ÄÇp.‚ÄÇ74,
‚ÄÇp.‚ÄÇ78,‚ÄÇp.‚ÄÇ86
8 Audio controls p. 56
i-MID‚ÄÇbutton*‚ÄÇ‚ÄÇ‚ÄÇp. 58
9‚ÄÇ‚ÄÇInstrument‚ÄÇpanel‚ÄÇ‚ÄÇ‚ÄÇp.‚ÄÇ24
10‚ÄÇ‚ÄÇInformation‚ÄÇdisplay*‚ÄÇ‚ÄÇp. 28
‚ÄÇMulti-Information‚ÄÇDisplay‚ÄÇ(MID)*‚ÄÇp. 29
11‚ÄÇ‚ÄÇ‚ÄÇINFO‚ÄÇbuttons*‚ÄÇ‚ÄÇ‚ÄÇp. 29
SEL/RESET‚ÄÇbutton*‚ÄÇ‚ÄÇ‚ÄÇp. 29
12 Hood release handle p. 126
13 Fuel fill door handle p. 110
14‚ÄÇ‚ÄÇENGINE‚ÄÇSTART/STOP‚ÄÇbutton*‚ÄÇ‚ÄÇ‚ÄÇp.‚ÄÇ97
15 ECON‚ÄÇbutton p. 100
16  Vehicle Stability Assist (VSA®) OFF
‚ÄÇbutton‚ÄÇ‚ÄÇ‚ÄÇp. 100
‚ÄÇLane‚ÄÇDeparture‚ÄÇWarning‚ÄÇ(LDW)‚ÄÇ‚ÄÇ ‚ÄÇ
‚ÄÇbutton*‚ÄÇ‚ÄÇ‚ÄÇ‚ÄÇp.‚ÄÇ104
‚ÄÇPower‚ÄÇtailgate‚ÄÇbutton*‚ÄÇ‚ÄÇ‚ÄÇp. 36
Tire Pressure Monitoring System
‚ÄÇ(TPMS)‚ÄÇbutton*‚ÄÇ‚ÄÇ‚ÄÇp. 115
Collision Mitigation Braking System‚Ñ¢
‚ÄÇ(CMBS‚Ñ¢)‚ÄÇbutton*‚ÄÇ‚ÄÇ‚ÄÇp. 106
‚ÄÇHeated‚ÄÇwindshield‚ÄÇbutton*‚ÄÇ‚ÄÇ‚ÄÇp. 52
VISUAL INDEX
*if‚ÄÇequipped*if‚ÄÇequipped
92
567111213
1815341014
16
Making a Call ......................................81
SMS Text Messaging and E-Mail*
...83
HondaLink‚Ñ¢ Assist
............................84
Siri
® Eyes Free .....................................84
NAVIGATION*
......................................85
Entering a Destination
.......................88
Routing
..................................................90
DRIVING
................................................92
Before Driving
.....................................92
Maximum Load Limit
..........................94
Towing a Trailer
..................................96
Starting to Drive
..................................97
Braking
.................................................99
Vehicle Stability Assist (VSA
®), aka
Electronic Stability Control (ESC)
System
.................................................100
Eco Assist‚Ñ¢ System
.........................100
Cruise Control*
..................................101
Adaptive Cruise Control (ACC)*
.....102
Lane Departure Warning (LDW)*
...104
Lane Keeping Assist System
(LKAS)*
................................................105
Collision Mitigation Braking
System‚Ñ¢ (CMBS‚Ñ¢)*
........................106
LaneWatch‚Ñ¢*
...................................107
Multi-View Rear Camera
.................108
Refueling
............................................110
HANDLING THE UNEXPECTED
.......111
Smart Entry Remote Battery
Strength*
............................................111
Shift Lever Does Not Move
.............111 Jump Starting
....................................112
Overheating
........................................113
Emergency Engine Stop*
.................114
Emergency Towing
...........................114
Tire Pressure Monitoring System
(TPMS)
................................................115
Changing a Flat Tire
..........................117
Fuse Locations
...................................120
MAINTENANCE
.................................123
Safety Precautions
...........................123
Maintenance Minder‚Ñ¢ ....................124
Under the Hood
..................................126
Engine Oil
...........................................127
Engine Coolant
..................................129
Checking the Battery
........................130
Brake Fluid
.........................................130
Window Washer Fluid
.....................130
Changing Wiper Blades
...................131
Tire Information
.................................133
Tire Labeling
......................................136
DOT Tire Quality Grading
.................137
Testing of Readiness Codes
............139
SPECIFICATIONS
...............................140
CUSTOMER INFORMATION
.............141
Frequently Asked Questions/
Troubleshooting
................................141
Contact Us
..........................................142
Honda Roadside Assistance
...........143
Warranty Coverages
.........................143
VOICE COMMAND INDEX
................144
INDEX
..................................................150
Page 16 of 80

24‚ÄÇ‚ÄÇ‚ÄÇ‚ÄÇ|| 25
I
NSTRUMENT PANELINSTRUMENT PANEL
Smart Entry system*
There‚ÄÇis‚ÄÇa‚ÄÇproblem‚ÄÇwith‚ÄÇthe‚ÄÇsmart‚ÄÇentry‚ÄÇsystem.
Malfunction indicator lamp (check engine light)
• The emissions control system may have a problem, or the fuel cap is loose  
or missing.
• (Blinks) A misfire in the engine’s cylinders is detected. Stop in a safe place, 
and wait for the engine to cool down.
Anti-lock Brake System (ABS)
There‚ÄÇis‚ÄÇa‚ÄÇproblem‚ÄÇwith‚ÄÇthe‚ÄÇanti-lock‚ÄÇbrake‚ÄÇsystem.‚ÄÇYour‚ÄÇvehicle‚ÄÇstill‚ÄÇhas‚ÄÇ
normal‚ÄÇbraking‚ÄÇability,‚ÄÇbut‚ÄÇno‚ÄÇanti-lock‚ÄÇfunction.‚ÄÇ
Tire Pressure Monitoring System (TPMS)*
There‚ÄÇis‚ÄÇa‚ÄÇproblem‚ÄÇwith‚ÄÇthe‚ÄÇtire‚ÄÇpressure‚ÄÇmonitoring‚ÄÇsystem,‚ÄÇor‚ÄÇthe‚ÄÇvehicle‚ÄÇis‚ÄÇ
fitted with the compact spare tire.
Collision Mitigation Braking System‚Ñ¢ (CMBS‚Ñ¢)*
There‚ÄÇis‚ÄÇa‚ÄÇproblem‚ÄÇwith‚ÄÇsystem,‚ÄÇthe‚ÄÇradar‚ÄÇsensor‚ÄÇis‚ÄÇblocked,‚ÄÇor‚ÄÇthe‚ÄÇ
temperature is too high.
Lane Departure Warning (LDW)*
There‚ÄÇis‚ÄÇa‚ÄÇproblem‚ÄÇwith‚ÄÇthe‚ÄÇsystem,‚ÄÇthe‚ÄÇcamera‚ÄÇis‚ÄÇblocked,‚ÄÇor‚ÄÇthe‚ÄÇ
temperature is too high.
Lane Keeping Assist System (LKAS)*
There‚ÄÇis‚ÄÇa‚ÄÇproblem‚ÄÇwith‚ÄÇthe‚ÄÇsystem,‚ÄÇthe‚ÄÇcamera‚ÄÇis‚ÄÇblocked,‚ÄÇor‚ÄÇthe‚ÄÇ
temperature is too high.
Vehicle Stability Assist (VSA
®)
There‚ÄÇis‚ÄÇa‚ÄÇproblem‚ÄÇwith‚ÄÇthe‚ÄÇVSA‚ÄÇsystem‚ÄÇor‚ÄÇhill‚ÄÇstart‚ÄÇassist‚ÄÇsystem.
Adaptive Cruise Control (ACC)*
There‚ÄÇis‚ÄÇa‚ÄÇproblem‚ÄÇwith‚ÄÇthe‚ÄÇsystem,‚ÄÇthe‚ÄÇradar‚ÄÇsensor‚ÄÇis‚ÄÇblocked,‚ÄÇor‚ÄÇthe‚ÄÇ
temperature is too high.
Electric Power Steering (EPS)
There‚ÄÇis‚ÄÇa‚ÄÇproblem‚ÄÇwith‚ÄÇthe‚ÄÇEPS‚ÄÇsystem.‚ÄÇStop‚ÄÇin‚ÄÇa‚ÄÇsafe‚ÄÇplace,‚ÄÇand‚ÄÇrestart‚ÄÇthe‚ÄÇ
vehicle.
Starter system*
There‚ÄÇis‚ÄÇa‚ÄÇproblem‚ÄÇwith‚ÄÇthe‚ÄÇstarter‚ÄÇsystem.‚ÄÇPress‚ÄÇand‚ÄÇhold‚ÄÇthe‚ÄÇENGINE‚ÄÇ
START/STOP‚ÄÇbutton‚ÄÇfor‚ÄÇup‚ÄÇto‚ÄÇ15‚ÄÇseconds‚ÄÇwhile‚ÄÇpressing‚ÄÇthe‚ÄÇbrake‚ÄÇpedal‚ÄÇand‚ÄÇ
manually start the engine.
All Wheel Drive (AWD)*
There‚ÄÇis‚ÄÇa‚ÄÇproblem‚ÄÇwith‚ÄÇthe‚ÄÇAWD‚ÄÇsystem.‚ÄÇIf‚ÄÇthe‚ÄÇindicator‚ÄÇblinks,‚ÄÇthe‚ÄÇsystem‚ÄÇ
is overheated and inactive. Stop in a safe place, and idle until the ind\
icator
goes off.
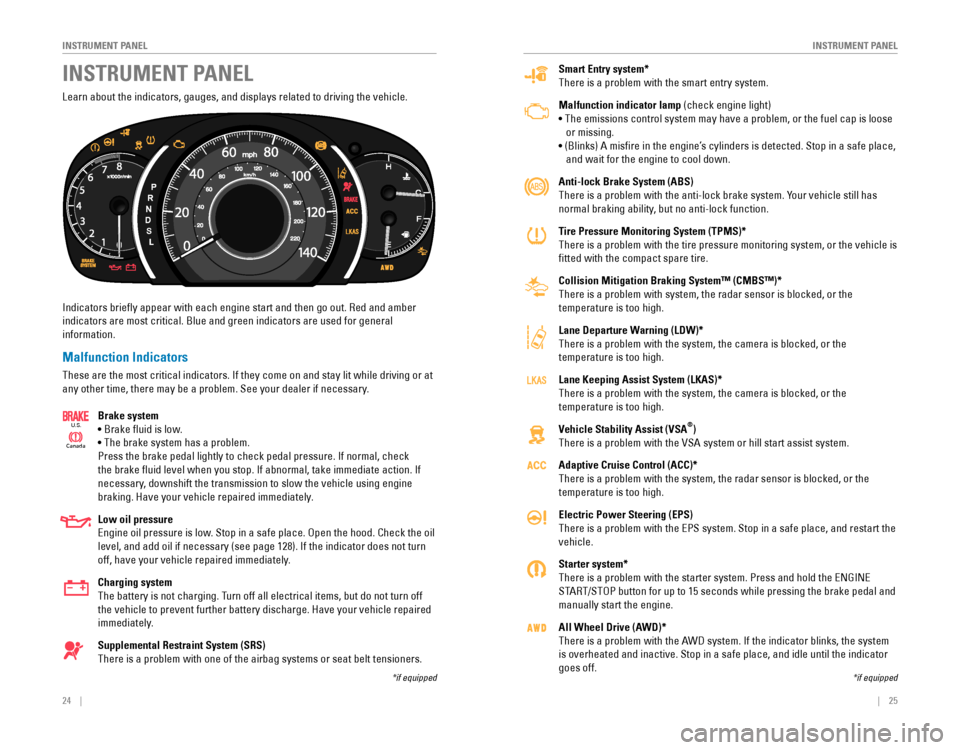
Learn‚ÄÇabout‚ÄÇthe‚ÄÇindicators,‚ÄÇgauges,‚ÄÇand‚ÄÇdisplays‚ÄÇrelated‚ÄÇto‚ÄÇdriving‚ÄÇthe‚ÄÇvehicle.
Indicators‚ÄÇbriefly‚ÄÇappear‚ÄÇwith‚ÄÇeach‚ÄÇengine‚ÄÇstart‚ÄÇand‚ÄÇthen‚ÄÇgo‚ÄÇout.‚ÄÇRed‚ÄÇand‚ÄÇamber‚ÄÇ
indicators are most critical. Blue and green indicators are used for general?
information.
Malfunction Indicators
These‚ÄÇare‚ÄÇthe‚ÄÇmost‚ÄÇcritical‚ÄÇindicators.‚ÄÇIf‚ÄÇthey‚ÄÇcome‚ÄÇon‚ÄÇand‚ÄÇstay‚ÄÇlit‚ÄÇwhile‚ÄÇdriving‚ÄÇor‚ÄÇat‚ÄÇ
any‚ÄÇother‚ÄÇtime,‚ÄÇthere‚ÄÇmay‚ÄÇbe‚ÄÇa‚ÄÇproblem.‚ÄÇSee‚ÄÇyour‚ÄÇdealer‚ÄÇif‚ÄÇnecessary.
Brake system
• Brake fluid is low.
• The brake system has a problem.
Press‚ÄÇthe‚ÄÇbrake‚ÄÇpedal‚ÄÇlightly‚ÄÇto‚ÄÇcheck‚ÄÇpedal‚ÄÇpressure.‚ÄÇIf‚ÄÇnormal,‚ÄÇcheck‚ÄÇ
the‚ÄÇbrake‚ÄÇfluid‚ÄÇlevel‚ÄÇwhen‚ÄÇyou‚ÄÇstop.‚ÄÇIf‚ÄÇabnormal,‚ÄÇtake‚ÄÇimmediate‚ÄÇaction.‚ÄÇIf‚ÄÇ
necessary, downshift the transmission to slow the vehicle using engine
braking.‚ÄÇHave‚ÄÇyour‚ÄÇvehicle‚ÄÇrepaired‚ÄÇimmediately.
Low oil pressure
Engine‚ÄÇoil‚ÄÇpressure‚ÄÇis‚ÄÇlow.‚ÄÇStop‚ÄÇin‚ÄÇa‚ÄÇsafe‚ÄÇplace.‚ÄÇOpen‚ÄÇthe‚ÄÇhood.‚ÄÇCheck‚ÄÇthe‚ÄÇoil‚ÄÇ
level,‚ÄÇand‚ÄÇadd‚ÄÇoil‚ÄÇif‚ÄÇnecessary‚ÄÇ(see‚ÄÇpage‚ÄÇ128).‚ÄÇIf‚ÄÇthe‚ÄÇindicator‚ÄÇdoes‚ÄÇnot‚ÄÇturn‚ÄÇ
off, have your vehicle repaired immediately.
Charging system
The‚ÄÇbattery‚ÄÇis‚ÄÇnot‚ÄÇcharging.‚ÄÇTurn‚ÄÇoff‚ÄÇall‚ÄÇelectrical‚ÄÇitems,‚ÄÇbut‚ÄÇdo‚ÄÇnot‚ÄÇturn‚ÄÇoff‚ÄÇ
the‚ÄÇvehicle‚ÄÇto‚ÄÇprevent‚ÄÇfurther‚ÄÇbattery‚ÄÇdischarge.‚ÄÇHave‚ÄÇyour‚ÄÇvehicle‚ÄÇrepaired‚ÄÇ
immediately.
Supplemental Restraint System (SRS)
There‚ÄÇis‚ÄÇa‚ÄÇproblem‚ÄÇwith‚ÄÇone‚ÄÇof‚ÄÇthe‚ÄÇairbag‚ÄÇsystems‚ÄÇor‚ÄÇseat‚ÄÇbelt‚ÄÇtensioners.‚ÄÇ
Ca nada
U.S.
INSTRUMENT PANEL
*if‚ÄÇequipped*if‚ÄÇequipped
Page 60 of 80

112 || 113
HANDLING THE UNEXPECTED
HANDLING THE UNEXPECTED
After the Engine Starts
Once your vehicle’s engine has started, remove the jumper cables in the following 
order:
1. Disconnect the jumper cable from your vehicle’s ground.
2. Disconnect the other end of the jumper cable from the assisting vehicle’s (-) 
terminal.
3. Disconnect the jumper cable from your vehicle’s (+) terminal.
4. Disconnect the other end of the jumper cable from the assisting vehicle’s (+) 
terminal.
5. Have‚ÄÇyour‚ÄÇvehicle‚ÄÇinspected‚ÄÇby‚ÄÇa‚ÄÇnearby‚ÄÇservice‚ÄÇstation‚ÄÇor‚ÄÇa‚ÄÇdealer.
Overheating
If‚ÄÇthe‚ÄÇtemperature‚ÄÇgauge‚ÄÇneedle‚ÄÇis‚ÄÇat‚ÄÇthe‚ÄÇH‚ÄÇmark,‚ÄÇthe‚ÄÇengine‚ÄÇsuddenly‚ÄÇloses‚ÄÇpower,‚ÄÇ
or steam or spray comes out from under the hood, your engine is overheat\
ing.
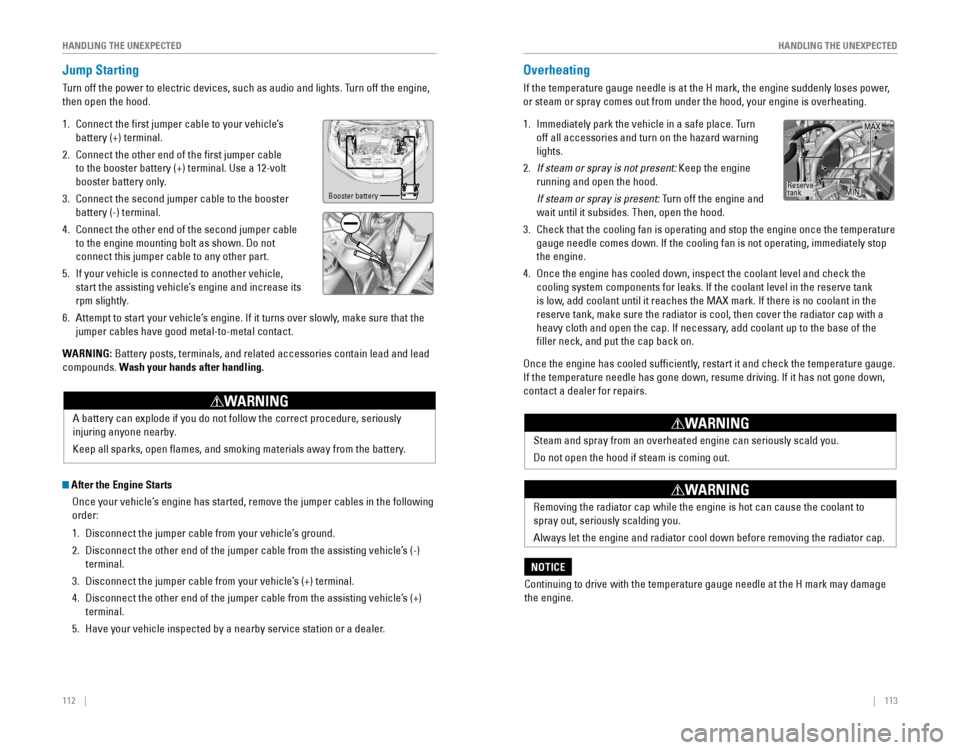
1. Immediately‚ÄÇpark‚ÄÇthe‚ÄÇvehicle‚ÄÇin‚ÄÇa‚ÄÇsafe‚ÄÇplace.‚ÄÇTurn‚ÄÇ
off‚ÄÇall‚ÄÇaccessories‚ÄÇand‚ÄÇturn‚ÄÇon‚ÄÇthe‚ÄÇhazard‚ÄÇwarning‚ÄÇ
lights.
2. If‚ÄÇsteam‚ÄÇor‚ÄÇspray‚ÄÇis‚ÄÇnot‚ÄÇpresent: Keep the engine
running and open the hood.
‚ÄÇIf‚ÄÇsteam‚ÄÇor‚ÄÇspray‚ÄÇis‚ÄÇpresent: Turn off the engine and
wait‚ÄÇuntil‚ÄÇit‚ÄÇsubsides.‚ÄÇThen,‚ÄÇopen‚ÄÇthe‚ÄÇhood.
3. Check that the cooling fan is operating and stop the engine once the tem\
perature
gauge‚ÄÇneedle‚ÄÇcomes‚ÄÇdown.‚ÄÇIf‚ÄÇthe‚ÄÇcooling‚ÄÇfan‚ÄÇis‚ÄÇnot‚ÄÇoperating,‚ÄÇimmediately‚ÄÇstop‚ÄÇ
the engine.
4.‚ÄÇOnce‚ÄÇthe‚ÄÇengine‚ÄÇhas‚ÄÇcooled‚ÄÇdown,‚ÄÇinspect‚ÄÇthe‚ÄÇcoolant‚ÄÇlevel‚ÄÇand‚ÄÇcheck‚ÄÇthe‚ÄÇ
cooling‚ÄÇsystem‚ÄÇcomponents‚ÄÇfor‚ÄÇleaks.‚ÄÇIf‚ÄÇthe‚ÄÇcoolant‚ÄÇlevel‚ÄÇin‚ÄÇthe‚ÄÇreserve‚ÄÇtank‚ÄÇ
is‚ÄÇlow,‚ÄÇadd‚ÄÇcoolant‚ÄÇuntil‚ÄÇit‚ÄÇreaches‚ÄÇthe‚ÄÇMAX‚ÄÇmark.‚ÄÇIf‚ÄÇthere‚ÄÇis‚ÄÇno‚ÄÇcoolant‚ÄÇin‚ÄÇthe‚ÄÇ
reserve tank, make sure the radiator is cool, then cover the radiator ca\
p with a
heavy‚ÄÇcloth‚ÄÇand‚ÄÇopen‚ÄÇthe‚ÄÇcap.‚ÄÇIf‚ÄÇnecessary,‚ÄÇadd‚ÄÇcoolant‚ÄÇup‚ÄÇto‚ÄÇthe‚ÄÇbase‚ÄÇof‚ÄÇthe‚ÄÇ
filler‚ÄÇneck,‚ÄÇand‚ÄÇput‚ÄÇthe‚ÄÇcap‚ÄÇback‚ÄÇon.
Once the engine has cooled sufficiently, restart it and check the temperature gauge.
If‚ÄÇthe‚ÄÇtemperature‚ÄÇneedle‚ÄÇhas‚ÄÇgone‚ÄÇdown,‚ÄÇresume‚ÄÇdriving.‚ÄÇIf‚ÄÇit‚ÄÇhas‚ÄÇnot‚ÄÇgone‚ÄÇdown,‚ÄÇ
contact a dealer for repairs.
Reserve
tank MAX
MIN
A‚ÄÇbattery‚ÄÇcan‚ÄÇexplode‚ÄÇif‚ÄÇyou‚ÄÇdo‚ÄÇnot‚ÄÇfollow‚ÄÇthe‚ÄÇcorrect‚ÄÇprocedure,‚ÄÇseriously‚ÄÇ
injuring‚ÄÇanyone‚ÄÇnearby.
Keep‚ÄÇall‚ÄÇsparks,‚ÄÇopen‚ÄÇflames,‚ÄÇand‚ÄÇsmoking‚ÄÇmaterials‚ÄÇaway‚ÄÇfrom‚ÄÇthe‚ÄÇbattery.
WARNING
Jump Starting
Turn off the power to electric devices, such as audio and lights. Turn off the engine,
then open the hood.
1. Connect the first jumper cable to your vehicle’s 
battery‚ÄÇ(+)‚ÄÇterminal.
2. Connect‚ÄÇthe‚ÄÇother‚ÄÇend‚ÄÇof‚ÄÇthe‚ÄÇfirst‚ÄÇjumper‚ÄÇcable‚ÄÇ
to‚ÄÇthe‚ÄÇbooster‚ÄÇbattery‚ÄÇ(+)‚ÄÇterminal.‚ÄÇUse‚ÄÇa‚ÄÇ12-volt‚ÄÇ
booster‚ÄÇbattery‚ÄÇonly.
3. Connect‚ÄÇthe‚ÄÇsecond‚ÄÇjumper‚ÄÇcable‚ÄÇto‚ÄÇthe‚ÄÇbooster‚ÄÇ
battery‚ÄÇ(-)‚ÄÇterminal.
4.‚ÄÇConnect‚ÄÇthe‚ÄÇother‚ÄÇend‚ÄÇof‚ÄÇthe‚ÄÇsecond‚ÄÇjumper‚ÄÇcable‚ÄÇ
to‚ÄÇthe‚ÄÇengine‚ÄÇmounting‚ÄÇbolt‚ÄÇas‚ÄÇshown.‚ÄÇDo‚ÄÇnot‚ÄÇ
connect‚ÄÇthis‚ÄÇjumper‚ÄÇcable‚ÄÇto‚ÄÇany‚ÄÇother‚ÄÇpart.
5. If‚ÄÇyour‚ÄÇvehicle‚ÄÇis‚ÄÇconnected‚ÄÇto‚ÄÇanother‚ÄÇvehicle,‚ÄÇ
start the assisting vehicle’s engine and increase its
rpm slightly.
6. Attempt to start your vehicle’s engine. If it turns over slowly, make sure that the 
jumper‚ÄÇcables‚ÄÇhave‚ÄÇgood‚ÄÇmetal-to-metal‚ÄÇcontact.
WARNING: Battery posts, terminals, and related accessories contain lead and lead\
compounds. Wash your hands after handling.
Booster‚ÄÇbattery
Steam and spray from an overheated engine can seriously scald you.
Do‚ÄÇnot‚ÄÇopen‚ÄÇthe‚ÄÇhood‚ÄÇif‚ÄÇsteam‚ÄÇis‚ÄÇcoming‚ÄÇout.
WARNING
Removing the radiator cap while the engine is hot can cause the coolant \
to
spray out, seriously scalding you.
Always‚ÄÇlet‚ÄÇthe‚ÄÇengine‚ÄÇand‚ÄÇradiator‚ÄÇcool‚ÄÇdown‚ÄÇbefore‚ÄÇremoving‚ÄÇthe‚ÄÇradiator‚ÄÇcap.
WARNING
Continuing to drive with the temperature gauge needle at the H mark may \
damage
the engine.
NOTICE
Page 61 of 80

114‚ÄÇ‚ÄÇ‚ÄÇ‚ÄÇ|| 115
HANDLING THE UNEXPECTED
HANDLING THE UNEXPECTED
Emergency Engine Stop*
The‚ÄÇENGINE‚ÄÇSTART/STOP‚ÄÇbutton‚ÄÇmay‚ÄÇbe‚ÄÇused‚ÄÇto‚ÄÇstop‚ÄÇthe‚ÄÇengine‚ÄÇdue‚ÄÇto‚ÄÇan‚ÄÇ
emergency‚ÄÇsituation‚ÄÇeven‚ÄÇwhile‚ÄÇdriving.‚ÄÇIf‚ÄÇyou‚ÄÇmust‚ÄÇstop‚ÄÇthe‚ÄÇengine,‚ÄÇchoose‚ÄÇone‚ÄÇof‚ÄÇ
the following operations:
• 
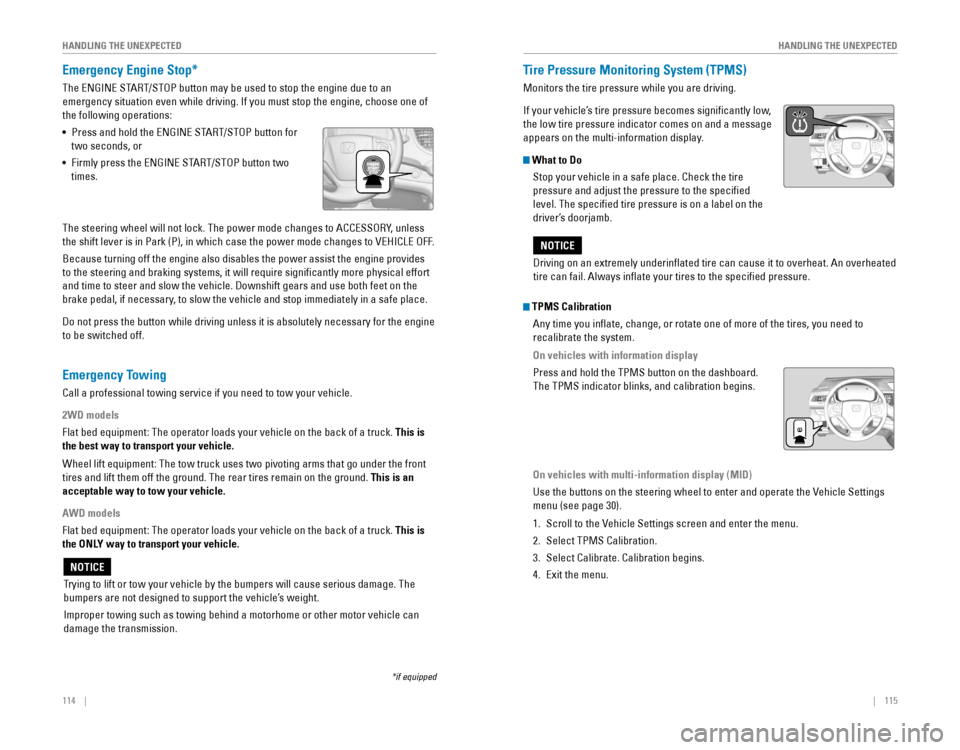
Press‚ÄÇand‚ÄÇhold‚ÄÇthe‚ÄÇENGINE‚ÄÇSTART/STOP‚ÄÇbutton‚ÄÇfor‚ÄÇ
two seconds, or
• 
Firmly‚ÄÇpress‚ÄÇthe‚ÄÇENGINE‚ÄÇSTART/STOP‚ÄÇbutton‚ÄÇtwo‚ÄÇ
times.
The‚ÄÇsteering‚ÄÇwheel‚ÄÇwill‚ÄÇnot‚ÄÇlock.‚ÄÇThe‚ÄÇpower‚ÄÇmode‚ÄÇchanges‚ÄÇto‚ÄÇACCESSORY,‚ÄÇunless‚ÄÇ
the‚ÄÇshift‚ÄÇlever‚ÄÇis‚ÄÇin‚ÄÇPark‚ÄÇ(P),‚ÄÇin‚ÄÇwhich‚ÄÇcase‚ÄÇthe‚ÄÇpower‚ÄÇmode‚ÄÇchanges‚ÄÇto‚ÄÇVEHICLE‚ÄÇOFF.
Because‚ÄÇturning‚ÄÇoff‚ÄÇthe‚ÄÇengine‚ÄÇalso‚ÄÇdisables‚ÄÇthe‚ÄÇpower‚ÄÇassist‚ÄÇthe‚ÄÇengine‚ÄÇprovides‚ÄÇ
to‚ÄÇthe‚ÄÇsteering‚ÄÇand‚ÄÇbraking‚ÄÇsystems,‚ÄÇit‚ÄÇwill‚ÄÇrequire‚ÄÇsignificantly‚ÄÇmore‚ÄÇphysical‚ÄÇeffort‚ÄÇ
and‚ÄÇtime‚ÄÇto‚ÄÇsteer‚ÄÇand‚ÄÇslow‚ÄÇthe‚ÄÇvehicle.‚ÄÇDownshift‚ÄÇgears‚ÄÇand‚ÄÇuse‚ÄÇboth‚ÄÇfeet‚ÄÇon‚ÄÇthe‚ÄÇ
brake‚ÄÇpedal,‚ÄÇif‚ÄÇnecessary,‚ÄÇto‚ÄÇslow‚ÄÇthe‚ÄÇvehicle‚ÄÇand‚ÄÇstop‚ÄÇimmediately‚ÄÇin‚ÄÇa‚ÄÇsafe‚ÄÇplace.
Do‚ÄÇnot‚ÄÇpress‚ÄÇthe‚ÄÇbutton‚ÄÇwhile‚ÄÇdriving‚ÄÇunless‚ÄÇit‚ÄÇis‚ÄÇabsolutely‚ÄÇnecessary‚ÄÇfor‚ÄÇthe‚ÄÇengine‚ÄÇ
to‚ÄÇbe‚ÄÇswitched‚ÄÇoff.
*if‚ÄÇequipped
Trying‚ÄÇto‚ÄÇlift‚ÄÇor‚ÄÇtow‚ÄÇyour‚ÄÇvehicle‚ÄÇby‚ÄÇthe‚ÄÇbumpers‚ÄÇwill‚ÄÇcause‚ÄÇserious‚ÄÇdamage.‚ÄÇThe‚ÄÇ
bumpers are not designed to support the vehicle’s weight.
Improper‚ÄÇtowing‚ÄÇsuch‚ÄÇas‚ÄÇtowing‚ÄÇbehind‚ÄÇa‚ÄÇmotorhome‚ÄÇor‚ÄÇother‚ÄÇmotor‚ÄÇvehicle‚ÄÇcan‚ÄÇ
damage the transmission.
NOTICE
Tire Pressure Monitoring System (TPMS)
Monitors the tire pressure while you are driving.
If your vehicle’s tire pressure becomes significantly low, 
the low tire pressure indicator comes on and a message
appears on the multi-information display.
What to Do Stop your vehicle in a safe place. Check the tire
pressure and adjust the pressure to the specified
level.‚ÄÇThe‚ÄÇspecified‚ÄÇtire‚ÄÇpressure‚ÄÇis‚ÄÇon‚ÄÇa‚ÄÇlabel‚ÄÇon‚ÄÇthe‚ÄÇ
driver’s doorjamb.
Emergency Towing
Call a professional towing service if you need to tow your vehicle.
2WD models
Flat‚ÄÇbed‚ÄÇequipment:‚ÄÇThe‚ÄÇoperator‚ÄÇloads‚ÄÇyour‚ÄÇvehicle‚ÄÇon‚ÄÇthe‚ÄÇback‚ÄÇof‚ÄÇa‚ÄÇtruck.‚ÄÇThis is
the best way to transport your vehicle.
Wheel‚ÄÇlift‚ÄÇequipment:‚ÄÇThe‚ÄÇtow‚ÄÇtruck‚ÄÇuses‚ÄÇtwo‚ÄÇpivoting‚ÄÇarms‚ÄÇthat‚ÄÇgo‚ÄÇunder‚ÄÇthe‚ÄÇfront‚ÄÇ
tires and lift them off the ground. The rear tires remain on the ground.\
This is an
acceptable way to tow your vehicle.
AWD models
Flat‚ÄÇbed‚ÄÇequipment:‚ÄÇThe‚ÄÇoperator‚ÄÇloads‚ÄÇyour‚ÄÇvehicle‚ÄÇon‚ÄÇthe‚ÄÇback‚ÄÇof‚ÄÇa‚ÄÇtruck.‚ÄÇThis is
the ONLY way to transport your vehicle.
Driving‚ÄÇon‚ÄÇan‚ÄÇextremely‚ÄÇunderinflated‚ÄÇtire‚ÄÇcan‚ÄÇcause‚ÄÇit‚ÄÇto‚ÄÇoverheat.‚ÄÇAn‚ÄÇoverheated‚ÄÇ
tire can fail. Always inflate your tires to the specified pressure.
NOTICE
TPMS Calibration
Any time you inflate, change, or rotate one of more of the tires, you \
need to
recalibrate‚ÄÇthe‚ÄÇsystem.
On vehicles with information display
Press‚ÄÇand‚ÄÇhold‚ÄÇthe‚ÄÇTPMS‚ÄÇbutton‚ÄÇon‚ÄÇthe‚ÄÇdashboard.‚ÄÇ
The‚ÄÇTPMS‚ÄÇindicator‚ÄÇblinks,‚ÄÇand‚ÄÇcalibration‚ÄÇbegins.
On vehicles with multi-information display (MID)
Use‚ÄÇthe‚ÄÇbuttons‚ÄÇon‚ÄÇthe‚ÄÇsteering‚ÄÇwheel‚ÄÇto‚ÄÇenter‚ÄÇand‚ÄÇoperate‚ÄÇthe‚ÄÇVehicle‚ÄÇSettings‚ÄÇ
menu (see page 30).
1. Scroll to the Vehicle Settings screen and enter the menu.
2. Select‚ÄÇTPMS‚ÄÇCalibration.
3. Select‚ÄÇCalibrate.‚ÄÇCalibration‚ÄÇbegins.
4.‚ÄÇExit‚ÄÇthe‚ÄÇmenu.