ECO mode HONDA CR-V 2017 RM1, RM3, RM4 / 4.G Owners Manual
[x] Cancel search | Manufacturer: HONDA, Model Year: 2017, Model line: CR-V, Model: HONDA CR-V 2017 RM1, RM3, RM4 / 4.GPages: 657
Page 479 of 657
uuWhen Driving uAdaptive Cruise Control (ACC) with Low Speed Follow (LSF)*
478
Driving
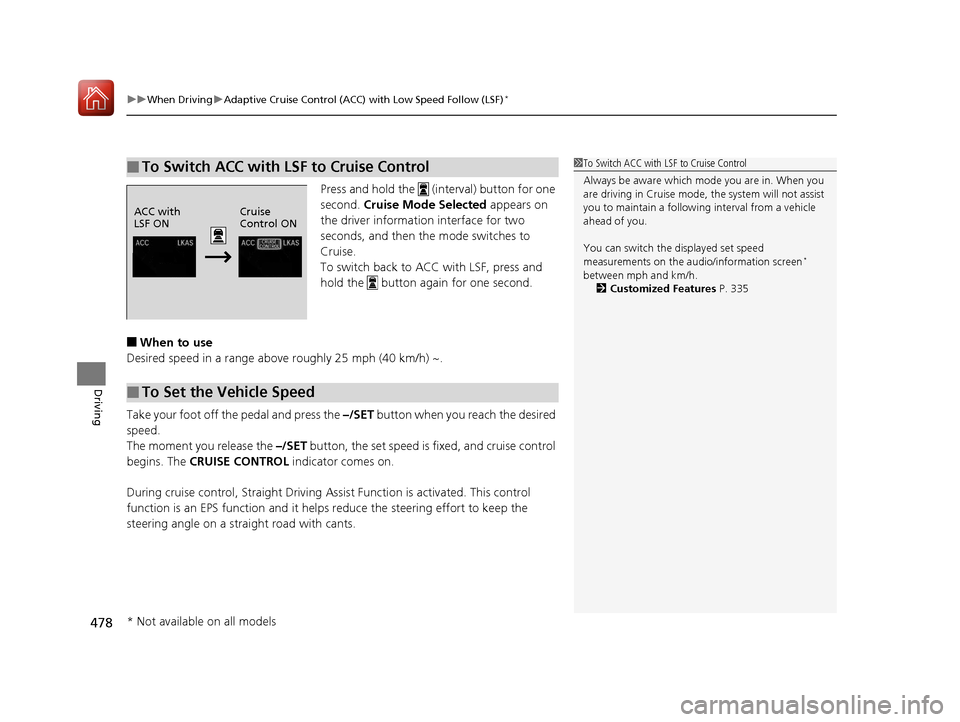
Press and hold the (interval) button for one
second. Cruise Mode Selected appears on
the driver information interface for two
seconds, and then the mode switches to
Cruise.
To switch back to ACC with LSF, press and
hold the button again for one second.
■When to use
Desired speed in a range above roughly 25 mph (40 km/h) ~.
Take your foot off the pedal and press the –/SET button when you reach the desired
speed.
The moment you release the –/SET button, the set speed is fixed, and cruise control
begins. The CRUISE CONTROL indicator comes on.
During cruise control, Straight Driving A ssist Function is activated. This control
function is an EPS function and it helps reduce the steering effort to keep the
steering angle on a straight road with cants.
■To Switch ACC with LSF to Cruise Control1 To Switch ACC with LSF to Cruise Control
Always be aware which mode you are in. When you
are driving in Cruise mode, the system will not assist
you to maintain a followi ng interval from a vehicle
ahead of you.
You can switch the displayed set speed
measurements on the audio/information screen
*
between mph and km/h.
2 Customized Features P. 335
ACC with
LSF ON Cruise
Control ON
■To Set the Vehicle Speed
* Not available on all models
17 CR-V-31TLA6000.book 478 ページ 2016年10月11日 火曜日 午後6時37分
Page 485 of 657
484
uuWhen Driving uLane Keeping Assist System (LKAS)*
Driving
Lane Keeping Assist System (LKAS)*
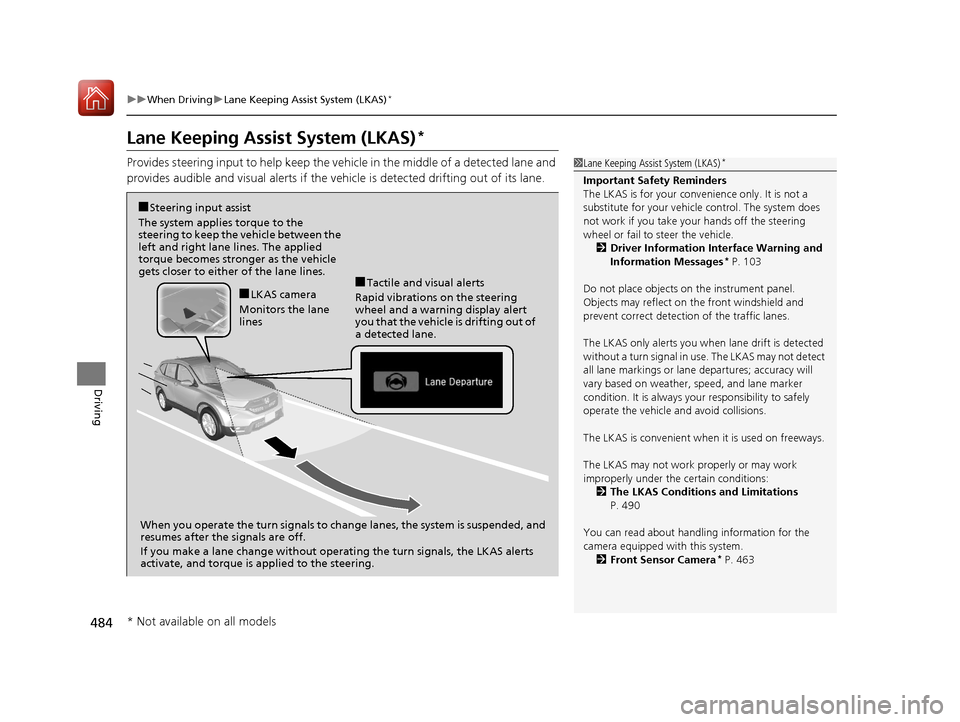
Provides steering input to help keep the vehicle in the middle of a detected lane and
provides audible and visual alerts if the vehicle is detected drifting out of its lane.1Lane Keeping Assist System (LKAS)*
Important Safety Reminders
The LKAS is for your convenience only. It is not a
substitute for your vehicl e control. The system does
not work if you take y our hands off the steering
wheel or fail to steer the vehicle.
2 Driver Information Interface Warning and
Information Messages
* P. 103
Do not place objects on the instrument panel.
Objects may reflect on th e front windshield and
prevent correct detectio n of the traffic lanes.
The LKAS only alerts you when lane drift is detected
without a turn signal in us e. The LKAS may not detect
all lane markings or lane departures; accuracy will
vary based on weather, speed, and lane marker
condition. It is always your responsibility to safely
operate the vehicle an d avoid collisions.
The LKAS is convenient when it is used on freeways.
The LKAS may not work properly or may work
improperly under the certain conditions: 2 The LKAS Conditions and Limitations
P. 490
You can read about handling information for the
camera equipped with this system. 2 Front Sensor Camera
* P. 463
■Steering input assist
The system applies torque to the
steering to keep the vehicle between the
left and right lane lines. The applied
torque becomes stronger as the vehicle
gets closer to either of the lane lines.
When you operate the turn signals to chan ge lanes, the system is suspended, and
resumes after the signals are off.
If you make a lane change without operat ing the turn signals, the LKAS alerts
activate, and torque is applied to the steering.
■LKAS camera
Monitors the lane
lines■Tactile and visual alerts
Rapid vibrations on the steering
wheel and a warning display alert
you that the vehicle is drifting out of
a detected lane.
* Not available on all models
17 CR-V-31TLA6000.book 484 ページ 2016年10月11日 火曜日 午後6時37分
Page 486 of 657
Continued485
uuWhen Driving uLane Keeping Assist System (LKAS)*
Driving
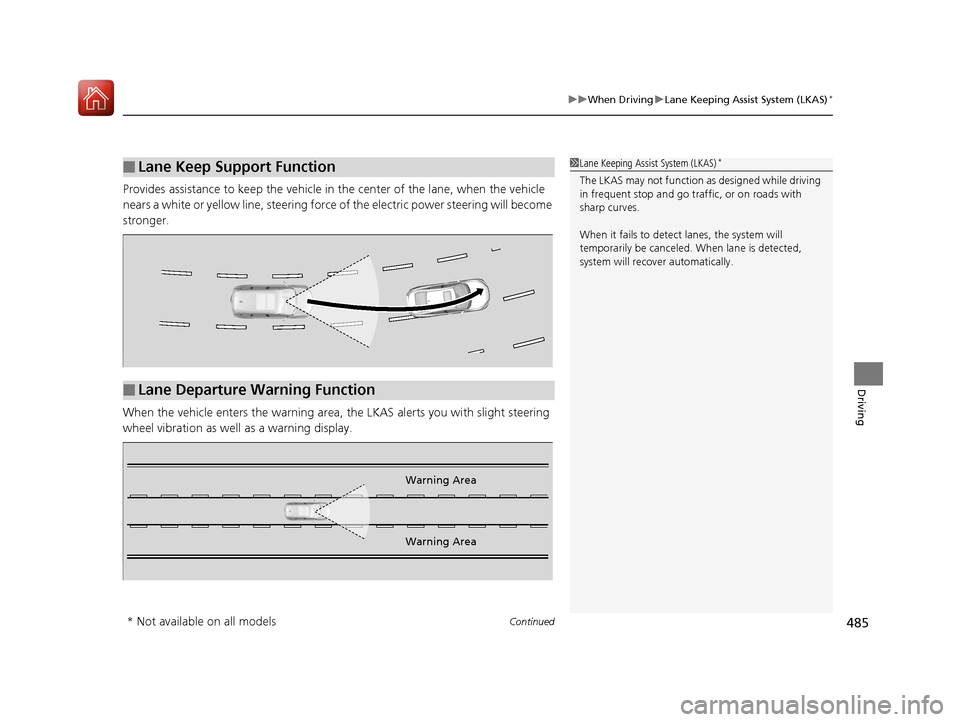
Provides assistance to keep the vehicle in the center of the lane, when the vehicle
nears a white or yellow line, steering force of the electric power steering will become
stronger.
When the vehicle enters the warning area, the LKAS alerts you with slight steering
wheel vibration as well as a warning display.
■Lane Keep Support Function1 Lane Keeping Assist System (LKAS)*
The LKAS may not function as designed while driving
in frequent stop and go traf fic, or on roads with
sharp curves.
When it fails to detect lanes, the system will
temporarily be canceled. When lane is detected,
system will recover automatically.
■Lane Departure Warning Function
Warning Area
Warning Area
* Not available on all models
17 CR-V-31TLA6000.book 485 ページ 2016年10月11日 火曜日 午後6時37分
Page 494 of 657
493
uuWhen Driving uVehicle Stability Assist (VSA ®), aka Electronic Stability Control (ESC), System
Driving
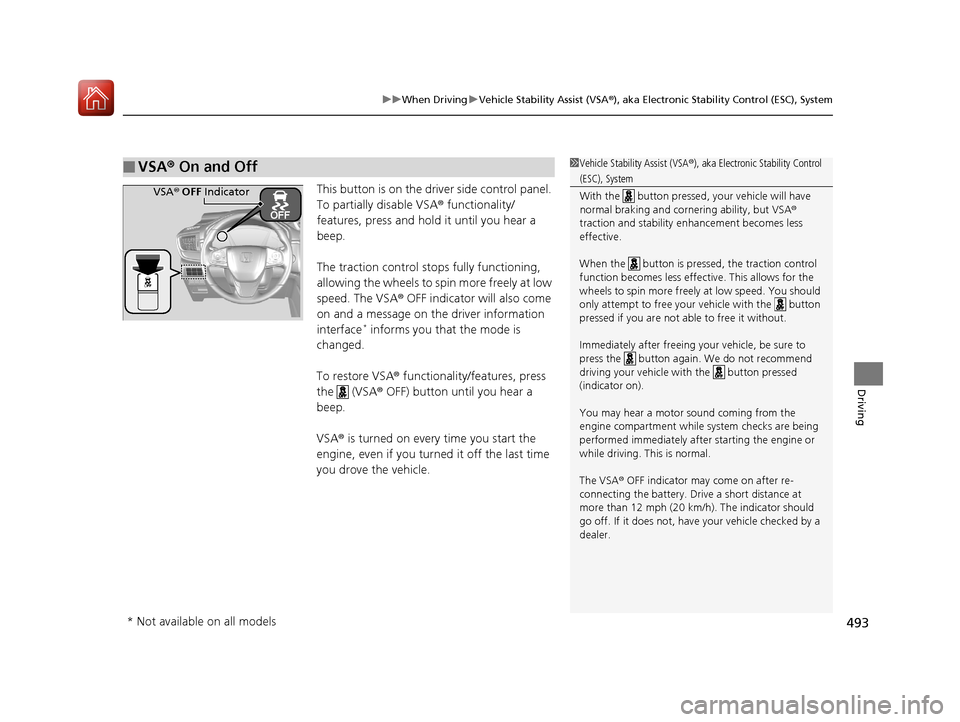
This button is on the driver side control panel.
To partially disable VSA ® functionality/
features, press and hold it until you hear a
beep.
The traction control stop s fully functioning,
allowing the wheels to spin more freely at low
speed. The VSA ® OFF indicator will also come
on and a message on the driver information
interface
* informs you that the mode is
changed.
To restore VSA ® functionality/features, press
the (VSA ® OFF) button until you hear a
beep.
VSA ® is turned on every time you start the
engine, even if you turned it off the last time
you drove the vehicle.
■VSA ® On and Off1 Vehicle Stability Assist (VSA ®), aka Electronic Stability Control
(ESC), System
With the button pressed, your vehicle will have
normal braking and corn ering ability, but VSA®
traction and stability enhancement becomes less
effective.
When the button is pressed, the traction control
function becomes less effective. This allows for the
wheels to spin more freely at low speed. You should
only attempt to free your vehicle with the button
pressed if you are not able to free it without.
Immediately after freeing your vehicle, be sure to
press the button again. We do not recommend
driving your vehicle wi th the button pressed
(indicator on).
You may hear a motor sound coming from the
engine compartment while system checks are being
performed immediately after starting the engine or
while driving. This is normal.
The VSA ® OFF indicator may come on after re-
connecting the battery. Drive a short distance at
more than 12 mph (20 km/h). The indicator should
go off. If it does not, have your vehicle checked by a
dealer.VSA ® OFF Indicator
* Not available on all models
17 CR-V-31TLA6000.book 493 ページ 2016年10月11日 火曜日 午後6時37分
Page 496 of 657
495
uuWhen Driving uBlind spot information (BSI) System*
Continued
Driving
Blind spot informa tion (BSI) System*
Is designed to detect vehicles in specified alert zones adjacent to your vehicle,
particularly in harder to see areas commonly known as “blind spots.”
When the system detects vehicles approach ing from behind in adjacent lanes, the
appropriate indicator comes on for a few seconds, providing assistance when you
change lanes.
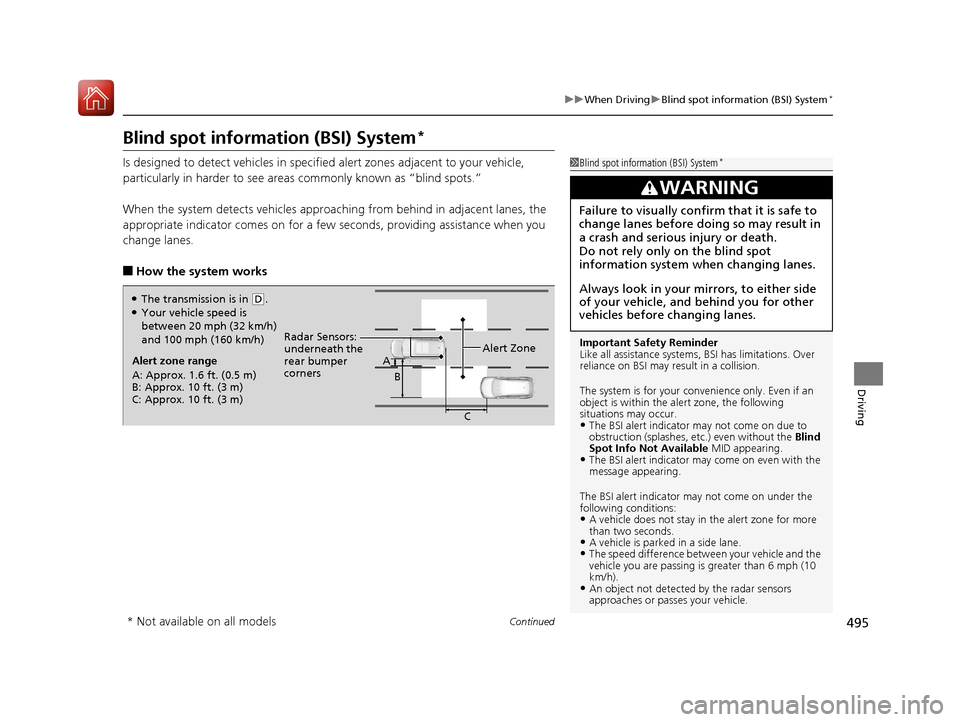
■How the system works
1 Blind spot inform ation (BSI) System*
Important Safety Reminder
Like all assistance systems, BSI has limitations. Over
reliance on BSI may re sult in a collision.
The system is for your convenience only. Even if an
object is within the alert zone, the following
situations may occur.
•The BSI alert indicator may not come on due to
obstruction (splashes, et c.) even without the Blind
Spot Info Not Available MID appearing.
•The BSI alert indicator may come on even with the
message appearing.
The BSI alert i ndicator may not come on under the
following conditions:
•A vehicle does not stay in the alert zone for more
than two seconds.
•A vehicle is parked in a side lane.•The speed difference betw een your vehicle and the
vehicle you are passing is greater than 6 mph (10
km/h).
•An object not detected by the radar sensors
approaches or passes your vehicle.
3WARNING
Failure to visually confirm that it is safe to
change lanes before doing so may result in
a crash and serious injury or death.
Do not rely only on the blind spot
information system wh en changing lanes.
Always look in your mirrors, to either side
of your vehicle, and behind you for other
vehicles before changing lanes.
Alert zone range
A: Approx. 1.6 ft. (0.5 m)
B: Approx. 10 ft. (3 m)
C: Approx. 10 ft. (3 m) Radar Sensors:
underneath the
rear bumper
corners
Alert ZoneA
B
C
●The transmission is in (D.●Your vehicle speed is
between 20 mph (32 km/h)
and 100 mph (160 km/h)
* Not available on all models
17 CR-V-31TLA6000.book 495 ページ 2016年10月11日 火曜日 午後6時37分
Page 502 of 657
501
uuWhen Driving uTire Pressure Monitoring System (TPMS)
Continued
Driving
Tire Pressure Monitoring System (TPMS)
Instead of directly measuring the pressure in each tire, the TPMS on this vehicle
monitors and compares the rolling radius and rotational characteristics of each
wheel and tire while you are driving to determine if one or more tires are
significantly under-inflated. This will caus e the low tire pressure/TPMS indicator to
come on and a message to appear on the driver information interface
*.
You must start TPMS calibration every time you:
• Adjust the pressure in one or more tires.
• Rotate the tires.
• Replace one or more tires.
Before calibrating the TPMS:
• Set the cold tire pressure in all four tires.
2 Checking Tires P. 579
Make sure:
•The vehicle is at a complete stop.
• The shift lever is in
(P.
• The ignition switch is in ON
(w*1.
*1: Models with the smart entry system have an ENGINE START/STOP button instead of an
ignition switch.
■TPMS Calibration
1 Tire Pressure Monitoring System (TPMS)
The system does not monitor the tires when driving
at low speed.
Conditions such as low ambient temperature and
altitude change directly a ffect tire pressure and can
trigger the low tire pressure/TPMS indicator to come on.
Tire pressure checked and inflated in:
•Warm weather can beco me under-inflated in
colder weather.
•Cold weather can become over-inflated in warmer
weather.
The low tire pressure indica tor will not come on as a
result of over inflation.
The TPMS may not function pr operly if tire type and
size are mixed. Make sure to use the same size and
type of tire. 2 Checking and Maintaining Tires P. 579
The low tire pressure/TPMS indicator may come on
with a delay or may not come on at all when:
•You rapidly accelerate, decelerate, or turn the
steering wheel.
•You drive on snowy or slippery roads.•Snow chains are used.
The low tire pressure/TPMS indicator may come on
under the following conditions:
•A compact spare tire is used.•There is a heavier and une ven load on the tires,
such as when towing a trailer, than the condition at
calibration.
•Snow chains are used.
* Not available on all models
17 CR-V-31TLA6000.book 501 ページ 2016年10月11日 火曜日 午後6時37分
Page 503 of 657
uuWhen Driving uTire Pressure Monitoring System (TPMS)
502
Driving
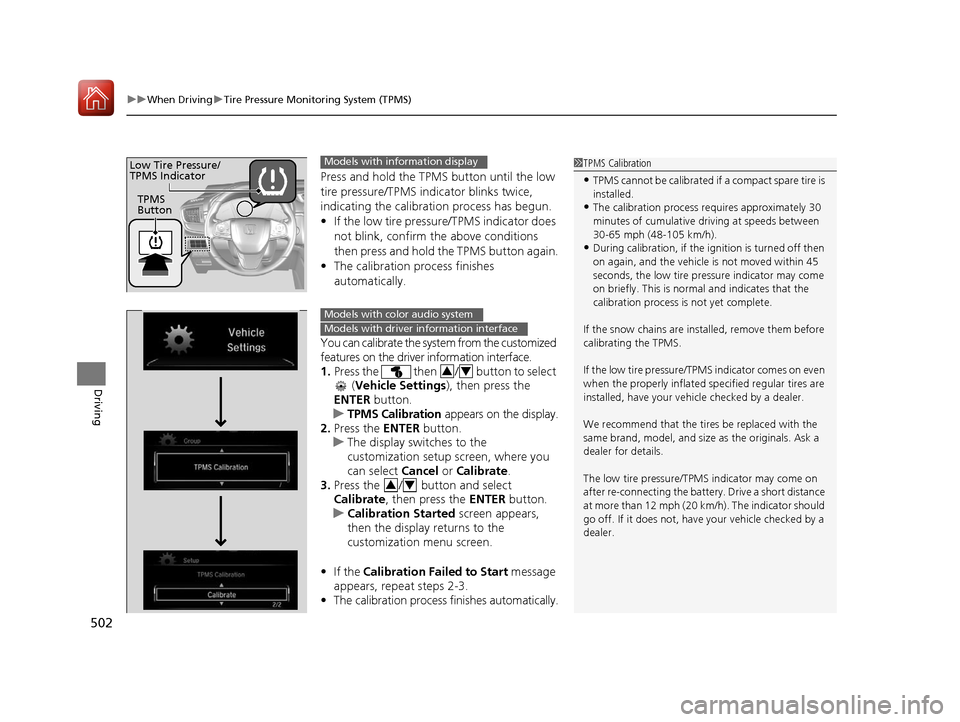
Press and hold the TPMS button until the low
tire pressure/TPMS indi cator blinks twice,
indicating the calibration process has begun.
• If the low tire pressure/TPMS indicator does
not blink, confirm the above conditions
then press and hold the TPMS button again.
• The calibration pr ocess finishes
automatically.
You can calibrate the system from the customized
features on the driver information interface.
1. Press the then / button to select
(Vehicle Settings ), then press the
ENTER button.
u TPMS Calibration appears on the display.
2. Press the ENTER button.
u The display switches to the
customization setup screen, where you
can select Cancel or Calibrate .
3. Press the / button and select
Calibrate , then press the ENTER button.
u Calibration Started screen appears,
then the display returns to the
customization menu screen.
• If the Calibration Failed to Start message
appears, repeat steps 2-3.
• The calibration process finishes automatically.
1TPMS Calibration
•TPMS cannot be calibrated if a compact spare tire is
installed.
•The calibration process requires approximately 30
minutes of cumulative dr iving at speeds between
30-65 mph (48-105 km/h).
•During calibration, if the ignition is turned off then
on again, and the vehicle is not moved within 45
seconds, the low tire pres sure indicator may come
on briefly. This is norma l and indicates that the
calibration process is not yet complete.
If the snow chains are installed, remove them before
calibrating the TPMS.
If the low tire pressure/TPMS indicator comes on even
when the properly inflated specified regular tires are
installed, have your vehicle checked by a dealer.
We recommend that the tires be replaced with the
same brand, model, and size as the originals. Ask a
dealer for details.
The low tire pressure/TPMS indicator may come on
after re-connecting th e battery. Drive a short distance
at more than 12 mph (20 km/h). The indicator should
go off. If it does not, have your vehicle checked by a
dealer.
TPMS
Button
Low Tire Pressure/
TPMS IndicatorModels with info rmation display
Models with color audio system
Models with driver information interface
34
34
17 CR-V-31TLA6000.book 502 ページ 2016年10月11日 火曜日 午後6時37分
Page 505 of 657
504
uuWhen Driving uTire Pressure Monitoring System (TPMS) - Required Federal Explanation
Driving
Tire Pressure Monitoring System (TPMS) - Required
Federal Explanation
Each tire, including the spare (i f provided), should be checked
monthly when cold and inflated to the inflation pressure
recommended by the vehicle manufacturer on the vehicle placard
or tire inflation pressure label.
(If your vehicle has tires of a different size than the size indicated
on the vehicle placard or tire infl ation pressure label, you should
determine the proper tire inflat ion pressure for those tires.)
As an added safety feature, your vehicle has been equipped with
a tire pressure monitoring system (TPMS) that illuminates a low
tire pressure telltale
when one or more of your tire s is significantly under-inflated.
Accordingly, when the low tire pr essure telltale illuminates, you
should stop and check your tires as soon as possible, and inflate
them to the proper pressure.
Driving on a significantly under-in flated tire causes the tire to
overheat and can lead to tire fail ure. Under-inflation also reduces
fuel efficiency and tire tread li fe, and may affect the vehicle's
handling and stopping ability.
U.S. models
17 CR-V-31TLA6000.book 504 ページ 2016年10月11日 火曜日 午後6時37分
Page 509 of 657
uuBraking uBrake System
508
Driving
■Activating and d eactivating the automatic parking brake feature
With the ignition switch is in ON
(w*1, carry out the following steps to either activate
or deactivate the automatic parking brake feature.
1. Shift the select lever to
(P.
2. Without depressing the brake pedal, pull up and release the parking brake switch.
u Check that the parking brake indicator has come on.
3. Pull up and hold the parking brake switch. When you hear a beeping sound,
release the switch and wi thin 3 seconds pull up and hold the switch again.
4. When you hear a sound indicating that the procedure is completed, release the
switch.
u Two beeps indicates that the feature has been activated.
u One beep indicates that the feature has been deactivated.
u When you have completed activating the feature, the parking brake will
remain applied after you turn off the engine.
u Deactivate the feature only if it is absolutely necessary.
u To confirm that the parking brake is applied, check if the parking brake
indicator is on.
If you need to temporarily deactivate the feature for when putting your vehicle
through a conveyor type car wash or when having your vehicle towed. You can
follow the procedure explained below.
1. Depress the brake pedal and bring the vehicle to a stop.
2. Turn the ignition switch to LOCK
(0*1 and then within 2 seconds push down the
parking brake switch.
u Activation and deactivation settings fo r the feature will not be affected.
u Before temporarily deactivating the feat ure, make sure to first turn off both
ACC with LSF and the automatic brake hold system.
u To confirm that the parking brake is applied, check if the parking brake
indicator is on.
*1: Models with the smart entry system have an ENGINE START/STOP button instead of an
ignition switch.
1 Parking brake system
In cold climates, the parking brake may freeze in
place if applied.
When parking the vehicle, chock the wheels and
make sure the automatic parking brake feature is
deactivated.
Also, when putting your vehicle through a conveyor-
type car wash or when ha ving your vehicle towed,
deactivate the automatic parking brake feature and
leave the parking brake released.
17 CR-V-31TLA6000.book 508 ページ 2016年10月11日 火曜日 午後6時37分
Page 519 of 657
uuBraking uCollision Mitigation Braking SystemTM (CMBSTM)*
518
Driving
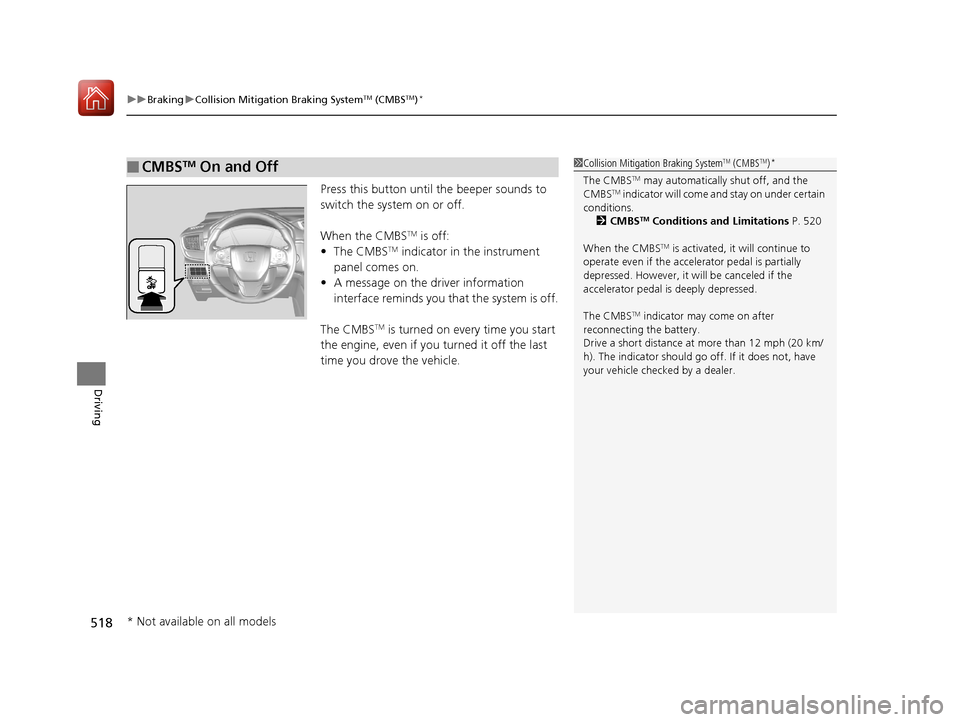
Press this button until the beeper sounds to
switch the system on or off.
When the CMBS
TM is off:
• The CMBSTM indicator in the instrument
panel comes on.
• A message on the driver information
interface reminds you that the system is off.
The CMBS
TM is turned on every time you start
the engine, even if you turned it off the last
time you drove the vehicle.
■CMBSTM On and Off1 Collision Mitigation Braking SystemTM (CMBSTM)*
The CMBSTM may automatically shut off, and the
CMBSTM indicator will come and stay on under certain
conditions.
2 CMBS
TM Conditions and Limitations P. 520
When the CMBS
TM is activated, it will continue to
operate even if the accele rator pedal is partially
depressed. However, it will be canceled if the
accelerator pedal is deeply depressed.
The CMBS
TM indicator may come on after
reconnecting the battery.
Drive a short distance at more than 12 mph (20 km/
h). The indicator should go of f. If it does not, have
your vehicle checked by a dealer.
* Not available on all models
17 CR-V-31TLA6000.book 518 ページ 2016年10月11日 火曜日 午後6時37分