change time HONDA CR-V 2017 RM1, RM3, RM4 / 4.G User Guide
[x] Cancel search | Manufacturer: HONDA, Model Year: 2017, Model line: CR-V, Model: HONDA CR-V 2017 RM1, RM3, RM4 / 4.GPages: 657
Page 160 of 657
Continued159
uuSecurity System uSecurity System Alarm*
Controls
■To deactivate the security system alarm
Unlock the vehicle using the remote transmi tter or smart entry system. The system,
along with the horn and flashing lights, is deactivated.
■Setting the security system alarm
The security system alarm automatically sets when the following conditions have
been met:
• The power mode is set to VEHICLE OFF (LOCK).
• The hood and tailgate are closed.
• All doors and tailgate are locked with the key or the remote transmitter.
■When the security system alarm sets
The security system alarm indicator in the instrument panel blinks. When the
blinking interval changes after about 15 se conds, the security system alarm is set.
■To cancel the security system alarm
The security system is canceled when the vehicle is unlocked using the key, remote
transmitter, smart entry system, or the power mode is set to ON. The security system
alarm indicator goes off at the same time.
1 Security System Alarm*
Do not set the security system alarm when someone
is in the vehicle or a window is open. The system can
accidentally activate when:
•Unlocking the door with the lock tab.•Opening the hood with the hood release handle.
•Moving the shift lever out of ( P.
If the battery goes dead after you have set the
security system alarm, the security alarm may go off
once the battery is re charged or replaced.
If this occurs, deactivate the security system alarm by
unlocking a door using the ke y or remote transmitter.
Do not attempt to alter th is system or add another
device to it.
* Not available on all models
17 CR-V-31TLA6000.book 159 ページ 2016年10月11日 火曜日 午後6時37分
Page 171 of 657
uuOperating the Switches Around the Steering Wheel uENGINE START/STOP Button*
170
Controls
If you leave the vehicle for 30 to 60 minutes with the shift lever in (P and the power
mode in ACCESSORY, the vehicle automati cally goes into the mode similar to
VEHICLE OFF (LOCK) to avoid the battery drain.
When in this mode:
The steering wheel does not lock.
You cannot lock or unlock doors with th e remote transmitter or the smart entry
system.
Press the ENGINE START/STOP button three times to swit ch the mode to VEHICLE
OFF (LOCK).
■Automatic Power Off1 ENGINE START/STOP Button*
If the power mode does not change from VEHICLE
OFF to ACCESSORY, press the ENGINE START/STOP
button while moving the st eering wheel left and
right. The steering wheel will unlock, allowing the
mode to change.
Do not leave the power mode in ACCESSORY or ON
when you get out.
Canadian models
Canadian models
* Not available on all models
17 CR-V-31TLA6000.book 170 ページ 2016年10月11日 火曜日 午後6時37分
Page 174 of 657
173
uuOperating the Switches Around the Steering Wheel uTurn Signals
Controls
Turn Signals
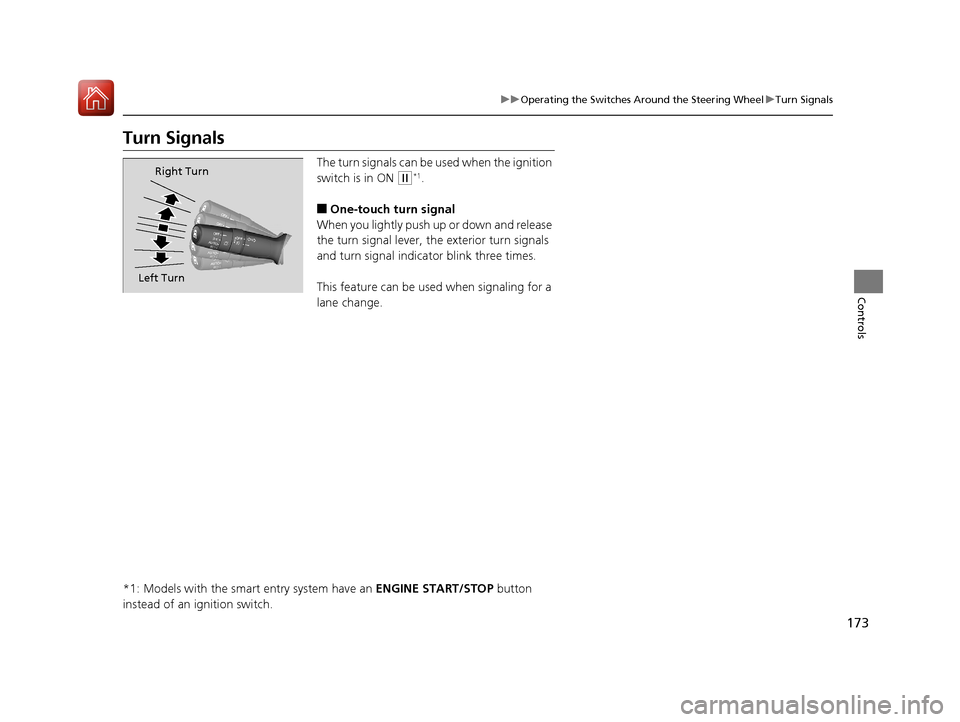
The turn signals can be used when the ignition
switch is in ON
(w*1.
■One-touch turn signal
When you lightly push up or down and release
the turn signal lever, th e exterior turn signals
and turn signal indicator blink three times.
This feature can be used when signaling for a
lane change.
*1: Models with the smart entry system have an ENGINE START/STOP button
instead of an ignition switch.
Right Turn
Left Turn
17 CR-V-31TLA6000.book 173 ページ 2016年10月11日 火曜日 午後6時37分
Page 177 of 657
uuOperating the Switches Around the Steering Wheel uLight Switches
176
Controls
The headlights, all other exterior lights, an d the instrument panel lights turn off 15
seconds after you set the power mode to VE HICLE OFF (LOCK), take the remote with
you, and close th e driver’s door.
u You can change the headlight auto off timer setting.
2 Customized Features P. 335
If you turn the igniti on switch to LOCK (0*1 with the headlight switch on, but do
not open the door, the lights turn off after 10 minutes (3 minutes, if the switch is in
the AUTO position).
The lights turn on again when you unlock or open the driver's door. If you unlock
the door, but do not open it within 15 seconds, the lights go off. If you open the
driver's door, you will hear a lights on reminder chime.
*1: Models with the smart entry system have an ENGINE START/STOP button
instead of an ignition switch.
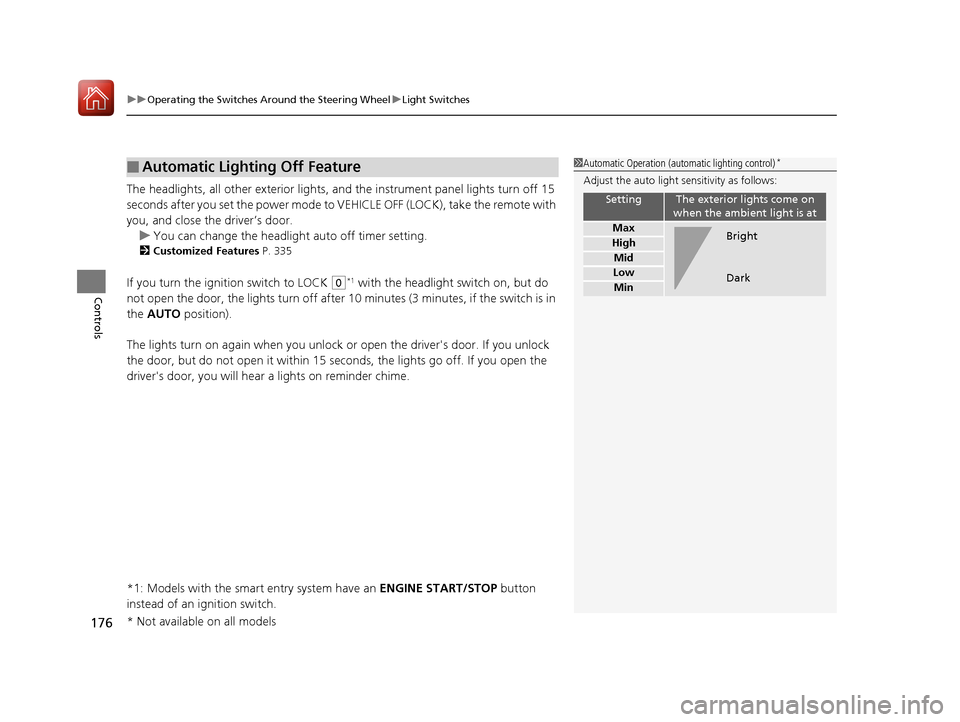
■Automatic Lighting Off Feature1 Automatic Operation (aut omatic lighting control)*
Adjust the auto light sensitivity as follows:
SettingThe exterior lights come on
when the ambient light is at
Max
High
Mid
Low
Min
Bright
Dark
* Not available on all models
17 CR-V-31TLA6000.book 176 ページ 2016年10月11日 火曜日 午後6時37分
Page 179 of 657
178
uuOperating the Switches Around the Steering Wheel uAuto High-Beam System*
Controls
Auto High-Beam System*
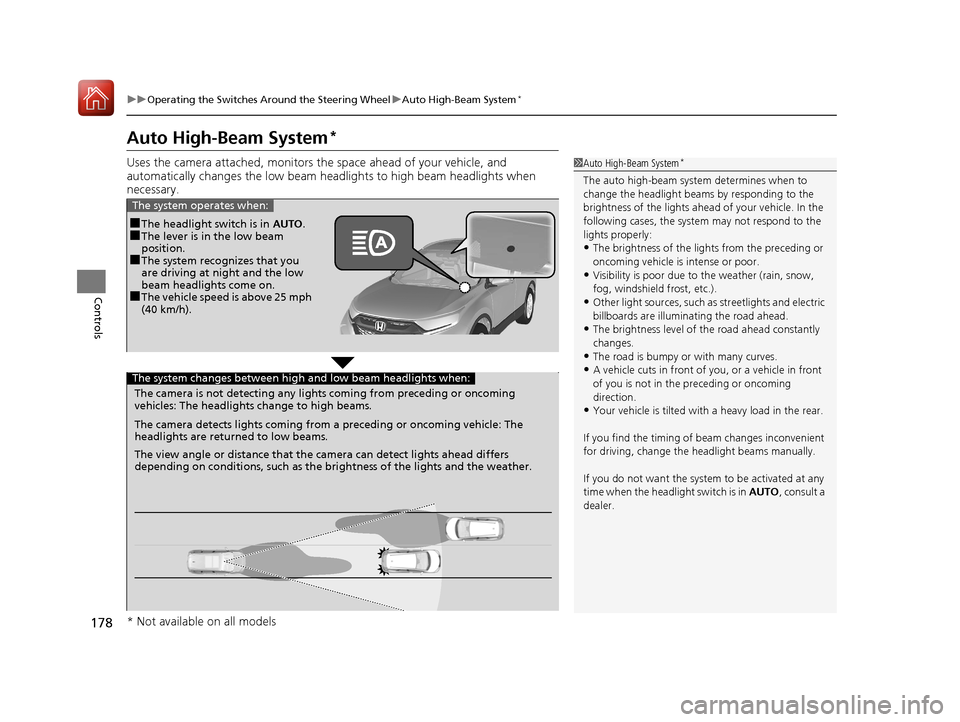
Uses the camera attached, monitors the space ahead of yo ur vehicle, and
automatically changes the low beam he adlights to high beam headlights when
necessary.1 Auto High-Beam System*
The auto high-beam system determines when to
change the headlight beams by responding to the
brightness of the lights ahead of your vehicle. In the
following cases, the system may not respond to the
lights properly:
•The brightness of the lights from the preceding or
oncoming vehicle is intense or poor.
•Visibility is poor due to the weather (rain, snow,
fog, windshield frost, etc.).
•Other light sources, such as streetlights and electric
billboards are illumina ting the road ahead.
•The brightness level of th e road ahead constantly
changes.
•The road is bumpy or with many curves.
•A vehicle cuts in front of you, or a vehicle in front
of you is not in the preceding or oncoming
direction.
•Your vehicle is tilted with a heavy load in the rear.
If you find the timing of beam changes inconvenient
for driving, change the headlight beams manually.
If you do not want the system to be activated at any
time when the headlight switch is in AUTO, consult a
dealer.
■The headlight switch is in AUTO.■The lever is in the low beam
position.
■The system recognizes that you
are driving at night and the low
beam headlights come on.
■The vehicle speed is above 25 mph
(40 km/h).
The system operates when:
The camera is not detecting any lights coming from preceding or oncoming
vehicles: The headlights change to high beams.
The camera detects lights coming from a preceding or oncoming vehicle: The
headlights are return ed to low beams.
The view angle or distance that the camera can detect lights ahead differs
depending on conditions, such as the brightness of the lights and the weather.
The system changes between high and low beam headlights when:
* Not available on all models
17 CR-V-31TLA6000.book 178 ページ 2016年10月11日 火曜日 午後6時37分
Page 181 of 657
uuOperating the Switches Around the Steering Wheel uAuto High-Beam System*
180
Controls
■To manually cancel the system temporarily
You can cancel the operation when you manually change the headlights to high
beams. Push the lever forward until you hear a click, or lightly pull the lever towards
you to flash high beams. The auto hi gh-beam system indicator goes off.
If you want the auto high-beam system ope ration to resume at once, pull the lever
towards you.
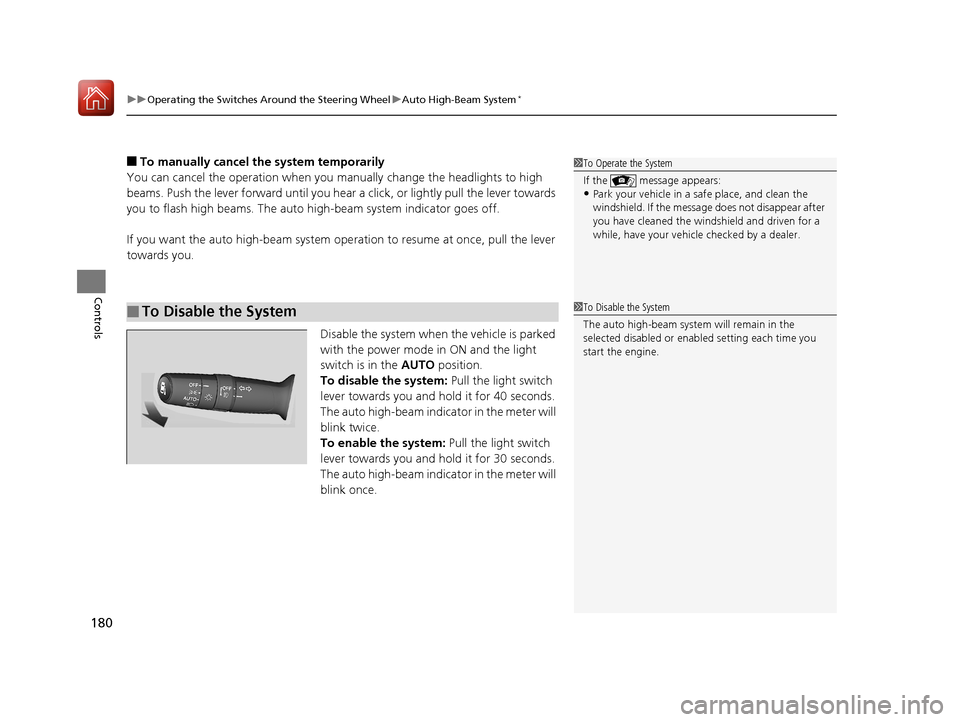
Disable the system when the vehicle is parked
with the power mode in ON and the light
switch is in the AUTO position.
To disable the system: Pull the light switch
lever towards you and hold it for 40 seconds.
The auto high-beam indica tor in the meter will
blink twice.
To enable the system: Pull the light switch
lever towards you and hold it for 30 seconds.
The auto high-beam indica tor in the meter will
blink once.
■To Disable the System
1 To Operate the System
If the message appears:
•Park your vehicle in a sa fe place, and clean the
windshield. If the message does not disappear after
you have cleaned the winds hield and driven for a
while, have your vehicle checked by a dealer.
1 To Disable the System
The auto high-beam system will remain in the
selected disabled or enab led setting each time you
start the engine.
17 CR-V-31TLA6000.book 180 ページ 2016年10月11日 火曜日 午後6時37分
Page 183 of 657
182
uuOperating the Switches Around the Steering Wheel uWipers and Washers
Controls
Wipers and Washers
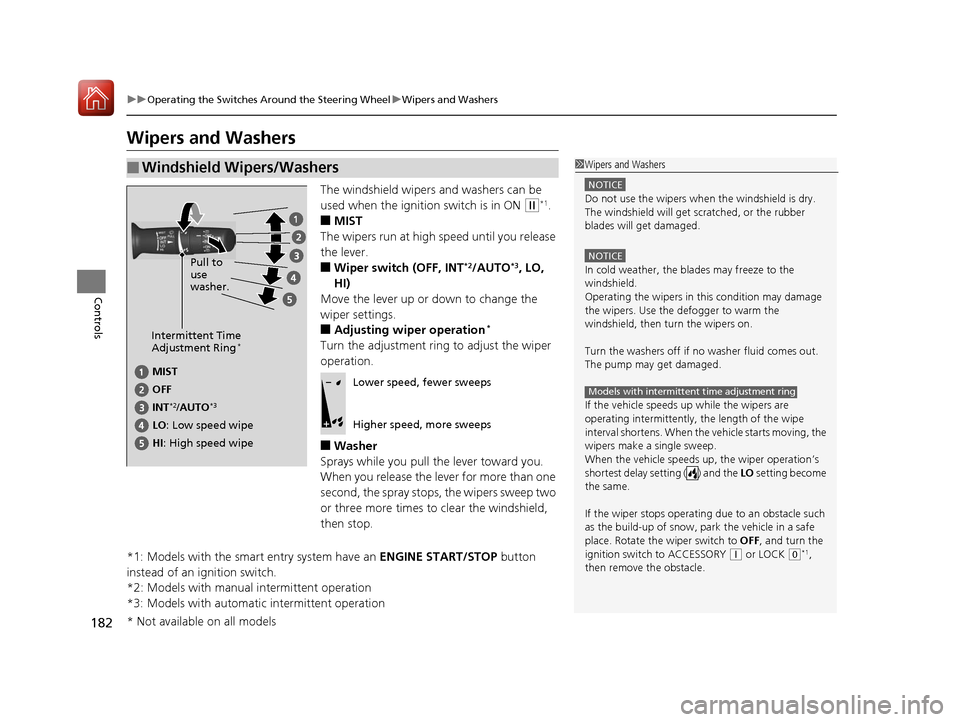
The windshield wipers and washers can be
used when the ignition switch is in ON
(w*1.
■MIST
The wipers run at high speed until you release
the lever.
■Wiper switch (OFF, INT*2/AUTO*3, LO,
HI)
Move the lever up or down to change the
wiper settings.
■Adjusting wiper operation*
Turn the adjustment ring to adjust the wiper
operation.
■Washer
Sprays while you pull the lever toward you.
When you release the lever for more than one
second, the spray stops, the wipers sweep two
or three more times to clear the windshield,
then stop.
*1: Models with the smart entry system have an ENGINE START/STOP button
instead of an ignition switch.
*2: Models with manual intermittent operation
*3: Models with automati c intermittent operation
■Windshield Wipers/Washers1Wipers and Washers
NOTICE
Do not use the wipers when the windshield is dry.
The windshield will get sc ratched, or the rubber
blades will get damaged.
NOTICE
In cold weather, the blades may freeze to the
windshield.
Operating the wipers in th is condition may damage
the wipers. Use the defogger to warm the
windshield, then turn the wipers on.
Turn the washers off if no washer fluid comes out.
The pump may get damaged.
If the vehicle speeds up while the wipers are
operating intermittently, the length of the wipe
interval shortens. When the vehicle starts moving, the
wipers make a single sweep.
When the vehicle speeds up, the wiper operation’s
shortest delay setting ( ) and the LO setting become
the same.
If the wiper stops operating due to an obstacle such
as the build-up of snow, pa rk the vehicle in a safe
place. Rotate the wiper switch to OFF, and turn the
ignition switch to ACCESSORY
( q or LOCK ( 0*1,
then remove the obstacle.
Models with intermittent time adjustment ring
Intermittent Time
Adjustment Ring*
MIST
INT
*2/AUTO*3
OFF
LO : Low speed wipe Pull to
use
washer.
HI: High speed wipe
Lower speed, fewer sweeps
Higher speed, more sweeps
* Not available on all models
17 CR-V-31TLA6000.book 182 ページ 2016年10月11日 火曜日 午後6時37分
Page 204 of 657
203Continued
Controls
Interior Lights/Interior Convenience Items
Interior Lights
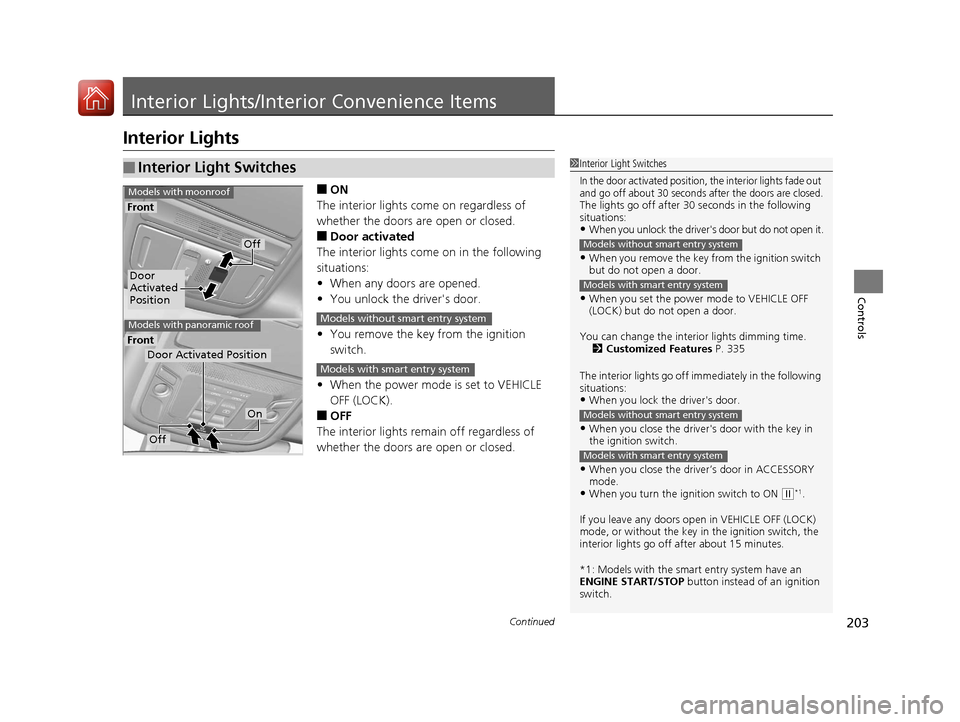
■ON
The interior lights come on regardless of
whether the doors are open or closed.
■Door activated
The interior lights come on in the following
situations:
• When any doors are opened.
• You unlock the driver's door.
• You remove the key from the ignition
switch.
• When the power mode is set to VEHICLE
OFF (LOCK).
■OFF
The interior lights remain off regardless of
whether the doors are open or closed.
■Interior Light Switches1 Interior Light Switches
In the door activated position, the interior lights fade out
and go off about 30 seconds after the doors are closed.
The lights go off after 30 seconds in the following
situations:
•When you unlock the driver's door but do not open it.
•When you remove the key from the ignition switch
but do not open a door.
•When you set the power mode to VEHICLE OFF
(LOCK) but do not open a door.
You can change the interi or lights dimming time.
2 Customized Features P. 335
The interior lights go off i mmediately in the following
situations:
•When you lock the driver's door.
•When you close the driver's door with the key in
the ignition switch.
•When you close the driver’s door in ACCESSORY
mode.
•When you turn the ignition switch to ON ( w*1.
If you leave any doors open in VEHICLE OFF (LOCK)
mode, or without the key in the ignition switch, the
interior lights go off after about 15 minutes.
*1: Models with the smart entry system have an
ENGINE START/STOP button instead of an ignition
switch.
Models without smart entry system
Models with smart entry system
Models without smart entry system
Models with smart entry system
Door
Activated
Position
Off
Front
Front
Models with moonroof
Models with panoramic roof
Door Activated Position
Off
On
Models without smart entry system
Models with smart entry system
17 CR-V-31TLA6000.book 203 ページ 2016年10月11日 火曜日 午後6時37分
Page 236 of 657
235
Features
Audio System Basic Operation
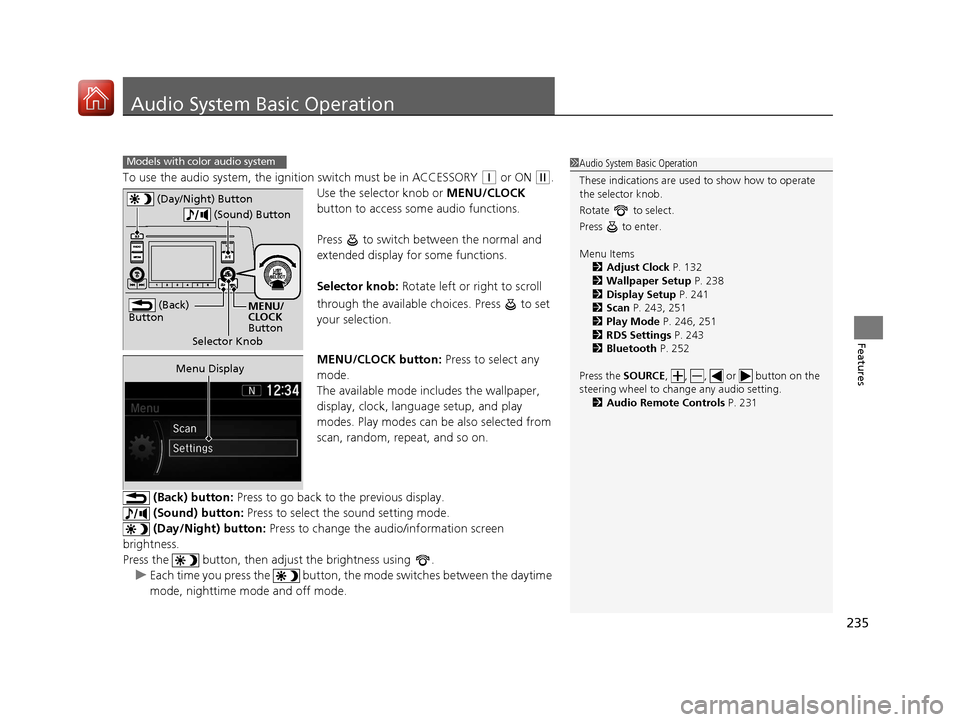
To use the audio system, the ignition switch must be in ACCESSORY (q or ON (w.
Use the selector knob or MENU/CLOCK
button to access some audio functions.
Press to switch between the normal and
extended display fo r some functions.
Selector knob: Rotate left or right to scroll
through the available ch oices. Press to set
your selection.
MENU/CLOCK button: Press to select any
mode.
The available mode in cludes the wallpaper,
display, clock, language setup, and play
modes. Play modes can be also selected from
scan, random, repeat, and so on.
(Back) button: Press to go back to the previous display.
(Sound) button: Press to select the sound setting mode.
(Day/Night) button: Press to change the audio/information screen
brightness.
Press the button, then adjust the brightness using . u Each time you press the button, the mode switches between the daytime
mode, nighttime mode and off mode.
Models with color audio system1 Audio System Basic Operation
These indications are used to show how to operate
the selector knob.
Rotate to select.
Press to enter.
Menu Items 2 Adjust Clock P. 132
2 Wallpaper Setup P. 238
2 Display Setup P. 241
2 Scan P. 243, 251
2 Play Mode P. 246, 251
2 RDS Settings P. 243
2 Bluetooth P. 252
Press the SOURCE , , , or button on the
steering wheel to cha nge any audio setting.
2 Audio Remote Controls P. 231
(Back)
Button
Selector Knob MENU/
CLOCK
Button
(Day/Night) Button
(Sound) Button
Menu Display
17 CR-V-31TLA6000.book 235 ページ 2016年10月11日 火曜日 午後6時37分
Page 239 of 657
uuAudio System Basic Operation uAudio/Information Screen
238
Features
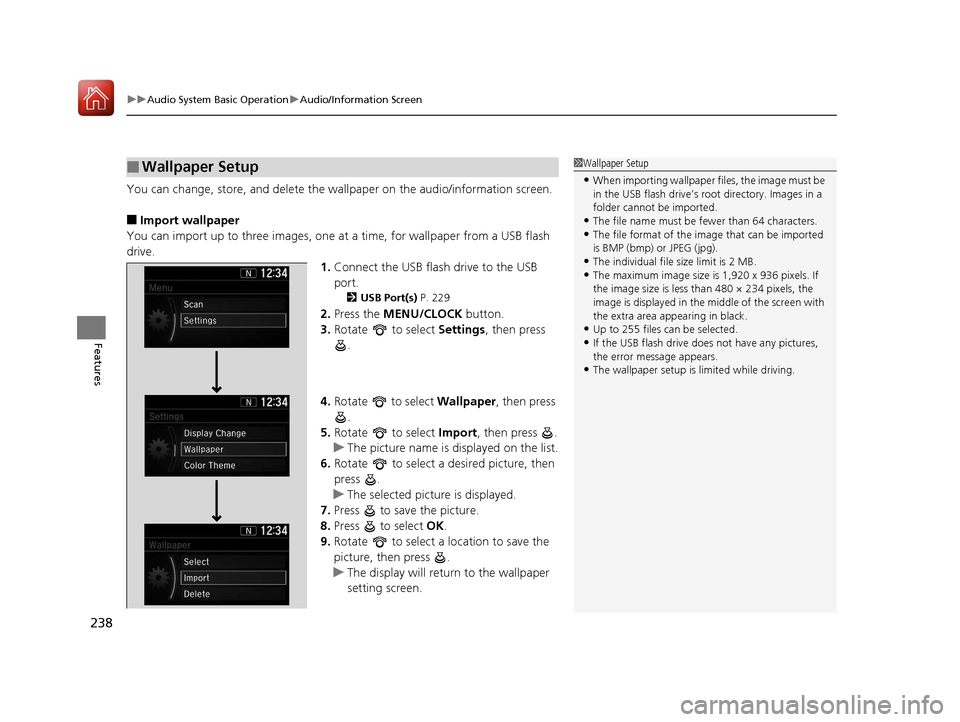
You can change, store, and delete the wa llpaper on the audio/information screen.
■Import wallpaper
You can import up to three images, one at a time, for wallpaper from a USB flash
drive.
1.Connect the USB flash drive to the USB
port.
2 USB Port(s) P. 229
2.Press the MENU/CLOCK button.
3. Rotate to select Settings, then press
.
4. Rotate to select Wallpaper, then press
.
5. Rotate to select Import, then press .
u The picture name is displayed on the list.
6. Rotate to select a desired picture, then
press .
u The selected picture is displayed.
7. Press to save the picture.
8. Press to select OK.
9. Rotate to select a location to save the
picture, then press .
u The display will return to the wallpaper
setting screen.
■Wallpaper Setup1Wallpaper Setup
•When importing wallpaper files, the image must be
in the USB flash drive’s root directory. Images in a
folder cannot be imported.
•The file name must be fewer than 64 characters.•The file format of the im age that can be imported
is BMP (bmp) or JPEG (jpg).
•The individual file size limit is 2 MB.•The maximum image size is 1,920 x 936 pixels. If
the image size is less than 480 × 234 pixels, the
image is displayed in the middle of the screen with
the extra area appearing in black.
•Up to 255 files can be selected.
•If the USB flash drive doe s not have any pictures,
the error message appears.
•The wallpaper setup is limited while driving.
17 CR-V-31TLA6000.book 238 ページ 2016年10月11日 火曜日 午後6時37分