warning light HONDA CR-V 2018 (in English) User Guide
[x] Cancel search | Manufacturer: HONDA, Model Year: 2018, Model line: CR-V, Model: HONDA CR-V 2018Pages: 679, PDF Size: 23.22 MB
Page 466 of 679
uuWhen Driving uStarting the Engine
464
Driving
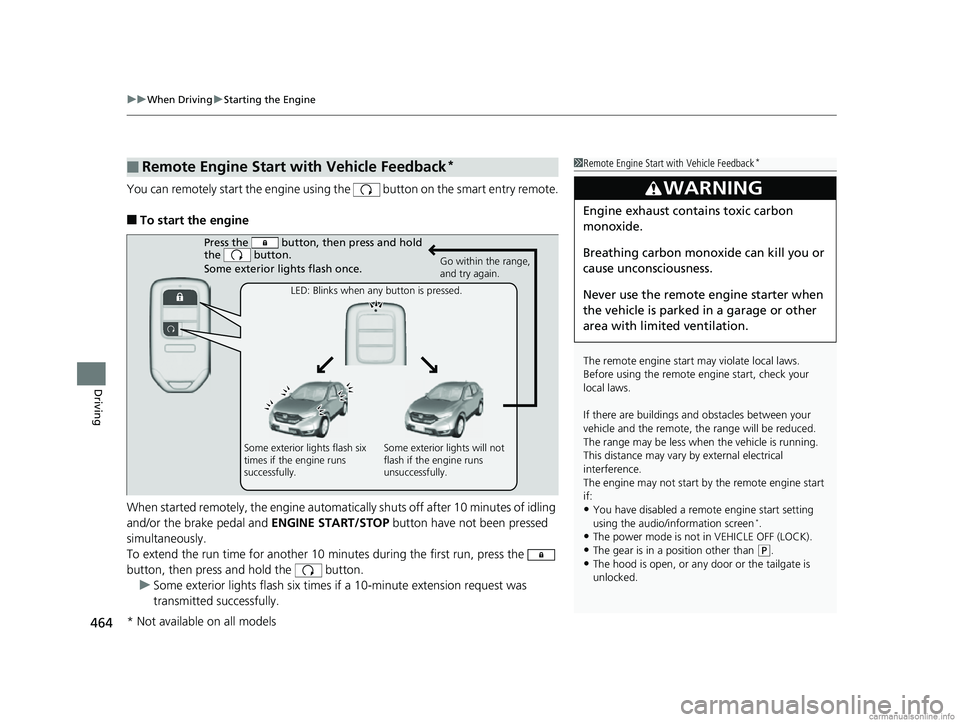
You can remotely start the engine using the button on the smart entry remote.
■To start the engine
When started remotely, the engine automati cally shuts off after 10 minutes of idling
and/or the brake pedal and ENGINE START/STOP button have not been pressed
simultaneously.
To extend the run time for another 10 minutes during the first run, press the
button, then press and hold the button. u Some exterior lights flash six times if a 10-minute extension request was
transmitted successfully.
■Remote Engine Start with Vehicle Feedback*1Remote Engine Start with Vehicle Feedback*
The remote engine start may violate local laws.
Before using the remote e ngine start, check your
local laws.
If there are buildings an d obstacles between your
vehicle and the remote, th e range will be reduced.
The range may be less when the vehicle is running.
This distance may vary by external electrical
interference.
The engine may not start by the remote engine start
if:
•You have disabled a remo te engine start setting
using the audio/information screen*.
•The power mode is not in VEHICLE OFF (LOCK).•The gear is in a position other than ( P.
•The hood is open, or any door or the tailgate is
unlocked.
3WARNING
Engine exhaust contains toxic carbon
monoxide.
Breathing carbon monoxide can kill you or
cause unconsciousness.
Never use the remote engine starter when
the vehicle is parked in a garage or other
area with limited ventilation.
Press the button, th en press and hold
the button.
Some exterior lights flash once.
Go within the range,
and try again.
LED: Blinks when any button is pressed.
Some exterior lights flash six
times if the engine runs
successfully. Some exterior lights will not
flash if the engine runs
unsuccessfully.
* Not available on all models
18 CR-V-31TLA6100.book 464 ページ 2017年9月7日 木曜日 午後3時56分
Page 483 of 679
481
uuWhen Driving uAdaptive Cruise Control (ACC) with Low Speed Follow (LSF)*
Continued
Driving
Adaptive Cruise Control (ACC) with Low Speed Follow (LSF)*
Helps maintain a constant vehicle speed an d a set following-interval behind a vehicle
detected ahead of yours and, if the detect ed vehicle comes to a stop, can decelerate
and stop your ve hicle, without yo u having to keep your foot on the brake or the
accelerator.
When ACC with LSF slows your vehicle by applying the brakes, your vehicle’s brake
lights will illuminate.1 Adaptive Cruise Control (ACC) with Low Speed Follow (LSF)*
Important Reminder
As with any system, there are limits to ACC with LSF.
Use the brake pedal whenever necessary, and always
keep a safe distance between your vehicle and other
vehicles.
3WARNING
Improper use of ACC with LSF can lead
to a crash.
Use ACC with LSF only when driving on
expressways or freeways and in good
weather conditions.
3WARNING
ACC with LSF has limited braking
capability and may not stop your vehicle
in time to avoid a co llision with a vehicle
that quickly stops in front of you.
Always be prepared to apply the brake
pedal if the cond itions require.
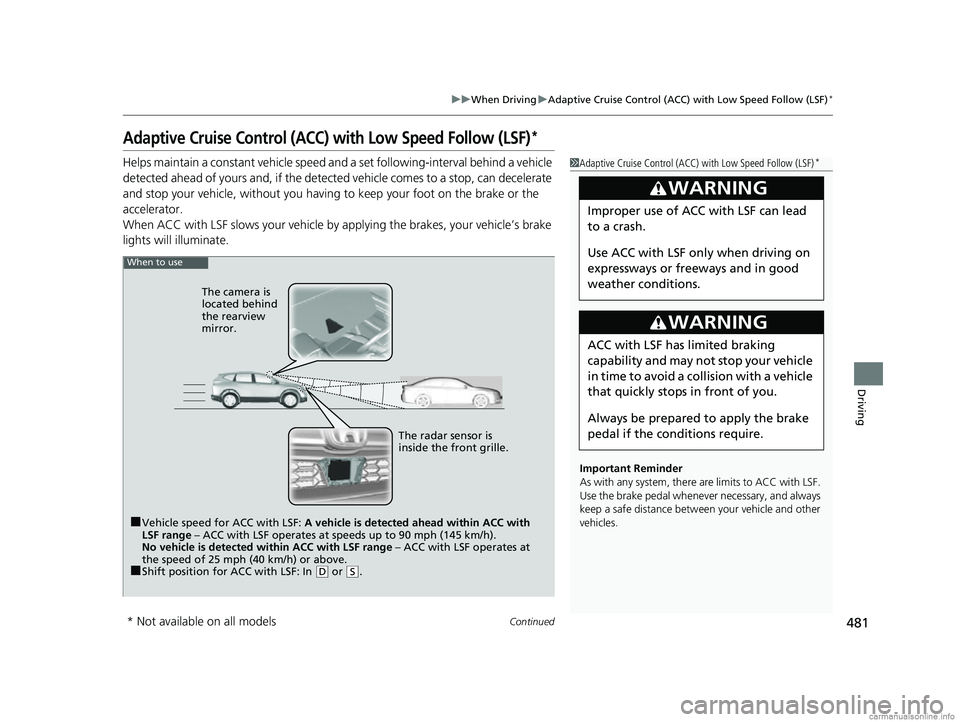
When to use
■Vehicle speed for ACC with LSF: A vehicle is detected ahead within ACC with
LSF range – ACC with LSF operates at speeds up to 90 mph (145 km/h).
No vehicle is detected within ACC with LSF range – ACC with LSF operates at
the speed of 25 mph (40 km/h) or above.
■Shift position for ACC with LSF: In (D or (S. The radar sensor is
inside the front grille.
The camera is
located behind
the rearview
mirror.
* Not available on all models
18 CR-V-31TLA6100.book 481 ページ 2017年9月7日 木曜日 午後3時56分
Page 490 of 679
uuWhen Driving uAdaptive Cruise Control (ACC) with Low Speed Follow (LSF)*
488
Driving
The system may automatically shut off and the ACC indicator will come on under
certain conditions. Some examples of th ese conditions are listed below. Other
conditions may reduce some of the ACC functions.
2 Front Sensor Camera* P. 479
■Environmental conditions
• Driving in bad weather (rain, fog, snow, etc.).
■Roadway conditions
• Driving on a snowy or wet roadway (obscured lane marking, vehicle tracks,
reflected lights, road spray, high contrast).
■Vehicle conditions
• The outside of the windshie ld is blocked by dirt, mud, leaves, wet snow, etc.
• An abnormal tire or wheel condition (Wro ng size, varied size or construction,
improperly inflated, comp act spare tire, etc.).
• The camera temperature gets too high.
• The parking brake is applied.
• When the front grille is dirty.
• The vehicle is tilted due to a heav y load or suspension modifications.
• When tire chains are installed.
■ACC with LSF Conditions and Limitations1ACC with LSF Conditions and Limitations
The radar sensor for ACC with LSF is shared with the
collision mitigation braking system
TM (CMBSTM).
2 Collision Mitigation Braking SystemTM
(CMBSTM)* P. 532
You can read about handling information for the
camera equipped with this system. 2 Front Sensor Camera
* P. 479
Do not put a sticker on the radar sensor cover or
replace the radar sensor cover.
Have your vehicle checked by a dealer if you find any
unusual behavior of the system (e.g., the warning
message appears too frequently).
If the front of the vehicle is impacted in any of the
following situations, the ra dar sensor may not work
properly. Have your vehi cle checked by a dealer:
•The vehicle mounted onto a bump, curb, chock,
embankment, etc.
•You drive the vehicle where the water is deep.
•Your vehicle has a frontal collision.
* Not available on all models
18 CR-V-31TLA6100.book 488 ページ 2017年9月7日 木曜日 午後3時56分
Page 500 of 679
uuWhen Driving uRoad Departure Mitigation (RDM) System*
498
Driving
The system becomes ready to start sear ching for lane markings when all the
following conditions are met:
• The vehicle is traveling between about 45 and 90 mph (72 and 145 km/h).
• The vehicle is on a straight or slightly curved road.
• The turn signals are off.
• The brake pedal is not depressed.
• The wipers are not in continuous operation.
• The system makes a determination that the driver is not actively accelerating,
braking or steering.
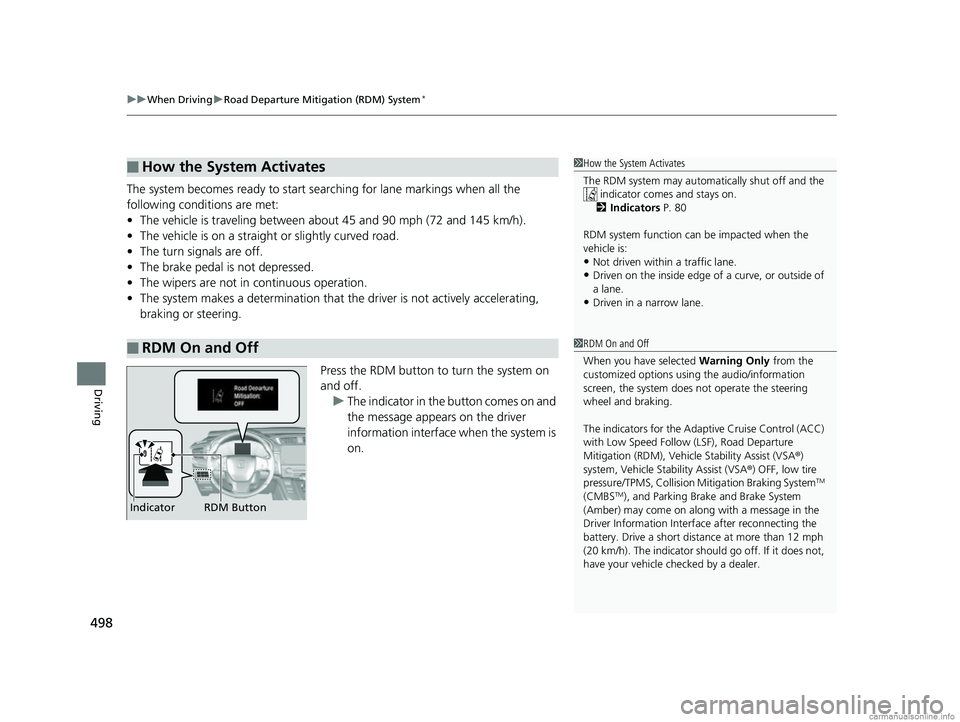
Press the RDM button to turn the system on
and off.u The indicator in the button comes on and
the message appears on the driver
information interface when the system is
on.
■How the System Activates
■RDM On and Off
1How the System Activates
The RDM system may automa tically shut off and the
indicator comes and stays on.
2 Indicators P. 80
RDM system function can be impacted when the
vehicle is:
•Not driven within a traffic lane.•Driven on the inside edge of a curve, or outside of
a lane.
•Driven in a narrow lane.
1 RDM On and Off
When you have selected Warning Only from the
customized options using the audio/information
screen, the system does not operate the steering
wheel and braking.
The indicators for the Adaptive Cruise Control (ACC)
with Low Speed Follow (LSF), Road Departure
Mitigation (RDM), Vehicle Stability Assist (VSA®)
system, Vehicle Stability Assist (VSA ®) OFF, low tire
pressure/TPMS, Collisi on Mitigation Braking System
TM
(CMBSTM), and Parking Brake and Brake System
(Amber) may come on along with a message in the
Driver Information Interf ace after reconnecting the
battery. Drive a short distance at more than 12 mph
(20 km/h). The indicator shoul d go off. If it does not,
have your vehicle ch ecked by a dealer.RDM Button
Indicator
18 CR-V-31TLA6100.book 498 ページ 2017年9月7日 木曜日 午後3時56分
Page 504 of 679
uuWhen Driving uLane Keeping Assist System (LKAS)*
502
Driving
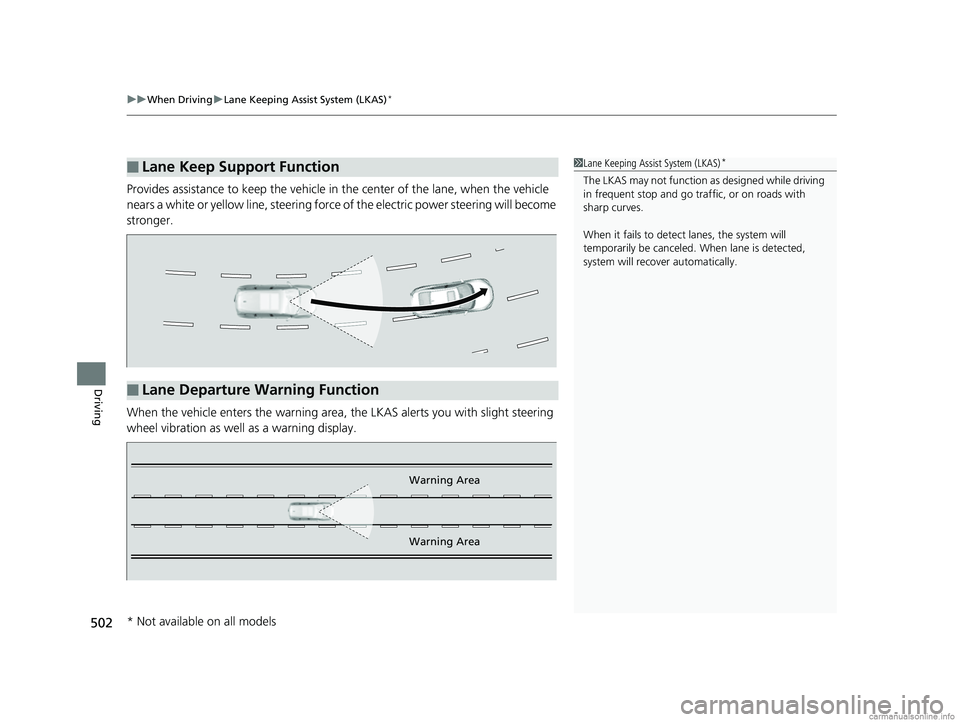
Provides assistance to keep the vehicle in the center of the lane, when the vehicle
nears a white or yellow line, steering force of the electric power steering will become
stronger.
When the vehicle enters the warning area, the LKAS alerts you with slight steering
wheel vibration as well as a warning display.
■Lane Keep Support Function1 Lane Keeping Assist System (LKAS)*
The LKAS may not function as designed while driving
in frequent stop and go traf fic, or on roads with
sharp curves.
When it fails to detect lanes, the system will
temporarily be canceled. When lane is detected,
system will recover automatically.
■Lane Departure Warning Function
Warning Area
Warning Area
* Not available on all models
18 CR-V-31TLA6100.book 502 ページ 2017年9月7日 木曜日 午後3時56分
Page 517 of 679
515
uuWhen Driving uLaneWatchTM*
Continued
Driving
LaneWatchTM*
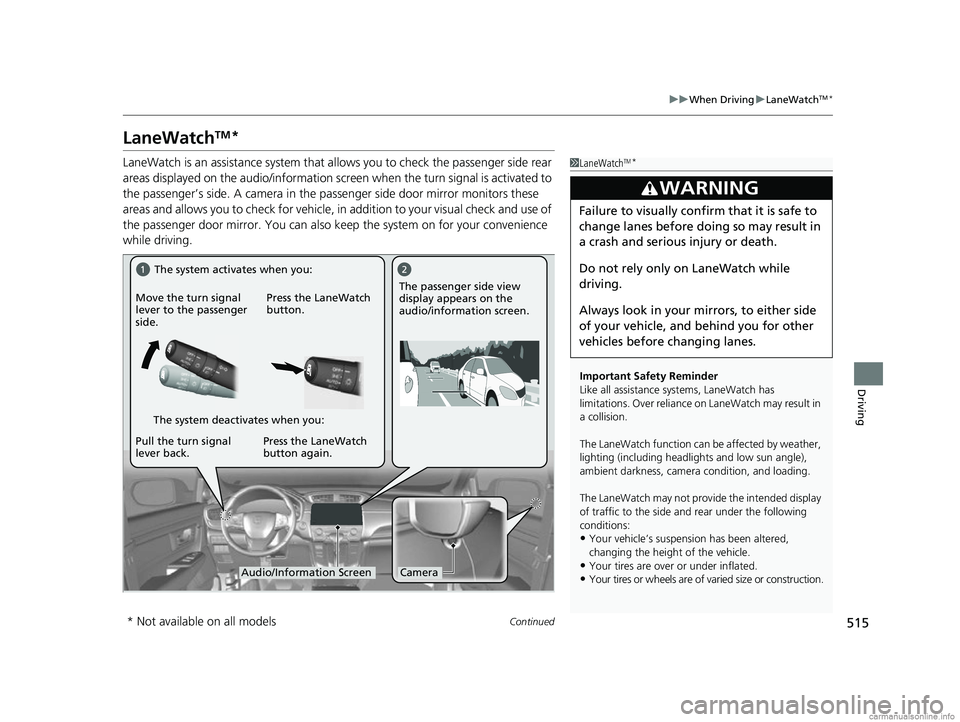
LaneWatch is an assistance system that al lows you to check the passenger side rear
areas displayed on the audio/information screen when the turn signal is activated to
the passenger’s side. A camera in the pa ssenger side door mirror monitors these
areas and allows you to check for vehicle, in addition to your visual check and use of
the passenger door mirror. You can also keep the system on for your convenience
while driving.1 LaneWatchTM*
Important Safety Reminder
Like all assistance systems, LaneWatch has
limitations. Over reliance on LaneWatch may result in
a collision.
The LaneWatch func tion can be affected by weather,
lighting (including headli ghts and low sun angle),
ambient darkness, camera condition, and loading.
The LaneWatch may not prov ide the intended display
of traffic to the side and rear under the following
conditions:
•Your vehicle’s suspension has been altered,
changing the height of the vehicle.
•Your tires are over or under inflated.
•Your tires or wheels are of varied size or construction.
3WARNING
Failure to visually confirm that it is safe to
change lanes before doing so may result in
a crash and serious injury or death.
Do not rely only on LaneWatch while
driving.
Always look in your mirrors, to either side
of your vehicle, and behind you for other
vehicles before changing lanes.
CameraAudio/Information Screen
Move the turn signal
lever to the passenger
side.
Press the LaneWatch
button.
Pull the turn signal
lever back. Press the LaneWatch
button again. The passenger side view
display appears on the
audio/information screen.
The system activates when you:
The system deactivates when you:
* Not available on all models
18 CR-V-31TLA6100.book 515 ページ 2017年9月7日 木曜日 午後3時56分
Page 530 of 679
uuBraking uBrake System
528
Driving
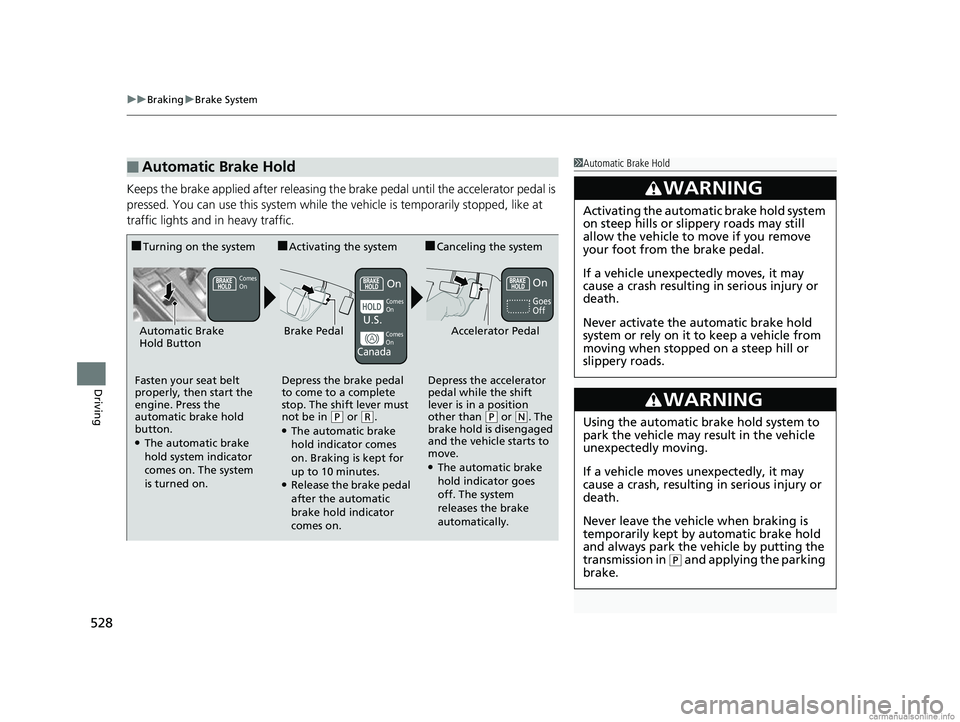
Keeps the brake applied after releasing the br ake pedal until the accelerator pedal is
pressed. You can use this system while th e vehicle is temporarily stopped, like at
traffic lights and in heavy traffic.
■Automatic Brake Hold1 Automatic Brake Hold
3WARNING
Activating the automatic brake hold system
on steep hills or slippery roads may still
allow the vehicle to move if you remove
your foot from the brake pedal.
If a vehicle unexpectedly moves, it may
cause a crash resulting in serious injury or
death.
Never activate the automatic brake hold
system or rely on it to keep a vehicle from
moving when stopped on a steep hill or
slippery roads.
3WARNING
Using the automatic brake hold system to
park the vehicle may result in the vehicle
unexpectedly moving.
If a vehicle moves unexpectedly, it may
cause a crash, resulting in serious injury or
death.
Never leave the vehicle when braking is
temporarily kept by automatic brake hold
and always park the vehicle by putting the
transmission in
( P and applying the parking
brake.
■Turning on the system
Fasten your seat belt
properly, then start the
engine. Press the
automatic brake hold
button.
●The automatic brake
hold system indicator
comes on. The system
is turned on.
■Activating the system
Depress the brake pedal
to come to a complete
stop. The shift lever must
not be in
( P or (R.●The automatic brake
hold indicator comes
on. Braking is kept for
up to 10 minutes.
●Release the brake pedal
after the automatic
brake hold indicator
comes on.
■Canceling the system
Depress the accelerator
pedal while the shift
lever is in a position
other than
( P or (N. The
brake hold is disengaged
and the vehicle starts to
move.
●The automatic brake
hold indicator goes
off. The system
releases the brake
automatically.
Accelerator PedalBrake PedalAutomatic Brake
Hold Button
Goes
Off
On On
U.S.
Canada
Comes
On Comes
On
Comes
On
18 CR-V-31TLA6100.book 528 ページ 2017年9月7日 木曜日 午後3時56分
Page 537 of 679
535
uuBraking uCollision Mitigation Braking SystemTM (CMBSTM)*
Continued
Driving
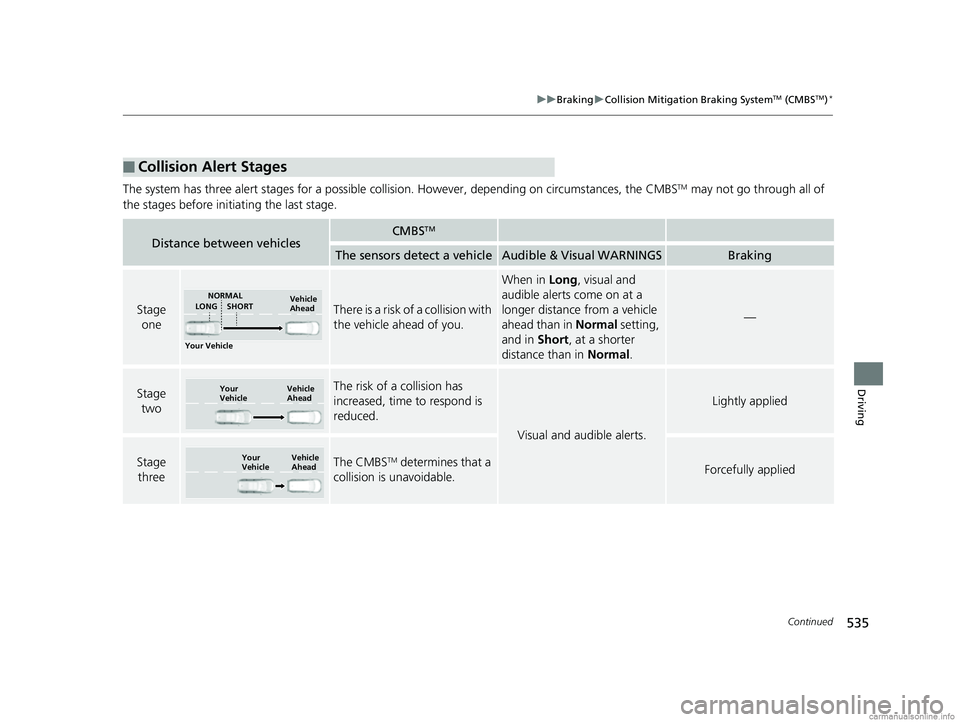
The system has three alert stages for a possible collis ion. However, depending on circumstances, the CMBSTM may not go through all of
the stages before initiating the last stage.
■Collision Alert Stages
Distance between vehiclesCMBSTM
The sensors detect a vehicleAudible & Visual WARNINGSBraking
Stage oneThere is a risk of a collision with
the vehicle ahead of you.
When in Long, visual and
audible alerts come on at a
longer distance from a vehicle
ahead than in Normal setting,
and in Short, at a shorter
distance than in Normal.
—
Stage
twoThe risk of a collision has
increased, time to respond is
reduced.
Visual and audible alerts.
Lightly applied
Stage three The CMBSTM determines that a
collision is unavoidable.Forcefully applied
Your Vehicle Vehicle
Ahead
NORMAL
SHORT
LONG
Your
Vehicle Vehicle
Ahead
Your
VehicleVehicle
Ahead
18 CR-V-31TLA6100.book 535 ページ 2017年9月7日 木曜日 午後3時56分
Page 573 of 679
571
uuMaintenance Under the Hood uOpening the Hood
Maintenance
Opening the Hood
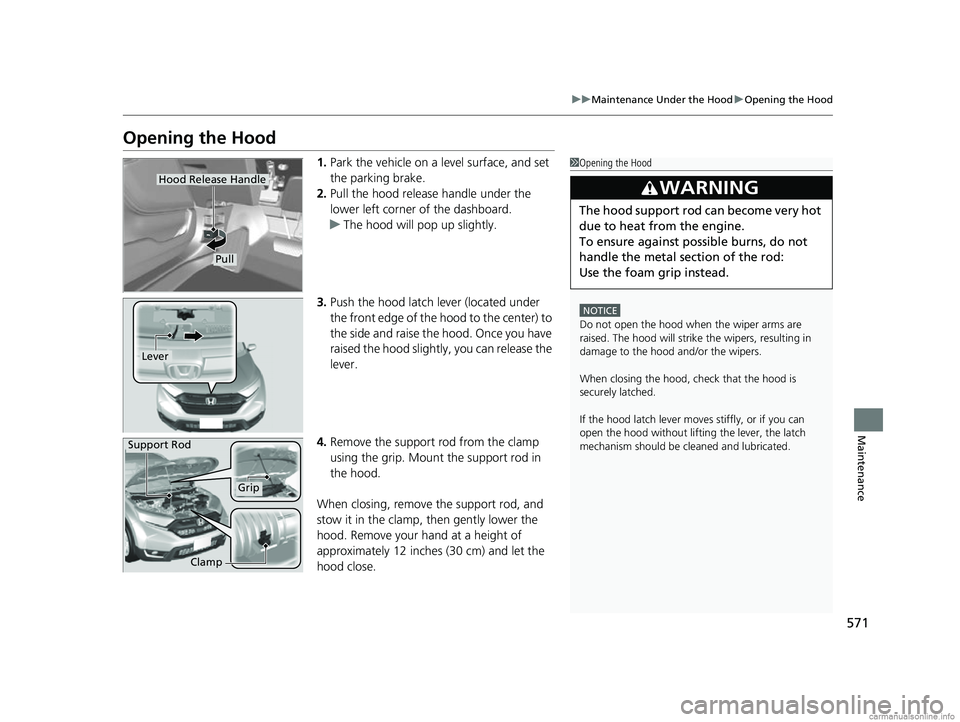
1. Park the vehicle on a level surface, and set
the parking brake.
2. Pull the hood release handle under the
lower left corner of the dashboard.
u The hood will pop up slightly.
3. Push the hood latch lever (located under
the front edge of the hood to the center) to
the side and raise the hood. Once you have
raised the hood slightly , you can release the
lever.
4. Remove the support rod from the clamp
using the grip. Mount the support rod in
the hood.
When closing, remove the support rod, and
stow it in the clamp, then gently lower the
hood. Remove your hand at a height of
approximately 12 inches (30 cm) and let the
hood close.1 Opening the Hood
NOTICE
Do not open the hood when the wiper arms are
raised. The hood will strike the wipers, resulting in
damage to the hood and/or the wipers.
When closing the hood, check that the hood is
securely latched.
If the hood latch lever moves stiffly, or if you can
open the hood without lifti ng the lever, the latch
mechanism should be cleaned and lubricated.
3WARNING
The hood support rod can become very hot
due to heat from the engine.
To ensure against po ssible burns, do not
handle the metal section of the rod:
Use the foam grip instead.
Hood Release Handle
Pull
Lever
Support Rod
Grip
Clamp
18 CR-V-31TLA6100.book 571 ページ 2017年9月7日 木曜日 午後3時56分
Page 621 of 679
619Continued
Handling the Unexpected
If a Tire Goes Flat
Changing a Flat Tire
If a tire goes flat while driving, grasp the steering wheel firmly, and brake gradually
to reduce speed. Then stop in a safe place. Replace the flat tire with a compact spare
tire. Go to a dealer as soon as possible to have the full-size tire repaired or replaced.
1. Park the vehicle on firm, level, and non- slippery surface, and apply the parking
brake.
2. Move the shift lever to
(P.
3. Turn on the hazard warning lights an d turn the ignition switch to LOCK
(0*1.
*1: Models with the smart entry system have an ENGINE START/STOP button instead of an
ignition switch.
1 Changing a Flat Tire
Follow compact spare precautions:
Periodically check the tire pressure of the compact
spare. It should be set to the specified pressure.
Specified Pressure: 60 psi (420 kPa, 4.2 kgf/cm
2)
When driving with the compact spare tire, keep the
vehicle speed under 50 mph (80 km/h). Replace with
a full-size tire as soon as possible.
The compact spare tire and wheel in your vehicle are
specifically for this model. Do not use them with
another vehicle. Do not us e another type of compact
spare tire or wheel with your vehicle.
Do not mount tire chains on a compact spare tire.
If a chain-mounted front tire goes flat, remove one of
the full-size rear tires and replace it with the compact
spare tire. Remove the flat front tire and replace it
with the full-size tire that was removed from the rear.
Mount the tire chains on the front tire.
NOTICE
Do not use the jack if it doesn’t work properly. Call
your dealer or a prof essional towing service.
18 CR-V-31TLA6100.book 619 ページ 2017年9月7日 木曜日 午後3時56分