check engine HONDA CR-V 2018 (in English) Service Manual
[x] Cancel search | Manufacturer: HONDA, Model Year: 2018, Model line: CR-V, Model: HONDA CR-V 2018Pages: 679, PDF Size: 23.22 MB
Page 573 of 679
571
uuMaintenance Under the Hood uOpening the Hood
Maintenance
Opening the Hood
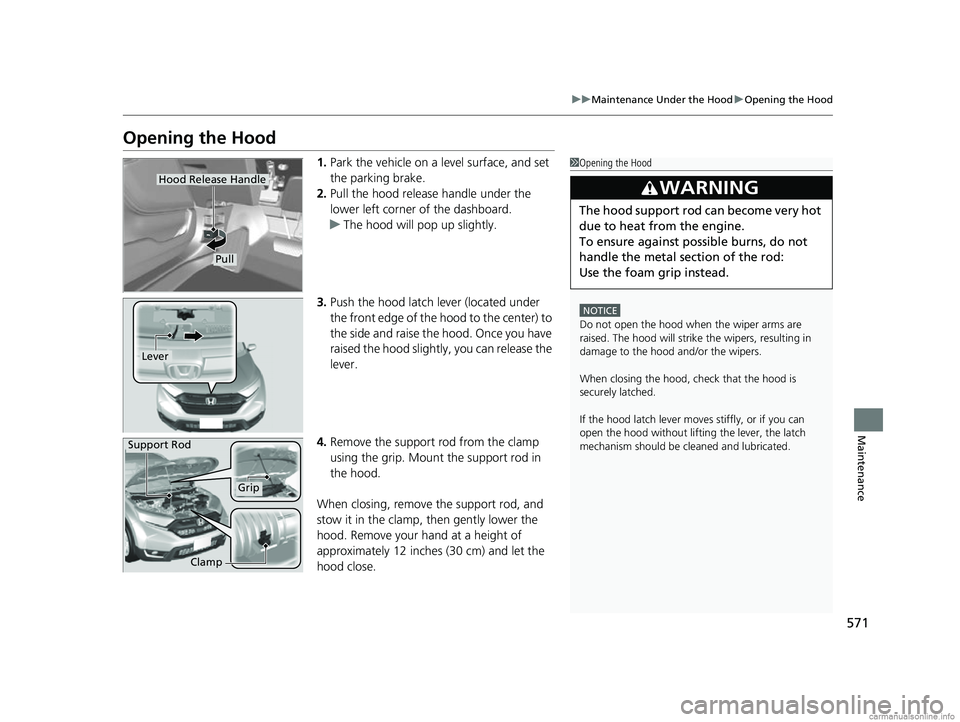
1. Park the vehicle on a level surface, and set
the parking brake.
2. Pull the hood release handle under the
lower left corner of the dashboard.
u The hood will pop up slightly.
3. Push the hood latch lever (located under
the front edge of the hood to the center) to
the side and raise the hood. Once you have
raised the hood slightly , you can release the
lever.
4. Remove the support rod from the clamp
using the grip. Mount the support rod in
the hood.
When closing, remove the support rod, and
stow it in the clamp, then gently lower the
hood. Remove your hand at a height of
approximately 12 inches (30 cm) and let the
hood close.1 Opening the Hood
NOTICE
Do not open the hood when the wiper arms are
raised. The hood will strike the wipers, resulting in
damage to the hood and/or the wipers.
When closing the hood, check that the hood is
securely latched.
If the hood latch lever moves stiffly, or if you can
open the hood without lifti ng the lever, the latch
mechanism should be cleaned and lubricated.
3WARNING
The hood support rod can become very hot
due to heat from the engine.
To ensure against po ssible burns, do not
handle the metal section of the rod:
Use the foam grip instead.
Hood Release Handle
Pull
Lever
Support Rod
Grip
Clamp
18 CR-V-31TLA6100.book 571 ページ 2017年9月7日 木曜日 午後3時56分
Page 575 of 679
573
uuMaintenance Under the Hood uOil Check
Continued
Maintenance
Oil Check
We recommend that you check the engi ne oil level every time you refuel.
Park the vehicle on level ground.
Wait approximately three minutes after turn ing the engine off before you check the
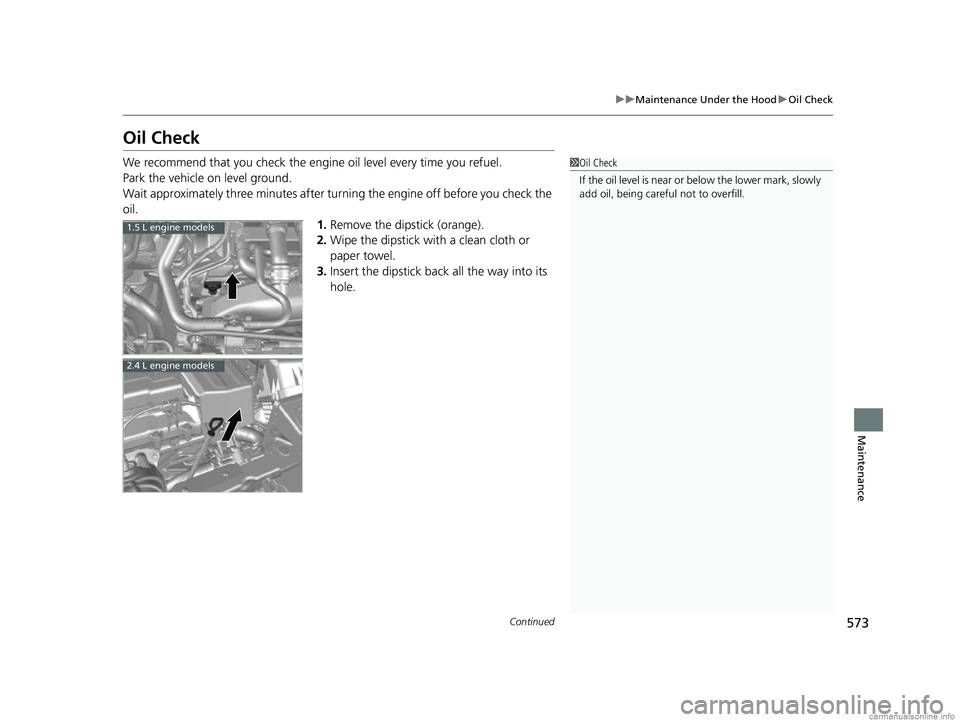
oil. 1.Remove the dipstick (orange).
2. Wipe the dipstick with a clean cloth or
paper towel.
3. Insert the dipstick back all the way into its
hole.1Oil Check
If the oil level is near or below the lower mark, slowly
add oil, being careful not to overfill.
1.5 L engine models
2.4 L engine models
18 CR-V-31TLA6100.book 573 ページ 2017年9月7日 木曜日 午後3時56分
Page 576 of 679
574
uuMaintenance Under the Hood uOil Check
Maintenance
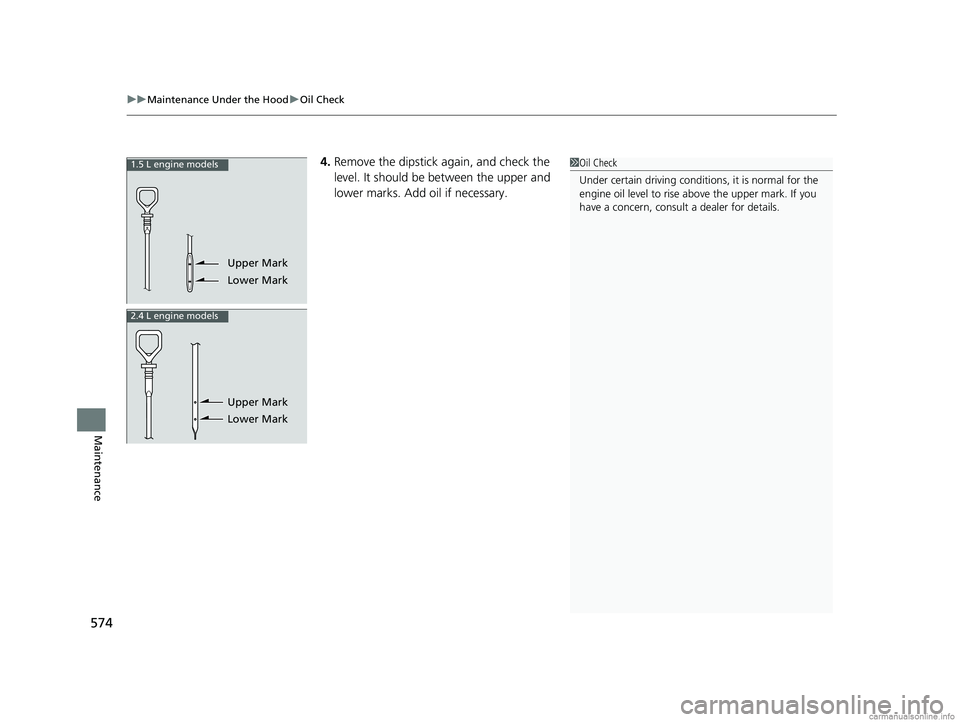
4. Remove the dipstick again, and check the
l
evel. It should be between the upper and
lower marks. Add oil if necessary.1.5 L engine models
Upper Mark
Lower Mark
Upper Mark
Lower Mark
2.4 L engine models
18 CR-V-31TLA6100.book 574 ページ 2017年9月7日 木曜日 午後3時56分
1 Oil Check
Under certain driving conditions, it is normal for the
engine oil level to rise above the upper mark. If you
have a concern, consult a dealer for details.
Page 577 of 679
575
uuMaintenance Under the Hood uAdding Engine Oil
Maintenance
Adding Engine Oil
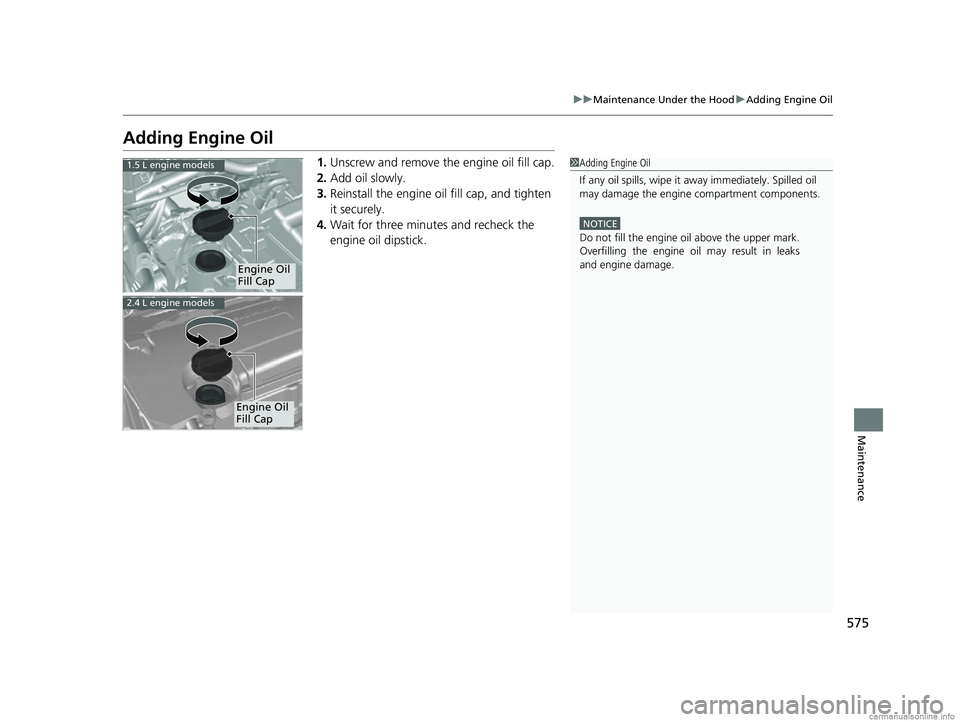
1. Unscrew and remove the engine oil fill cap.
2. Add oil slowly.
3. Reinstall the engine oil fill cap, and tighten
it securely.
4. Wait for three minutes and recheck
the
engi
ne oil dipstick.1Adding Engine Oil
If any oil spills, wipe it away immediately. Spilled oil
may damage the engine compartment components.
NOTICE
Do not fill the engine
oil above the upper mark.
Overfilling the engine oil may
result in leaks
and engine damage.
Engine Oil
Fill Cap
1.5 L engine models
2.4 L engine models
Engine Oil
Fill Cap
18 CR-V-31TLA6100.book 575 ページ 2017年9月7日 木曜日 午後3時56分
Page 580 of 679
uuMaintenance Under the Hood uChanging the Engine Oil and Oil Filter
578
Maintenance
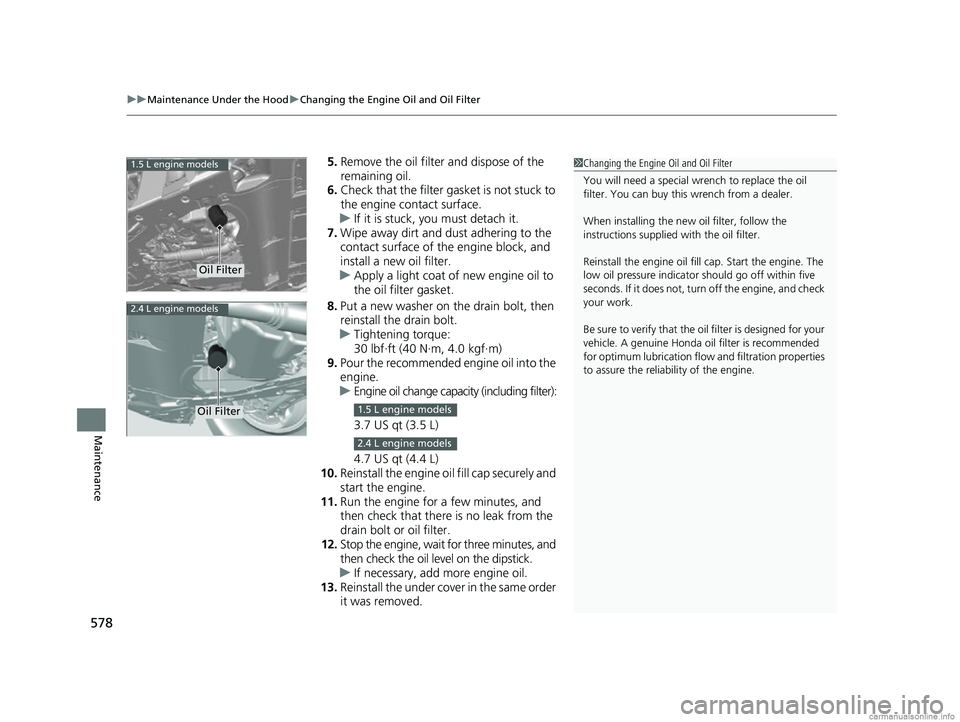
5. Remove the oil filter and dispose of the
remaining oil.
6. Check that the filter ga sket is not stuck to
the engine contact surface.
u If it is stuck, you must detach it.
7. Wipe away dirt and dust adhering to the
contact surface of the engine block, and
install a new oil filter.
u Apply a light coat of new engine oil to
the oil filter gasket.
8. Put a new washer on the drain bolt, then
reinstall the drain bolt.
u Tightening torque:
30 lbf∙ft (40 N∙m, 4.0 kgf∙m)
9. Pour the recommended engine oil into the
engine.
u Engine oil change capacity (including filter):
3.7 US qt (3.5 L)
4.7 US qt (4.4 L)
10. Reinstall the engine oil fill cap securely and
start the engine.
11. Run the engine for a few minutes, and
then check that ther e is no leak from the
drain bolt or oil filter.
12. Stop the engine, wait for three minutes, and
then check the oil level on the dipstick.
u If necessary, add more engine oil.
13. Reinstall the under cover in the same order
it was removed.1Changing the Engine Oil and Oil Filter
You will need a special wrench to replace the oil
filter. You can buy this wrench from a dealer.
When installing the new oil filter, follow the
instructions supplied with the oil filter.
Reinstall the engine oil fill cap. Start the engine. The
low oil pressure indicator should go off within five
seconds. If it does not, turn off the engine, and check
your work.
Be sure to verify that the o il filter is designed for your
vehicle. A genuine Honda oil filter is recommended
for optimum lubrication flow and filtration properties
to assure the reliability of the engine.1.5 L engine models
Oil Filter
2.4 L engine models
Oil Filter1.5 L engine models
2.4 L engine models
18 CR-V-31TLA6100.book 578 ページ 2017年9月7日 木曜日 午後3時56分
Page 581 of 679
579
uuMaintenance Under the Hood uEngine Coolant
Continued
Maintenance
Engine Coolant
This coolant is premixed with 50% an tifreeze and 50% water. Do not add any
straight antifreeze or water.
We recommend you check the engine coolant level every time you refuel. Check the
reserve tank. Add the engine coolant accordingly.
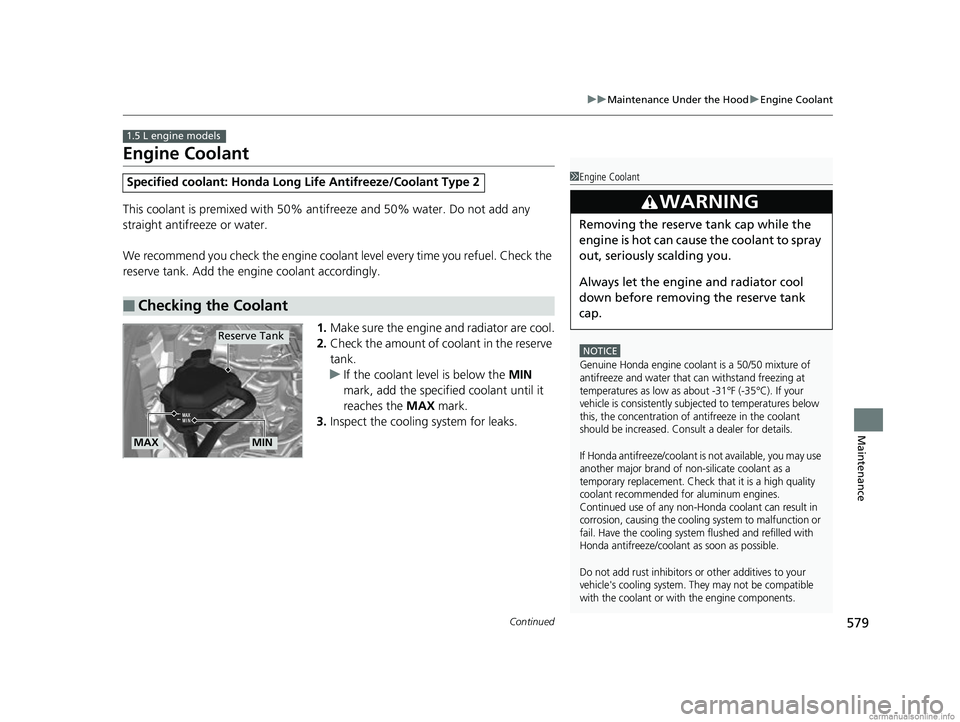
1.Make sure the engine and radiator are cool.
2. Check the amount of coolant in the reserve
tank.
u If the coolant level is below the MIN
mark, add the specified coolant until it
reaches the MAX mark.
3. Inspect the cooling system for leaks.
Specified coolant: Ho nda Long Life Antifreeze/Coolant Type 2
■Checking the Coolant
1.5 L engine models
1Engine Coolant
NOTICE
Genuine Honda engine coolant is a 50/50 mixture of
antifreeze and water that can withstand freezing at
temperatures as low as about -31°F (-35°C). If your
vehicle is consistently subjected to temperatures below
this, the concentration of antifreeze in the coolant
should be increased. Consult a dealer for details.
If Honda antifreeze/coolant is not available, you may use
another major brand of non-silicate coolant as a
temporary replacement. Check that it is a high quality
coolant recommended for aluminum engines.
Continued use of any non-Honda coolant can result in
corrosion, causing the cooling system to malfunction or
fail. Have the cooling system flushed and refilled with
Honda antifreeze/coolant as soon as possible.
Do not add rust inhibitors or other additives to your
vehicle's cooling system. They may not be compatible
with the coolant or with the engine components.
3WARNING
Removing the reserve tank cap while the
engine is hot can cause the coolant to spray
out, seriously scalding you.
Always let the engine and radiator cool
down before removing the reserve tank
cap.
Reserve Tank
MAXMIN
18 CR-V-31TLA6100.book 579 ページ 2017年9月7日 木曜日 午後3時56分
Page 583 of 679
581
uuMaintenance Under the Hood uEngine Coolant
Continued
Maintenance
Engine Coolant
This coolant is premixed with 50% an tifreeze and 50% water. Do not add any
straight antifreeze or water.
We recommend you check the engine coolant level every time you refuel. Check the
reserve tank first. If it is completely empty, also check the coolant level in the
radiator. Add the engine coolant accordingly.
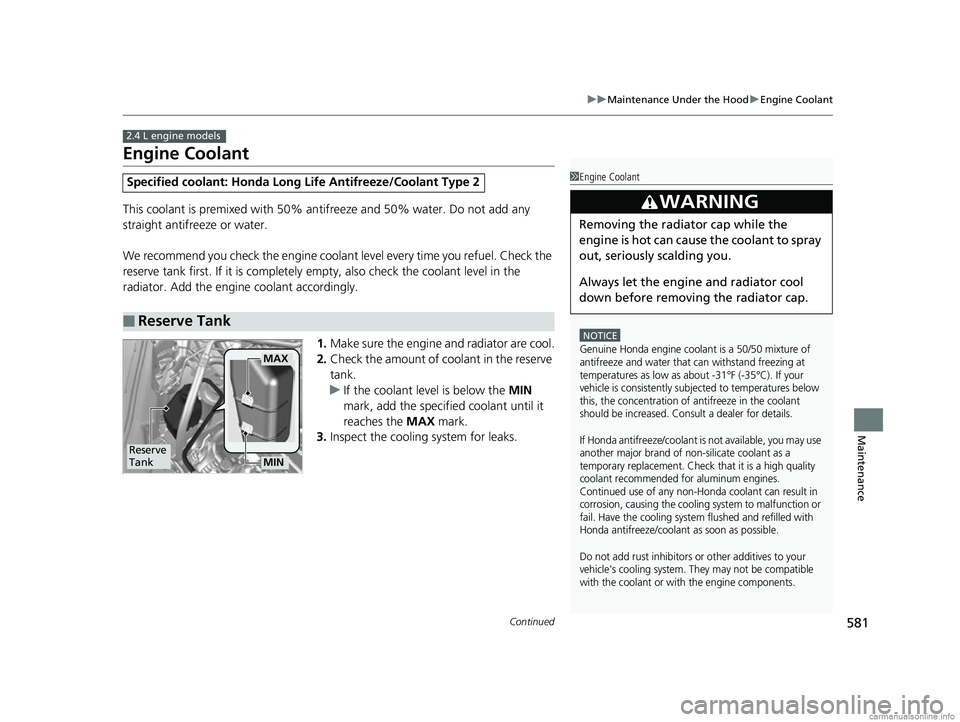
1.Make sure the engine and radiator are cool.
2. Check the amount of coolant in the reserve
tank.
u If the coolant level is below the MIN
mark, add the specified coolant until it
reaches the MAX mark.
3. Inspect the cooling system for leaks.
Specified coolant: Ho nda Long Life Antifreeze/Coolant Type 2
■Reserve Tank
2.4 L engine models
1Engine Coolant
NOTICE
Genuine Honda engine coolant is a 50/50 mixture of
antifreeze and water that can withstand freezing at
temperatures as low as about -31°F (-35°C). If your
vehicle is consistently subjected to temperatures below
this, the concentration of antifreeze in the coolant
should be increased. Consult a dealer for details.
If Honda antifreeze/coolant is not available, you may use
another major brand of non-silicate coolant as a
temporary replacement. Check that it is a high quality
coolant recommended for aluminum engines.
Continued use of any non-Honda coolant can result in
corrosion, causing the cooling system to malfunction or
fail. Have the cooling system flushed and refilled with
Honda antifreeze/coolant as soon as possible.
Do not add rust inhibitors or other additives to your
vehicle's cooling system. They may not be compatible
with the coolant or with the engine components.
3WARNING
Removing the radiator cap while the
engine is hot can cause the coolant to spray
out, seriously scalding you.
Always let the engine and radiator cool
down before removing the radiator cap.
Reserve
Tank
MAX
MIN
18 CR-V-31TLA6100.book 581 ページ 2017年9月7日 木曜日 午後3時56分
Page 587 of 679
585
uuMaintenance Under the Hood uRefilling Window Washer Fluid
Maintenance
Refilling Window Washer Fluid
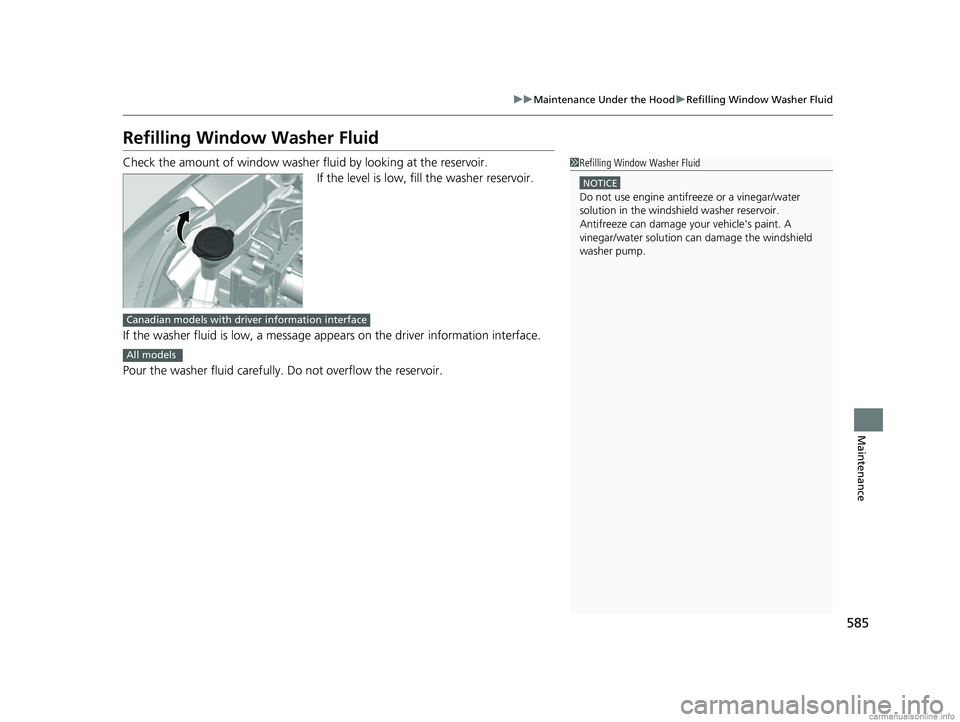
Check the amount of window washer fluid by looking at the reservoir.
If the level is low, fill the washer reservoir.
If the washer fluid is low, a message ap pears on the driver information interface.
Pour the washer fluid carefully. Do not overflow the reservoir.1 Refilling Window Washer Fluid
NOTICE
Do not use engine antifreeze or a vinegar/water
solution in the windshield washer reservoir.
Antifreeze can damage y our vehicle's paint. A
vinegar/water solution ca n damage the windshield
washer pump.
Canadian models with dri ver information interface
All models
18 CR-V-31TLA6100.book 585 ページ 2017年9月7日 木曜日 午後3時56分
Page 609 of 679
607
uuBattery uCharging the Battery
Maintenance
Charging the Battery
Disconnect both battery cables to prevent damaging your vehicle's electrical system.
Always disconnect the negative (–) cable first, and reconnect it last.
*1: Models with the smart entry system have an ENGINE START/STOP button instead of an
ignition switch.
1 Battery
When you find corrosion, cl ean the battery terminals
by applying a baking powder and water solution.
Clean the terminals with a damp towel. Cloth/towel
dry the battery. Coat the terminals with grease to
help prevent future corrosion.
When replacing the battery, the replacement must be
of the same specifications.
Consult a dealer for more information.
The indicators for the Adaptive Cruise Control (ACC)
with Low Speed Follow (LSF)
*, Road Departure
Mitigation (RDM) System*, Vehicle Stability Assist
(VSA ®) system, Vehicle Stability Assist (VSA ®) OFF,
Collision Mitigation Braking System
TM (CMBSTM)*, low
tire pressure/Tire Pressure Monitoring System (TPMS),
and Parking Brake and Br ake System (Amber) may
come on along with a message in the Driver
Information Interface
* when you turn the ignition
switch to ON
( w*1 after re-connect ing the battery.
Drive a short distance at more than 12 mph (20 km/
h). The indicator should go of f. If it does not, have
your vehicle checked by a dealer.
* Not available on all models
18 CR-V-31TLA6100.book 607 ページ 2017年9月7日 木曜日 午後3時56分
Page 619 of 679
617
Handling the Unexpected
This chapter explains how to handle unexpected troubles.
ToolsTypes of Tools .................................. 618
If a Tire Goes Flat Changing a Flat Tire ......................... 619
Engine Does Not Start Checking the Engine ........................ 626
If the Smart Entry Remote Battery is Weak .......................................... 627
Emergency Engine Stop ................... 628
Jump Starting .................................... 629
Shift Lever Does Not Move .............. 632
Overheating How to Handle Overheating ............. 633 Indicator, Coming On/Blinking
If the Low Oil Pressure Indicator Comes
On................................................ 637
If the Charging System Indicator Comes
On ................................................. 637
If the Malfunction Indicator Lamp Comes On or Blinks ................................... 638
If the Brake System Indicator (Red) Comes On or Blinks ....................................... 639
If the Brake System Indicator (Red) Comes On or
Blinks at the Same Time When the Brake
System Indicator (Amber) Comes On ..... 640
If the Electric Power Steering (EPS) System Indicator Comes On ........................... 641
If the Low Tire Pressure/TPMS Indicator Comes On or Blinks ....................... 643
Fuses Fuse Locations ................................. 644
Inspecting and Changing Fuses ........ 647
Emergency Towing ........................... 648
When You Cannot Open the Tailgate.. 649Refueling................................................. 650
18 CR-V-31TLA6100.book 617 ページ 2017年9月7日 木曜日 午後3時56分