manual start HONDA CR-V 2020 (in English) User Guide
[x] Cancel search | Manufacturer: HONDA, Model Year: 2020, Model line: CR-V, Model: HONDA CR-V 2020Pages: 671, PDF Size: 33.11 MB
Page 183 of 671
181
uuOperating the Switches Around the Steering Wheel uAuto High-Beam
Continued
Controls
Auto High-Beam
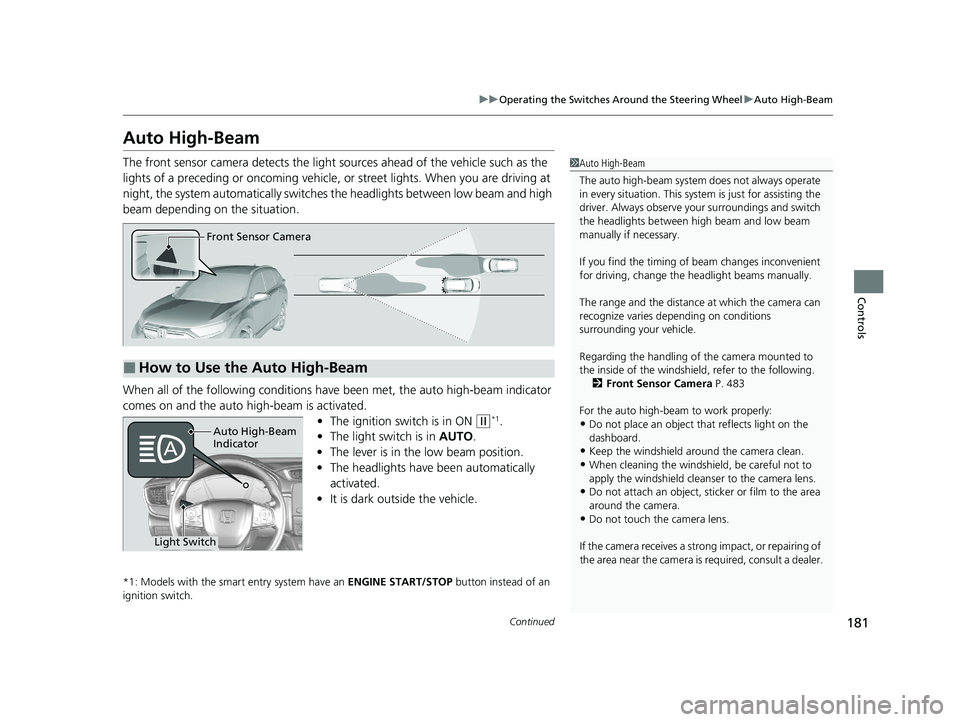
The front sensor camera detects the light sources ahead of the vehicle such as the
lights of a preceding or oncoming vehicle, or street lights. When you are driving at
night, the system automatically switches the headlights between low beam and high
beam depending on the situation.
When all of the following conditions have been met, the auto high-beam indicator
comes on and the auto high-beam is activated. •The ignition switch is in ON
(w*1.
• The light switch is in AUTO.
• The lever is in the low beam position.
• The headlights have been automatically
activated.
• It is dark outside the vehicle.
*1: Models with the smart entry system have an ENGINE START/STOP button instead of an
ignition switch.
1 Auto High-Beam
The auto high-beam system does not always operate
in every situation. This syst em is just for assisting the
driver. Always observe your surroundings and switch
the headlights between high beam and low beam
manually if necessary.
If you find the timing of beam changes inconvenient
for driving, change the headlight beams manually.
The range and the distance at which the camera can
recognize varies de pending on conditions
surrounding your vehicle.
Regarding the handling of the camera mounted to
the inside of the windshiel d, refer to the following.
2 Front Sensor Camera P. 483
For the auto high-beam to work properly:
•Do not place an object that reflects light on the
dashboard.
•Keep the windshield around the camera clean.
•When cleaning the windshield, be careful not to
apply the windshield cleans er to the camera lens.
•Do not attach an object, sticker or film to the area
around the camera.
•Do not touch the camera lens.
If the camera receives a st rong impact, or repairing of
the area near the camera is required, consult a dealer.
■How to Use the Auto High-Beam
Front Sensor Camera
Auto High-Beam
Indicator
Light Switch
20 CR-V PET ELP_MAP_HMIN_HCM_J-31TLA6310.book 181 ページ 2019年10月3日 木曜日 午後4時55分
Page 185 of 671
Continued183
uuOperating the Switches Around the Steering Wheel uAuto High-Beam
Controls
■Manual switching between high-beam and low-beam
If you want to manually switch the h eadlights between high beam and low beam,
follow either of the procedur es below. Note that when you do this, the auto high-
beam indicator will turn off and the auto high-beam will be deactivated.
Using the lever:
Pull the lever toward you for flashing the hi gh beams then release it within about
one second while driving. u To reactivate the auto hi gh-beam, pull the lever toward you for flashing the
high beams then release it while driv ing. The auto high-beam indicator will
come on.
Using the light switch:
Turn the light switch to . u To reactivate the au to high-beam, turn the light switch to AUTO when the
lever is in the low beam position, the auto high-beam indicator will come on.1How to Use the Auto High-Beam
If the Some Driver Assist Systems Cannot
Operate: Camera Temperature Too High message
appears:
•Use the climate control system to cool down the
interior and, if necessary, also use defroster mode
with the airflow directed toward the camera.
•Start driving the vehicle to lower the windshield
temperature, which cool s down the area around
the camera.
If the Some Driver Assist Systems Cannot
Operate: Clean Front Windshield message
appears:
•Park your vehicle in a sa fe place, and clean the
windshield. If the message does not disappear after
you have cleaned the windshield and driven for a
while, have your vehicle checked by a dealer.
20 CR-V PET ELP_MAP_HMIN_HCM_J-31TLA6310.book 183 ページ 2019年10月3日 木曜日 午後4時55分
Page 188 of 671
186
uuOperating the Switches Around the Steering Wheel uWipers and Washers
Controls
Wipers and Washers
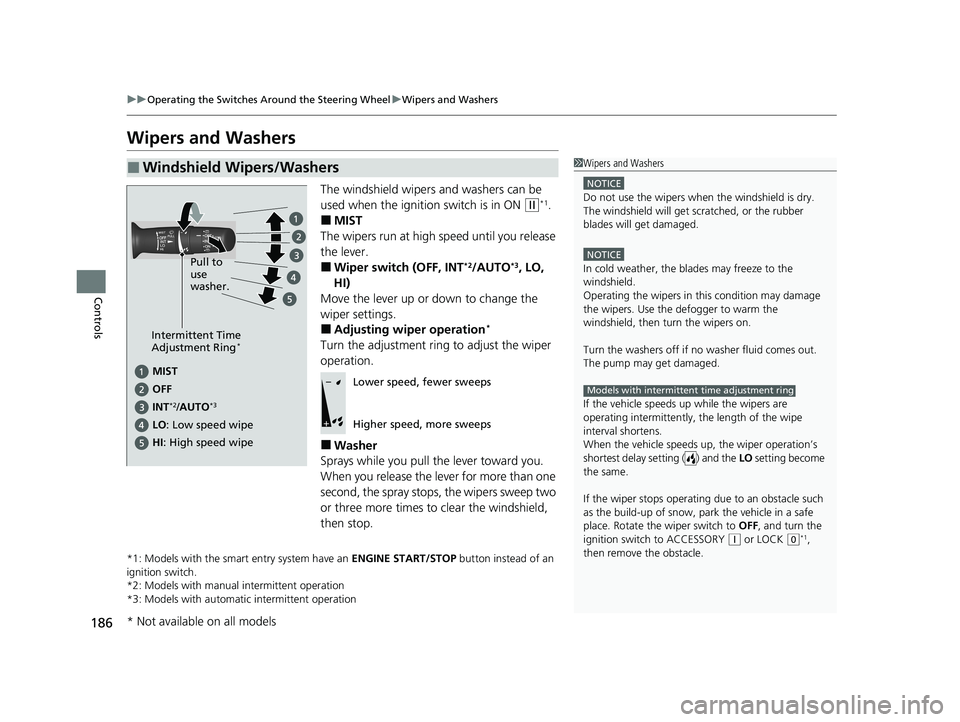
The windshield wipers and washers can be
used when the ignition switch is in ON
(w*1.
■MIST
The wipers run at high speed until you release
the lever.
■Wiper switch (OFF, INT*2/AUTO*3, LO,
HI)
Move the lever up or down to change the
wiper settings.
■Adjusting wiper operation*
Turn the adjustment ring to adjust the wiper
operation.
■Washer
Sprays while you pull the lever toward you.
When you release the lever for more than one
second, the spray stops, the wipers sweep two
or three more times to clear the windshield,
then stop.
*1: Models with the smart entry system have an ENGINE START/STOP button instead of an
ignition switch.
*2: Models with manual intermittent operation
*3: Models with automati c intermittent operation
■Windshield Wipers/Washers1Wipers and Washers
NOTICE
Do not use the wipers when the windshield is dry.
The windshield will get sc ratched, or the rubber
blades will get damaged.
NOTICE
In cold weather, the blades may freeze to the
windshield.
Operating the wipers in th is condition may damage
the wipers. Use the defogger to warm the
windshield, then turn the wipers on.
Turn the washers off if no washer fluid comes out.
The pump may get damaged.
If the vehicle speeds up while the wipers are
operating intermittently, the length of the wipe
interval shortens.
When the vehicle speeds up, the wiper operation’s
shortest delay setting ( ) and the LO setting become
the same.
If the wiper stops operating due to an obstacle such
as the build-up of snow, pa rk the vehicle in a safe
place. Rotate the wiper switch to OFF, and turn the
ignition switch to ACCESSORY
( q or LOCK (0*1,
then remove the obstacle.
Models with intermittent time adjustment ring
Intermittent Time
Adjustment Ring*
MIST
INT
*2/AUTO*3
OFF
LO : Low speed wipe Pull to
use
washer.
HI: High speed wipe
Lower speed, fewer sweeps
Higher speed, more sweeps
* Not available on all models
20 CR-V PET ELP_MAP_HMIN_HCM_J-31TLA6310.book 186 ページ 2019年10月3日 木曜日 午後4時55分
Page 220 of 671
uuInterior Lights/Interior Convenience Items uInterior Convenience Items
218
Controls
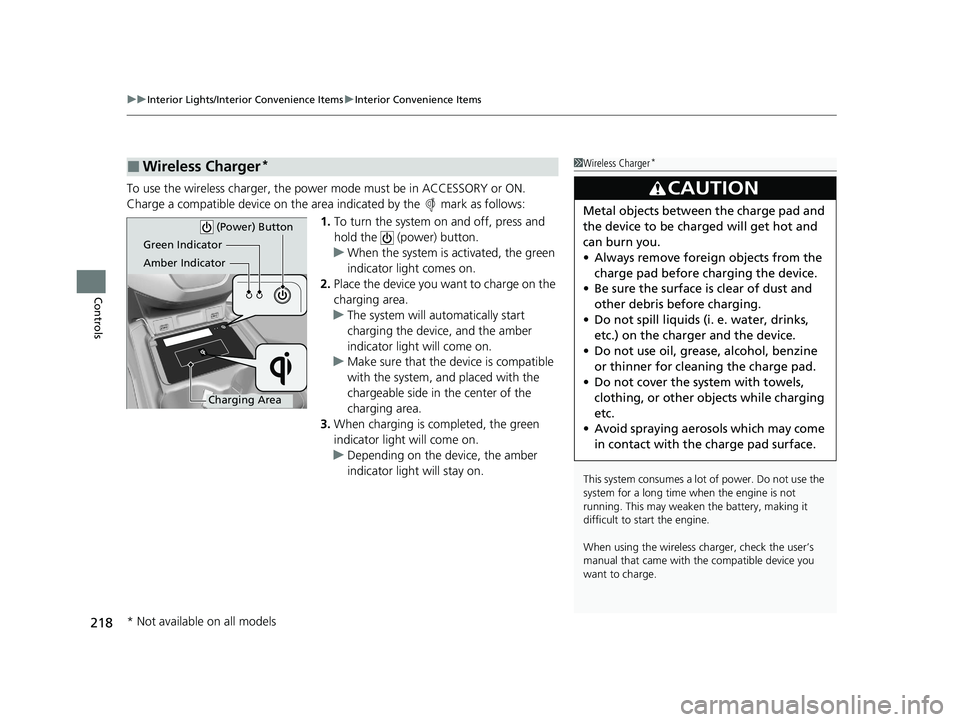
To use the wireless charger, the powe r mode must be in ACCESSORY or ON.
Charge a compatible device on the ar ea indicated by the mark as follows:
1. To turn the system on and off, press and
hold the (power) button.
u When the system is activated, the green
indicator light comes on.
2. Place the device you want to charge on the
charging area.
u The system will automatically start
charging the device, and the amber
indicator light will come on.
u Make sure that the device is compatible
with the system, a nd placed with the
chargeable side in the center of the
charging area.
3. When charging is completed, the green
indicator light will come on.
u Depending on the device, the amber
indicator light will stay on.
■Wireless Charger*1Wireless Charger*
This system consumes a lot of power. Do not use the
system for a long time when the engine is not
running. This may weaken the battery, making it
difficult to start the engine.
When using the wireless charger, check the user’s
manual that came with th e compatible device you
want to charge.
3CAUTION
Metal objects between the charge pad and
the device to be charged will get hot and
can burn you.
• Always remove foreign objects from the
charge pad before charging the device.
• Be sure the surface is clear of dust and
other debris before charging.
• Do not spill liquids (i. e. water, drinks,
etc.) on the charger and the device.
• Do not use oil, grease, alcohol, benzine
or thinner for cleaning the charge pad.
• Do not cover the system with towels,
clothing, or other objects while charging
etc.
• Avoid spraying aerosols which may come
in contact with the charge pad surface.
Green Indicator
Amber Indicator
Charging Area (Power) Button
* Not available on all models
20 CR-V PET ELP_MAP_HMIN_HCM_J-31TLA6310.book 218 ページ 2019年10月3日 木曜日 午後4時55分
Page 230 of 671
228
Controls
Climate Control System
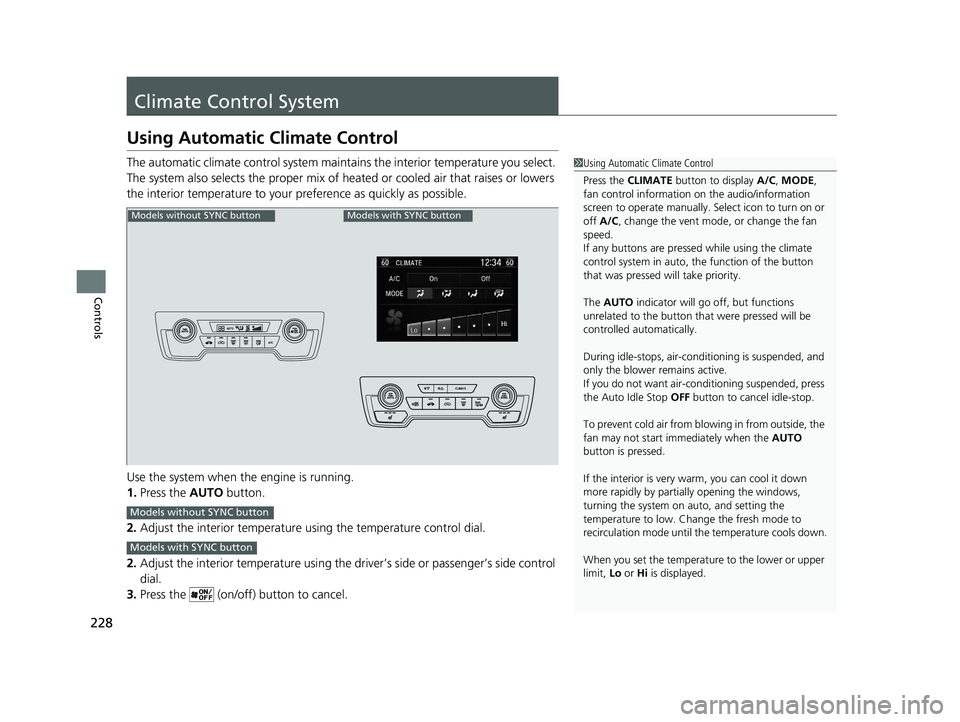
Using Automatic Climate Control
The automatic climate control system maintains the interior temperature you select.
The system also selects the proper mix of heated or cooled air that raises or lowers
the interior temperature to your preference as quickly as possible.
Use the system when the engine is running.
1. Press the AUTO button.
2. Adjust the interior temperature us ing the temperature control dial.
2. Adjust the interior temperature using the dr iver’s side or passenger’s side control
dial.
3. Press the (on/off) button to cancel.1Using Automatic Climate Control
Press the CLIMATE button to display A/C, MODE,
fan control information on the audio/information
screen to operate manually. Select ic on to turn on or
off A/C , change the vent mode , or change the fan
speed.
If any buttons are presse d while using the climate
control system in auto, the function of the button
that was pressed will take priority.
The AUTO indicator will go off, but functions
unrelated to the button that were pressed will be
controlled automatically.
During idle-stops, air-conditioning is suspended, and
only the blower remains active.
If you do not want air-cond itioning suspended, press
the Auto Idle Stop OFF button to cancel idle-stop.
To prevent cold air from bl owing in from outside, the
fan may not start i mmediately when the AUTO
button is pressed.
If the interior is very warm, you can cool it down
more rapidly by partial ly opening the windows,
turning the system on auto, and setting the
temperature to low. Change the fresh mode to
recirculation mode until the temperature cools down.
When you set the temperat ure to the lower or upper
limit, Lo or Hi is displayed.
Models without SYNC buttonModels with SYNC button
Models without SYNC button
Models with SYNC button
20 CR-V PET ELP_MAP_HMIN_HCM_J-31TLA6310.book 228 ページ 2019年10月3日 木曜日 午後4時55分
Page 287 of 671
285
uuAudio System Basic Operation uDisplay Setup
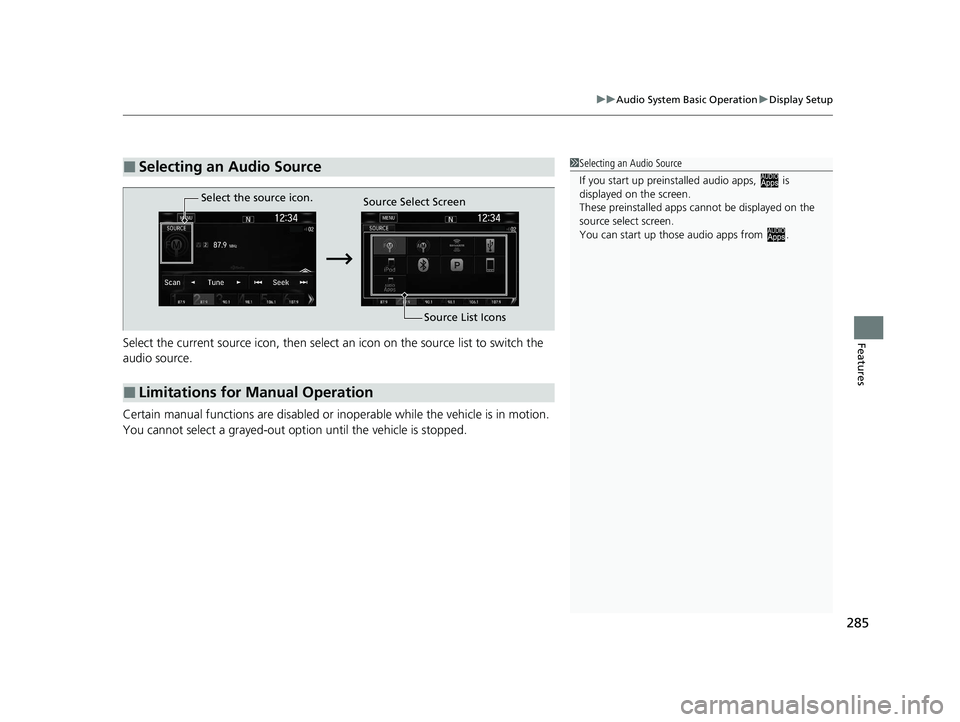
FeaturesSelect the current source icon, then select an icon on the source list to switch the
audio source.
Certain manual functions are disabled or inoperable while the vehicle is in motion.
You cannot select a grayed-out option until the vehicle is stopped.
■Selecting an Audio Source1 Selecting an Audio Source
If you start up preinstalled audio apps, is
displayed on the screen.
These preinstalled apps ca nnot be displayed on the
source select screen.
You can start up thos e audio apps from .
■Limitations for Manual Operation
Select the source icon.
Source Select Screen
Source List Icons
20 CR-V PET ELP_MAP_HMIN_HCM_J-31TLA6310.book 285 ページ 2019年10月3日 木曜日 午後4時55分
Page 411 of 671
Continued409
uuBluetooth ® HandsFreeLink ®u HFL Menus
Features
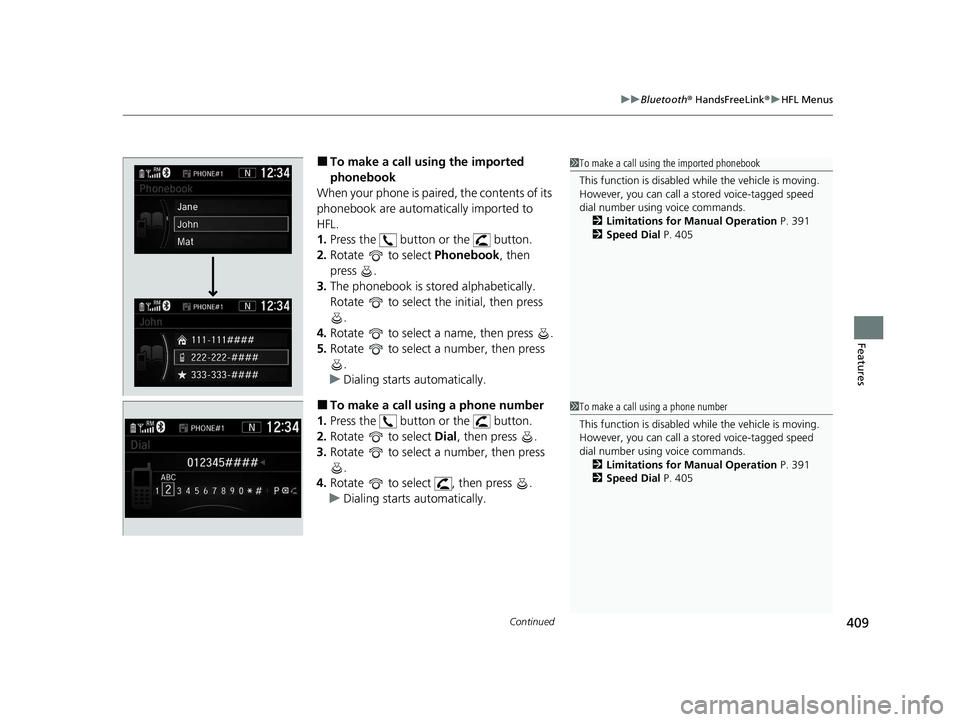
■To make a call using the imported
phonebook
When your phone is paired, the contents of its
phonebook are automatically imported to
HFL.
1. Press the button or the button.
2. Rotate to select Phonebook, then
press .
3. The phonebook is stored alphabetically.
Rotate to select the initial, then press
.
4. Rotate to select a name, then press .
5. Rotate to select a number, then press
.
u Dialing starts automatically.
■To make a call using a phone number
1. Press the button or the button.
2. Rotate to select Dial, then press .
3. Rotate to select a number, then press
.
4. Rotate to select , then press .
u Dialing starts automatically.
1To make a call using the imported phonebook
This function is disabled while the vehicle is moving.
However, you can call a stored voice-tagged speed
dial number using voice commands. 2 Limitations for Manual Operation P. 391
2 Speed Dial P. 405
1To make a call using a phone number
This function is disabled while the vehicle is moving.
However, you can call a stored voice-tagged speed
dial number using voice commands. 2 Limitations for Manual Operation P. 391
2 Speed Dial P. 405
20 CR-V PET ELP_MAP_HMIN_HCM_J-31TLA6310.book 409 ページ 2019年10月3日 木曜日 午後4時55分
Page 450 of 671
448
Features
Compass*
When you turn the ignition switch to ON (w, the compass self-calibrates, and the
compass display appears.
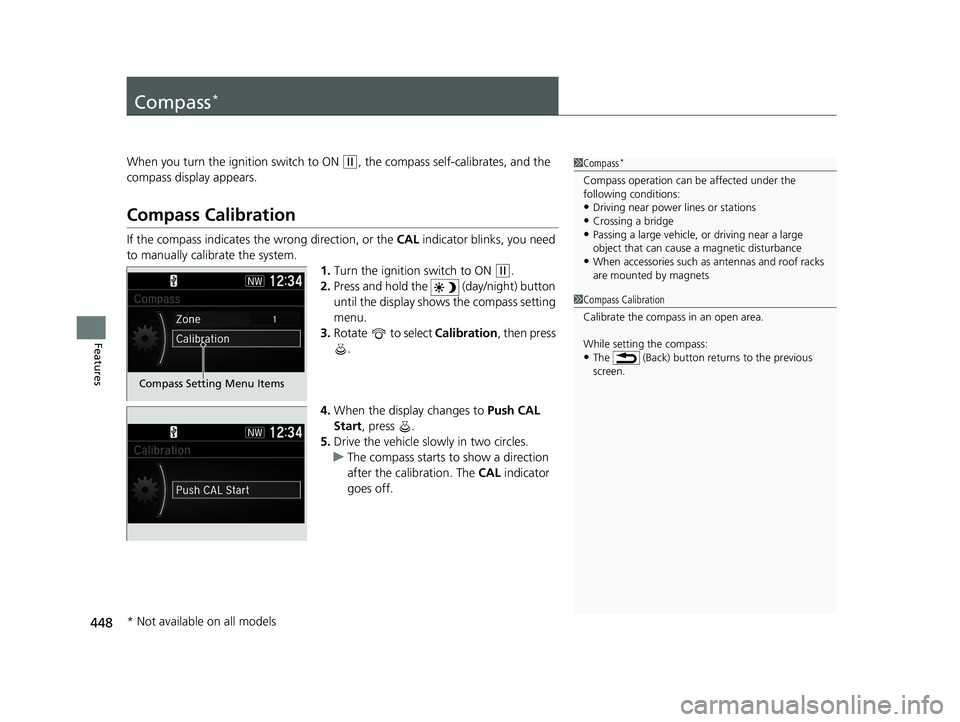
Compass Calibration
If the compass indicates the wrong direction, or the CAL indicator blinks, you need
to manually calibrate the system.
1.Turn the ignition switch to ON
(w.
2. Press and hold the (day/night) button
until the display shows the compass setting
menu.
3. Rotate to select Calibration, then press
.
4. When the display changes to Push CAL
Start, press .
5. Drive the vehicle slowly in two circles.
u The compass starts to show a direction
after the calibration. The CAL indicator
goes off.
1 Compass*
Compass operation can be affected under the
following conditions:
•Driving near power lines or stations
•Crossing a bridge•Passing a large vehicle, or driving near a large
object that can cause a magnetic disturbance
•When accessories such as antennas and roof racks
are mounted by magnets
1 Compass Calibration
Calibrate the compass in an open area.
While setting the compass:
•The (Back) button returns to the previous
screen.
Compass Setting Menu Items
* Not available on all models
20 CR-V PET ELP_MAP_HMIN_HCM_J-31TLA6310.book 448 ページ 2019年10月3日 木曜日 午後4時55分
Page 468 of 671
uuWhen Driving uStarting the Engine
466
Driving
1. Keeping your right foot on the br ake pedal, put the shift lever in (D. Select (R
when reversing.
2. With the parking brake applied, release the brake pedal and gently depress the
accelerator pedal.
u Make sure the parking brake and brake system indicator goes off.
2 Parking Brake P. 528
■Hill start assist system
Hill start assist keeps the brake engaged br iefly to help prevent the vehicle from
rolling on inclines as you move your fo ot from the brake pedal to the accelerator.
Move the shift lever to
(D, (S, or (L when facing uphill, or (R when facing
downhill, then release the brake pedal.
■Starting to Drive1 Starting the Engine
The immobilizer system pr otects your vehicle from
theft. If an improperly code d key (or other device) is
used, the engine's fuel system is disabled.
2 Immobilizer System P. 160
You can also release the parking brake by pressing
the electric parking brake sw itch while depressing the
brake pedal. When facing downhill, you can start
your vehicle more smoothly by manually releasing it
with the electric parki ng brake switch than by
releasing it with th e accelerator pedal.
1Hill start assist system
Hill start assist may not prevent the vehicle from
rolling downhill on a very st eep or slippery slope, and
does not operate on small inclines.
Hill start assist is not a replacement for the parking
brake.
Hill start assist will operate even when VSA ® is
switched off.
20 CR-V PET ELP_MAP_HMIN_HCM_J-31TLA6310.book 466 ページ 2019年10月3日 木曜日 午後4時55分
Page 473 of 671
471
uuWhen Driving uStarting the Engine
Driving
1. Depress the brake pedal and press the ENGINE START/STOP button
simultaneously.
2. Put the shift lever in
(D. Select (R when reversing.
3. With the parking brake is applied, release the brake pedal and gently depress the
accelerator pedal.
u Make sure the parking brake and brake system indicator goes off.
4. Gradually release the brake pedal and gently depress the accelerator pedal to pull
away.
■Hill start assist system
Hill start assist keeps the brake engaged br iefly to help prevent the vehicle from
rolling on inclines as you move your foot from the brake pedal to the accelerator.
Move the shift lever to
(D, (S, or (L when facing uphill, or (R when facing
downhill, then release the brake pedal.
■Starting to Drive1 Starting to Drive
The engine stops when the sh ift lever is moved out of
(P before the ENGINE START/STOP button is
pressed. Follow step 1 when starting to drive.
You can also release the parking brake by pressing
the electric parking brake sw itch while depressing the
brake pedal. When facing downhill, you can start
your vehicle more smoothly by manually releasing it
with the electric parki ng brake switch than by
releasing it with th e accelerator pedal.
When the engine was started using the button*
on the smart entry remoteWhen the engine was started using the button* on the smart entry remote
When the engine was started in any case
1 Hill start assist system
Hill start assist may not prevent the vehicle from
rolling downhill on a very st eep or slippery slope, and
does not operate on small inclines.
Hill start assist is not a replacement for the parking
brake.
Hill start assist will operate even when VSA ® is
switched off.
* Not available on all models
20 CR-V PET ELP_MAP_HMIN_HCM_J-31TLA6310.book 471 ページ 2019年10月3日 木曜日 午後4時55分