display HONDA CR-V 2020 (in English) Service Manual
[x] Cancel search | Manufacturer: HONDA, Model Year: 2020, Model line: CR-V, Model: HONDA CR-V 2020Pages: 671, PDF Size: 33.11 MB
Page 230 of 671
228
Controls
Climate Control System
Using Automatic Climate Control
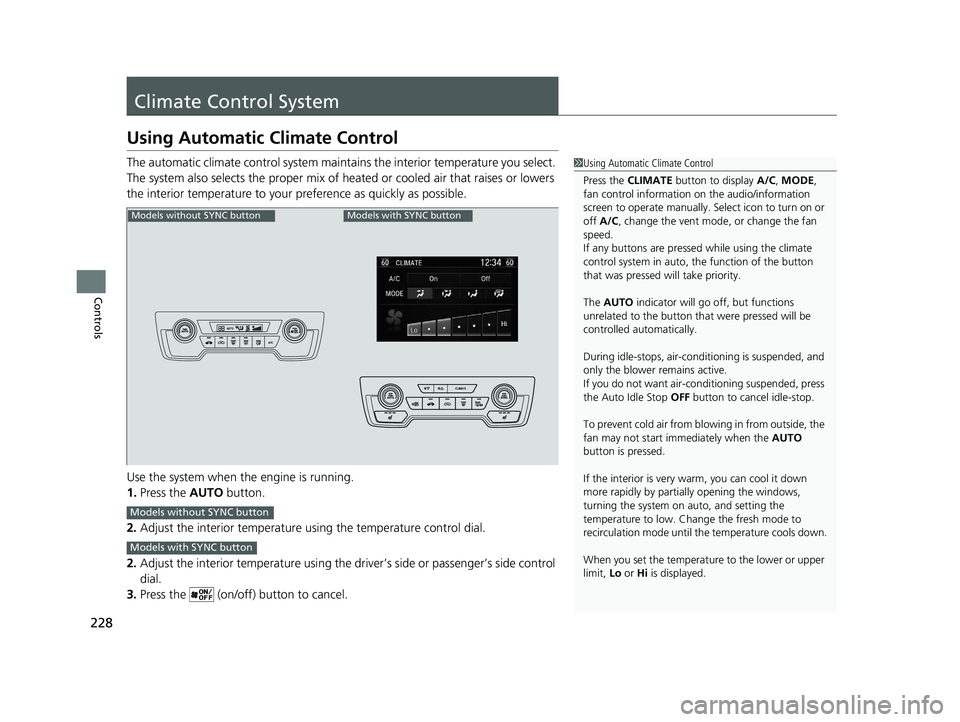
The automatic climate control system maintains the interior temperature you select.
The system also selects the proper mix of heated or cooled air that raises or lowers
the interior temperature to your preference as quickly as possible.
Use the system when the engine is running.
1. Press the AUTO button.
2. Adjust the interior temperature us ing the temperature control dial.
2. Adjust the interior temperature using the dr iver’s side or passenger’s side control
dial.
3. Press the (on/off) button to cancel.1Using Automatic Climate Control
Press the CLIMATE button to display A/C, MODE,
fan control information on the audio/information
screen to operate manually. Select ic on to turn on or
off A/C , change the vent mode , or change the fan
speed.
If any buttons are presse d while using the climate
control system in auto, the function of the button
that was pressed will take priority.
The AUTO indicator will go off, but functions
unrelated to the button that were pressed will be
controlled automatically.
During idle-stops, air-conditioning is suspended, and
only the blower remains active.
If you do not want air-cond itioning suspended, press
the Auto Idle Stop OFF button to cancel idle-stop.
To prevent cold air from bl owing in from outside, the
fan may not start i mmediately when the AUTO
button is pressed.
If the interior is very warm, you can cool it down
more rapidly by partial ly opening the windows,
turning the system on auto, and setting the
temperature to low. Change the fresh mode to
recirculation mode until the temperature cools down.
When you set the temperat ure to the lower or upper
limit, Lo or Hi is displayed.
Models without SYNC buttonModels with SYNC button
Models without SYNC button
Models with SYNC button
20 CR-V PET ELP_MAP_HMIN_HCM_J-31TLA6310.book 228 ページ 2019年10月3日 木曜日 午後4時55分
Page 237 of 671
235
uuAudio System uUSB Port(s)
Features
USB Port(s)
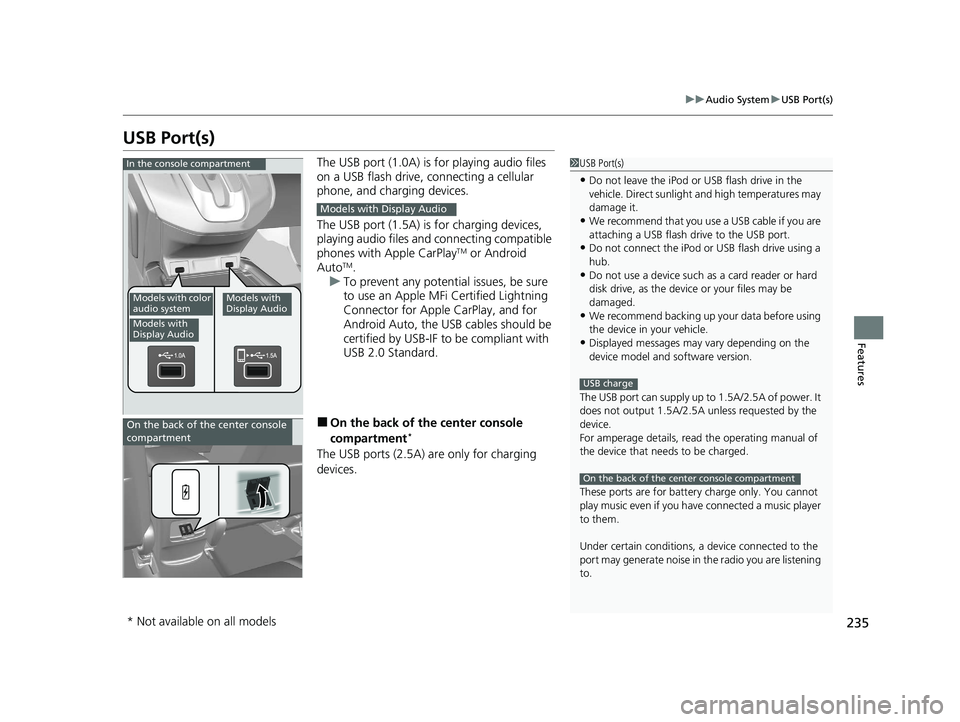
The USB port (1.0A) is for playing audio files
on a USB flash drive, connecting a cellular
phone, and charging devices.
The USB port (1.5A) is for charging devices,
playing audio files and connecting compatible
phones with Apple CarPlay
TM or Android
AutoTM.
u To prevent any potenti al issues, be sure
to use an Apple MFi Certified Lightning
Connector for Apple CarPlay, and for
Android Auto, the USB cables should be
certified by USB-IF to be compliant with
USB 2.0 Standard.
■On the back of the center console
compartment*
The USB ports (2.5A) are only for charging
devices.
1 USB Port(s)
•Do not leave the iPod or USB flash drive in the
vehicle. Direct sunlight and high temperatures may
damage it.
•We recommend that you us e a USB cable if you are
attaching a USB flash drive to the USB port.
•Do not connect the iPod or USB flash drive using a
hub.
•Do not use a device such as a card reader or hard
disk drive, as the device or your files may be
damaged.
•We recommend backing up yo ur data before using
the device in your vehicle.
•Displayed messages may vary depending on the
device model and software version.
The USB port can supply up to 1.5A/2.5A of power. It
does not output 1.5A/2.5A unless requested by the
device.
For amperage details, read the operating manual of
the device that ne eds to be charged.
These ports are for battery charge only. You cannot
play music even if you have connected a music player
to them.
Under certain condi tions, a device connected to the
port may generate noise in the radio you are listening
to.
USB charge
On the back of the center console compartment
In the console compartment
Models with color
audio system
Models with
Display Audio
Models with
Display Audio
Models with Display Audio
On the back of the center console
compartment
* Not available on all models
20 CR-V PET ELP_MAP_HMIN_HCM_J-31TLA6310.book 235 ページ 2019年10月3日 木曜日 午後4時55分
Page 238 of 671
236
uuAudio System uAudio System Theft Protection
Features
Audio System Theft Protection
The audio system is disabled when it is disconnected from the power source, such as
when the battery is disconnected or goes dead. In certain conditions, the system
may display a code entry screen. If this occurs, reactivate the audio system.
■Reactivating the audio system
1. Turn the ignition switch to ON
(w*1.
2. Turn on the audio system.
3. Press and hold the audio system power button for more than two seconds.
u The audio system is reac tivated when the audio co ntrol unit establishes a
connection with the vehicle control unit. If the control unit fails to recognize
the audio unit, you must go to a dealer and have the audio unit checked.
*1: Models with the smart entry system have an ENGINE START/STOP button instead of an
ignition switch.
20 CR-V PET ELP_MAP_HMIN_HCM_J-31TLA6310.book 236 ページ 2019年10月3日 木曜日 午後4時55分
Page 239 of 671
237
uuAudio System uAudio Remote Controls
Continued
Features
Audio Remote Controls
Allow you to operate the audio system whil e driving. The information is shown on
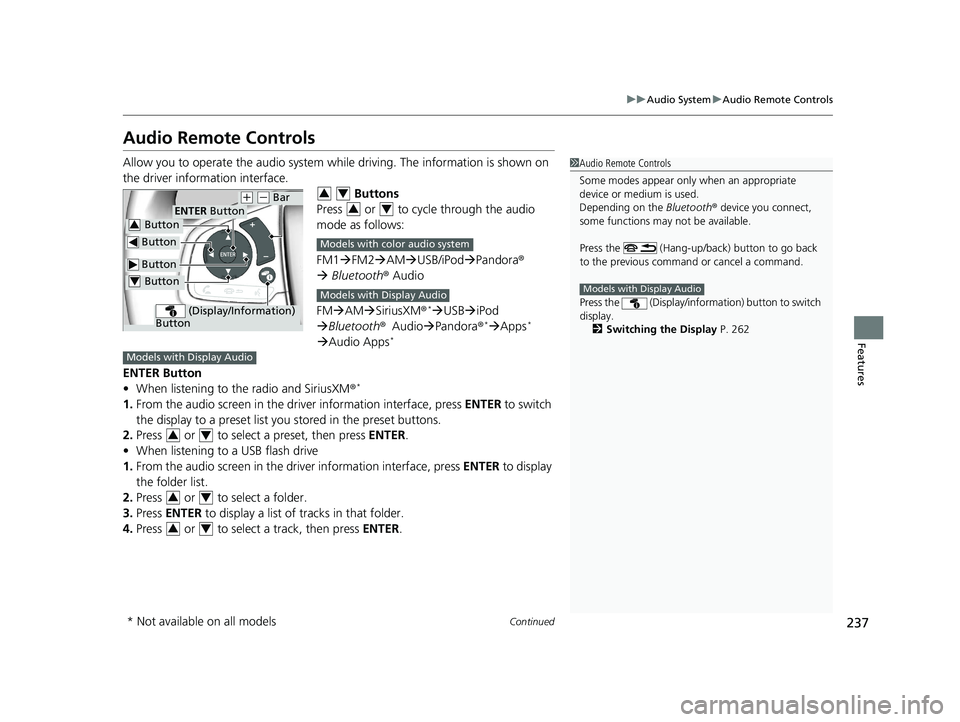
the driver information interface. Buttons
Press or to cycle through the audio
mode as follows:
FM1 FM2 AM USB/iPod Pandora ®
Bluetooth ® Audio
FM AM SiriusXM ®
*USB iPod
Bluetooth ®Audio Pandora®*Apps*
Audio Apps*
ENTER Button
• When listening to the radio and SiriusXM ®*
1.From the audio screen in the dr iver information interface, press ENTER to switch
the display to a preset list yo u stored in the preset buttons.
2. Press or to select a preset, then press ENTER.
• When listening to a USB flash drive
1. From the audio screen in the dr iver information interface, press ENTER to display
the folder list.
2. Press or to select a folder.
3. Press ENTER to display a list of tracks in that folder.
4. Press or to select a track, then press ENTER.
1Audio Remote Controls
Some modes appear only when an appropriate
device or medium is used.
Depending on the Bluetooth® device you connect,
some functions may not be available.
Press the (Hang-up/back) button to go back
to the previous command or cancel a command.
Press the (Display/informa tion) button to switch
display.
2 Switching the Display P. 262
Models with Display Audio
Button
ENTER Button
Button
(+ (- Bar
(Display/Information)
Button
Button3
Button4
34
34
Models with color audio system
Models with Display Audio
Models with Display Audio
34
34
34
* Not available on all models
20 CR-V PET ELP_MAP_HMIN_HCM_J-31TLA6310.book 237 ページ 2019年10月3日 木曜日 午後4時55分
Page 240 of 671
238
uuAudio System uAudio Remote Controls
Features
• When listening to an iPod
1. From the audio screen in the dr iver information interface, press ENTER to display
the iPod music list.
2. Press or to select a category.
3. Press ENTER to display a list of items in the category.
4. Press or to select an item, then press ENTER.
u Press ENTER and press or repeatedly until the desired mode you want
to listen to is displayed.
• When listening to Pandora ®
*
1.From the audio screen in the dr iver information interface, press ENTER to display
the station list.
2. Press or to select an item, then press ENTER.
• When listening to Bluetooth®Audio
1. From the audio screen in the dr iver information interface, press ENTER to display
the track list.
2. Press or to select a track, then press ENTER.
(+ (- (Volume) Bar
Press
(+: To increase the volume.
Press
(-: To decrease the volume.
34
34
34
34
34
* Not available on all models
20 CR-V PET ELP_MAP_HMIN_HCM_J-31TLA6310.book 238 ページ 2019年10月3日 木曜日 午後4時55分
Page 242 of 671
240
Features
Audio System Basic Operation
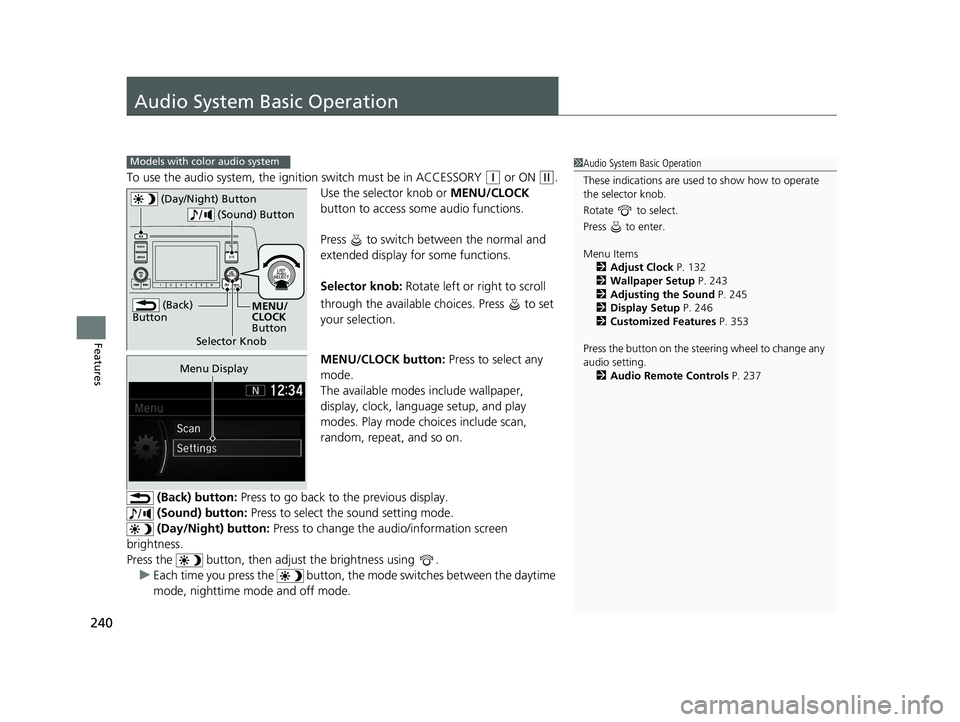
To use the audio system, the ignition switch must be in ACCESSORY (q or ON (w.
Use the selector knob or MENU/CLOCK
button to access some audio functions.
Press to switch between the normal and
extended display fo r some functions.
Selector knob: Rotate left or right to scroll
through the available choices. Press to set
your selection.
MENU/CLOCK button: Press to select any
mode.
The available modes include wallpaper,
display, clock, langu age setup, and play
modes. Play mode choices include scan,
random, repeat, and so on.
(Back) button: Press to go back to the previous display.
(Sound) button: Press to select the sound setting mode.
(Day/Night) button: Press to change the audio/information screen
brightness.
Press the button, then adjust the brightness using . u Each time you press the button, th e mode switches between the daytime
mode, nighttime mode and off mode.
Models with color audio system1 Audio System Basic Operation
These indications are used to show how to operate
the selector knob.
Rotate to select.
Press to enter.
Menu Items 2 Adjust Clock P. 132
2 Wallpaper Setup P. 243
2 Adjusting the Sound P. 245
2 Display Setup P. 246
2 Customized Features P. 353
Press the button on the stee ring wheel to change any
audio setting. 2 Audio Remote Controls P. 237
(Back)
Button
Selector Knob MENU/
CLOCK
Button
(Day/Night) Button
(Sound) Button
Menu Display
20 CR-V PET ELP_MAP_HMIN_HCM_J-31TLA6310.book 240 ページ 2019年10月3日 木曜日 午後4時55分
Page 243 of 671
241
uuAudio System Basic Operation uAudio/Information Screen
Continued
Features
Audio/Information Screen
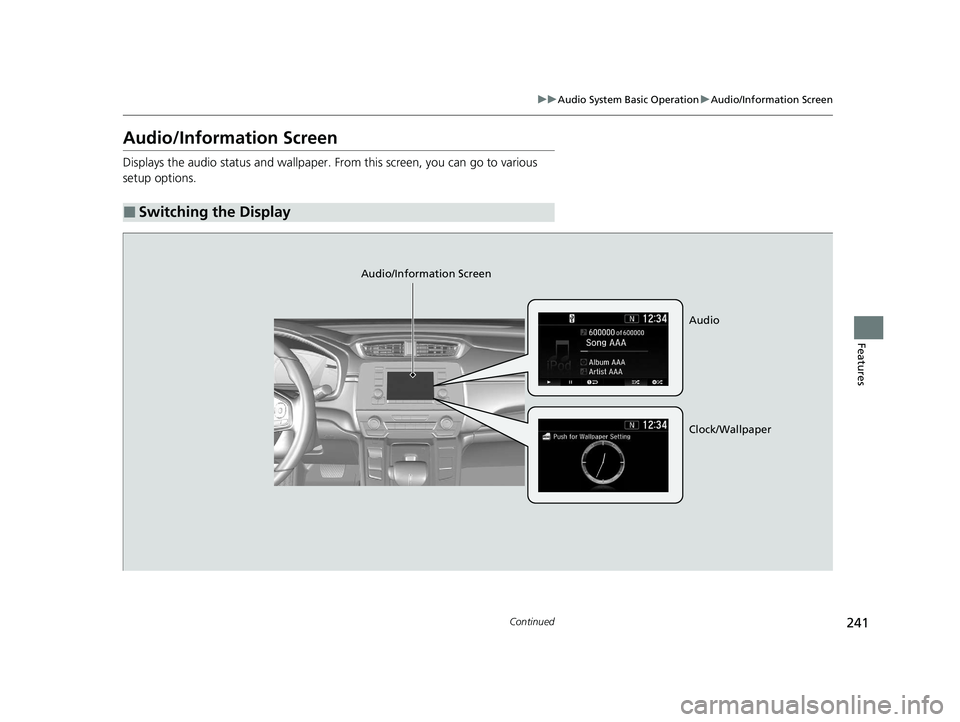
Displays the audio status and wallpaper. From this screen, you can go to various
setup options.
■Switching the Display
Audio/Information Screen
Audio
Clock/Wallpaper
20 CR-V PET ELP_MAP_HMIN_HCM_J-31TLA6310.book 241 ページ 2019年10月3日 木曜日 午後4時55分
Page 244 of 671
242
uuAudio System Basic Operation uAudio/Information Screen
Features
■Audio
Shows the current audio information.
■Clock/Wallpaper
Shows a clock screen or an image you import.
■Change display
1. Press the MENU/CLOCK button.
2. Rotate to select Settings, then press .
3. Rotate to select Display Change, then press .
4. Rotate to select Wallpaper, then press .
u If you want to return to the audio/information screen, select Audio.
20 CR-V PET ELP_MAP_HMIN_HCM_J-31TLA6310.book 242 ページ 2019年10月3日 木曜日 午後4時55分
Page 245 of 671
Continued243
uuAudio System Basic Operation uAudio/Information Screen
Features
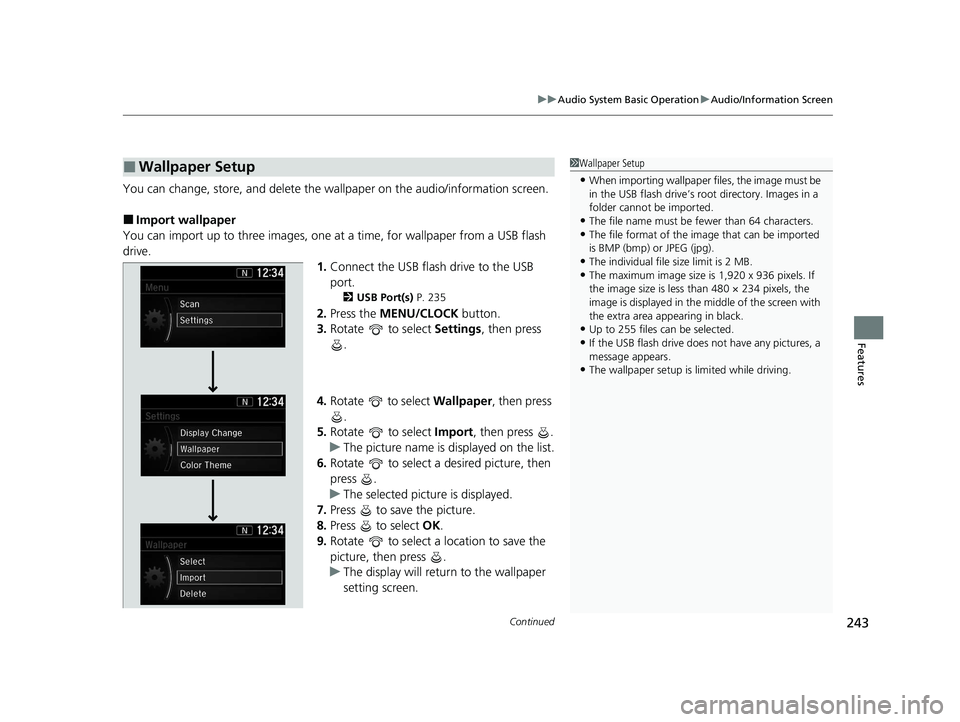
You can change, store, and delete the wallpaper on the audio/ information screen.
■Import wallpaper
You can import up to three images, one at a time, for wallpaper from a USB flash
drive. 1.Connect the USB flash drive to the USB
port.
2 USB Port(s) P. 235
2.Press the MENU/CLOCK button.
3. Rotate to select Settings, then press
.
4. Rotate to select Wallpaper, then press
.
5. Rotate to select Import, then press .
u The picture name is displayed on the list.
6. Rotate to select a desired picture, then
press .
u The selected picture is displayed.
7. Press to save the picture.
8. Press to select OK.
9. Rotate to select a location to save the
picture, then press .
u The display will return to the wallpaper
setting screen.
■Wallpaper Setup1Wallpaper Setup
•When importing wallpaper f iles, the image must be
in the USB flash drive’s root directory. Images in a
folder cannot be imported.
•The file name must be fewer than 64 characters.•The file format of the im age that can be imported
is BMP (bmp) or JPEG (jpg).
•The individual file size limit is 2 MB.•The maximum image size is 1,920 x 936 pixels. If
the image size is less than 480 × 234 pixels, the
image is displayed in the middle of the screen with
the extra area appearing in black.
•Up to 255 files can be selected.
•If the USB flash drive does not have any pictures, a
message appears.
•The wallpaper setup is limited while driving.
20 CR-V PET ELP_MAP_HMIN_HCM_J-31TLA6310.book 243 ページ 2019年10月3日 木曜日 午後4時55分
Page 246 of 671
uuAudio System Basic Operation uAudio/Information Screen
244
Features
■Select wallpaper
1. Press the MENU/CLOCK button.
2. Rotate to select Settings, then press .
3. Rotate to select Wallpaper, then press .
4. Rotate to select Select, then press .
u The screen changes to the wallpaper list.
5. Rotate to select a desired wallpaper, then press .
■To view wallpaper once it is set
1. Press the MENU/CLOCK button.
2. Rotate to select Settings, then press .
3. Rotate to select Display Change, then press .
4. Rotate to select Wallpaper, then press .
5. Press the (Back) button until the top screen is displayed.
■Delete wallpaper
1. Press the MENU/CLOCK button.
2. Rotate to select Settings, then press .
3. Rotate to select Wallpaper, then press .
4. Rotate to select Delete, then press .
u The screen changes to the wallpaper list.
5. Rotate to select a wallpaper that you want to delete, then press .
6. Rotate to select Yes, then press .
u The display will return to the wallpaper setting screen.
1Wallpaper Setup
To go back to the previous screen, press the
(Back) button.
When the file size is large, it takes a while to be
previewed.
20 CR-V PET ELP_MAP_HMIN_HCM_J-31TLA6310.book 244 ページ 2019年10月3日 木曜日 午後4時55分