rest HONDA CR-V 2020 (in English) Repair Manual
[x] Cancel search | Manufacturer: HONDA, Model Year: 2020, Model line: CR-V, Model: HONDA CR-V 2020Pages: 671, PDF Size: 33.11 MB
Page 516 of 671
uuWhen Driving uVehicle Stability AssistTM (VSA ®), aka Electronic Stability Control (ESC), System
514
Driving
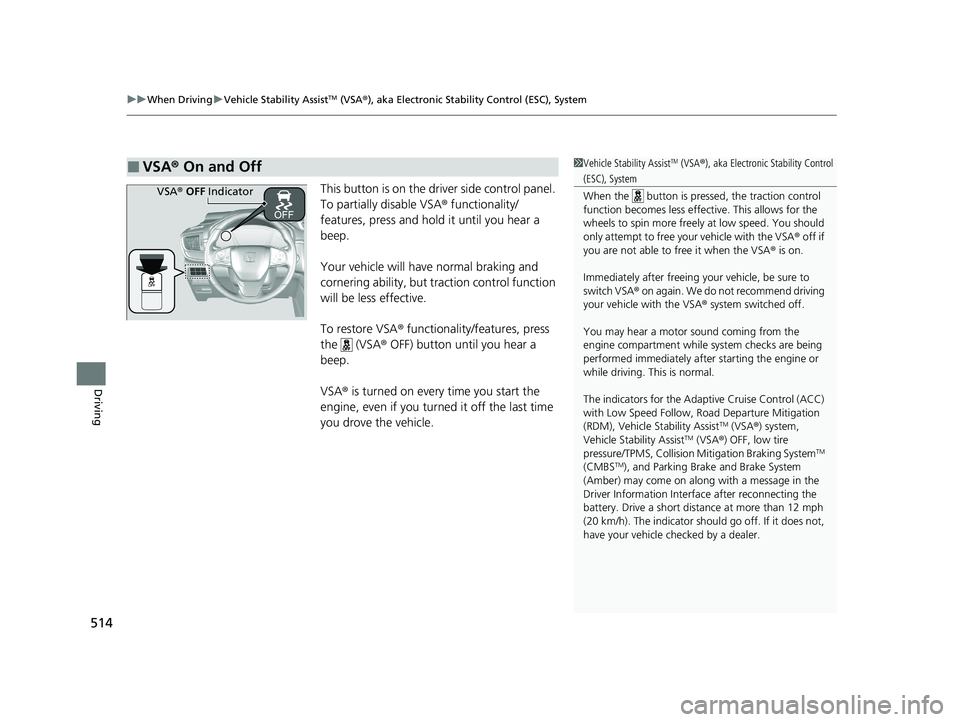
This button is on the driver side control panel.
To partially disable VSA ® functionality/
features, press and hold it until you hear a
beep.
Your vehicle will have normal braking and
cornering ability, but traction control function
will be less effective.
To restore VSA ® functionality/features, press
the (VSA ® OFF) button until you hear a
beep.
VSA ® is turned on every time you start the
engine, even if you turned it off the last time
you drove the vehicle.
■VSA ® On and Off1 Vehicle Stability AssistTM (VSA ®), aka Electronic Stability Control
(ESC), System
When the button is pressed, the traction control
function becomes less effective. This allows for the
wheels to spin more freely at low speed. You should
only attempt to free your vehicle with the VSA ® off if
you are not able to free it when the VSA ® is on.
Immediately after freeing your vehicle, be sure to
switch VSA ® on again. We do not recommend driving
your vehicle with the VSA ® system switched off.
You may hear a motor sound coming from the
engine compartment while system checks are being
performed immediately after starting the engine or
while driving. This is normal.
The indicators for the Adaptive Cruise Control (ACC)
with Low Speed Follow, Road Departure Mitigation
(RDM), Vehicle Stability Assist
TM (VSA ®) system,
Vehicle Stability AssistTM (VSA ®) OFF, low tire
pressure/TPMS, Collision Mitigation Braking SystemTM
(CMBSTM), and Parking Brake and Brake System
(Amber) may come on along with a message in the
Driver Information Interf ace after reconnecting the
battery. Drive a short distance at more than 12 mph
(20 km/h). The indicator shoul d go off. If it does not,
have your vehicle ch ecked by a dealer.
VSA® OFF Indicator
20 CR-V PET ELP_MAP_HMIN_HCM_J-31TLA6310.book 514 ページ 2019年10月3日 木曜日 午後4時55分
Page 522 of 671
uuWhen Driving uLaneWatchTM*
520
Driving
■Customizing the LaneWatch settings
You can customize the following items using the audio/information screen.
• Show with Turn Signal : Selects whether LaneWatch monitor comes on when
you operate the turn signal lever.
• Display Time after Turn Signal Off : Changes the remaining Lane Watch
display time after you pull the turn signal lever back.
• Reference Line : Selects whether the reference lines appear on the LaneWatch
monitor.
• Display : Adjusts display settings.
2Customized Features P. 360
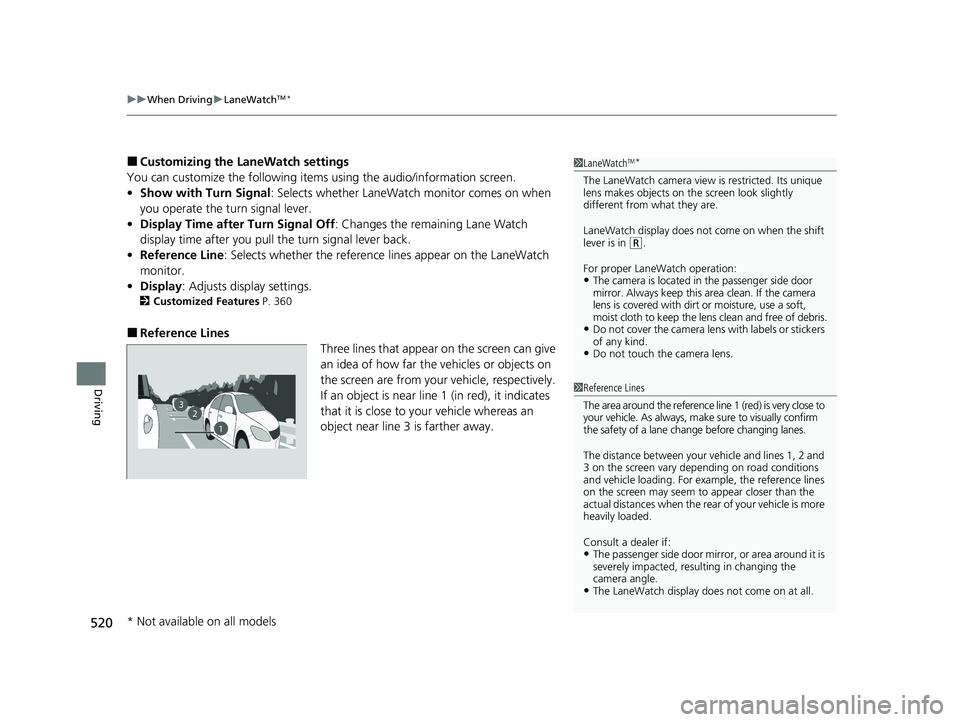
■Reference Lines
Three lines that appear on the screen can give
an idea of how far the vehicles or objects on
the screen are from your vehicle, respectively.
If an object is near line 1 (in red), it indicates
that it is close to your vehicle whereas an
object near line 3 is farther away.
1 LaneWatchTM*
The LaneWatch camera view is restricted. Its unique
lens makes objects on the screen look slightly
different from what they are.
LaneWatch display does not come on when the shift
lever is in
( R.
For proper LaneWatch operation:
•The camera is located in the passenger side door
mirror. Always keep this area clean. If the camera
lens is covered with dirt or moisture, use a soft,
moist cloth to keep the lens clean and free of debris.
•Do not cover the camera lens with labels or stickers
of any kind.
•Do not touch the camera lens.
23
1
1Reference Lines
The area around the reference line 1 (red) is very close to
your vehicle. As always, m ake sure to visually confirm
the safety of a lane chan ge before changing lanes.
The distance betwee n your vehicle and lines 1, 2 and
3 on the screen vary depending on road conditions
and vehicle loading. For ex ample, the reference lines
on the screen may seem to appear closer than the
actual distances when the rear of your vehicle is more
heavily loaded.
Consult a dealer if:
•The passenger side door mirr or, or area around it is
severely impacted, resulting in changing the
camera angle.
•The LaneWatch display doe s not come on at all.
* Not available on all models
20 CR-V PET ELP_MAP_HMIN_HCM_J-31TLA6310.book 520 ページ 2019年10月3日 木曜日 午後4時55分
Page 531 of 671
Continued529
uuBraking uBrake System
Driving
■Automatic parking brake feature operation
If the automatic parking brake feature has been activated:
• The parking brake is applied automatically when you turn the ignition switch to
LOCK
(0*1.
• To confirm that the parking brake is applied, check if the parking brake and brake
system indicator is on.
2 Activating and deactivating the automatic parking brake feature P. 530
■To release automatically
Use the accelerator pedal to release the parking brake when you are starting the
vehicle facing uphill, or in a traffic jam.
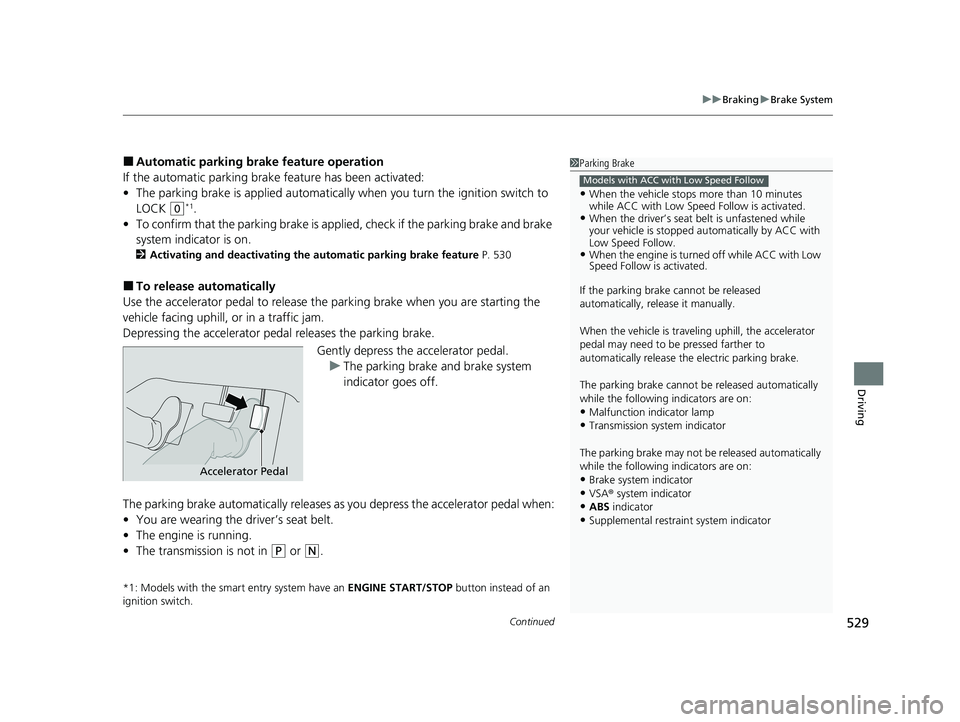
Depressing the accelerator pedal releases the parking brake.
Gently depress the accelerator pedal.u The parking brake and brake system
indicator goes off.
The parking brake automatically releases as you depress the accelerator pedal when:
• You are wearing the driver’s seat belt.
• The engine is running.
• The transmission is not in
(P or (N.
*1: Models with the smart entry system have an ENGINE START/STOP button instead of an
ignition switch.
1 Parking Brake
•When the vehicle stops more than 10 minutes
while ACC with Low Speed Follow is activated.
•When the driver’s seat belt is unfastened while
your vehicle is stopped au tomatically by ACC with
Low Speed Follow.
•When the engine is turned off while ACC with Low
Speed Follow is activated.
If the parking brake cannot be released
automatically, release it manually.
When the vehicle is travel ing uphill, the accelerator
pedal may need to be pressed farther to
automatically release the electric parking brake.
The parking brake cannot be released automatically
while the following indicators are on:
•Malfunction indicator lamp
•Transmission system indicator
The parking brake may not be released automatically
while the following indicators are on:
•Brake system indicator
•VSA® system indicator
•ABS indicator•Supplemental restraint system indicator
Models with ACC with Low Speed Follow
Accelerator Pedal
20 CR-V PET ELP_MAP_HMIN_HCM_J-31TLA6310.book 529 ページ 2019年10月3日 木曜日 午後4時55分
Page 533 of 671
Continued531
uuBraking uBrake System
Driving
Your vehicle is equipped with disc brakes at all four wheels. The brake assist system
increases the stopping force when you depress the brake pedal hard in an
emergency situation. The an ti-lock brake system (ABS) helps you retain steering
control when brak ing very hard.
2Brake Assist System P. 535
2 Anti-lock Brake System (ABS) P. 534
■Foot Brake1Foot Brake
Check the brakes after driving through deep water,
or if there is a buildup of road surface water. If
necessary, dry the brakes by lightly depressing the
pedal several times.
If you hear a continuous me tallic friction sound when
applying the brakes, this is caused by the brake wear
indicator rubbing on the brake rotor and indicates
that the brake pads need to be replaced. Have the
vehicle checked by a deal er. If you hear only an
occasional squeak or squeal when you initially apply
the brake pedal, this may be normal and caused by
high frequency vibr ation of the brake pads against
the rotating brake disc.
Constantly using the brake pedal while going down a
long hill builds up heat, which reduces the brake
effectiveness. Apply engine braking by taking your
foot off the accelerator pe dal and downshifting to a
lower gear/speed position. With manual transmission
use a lower gear for gr eater engine braking.
Do not rest your foot on the brake pedal while
driving, as it will lightly apply the brakes and cause
them to lose effectiveness over time and reduce pad
life. It will also conf use drivers behind you.
Whenever the brakes are activated by CMBS
TM or
another system that automa tically controls braking,
the brake pedal is depressed and released in
accordance with braking function.
20 CR-V PET ELP_MAP_HMIN_HCM_J-31TLA6310.book 531 ページ 2019年10月3日 木曜日 午後4時55分
Page 544 of 671
uuBraking uCollision Mitigation Braking SystemTM (CMBSTM)
542
Driving
The system may automatically shut off and the CMBSTM indicator will come on under
certain conditions. Some examples of th ese conditions are listed below. Other
conditions may reduce some of the CMBS
TM functions.
2 Front Sensor Camera P. 483
■Environmental conditions
• Driving in bad weather (rain, fog, snow, etc.).
• Sudden changes between light and dark, such as an entrance or exit of a tunnel.
• There is little contrast between objects and the background.
• Driving into low sunlight (e.g., at dawn or dusk).
• Strong light is reflected onto the roadway.
• Driving in the shadows of trees, buildings, etc.
• Roadway objects or structures are misint erpreted as vehicles and pedestrians.
• Reflections on the interior of the front windshield.
• Driving at night or in a dark place such as a tunnel (due to low-light conditions,
pedestrians or other vehicles may not be detected).
■Roadway conditions
• Driving on a snowy or wet roadway (obs cured lane marking, vehicle tracks,
reflected lights, road spray, high co ntrast on a snowy or wet roadway).
• Driving on curvy, winding, or undulating roads.
• The road is hilly or the vehicle is approaching the crest of a hill.
■CMBSTM Conditions and Limitations1CMBSTM Conditions and Limitations
Do not put a sticker on the radar sensor cover or
replace the radar sensor cover.
If you need the radar sensor to be repaired, or
removed, or the radar se nsor cover is strongly
impacted, turn off the system by pressing the
CMBS
TM off button and take your vehicle to a dealer.
20 CR-V PET ELP_MAP_HMIN_HCM_J-31TLA6310.book 542 ページ 2019年10月3日 木曜日 午後4時55分
Page 554 of 671
552
Driving
Multi-View Rear Camera
About Your Multi-View Rear Camera
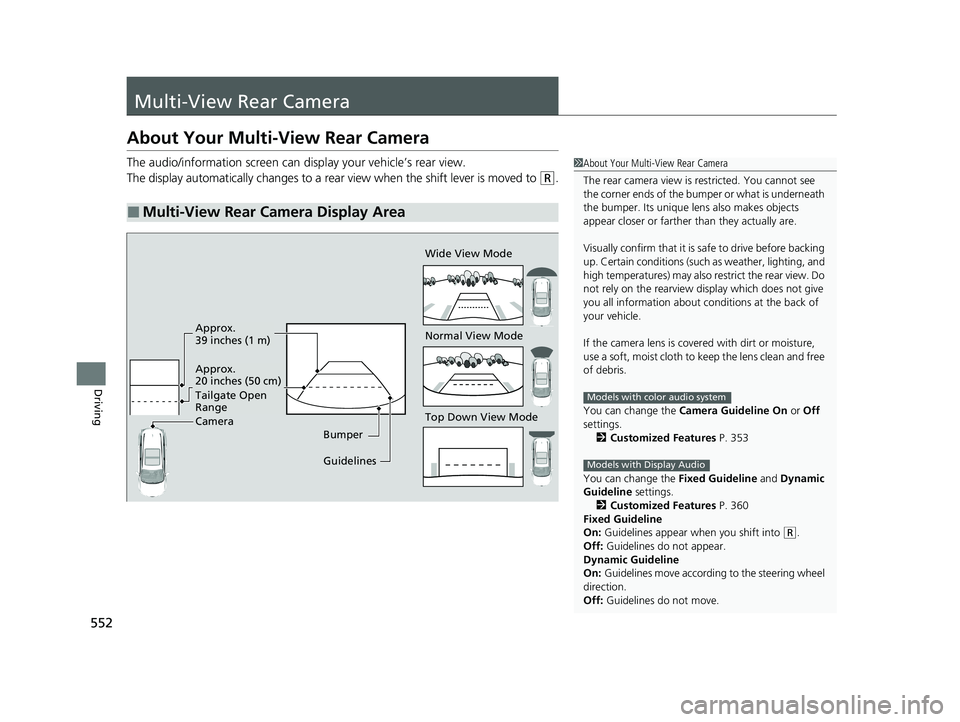
The audio/information screen can display your vehicle’s rear view.
The display automatically changes to a rear view when the shift lever is moved to
(R.
■Multi-View Rear Camera Display Area
1About Your Multi-View Rear Camera
The rear camera view is restricted. You cannot see
the corner ends of the bumper or what is underneath
the bumper. Its unique le ns also makes objects
appear closer or farther than they actually are.
Visually confirm that it is safe to drive before backing
up. Certain conditions (such as weather, lighting, and
high temperatures) may also restrict the rear view. Do
not rely on the rearview display which does not give
you all information about conditions at the back of
your vehicle.
If the camera lens is cove red with dirt or moisture,
use a soft, moist cloth to keep the lens clean and free
of debris.
You can change the Camera Guideline On or Off
settings. 2 Customized Features P. 353
You can change the Fixed Guideline and Dynamic
Guideline settings.
2 Customized Features P. 360
Fixed Guideline
On: Guidelines appear when you shift into
(R.
Off: Guidelines do not appear.
Dynamic Guideline
On: Guidelines move accordi ng to the steering wheel
direction.
Off: Guidelines do not move.
Models with color audio system
Models with Display AudioGuidelines Bumper Wide View Mode
Normal View Mode
Top Down View Mode
Approx.
39 inches (1 m)
Approx.
20 inches (50 cm)
Tailgate Open
Range
Camera
20 CR-V PET ELP_MAP_HMIN_HCM_J-31TLA6310.book 552 ページ 2019年10月3日 木曜日 午後4時55分
Page 560 of 671
558
Driving
Turbo Engine Vehicle
Handling Precautions
The turbocharger is a high-precision device to obtain greater horsepower by
delivering a large volume of compressed air into the engine using a turbine driven by
the engine's exhaust gas pressure.
• When the engine is cold just after starting, avoid revving the engine or sudden
acceleration.
• Always replace the engine oil and engine oil filter according to the Maintenance
Minder. The turbine rotates at very high speeds over 100,000 rpm and its
temperature reaches over 1,292°F (700°C). It is lubricated and cooled by engine
oil. If you fail to replace the engine oil and filter at the scheduled distance or
interval, deteriorated engine oil may caus e failure such as sticking and abnormal
noise of the turbine bearing.1 Turbo Engine Vehicle
The scheduled maintenance intervals for replacing
the filter is indicated on the driver information
interface. Follow the information of when to replace
them. 2 Maintenance Minder
TM P. 563
The temperature gauge pointer is at the mark
when you restart the engi ne after driving under high
load conditions such as at high speed or in hilly
terrain. This is normal. The gauge goes down after
you idle or drive the vehi cle for about one minute.
H
20 CR-V PET ELP_MAP_HMIN_HCM_J-31TLA6310.book 558 ページ 2019年10月3日 木曜日 午後4時55分
Page 618 of 671
uuIf a Tire Goes Flat uChanging a Flat Tire
616
Handling the Unexpected
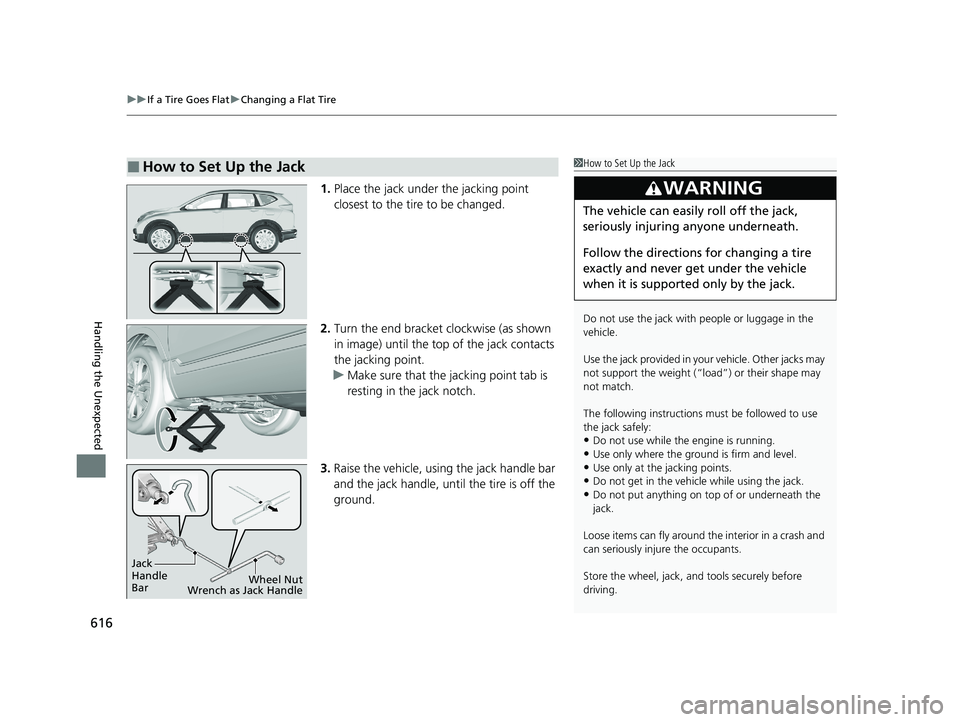
1. Place the jack under the jacking point
closest to the tire to be changed.
2. Turn the end bracket clockwise (as shown
in image) until the top of the jack contacts
the jacking point.
u Make sure that the jacking point tab is
resting in the jack notch.
3. Raise the vehicle, using the jack handle bar
and the jack handle, until the tire is off the
ground.
■How to Set Up the Jack1How to Set Up the Jack
Do not use the jack with people or luggage in the
vehicle.
Use the jack provided in yo ur vehicle. Other jacks may
not support the weight (“load”) or their shape may
not match.
The following instructions must be followed to use
the jack safely:
•Do not use while the engine is running.
•Use only where the ground is firm and level.
•Use only at the jacking points.•Do not get in the vehicl e while using the jack.
•Do not put anything on top of or underneath the
jack.
Loose items can fly around the interior in a crash and
can seriously inju re the occupants.
Store the wheel, jack, a nd tools securely before
driving.
3WARNING
The vehicle can easily roll off the jack,
seriously injuring anyone underneath.
Follow the directions for changing a tire
exactly and never get under the vehicle
when it is supported only by the jack.
Jack
Handle
Bar Wheel Nut
Wrench as Jack Handle
20 CR-V PET ELP_MAP_HMIN_HCM_J-31TLA6310.book 616 ページ 2019年10月3日 木曜日 午後4時55分
Page 630 of 671
uuOverheating uHow to Handle Overheating
628
Handling the Unexpected
■Next thing to do
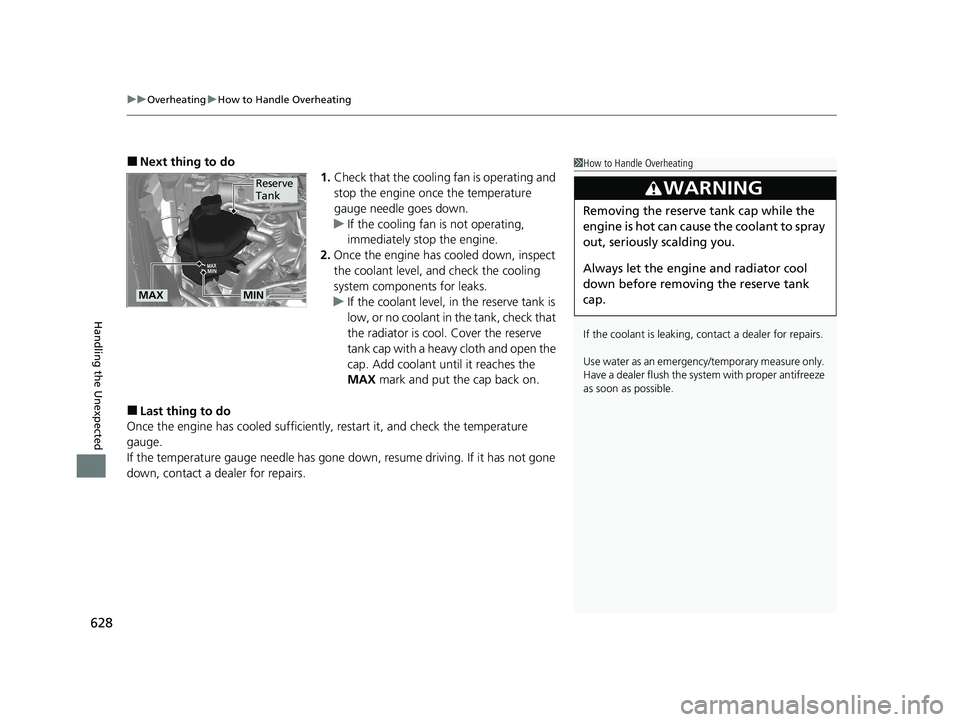
1.Check that the cooling fan is operating and
stop the engine once the temperature
gauge needle goes down.
u If the cooling fan is not operating,
immediately stop the engine.
2. Once the engine has cooled down, inspect
the coolant level, an d check the cooling
system components for leaks.
u If the coolant level, in the reserve tank is
low, or no coolant in the tank, check that
the radiator is cool . Cover the reserve
tank cap with a hea vy cloth and open the
cap. Add coolant until it reaches the
MAX mark and put the cap back on.
■Last thing to do
Once the engine has cooled sufficiently , restart it, and check the temperature
gauge.
If the temperature gauge needle has gone do wn, resume driving. If it has not gone
down, contact a dealer for repairs.
1 How to Handle Overheating
If the coolant is leaking, contact a dealer for repairs.
Use water as an emergency/temporary measure only.
Have a dealer flush the system with proper antifreeze
as soon as possible.
3WARNING
Removing the reserve tank cap while the
engine is hot can cause the coolant to spray
out, seriously scalding you.
Always let the engine and radiator cool
down before removing the reserve tank
cap.
Reserve
Tank
MAXMIN
20 CR-V PET ELP_MAP_HMIN_HCM_J-31TLA6310.book 628 ページ 2019年10月3日 木曜日 午後4時55分
Page 631 of 671
629
Handling the Unexpected
Indicator, Coming On/Blinking
If the Low Oil Pressure Indicator Comes On
■Reasons for the indicator to come on
Comes on when the engine oil pressure is low.
■What to do as soon as the indicator comes on
1. Immediately park the vehicle on level ground in a safe place.
2. If necessary, turn the hazard warning lights on.
■What to do after parking the vehicle
1. Stop the engine and let it sit for about three minutes.
2. Open the hood and check the oil level.
2 Oil Check P. 572
3.Start the engine and check th e low oil pressure indicator.
u The indicator goes off: Start driving again.
u The indicator does not go off within 10 seconds: Stop the engine
and contact a dealer for repairs immediately.
If the Charging System Indicator Comes On
■Reasons for the indicator to come on
Comes on when the battery is not being charged.
■What to do when th e indicator comes on
Turn off the climate control system, rear defogger, and other electrical
systems. Immediately cont act a dealer for repairs.
1If the Low Oil Pressure Indicator Comes On
NOTICE
Running the engine with low oil pressure can cause
serious mechanical damage almost immediately.
1If the Charging System Indicator Comes On
If you need to stop temporarily, do not turn off the
engine. Restarting the engi ne may rapidly discharge
the battery.
20 CR-V PET ELP_MAP_HMIN_HCM_J-31TLA6310.book 629 ページ 2019年10月3日 木曜日 午後4時55分