HONDA CROSSTOUR 2014 1.G Owners Manual
Manufacturer: HONDA, Model Year: 2014, Model line: CROSSTOUR, Model: HONDA CROSSTOUR 2014 1.GPages: 573, PDF Size: 21.2 MB
Page 161 of 573
uuClimate Control System
*uUsing Automatic Climate Control
160Controls
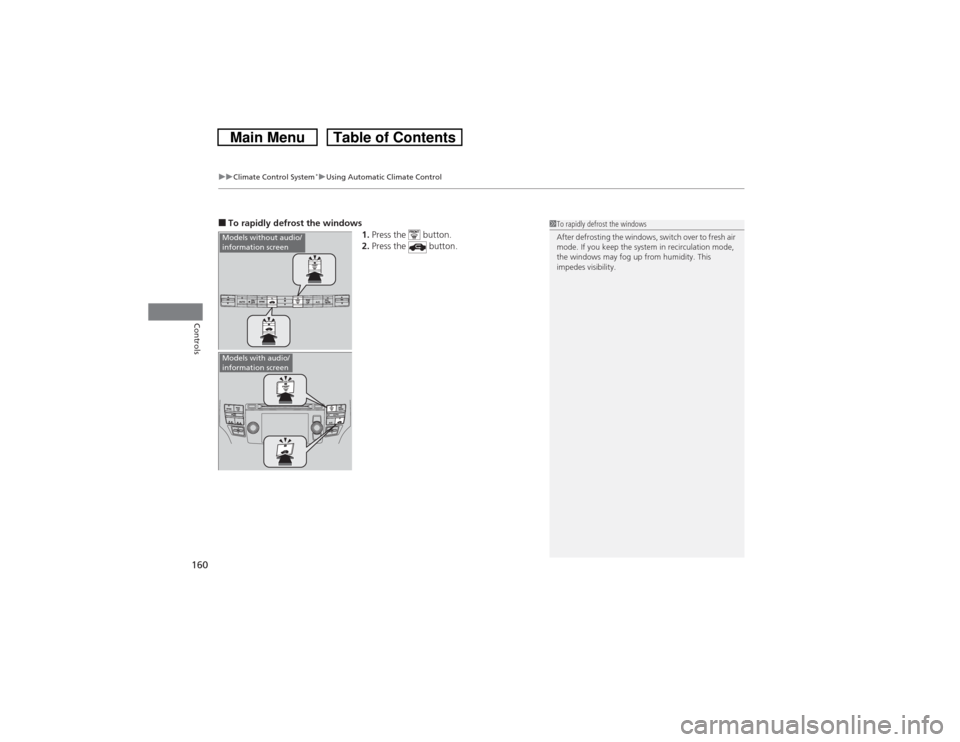
■To rapidly defrost the windows
1.Press the button.
2.Press the button.Models without audio/
information screenModels with audio/
information screen
1To rapidly defrost the windows
After defrosting the windows, switch over to fresh air
mode. If you keep the system in recirculation mode,
the windows may fog up from humidity. This
impedes visibility.
Page 162 of 573
161
uuClimate Control System
*uSynchronized Mode
Controls
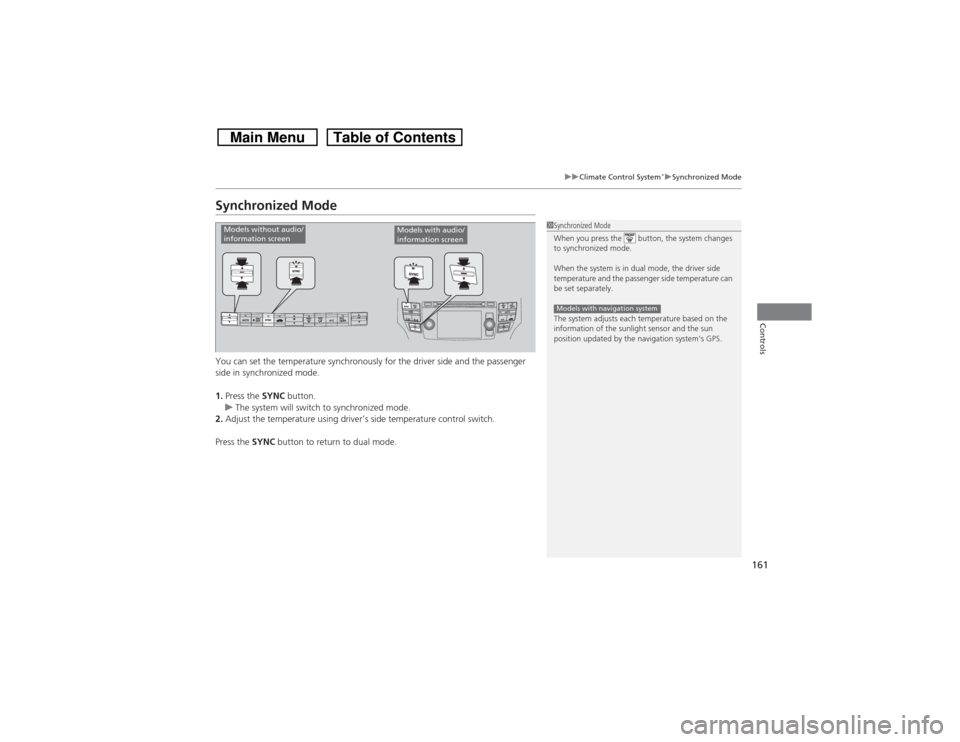
Synchronized ModeYou can set the temperature synchronously for the driver side and the passenger
side in synchronized mode.
1.Press the SYNC button.
uThe system will switch to synchronized mode.
2.Adjust the temperature using driver’s side temperature control switch.
Press the SYNC button to return to dual mode.
1Synchronized Mode
When you press the button, the system changes
to synchronized mode.
When the system is in dual mode, the driver side
temperature and the passenger side temperature can
be set separately.
The system adjusts each temperature based on the
information of the sunlight sensor and the sun
position updated by the navigation system’s GPS.Models with navigation system
Models without audio/
information screen
Models with audio/
information screen
Page 163 of 573
162
uuClimate Control System
*uAutomatic Climate Control Sensors
Controls
Automatic Climate Control Sensors
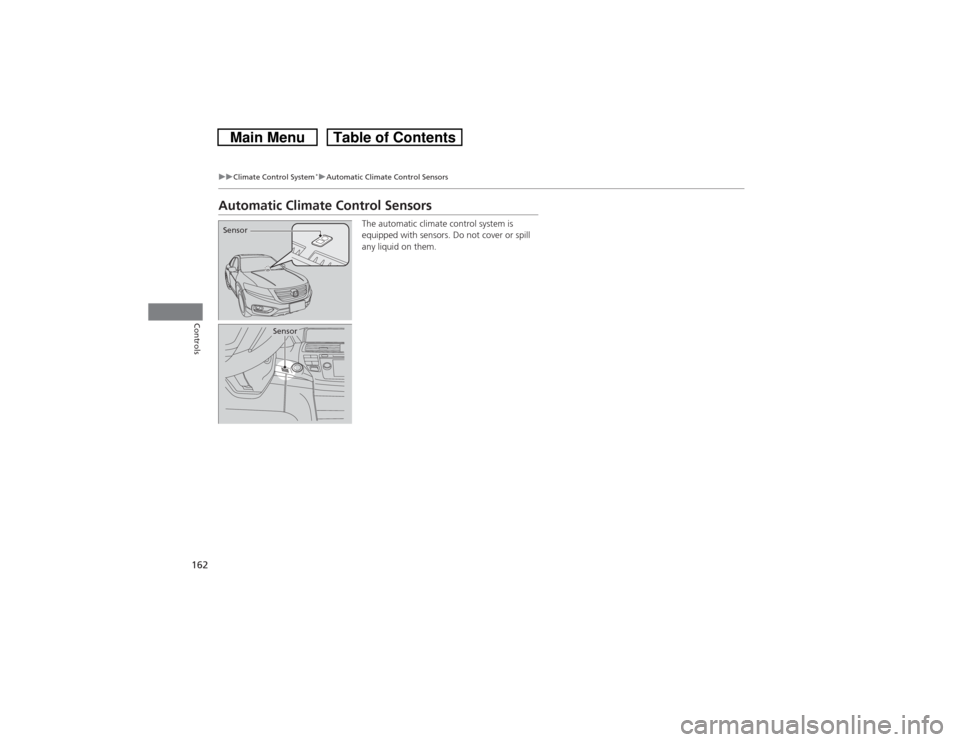
The automatic climate control system is
equipped with sensors. Do not cover or spill
any liquid on them.
Sensor
Sensor
Page 164 of 573
163
Features
This chapter describes how to operate technology features.
Audio System
About Your Audio System................ 164
USB Adapter Cable .......................... 165
Auxiliary Input Jack .......................... 165
Audio System Theft Protection ......... 166
Region Setting
*............................... 167
Audio Remote Controls.................... 168
Audio System Basic Operation........ 169
Audio System Basic Operation........ 182
Models without navigation systemAudio system without touch screenAudio system with touch screen
Audio System Basic Operation........ 215
Audio Error Messages...................... 268
General Information on the Audio
System............................................. 276
Customized Features
*...................... 281
HomeLink® Universal Transceiver
*.. 318
Bluetooth
® HandsFreeLink
®....320
, 332, 367
Compass
*.................................. 405, 407
Models with navigation system
* Not available on all models
Page 165 of 573
164Features
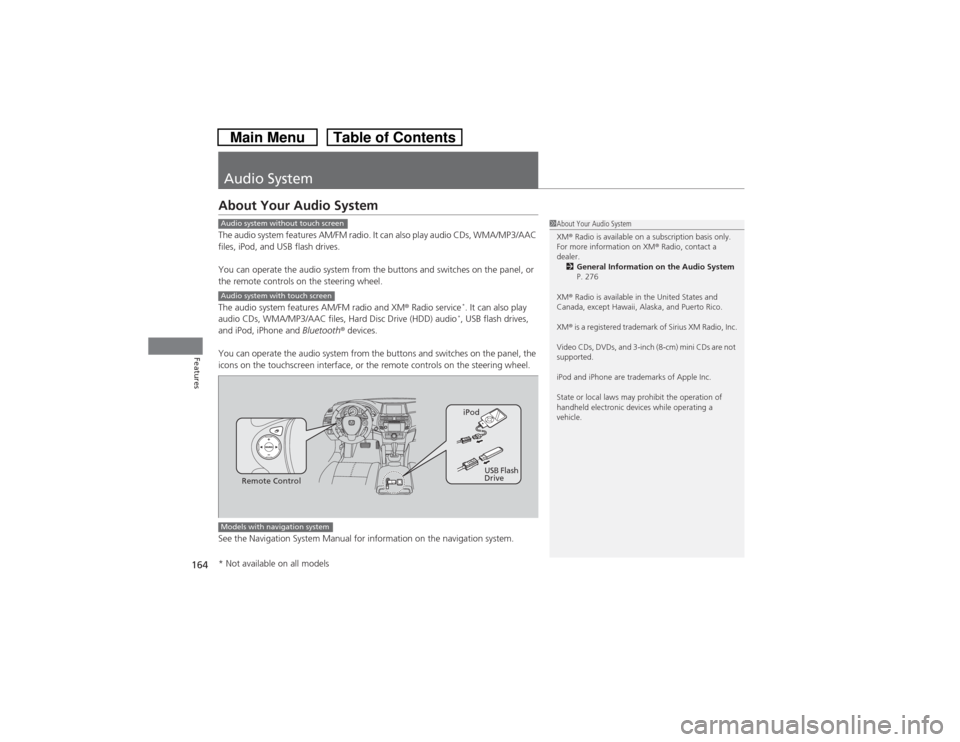
Audio SystemAbout Your Audio SystemThe audio system features AM/FM radio. It can also play audio CDs, WMA/MP3/AAC
files, iPod, and USB flash drives.
You can operate the audio system from the buttons and switches on the panel, or
the remote controls on the steering wheel.
The audio system features AM/FM radio and XM® Radio service
*. It can also play
audio CDs, WMA/MP3/AAC files, Hard Disc Drive (HDD) audio*, USB flash drives,
and iPod, iPhone and Bluetooth® devices.
You can operate the audio system from the buttons and switches on the panel, the
icons on the touchscreen interface, or the remote controls on the steering wheel.
See the Navigation System Manual for information on the navigation system.
1About Your Audio System
XM® Radio is available on a subscription basis only.
For more information on XM® Radio, contact a
dealer.
2General Information on the Audio System
P. 276
XM® Radio is available in the United States and
Canada, except Hawaii, Alaska, and Puerto Rico.
XM® is a registered trademark of Sirius XM Radio, Inc.
Video CDs, DVDs, and 3-inch (8-cm) mini CDs are not
supported.
iPod and iPhone are trademarks of Apple Inc.
State or local laws may prohibit the operation of
handheld electronic devices while operating a
vehicle.
Audio system without touch screenAudio system with touch screen
Remote ControliPod
USB Flash
Drive
Models with navigation system* Not available on all models
Page 166 of 573
165
uuAudio SystemuUSB Adapter Cable
Features
USB Adapter Cable
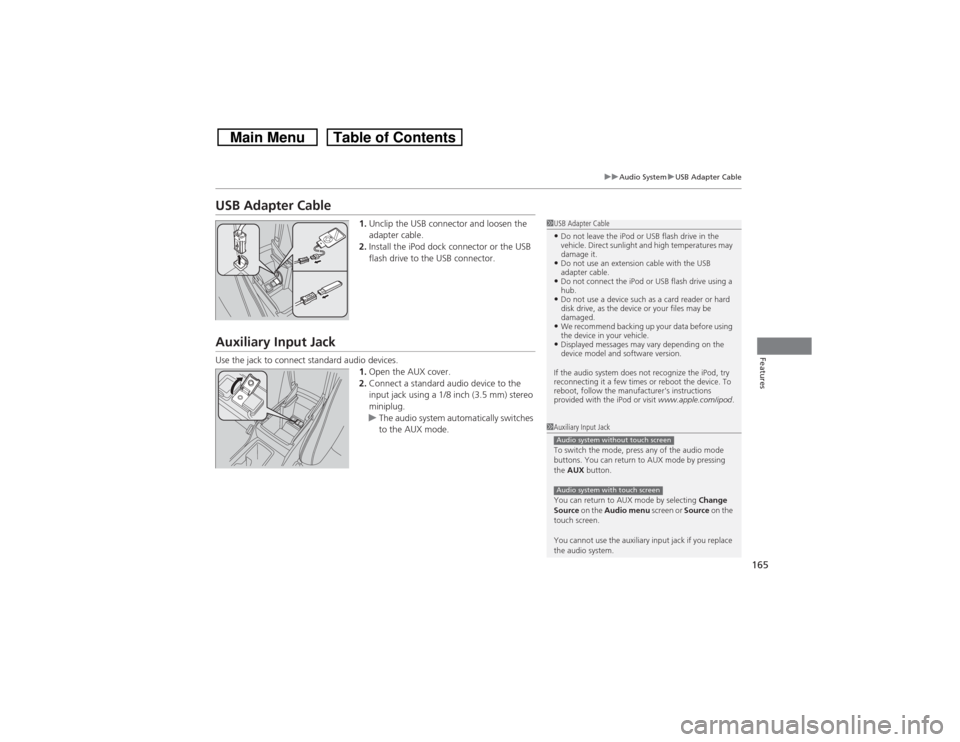
1.Unclip the USB connector and loosen the
adapter cable.
2.Install the iPod dock connector or the USB
flash drive to the USB connector.
Auxiliary Input JackUse the jack to connect standard audio devices.
1.Open the AUX cover.
2.Connect a standard audio device to the
input jack using a 1/8 inch (3.5 mm) stereo
miniplug.
uThe audio system automatically switches
to the AUX mode.
1USB Adapter Cable•Do not leave the iPod or USB flash drive in the
vehicle. Direct sunlight and high temperatures may
damage it.•Do not use an extension cable with the USB
adapter cable.•Do not connect the iPod or USB flash drive using a
hub.•Do not use a device such as a card reader or hard
disk drive, as the device or your files may be
damaged.•We recommend backing up your data before using
the device in your vehicle.•Displayed messages may vary depending on the
device model and software version.
If the audio system does not recognize the iPod, try
reconnecting it a few times or reboot the device. To
reboot, follow the manufacturer's instructions
provided with the iPod or visit www.apple.com/ipod.
1Auxiliary Input Jack
To switch the mode, press any of the audio mode
buttons. You can return to AUX mode by pressing
the AUX button.
You can return to AUX mode by selecting Change
Source on the Audio menu screen or Source on the
touch screen.
You cannot use the auxiliary input jack if you replace
the audio system.Audio system without touch screenAudio system with touch screen
Page 167 of 573
166
uuAudio SystemuAudio System Theft Protection
Features
Audio System Theft ProtectionThe audio system is disabled when it is disconnected from the power source, such as
when the battery is disconnected or goes dead.■Reactivating the audio system
1.Turn the ignition switch to ON
(w, and turn on the audio system.
uIf you turn the ignition switch to ACCESSORY
(q, you will be requested to
enter the audio security code.
2.Enter the audio security code using the preset buttons.
1.Turn the ignition switch to ON
(w*1, and turn on the audio system.
uIf you turn the ignition switch to ACCESSORY
(q*1, you will be requested to
enter the audio security code. See step 3.
2.Press and hold the VOL/ (power/volume) button again for more than two
seconds.
uThe audio system is reactivated when the system’s control unit recognizes that
the system is in your vehicle.
If the control unit fails to recognize, Enter code/Enter PIN appears on the
audio/information screen.
3.If the two steps do not work, you can enter the audio security code using the
touch screen.
If you enter an incorrect digit, continue to the last digit, then try again. If you do not
enter the code correctly after 10 tries, leave the system for one hour before trying
again, or visit a dealer to have the system reset.
*1: Models with the smart entry system have an ENGINE START/STOP button instead of an
ignition switch.
1Audio System Theft Protection
Find the audio system’s security code and serial
number label in your owner’s manual kit.
We recommend that you write down the serial
number in this owner’s manual.
Do not store the label in your vehicle. If you lose the
label, you must first retrieve the serial number, and
then obtain the code.
You can find out about your serial number and
security code from a dealer.
You can register the security code at Honda Owners
(owners.honda.com.), and find information on how
to retrieve the serial number and obtain the code at
radio-navicode.honda.com.U.S. models
Audio system without touch screenAudio system with touch screenAll models
Page 168 of 573
167
uuAudio SystemuRegion Setting
*
Features
Region Setting
*
The audio system’s region setting will be lost when the battery is disconnected or
goes dead.
If the Region Select screen appears, you need to set the region for the audio
system. Follow the steps below:
1.Press to select OK.
2.Rotate to select the region you live in, then press .
3.You will receive a confirmation message on the screen. Rotate to select Yes,
then press .
1Region Setting
*
The region setting is required only when the battery
power is temporarily disconnected. It has been
usually set to your vehicle’s region type beforehand.
You cannot change the setting once you have
completed the setting procedure. Contact a dealer if
you selected an incorrect region.
These indications are used to show how to operate
the MENU/SEL (Selector) knob or the interface dial.
Rotate to select.
Press to enter.
* Not available on all models
Page 169 of 573
168
uuAudio SystemuAudio Remote Controls
Features
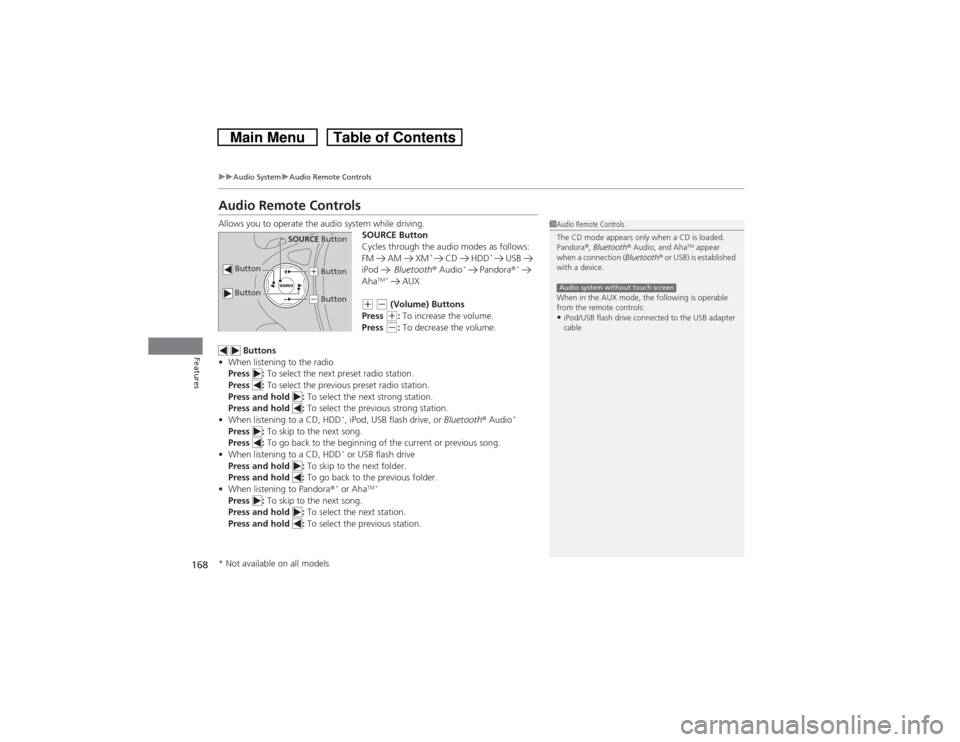
Audio Remote ControlsAllows you to operate the audio system while driving.
SOURCE Button
Cycles through the audio modes as follows:
FM AM XM
*
CD HDD
*
USB
iPod Bluetooth® Audio
* Pandora®
*
Aha
TM * AUX
(+ (- (Volume) Buttons
Press (+: To increase the volume.
Press (-: To decrease the volume.
Buttons
•When listening to the radio
Press : To select the next preset radio station.
Press : To select the previous preset radio station.
Press and hold : To select the next strong station.
Press and hold : To select the previous strong station.
•When listening to a CD, HDD
*, iPod, USB flash drive, or Bluetooth® Audio
*
Press : To skip to the next song.
Press : To go back to the beginning of the current or previous song.
•When listening to a CD, HDD
* or USB flash drive
Press and hold : To skip to the next folder.
Press and hold : To go back to the previous folder.
•When listening to Pandora®* or Aha
TM *
Press : To skip to the next song.
Press and hold : To select the next station.
Press and hold : To select the previous station.
1Audio Remote Controls
The CD mode appears only when a CD is loaded.
Pandora®, Bluetooth® Audio, and Aha
TM appear
when a connection (Bluetooth® or USB) is established
with a device.
When in the AUX mode, the following is operable
from the remote controls:
•iPod/USB flash drive connected to the USB adapter
cableAudio system without touch screen
Button
SOURCE Button
Button
(+ Button(- Button
* Not available on all models
Page 170 of 573
169Features
Audio System Basic OperationTo use the audio system function, the ignition switch must be in ACCESSORY
(q or
ON
(w.
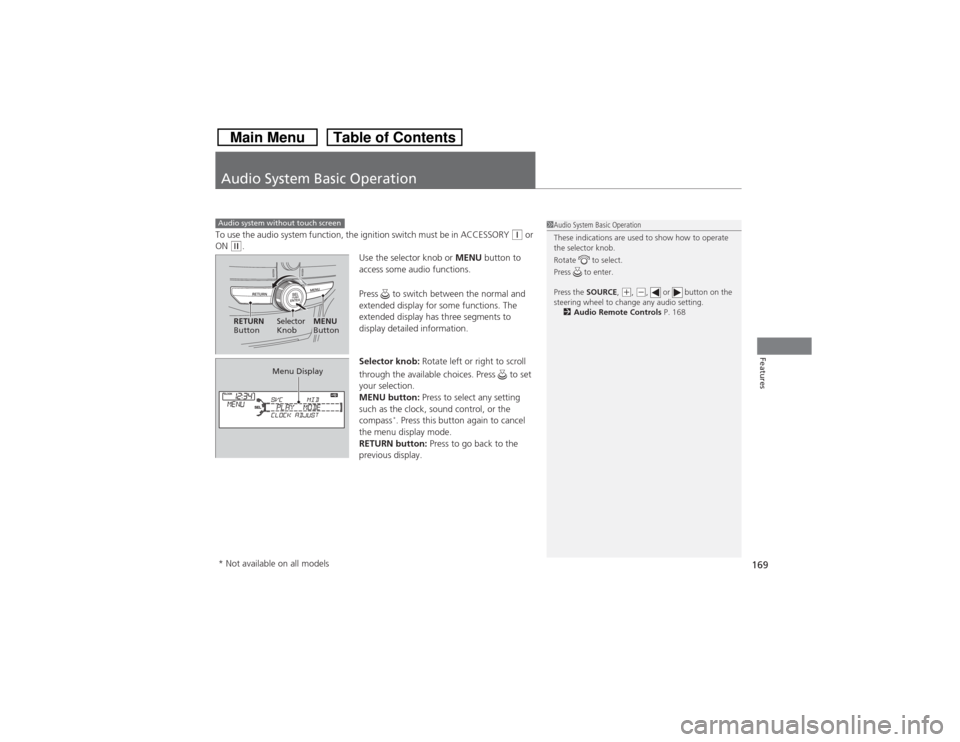
Use the selector knob or MENU button to
access some audio functions.
Press to switch between the normal and
extended display for some functions. The
extended display has three segments to
display detailed information.
Selector knob: Rotate left or right to scroll
through the available choices. Press to set
your selection.
MENU button: Press to select any setting
such as the clock, sound control, or the
compass
*. Press this button again to cancel
the menu display mode.
RETURN button: Press to go back to the
previous display.
Audio system without touch screen
1Audio System Basic Operation
These indications are used to show how to operate
the selector knob.
Rotate to select.
Press to enter.
Press the SOURCE,
(+, (-, or button on the
steering wheel to change any audio setting.
2Audio Remote Controls P. 168
RETURN
ButtonSelector
Knob
MENU
Button
Menu Display
* Not available on all models