HONDA CROSSTOUR 2014 1.G Owners Manual
Manufacturer: HONDA, Model Year: 2014, Model line: CROSSTOUR, Model: HONDA CROSSTOUR 2014 1.GPages: 573, PDF Size: 21.2 MB
Page 311 of 573
310
uuCustomized Features
*u
Features
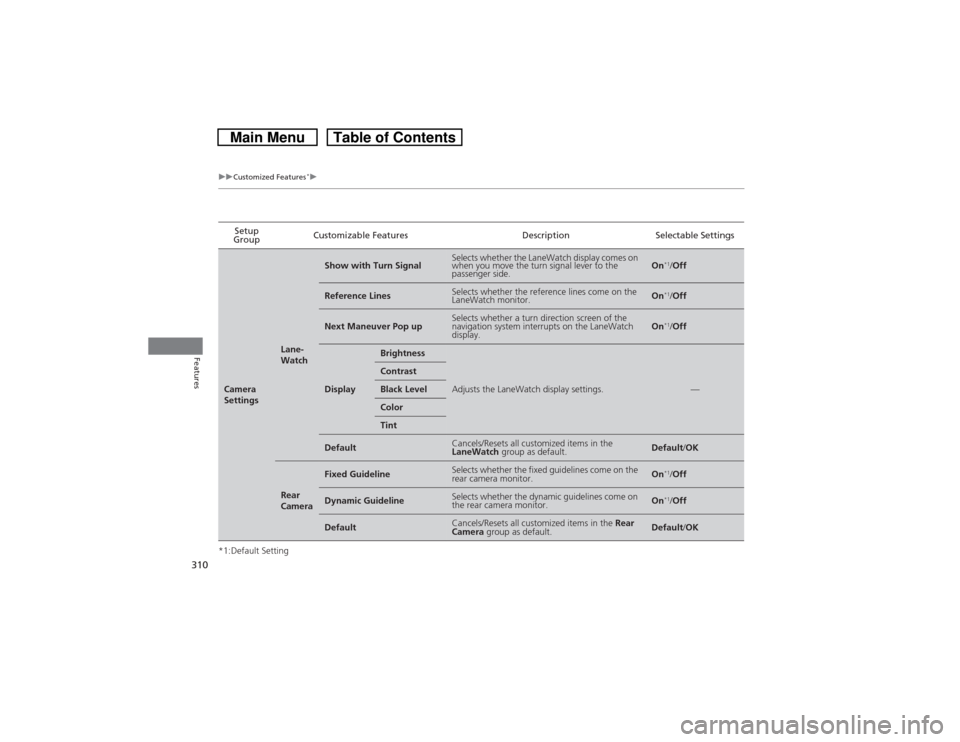
*1:Default SettingSetup
GroupCustomizable Features Description Selectable SettingsCamera
Settings
Lane-
Watch
Show with Turn Signal
Selects whether the LaneWatch display comes on
when you move the turn signal lever to the
passenger side.
On
*1/Off
Reference Lines
Selects whether the reference lines come on the
LaneWatch monitor.
On
*1/Off
Next Maneuver Pop up
Selects whether a turn direction screen of the
navigation system interrupts on the LaneWatch
display.
On
*1/Off
Display
Brightness
Adjusts the LaneWatch display settings.
—
ContrastBlack LevelColorTint
Default
Cancels/Resets all customized items in the
LaneWatch group as default.
Default/OK
Rear
Camera
Fixed Guideline
Selects whether the fixed guidelines come on the
rear camera monitor.
On
*1/Off
Dynamic Guideline
Selects whether the dynamic guidelines come on
the rear camera monitor.
On
*1/Off
Default
Cancels/Resets all customized items in the Rear
Camera group as default.
Default/OK
Page 312 of 573
311
uuCustomized Features
*u
Continued
Features
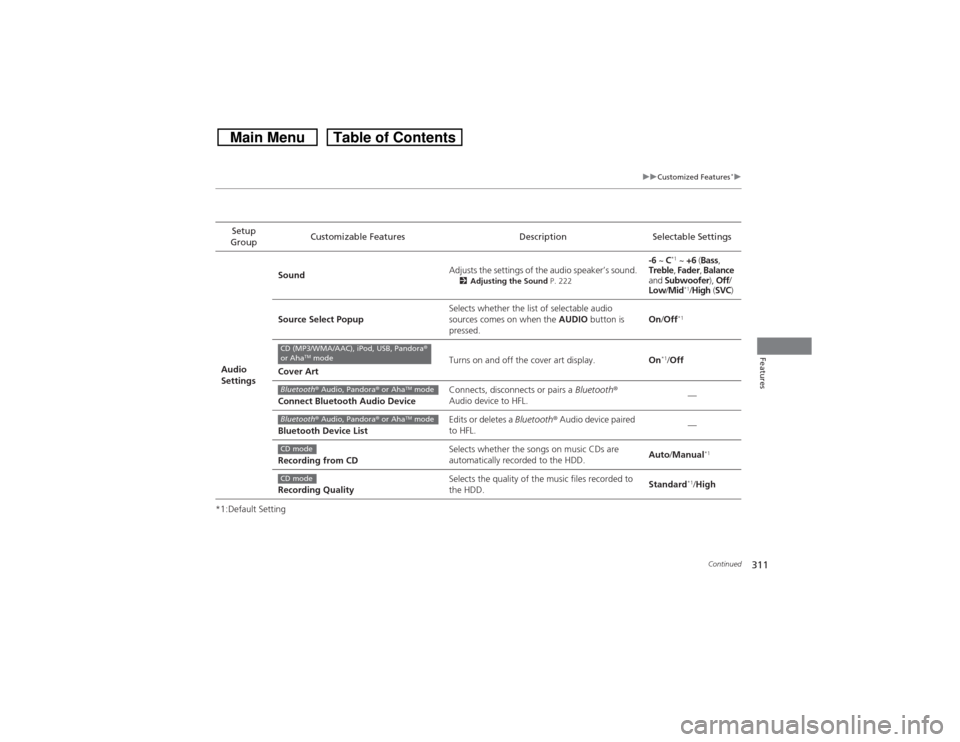
*1:Default SettingSetup
GroupCustomizable Features Description Selectable Settings
Audio
SettingsSoundAdjusts the settings of the audio speaker’s sound.
2Adjusting the Sound P. 222
-6 ~ C
*1 ~ +6 (Bass,
Treble, Fader, Balance
and Subwoofer), Off/
Low/Mid*1/High (SVC)
Source Select PopupSelects whether the list of selectable audio
sources comes on when the AUDIO button is
pressed.On/Off*1
Cover ArtTurns on and off the cover art display.On
*1/Off
Connect Bluetooth Audio DeviceConnects, disconnects or pairs a Bluetooth®
Audio device to HFL.—
Bluetooth Device ListEdits or deletes a Bluetooth® Audio device paired
to HFL.—
Recording from CDSelects whether the songs on music CDs are
automatically recorded to the HDD.Auto/Manual
*1
Recording QualitySelects the quality of the music files recorded to
the HDD.Standard
*1/High
CD (MP3/WMA/AAC), iPod, USB, Pandora®
or Aha
TM mode
Bluetooth® Audio, Pandora® or Aha
TM mode
Bluetooth® Audio, Pandora® or Aha
TM mode
CD modeCD mode
Page 313 of 573
312
uuCustomized Features
*u
Features
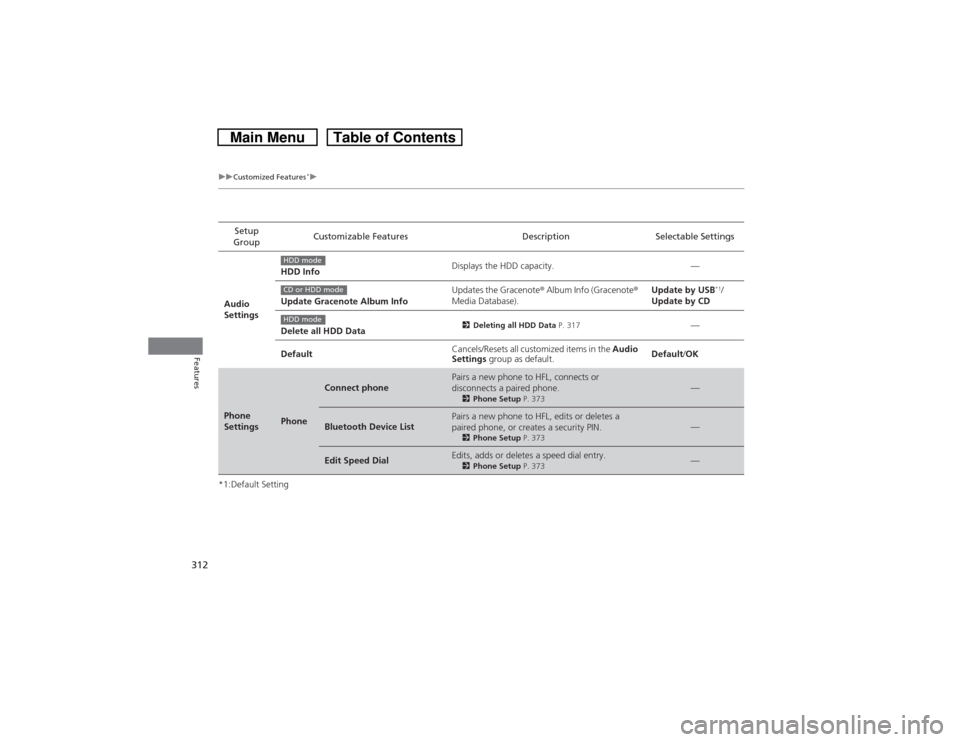
*1:Default SettingSetup
GroupCustomizable Features Description Selectable Settings
Audio
SettingsHDD InfoDisplays the HDD capacity. —
Update Gracenote Album InfoUpdates the Gracenote® Album Info (Gracenote®
Media Database).Update by USB
*1/
Update by CD
Delete all HDD Data
2Deleting all HDD Data P. 317
—
DefaultCancels/Resets all customized items in the Audio
Settings group as default.Default/OK
Phone
Settings
Phone
Connect phone
Pairs a new phone to HFL, connects or
disconnects a paired phone.2Phone Setup P. 373
—
Bluetooth Device List
Pairs a new phone to HFL, edits or deletes a
paired phone, or creates a security PIN.2Phone Setup P. 373
—
Edit Speed Dial
Edits, adds or deletes a speed dial entry.2Phone Setup P. 373
—
HDD modeCD or HDD modeHDD mode
Page 314 of 573
313
uuCustomized Features
*u
Continued
Features
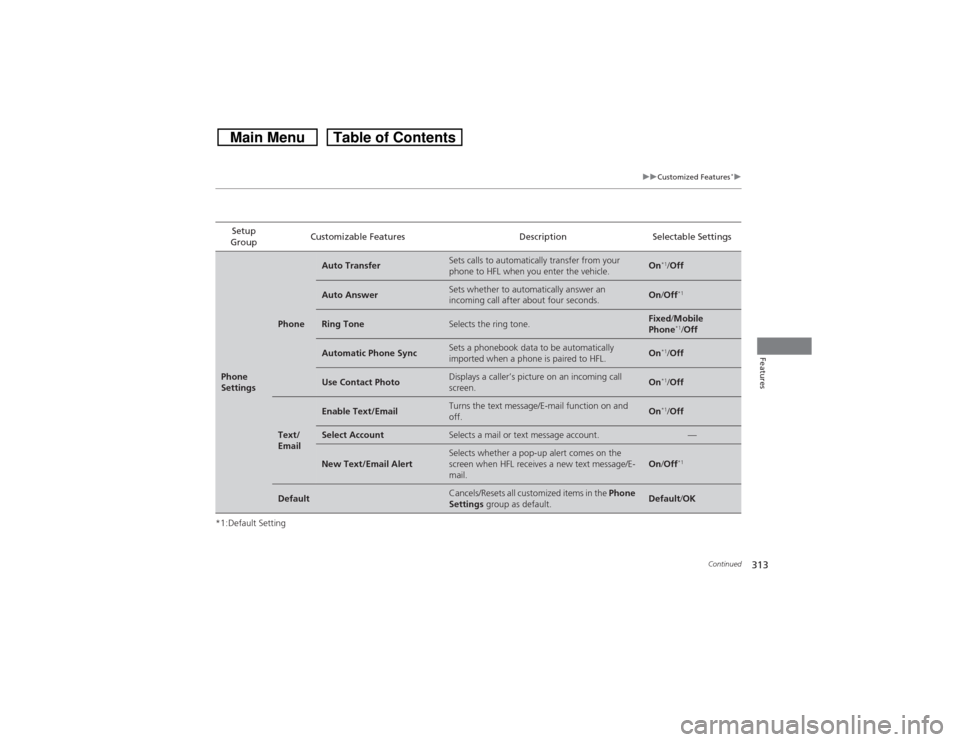
*1:Default SettingSetup
GroupCustomizable Features Description Selectable SettingsPhone
Settings
Phone
Auto Transfer
Sets calls to automatically transfer from your
phone to HFL when you enter the vehicle.
On
*1/Off
Auto Answer
Sets whether to automatically answer an
incoming call after about four seconds.
On/Off
*1
Ring Tone
Selects the ring tone.
Fixed/Mobile
Phone
*1/Off
Automatic Phone Sync
Sets a phonebook data to be automatically
imported when a phone is paired to HFL.
On
*1/Off
Use Contact Photo
Displays a caller’s picture on an incoming call
screen.
On
*1/Off
Text/
Email
Enable Text/Email
Turns the text message/E-mail function on and
off.
On
*1/Off
Select Account
Selects a mail or text message account.
—
New Text/Email Alert
Selects whether a pop-up alert comes on the
screen when HFL receives a new text message/E-
mail.
On/Off
*1
Default
Cancels/Resets all customized items in the Phone
Settings group as default.
Default/OK
Page 315 of 573
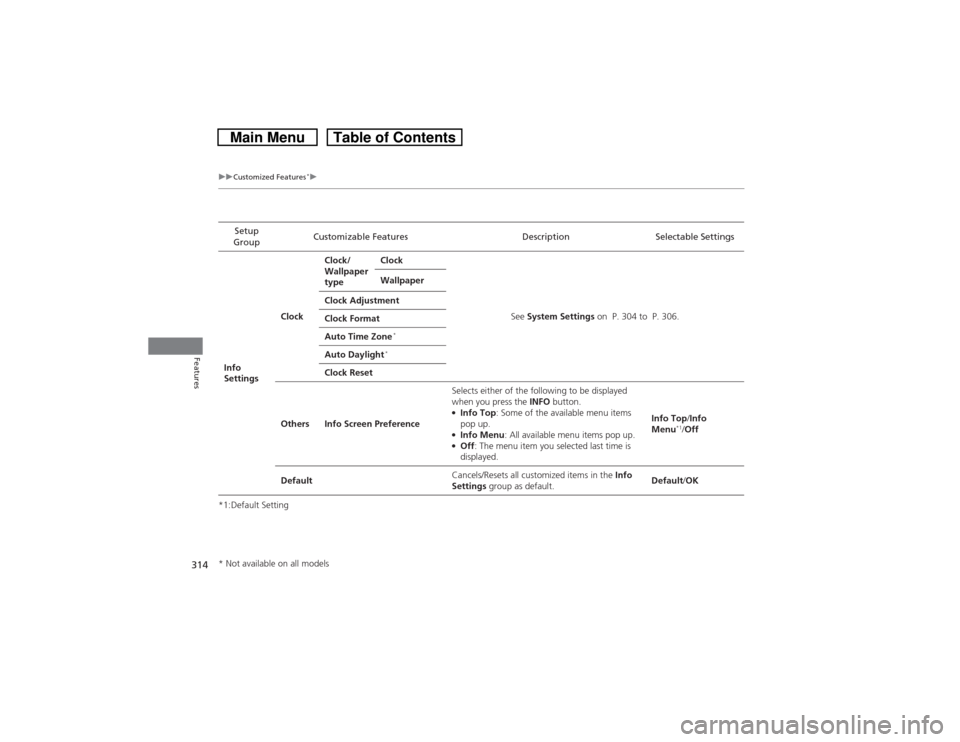
314
uuCustomized Features
*u
Features
*1:Default SettingSetup
GroupCustomizable Features Description Selectable Settings
Info
SettingsClockClock/
Wallpaper
typeClock
See System Settings on P. 304 to P. 306. Wallpaper
Clock Adjustment
Clock Format
Auto Time Zone
*
Auto Daylight
*
Clock Reset
Others Info Screen PreferenceSelects either of the following to be displayed
when you press the INFO button.
●Info Top: Some of the available menu items
pop up.●Info Menu: All available menu items pop up.●Off: The menu item you selected last time is
displayed.Info Top/Info
Menu
*1/Off
DefaultCancels/Resets all customized items in the Info
Settings group as default.Default/OK
* Not available on all models
Page 316 of 573
315
uuCustomized Features
*uDefaulting All the Settings
Features
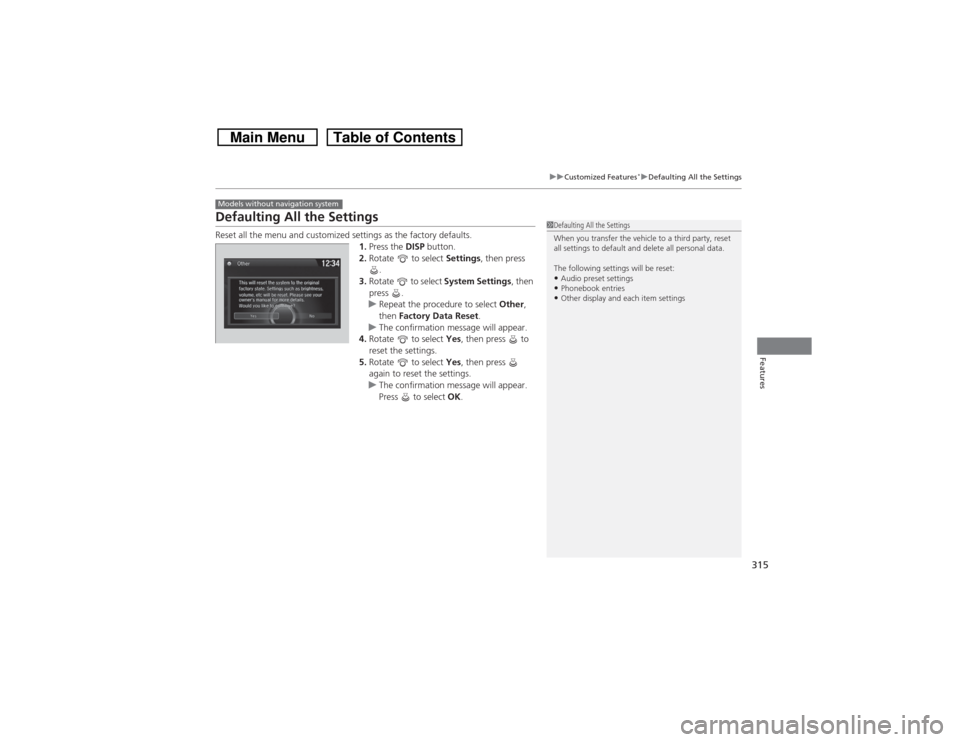
Defaulting All the SettingsReset all the menu and customized settings as the factory defaults.
1.Press the DISP button.
2.Rotate to select Settings, then press
.
3.Rotate to select System Settings, then
press .
uRepeat the procedure to select Other,
then Factory Data Reset.
uThe confirmation message will appear.
4.Rotate to select Yes, then press to
reset the settings.
5.Rotate to select Yes, then press
again to reset the settings.
uThe confirmation message will appear.
Press to select OK.Models without navigation system
1Defaulting All the Settings
When you transfer the vehicle to a third party, reset
all settings to default and delete all personal data.
The following settings will be reset:•Audio preset settings•Phonebook entries•Other display and each item settings
Page 317 of 573
316
uuCustomized Features
*uDefaulting All the Settings
Features
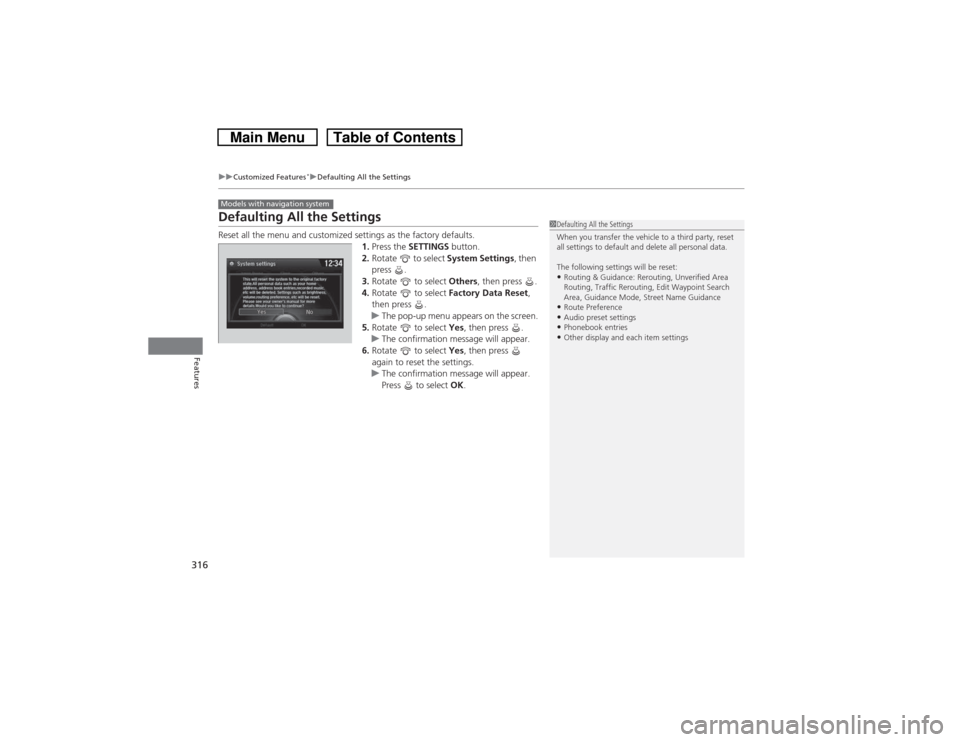
Defaulting All the SettingsReset all the menu and customized settings as the factory defaults.
1.Press the SETTINGS button.
2.Rotate to select System Settings, then
press .
3.Rotate to select Others, then press .
4.Rotate to select Factory Data Reset,
then press .
uThe pop-up menu appears on the screen.
5.Rotate to select Yes, then press .
uThe confirmation message will appear.
6.Rotate to select Yes, then press
again to reset the settings.
uThe confirmation message will appear.
Press to select OK.Models with navigation system
1Defaulting All the Settings
When you transfer the vehicle to a third party, reset
all settings to default and delete all personal data.
The following settings will be reset:•Routing & Guidance: Rerouting, Unverified Area
Routing, Traffic Rerouting, Edit Waypoint Search
Area, Guidance Mode, Street Name Guidance•Route Preference•Audio preset settings•Phonebook entries•Other display and each item settings
Page 318 of 573
317
uuCustomized Features
*uDeleting all HDD Data
Features
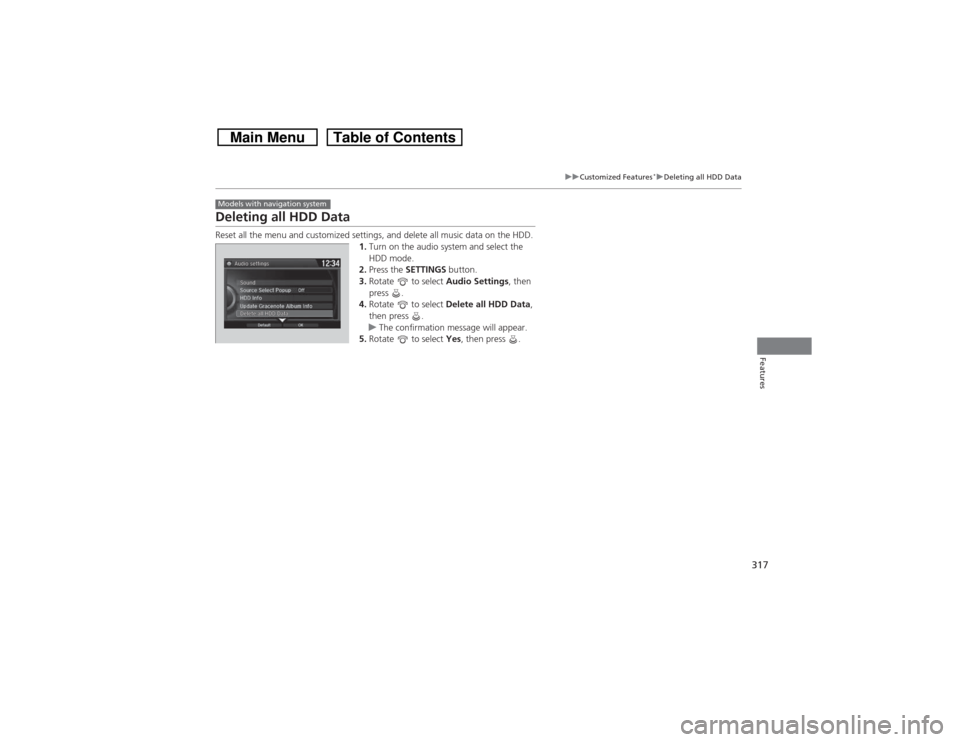
Deleting all HDD DataReset all the menu and customized settings, and delete all music data on the HDD.
1.Turn on the audio system and select the
HDD mode.
2.Press the SETTINGS button.
3.Rotate to select Audio Settings, then
press .
4.Rotate to select Delete all HDD Data,
then press .
uThe confirmation message will appear.
5.Rotate to select Yes, then press .Models with navigation system
Page 319 of 573
318Features
HomeLink® Universal Transceiver
*
The HomeLink® Universal Transceiver can be programmed to operate up to three
remote controlled devices around your home, such as garage doors, lighting, or
home security systems.
Refer to the safety information that comes with your garage door opener to test that
the safety features are functioning properly. If you do not have the safety
information, contact the manufacturer.
Before programming HomeLink, make sure that people and objects are out of the
way of the garage or gate to prevent potential injury or damage.
When programming a garage door opener, park just outside the garage door’s
path.Training HomeLink
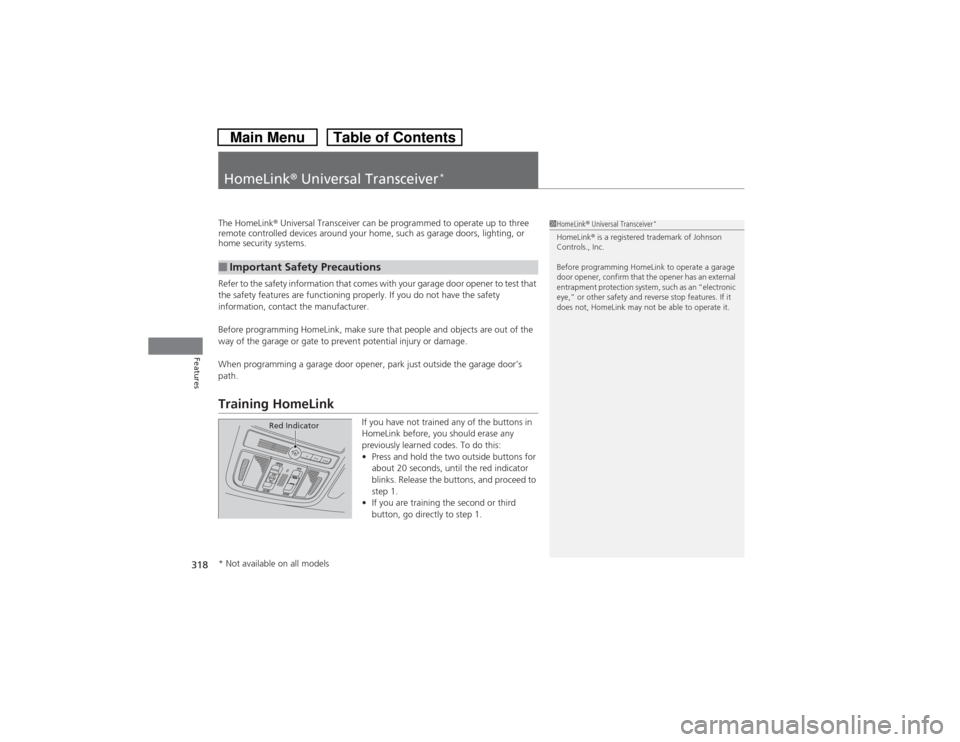
If you have not trained any of the buttons in
HomeLink before, you should erase any
previously learned codes. To do this:
•Press and hold the two outside buttons for
about 20 seconds, until the red indicator
blinks. Release the buttons, and proceed to
step 1.
•If you are training the second or third
button, go directly to step 1.
■Important Safety Precautions
1HomeLink® Universal Transceiver
*
HomeLink® is a registered trademark of Johnson
Controls., Inc.
Before programming HomeLink to operate a garage
door opener, confirm that the opener has an external
entrapment protection system, such as an “electronic
eye,” or other safety and reverse stop features. If it
does not, HomeLink may not be able to operate it.
Red Indicator
* Not available on all models
Page 320 of 573
319
uuHomeLink® Universal Transceiver
*uTraining HomeLink
Features
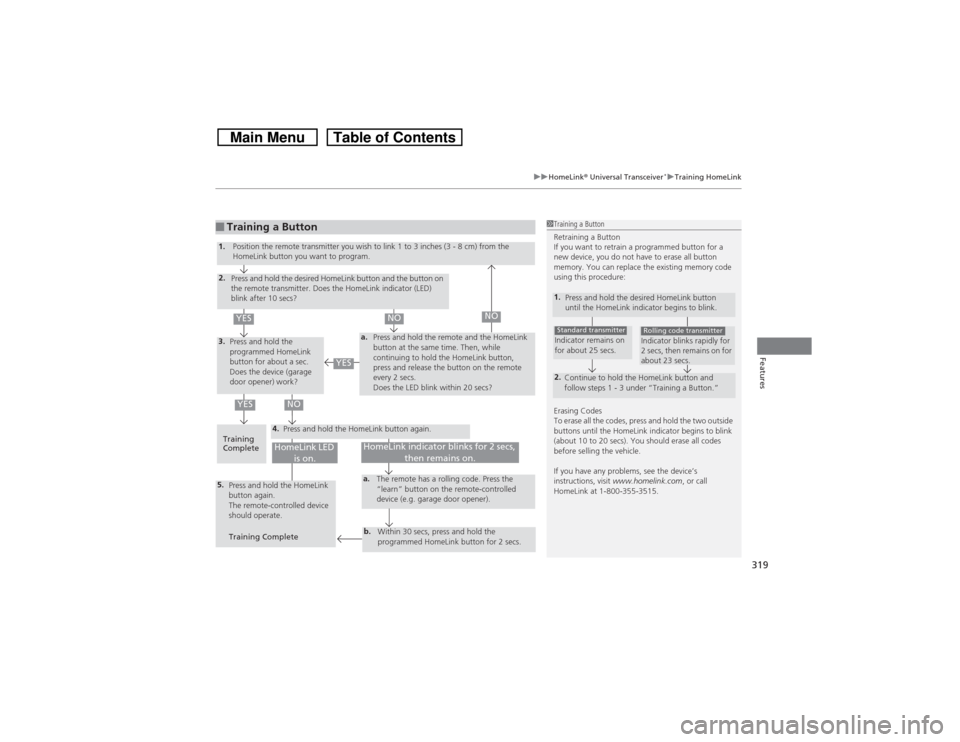
■Training a Button
1Training a Button
Retraining a Button
If you want to retrain a programmed button for a
new device, you do not have to erase all button
memory. You can replace the existing memory code
using this procedure:
Erasing Codes
To erase all the codes, press and hold the two outside
buttons until the HomeLink indicator begins to blink
(about 10 to 20 secs). You should erase all codes
before selling the vehicle.
If you have any problems, see the device’s
instructions, visit www.homelink.com, or call
HomeLink at 1-800-355-3515.1.
Press and hold the desired HomeLink button
until the HomeLink indicator begins to blink.2.
Continue to hold the HomeLink button and
follow steps 1 - 3 under “Training a Button.”Indicator remains on
for about 25 secs.Standard transmitter
Indicator blinks rapidly for
2 secs, then remains on for
about 23 secs.Rolling code transmitter
4.
a.
3.2.5.
a.b.
1.
Position the remote transmitter you wish to link 1 to 3 inches (3 - 8 cm) from the
HomeLink button you want to program.
Press and hold the desired HomeLink button and the button on
the remote transmitter. Does the HomeLink indicator (LED)
blink after 10 secs?
Press and hold the
programmed HomeLink
button for about a sec.
Does the device (garage
door opener) work?Press and hold the remote and the HomeLink
button at the same time. Then, while
continuing to hold the HomeLink button,
press and release the button on the remote
every 2 secs.
Does the LED blink within 20 secs?
Training
CompletePress and hold the HomeLink button again.
Press and hold the HomeLink
button again.
The remote-controlled device
should operate.
Training CompleteThe remote has a rolling code. Press the
“learn” button on the remote-controlled
device (e.g. garage door opener).
Within 30 secs, press and hold the
programmed HomeLink button for 2 secs.
HomeLink indicator blinks for 2 secs,
then remains on.
HomeLink LED
is on.
YES
NO
YES
YES
NO
NO