warning light HONDA CRV 2023 User Guide
[x] Cancel search | Manufacturer: HONDA, Model Year: 2023, Model line: CRV, Model: HONDA CRV 2023Pages: 719, PDF Size: 13.43 MB
Page 475 of 719
474
uuWhen Driving uHill Descent Control System
Driving
Hill Descent Control System
When driving down hills where engine braking is not enough to decelerate the
vehicle, this system helps maintain a co nstant vehicle speed without needing to
depress the brake pedal.
The system operates under the following conditions.
• Driving at a speed between about 2-12 mph (3-20 km/h).
• Driving downhill.
• Accelerator pedal and brake pedal are not depressed.
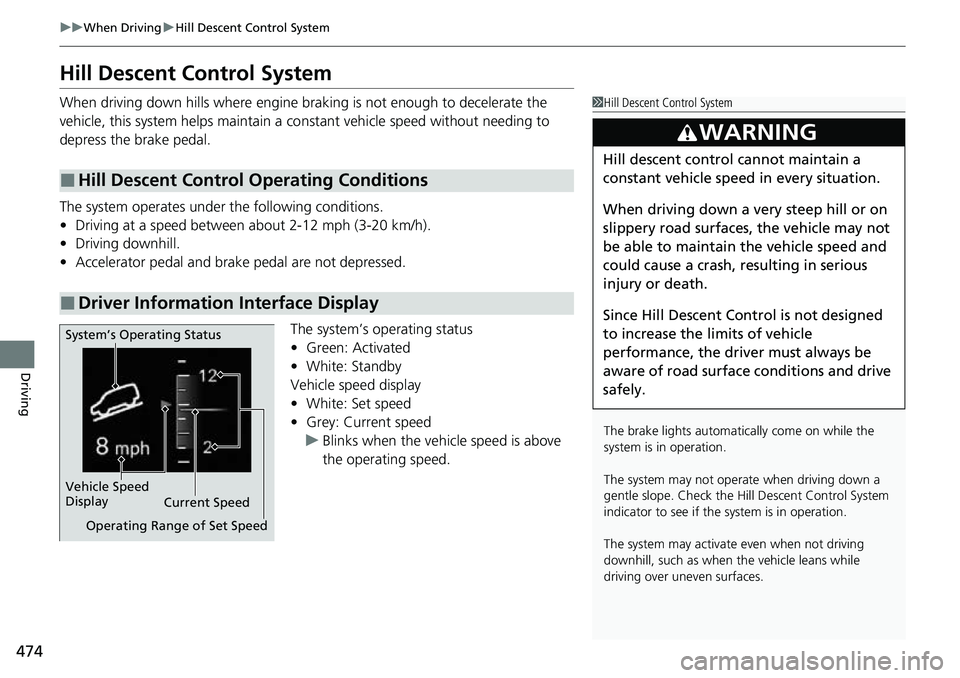
The system’s operating status
•Green: Activated
• White: Standby
Vehicle speed display
• White: Set speed
• Grey: Current speed
u Blinks when the vehicle speed is above
the operating speed.
■Hill Descent Control Operating Conditions
■Driver Information Interface Display
1Hill Descent Control System
The brake lights automati cally come on while the
system is in operation.
The system may not operate when driving down a
gentle slope. Check the Hill Descent Control System
indicator to see if the system is in operation.
The system may activate even when not driving
downhill, such as when the vehicle leans while
driving over uneven surfaces.
3WARNING
Hill descent control cannot maintain a
constant vehicle speed in every situation.
When driving down a very steep hill or on
slippery road surfaces, the vehicle may not
be able to maintain the vehicle speed and
could cause a crash, resulting in serious
injury or death.
Since Hill Descent Control is not designed
to increase the limits of vehicle
performance, the driver must always be
aware of road surface conditions and drive
safely.
System’s Operating Status
Vehicle Speed
Display Current Speed
Operating Range of Set Speed
Page 499 of 719
498
uuHonda Sensing ®u Collision Mitigation Braking SystemTM (CMBSTM)
Driving
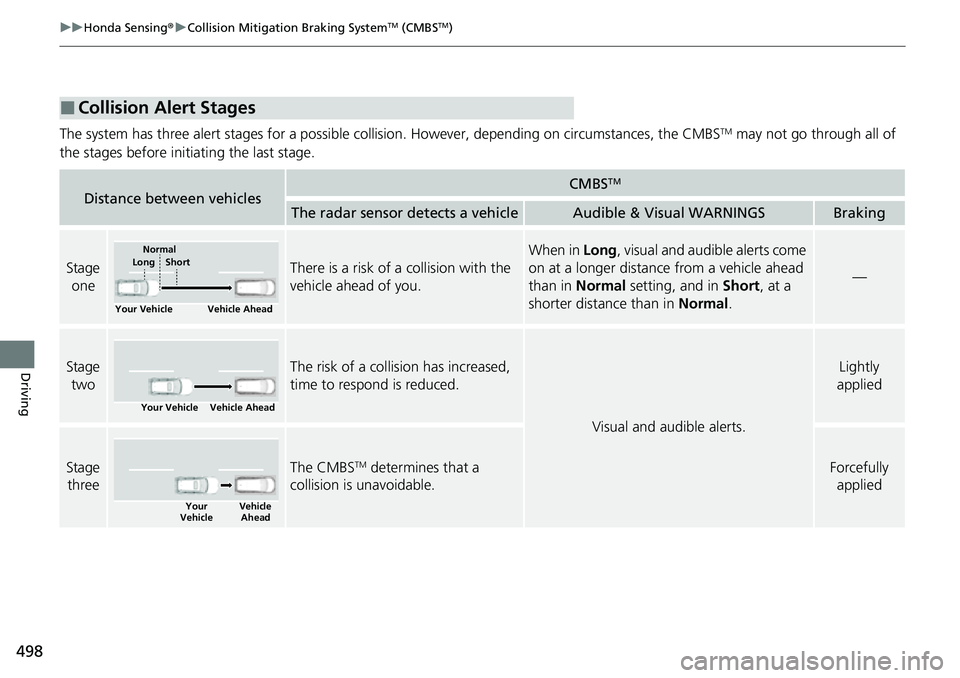
The system has three alert stages for a possible collision. However, depending on circumstances, the CMBSTM may not go through all of
the stages before initiating the last stage.
■Collision Alert Stages
Distance between vehiclesCMBSTM
The radar sensor detects a vehicleAudible & Visual WARNINGSBraking
Stage oneThere is a risk of a collision with the
vehicle ahead of you.
When in Long, visual and audible alerts come
on at a longer distance from a vehicle ahead
than in Normal setting, and in Short, at a
shorter distance than in Normal.
—
Stage
twoThe risk of a collision has increased,
time to respond is reduced.
Visual and audible alerts.
Lightly
applied
Stage three The CMBSTM determines that a
collision is unavoidable.Forcefully applied
Your Vehicle Vehicle Ahead
Normal
Short
Long
Your Vehicle Vehicle Ahead
Your
Vehicle Vehicle
Ahead
Page 514 of 719
513
uuHonda Sensing ®u Adaptive Cruise Control (ACC) with Low Speed Follow
Continued
Driving
Adaptive Cruise Control (ACC) with Low Speed Follow
Helps maintain a constant vehicle speed and a set following-interval behind a vehicle
detected ahead of yours and, if the detect ed vehicle comes to a stop, can decelerate
and stop your ve hicle, without you having to keep your foot on the brake or the
accelerator.
When ACC with Low Speed Follo w slows your vehicle by applying the brakes, your
vehicle’s brake lights will illuminate.1 Adaptive Cruise Control (ACC) with Low Speed Follow
Important Reminder
As with any system, there are limits to ACC with Low
Speed Follow. Use the brake pedal whenever
necessary, and always keep a safe interval between
your vehicle and other vehicles.
For directions on the prop er handling of the radar
sensor, refer to the following page. 2 Radar Sensor P. 570
You can read about handling information for the
camera equipped with this system. 2 Front Sensor Camera P. 568
3WARNING
Improper use of ACC with Low Speed
Follow can lead to a crash.
Use ACC with Low Speed Follow only when
driving on expressways or freeways and in
good road and weather conditions.
3WARNING
ACC with Low Speed Follow has limited
braking capability and may not stop your
vehicle in time to avoid a collision with a
vehicle that quickly stops in front of you.
Always be prepared to apply the brake
pedal if the conditions require.
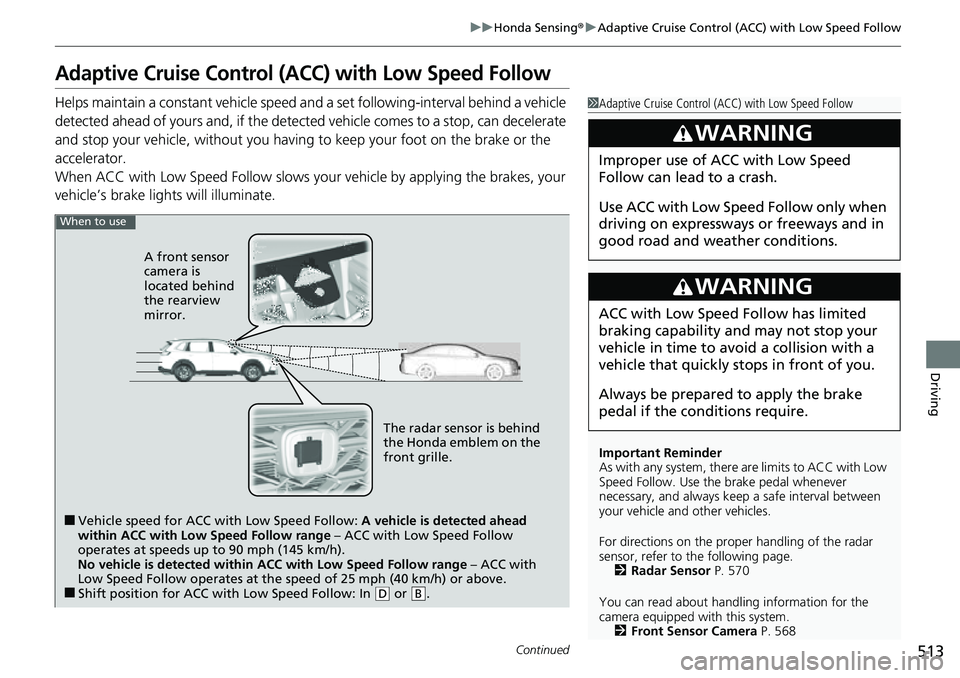
When to use
■Vehicle speed for ACC wi th Low Speed Follow: A vehicle is detected ahead
within ACC with Low Speed Follow range – ACC with Low Speed Follow
operates at speeds up to 90 mph (145 km/h).
No vehicle is detected within ACC with Low Speed Follow range – ACC with
Low Speed Follow operates at the speed of 25 mph (40 km/h) or above.
■Shift position for ACC with Low Speed Follow: In ( D or .B
The radar sensor is behind
the Honda emblem on the
front grille.
A front sensor
camera is
located behind
the rearview
mirror.
Page 522 of 719
Continued521
uuHonda Sensing ®u Adaptive Cruise Control (ACC) with Low Speed Follow
Driving
The system may automatically shut off u nder certain conditions. Some examples of
these conditions are listed below. Othe r conditions may reduce some of the ACC
with Low Speed Follow functions.
2 Front Sensor Camera P. 568
2 Radar Sensor P. 570
■Environmental conditions
• Driving in bad weather (rain, fog, snow, etc.).
■Roadway conditions
• Driving on a snowy or wet roadway (obs cured lane marking, vehicle tracks,
reflected lights, road spray, high contrast).
■Vehicle conditions
• The outside of the windshield is blocked by dirt, mud, leaves, wet snow, etc.
• An abnormal tire or wheel condition (inco rrect sizes, varied sizes or construction,
improperly inflated, etc.).
• The camera temperature gets too high.
• The parking brake is applied.
• The front grille is dirty.
• The vehicle is tilted due to a heavy load or suspension modifications.
• Tire chains are installed.
• The vehicle is towing a trailer.
■ACC with Low Speed Follow Conditions and Limitations1ACC with Low Speed Follow Conditions and Limitations
If you need the radar sensor to be repaired, or
removed, or the front grille is strongly impacted, turn
off the system by pre ssing the button and take
your vehicle to a dealer.
Have your vehicle checked by a dealer if you find any
unusual behavior of the system (e.g., the warning
message appears too frequently).
Page 536 of 719
535
uuHonda Sensing ®u Lane Keeping Assist System (LKAS)
Continued
Driving
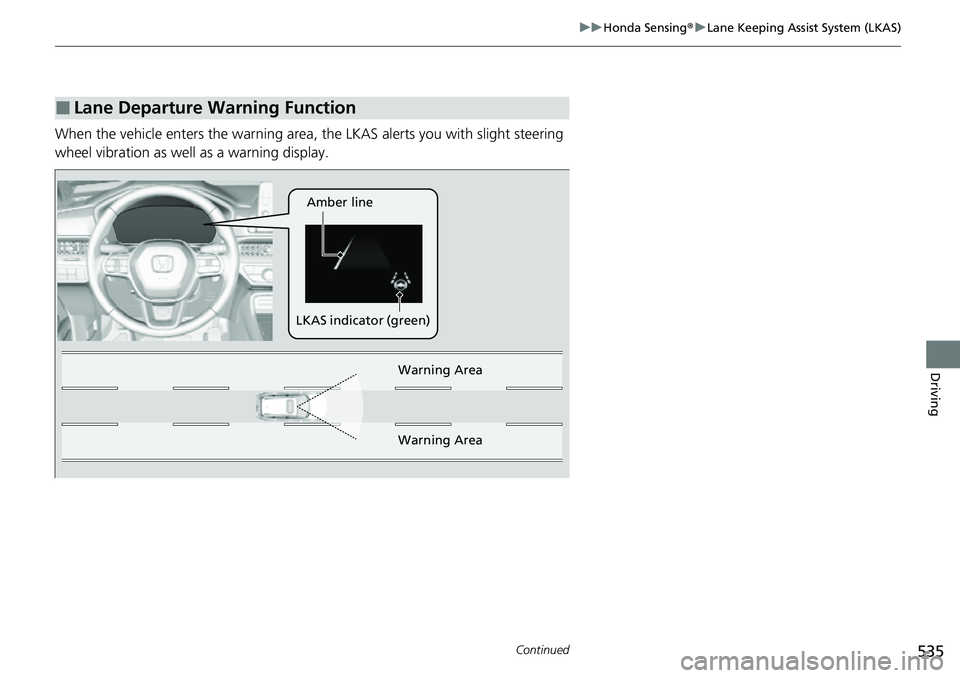
When the vehicle enters the warning area, the LKAS alerts you with slight steering
wheel vibration as well as a warning display.
■Lane Departure Warning Function
LKAS indicator (green) Amber line
Warning Area
Warn
ing Area
Page 578 of 719
Continued577
uuBraking uBrake System
Driving
Keeps the brake applied after releasing the brake pedal until the accelerator pedal is
pressed. You can use this system while th e vehicle is temporarily stopped, like at
traffic lights and in heavy traffic.
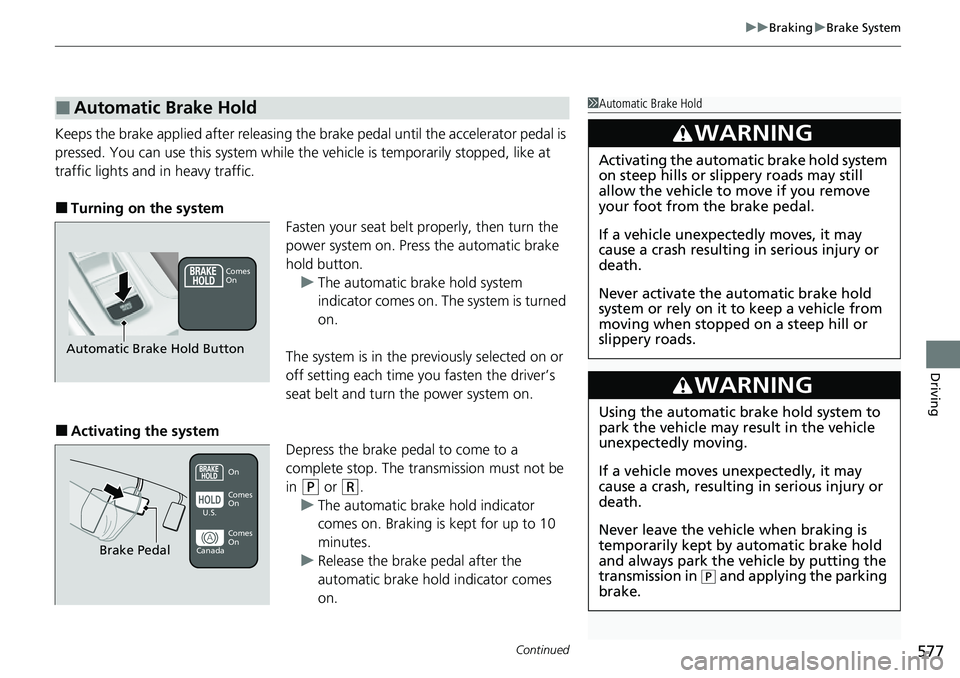
■Turning on the system Fasten your seat belt properly, then turn the
power system on. Press the automatic brake
hold button.u The automatic brake hold system
indicator comes on. The system is turned
on.
The system is in the prev iously selected on or
off setting each time you fasten the driver’s
seat belt and turn the power system on.
■Activating the system Depress the brake pedal to come to a
complete stop. The transmission must not be
in
(P or (R.
u The automatic brake hold indicator
comes on. Braking is kept for up to 10
minutes.
u Release the brake pedal after the
automatic brake hold indicator comes
on.
■Automatic Brake Hold1Automatic Brake Hold
3WARNING
Activating the automatic brake hold system
on steep hills or slippery roads may still
allow the vehicle to move if you remove
your foot from the brake pedal.
If a vehicle unexpectedly moves, it may
cause a crash resulting in serious injury or
death.
Never activate the automatic brake hold
system or rely on it to keep a vehicle from
moving when stopped on a steep hill or
slippery roads.
3WARNING
Using the automatic brake hold system to
park the vehicle may result in the vehicle
unexpectedly moving.
If a vehicle moves unexpectedly, it may
cause a crash, resulting in serious injury or
death.
Never leave the vehicle when braking is
temporarily kept by automatic brake hold
and always park the vehicle by putting the
transmission in
( P and applying the parking
brake.
Comes
On
Automatic Brake Hold Button
On
Brake Pedal
Comes
On Comes
On
U.S.
Canada
Page 597 of 719
596
uuRefueling uHow to Refuel
Driving
How to Refuel
Your fuel tank is not equipped with a fuel filler cap. You can insert the filler nozzle
directly into the filler neck. The tank seal s itself again when you pull out the filler
nozzle.
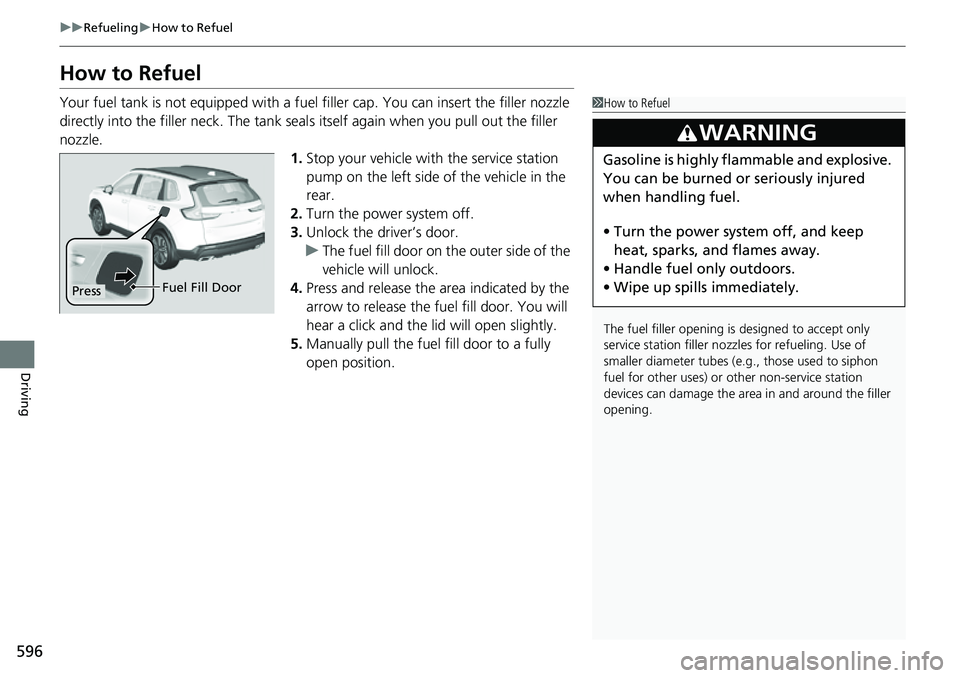
1.Stop your vehicle with the service station
pump on the left side of the vehicle in the
rear.
2. Turn the power system off.
3. Unlock the driver’s door.
u The fuel fill door on the outer side of the
vehicle will unlock.
4. Press and release the area indicated by the
arrow to release the fu el fill door. You will
hear a click and the lid will open slightly.
5. Manually pull the fuel fill door to a fully
open position.1How to Refuel
The fuel filler opening is designed to accept only
service station filler nozzles for refueling. Use of
smaller diamet er tubes (e.g., those used to siphon
fuel for other uses) or other non-service station
devices can damage the area in and around the filler
opening.
3WARNING
Gasoline is highly flammable and explosive.
You can be burned or seriously injured
when handling fuel.
• Turn the power system off, and keep
heat, sparks, and flames away.
• Handle fuel only outdoors.
• Wipe up spills immediately.
Press Fuel Fill Door
Page 618 of 719
617
uuMaintenance Under the Hood uChanging the Engine Oil and Oil Filter
Maintenance
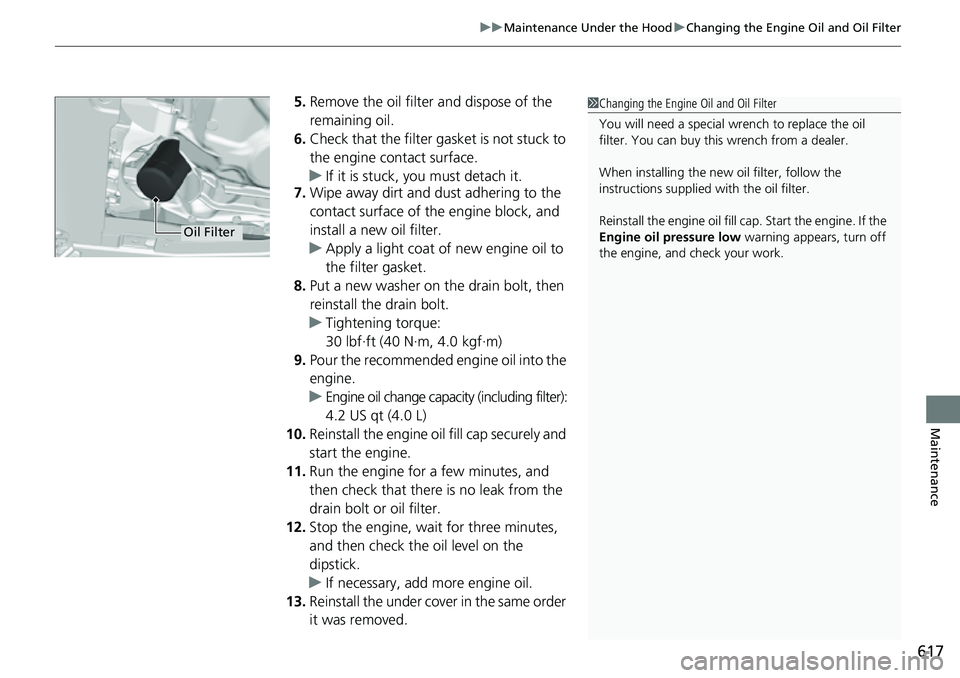
5. Remove the oil filter and dispose of the
remaining oil.
6. Check that the filter gasket is not stuck to
the engine contact surface.
u If it is stuck, you must detach it.
7. Wipe away dirt and dust adhering to the
contact surface of the engine block, and
install a new oil filter.
u Apply a light coat of new engine oil to
the filter gasket.
8. Put a new washer on the drain bolt, then
reinstall the drain bolt.
u Tightening torque:
30 lbf∙ft (40 N∙m, 4.0 kgf∙m)
9. Pour the recommended engine oil into the
engine.
u Engine oil change capacity (including filter):
4.2 US qt (4.0 L)
10. Reinstall the engine oil fill cap securely and
start the engine.
11. Run the engine for a few minutes, and
then check that there is no leak from the
drain bolt or oil filter.
12. Stop the engine, wait for three minutes,
and then check the oil level on the
dipstick.
u If necessary, add more engine oil.
13. Reinstall the under cover in the same order
it was removed.1Changing the Engine Oil and Oil Filter
You will need a special wrench to replace the oil
filter. You can buy this wrench from a dealer.
When installing the new oil filter, follow the
instructions supplied with the oil filter.
Reinstall the engine oil fill cap. Start the engine. If the
Engine oil pressure low warning appears, turn off
the engine, and check your work.
Oil Filter
Page 654 of 719
653Continued
Handling the Unexpected
If a Tire Goes Flat
Temporarily Repairing a Flat Tire
If the tire has a large cut or is otherwise severely damaged, you will need to have the
vehicle towed. If the tire only has a small puncture, from a nail for instance, you can
use the temporary tire repair kit so that you can drive to the nearest service station
for a more permanent repair.
If a tire goes flat while driving, grasp the steering wheel firmly, and brake gradually
to reduce speed. Then, stop in a safe place.
1. Park the vehicle on a firm, level, non-slippery surface and apply the parking brake.
2. Put the transmission into
(P.
3. Turn on the hazard warning lights an d set the power mode to VEHICLE OFF.
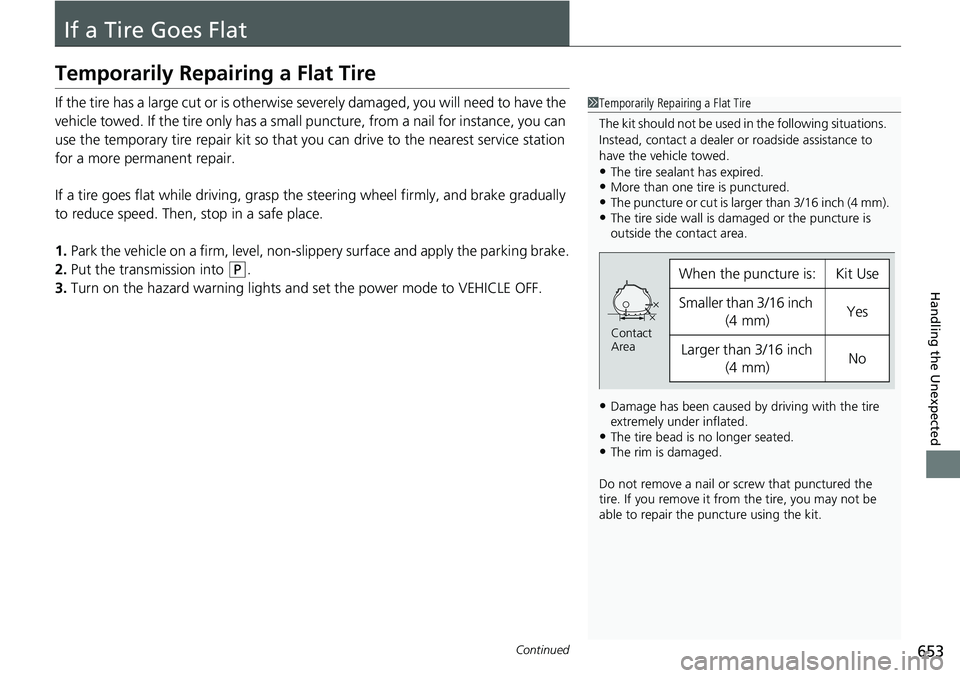
1Temporarily Repairing a Flat Tire
The kit should not be used in the following situations.
Instead, contact a dealer or roadside assistance to
have the vehicle towed.
•The tire sealant has expired.•More than one tire is punctured.•The puncture or cut is larger than 3/16 inch (4 mm).•The tire side wall is da maged or the puncture is
outside the contact area.
•Damage has been caused by driving with the tire
extremely under inflated.
•The tire bead is no longer seated.•The rim is damaged.
Do not remove a nail or screw that punctured the
tire. If you remove it from the tire, you may not be
able to repair the puncture using the kit.
When the puncture is:Kit Use
Smaller than 3/16 inch
(4 mm)Yes
Larger than 3/16 inch (4 mm)No
Contact
Area
Page 672 of 719
671Continued
Handling the Unexpected
If the 12-Volt Battery Is Dead
Jump Starting Procedure
Turn off the power to electric devices, such as audio and lights. Turn off the power
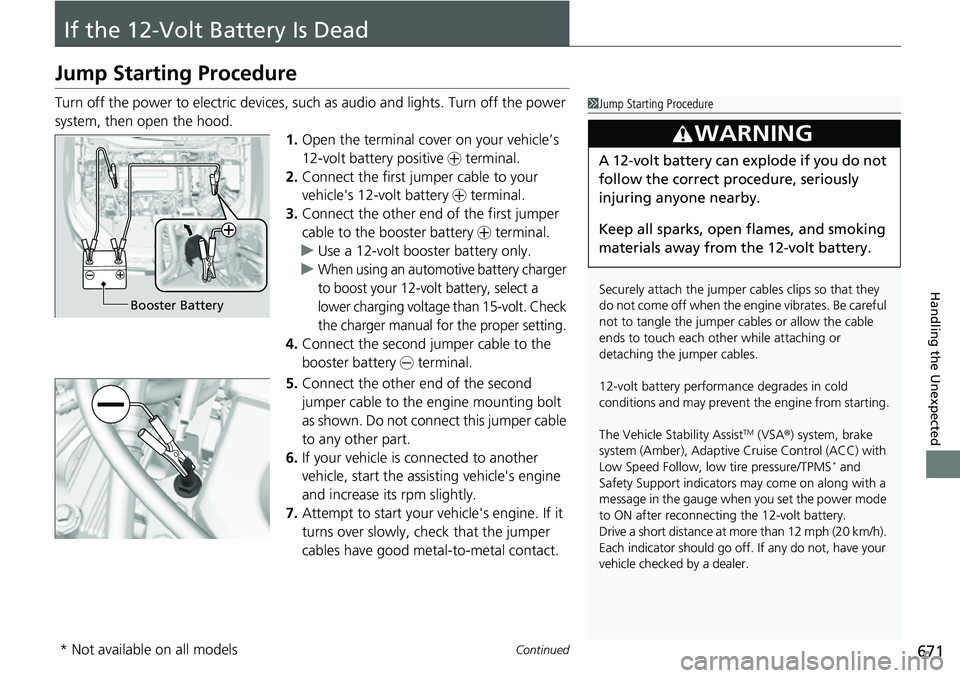
system, then open the hood. 1.Open the terminal cover on your vehicle’s
12-volt battery positive + terminal.
2. Connect the first jumper cable to your
vehicle's 12-volt battery + terminal.
3. Connect the other end of the first jumper
cable to the booster battery + terminal.
u Use a 12-volt booster battery only.
u
When using an automotive battery charger
to boost your 12-volt battery, select a
lower charging voltage than 15-volt. Check
the charger manual for the proper setting.
4. Connect the second jumper cable to the
booster battery - terminal.
5. Connect the other end of the second
jumper cable to the engine mounting bolt
as shown. Do not connect this jumper cable
to any other part.
6. If your vehicle is connected to another
vehicle, start the assisting vehicle's engine
and increase its rpm slightly.
7. Attempt to start your ve hicle's engine. If it
turns over slowly, check that the jumper
cables have good metal-to-metal contact.
1 Jump Starting Procedure
Securely attach the jumper cables clips so that they
do not come off when the e ngine vibrates. Be careful
not to tangle the jumper cables or allow the cable
ends to touch each other while attaching or
detaching the jumper cables.
12-volt battery performa nce degrades in cold
conditions and may prevent the engine from starting.
The Vehicle Stability Assist
TM (VSA ®) system, brake
system (Amber), Adaptive Cruise Control (ACC) with
Low Speed Follow, low tire pressure/TPMS
* and
Safety Support indicators may come on along with a
message in the gauge when you set the power mode
to ON after reconnecting the 12-volt battery.
Drive a short distance at more than 12 mph (20 km/h).
Each indicator should go off. If any do not, have your
vehicle checked by a dealer.
3WARNING
A 12-volt battery can explode if you do not
follow the correct procedure, seriously
injuring anyone nearby.
Keep all sparks, open flames, and smoking
materials away from the 12-volt battery.
Booster Battery
* Not available on all models