change HONDA CRV 2023 Owner's Guide
[x] Cancel search | Manufacturer: HONDA, Model Year: 2023, Model line: CRV, Model: HONDA CRV 2023Pages: 719, PDF Size: 13.43 MB
Page 178 of 719
Continued177
uuSecurity System uSecurity System Alarm
Controls
■When the security system alarm activates
The horn sounds intermittently, and some exterior lights flash.
■To deactivate the security system alarm
Unlock the vehicle using the key, remote tra nsmitter, or keyless access system, or
turn the power mode is set to ON. The system, along with the horn and flashing
lights, is deactivated.
■Setting the security system alarm
The security system alarm automatically sets when the following conditions have
been met:
• The power mode is set to VEHICLE OFF.
• The hood is closed.
• All doors and tailgate are locked from ou tside with the remote transmitter or
keyless access system.
■When the security system alarm sets
The security system alarm in dicator in the instrument panel blinks and the blinking
interval changes after about 15 seconds.
■To cancel the security system alarm
The security system alarm is canceled when the vehicle is unlocked using the remote
transmitter or keyless access system, or when the power mode is set to ON. The
security system alarm indicato r goes off at the same time.
1Security System Alarm
Do not set the security system alarm when someone
is in the vehicle or a window is open. The system can
accidentally activate when:
•Unlocking the door with the lock tab.•Opening the hood with the hood release handle.
•Taking the transmission out of ( P.
If the 12-volt battery goes dead after you have set the
security system alarm, the security alarm may go off
once the 12-volt battery is recharged or replaced.
If this occurs, deactivate the security system alarm by
unlocking a door using the ke y, remote transmitter,
or keyless access system.
Page 184 of 719
183
Controls
Moonroof
Opening/Closing the Moonroof
You can operate the moonroof when the power mode is in ON. Use the switch in
the front of the ceiling to open and close the moonroof.
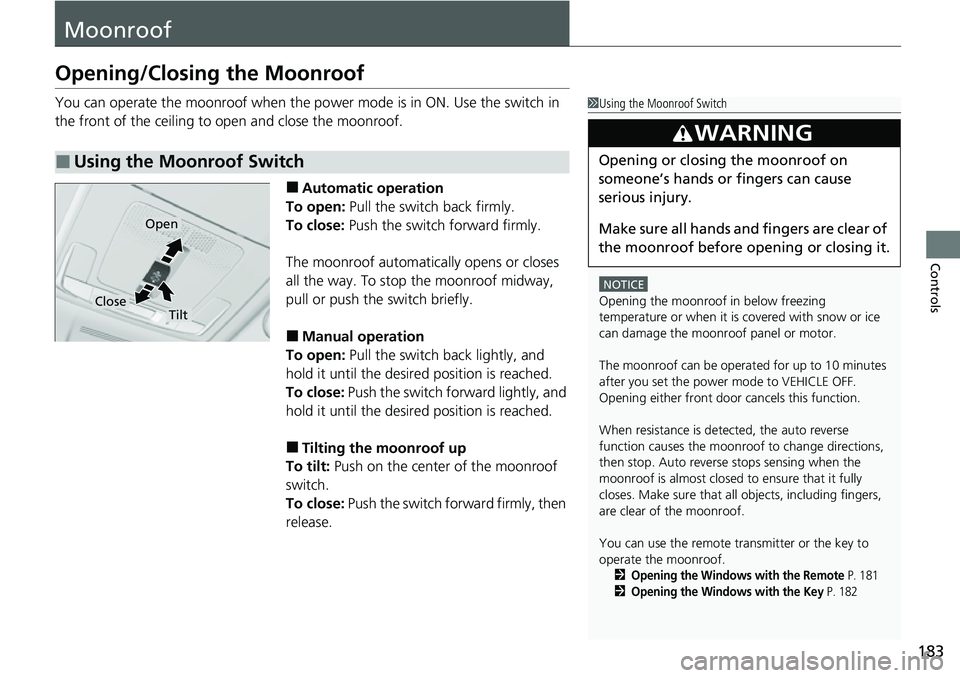
■Automatic operation
To open: Pull the switch back firmly.
To close: Push the switch forward firmly.
The moonroof automatically opens or closes
all the way. To stop the moonroof midway,
pull or push the switch briefly.
■Manual operation
To open: Pull the switch back lightly, and
hold it until the desired position is reached.
To close: Push the switch forward lightly, and
hold it until the desired position is reached.
■Tilting the moonroof up
To tilt: Push on the center of the moonroof
switch.
To close: Push the switch fo rward firmly, then
release.
■Using the Moonroof Switch
1 Using the Moonroof Switch
NOTICE
Opening the moonroof in below freezing
temperature or when it is covered with snow or ice
can damage the moonr oof panel or motor.
The moonroof can be opera ted for up to 10 minutes
after you set the power mode to VEHICLE OFF.
Opening either front door cancels this function.
When resistance is detected, the auto reverse
function causes the moonroof to change directions,
then stop. Auto reverse stops sensing when the
moonroof is almost closed to ensure that it fully
closes. Make sure that al l objects, including fingers,
are clear of the moonroof.
You can use the remote transmitter or the key to
operate the moonroof.
2Opening the Windows with the Remote P. 181
2Opening the Windows with the Key P. 182
3WARNING
Opening or closing the moonroof on
someone’s hands or fingers can cause
serious injury.
Make sure all hands and fingers are clear of
the moonroof before opening or closing it.
Open
CloseTilt
Page 187 of 719
uuOperating the Switches Around the Steering Wheel uPOWER Button
186
Controls
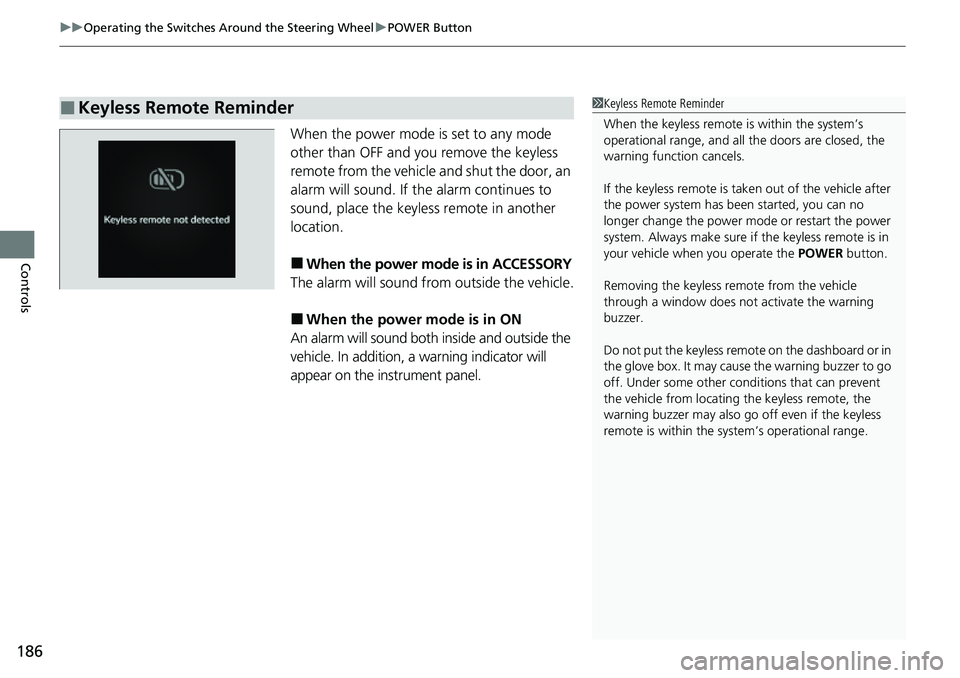
When the power mode is set to any mode
other than OFF and you remove the keyless
remote from the vehicle and shut the door, an
alarm will sound. If th e alarm continues to
sound, place the keyless remote in another
location.
■When the power mode is in ACCESSORY
The alarm will sound from outside the vehicle.
■When the power mode is in ON
An alarm will sound both inside and outside the
vehicle. In addition, a warning indicator will
appear on the instrument panel.
■Keyless Remote Reminder1 Keyless Remote Reminder
When the keyless remote is within the system’s
operational range, and all the doors are closed, the
warning function cancels.
If the keyless remote is taken out of the vehicle after
the power system has be en started, you can no
longer change the power m ode or restart the power
system. Always make sure if the keyless remote is in
your vehicle when you operate the POWER button.
Removing the keyless remote from the vehicle
through a window does not activate the warning
buzzer.
Do not put the keyless remo te on the dashboard or in
the glove box. It may cause the warning buzzer to go
off. Under some other cond itions that can prevent
the vehicle from locating the keyless remote, the
warning buzzer may also go off even if the keyless
remote is within the system’s operational range.
Page 191 of 719
uuOperating the Switches Around the Steering Wheel uLight Switches
190
Controls
The headlights automatically come on when the wipers are used several times within
a certain number of intervals wi th the headlight switch in AUTO.
The headlights automatically go off a few minutes later if the wipers are stopped.
■Headlight Integration with Wipers
1Automatic Operation (aut omatic lighting control)
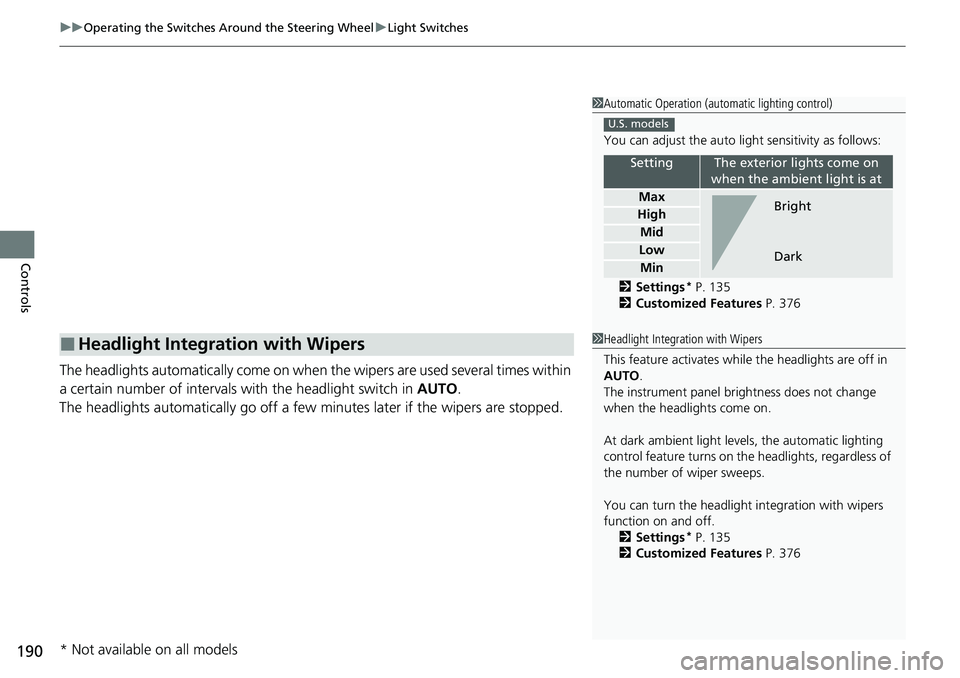
You can adjust the auto li ght sensitivity as follows:
2 Settings
* P. 135
2 Customized Features P. 376
SettingThe exterior lights come on
when the ambient light is at
Max
High
Mid
Low
Min
U.S. models
Bright
Dark
1 Headlight Integration with Wipers
This feature activates while the headlights are off in
AUTO .
The instrument panel br ightness does not change
when the headlights come on.
At dark ambient light leve ls, the automatic lighting
control feature turns on the headlights, regardless of
the number of wiper sweeps.
You can turn the headlight integration with wipers
function on and off. 2 Settings
* P. 135
2 Customized Features P. 376
* Not available on all models
Page 192 of 719
191
uuOperating the Switches Around the Steering Wheel uLight Switches
Controls
The headlights, all other exterior lights, and the instrument panel lights turn off 15
seconds after you set the power mode to VEHICLE OFF, take the keyless remote with
you, and close the driver’s door.
If you set the power mode to VEHICLE OFF with the headlight switch on, but do not
open the door, the lights turn off after 10 minu tes (3 minutes, if the switch is in the
AUTO position).
The lights turn on again when you unlock or open the driver’s door. If you unlock
the door, but do not open it within 15 seconds, the lights go off. If you open the
driver’s door, you will hear a reminder chime alerting you that the lights are on.
■Automatic Lighting Off Feature1 Automatic Lighting Off Feature
You can change the headlight auto off timer setting.
2 Settings
* P. 135
2 Customized Features P. 376
* Not available on all models
Page 194 of 719
193
uuOperating the Switches Around the Steering Wheel uAuto High-Beam
Continued
Controls
Auto High-Beam
The front sensor camera detects the light sources ahead of the vehicle such as the
lights of a preceding or oncoming vehicle, or street lights. When you are driving at
night, the system automatically switches the headlights between low beam and high
beam depending on the situation.
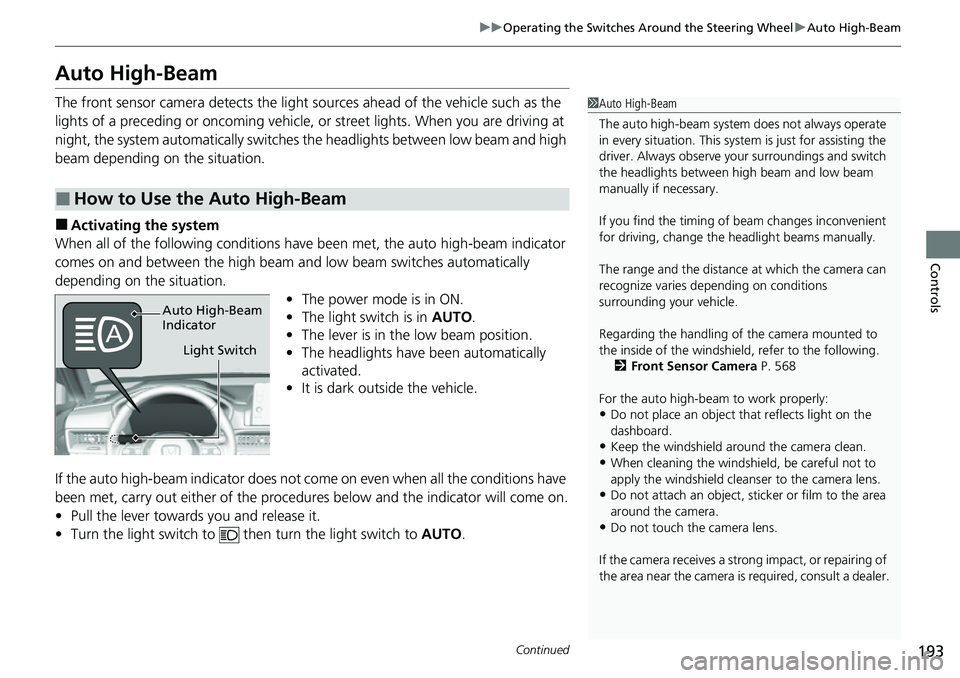
■Activating the system
When all of the following conditions have been met, the auto high-beam indicator
comes on and between the high beam and low beam switches automatically
depending on the situation. •The power mode is in ON.
• The light switch is in AUTO.
• The lever is in the low beam position.
• The headlights have been automatically
activated.
• It is dark outside the vehicle.
If the auto high-beam indica tor does not come on even when all the conditions have
been met, carry out either of the procedures below and the indicator will come on.
• Pull the lever towards you and release it.
• Turn the light switch to th en turn the light switch to AUTO.
■How to Use the Auto High-Beam
1Auto High-Beam
The auto high-beam system does not always operate
in every situation. This syst em is just for assisting the
driver. Always observe your surroundings and switch
the headlights between high beam and low beam
manually if necessary.
If you find the timing of beam changes inconvenient
for driving, change the headlight beams manually.
The range and the distance at which the camera can
recognize varies de pending on conditions
surrounding your vehicle.
Regarding the handling of the camera mounted to
the inside of the windshiel d, refer to the following.
2 Front Sensor Camera P. 568
For the auto high-beam to work properly:
•Do not place an object that reflects light on the
dashboard.
•Keep the windshield around the camera clean.
•When cleaning the windshield, be careful not to
apply the windshield cleans er to the camera lens.
•Do not attach an object, sticker or film to the area
around the camera.
•Do not touch the camera lens.
If the camera receives a st rong impact, or repairing of
the area near the camera is required, consult a dealer.
Light Switch
Auto High-Beam
Indicator
Page 195 of 719
uuOperating the Switches Around the Steering Wheel uAuto High-Beam
194
Controls
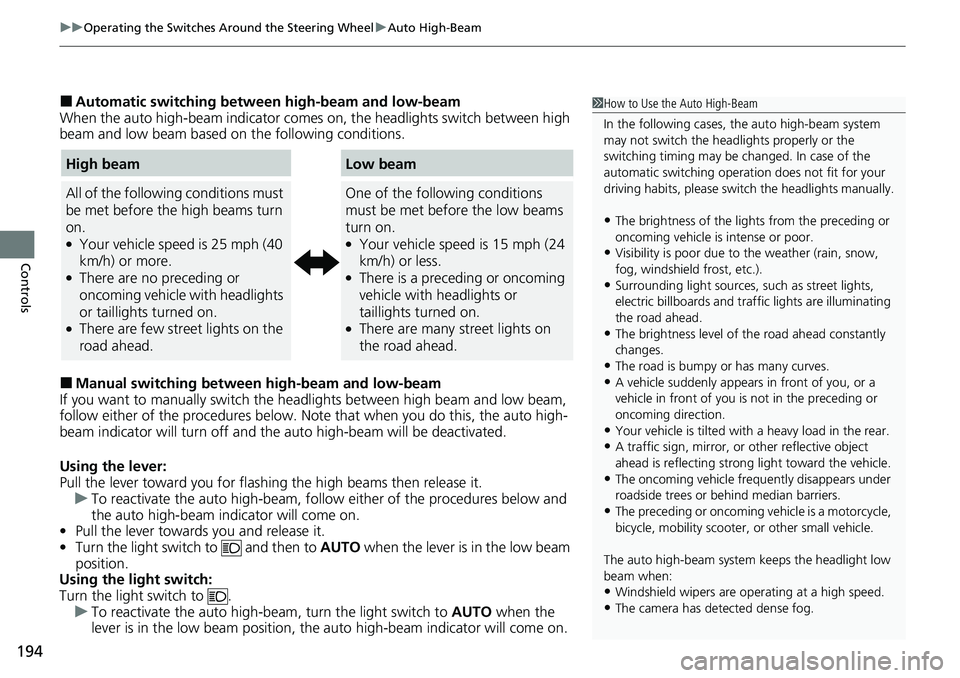
■Automatic switching between high-beam and low-beam
When the auto high-beam indicator comes on, the headlights switch between high
beam and low beam based on the following conditions.
■Manual switching between high-beam and low-beam
If you want to manually switch the headlights between high beam and low beam,
follow either of the proced ures below. Note that when you do this, the auto high-
beam indicator will turn off and the auto high-beam will be deactivated.
Using the lever:
Pull the lever toward you for flashi ng the high beams then release it.
u To reactivate the auto high-beam, follo w either of the procedures below and
the auto high-beam indicator will come on.
• Pull the lever towards you and release it.
• Turn the light switch to and then to AUTO when the lever is in the low beam
position.
Using the light switch:
Turn the light switch to .
u To reactivate the auto high-be am, turn the light switch to AUTO when the
lever is in the low beam position, the auto high-beam indicator will come on.
1 How to Use the Auto High-Beam
In the following cases, th e auto high-beam system
may not switch the head lights properly or the
switching timing may be ch anged. In case of the
automatic switching operati on does not fit for your
driving habits, please swit ch the headlights manually.
•The brightness of the lights from the preceding or
oncoming vehicle is intense or poor.
•Visibility is poor due to the weather (rain, snow,
fog, windshield frost, etc.).
•Surrounding light sources, such as street lights,
electric billboards and traf fic lights are illuminating
the road ahead.
•The brightness level of th e road ahead constantly
changes.
•The road is bumpy or has many curves.•A vehicle suddenly appears in front of you, or a
vehicle in front of you is not in the preceding or
oncoming direction.
•Your vehicle is tilted with a heavy load in the rear.•A traffic sign, mirror, or other reflective object
ahead is reflecting strong light toward the vehicle.
•The oncoming vehicle freq uently disappears under
roadside trees or be hind median barriers.
•The preceding or oncoming vehicle is a motorcycle,
bicycle, mobility scooter, or other small vehicle.
The auto high-beam system keeps the headlight low
beam when:
•Windshield wipers are op erating at a high speed.
•The camera has detected dense fog.
High beam
All of the following conditions must
be met before the high beams turn
on.
●Your vehicle speed is 25 mph (40
km/h) or more.
●There are no preceding or
oncoming vehicle with headlights
or taillights turned on.
●There are few street lights on the
road ahead.
Low beam
One of the following conditions
must be met before the low beams
turn on.
●Your vehicle speed is 15 mph (24
km/h) or less.
●There is a preceding or oncoming
vehicle with headlights or
taillights turned on.
●There are many street lights on
the road ahead.
Page 197 of 719
196
uuOperating the Switches Around the Steering Wheel uWipers and Washers
Controls
Wipers and Washers
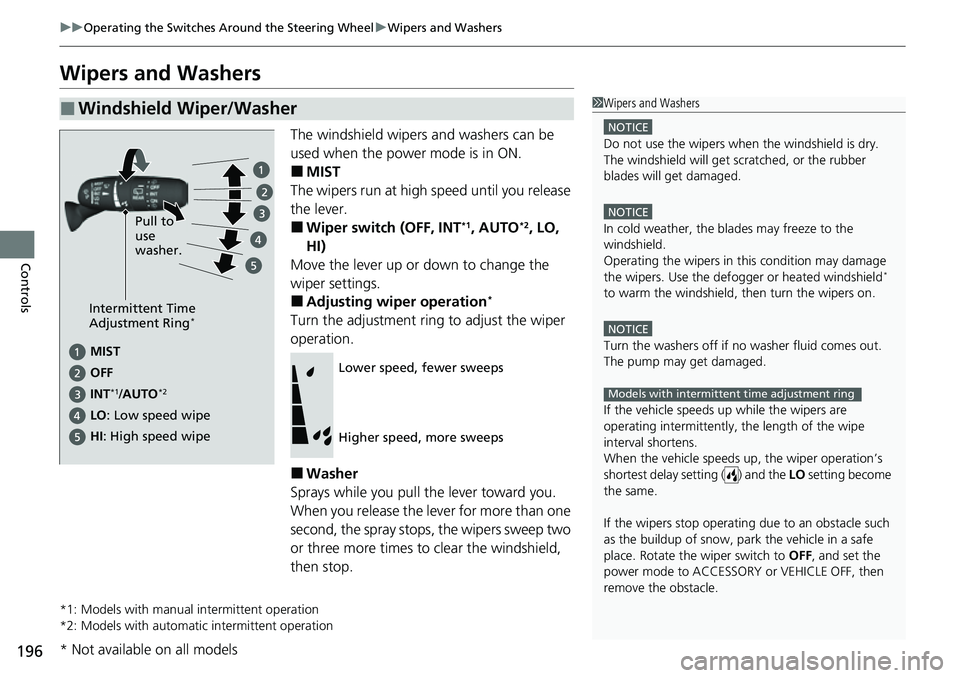
The windshield wipers and washers can be
used when the power mode is in ON.
■MIST
The wipers run at high speed until you release
the lever.
■Wiper switch (OFF, INT*1, AUTO*2, LO,
HI)
Move the lever up or down to change the
wiper settings.
■Adjusting wiper operation*
Turn the adjustment ring to adjust the wiper
operation.
■Washer
Sprays while you pull the lever toward you.
When you release the lever for more than one
second, the spray stops, the wipers sweep two
or three more times to clear the windshield,
then stop.
*1: Models with manual intermittent operation
*2: Models with automati c intermittent operation
■Windshield Wiper/Washer1Wipers and Washers
NOTICE
Do not use the wipers when the windshield is dry.
The windshield will get sc ratched, or the rubber
blades will get damaged.
NOTICE
In cold weather, the blades may freeze to the
windshield.
Operating the wipers in th is condition may damage
the wipers. Use the defogge r or heated windshield
*
to warm the windshield, then turn the wipers on.
NOTICE
Turn the washers off if no washer fluid comes out.
The pump may get damaged.
If the vehicle speeds up while the wipers are
operating intermittently, the length of the wipe
interval shortens.
When the vehicle speeds up, the wiper operation’s
shortest delay setting ( ) and the LO setting become
the same.
If the wipers st op operating due to an obstacle such
as the buildup of snow, park the vehicle in a safe
place. Rotate the wiper switch to OFF, and set the
power mode to ACCESSORY or VEHICLE OFF, then
remove the obstacle.
Models with intermittent time adjustment ring
Intermittent Time
Adjustment Ring*
MIST
INT
*1/AUTO*2
OFF
LO : Low speed wipe Pull to
use
washer.
HI: High speed wipe
Lower speed, fewer sweeps
Higher speed, more sweeps
* Not available on all models
Page 199 of 719
198
uuOperating the Switches Around the Steering Wheel uWipers and Washers
Controls
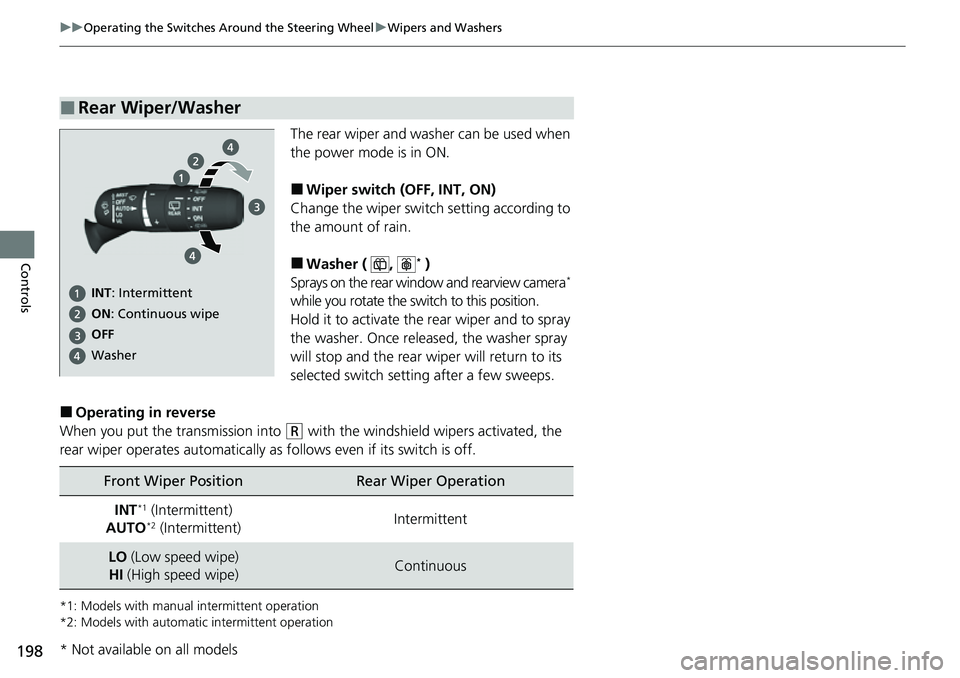
The rear wiper and washer can be used when
the power mode is in ON.
■Wiper switch (OFF, INT, ON)
Change the wiper switch setting according to
the amount of rain.
■Washer ( , * )
Sprays on the rear window and rearview camera*
while you rotate the switch to this position.
Hold it to activate the rear wiper and to spray
the washer. Once released, the washer spray
will stop and the rear wi per will return to its
selected switch setting after a few sweeps.
■Operating in reverse
When you put the transmission into
(R with the windshield wipers activated, the
rear wiper operates automatically as follows even if its switch is off.
*1: Models with manual intermittent operation
*2: Models with automati c intermittent operation
■Rear Wiper/Washer
INT: Intermittent
OFF ON : Continuous wipe
Washer
Front Wiper PositionRear Wiper Operation
INT*1 (Intermittent)
AUTO*2 (Intermittent)Intermittent
LO (Low speed wipe)
HI (High speed wipe)Continuous
* Not available on all models
Page 208 of 719
Continued207
uuSeats uFront Seats
Controls
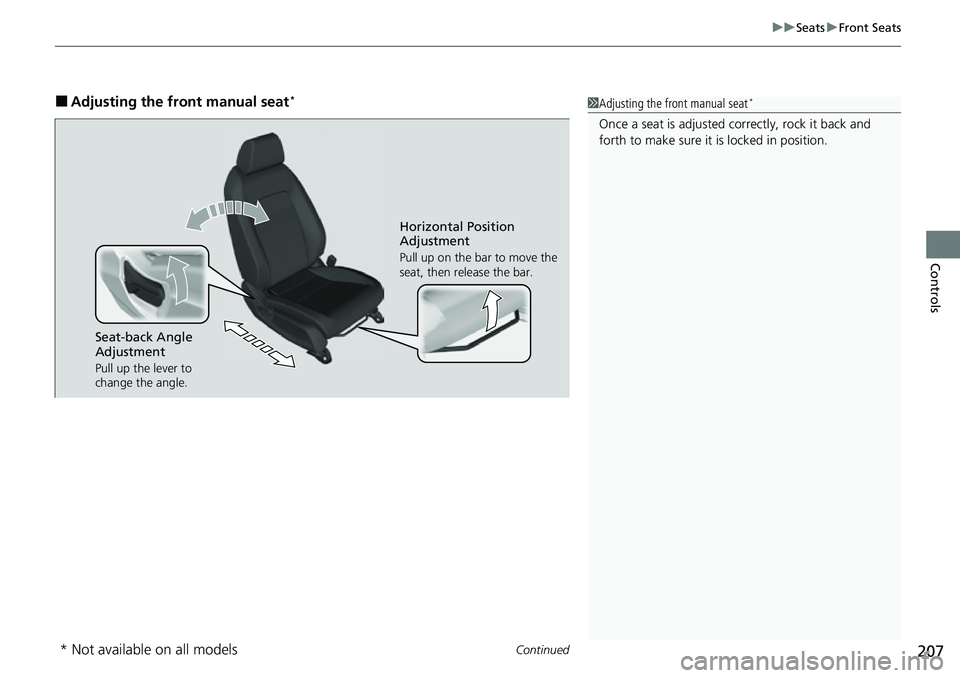
■Adjusting the front manual seat*1Adjusting the front manual seat*
Once a seat is adjusted co rrectly, rock it back and
forth to make sure it is locked in position.
Seat-back Angle
Adjustment
Pull up the lever to
change the angle.
Horizontal Position
Adjustment
Pull up on the bar to move the
seat, then release the bar.
* Not available on all models