check engine light HONDA CRV 2023 Owners Manual
[x] Cancel search | Manufacturer: HONDA, Model Year: 2023, Model line: CRV, Model: HONDA CRV 2023Pages: 719, PDF Size: 13.43 MB
Page 38 of 719
37
Quick Reference Guide
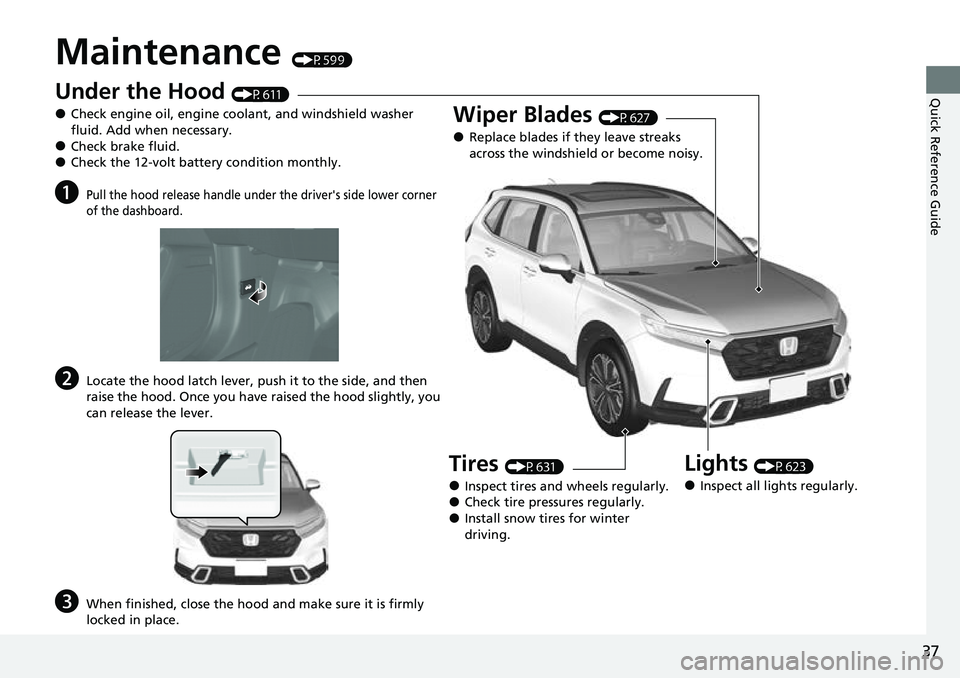
Maintenance (P599)
Under the Hood (P611)
●Check engine oil, engine coolant, and windshield washer
fluid. Add when necessary.
●Check brake fluid.●Check the 12-volt battery condition monthly.
aPull the hood release handle under the driver's side lower corner
of the dashboard.
bLocate the hood latch lever, push it to the side, and then
raise the hood. Once you have raised the hood slightly, you
can release the lever.
cWhen finished, close the hood and make sure it is firmly
locked in place.
Lights (P623)
●Inspect all lights regularly.
Wiper Blades (P627)
●Replace blades if they leave streaks
across the windshield or become noisy.
Tires (P631)
●Inspect tires and wheels regularly.●Check tire pressures regularly.●Install snow tires for winter
driving.
Page 443 of 719
442
Driving
Before Driving
Driving Preparation
Check the following items before you start driving.
• Make sure there are no obstructions on the windows, door mirrors, exterior
lights, or other parts of the vehicle.
u Remove any frost, snow, or ice.
u Remove any snow on the roof, as this can slip down and obstruct your field of
vision while driving. If frozen solid , remove ice once it has softened.
u When removing ice from around the wheels, be sure not to damage the wheel
or wheel components.
• Make sure the hood is securely closed.
u If the hood opens while driving, your front view will be blocked.
• Make sure the tires are in good condition.
u Check air pressures, and check for damage and excessive wear.
2Checking and Maintaining Tires P. 631
•Make sure there are no people or ob jects behind or around the vehicle.
u There are blind spots from the inside.
■Exterior Checks1Exterior Checks
NOTICE
When doors are frozen s hut, use warm water around
the door edges to melt any ice. Do not try to force
them open, as this can damage the rubber trim
around the doors. When done, wipe dry to avoid
further freezing.
Do not pour warm water into the key cylinder.
You will be unable to insert the key if the water
freezes in the hole.
Heat from the engine and exhaust can ignite
flammable material s left under the hood, causing a
fire. If you've parked y our vehicle for an extended
period, inspect and remove any debris that may have
collected, such as dried grass and leaves that have
fallen or have been carried in for use as a nest by a
small animal. Also, check under the hood for leftover
flammable materials after you or someone else has
performed maintenance on your vehicle.
Page 456 of 719
455Continued
Driving
When Driving
Turning on the Power
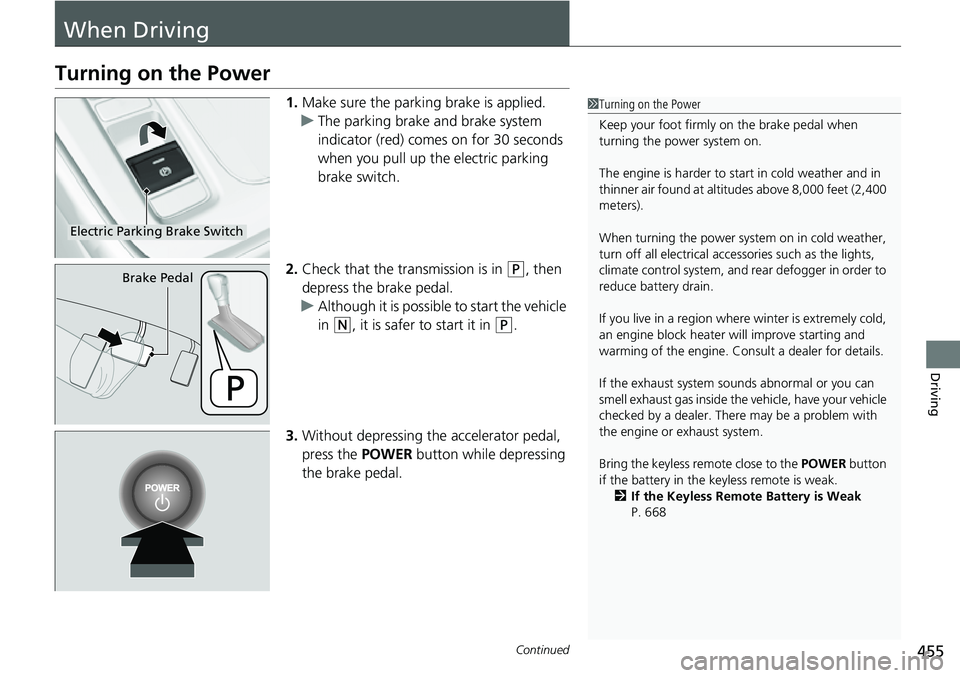
1.Make sure the parkin g brake is applied.
u The parking brake and brake system
indicator (red) comes on for 30 seconds
when you pull up the electric parking
brake switch.
2. Check that the transmission is in
(P, then
depress the brake pedal.
u Although it is possible to start the vehicle
in
(N, it is safer to start it in (P.
3. Without depressing the accelerator pedal,
press the POWER button while depressing
the brake pedal.
1 Turning on the Power
Keep your foot firmly on the brake pedal when
turning the power system on.
The engine is harder to st art in cold weather and in
thinner air found at altit udes above 8,000 feet (2,400
meters).
When turning the power system on in cold weather,
turn off all electrical accessories such as the lights,
climate control system, and rear defogger in order to
reduce battery drain.
If you live in a region where winter is extremely cold,
an engine block heater will improve starting and
warming of the engine. Consult a dealer for details.
If the exhaust system sounds abnormal or you can
smell exhaust gas inside the vehicle, have your vehicle
checked by a dealer. There may be a problem with
the engine or exhaust system.
Bring the keyless remote close to the POWER button
if the battery in the keyless remote is weak. 2 If the Keyless Remote Battery is Weak
P. 668
Electric Parking Brake Switch
Brake Pedal
Page 457 of 719
uuWhen Driving uTurning on the Power
456
Driving
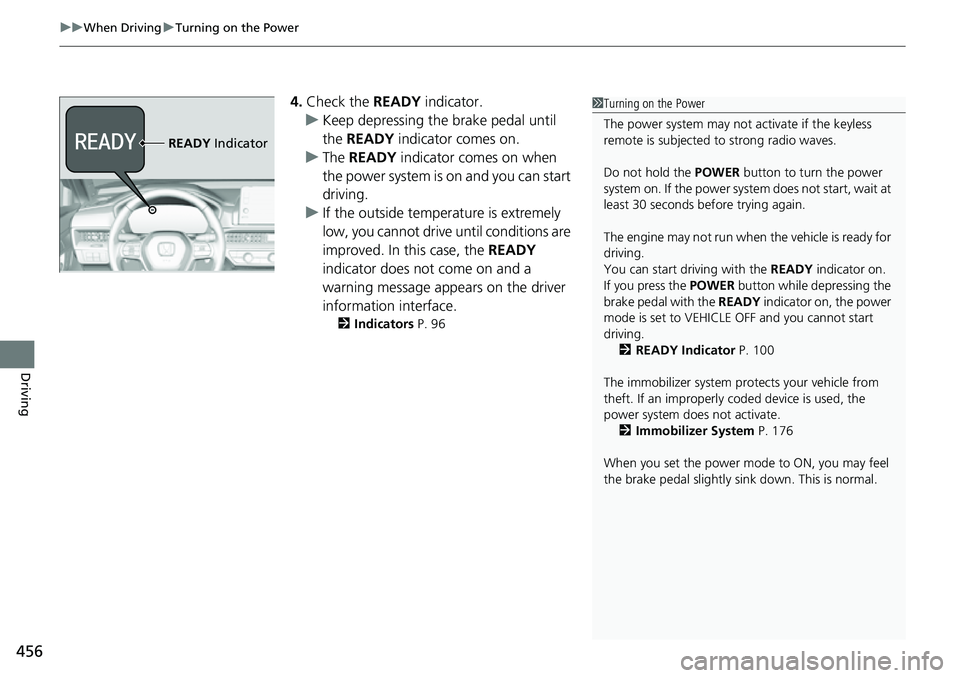
4. Check the READY indicator.
u Keep depressing the brake pedal until
the READY indicator comes on.
u The READY indicator comes on when
the power system is on and you can start
driving.
u If the outside temperature is extremely
low, you cannot drive until conditions are
improved. In this case, the READY
indicator does not come on and a
warning message appears on the driver
information interface.
2 Indicators P. 96
1Turning on the Power
The power system may not activate if the keyless
remote is subjected to strong radio waves.
Do not hold the POWER button to turn the power
system on. If the power system does not start, wait at
least 30 seconds before trying again.
The engine may not run when the vehicle is ready for
driving.
You can start driving with the READY indicator on.
If you press the POWER button while depressing the
brake pedal with the READY indicator on, the power
mode is set to VEHICLE OFF and you cannot start
driving.
2 READY Indicator P. 100
The immobilizer system pr otects your vehicle from
theft. If an improperly c oded device is used, the
power system does not activate. 2 Immobilizer System P. 176
When you set the power mode to ON, you may feel
the brake pedal slightly si nk down. This is normal.
READY Indicator
Page 458 of 719
Continued457
uuWhen Driving uTurning on the Power
Driving
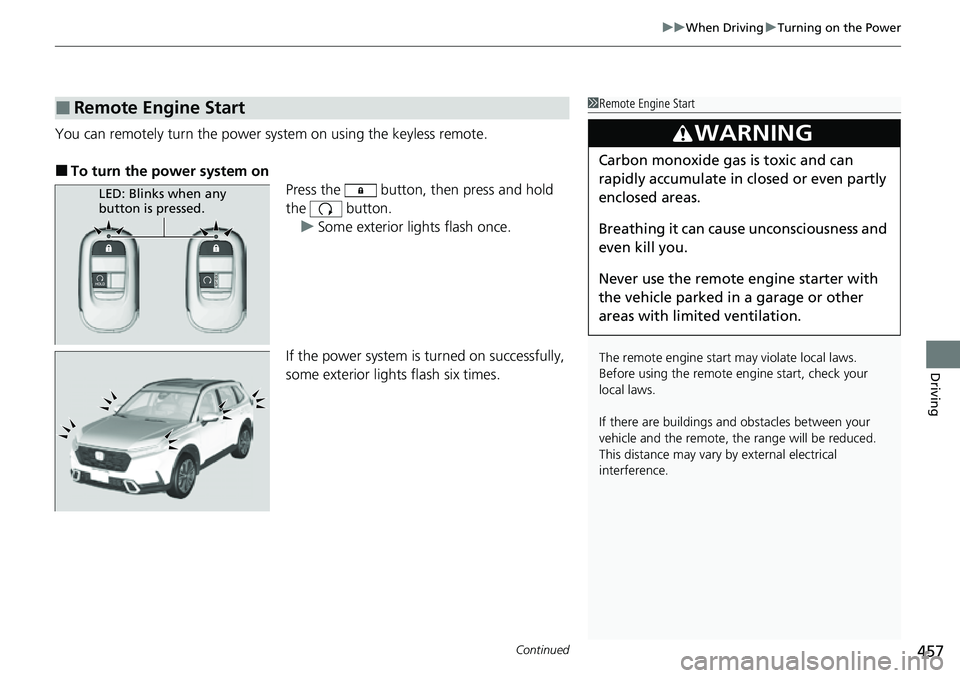
You can remotely turn the power system on using the keyless remote.
■To turn the power system on
Press the button, then press and hold
the button.
u Some exterior lights flash once.
If the power system is turned on successfully,
some exterior lights flash six times.
■Remote Engine Start1 Remote Engine Start
The remote engine start may violate local laws.
Before using the remote e ngine start, check your
local laws.
If there are buildings an d obstacles between your
vehicle and the remote, th e range will be reduced.
This distance may vary by external electrical
interference.
3WARNING
Carbon monoxide ga s is toxic and can
rapidly accumulate in closed or even partly
enclosed areas.
Breathing it can cause unconsciousness and
even kill you.
Never use the remote engine starter with
the vehicle parked in a garage or other
areas with limited ventilation.
LED: Blinks when any
button is pressed.
Page 475 of 719
474
uuWhen Driving uHill Descent Control System
Driving
Hill Descent Control System
When driving down hills where engine braking is not enough to decelerate the
vehicle, this system helps maintain a co nstant vehicle speed without needing to
depress the brake pedal.
The system operates under the following conditions.
• Driving at a speed between about 2-12 mph (3-20 km/h).
• Driving downhill.
• Accelerator pedal and brake pedal are not depressed.
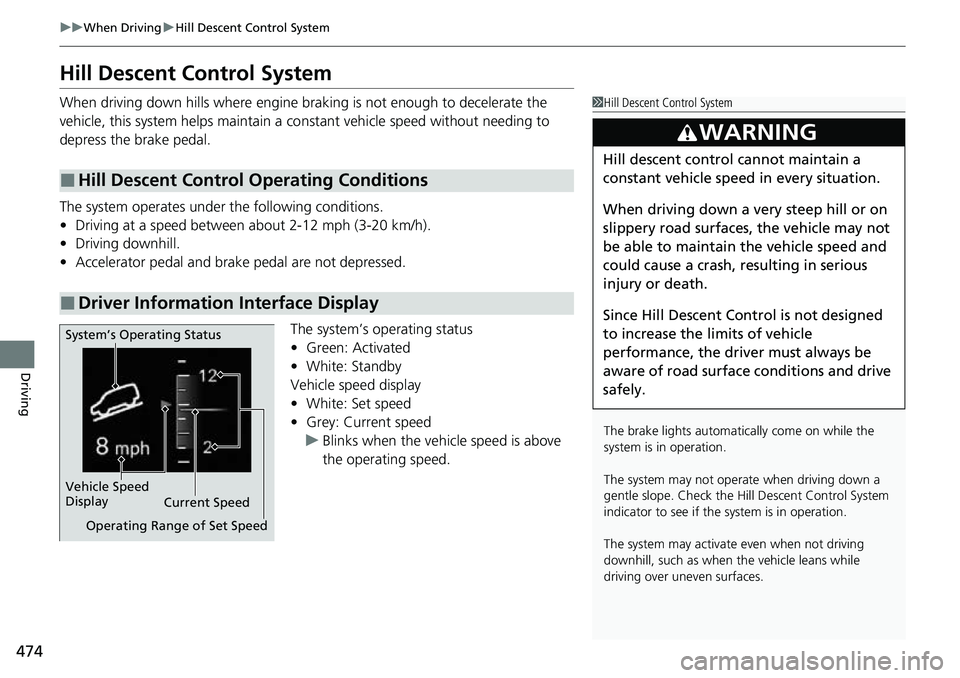
The system’s operating status
•Green: Activated
• White: Standby
Vehicle speed display
• White: Set speed
• Grey: Current speed
u Blinks when the vehicle speed is above
the operating speed.
■Hill Descent Control Operating Conditions
■Driver Information Interface Display
1Hill Descent Control System
The brake lights automati cally come on while the
system is in operation.
The system may not operate when driving down a
gentle slope. Check the Hill Descent Control System
indicator to see if the system is in operation.
The system may activate even when not driving
downhill, such as when the vehicle leans while
driving over uneven surfaces.
3WARNING
Hill descent control cannot maintain a
constant vehicle speed in every situation.
When driving down a very steep hill or on
slippery road surfaces, the vehicle may not
be able to maintain the vehicle speed and
could cause a crash, resulting in serious
injury or death.
Since Hill Descent Control is not designed
to increase the limits of vehicle
performance, the driver must always be
aware of road surface conditions and drive
safely.
System’s Operating Status
Vehicle Speed
Display Current Speed
Operating Range of Set Speed
Page 581 of 719
580
uuBraking uAnti-lock Brake System (ABS)
Driving
Anti-lock Brake System (ABS)
Helps prevent the wheels from locking up, a nd helps you retain steering control by
pumping the brakes rapidly, much faster than you can.
The electronic brake distribution (EBD) system, which is part of the ABS, also
balances the front-to-rear braking distri bution according to vehicle loading.
You should never pump the brake pedal. Let the ABS work for you by always
keeping firm, steady pressure on the brake pe dal. This is sometimes referred to as
“stomp and steer.”
■ABS operation
The brake pedal may pulsate slightly when the ABS is working. Depress the brake
pedal and keep holding the pedal firmly dow n. On dry pavement, you will need to
press on the brake pedal very hard before the ABS activates. However, you may feel
the ABS activate immediately if yo u are trying to stop on snow or ice.
ABS may activate when you depress the brake pedal when driving on:
• Wet or snow covered roads.
• Roads paved with stone.
• Roads with uneven surfaces, such as potholes, cracks, manholes, etc.
When the vehicle speed goes unde r 6 mph (10 km/h), the ABS stops.
■ABS1Anti-lock Brake System (ABS)
NOTICE
The ABS may not function correctly if you use a tire of
the incorrect size or type.
If the ABS indicator comes on while driving, there
may be a problem with the system.
While normal braking will not be affected, there is a
possibility that the ABS wi ll not be operating. Have
your vehicle checked by a dealer immediately.
The ABS is not designed for the purpose of reducing
the time or distance it takes for a vehicle to stop: It is
designed to limit brake lo ckup which can lead to
skidding and loss of steering control.
In the following cases, yo ur vehicle may need more
distance to stop than a vehicle without the ABS:
•You are driving on rough or uneven road surfaces,
such as gravel or snow.
•The tires are equipped with tire chains.
The following may be observed with the ABS system:
•Motor sounds coming from the engine
compartment when the brakes are applied, or
when system checks are being performed after the
power system has been turned on and while the
vehicle accelerates.
•Brake pedal and/or the vehicle body vibration when
ABS activates.
These vibrations and sounds are normal to ABS
systems and are no cause for concern.
Page 600 of 719
599
Maintenance
This chapter discusses basic maintenance.
Before Performing MaintenanceInspection and Maintenance ............ 600
Safety When Performing Maintenance ....601Parts and Fluids Used in Maintenance Service ........................................... 602
Maintenance Minder
TM..................... 603
Maintenance Under the Hood Maintenance Items Under the Hood .... 611
Opening the Hood ........................... 612
Recommended Engine Oil ................ 613
Oil Check ......................................... 614
Adding Engine Oil ............................ 615
Changing the Engine Oil and Oil Filter ...616
Cooling System ................................ 618
Transmission Fluid ............................ 620
Brake Fluid ....................................... 621
Refilling Window Wa sher Fluid......... 622
Replacing Light Bulbs ....................... 623
Checking and Maintaining Wiper
Blades .......................................... 627
Checking and Maintaining Tires
Checking Tires ................................. 631
Tire and Loading Information Label ... 632
Tire Labeling .................................... 632
DOT Tire Quality Grading (U.S. Vehicles) .... 634Wear Indicators................................ 636 Tire Service Life ................................ 636
Tire and Wheel Replacement ........... 637
Tire Rotation .................................... 638
Winter Tires ..................................... 639
12-Volt Battery ................................. 640
Remote Transmitter Care
Replacing the Remote Battery .......... 642
Climate Control System Maintenance .... 643Cleaning
Interior Care .................................... 644
Exterior Care.................................... 646
Accessories and Modifications .......... 649
Page 613 of 719
612
uuMaintenance Under the Hood uOpening the Hood
Maintenance
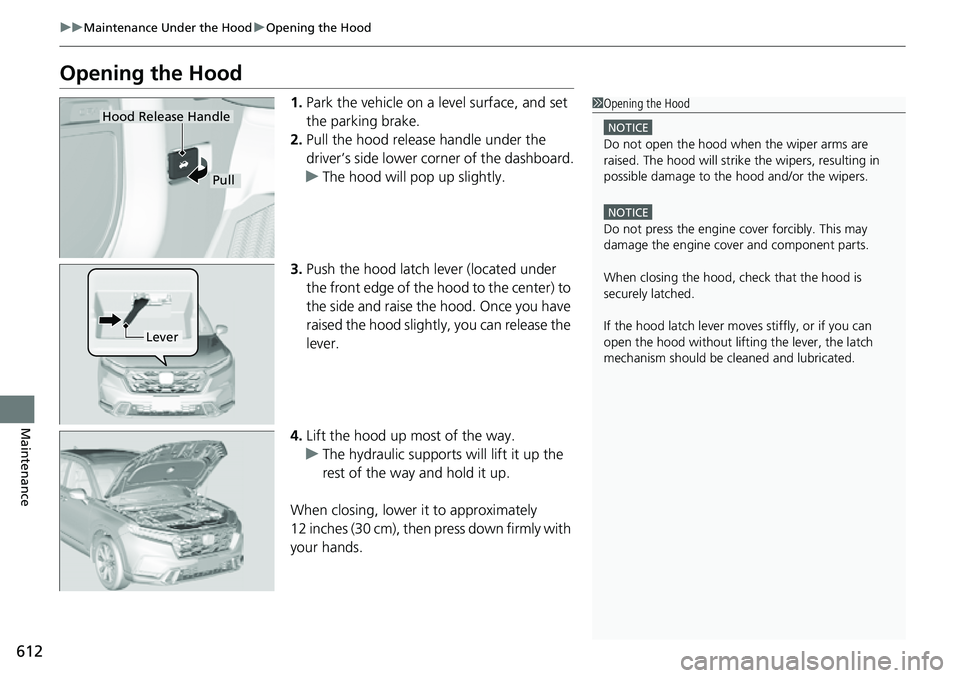
Opening the Hood
1. Park the vehicle on a level surface, and set
the parking brake.
2. Pull the hood release handle under the
driver’s side lower corner of the dashboard.
u The hood will pop up slightly.
3. Push the hood latch lever (located under
the front edge of the hood to the center) to
the side and raise the hood. Once you have
raised the hood slightly, you can release the
lever.
4. Lift the hood up most of the way.
u The hydraulic supports will lift it up the
rest of the way and hold it up.
When closing, lower it to approximately
12 inches (30 cm), then press down firmly with
your hands.1 Opening the Hood
NOTICE
Do not open the hood when the wiper arms are
raised. The hood will strike the wipers, resulting in
possible damage to the hood and/or the wipers.
NOTICE
Do not press the engine cover forcibly. This may
damage the engine cover and component parts.
When closing the hood, check that the hood is
securely latched.
If the hood latch lever moves stiffly, or if you can
open the hood without lifti ng the lever, the latch
mechanism should be cl eaned and lubricated.
Pull
Hood Release Handle
Lever
Page 618 of 719
617
uuMaintenance Under the Hood uChanging the Engine Oil and Oil Filter
Maintenance
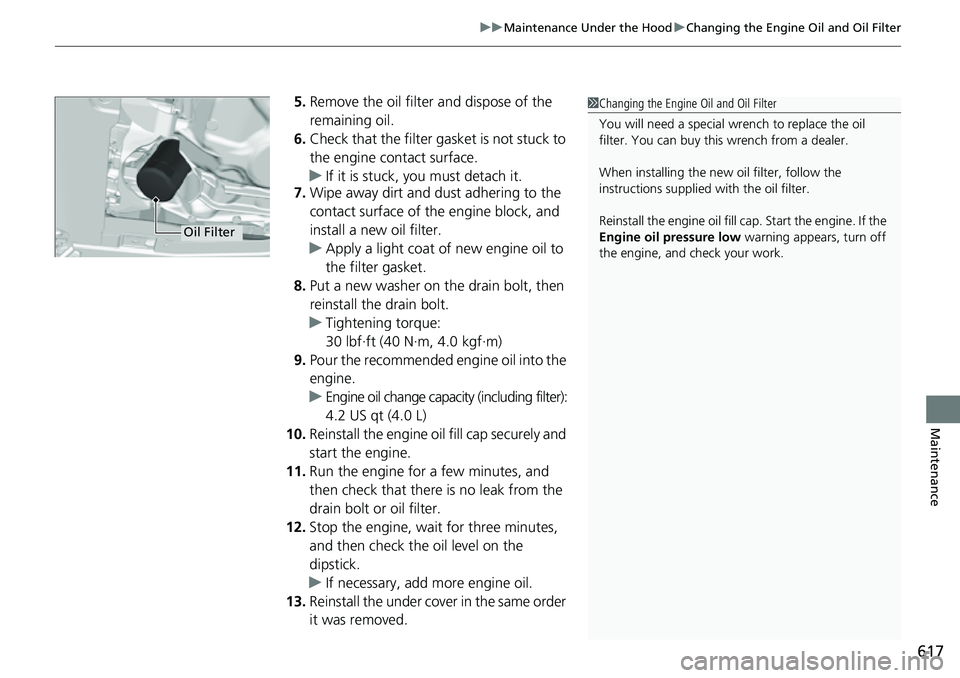
5. Remove the oil filter and dispose of the
remaining oil.
6. Check that the filter gasket is not stuck to
the engine contact surface.
u If it is stuck, you must detach it.
7. Wipe away dirt and dust adhering to the
contact surface of the engine block, and
install a new oil filter.
u Apply a light coat of new engine oil to
the filter gasket.
8. Put a new washer on the drain bolt, then
reinstall the drain bolt.
u Tightening torque:
30 lbf∙ft (40 N∙m, 4.0 kgf∙m)
9. Pour the recommended engine oil into the
engine.
u Engine oil change capacity (including filter):
4.2 US qt (4.0 L)
10. Reinstall the engine oil fill cap securely and
start the engine.
11. Run the engine for a few minutes, and
then check that there is no leak from the
drain bolt or oil filter.
12. Stop the engine, wait for three minutes,
and then check the oil level on the
dipstick.
u If necessary, add more engine oil.
13. Reinstall the under cover in the same order
it was removed.1Changing the Engine Oil and Oil Filter
You will need a special wrench to replace the oil
filter. You can buy this wrench from a dealer.
When installing the new oil filter, follow the
instructions supplied with the oil filter.
Reinstall the engine oil fill cap. Start the engine. If the
Engine oil pressure low warning appears, turn off
the engine, and check your work.
Oil Filter