engine HONDA ELEMENT 2009 1.G User Guide
[x] Cancel search | Manufacturer: HONDA, Model Year: 2009, Model line: ELEMENT, Model: HONDA ELEMENT 2009 1.GPages: 345, PDF Size: 18.9 MB
Page 72 of 345

Outside Temperature IndicatorOn EX and SC modelsThis indicator displays the outside
temperature in Fahrenheit (U.S.
models) or Celsius (Canadian
models).
The temperature sensor is in the
front bumper. The temperature
reading can be affected by heat
reflection from the road surface,
engine heat, and the exhaust from
surrounding traffic. This can cause
an incorrect temperature reading
when your vehicle speed is under 19
mph (30 km/h). When you start your
trip, the sensor is not fully
acclimatized, therefore it may take
several minutes until the proper
temperature is displayed.In certain weather conditions,
temperature readings near freezing
(32°F, 0°C) could mean that ice is
forming on the road surface.
If the outside temperature is
incorrectly displayed, you can adjust
it up to
ꭗ5°F in U.S. models (ꭗ 3°C
in Canadian models) warmer or
cooler.
NOTE: The temperature must be
stabilized before doing this
procedure. To adjust the outside temperature
indicator, make sure the odometer is
shown in the display, then press and
hold the select/reset knob for 10
seconds. The following sequence will
appear for 1 second each: 0, 1, 2, 3, 4,
5,
-5, -4,-3,-2,-1, 0 (U.S.) or
0, 1, 2, 3, -3,-2,-1, 0 (Canada).
When the temperature reaches the
desired value, release the select/
reset knob. You should see the new
outside temperature displayed.Gauges68
2009 Element
Page 80 of 345

You should have received a key
number tag with your set of keys.
You will need this key number if you
ever have to get a key replaced. Use
only Honda-approved key blanks.These keys contain electronic
circuits that are activated by the
immobilizer system. They will not
work to start the engine if the circuits
are damaged.
●Protect the keys from direct
sunlight, high temperature, and
high humidity.●Do not drop the keys or set heavy
objects on them.●Keep the keys away from liquids.
If they get wet, dry them
immediately with a soft cloth.
The keys do not contain batteries.
Do not try to take them apart.
See page77for an explanation of the
remote transmitter's operation. Immobilizer System
The immobilizer system protects
your vehicle from theft. If an
improperly coded key (or other
device) is used, the engine's fuel
system is disabled.
When you turn the ignition switch to
the ON (II) position, the immobilizer
system indicator should come on for
a few seconds, then go off. If the
indicator starts to blink, it means the
system does not recognize the
coding of the key. Turn the ignition
switch to the LOCK (0) position,
remove the key, reinsert it, and turn
the ignition switch to the ON (II)
position again.
The system may not recognize your
key's coding if another immobilizer
key or other metal object (i.e. key
fob) is near the ignition switch when
you insert the key.
Keys and Locks, Immobilizer System76
2009 Element
Page 81 of 345
If the system repeatedly does not
recognize the coding of your key,
contact your dealer.
Do not attempt to alter this system or
add other devices to it. Electrical
problems could result that may make
your vehicle inoperable.
If you have lost your key and cannot
start the engine, contact your dealer.Always take the ignition key with you
whenever you leave the vehicle alone.
As required by the FCC:This device complies with Part 15 of theFCC rules. Operation is subject to the
following two conditions: (1) This devicemay not cause harmful interference, and(2) this device must accept any
interference received, includinginterference that may cause undesiredoperation.
Changes or modifications not expresslyapproved by the party responsible for
compliance could void the user'sauthority to operate the equipment.
This device complies with IndustryCanada Standard RSS-210.
Operation is subject to the following twoconditions: (1) this device may not causeinterference, and (2) this device must
accept any interference that may causeundesired operation of the device.
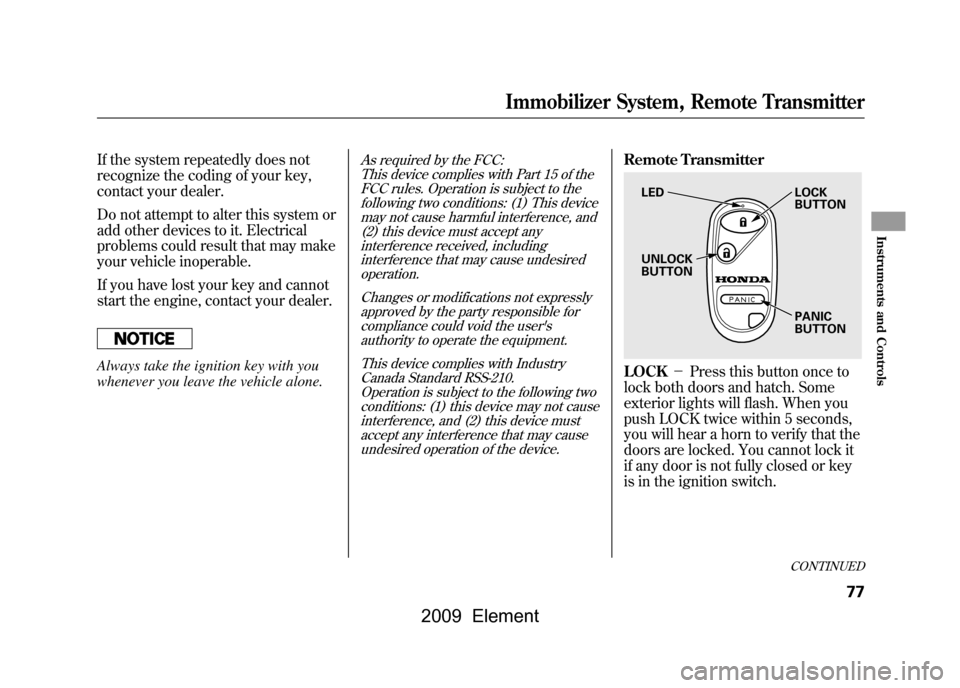
Remote TransmitterLOCK -Press this button once to
lock both doors and hatch. Some
exterior lights will flash. When you
push LOCK twice within 5 seconds,
you will hear a horn to verify that the
doors are locked. You cannot lock it
if any door is not fully closed or key
is in the ignition switch.
LED
UNLOCK
BUTTON LOCK
BUTTON
PANIC
BUTTON
CONTINUED
Immobilizer System, Remote Transmitter
77
Instruments and Controls
2009 Element
Page 84 of 345
If the front wheels are turned, the
anti-theft lock may make it difficult to
turn the key. Firmly turn the steering
wheel to the left or right as you turn
the key.
ACCESSORY (I)-You can operate
the audio system and the accessory
power sockets in this position.
ON (II) -This is the normal key
position when driving. Several of the
indicators on the instrument panel
come on as a test when you turn the
ignition switch from the
ACCESSORY (I) to the ON (II)
position.
START (III) -Use this position
only to start the engine. The switch
returns to the ON (II) position when
you let go of the key. You will hear a reminder beeper if
you leave the key in the LOCK (0) or
the ACCESSORY (I) position and
open the driver's door. Remove the
key to turn off the beeper.
If your vehicle has an automatic
transmission, the shift lever must be
in Park before you can remove the
key from the ignition switch.
Removing the key from the
ignition switch while driving
locks the steering. This can
cause you to lose control of the
vehicle.
Remove the key from the
ignition switch only when
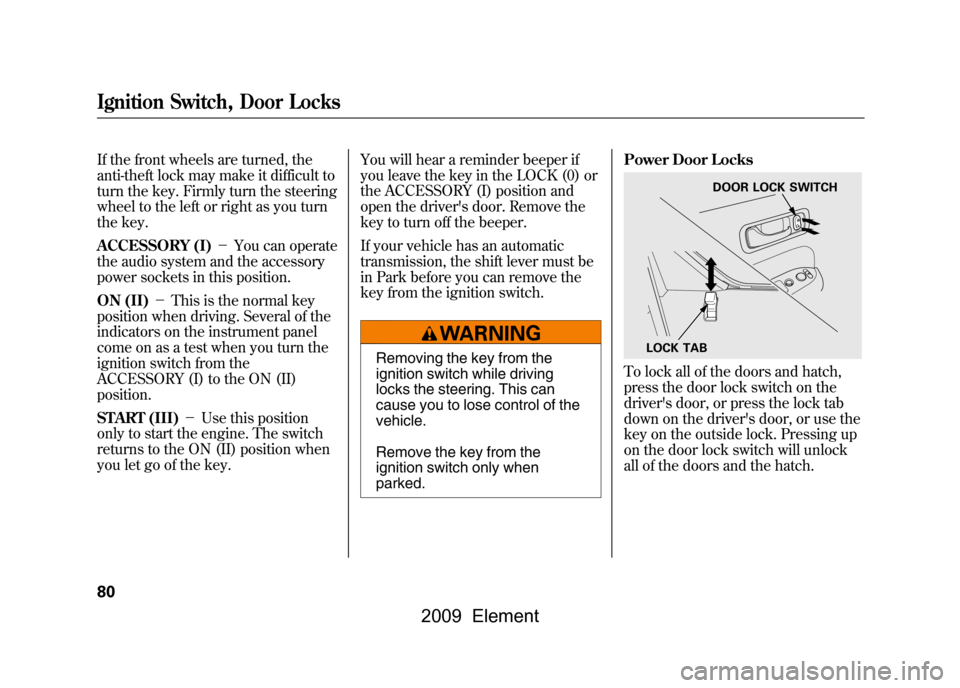
parked.Power Door Locks
To lock all of the doors and hatch,
press the door lock switch on the
driver's door, or press the lock tab
down on the driver's door, or use the
key on the outside lock. Pressing up
on the door lock switch will unlock
all of the doors and the hatch.
LOCK TAB
DOOR LOCK SWITCH
Ignition Switch, Door Locks80
2009 Element
Page 96 of 345
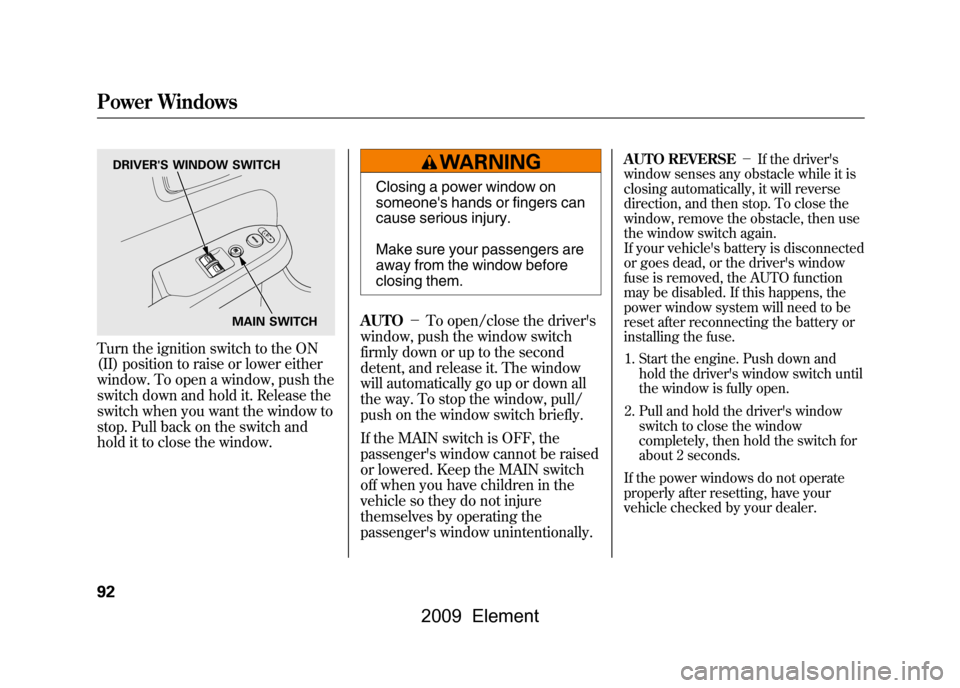
Turn the ignition switch to the ON
(II) position to raise or lower either
window. To open a window, push the
switch down and hold it. Release the
switch when you want the window to
stop. Pull back on the switch and
hold it to close the window.
Closing a power window on
someone's hands or fingers can
cause serious injury.
Make sure your passengers are
away from the window before
closing them.
AUTO -To open/close the driver's
window, push the window switch
firmly down or up to the second
detent, and release it. The window
will automatically go up or down all
the way. To stop the window, pull/
push on the window switch briefly.
If the MAIN switch is OFF, the
passenger's window cannot be raised
or lowered. Keep the MAIN switch
off when you have children in the
vehicle so they do not injure
themselves by operating the
passenger's window unintentionally.
AUTO REVERSE -If the driver's
window senses any obstacle while it is
closing automatically, it will reverse
direction, and then stop. To close the
window, remove the obstacle, then use
the window switch again.
If your vehicle's battery is disconnected
or goes dead, or the driver's window
fuse is removed, the AUTO function
may be disabled. If this happens, the
power window system will need to be
reset after reconnecting the battery or
installing the fuse.
1. Start the engine. Push down and hold the driver's window switch until
the window is fully open.
2. Pull and hold the driver's window switch to close the window
completely, then hold the switch for
about 2 seconds.
If the power windows do not operate
properly after resetting, have your
vehicle checked by your dealer.
DRIVER'S WINDOW SWITCH
MAIN SWITCH
Power Windows92
2009 Element
Page 110 of 345

Air flows from the defroster
vents at the base of the windshield.
When you select
or
, the
system automatically switches to
fresh air mode and turns on the A/C.
The A/C indicator does not come on.
Ventilation
The flow-through ventilation system
draws in outside air, circulates it
through the interior, then discharges
it through vents near the tailgate.
1. Set the temperature to the lower limit.
2. Make sure the A/C is off.
3. Select
and fresh air mode.
4. Set the fan to the desired speed. Using the Heater
The heater uses engine coolant to
warm the air. If the engine is cold, it
will be several minutes before you
feel warm air coming from the
system.
1. Select
and fresh air mode.
2. Set the fan to the desired speed.
3. Adjust the warmth of the air with the temperature control dial.
Using the A/C
Air conditioning places an extra load
on the engine. Watch the engine
coolant temperature gauge (see page
67).If it moves near the red zone,
turn off the A/C until the gauge
reading returns to normal.
1. Turn on the A/C by pressing the button. The indicator in the button
comes on when a fan speed is
selected.
2. Set the temperature to the lower limit. 3. Select
.
4. If the outside air is humid, select recirculation mode. If the outside
air is dry, select fresh air mode.
5. Set the fan to the desired speed.
If the interior is very warm,
you can
cool it down more rapidly by partially
opening the windows, turning on the
A/C, and setting the fan to maximum
speed in fresh air mode.
To cool the interior with MAX A/C:1. Set the mode control dial to MAX A/C.
The system automatically turns on
the A/C, selects
and switches
to recirculation mode.
2. Set the temperature to the lower limit.
3. Set the fan to the desired speed.
Vents, Heating, and A/C106
2009 Element
Page 201 of 345

Before you begin driving your
vehicle, you should know what
gasoline to use and how to check the
levels of important fluids. You also
need to know how to properly store
luggage or packages. The
information in this section will help
you. If you plan to add any
accessories to your vehicle, please
read the information in this section
first.Break-in Period
...........................
198
Fuel Recommendation
................
198
Service Station Procedures
.........
199
Refueling
.................................
199
Opening and Closing the Hood
...................................
200
Oil Check
................................
201
Engine Coolant Check
............
201
Fuel Economy
.............................
202
Accessories and Modifications
..........................
205
Carrying Cargo
...........................
207
Before Driving
197
Before Driving
2009 Element
Page 202 of 345

Break-in Period
Help assure your vehicle's future
reliability and performance by paying
extra attention to how you drive
during the first 600 miles (1,000 km).
During this period:●Avoid full-throttle starts and rapid
acceleration.●Do not change the oil until the
scheduled maintenance time.●Avoid hard braking for the first 200
miles (300 km).●Do not tow a trailer.
You should also follow these
recommendations with an
overhauled or exchanged engine, or
when the brakes are replaced. Fuel Recommendation
Your vehicle is designed to operate
on unleaded gasoline with a pump
octane number of 87 or higher. Use
of a lower octane gasoline can cause
a persistent, heavy metallic rapping
noise that can lead to engine
damage.
On vehicles with manual transmissionYou may hear a knocking noise from
the engine if you drive the vehicle at
low engine speed (below about 1,000
rpm) in a higher gear. To stop this,
raise the engine speed by shifting to
a lower gear.
We recommend using quality
gasoline containing detergent
additives that help prevent fuel
system and engine deposits.In addition, in order to maintain good
performance, fuel economy, and
emissions control, we strongly
recommend, in areas where it is
available, the use of gasoline that
does NOT contain manganese-based
fuel additives such as MMT.
Use of gasoline with these additives
may adversely affect performance,
and cause the malfunction indicator
lamp on your instrument panel to
come on. If this happens, contact
your authorized dealer for service.
Some gasoline today is blended with
oxygenates such as ethanol or
MTBE. Your vehicle is designed to
operate on oxygenated gasoline
containing up to 10% ethanol by
volume and up to 15% MTBE by
volume. Do not use gasoline
containing methanol.
Break-in Period, Fuel Recommendation198
2009 Element
Page 203 of 345
If you notice any undesirable
operating symptoms, try another
service station or switch to another
brand of gasoline.
For further important fuel-related
information, please refer to your
Quick Start Guide.Refueling
1. Park with the driver's side closest to
the service station pump.
2. Outside of the vehicle, open the fuel fill door by pulling its notched edge.
Gasoline is highly flammable and
explosive. You can be burned or
seriously injured when handling
fuel.●Stop the engine and keep heat,
sparks, and flame away.●Handle fuel only outdoors.●Wipe up spills immediately.
3. Remove the fuel fill cap slowly. You may hear a hissing sound as
pressure inside the tank escapes.
Place the cap in the holder on the
fuel fill door. 4. Stop filling the tank after the fuel
nozzle automatically clicks off. Do
not try to ‘‘top off ’’the tank. This
leaves some room in the fuel tank for
the fuel to expand with temperature
changes.
If the fuel nozzle keeps clicking offeven though the tank is not full,
there may be a problem with your
vehicle's fuel vapor recovery system.
The system helps keep fuel vapor
from going into the atmosphere. Try
filling at another pump. If this does
not fix the problem, consult your
dealer.
5. Screw the fuel fill cap back on until it clicks at least once. If you do not
properly tighten the cap, the
malfunction indicator lamp may
come on (see page296).You will
also see a ‘‘CHECK FUEL CAP’’
message on the information display.
6. Close the fuel fill door.
Fuel Recommendation, Service Station Procedures
199
Before Driving
2009 Element
Page 205 of 345
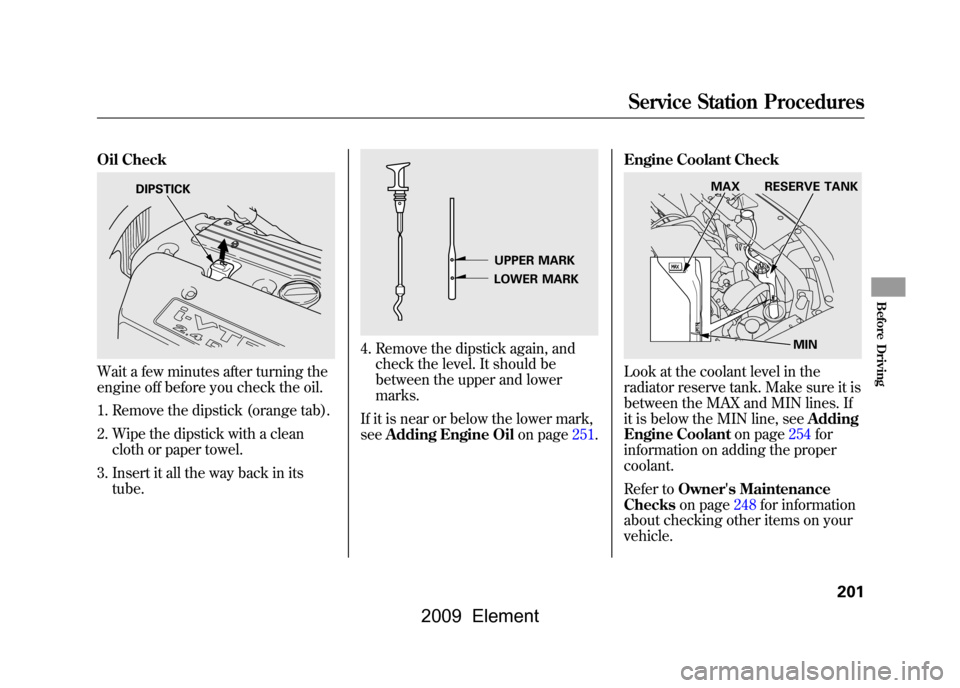
Oil CheckWait a few minutes after turning the
engine off before you check the oil.1. Remove the dipstick (orange tab).
2. Wipe the dipstick with a clean cloth or paper towel.
3. Insert it all the way back in its tube.
4. Remove the dipstick again, andcheck the level. It should be
between the upper and lower
marks.
If it is near or below the lower mark,
see Adding Engine Oil on page251.Engine Coolant Check
Look at the coolant level in the
radiator reserve tank. Make sure it is
between the MAX and MIN lines. If
it is below the MIN line, see
Adding
Engine Coolant on page254for
information on adding the proper
coolant.
Refer to Owner's Maintenance
Checks on page248for information
about checking other items on your
vehicle.
DIPSTICK
UPPER MARK
LOWER MARK
MIN
MAX RESERVE TANK
Service Station Procedures
201
Before Driving
2009 Element