service HONDA ELEMENT 2010 1.G User Guide
[x] Cancel search | Manufacturer: HONDA, Model Year: 2010, Model line: ELEMENT, Model: HONDA ELEMENT 2010 1.GPages: 342, PDF Size: 5.76 MB
Page 83 of 342
If the system still detects a leak in
your vehicle's evaporative emissions
system, the malfunction indicator
lamp (MIL) comes on. If the fuel fill
cap was not already tightened, turn
the engine off, and check or
retighten the fuel fill cap until it
clicks at least once. The MIL should
go off after several days of normal
driving once the cap is tightened or
replaced. If the MIL does not go off,
have your vehicle inspected by a
dealer. For more information, see
page 296.Temperature Gauge
This shows the temperature of the
engine's coolant. During normal
operation, the pointer should rise to
about the middle of the gauge. In
severe driving conditions, the pointer
may rise to the upper zone. If it
reaches the red (hot) mark, pull
safely to the side of the road. Turn to
page 293 for instructions and
precautions on checking the engine's
cooling system.
Maintenance Minder
The information display in the
instrument panel shows you the
engine oil life and maintenance
service items when the ignition
switch is in the ON (II) position. This
information helps to keep you aware
of the periodic maintenance your
vehicle needs for continued trouble-
free driving. Refer to page 243 for
more information.
Gauges
67
Instruments and Controls
Table of Contents
Page 134 of 342

Depending on where you drive, you
may experience reception problems.
Interference can be caused by any of
these conditions:● Driving on the north side of an
east/west mountain road.
● Driving on the north side of a large
commercial truck on an east/westroad.
● Driving in tunnels.
● Driving on a road beside a vertical
wall, steep cliff, or hill to the south
of you.
● Driving on the lower level of a
multi-tiered road.
● Driving on a single lane road
alongside dense trees taller than
50 ft. (15 m) to the south of you.
● Large items carried on a roof rack.
There may be other geographic
situations that could affect XM Radioreception.As required by the FCC: Changes or modifications not expressly
approved by the party responsible forcompliance could void the user'sauthority to operate the equipment.
Receiving XM Radio Service
If your XM Radio service has expired or
you purchased your vehicle from a
previous owner, you can listen to a
sampling of the broadcasts available on
XM Radio. With the ignition switch in the
ACCESSORY (I) or ON (II) position,
push the VOL/PWR knob to turn on the
audio system and press the XM button. A
variety of music types and styles will play.
If you decide to purchase XM Radio
service, contact XM Radio at
www.xmradio.com,or at 1-800-852-9696.
In Canada, contact XM CANADA at
www.xmradio.ca, or at 1-877-209-0079.
You will need to give them your radio I.
D. number and your credit card number.
To get your radio I.D. number, turn the
TUNE knob until ‘‘0 ’’ appears in the
display. Your I.D. will appear in thedisplay. After you've registered with XM Radio,
keep your audio system in the XM Radio
mode while you wait for activation. This
should take about 30 minutes.
While waiting for activation, make sure
your vehicle remains in an open area
with good reception. Once your audio
system is activated, you'll be able to
listen to XM Radio broadcasts. XM Radio
will continue to send an activation signal
to your vehicle for at least 12 hours from
the activation request. If the service has
not been activated after 36 hours, contact
XM Radio. In Canada, contact XM CANADA.
Playing the XM®Radio (Models without navigation system)
118
Table of Contents
Page 154 of 342

Depending on where you drive, you
may experience reception problems.
Interference can be caused by any of
these conditions:● Driving on the north side of an
east/west mountain road.
● Driving on the north side of a large
commercial truck on an east/westroad.
● Driving in tunnels.
● Driving on a road beside a vertical
wall, steep cliff, or hill to the south
of you.
● Driving on the lower level of a
multi-tiered road.
● Driving on a single lane road
alongside dense trees taller than
50 ft. (15 m) to the south of you.
● Large items carried on a roof rack.
There may be other geographic
situations that could affect XM Radioreception.As required by the FCC: Changes or modifications not expresslyapproved by the party responsible for
compliance could void the user'sauthority to operate the equipment.
Receiving XM Radio Service
If your XM Radio service has expired
or you purchased your vehicle from a
previous owner, you can listen to a
sampling of the broadcasts available
on XM Radio. With the ignition
switch in the ACCESSORY (I) or ON
(II) position, push the power/volume
knob to turn on the audio system and
press the CD/XM button. A variety
of music types and styles will play. If you decide to purchase XM Radio
service, contact XM Radio at
www.
xmradio.com,
or at 1-800-852-9696. In
Canada, contact XM CANADA at
www.xmradio.ca,or at 1-877-209-0079.
You will need to give them your radio
I.D. number and your credit card
number. To get your radio I.D.
number, press the TUNE bar until‘‘ 0 ’’ appears in the display. Your I.D.
will appear in the display.
After you've registered with XM
Radio, keep your audio system in the
XM Radio mode while you wait for
activation. This should take about 30 minutes.
Playing the XM®Radio (Models with navigation system)
138
Table of Contents
Page 155 of 342

While waiting for activation, make
sure your vehicle remains in an open
area with good reception. Once your
audio system is activated, you'll be
able to listen to XM Radio
broadcasts. XM Radio will continue
to send an activation signal to your
vehicle for at least 12 hours from the
activation request. If the service has
not been activated after 36 hours,
contact XM Radio. In Canada, contact
XM CANADA.
Playing the XM®Radio (Models with navigation system)
139
Features
Table of Contents
Page 213 of 342
Before you begin driving your
vehicle, you should know what
gasoline to use and how to check the
levels of important fluids. You also
need to know how to properly store
luggage or packages. The
information in this section will help
you. If you plan to add any
accessories to your vehicle, please
read the information in this section first.Break-in Period........................... 198
Fuel Recommendation ................
198
Service Station Procedures .........199
Refueling .................................
199
Opening and Closing the Hood ................................... 200
Oil Check ................................ 201
Engine Coolant Check ............201
Fuel Economy .............................
202
Accessories and Modifications .......................... 205
Carrying Cargo ........................... 207
Before Driving
197
Before Driving
Page 214 of 342

Break-in Period
Help assure your vehicle's future
reliability and performance by paying
extra attention to how you drive
during the first 600 miles (1,000 km).
During this period:● Avoid full-throttle starts and rapidacceleration.
● Do not change the oil until the
scheduled maintenance time.
● Avoid hard braking for the first 200
miles (300 km).
● Do not tow a trailer.
You should also follow these
recommendations with an
overhauled or exchanged engine, or
when the brakes are replaced. Fuel Recommendation
Your vehicle is designed to operate
on unleaded gasoline with a pump
octane number of 87 or higher. Use
of a lower octane gasoline can cause
a persistent, heavy metallic rapping
noise that can lead to enginedamage.
On vehicles with manual transmission
You may hear a knocking noise from
the engine if you drive the vehicle at
low engine speed (below about 1,000
rpm) in a higher gear. To stop this,
raise the engine speed by shifting to
a lower gear.
We recommend using quality
gasoline containing detergent
additives that help prevent fuel
system and engine deposits.In addition, in order to maintain good
performance, fuel economy, and
emissions control, we strongly
recommend, in areas where it is
available, the use of gasoline that
does NOT contain manganese-based
fuel additives such as MMT.
Use of gasoline with these additives
may adversely affect performance,
and cause the malfunction indicator
lamp on your instrument panel to
come on. If this happens, contact
your authorized dealer for service.
Some gasoline today is blended with
oxygenates such as ethanol or
MTBE. Your vehicle is designed to
operate on oxygenated gasoline
containing up to 10% ethanol by
volume and up to 15% MTBE by
volume. Do not use gasoline
containing methanol.
Break-in Period, Fuel Recommendation
198
Table of Contents
Page 215 of 342
If you notice any undesirable
operating symptoms, try another
service station or switch to another
brand of gasoline.
For further important fuel-related
information for your vehicle, or
information on gasoline that does not
contain MMT, visit Owner Link at
owners.honda.com. In Canada, visit
www.honda.cafor additional
information on gasoline. Refueling
1. Park with the driver's side closest to
the service station pump.
2. Outside of the vehicle, open the fuel fill door by pulling its notched edge.
Gasoline is highly flammable and
explosive. You can be burned or
seriously injured when handling fuel.
● Stop the engine and keep heat,
sparks, and flame away.
● Handle fuel only outdoors.
● Wipe up spills immediately.
3. Remove the fuel fill cap slowly. You may hear a hissing sound as
pressure inside the tank escapes.
Place the cap in the holder on the
fuel fill door. 4. Stop filling the tank after the fuel
nozzle automatically clicks off. Do
not try to ‘‘top off ’’the tank. This
leaves some room in the fuel tank for
the fuel to expand with temperature changes.
If the fuel nozzle keeps clicking offeven though the tank is not full,
there may be a problem with your
vehicle's fuel vapor recovery system.
The system helps keep fuel vapor
from going into the atmosphere. Try
filling at another pump. If this does
not fix the problem, consult your dealer.
5. Screw the fuel fill cap back on until it clicks at least once. If you do not
properly tighten the cap, the
malfunction indicator lamp may
come on (see page 296). You will
also see a ‘‘CHECK FUEL CAP ’’
message on the information display.
6. Close the fuel fill door.
Fuel Recommendation, Service Station Procedures
199
Before Driving
Table of Contents
Page 216 of 342
Opening and Closing the Hood
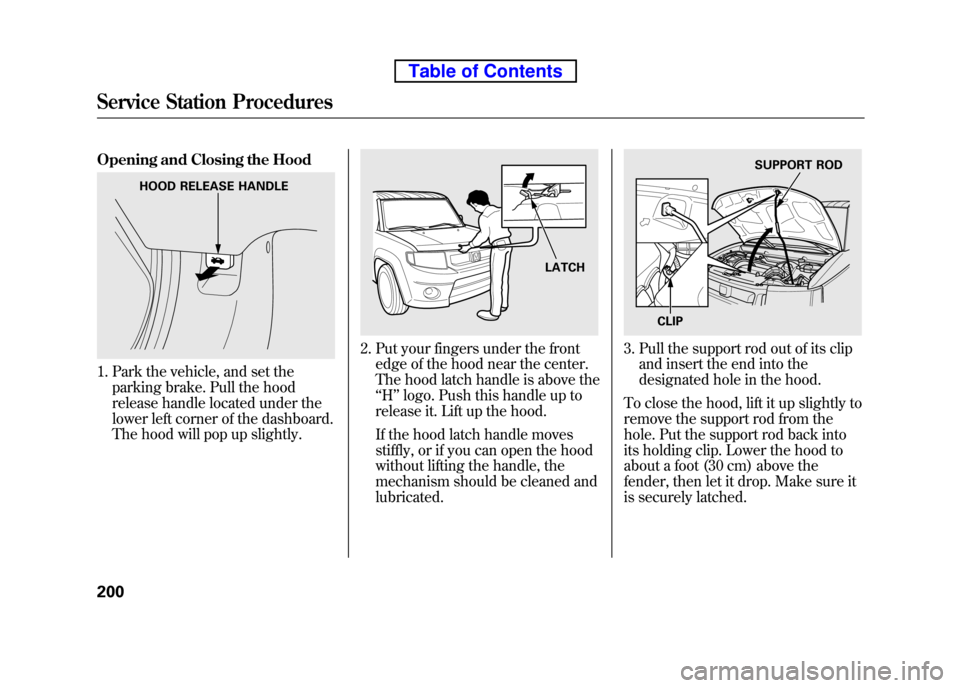
1. Park the vehicle, and set theparking brake. Pull the hood
release handle located under the
lower left corner of the dashboard.
The hood will pop up slightly.
2. Put your fingers under the frontedge of the hood near the center.
The hood latch handle is above the‘‘H ’’logo. Push this handle up to
release it. Lift up the hood.
If the hood latch handle moves
stiffly, or if you can open the hood
without lifting the handle, the
mechanism should be cleaned andlubricated.3. Pull the support rod out of its clip and insert the end into the
designated hole in the hood.
To close the hood, lift it up slightly to
remove the support rod from the
hole. Put the support rod back into
its holding clip. Lower the hood to
about a foot (30 cm) above the
fender, then let it drop. Make sure it
is securely latched.
HOOD RELEASE HANDLE
LATCH
SUPPORT ROD
CLIP
Service Station Procedures
200
Table of Contents
Page 217 of 342
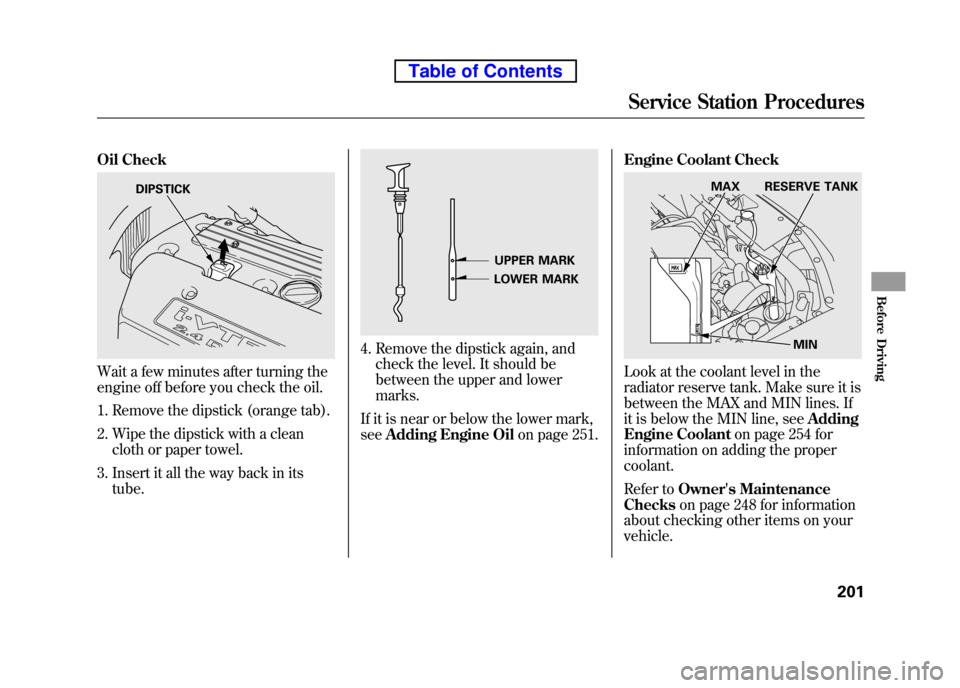
Oil Check
Wait a few minutes after turning the
engine off before you check the oil.1. Remove the dipstick (orange tab).
2. Wipe the dipstick with a clean cloth or paper towel.
3. Insert it all the way back in its tube.
4. Remove the dipstick again, andcheck the level. It should be
between the upper and lowermarks.
If it is near or below the lower mark,see Adding Engine Oil on page 251.Engine Coolant Check
Look at the coolant level in the
radiator reserve tank. Make sure it is
between the MAX and MIN lines. If
it is below the MIN line, see
Adding
Engine Coolant on page 254 for
information on adding the propercoolant.
Refer to Owner's Maintenance
Checks on page 248 for information
about checking other items on your vehicle.
DIPSTICK
UPPER MARK
LOWER MARK
MIN
MAX RESERVE TANK
Service Station Procedures
201
Before Driving
Table of Contents
Page 243 of 342

Your vehicle is equipped with a tire
pressure monitoring system (TPMS)
that turns on every time you start the
engine and monitors the pressure in
your tires while driving.
Each tire has its own pressure sensor
(not including the spare tire). If the
air pressure of a tire becomes
significantly low, the sensor in that
tire immediately sends a signal that
causes the low tire pressure indicator
to come on.Low Tire Pressure Indicator
When the low tire pressure indicator
is on, one or more of your tires is
significantly underinflated. You
should stop and check your tires as
soon as possible, and inflate them to
the proper pressure as indicated on
the vehicle's tire information placard.
If you think you can safely drive a
short distance to a service station,
proceed slowly, and inflate the tire to
the recommended pressure shown
on the driver's doorjamb.
If the tire is flat, or if the tire pressure
is too low to continue driving, replace
the tire with the compact spare tire
(see page 282). If you cannot make the low tire
pressure indicator go out after
inflating the tires to the specified
values, have your dealer check the
system as soon as possible.
Driving on a significantly
underinflated tire causes the tire to
overheat and can lead to tire failure.
Underinflation also reduces fuel
efficiency and tire tread life, and may
affect the vehicle's handling and
stopping ability.
Because tire pressure varies by
temperature and other conditions,
the low tire pressure indicator may
come on unexpectedly.
CONTINUED
Tire Pressure Monitoring System (TPMS)
227
Driving
Table of Contents