window HONDA ELEMENT 2010 1.G Owner's Manual
[x] Cancel search | Manufacturer: HONDA, Model Year: 2010, Model line: ELEMENT, Model: HONDA ELEMENT 2010 1.GPages: 342, PDF Size: 5.76 MB
Page 123 of 342

Dehumidify the Interior
Air conditioning, as it cools, removes
moisture from the air. When used in
combination with the heater, it
makes the interior warm and dry and
can prevent the windows from
fogging up.1. Turn the fan on.
2. Turn on the air conditioning.
3. Select
and fresh air mode.
4. Adjust the temperature to your preference.
This setting is suitable for all driving
conditions whenever the outside
temperature is above 32°F (0°C). To Defog and Defrost
To remove fog from the inside of thewindows:
1. Set the fan to the desired speed, or
high for faster defrosting.
2. Select
. The system
automatically switches to fresh air
mode and turns on the A/C. The
A/C indicator will not come on if it
was off to start with.
3. Adjust the temperature control dial so the airflow feels warm.
4. Select
to help clear the rear
window.
5. To increase airflow to the windshield, close the corner vents. When you select
or, the
system automatically turns on the
A/C. This helps to dehumidify the air
and to defog the windshield. In either
mode, you cannot turn off the A/C.
When you switch to another mode,
the A/C returns to its original
setting, either on or off.
Vents, Heating, and A/C
107
Features
Table of Contents
Page 124 of 342

To Remove Exterior Frost or Ice
From the Windows1. Select
. The system
automatically switches to fresh air
mode and turns on the A/C. The
A/C indicator does not come on if
the A/C was off to start with.
2. Select
.
3. Set the fan and temperature controls to maximum level.
4. Select
to help clear the rear
window.
To clear the windows faster, you can
close the dashboard corner vents by
rotating the tab below each vent.
This sends more warm air to the
windshield defroster vents. Once the
windshield is clear, select fresh air
mode to avoid fogging the windows.
For your safety, make sure you have
a clear view through all the windows
before driving. To Turn Everything Off
Turning the fan speed control dial all
the way to the left shuts the systemoff.
● Keep the system off for short
periods only.
● To keep stale air and mustiness
from collecting, you should have
the fan running at all times.
Vents, Heating, and A/C
108
Table of Contents
Page 221 of 342

Modifying your vehicle, or installing
some non-Honda accessories, can
make it unsafe. Before you make any
modifications or add any accessories,
be sure to read the following information. Accessories
Your dealer has Honda accessories
that allow you to personalize your
vehicle. These accessories have been
designed and approved for your
vehicle, and are covered by warranty.
Although non-Honda accessories
may fit on your vehicle, they may not
meet factory specifications, and could
adversely affect your vehicle's
handling and stability.
Improper accessories or
modifications can affect your
vehicle's handling, stability, and
performance, and cause a
crash in which you can be hurt
or killed.
Follow all instructions in this
owner's manual regarding
accessories and modifications.
When properly installed, cellular
phones, alarms, two-way radios, and
low-powered audio systems should
not interfere with your vehicle's
computer controlled systems, such
as your airbags, anti-lock brakes, and
tire pressure monitoring system. Before installing any accessory:
● Make sure the accessory does not
obscure any lights, or interfere
with proper vehicle operation or performance.
● Be sure electronic accessories do
not overload electrical circuits (see
page 298) or interfere with the
proper operation of your vehicle.
● Before installing any electronic
accessory, have the installer
contact your dealer for assistance.
If possible, have your dealer
inspect the final installation.
● Do not install accessories on the
side pillars or across the rear
windows. Accessories installed in
these areas may interfere with
proper operation of the side
curtain airbags.
CONTINUED
Accessories and Modifications
205
Before Driving
Table of Contents
Page 226 of 342

Carrying Items in the Passenger Compartment● Store or secure all items that could
be thrown around and hurt
someone during a crash.
● Be sure items placed on the floor
behind the front seats cannot roll
under the seats and interfere with
the pedals, the seat operation, or
the proper operation of the sensors
under the seats.
● Keep the glove box closed while
driving. If it is open, a passenger
could injure their knees during a
crash or sudden stop. ●
If you fold the rear seats down or
up, or remove them, tie down
items that could be thrown about
the vehicle during a crash or
sudden stop. Also, keep all cargo
below the bottom of the windows.
If it is higher, it could interfere
with the proper operation of the
side curtain airbags.
Carrying Cargo in the Cargo Area
or on a Roof Rack ● Distribute cargo evenly on the
floor of the cargo area, placing the
heaviest items on the bottom and
as far forward as possible. Tie
down items that could be thrown
about the vehicle during a crash or
sudden stop. ●
If you carry large items that
prevent you from closing the
tailgate or the hatch, exhaust gas
can enter the passenger area. To
avoid the possibility of carbon
monoxide poisoning, follow the
instructions on page 52.
● If you carry any items on a roof
rack, be sure the total weight of
the rack and the items does not
exceed 75 lbs (34 kg).
If you use an accessory roof rack,
the roof rack weight limit may be
lower. Refer to the information that
came with your roof rack.
Carrying Cargo
210
Table of Contents
Page 231 of 342

You should do the following checks
and adjustments before you drive
your vehicle.1. Make sure all windows, mirrors, and outside lights are clean and
unobstructed. Remove frost, snow,
or ice.
2. Check that the hood is fully closed.
3. Visually check the tires. If a tire looks low, use a gauge to check itspressure.
4. Check that any items you may be carrying are stored properly or
fastened down securely. 5. Check the seat adjustment (see
page 83).
6. Check the adjustment of the inside and outside mirrors (see page 93).
7. Check the steering wheel adjustment (see page 74). 8. Make sure the doors, the hatch,
and the tailgate are securely
closed and locked.
9. Fasten your seat belt. Check that your passengers have fastened
their seat belts (see page 14).
10. When you start the engine, check the gauges and indicators in the
instrument panel (see page 57).
Preparing to Drive
215
Driving
Table of Contents
Page 239 of 342

Always use the parking brake when
you park your vehicle. Make sure the
parking brake is set firmly, or your
vehicle may roll if it is parked on an incline.
If your vehicle has an automatic
transmission, set the parking brake
before you put the transmission in
Park. This keeps the vehicle from
moving and putting pressure on the
parking mechanism in thetransmission.Parking Tips
● Make sure the windows areclosed.
● Turn off the lights.
● Place any packages, valuables, etc.
in the cargo area or take them withyou.
● Lock the doors and the hatch with
the key.
● Never park over dry leaves, tall
grass, or other flammable
materials. The hot three way
catalytic converter could cause
these materials to catch on fire. ●
If the vehicle is facing uphill, turn
the front wheels away from the
curb. If your vehicle has a manual
transmission, put it in first gear.
● If the vehicle is facing downhill,
turn the front wheels toward the
curb. If your vehicle has a manual
transmission, put it in reversegear.
● Make sure the parking brake is
fully released before driving away.
Driving with the parking brake
partially set can overheat or
damage the rear brakes.
Parking
223
Driving
Table of Contents
Page 293 of 342

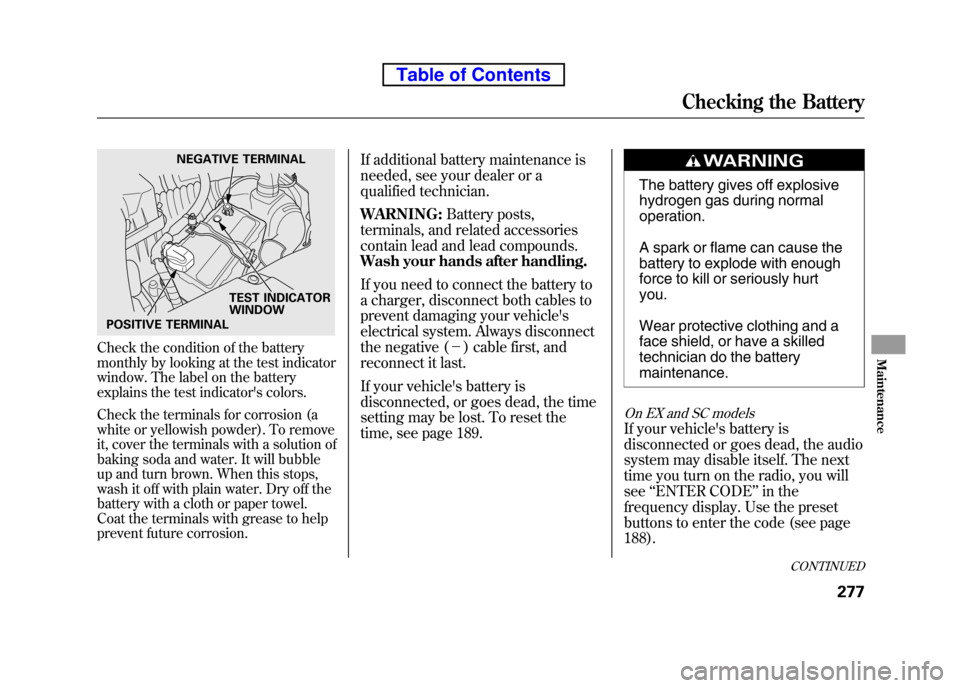
Check the condition of the battery
monthly by looking at the test indicator
window. The label on the battery
explains the test indicator's colors.
Check the terminals for corrosion (a
white or yellowish powder). To remove
it, cover the terminals with a solution of
baking soda and water. It will bubble
up and turn brown. When this stops,
wash it off with plain water. Dry off the
battery with a cloth or paper towel.
Coat the terminals with grease to help
prevent future corrosion.If additional battery maintenance is
needed, see your dealer or a
qualified technician. WARNING:
Battery posts,
terminals, and related accessories
contain lead and lead compounds.
Wash your hands after handling.
If you need to connect the battery to
a charger, disconnect both cables to
prevent damaging your vehicle's
electrical system. Always disconnect
the negative ( -) cable first, and
reconnect it last.
If your vehicle's battery is
disconnected, or goes dead, the time
setting may be lost. To reset the
time, see page 189.
The battery gives off explosive
hydrogen gas during normal operation.
A spark or flame can cause the
battery to explode with enough
force to kill or seriously hurtyou.
Wear protective clothing and a
face shield, or have a skilled
technician do the battery maintenance.
On EX and SC models
If your vehicle's battery is
disconnected or goes dead, the audio
system may disable itself. The next
time you turn on the radio, you willsee ‘‘ENTER CODE ’’in the
frequency display. Use the preset
buttons to enter the code (see page188).
NEGATIVE TERMINAL
TEST INDICATOR WINDOW
POSITIVE TERMINAL
CONTINUED
Checking the Battery
277
Maintenance
Table of Contents
Page 294 of 342

On vehicles with navigation system
The navigation system will also
disable itself. The next time you turn
on the ignition switch, the system
will require you to enter a PIN before
it can be used. Refer to the
navigation system manual.Vehicle Storage
If you need to park your vehicle for
an extended period (more than 1
month), there are several things you
should do to prepare it for storage.
Proper preparation helps prevent
deterioration and makes it easier to
get your vehicle back on the road. If
possible, store your vehicle indoors.
● Fill the fuel tank.
● Wash and dry the exterior completely.
● Clean the interior. Make sure the
carpeting, floor mats, etc., are
completely dry.
● Leave the parking brake off. Put
the transmission in reverse
(manual) or Park (automatic). ●
Block the rear wheels.
● If the vehicle is to be stored for a
longer period, it should be
supported on jackstands so the
tires are off the ground.
● Leave one window open slightly (if
the vehicle is being storedindoors).
● Disconnect the battery.
● Support the front and rear wiper
blade arms with a folded towel or
rag so they do not touch thewindshield.
● To minimize sticking, apply a
silicone spray lubricant to all door
and tailgate seals. Also, apply a
vehicle body wax to the painted
surfaces that mate with the door
and tailgate seals.
Checking the Battery, Vehicle Storage
278
Table of Contents
Page 311 of 342

Low Oil Pressure Indicator
This indicator should never
come on when the engine is
running. If it starts flashing or stays
on, the oil pressure has dropped very
low or lost pressure. Serious engine
damage is possible, and you should
take immediate action.
Running the engine with low oil
pressure can cause serious mechanical
damage almost immediately. Turn off
the engine as soon as you can safely get
the vehicle stopped. 1. Safely pull off the road, and shut
off the engine. Turn on the hazard
warning lights.
2. Let the vehicle sit for a minute. Open the hood, and check the oil
level (see page 201). An engine
very low on oil can lose pressure
during cornering and other drivingmaneuvers.
3. If necessary, add oil to bring the level back to the full mark on the
dipstick (see page 251).
4. Start the engine, and watch the oil pressure indicator. If it does not go
out within 10 seconds, turn off the
engine. There is a mechanical
problem that needs to be repaired
before you can continue driving(see Emergency Towing on page
303). Charging System Indicator
If the charging system
indicator comes on brightly
when the engine is running, the
battery is not being charged.
Immediately turn off all electrical
accessories. Try not to use other
electrically operated controls such as
the power windows. Keep the engine
running; starting the engine will
discharge the battery rapidly.
Go to a service station or garage
where you can get technicalassistance.
Low Oil Pressure Indicator, Charging System Indicator
295
Taking Care of the Unexpected
Table of Contents
Page 317 of 342

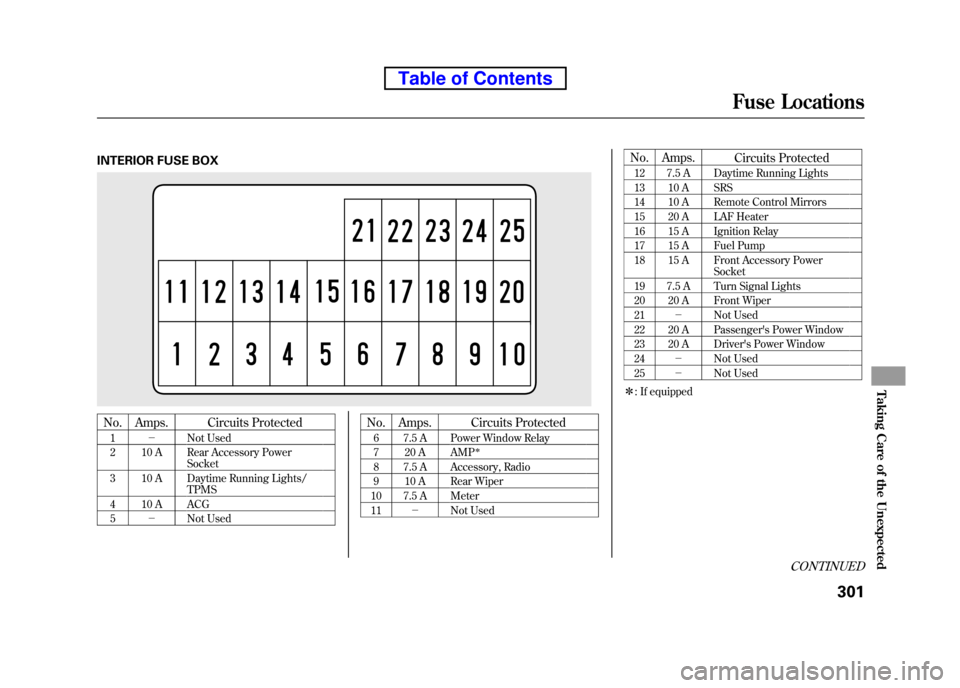
INTERIOR FUSE BOX
No.Amps. Circuits Protected
1 - Not Used
2 10 A Rear Accessory Power Socket
3 10 A Daytime Running Lights/ TPMS
4 10 A ACG 5 - Not Used No. Amps.
Circuits Protected
6 7.5 A Power Window Relay
7 20 A AMP
ꭧ
8 7.5 A Accessory, Radio
9 10 A Rear Wiper
10 7.5 A Meter11 - Not Used No. Amps.
Circuits Protected
12 7.5 A Daytime Running Lights
13 10 A SRS
14 10 A Remote Control Mirrors
15 20 A LAF Heater
16 15 A Ignition Relay
17 15 A Fuel Pump
18 15 A Front Accessory Power Socket
19 7.5 A Turn Signal Lights
20 20 A Front Wiper21 - Not Used
22 20 A Passenger's Power Window
23 20 A Driver's Power Window 24 - Not Used
25 - Not Used
ꭧ : If equipped
CONTINUED
Fuse Locations
301
Taking Care of the Unexpected
Table of Contents