height HONDA ELEMENT 2010 1.G Owners Manual
[x] Cancel search | Manufacturer: HONDA, Model Year: 2010, Model line: ELEMENT, Model: HONDA ELEMENT 2010 1.GPages: 342, PDF Size: 5.76 MB
Page 56 of 342
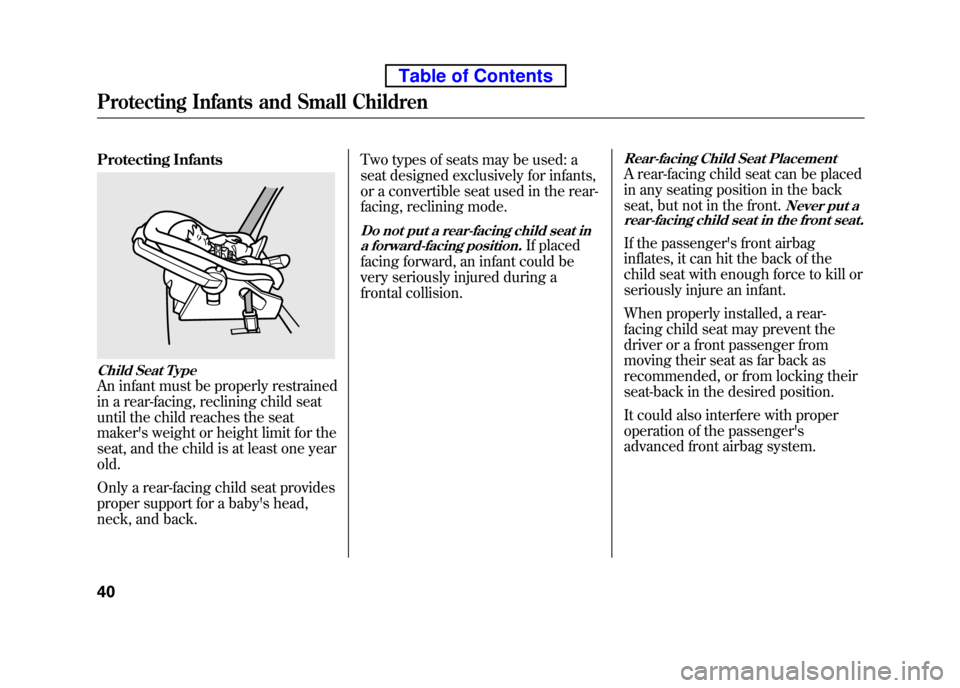
Protecting Infants
Child Seat Type
An infant must be properly restrained
in a rear-facing, reclining child seat
until the child reaches the seat
maker's weight or height limit for the
seat, and the child is at least one year old.
Only a rear-facing child seat provides
proper support for a baby's head,
neck, and back.Two types of seats may be used: a
seat designed exclusively for infants,
or a convertible seat used in the rear-
facing, reclining mode.
Do not put a rear-facing child seat in
a forward-facing position.If placed
facing forward, an infant could be
very seriously injured during a
frontal collision.
Rear-facing Child Seat Placement
A rear-facing child seat can be placed
in any seating position in the back
seat, but not in the front.
Never put a
rear-facing child seat in the front seat.
If the passenger's front airbag
inflates, it can hit the back of the
child seat with enough force to kill or
seriously injure an infant.
When properly installed, a rear-
facing child seat may prevent the
driver or a front passenger from
moving their seat as far back as
recommended, or from locking their
seat-back in the desired position.
It could also interfere with proper
operation of the passenger's
advanced front airbag system.
Protecting Infants and Small Children
40
Table of Contents
Page 57 of 342
In any of these situations, we
strongly recommend that you install
the child seat directly behind the
front passenger's seat, move the seat
as far forward as needed, and leave it
unoccupied. Or, you may wish to get
a smaller rear-facing child seat.
Placing a rear-facing child seat
in the front seat can result in
serious injury or death during a crash.
Always place a rear-facing child
seat in the back seat, not thefront.Protecting Small Children
Child Seat TypeMany states, Canadian provinces and
territories allow a child one year of age
or older who also meets the minimum
size and weight requirements to
transition from a rear-facing child seat
to a forward facing seat. Know the
requirements where you are driving
and follow the child seat instructions.
Many experts recommend use of a
rear-facing seat up to age two, if the
child's height and weight are
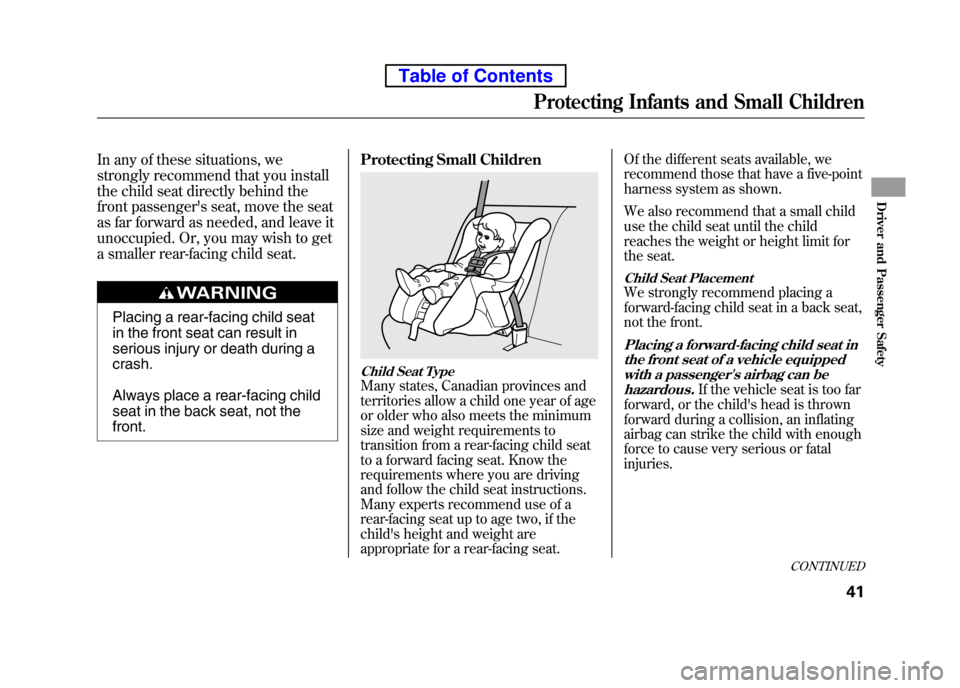
appropriate for a rear-facing seat. Of the different seats available, we
recommend those that have a five-point
harness system as shown.
We also recommend that a small child
use the child seat until the child
reaches the weight or height limit for
the seat.
Child Seat PlacementWe strongly recommend placing a
forward-facing child seat in a back seat,
not the front.
Placing a forward-facing child seat in
the front seat of a vehicle equippedwith a passenger's airbag can be
hazardous.
If the vehicle seat is too far
forward, or the child's head is thrown
forward during a collision, an inflating
airbag can strike the child with enough
force to cause very serious or fatal injuries.
CONTINUED
Protecting Infants and Small Children
41
Driver and Passenger Safety
Table of Contents
Page 65 of 342
When a child reaches the
recommended weight or height limit
for a forward-facing child seat, the
child should sit in a back seat on a
booster seat and wear the lap/
shoulder belt.
The following pages give instructions
on how to check proper seat belt fit,
what kind of booster seat to use if one
is needed, and important precautions
for a child who must sit in front.
Allowing a child age 12 or under
to sit in front can result in injury
or death if the passenger's front
airbag inflates.
If a child must ride in front, move
the vehicle seat as far back as
possible, use a booster seat if
needed, have the child sit up
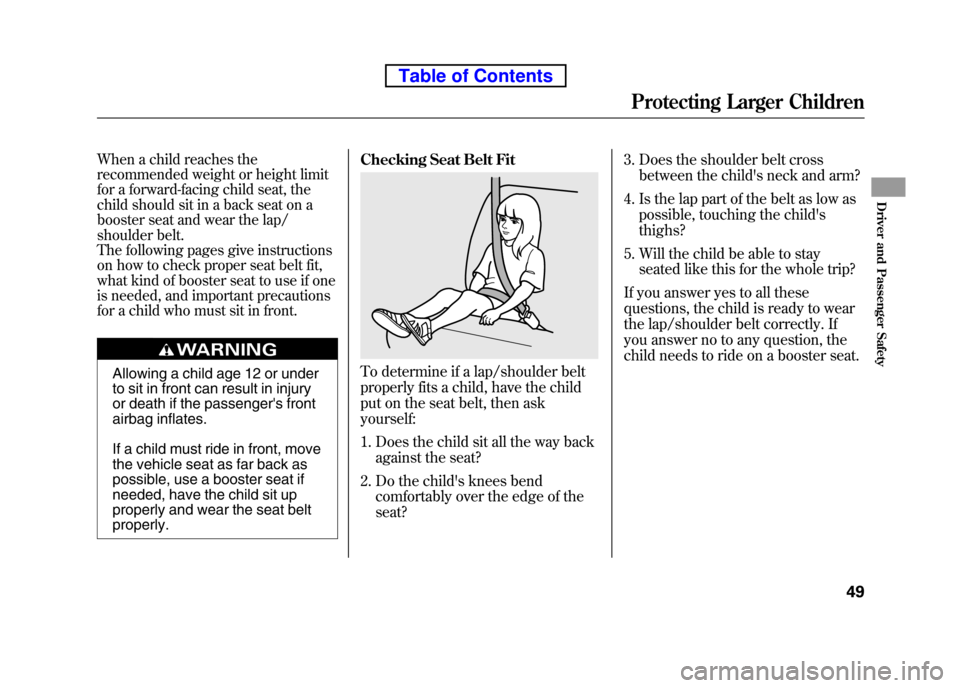
properly and wear the seat beltproperly.Checking Seat Belt FitTo determine if a lap/shoulder belt
properly fits a child, have the child
put on the seat belt, then ask yourself:
1. Does the child sit all the way back
against the seat?
2. Do the child's knees bend comfortably over the edge of the seat? 3. Does the shoulder belt cross
between the child's neck and arm?
4. Is the lap part of the belt as low as possible, touching the child'sthighs?
5. Will the child be able to stay seated like this for the whole trip?
If you answer yes to all these
questions, the child is ready to wear
the lap/shoulder belt correctly. If
you answer no to any question, the
child needs to ride on a booster seat.
Protecting Larger Children
49
Driver and Passenger Safety
Table of Contents
Page 66 of 342
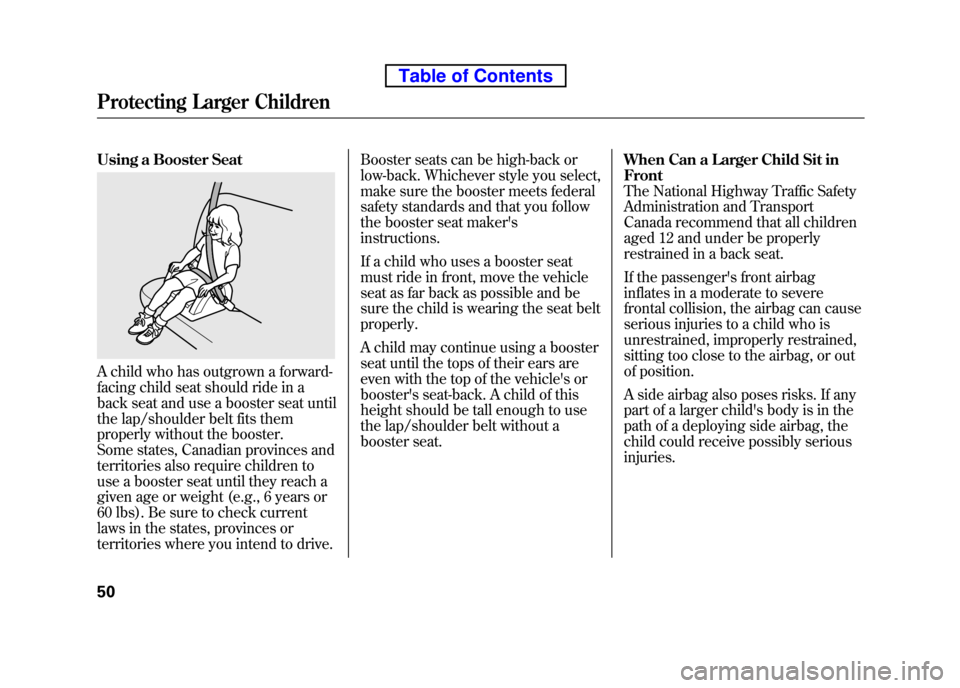
Using a Booster Seat
A child who has outgrown a forward-
facing child seat should ride in a
back seat and use a booster seat until
the lap/shoulder belt fits them
properly without the booster.
Some states, Canadian provinces and
territories also require children to
use a booster seat until they reach a
given age or weight (e.g., 6 years or
60 lbs). Be sure to check current
laws in the states, provinces or
territories where you intend to drive.Booster seats can be high-back or
low-back. Whichever style you select,
make sure the booster meets federal
safety standards and that you follow
the booster seat maker's instructions.
If a child who uses a booster seat
must ride in front, move the vehicle
seat as far back as possible and be
sure the child is wearing the seat beltproperly.
A child may continue using a booster
seat until the tops of their ears are
even with the top of the vehicle's or
booster's seat-back. A child of this
height should be tall enough to use
the lap/shoulder belt without a
booster seat.
When Can a Larger Child Sit inFront
The National Highway Traffic Safety
Administration and Transport
Canada recommend that all children
aged 12 and under be properly
restrained in a back seat.
If the passenger's front airbag
inflates in a moderate to severe
frontal collision, the airbag can cause
serious injuries to a child who is
unrestrained, improperly restrained,
sitting too close to the airbag, or out
of position.
A side airbag also poses risks. If any
part of a larger child's body is in the
path of a deploying side airbag, the
child could receive possibly seriousinjuries.
Protecting Larger Children
50
Table of Contents
Page 71 of 342
This section gives information about
the controls and displays that
contribute to the daily operation of
your vehicle. All the essential
controls are within easy reach.
Control Locations..........................56
Instrument Panel ..........................
57
Instrument Panel Indicators ..........58
Gauges ..........................................
64
Information Display ..................65
Odometer ..................................
65
Trip Meter ................................ 66
Fuel Gauge ............................... 66
Check Fuel Cap Message .........
66
Temperature Gauge ..................67
Maintenance Minder ................
67
Outside Temperature Indicator ............................... 68Controls Near the Steering
Wheel ....................................... 69
Windshield Wipers and Washers .................................... 70
Turn Signals and Headlights .........71
Instrument Panel Brightness ........
72
Hazard Warning Button ................73
Rear Window Defogger .................74
Steering Wheel Adjustment ..........
74
Keys and Locks ............................. 75
Immobilizer System ......................
76
Remote Transmitter ......................77
Ignition Switch ..............................
79
Door Locks ................................... 80
Power Door Locks ....................
80
Rear Doors ................................ 81
Hatch ........................................ 81
Tailgate .....................................
82
Seats ............................................. 83
Seat Adjustments ......................
83
Driver's Seat Height Adjustment ........................... 84
Front Seat Armrests ..................85
Head Restraints ......................... 85Reclining the Front Seats
..........
87
Folding the Rear Seats ..............
88
Removing the Rear Seats ..........90
Power Windows ............................
92
Mirrors ......................................... 93
Adjusting the Power Mirrors .....
93
Rear Windows ............................... 94
Parking Brake ............................... 94
Interior Lights ...............................
95
Light Control Switch .................95
Individual Map Lights ...............
95
Courtesy Light .......................... 96
Ceiling Light .............................
96
Cargo Area Light .......................96
Ignition Switch Light .................
96
Interior Convenience Items ...........97
Cooler Box ................................ 98
Beverage Holders .....................
99
Accessory Power Sockets .......100
Glove Box ...............................
100
Sun Visor ................................ 100
Vanity Mirror ..........................
101
Overhead Console ..................101
Instruments and Controls
55
Instruments and Controls
Page 100 of 342
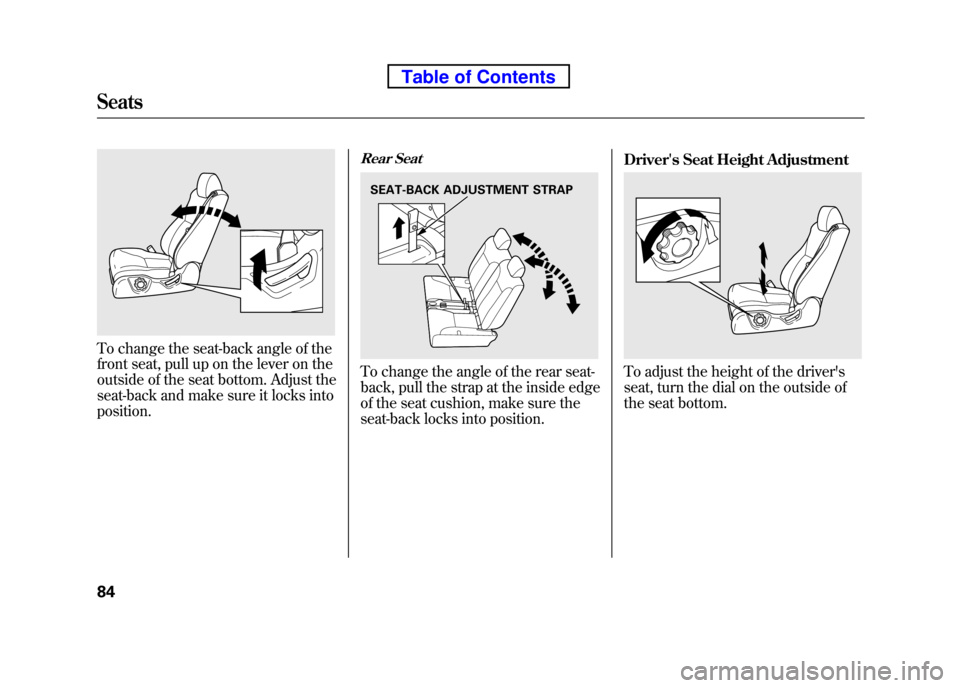
To change the seat-back angle of the
front seat, pull up on the lever on the
outside of the seat bottom. Adjust the
seat-back and make sure it locks intoposition.
Rear Seat
To change the angle of the rear seat-
back, pull the strap at the inside edge
of the seat cushion, make sure the
seat-back locks into position.Driver's Seat Height AdjustmentTo adjust the height of the driver's
seat, turn the dial on the outside of
the seat bottom.
SEAT-BACK ADJUSTMENT STRAP
Seats
84
Table of Contents
Page 102 of 342
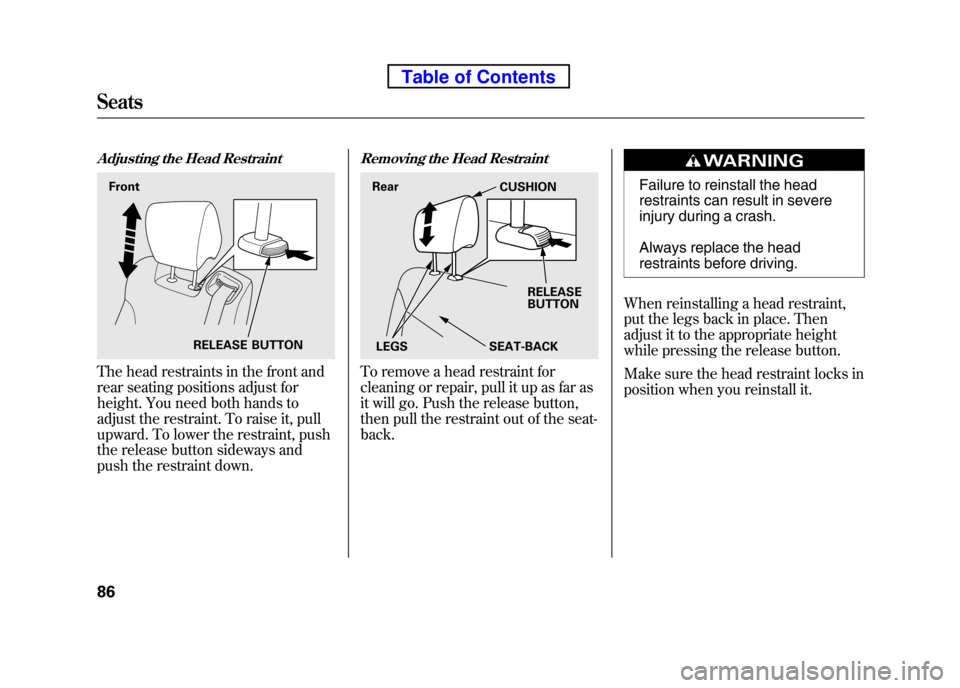
Adjusting the Head Restraint
The head restraints in the front and
rear seating positions adjust for
height. You need both hands to
adjust the restraint. To raise it, pull
upward. To lower the restraint, push
the release button sideways and
push the restraint down.
Removing the Head Restraint
To remove a head restraint for
cleaning or repair, pull it up as far as
it will go. Push the release button,
then pull the restraint out of the seat-back.
Failure to reinstall the head
restraints can result in severe
injury during a crash.
Always replace the head
restraints before driving.
When reinstalling a head restraint,
put the legs back in place. Then
adjust it to the appropriate height
while pressing the release button.
Make sure the head restraint locks in
position when you reinstall it.
RELEASE BUTTON
Front
Rear
CUSHION
RELEASE
BUTTON
SEAT-BACK
LEGS
Seats
86
Table of Contents
Page 252 of 342
Pre-Tow Checklist
When preparing to tow, and before
driving away, be sure to check thefollowing:● The vehicle has been properly
serviced, and the tires, brakes,
suspension, cooling system, and
lights are in good operatingcondition.
● The trailer has been properly
serviced and is in good condition.
● All weights and loads are within
limits (see pages 232 and 233).
● The hitch, safety chains, and any
other attachments are secure.
● All items in or on the trailer are
properly secured and cannot shift
while you drive. ●
Your vehicle tires and spare are
properly inflated (see page 271),
and the trailer tires and spare are
inflated as recommended by the
trailer maker. Driving Safely With a Trailer
The added weight, length, and
height of a trailer will affect your
vehicle's handling and performance,
so driving with a trailer requires
some special driving skills andtechniques.
For your safety and the safety of
others, take time to practice driving
maneuvers before heading for the
open road, and follow the guidelinesbelow.
Towing Speeds and Gears
Drive slower than normal in all
driving situations, and obey posted
speed limits for vehicles with trailers.
If you have an automatic
transmission, use the D position
when towing a trailer on level roads.
D3 is the proper shift lever position
to use when towing a trailer in hilly
terrain. (See
‘‘
Driving on Hills’’on the
next page for additional gearinformation.)
Towing a Trailer
236
Table of Contents
Page 324 of 342
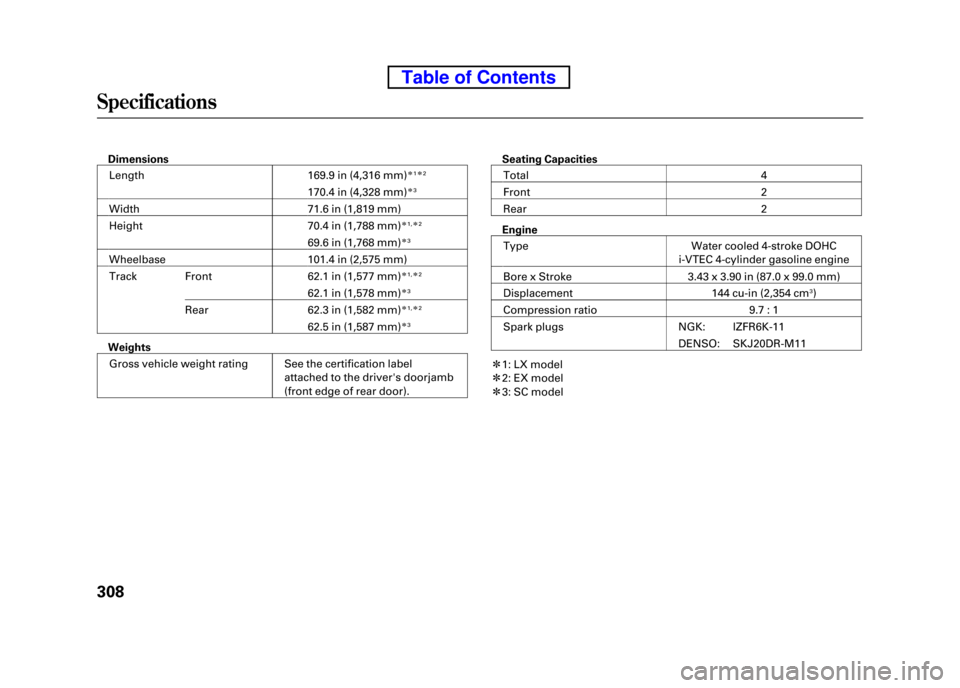
DimensionsLength 169.9 in (4,316 mm)ꭧ 1ꭧ 2
170.4 in (4,328 mm)ꭧ 3
Width 71.6 in (1,819 mm)
Height 70.4 in (1,788 mm)ꭧ1,ꭧ 2
69.6 in (1,768 mm)ꭧ3
Wheelbase 101.4 in (2,575 mm)
Track Front 62.1 in (1,577 mm)ꭧ1,ꭧ 2
62.1 in (1,578 mm)ꭧ3
Rear 62.3 in (1,582 mm)ꭧ1,ꭧ 2
62.5 in (1,587 mm)ꭧ3
Weights
Gross vehicle weight rating See the certification label attached to the driver's doorjamb
(front edge of rear door). Seating Capacities
Total 4
Front 2
Rear 2
Engine Type Water cooled 4-stroke DOHC i-VTEC 4-cylinder gasoline engine
Bore x Stroke 3.43 x 3.90 in (87.0 x 99.0 mm)
Displacement 144 cu-in (2,354 cm
3)
Compression ratio 9.7 : 1
Spark plugs NGK: IZFR6K-11 DENSO: SKJ20DR-M11
ꭧ 1: LX model
ꭧ 2: EX model
ꭧ 3: SC model
Specifications
308
Table of Contents
Page 329 of 342
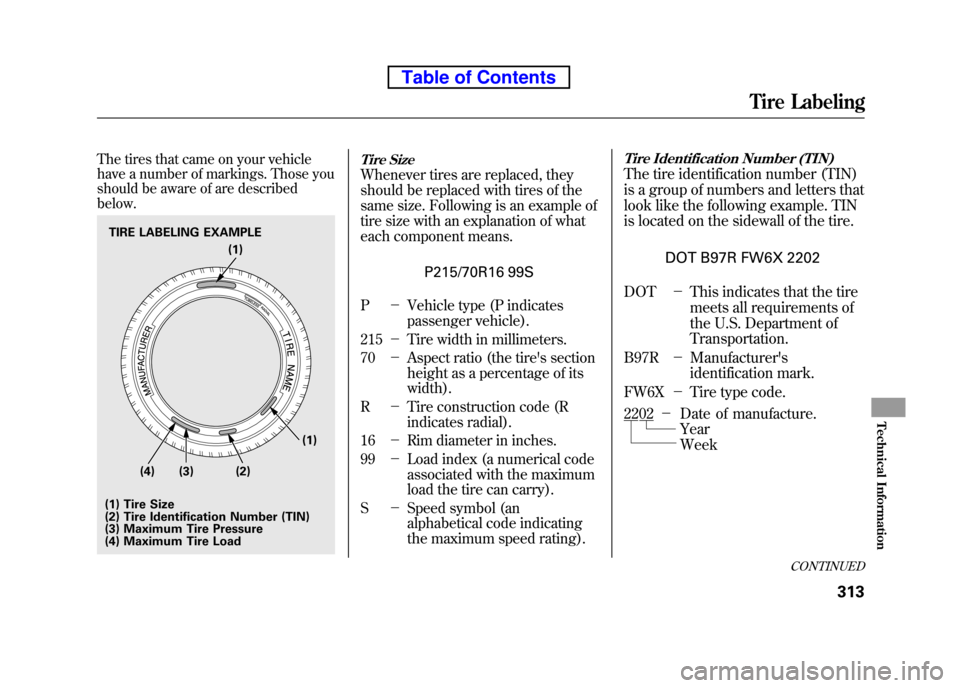
The tires that came on your vehicle
have a number of markings. Those you
should be aware of are described below.Tire Size
Whenever tires are replaced, they
should be replaced with tires of the
same size. Following is an example of
tire size with an explanation of what
each component means.P215/70R16 99S
P -Vehicle type (P indicates
passenger vehicle).
215 -Tire width in millimeters.
70 -Aspect ratio (the tire's section
height as a percentage of itswidth).
R -Tire construction code (R
indicates radial).
16 -Rim diameter in inches.
99 -Load index (a numerical code
associated with the maximum
load the tire can carry).
S -Speed symbol (an
alphabetical code indicating
the maximum speed rating).
Tire Identification Number (TIN)
The tire identification number (TIN)
is a group of numbers and letters that
look like the following example. TIN
is located on the sidewall of the tire.
DOT B97R FW6X 2202
DOT -This indicates that the tire
meets all requirements of
the U.S. Department ofTransportation.
B97R -Manufacturer's
identification mark.
FW6X -Tire type code.
TIRE LABELING EXAMPLE
(1) Tire Size
(2) Tire Identification Number (TIN)
(3) Maximum Tire Pressure
(4) Maximum Tire Load (1)
(2) (1)
(3)
(4)
2202 -
Year Week
Date of manufacture.
CONTINUED
Tire Labeling
313
Technical Information
Table of Contents