turn signal HONDA ELEMENT 2011 1.G User Guide
[x] Cancel search | Manufacturer: HONDA, Model Year: 2011, Model line: ELEMENT, Model: HONDA ELEMENT 2011 1.GPages: 286, PDF Size: 14.07 MB
Page 117 of 286

To Play the Radio
The ignition switch must be in the
ACCESSORY (I) or the ON (II)
position. Turn the system on by
pushing the VOL/PWR knob or the
AM/FM button. Adjust the volume
by turning the same knob.
The band and frequency that the
radio was last tuned to is displayed.
To change bands, press the AM/FM
button. On the FM band, ST will be
displayed if the station is
broadcasting in stereo. Stereo
reproduction in AM is not available.
To Select a Station
You can use any of five methods to
find radio stations on the selected
band: tune, seek, scan, the preset
buttons, and auto select.
TUNE-Use the TUNE knob to
tune the radio to a desired frequency.
Turn the knob right to tune to a
higher frequency, or left to tune to a
lower frequency. SEEK
-The seek function searches
up and down from the current
frequency to find a station with a
strong signal. To activate it, press
either (
or
), then release it.
SCAN -The scan function samples
all stations with strong signals on the
selected band. To activate it, press
the SCAN button, then release it.
You will see SCAN in the display.
The system will scan for a station
with a strong signal. When it finds
one, it will stop and play that station
for about 5 seconds (LX model) or 10
seconds (EX model).
If you do nothing, the system will
then scan for the next strong station
and play it for 5 seconds (LX model)
or 10 seconds (EX model). When it
plays a station you want to listen to,
press the SCAN button again. Preset
-Each preset button can
store one frequency on AM and two
frequencies on FM.
1. Select the desired band, AM or FM. FM1 and FM2 let you store
six stations each.
2. Use the tune, seek, or scan function to tune the radio to a
desired station.
3. Pick a preset number (1 -6), and
hold it until you hear a beep.
4. Repeat steps 1 through 3 to store a total of six stations on AM and
twelve stations on FM.
CONTINUED
Playing the AM/FM Radio
111
Features
10/08/06 08:34:41 11 ELEMENT MMC North America Owner's Man 50 31SCV680 enu
Page 120 of 286

XM Radio receives signals from two
satellites to produce clear, high-
quality digital reception. It offers
many channels in several categories.
Along with a large selection of
different types of music, XM Radio
allows you to view channel and
category selections in the display.Operating the XM Radio
To listen to the XM Radio, turn the
ignition switch to the ACCESSORY
(I) or ON (II) position. Push the
VOL/PWR knob to turn on the audio
system, and press the XM button.
Adjust the volume by turning the
VOL/PWR knob. The last channel
you listened to will show in the
display.
MODE
-To switch between
channel mode and category mode,
press and hold the DISP/MODE
button until the mode changes.
In the channel mode, you can select
all of the available channels. In the
category mode, such as Jazz, Rock,
Classical, etc., you can select all of
the channels within that category. Each time you press and release the
DISP/MODE button, the display
changes in the following sequence:
channel name, channel number,
category, artist name, and music title.
You may experience periods when
XM Radio does not transmit the
artist's name and song title
information. If this happens, there is
nothing wrong with your system.
TUNE
-Turn the TUNE knob left
or right to select channels. In the
category mode, you can only select
channels within that category.
CATEGORY (
or
) - Press
either button to select another
category.
Playing the XM
®Radio
11410/08/06 08:34:41 11 ELEMENT MMC North America Owner's Man 50 31SCV680 enu
Page 124 of 286

Depending on where you drive, you
may experience reception problems.
Interference can be caused by any of
these conditions:●Driving on the north side of an
east/west mountain road.●Driving on the north side of a large
commercial truck on an east/west
road.●Driving in tunnels.●Driving on a road beside a vertical
wall, steep cliff, or hill to the south
of you.●Driving on the lower level of a
multi-tiered road.●Driving on a single lane road
alongside dense trees taller than
50 ft. (15 m) to the south of you.●Large items carried on a roof rack.
There may be other geographic
situations that could affect XM Radio
reception.
As required by the FCC: Changes or modifications not expressly
approved by the party responsible forcompliance could void the user'sauthority to operate the equipment.Receiving XM Radio Service
If your XM Radio service has expired or
you purchased your vehicle from a
previous owner, you can listen to a
sampling of the broadcasts available on
XM Radio. With the ignition switch in the
ACCESSORY (I) or ON (II) position,
push the VOL/PWR knob to turn on the
audio system and press the XM button. A
variety of music types and styles will
play.
If you decide to purchase XM Radio
service, contact XM Radio atwww.xmradio.com,
or at 1-800-852-9696.
You will need to give them your radio I.
D. number and your credit card number.
To get your radio I.D. number, turn the
TUNE knob until ‘‘0 ’’ appears in the
display. Your I.D. will appear in the
display. After you've registered with XM Radio,
keep your audio system in the XM Radio
mode while you wait for activation. This
should take about 30 minutes.
While waiting for activation, make sure
your vehicle remains in an open area
with good reception. Once your audio
system is activated, you'll be able to
listen to XM Radio broadcasts. XM Radio
will continue to send an activation signal
to your vehicle for at least 12 hours from
the activation request. If the service has
not been activated after 36 hours, contact
XM
®Radio.
Playing the XM
®Radio
11810/08/06 08:34:41 11 ELEMENT MMC North America Owner's Man 50 31SCV680 enu
Page 175 of 286

Your vehicle is equipped with a tire
pressure monitoring system (TPMS)
that turns on every time you start the
engine and monitors the pressure in
your tires while driving.
Each tire has its own pressure sensor
(not including the spare tire). If the
air pressure of a tire becomes
significantly low, the sensor in that
tire immediately sends a signal that
causes the low tire pressure indicator
to come on.
Low Tire Pressure
Indicator
When the low tire pressure indicator
is on, one or more of your tires is
significantly underinflated. You
should stop and check your tires as
soon as possible, and inflate them to
the proper pressure as indicated on
the vehicle's tire information placard.
If you think you can safely drive a
short distance to a service station,
proceed slowly, and inflate the tire to
the recommended pressure shown on
the driver's doorjamb.
If the tire is flat, or if the tire pressure
is too low to continue driving, replace
the tire with the compact spare tire
(see page 222).If you cannot make the low tire
pressure indicator go out after
inflating the tires to the specified
values, have your dealer check the
system as soon as possible.
Driving on a significantly
underinflated tire causes the tire to
overheat and can lead to tire failure.
Underinflation also reduces fuel
efficiency and tire tread life, and may
affect the vehicle's handling and
stopping ability.
Because tire pressure varies by
temperature and other conditions, the
low tire pressure indicator may come
on unexpectedly.
CONTINUED
Tire Pressure Monitoring System (TPMS)
169
Driving
10/08/06 08:34:41 11 ELEMENT MMC North America Owner's Man 50 31SCV680 enu
Page 210 of 286

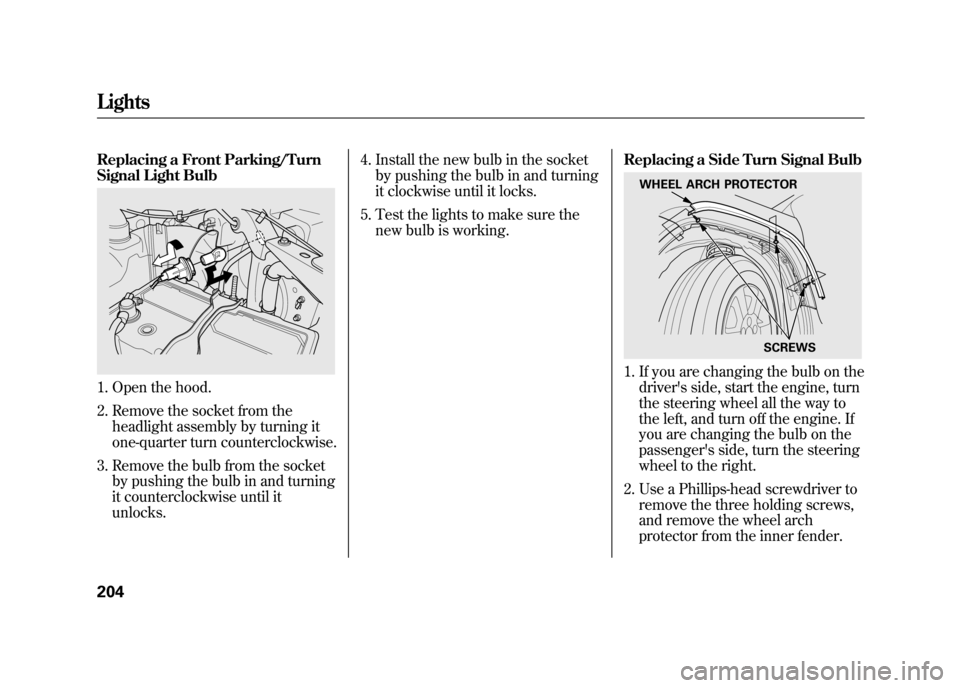
Replacing a Front Parking/Turn
Signal Light Bulb1. Open the hood.
2. Remove the socket from theheadlight assembly by turning it
one-quarter turn counterclockwise.
3. Remove the bulb from the socket by pushing the bulb in and turning
it counterclockwise until it
unlocks. 4. Install the new bulb in the socket
by pushing the bulb in and turning
it clockwise until it locks.
5. Test the lights to make sure the new bulb is working. Replacing a Side Turn Signal Bulb
1. If you are changing the bulb on the
driver's side, start the engine, turn
the steering wheel all the way to
the left, and turn off the engine. If
you are changing the bulb on the
passenger's side, turn the steering
wheel to the right.
2. Use a Phillips-head screwdriver to remove the three holding screws,
and remove the wheel arch
protector from the inner fender.
WHEEL ARCH PROTECTOR
SCREWS
Lights20410/08/06 08:34:41 11 ELEMENT MMC North America Owner's Man 50 31SCV680 enu
Page 211 of 286

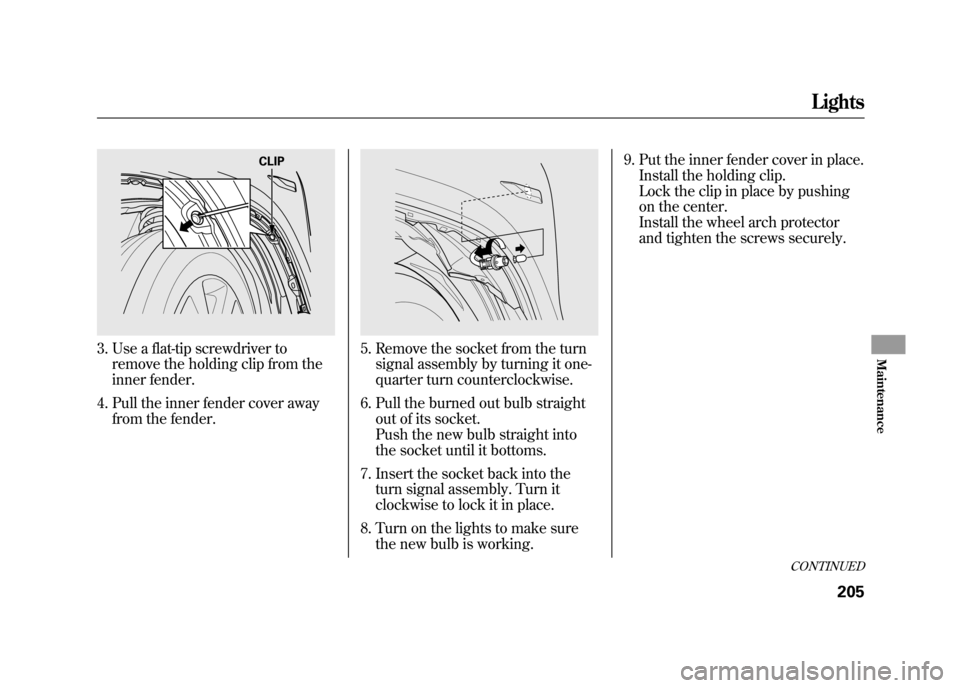
3. Use a flat-tip screwdriver toremove the holding clip from the
inner fender.
4. Pull the inner fender cover away from the fender.
5. Remove the socket from the turnsignal assembly by turning it one-
quarter turn counterclockwise.
6. Pull the burned out bulb straight out of its socket.
Push the new bulb straight into
the socket until it bottoms.
7. Insert the socket back into the turn signal assembly. Turn it
clockwise to lock it in place.
8. Turn on the lights to make sure the new bulb is working. 9. Put the inner fender cover in place.
Install the holding clip.
Lock the clip in place by pushing
on the center.
Install the wheel arch protector
and tighten the screws securely.
CLIP
CONTINUED
Lights
205
Maintenance
10/08/06 08:34:41 11 ELEMENT MMC North America Owner's Man 50 31SCV680 enu
Page 212 of 286

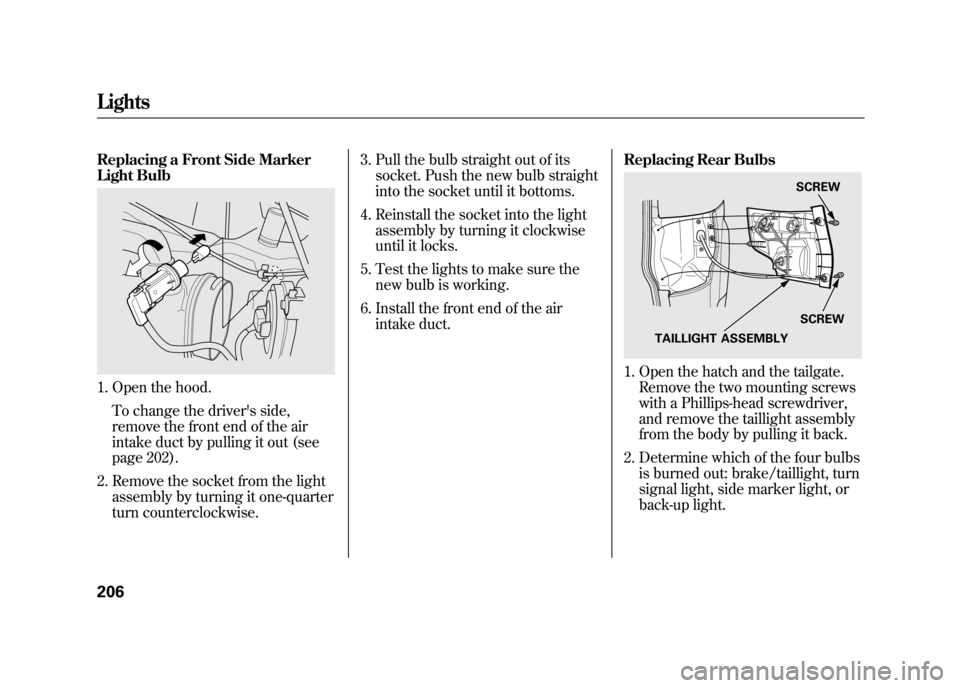
Replacing a Front Side Marker
Light Bulb1. Open the hood.To change the driver's side,
remove the front end of the air
intake duct by pulling it out (see
page 202).
2. Remove the socket from the light assembly by turning it one-quarter
turn counterclockwise. 3. Pull the bulb straight out of its
socket. Push the new bulb straight
into the socket until it bottoms.
4. Reinstall the socket into the light assembly by turning it clockwise
until it locks.
5. Test the lights to make sure the new bulb is working.
6. Install the front end of the air intake duct. Replacing Rear Bulbs
1. Open the hatch and the tailgate.
Remove the two mounting screws
with a Phillips-head screwdriver,
and remove the taillight assembly
from the body by pulling it back.
2. Determine which of the four bulbs is burned out: brake/taillight, turn
signal light, side marker light, or
back-up light.
SCREW
SCREW
TAILLIGHT ASSEMBLY
Lights20610/08/06 08:34:41 11 ELEMENT MMC North America Owner's Man 50 31SCV680 enu
Page 248 of 286

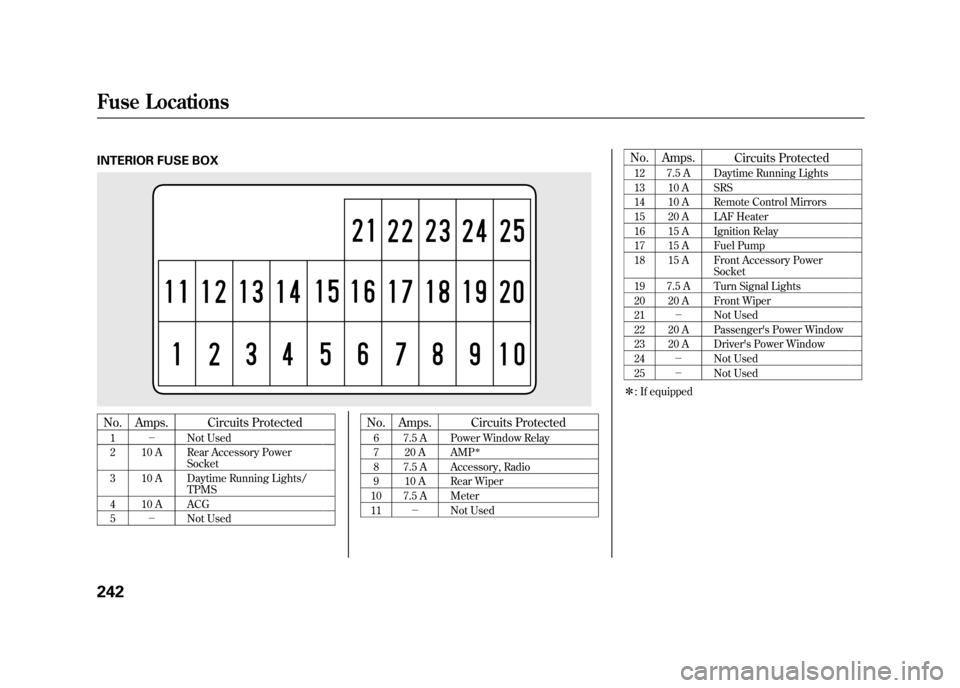
INTERIOR FUSE BOXNo.Amps. Circuits Protected1 - Not Used
2 10 A Rear Accessory Power Socket
3 10 A Daytime Running Lights/ TPMS
4 10 A ACG
5 - Not Used
No. Amps.
Circuits Protected6 7.5 A Power Window Relay
7 20 A AMP
ꭧ
8 7.5 A Accessory, Radio
9 10 A Rear Wiper
10 7.5 A Meter
11 - Not Used
No. Amps.
Circuits Protected12 7.5 A Daytime Running Lights
13 10 A SRS
14 10 A Remote Control Mirrors
15 20 A LAF Heater
16 15 A Ignition Relay
17 15 A Fuel Pump
18 15 A Front Accessory Power
Socket
19 7.5 A Turn Signal Lights
20 20 A Front Wiper
21 - Not Used
22 20 A Passenger's Power Window
23 20 A Driver's Power Window
24 - Not Used
25 - Not Used
ꭧ : If equipped
Fuse Locations24210/08/06 08:34:41 11 ELEMENT MMC North America Owner's Man 50 31SCV680 enu
Page 258 of 286

Air ConditioningRefrigerant type HFC-134a (R-134a)
Charge quantity 17.6-19.4 oz (500 -550 g)
Lubricant type ND-OIL8
Lights Headlights 60/55 W (H4/HB2)
Daytime running lights 60 W (HB3)
Front turn signal/parking lights 27/8 W (Amber)
Front side marker lights 3 CP
Side turn signal lights 3 CP
Rear turn signal lights 21 W (Amber)
Rear side marker lights 3 CP
Stop/taillights 21/5 W
Back-up lights 21 CP
License plate lights 5 W
Ceiling light 8 W
ꭧ1
5W
ꭧ2
Spotlights 8 W
ꭧ2
Cargo area light 8 W
High-mount brake light 21 W
Battery Capacity 12 V-47 AH/20 HR
12 V -38 AH/5 HR Fuses
Interior See page 242 or the fuse label
attached to the inside of the fuse
box lid under the steering
column.
Under-hood See page 243 or the fuse box
cover.
Alignment Toe-in Front 0.0 in (0 mm)
Rear 0.08 in (2.0 mm)
Camber Front -0°13 ’
Rear -1°00 ’
Caster Front 1°50’
Tires Size Front/Rear P215/70R16 99S
Pressure Front 33 psi (230 kPa, 2.3 kgf/cm
2)
Rear 35 psi (240 kPa, 2.4 kgf/cm2)
Spare 60 psi (420 kPa, 4.2 kgf/cm2)
ꭧ 1: LX model
ꭧ 2: EX model
Specifications25210/08/06 08:34:41 11 ELEMENT MMC North America Owner's Man 50 31SCV680 enu
Page 275 of 286

A
Accessories andModifications
..........................
149
ACCESSORY (Ignition Key Position)
...................................
79
Accessory Power Sockets
..........
100
Additives, Engine Oil
.................
194
Adjusting the Steering Wheel
......
74
Advanced Airbags
........................
26
Airbag (SRS)
............................
9, 22
Air Conditioning System
............
104
Air Pressure, Tires
..............
212, 213
Alcohol in Gasoline
....................
142
Antifreeze
...................................
196
Anti-lock Brakes (ABS) Indicator
............................
59, 168
Operation
................................
167
Anti-theft, Audio System
.............
132
Anti-theft Steering Column Lock
.........................................
79
Audio System
.............................
109
Automatic Seat Belt Tensioners...
20
Automatic Speed Control
...........
137 Automatic Transmission
............
161
Capacity, Fluid
........................
251
Checking Fluid Level
..............
198
Shifting
...................................
161
Shift Lever Position Indicators
............................
161
Shift Lever Positions
...............
161
Shift Lock Release
...................
163
Auxiliary Input Jack
...................
136
B
Battery Charging System
Indicator
........................
58, 235
Jump Starting
..........................
231
Maintenance
...........................
218
Specifications
..........................
252
Before Driving
...........................
141
Belts, Seat
................................
8, 18
Beverage Holders
........................
99
Booster Seats
...............................
50
Brakes
Anti-lock Brakes (ABS)
...........
167
Break-in, New Linings
.............
142 Bulb Replacement
...................
206
Fluid
.......................................
199
Parking
....................................
94
System Design
........................
166
System Indicator
...............
58, 237
Wear Indicators
.......................
167
Braking System
..........................
166
Break-in, New Vehicle
................
142
Brightness Control, Instruments
..............................
72
Bulb Replacement Back-up Lights
........................
206
Brake Lights
...........................
206
Daytime Running Lights
.........
203
Front Parking/Turn Signal Lights
..................................
204
Front Side Marker Lights
........
206
Headlights
..............................
202
High-mount Brake Light
.........
208
Rear Bulbs
..............................
206
Rear License Plate Lights
........
207
Side Turn Signal Lights
...........
204
Specifications
..........................
252
Taillights
.................................
206
Turn Signal Lights
..........
204, 206
CONTINUED
Index
I
INDEX
10/08/06 08:34:41 11 ELEMENT MMC North America Owner's Man 50 31SCV680 enu