sensor HONDA FIT 2009 2.G User Guide
[x] Cancel search | Manufacturer: HONDA, Model Year: 2009, Model line: FIT, Model: HONDA FIT 2009 2.GPages: 352, PDF Size: 17.67 MB
Page 34 of 352

If you see any of these indications,
the airbags and seat belt tensioners
may not work properly when you
need them.
Ignoring the SRS indicator can
result in serious injury or death
if the airbag systems or
tensioners do not work
properly.
Have your vehicle checked by a
dealer as soon as possible if
the SRS indicator alerts you to
a possible problem.How the Side Airbag Off Indicator
Works
U.S. Canada
This indicator
alerts you that the
passenger's side airbag has been
automatically shut off. It does
not
mean there is a problem with your
side airbags.
When you turn the ignition switch to
the ON (II) position, the indicator
should come on briefly and then go
off (see page61).If it doesn't come
on, stays on, or comes on while
driving without a passenger in the
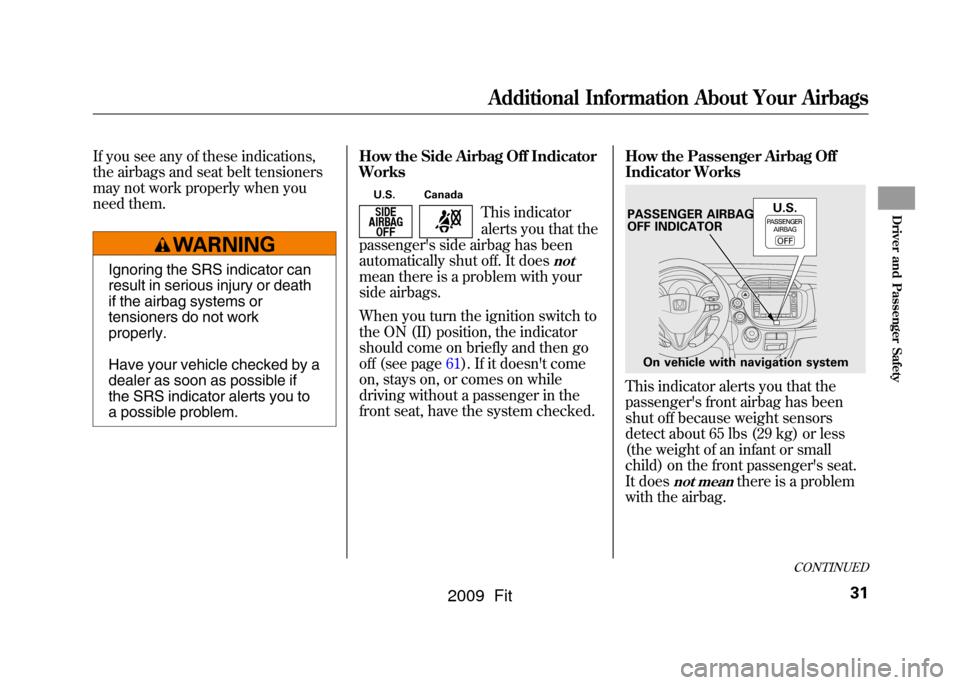
front seat, have the system checked. How the Passenger Airbag Off
Indicator Works
This indicator alerts you that the
passenger's front airbag has been
shut off because weight sensors
detect about 65 lbs (29 kg) or less
(the weight of an infant or small
child) on the front passenger's seat.
It does
not mean
there is a problem
with the airbag.
PASSENGER AIRBAG
OFF INDICATOR
On vehicle with navigation system U.S.
CONTINUED
Additional Information About Your Airbags
31
Driver and Passenger Safety
2009 Fit
Page 35 of 352

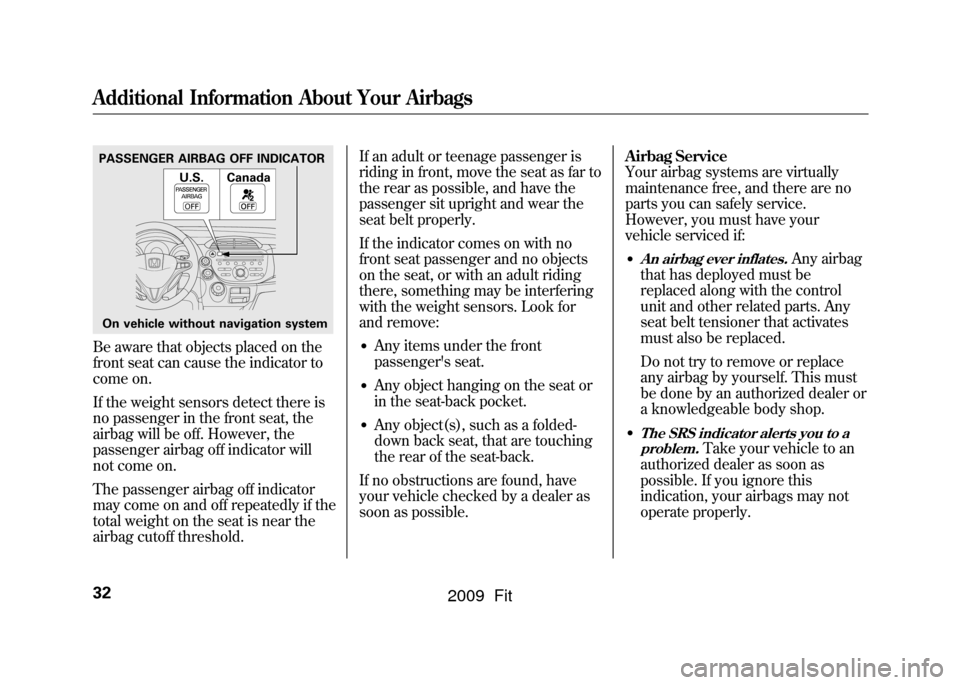
Be aware that objects placed on the
front seat can cause the indicator to
come on.
If the weight sensors detect there is
no passenger in the front seat, the
airbag will be off. However, the
passenger airbag off indicator will
not come on.
The passenger airbag off indicator
may come on and off repeatedly if the
total weight on the seat is near the
airbag cutoff threshold.If an adult or teenage passenger is
riding in front, move the seat as far to
the rear as possible, and have the
passenger sit upright and wear the
seat belt properly.
If the indicator comes on with no
front seat passenger and no objects
on the seat, or with an adult riding
there, something may be interfering
with the weight sensors. Look for
and remove:
●Any items under the front
passenger's seat.●Any object hanging on the seat or
in the seat-back pocket.●Any object(s), such as a folded-
down back seat, that are touching
the rear of the seat-back.
If no obstructions are found, have
your vehicle checked by a dealer as
soon as possible. Airbag Service
Your airbag systems are virtually
maintenance free, and there are no
parts you can safely service.
However, you must have your
vehicle serviced if:
●An airbag ever inflates.
Any airbag
that has deployed must be
replaced along with the control
unit and other related parts. Any
seat belt tensioner that activates
must also be replaced.
Do not try to remove or replace
any airbag by yourself. This must
be done by an authorized dealer or
a knowledgeable body shop.
●The SRS indicator alerts you to a
problem.
Take your vehicle to an
authorized dealer as soon as
possible. If you ignore this
indication, your airbags may not
operate properly.
PASSENGER AIRBAG OFF INDICATOR
On vehicle without navigation system U.S. CanadaAdditional Information About Your Airbags32
2009 Fit
Page 36 of 352

●If your vehicle has a moderate tosevere impact.
Even if your airbags
do not inflate, your dealer should
inspect the driver's seat position
sensor, the front passenger's
weight sensors, the front seat belt
tensioners, and all seat belts worn
during a crash to make sure they
are operating properly. Additional Safety Precautions
●Do not attempt to deactivate your
airbags.
Together, airbags and
seat belts provide the best
protection.
●Do not tamper with airbag components or wiring for any
reason.
Tampering could cause
the airbags to deploy, possibly
causing very serious injury.
●Do not expose the front
passenger's seat-back to liquid.
If
water or another liquid soaks into
a seat-back, it can prevent the side
airbag cutoff system from working
properly.
●Do not cover or replace front seat- back covers without consulting
your dealer.
Improperly replacing
or covering front seat-back covers
can prevent your side airbags from
inflating during a side impact.
●Do not remove or modify a front seat without consulting your
dealer.
This could make the
driver's seat position sensor or the
front passenger's weight sensors
ineffective. If it is necessary to
remove or modify a front seat to
accommodate a person with
disabilities, first contact Honda
Automobile Customer Service at
(800) 999-1009.
Additional Information About Your Airbags
33
Driver and Passenger Safety
2009 Fit
Page 64 of 352

If your front passenger does not
fasten their seat belt, the indicator
comes on about 6 seconds after the
ignition switch is turned to the ON
(II) position.
If either of you do not fasten your
seat belt while driving, the beeper
will sound and the indicator will flash
again at regular intervals. For more
information, see page18.
Supplemental Restraint
System Indicator
This indicator comes on briefly when
you turn the ignition switch to the
ON (II) position. If it comes on at any
other time, it indicates a potential
problem with your front airbags. This
indicator will also alert you to a
potential problem with your side
airbags, passenger's side airbag
cutoff system, side curtain airbags,
automatic seat belt tensioners,
driver's seat position sensor, or the
front passenger's weight sensors.
For more information, see page30.
U.S. Canada
Side Airbag Off
Indicator
This indicator comes on briefly when
you turn the ignition switch to the
ON (II) position. If it comes on at any
other time, it indicates that the
passenger's side airbag has
automatically shut off. For more
information, see page31.
CONTINUED
Instrument Panel Indicators
61
Instruments and Controls
2009 Fit
Page 214 of 352

Carrying Cargo in the Passenger
Compartment●Store or secure all items that could
be thrown around and hurt
someone during a crash.●Be sure items placed on the floor
behind the front seats cannot roll
under the seats and interfere with
the driver's ability to operate the
pedals, the proper operation of the
seats, or proper operation of the
sensors under the seats.●Keep the upper and lower glove
boxes closed while driving. If it is
open, a passenger could injure
their knees during a crash or
sudden stop.
●If you fold the rear seats up or
down, tie down items that could be
thrown about the vehicle during a
crash or sudden stop. Also, keep
all cargo below the bottom of the
windows. If it is higher, it could
interfere with the proper operation
of the side curtain airbags.Carrying Cargo in the Cargo Area
●Distribute cargo evenly on the
floor of the cargo area, placing the
heaviest items on the bottom and
as far forward as possible. Tie
down items that could be thrown
about the vehicle during a crash or
sudden stop.●Do not stack items higher than the
back of the rear seats. They can
block your view and be thrown
around the vehicle during a crash.●If you carry large items that
prevent you from closing the
tailgate, exhaust gas can enter the
passenger area. To avoid the
possibility of
carbon monoxide
poisoning, follow the instructions
on page53.
CONTINUED
Carrying Cargo
211
Before Driving
2009 Fit
Page 238 of 352

U.S. models onlyYour vehicle is equipped with a tire
pressure monitoring system (TPMS)
that turns on every time you start the
engine and monitors the pressure in
your tires while driving.
Each tire has its own pressure sensor
(not including the spare tire). If the
air pressure of a tire becomes
significantly low, the sensor in that
tire immediately sends a signal that
causes the low tire pressure indicator
to come on.
Low Tire Pressure
Indicator
When the low tire pressure indicator
is on, one or more of your tires is
significantly underinflated. You
should stop and check your tires as
soon as possible, and inflate them to
the proper pressure as indicated on
the vehicle's tire information placard.
If you think you can safely drive a
short distance to a service station,
proceed slowly, and inflate the tire to
the recommended pressure shown
on the driver's doorjamb.
If the tire is flat, or if the tire pressure
is too low to continue driving, replace
the tire with the compact spare tire
(see page284). If you cannot make the low tire
pressure indicator go out after
inflating the tires to the specified
values, have your dealer check the
system as soon as possible.
Driving on a significantly under-
inflated tire causes the tire to
overheat and can lead to tire failure.
Under-inflation also reduces fuel
efficiency and tire tread life, and may
affect the vehicle's handling and
stopping ability.
Because tire pressure varies by
temperature and other conditions,
the low tire pressure indicator may
come on unexpectedly.
CONTINUED
Tire Pressure Monitoring System (TPMS)
235
Driving
2009 Fit
Page 240 of 352

Changing a Tire with TPMS
If you have a flat tire, the low tire
pressure indicator will come on.
Replace the flat tire with the compact
spare tire (see page284).
Each wheel (except the compact
spare tire wheel) is equipped with a
tire pressure sensor mounted inside
the tire behind the valve stem. You
must use TPMS specific wheels. It is
recommended that you always have
your tires serviced by your dealer or
qualified technician.
After you replace the flat tire with the
compact spare tire, the low tire
pressure indicator stays on. This is
normal; the system is not monitoring
the spare tire pressure. Manually
check the spare tire pressure to be
sure it is correct. After several miles
(kilometers) driving with the
compact spare tire, the TPMS
indicator comes on and the low tire
pressure indicator goes off.The low tire pressure indicator or the
TPMS indicator will go off, after
several miles (kilometers) driving,
when you replace the spare tire with
the specified regular tire equipped
with the tire pressure monitor
sensor.
Never use a puncture-repairing agent
in a flat tire. If used, you will have to
replace the tire pressure sensor.
Have the flat tire repaired by your
dealer as soon as possible.
As required by the FCC: This device
complies with Part 15 of the FCC rules.
Operation is subject to the following twoconditions: (1) This device may notcause harmful interference, and (2) thisdevice must accept any interference
received, including interference that maycause undesired operation.
Changes or modifications not expresslyapproved by the party responsible forcompliance could void the user'sauthority to operate the equipment.
This device complies with IndustryCanada Standard RSS-210. Operation issubject to the following two conditions:(1) this device may not causeinterference, and (2) this device must
accept any interference that may causeundesired operation of the device.
Tire Pressure Monitoring System (TPMS)
237
Driving
2009 Fit
Page 292 of 352

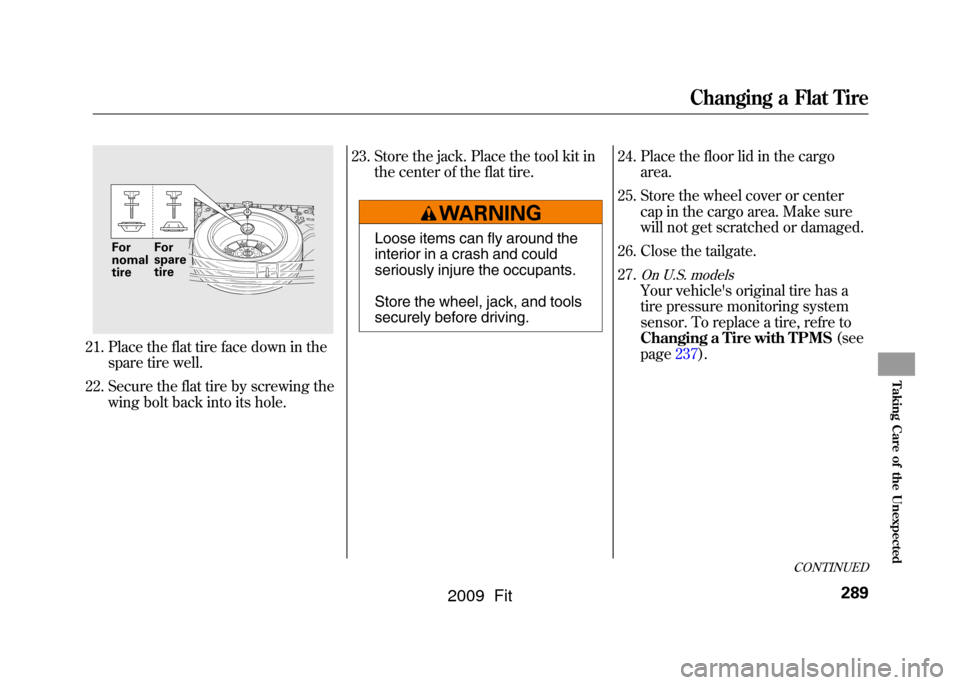
21. Place the flat tire face down in thespare tire well.
22. Secure the flat tire by screwing the wing bolt back into its hole. 23. Store the jack. Place the tool kit in
the center of the flat tire.
Loose items can fly around the
interior in a crash and could
seriously injure the occupants.
Store the wheel, jack, and tools
securely before driving. 24. Place the floor lid in the cargo
area.
25. Store the wheel cover or center cap in the cargo area. Make sure
will not get scratched or damaged.
26. Close the tailgate.
27.
On U.S. modelsYour vehicle's original tire has a
tire pressure monitoring system
sensor. To replace a tire, refre to
Changing a Tire with TPMS (see
page237).
For
nomal
tire For
spare
tire
CONTINUED
Changing a Flat Tire
289
Taking Care of the Unexpected
2009 Fit
Page 330 of 352

Exhaust Emissions Controls
The exhaust emissions controls
include four systems: PGM-FI,
ignition timing control, exhaust gas
recirculation, and three way catalytic
converter. These four systems work
together to control the engine's
combustion and minimize the
amount of HC, CO, and NOx that
come out the tailpipe. The exhaust
emissions control systems are
separate from the crankcase and
evaporative emissions control
systems.
PGM-FI SystemThe PGM-FI system uses sequential
multiport fuel injection. It has three
subsystems: air intake, engine
control, and fuel control. The
powertrain control module (PCM) in
automatic transmission vehicles or
the engine control module (ECM) in
manual transmission vehicles uses
various sensors to determine how
much air is going into the engine. It
then controls how much fuel to inject
under all operating conditions.Ignition Timing Control SystemThis system constantly adjusts the
ignition timing, reducing the amount
of HC, CO, and NOx produced.Exhaust Gas Recirculation (EGR)SystemThe exhaust gas recirculation (EGR)
system takes some of the exhaust gas
and routes it back into the intake
manifold. Adding exhaust gas to the
air/fuel mixture reduces the amount
of NOx produced when the fuel is
burned.
Three Way Catalytic ConverterThe three way catalytic converter is
in the exhaust system. Through
chemical reactions, it converts HC,
CO, and NOx in the engine's exhaust
to carbon dioxide (CO
2), nitrogen
(N
2), and water vapor.
Replacement Parts
The emissions control systems are
designed and certified to work
together in reducing emissions to
levels that comply with the Clean Air
Act. To make sure the emissions
remain low, you should use only new
Honda replacement parts or their
equivalent for repairs. Using lower
quality parts may increase the
emissions from your vehicle.
The emissions control systems are
covered by warranties separate from
the rest of your vehicle. Read your
warranty manual for more
information.
Emissions Controls
327
Technical Information
2009 Fit
Page 347 of 352

Rear View Mirror
.......................
101
Rear Window Defogger
................
76
Rear Window Wiper and Washer
.....................................
73
Recommended Shift Speeds
.......
218
Refueling
....................................
199
Reminder Indicators
.....................
60
Remote Audio Controls
..............
189
Remote Transmitter
.....................
90
Replacement Information Dust and Pollen Filter
.............
268
Engine Oil and Filter
...............
254
Fuses
......................................
306
Light Bulbs
.............................
262
Schedule
.................................
251
Tires
.......................................
276
Wiper Blades
..........................
269
Replacing Seat Belts After a Crash
........................................
20
Reporting Safety Defects (U.S. Vehicles)
................................
334
Reserve Tank, Engine Coolant
............................
202, 256
Restraint, Child
............................
34
Reverse Gear Position
................
221
Reverse Lockout
........................
223 Rotation, Tire
.............................
276
S
Safety Belts
..............................
8, 18
Safety Defects, Reporting (U.S. only)
.......................................
334
Safety Features
..............................
7
Airbags
......................................
9
Door Locks
..............................
11
Head Restraints
........................
13
Seat Belts
..............................
8, 14
Seats & Seat-Backs
..............
11, 12
Safety Labels, Location of
.............
54
Safety Messages
..........................
iii
Seat Belts
.................................
8, 18
Additional Information
.............
18
Advice for Pregnant Women
....
16
Automatic Seat Belt Tensioners
...........................
20
Cleaning
..................................
267
Detachable Anchor
..................
99
Lap/Shoulder Belt
..............
14, 19
Maintenance
............................
20 Reminder Indicator and
Beeper
.............................
18, 60
System Components
................
18
Use During Pregnancy
.............
16
Wearing a Lap/Shoulder Belt
..................................
14, 19
Seats
............................................
93
Seats, Adjusting the
.....................
93
Seat Under Box
..........................
106
Security System
.........................
193
Sensors Driver's Seat Position Sensor...
27
Front Passenger's Weight Sensors
................................
27
Impact Sensors
...................
22, 23
Serial Number
............................
316
Service Intervals
.........................
245
Service Manual (U.S. only)
........
335
Service Station Procedures
........
199
Setting the Clock
........................
192
Shifting the Automatic Transmission
..........................
219
Shift Lever Position Indicators
...
219
Shift Lock Release
......................
223
IndexVIII
2009 Fit