HONDA FIT 2009 2.G Owners Manual
Manufacturer: HONDA, Model Year: 2009, Model line: FIT, Model: HONDA FIT 2009 2.GPages: 352, PDF Size: 17.67 MB
Page 211 of 352
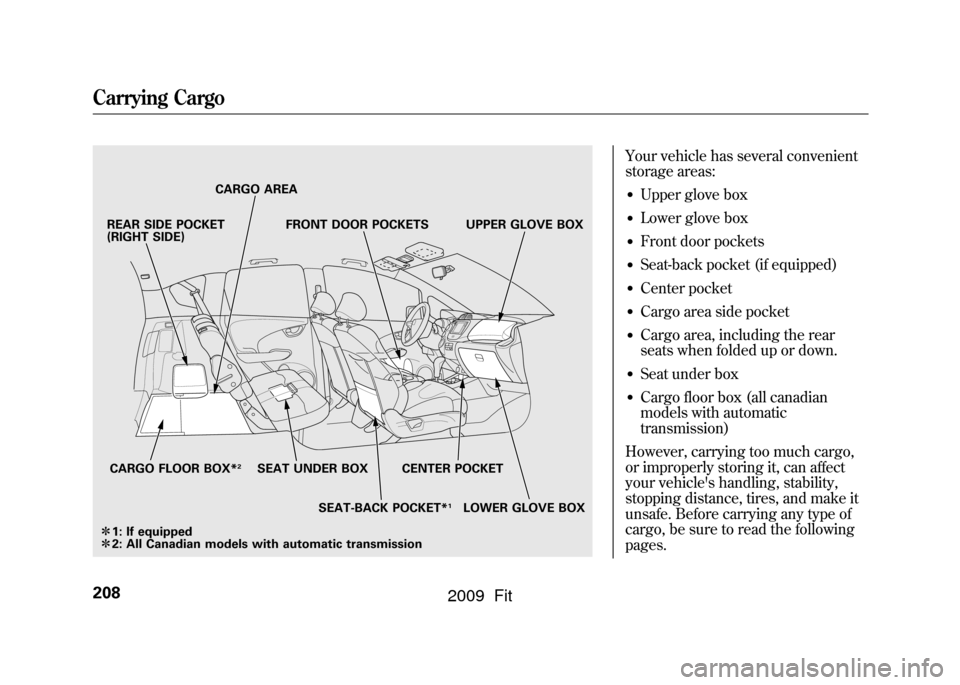
Your vehicle has several convenient
storage areas:●Upper glove box●Lower glove box●Front door pockets●Seat-back pocket (if equipped)●Center pocket●Cargo area side pocket●Cargo area, including the rear
seats when folded up or down.●Seat under box●Cargo floor box (all canadian
models with automatic
transmission)
However, carrying too much cargo,
or improperly storing it, can affect
your vehicle's handling, stability,
stopping distance, tires, and make it
unsafe. Before carrying any type of
cargo, be sure to read the following
pages.
REAR SIDE POCKET
(RIGHT SIDE)
CARGO FLOOR BOX*
2
FRONT DOOR POCKETS
SEAT-BACK POCKET*
1
SEAT UNDER BOX CENTER POCKET
CARGO AREA
LOWER GLOVE BOX
ꭧ 1: If equipped
ꭧ 2: All Canadian models with automatic transmission UPPER GLOVE BOX
Carrying Cargo208
2009 Fit
Page 212 of 352
Load Limits (Payload)
The maximum load for your vehicle
is 850 lbs (385 kg).
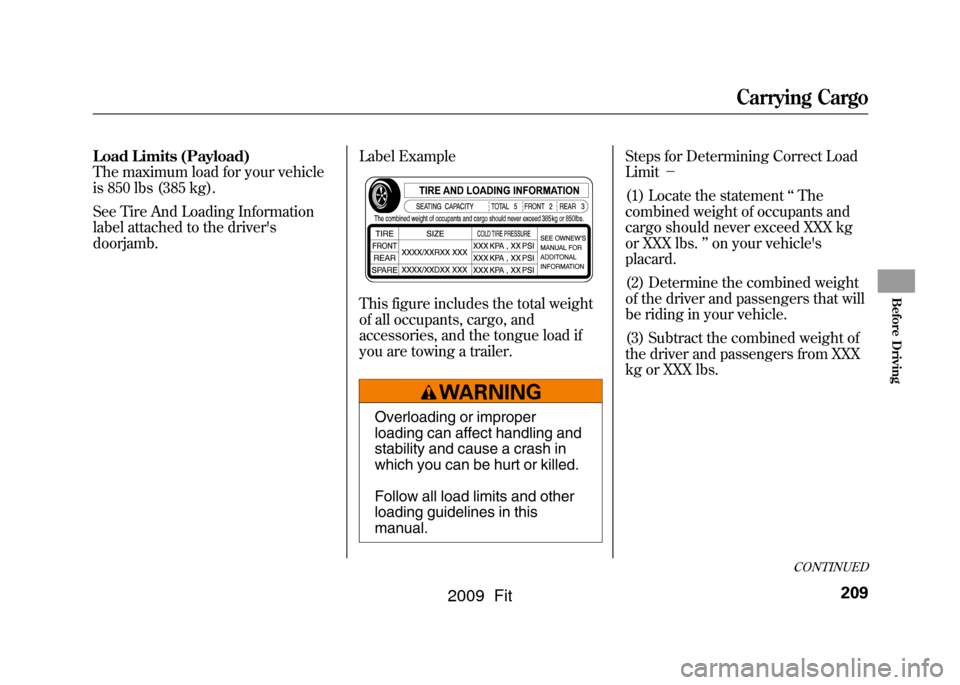
See Tire And Loading Information
label attached to the driver's
doorjamb.Label Example
This figure includes the total weight
of all occupants, cargo, and
accessories, and the tongue load if
you are towing a trailer.
Overloading or improper
loading can affect handling and
stability and cause a crash in
which you can be hurt or killed.
Follow all load limits and other
loading guidelines in this
manual.Steps for Determining Correct Load
Limit
-
(1) Locate the statement ‘‘The
combined weight of occupants and
cargo should never exceed XXX kg
or XXX lbs. ’’on your vehicle's
placard.
(2) Determine the combined weight
of the driver and passengers that will
be riding in your vehicle.
(3) Subtract the combined weight of
the driver and passengers from XXX
kg or XXX lbs.
CONTINUED
Carrying Cargo
209
Before Driving
2009 Fit
Page 213 of 352
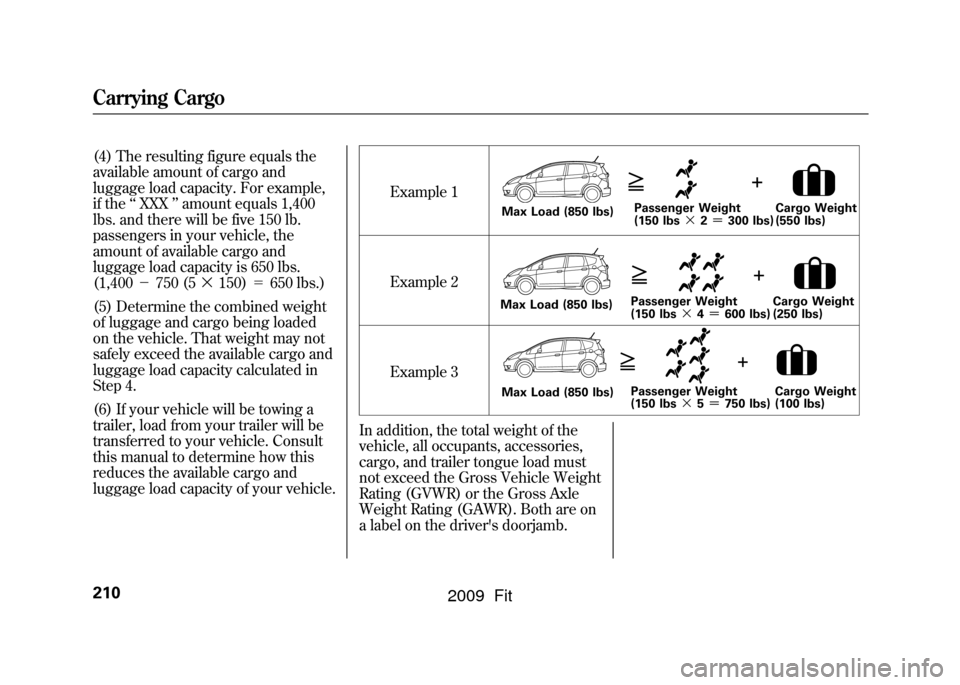
(4) The resulting figure equals the
available amount of cargo and
luggage load capacity. For example,
if the‘‘XXX ’’amount equals 1,400
lbs. and there will be five 150 lb.
passengers in your vehicle, the
amount of available cargo and
luggage load capacity is 650 lbs.
(1,400 -750 (5 ꭦ150) =650 lbs.)
(5) Determine the combined weight
of luggage and cargo being loaded
on the vehicle. That weight may not
safely exceed the available cargo and
luggage load capacity calculated in
Step 4.
(6) If your vehicle will be towing a
trailer, load from your trailer will be
transferred to your vehicle. Consult
this manual to determine how this
reduces the available cargo and
luggage load capacity of your vehicle. Example 1
Example 2
Example 3
In addition, the total weight of the
vehicle, all occupants, accessories,
cargo, and trailer tongue load must
not exceed the Gross Vehicle Weight
Rating (GVWR) or the Gross Axle
Weight Rating (GAWR). Both are on
a label on the driver's doorjamb.
Max Load (850 lbs) Passenger Weight
(150 lbs
ꭦ2= 300 lbs) Cargo Weight
(550 lbs)Max Load (850 lbs)
Passenger Weight
(150 lbs
ꭦ4= 600 lbs) Cargo Weight
(250 lbs)Max Load (850 lbs)
Passenger Weight
(150 lbs
ꭦ5= 750 lbs) Cargo Weight
(100 lbs)
Carrying Cargo210
2009 Fit
Page 214 of 352

Carrying Cargo in the Passenger
Compartment●Store or secure all items that could
be thrown around and hurt
someone during a crash.●Be sure items placed on the floor
behind the front seats cannot roll
under the seats and interfere with
the driver's ability to operate the
pedals, the proper operation of the
seats, or proper operation of the
sensors under the seats.●Keep the upper and lower glove
boxes closed while driving. If it is
open, a passenger could injure
their knees during a crash or
sudden stop.
●If you fold the rear seats up or
down, tie down items that could be
thrown about the vehicle during a
crash or sudden stop. Also, keep
all cargo below the bottom of the
windows. If it is higher, it could
interfere with the proper operation
of the side curtain airbags.Carrying Cargo in the Cargo Area
●Distribute cargo evenly on the
floor of the cargo area, placing the
heaviest items on the bottom and
as far forward as possible. Tie
down items that could be thrown
about the vehicle during a crash or
sudden stop.●Do not stack items higher than the
back of the rear seats. They can
block your view and be thrown
around the vehicle during a crash.●If you carry large items that
prevent you from closing the
tailgate, exhaust gas can enter the
passenger area. To avoid the
possibility of
carbon monoxide
poisoning, follow the instructions
on page53.
CONTINUED
Carrying Cargo
211
Before Driving
2009 Fit
Page 215 of 352
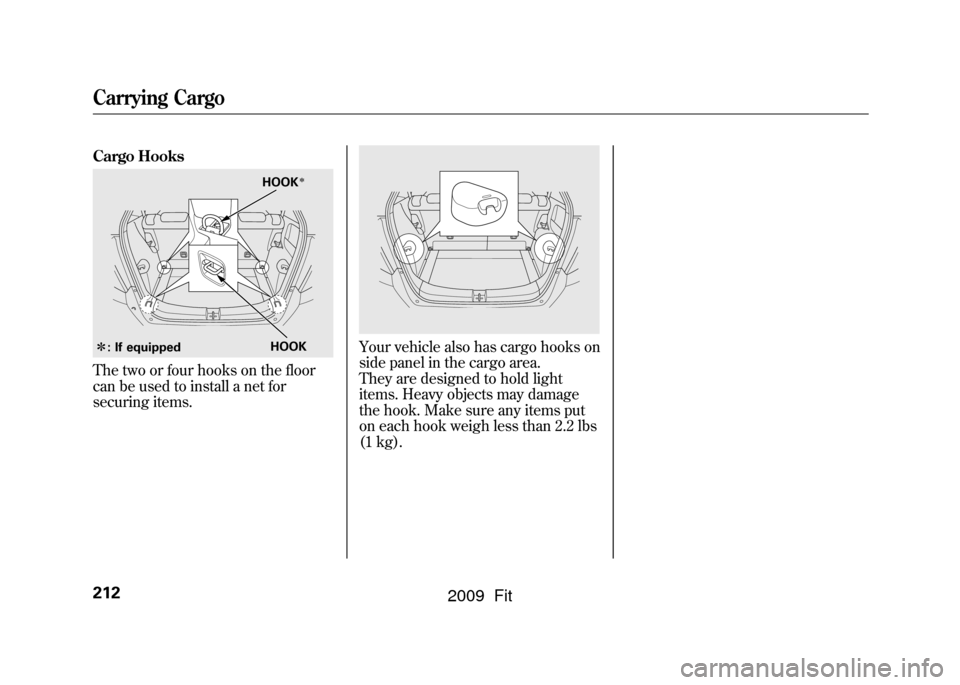
Cargo HooksThe two or four hooks on the floor
can be used to install a net for
securing items.
Your vehicle also has cargo hooks on
side panel in the cargo area.
They are designed to hold light
items. Heavy objects may damage
the hook. Make sure any items put
on each hook weigh less than 2.2 lbs
(1 kg).
HOOK
ꭧ : If equipped HOOK
ꭧ
Carrying Cargo212
2009 Fit
Page 216 of 352

This section gives you tips on
starting the engine under various
conditions, and how to operate the
manual and automatic transmissions.
It also includes important information
on parking your vehicle, the braking
system, the vehicle stability assist
(VSA
®), and the tire pressure
monitoring system (TPMS). Driving Guidelines
......................
214
Preparing to Drive
......................
215
Starting the Engine
.....................
216
Manual Transmission
.................
217
Automatic Transmission
.............
219
Driving with the Paddle Shifters
(Sport only)
.............................
224
Parking
.......................................
229
Braking System
..........................
230
Anti-lock Brakes (ABS)
...............
231
Vehicle Stability Assist (VSA
®),
aka Electronic Stability Control
(ESC), System
.....................
233
Tire Pressure Monitoring System (TPMS)
...................................
235
Towing a Trailer
..........................
238
Towing Your Vehicle Behind a
Motorhome
.............................
238
Driving
213
Driving
2009 Fit
Page 217 of 352
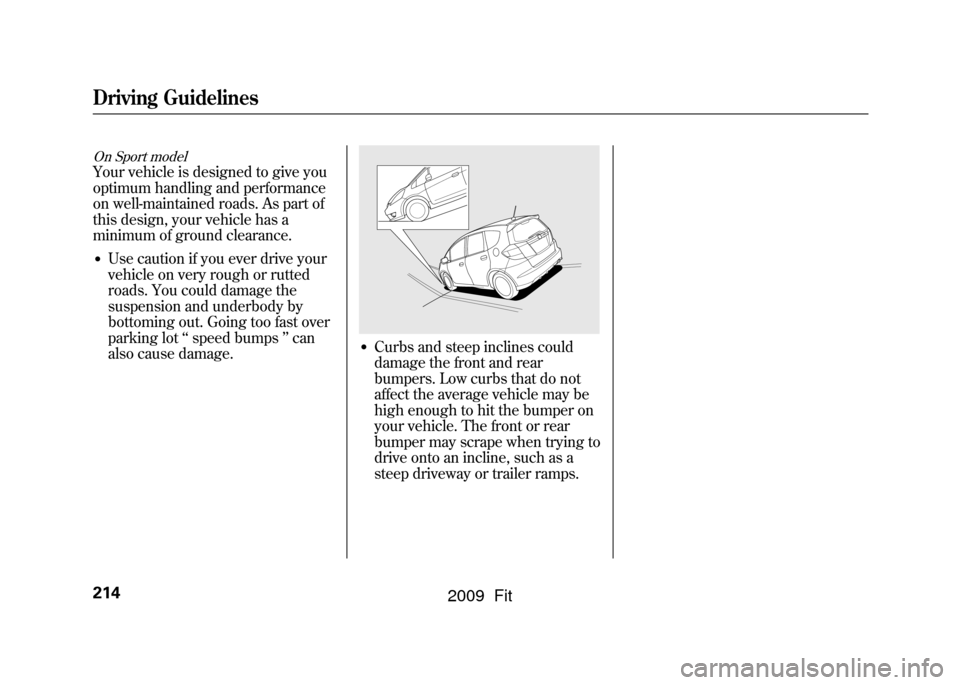
On Sport modelYour vehicle is designed to give you
optimum handling and performance
on well-maintained roads. As part of
this design, your vehicle has a
minimum of ground clearance.●Use caution if you ever drive your
vehicle on very rough or rutted
roads. You could damage the
suspension and underbody by
bottoming out. Going too fast over
parking lot‘‘speed bumps ’’can
also cause damage.
●Curbs and steep inclines could
damage the front and rear
bumpers. Low curbs that do not
affect the average vehicle may be
high enough to hit the bumper on
your vehicle. The front or rear
bumper may scrape when trying to
drive onto an incline, such as a
steep driveway or trailer ramps.
Driving Guidelines214
2009 Fit
Page 218 of 352

You should do the following checks
and adjustments before you drive
your vehicle.
1. Make sure all windows, mirrors,and outside lights are clean and
unobstructed. Remove frost, snow,
or ice.
2. Check that the hood is fully closed.
3. Visually check the tires. If a tire looks low, use a gauge to check its
pressure (see page273).
4. Check that any items you may be carrying are stored properly or
fastened down securely. 5. Check the seat adjustment (see
page 93).
6. Check the adjustment of the inside and outside mirrors (see page
101).
7. Check the steering wheel adjustment (see page 77).
8. Make sure the doors and the tailgate are securely closed and
locked.
9. Fasten your seat belt. Check that your passengers have fastened
their seat belts (see page 14).
10. When you start the engine, check the gauges and indicators in the
instrument panel (see page 59).
Preparing to Drive
215
Driving
2009 Fit
Page 219 of 352
1. Apply the parking brake.
2. In cold weather, turn off allelectrical accessories to reduce the
drain on the battery.
3.
Manual transmission:Press the clutch pedal down all the
way. The START (III) position
does not function unless the clutch
pedal is pressed.Automatic transmission:Make sure the shift lever is in
Park. Press on the brake pedal. 4. Without touching the accelerator
pedal, turn the ignition key to the
START (III) position. Do not hold
the key in the START (III) position
for more than 15 seconds at a time.
If the engine does not start right
away, pause for at least 10 seconds
before trying again.
The immobilizer system protects your
vehicle from theft. If an improperly-
coded key (or other device) is used, the
engine's fuel system is disabled. For
more information, see page79.
5. If the engine does not start within15 seconds, or starts but stalls
right away, repeat step 4 with the
accelerator pedal pressed halfway
down. If the engine starts, release
pressure on the accelerator pedal
so the engine does not race. 6. If the engine fails to start, press
the accelerator pedal all the way
down, and hold it there while
starting to clear flooding. If the
engine still does not start, return to
step 5.
The engine is harder to start in cold
weather. Also, the thinner air found at
altitudes above 8,000 feet (2,400
meters) adds to this problem.
Starting the Engine216
2009 Fit
Page 220 of 352
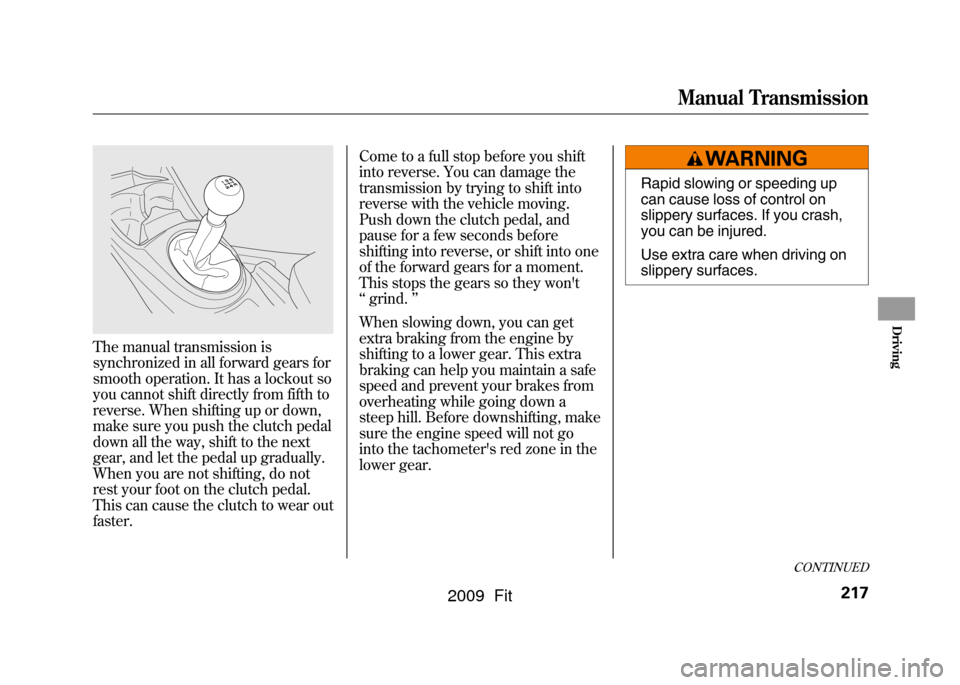
The manual transmission is
synchronized in all forward gears for
smooth operation. It has a lockout so
you cannot shift directly from fifth to
reverse. When shifting up or down,
make sure you push the clutch pedal
down all the way, shift to the next
gear, and let the pedal up gradually.
When you are not shifting, do not
rest your foot on the clutch pedal.
This can cause the clutch to wear out
faster.Come to a full stop before you shift
into reverse. You can damage the
transmission by trying to shift into
reverse with the vehicle moving.
Push down the clutch pedal, and
pause for a few seconds before
shifting into reverse, or shift into one
of the forward gears for a moment.
This stops the gears so they won't
‘‘
grind. ’’
When slowing down, you can get
extra braking from the engine by
shifting to a lower gear. This extra
braking can help you maintain a safe
speed and prevent your brakes from
overheating while going down a
steep hill. Before downshifting, make
sure the engine speed will not go
into the tachometer's red zone in the
lower gear.
Rapid slowing or speeding up
can cause loss of control on
slippery surfaces. If you crash,
you can be injured.
Use extra care when driving on
slippery surfaces.
CONTINUED
Manual Transmission
217
Driving
2009 Fit