HONDA FIT 2009 2.G Owners Manual
Manufacturer: HONDA, Model Year: 2009, Model line: FIT, Model: HONDA FIT 2009 2.GPages: 352, PDF Size: 17.67 MB
Page 241 of 352
Towing a Trailer
Your vehicle is not designed to tow a
trailer. Attempting to do so can void
your warranties.Towing Your Vehicle Behind a
Motorhome
Your vehicle can be towed behind a
motorhome at legal highway speeds
up to 65 mph (100 km/h). Do not
exceed 65 mph (100 km/h).
Otherwise, severe transmission
damage will occur.
When purchasing a tow bar, make
sure you select a reputable
manufacturer and installer. Follow
the manufacturer's attachment
instructions carefully.
The steering system can be damaged if
the steering wheel is locked. Leave the
ignition switch in the ACCESSORY (I)
position, and make sure the steering
wheel turns freely before you begin
towing.
Automatic transmission:Perform the following procedure
every day immediately before you
begin towing. Otherwise severe
automatic transmission damage will
occur.
1. Check the transmission fluid level
(see page259).
Do not overfill.
2. Start the engine.
3. Press on the brake pedal. Movethe shift lever through all its
positions.
4. Shift to the D position and hold for 5 seconds, then to N. Let the
engine run for 3 minutes, then turn
it off.Severe transmission damage will occur
if the vehicle is shifted from reverse to
neutral and then towed with the drive
wheels on the ground.
Towing a Trailer, Towing Your Vehicle Behind a Motorhome238
2009 Fit
Page 242 of 352
5. Release the parking brake.Manual transmission:1. Move the shifter into the Neutralposition.
2. Release the parking brake.
Leave the ignition switch in the
ACCESSORY (I) position so the
steering wheel does not lock. Make
sure the radio and any items plugged
into the accessory power sockets are
turned off so you do not run down
the battery.
When you stop towing your vehicle
and shift out of the neutral position,
you may not be able to move the shift
lever from neutral to reverse or Park.
If this happens, press the brake pedal
and turn the ignition switch to the
ON (II) position, then shift out of
neutral.
Extended TowingIf you tow more than 8 hours in one
day, you should repeat the above
procedure at least every 8 hours
(when you stop for fuel, etc.)Failure to follow the recommended
instructions exactly will result in severe
automatic transmission damage. If you
cannot shift the transmission or start
the engine, your vehicle must be
transported on a flat-bed truck or
trailer. When towing your vehicle for long
periods, remove the 20A Accessory
Socket and 30A Radio fuses to
reduce drain on battery. These fuses
are located in the interior fuse box
and are shown as number 13 and 61
below.
CONTINUED
Towing Your Vehicle Behind a Motorhome
239
Driving
2009 Fit
Page 243 of 352
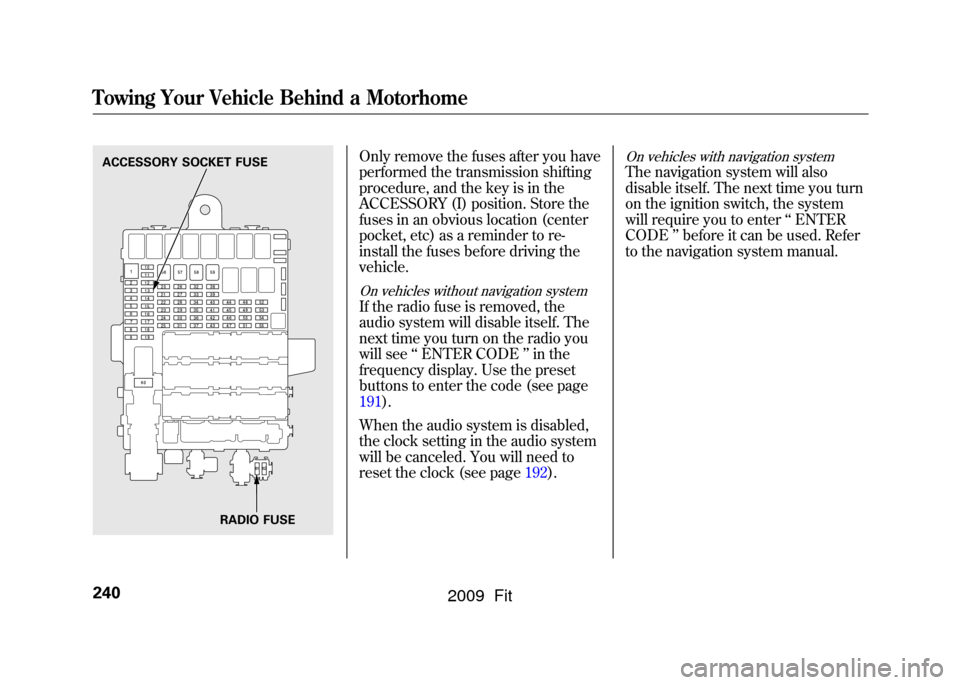
Only remove the fuses after you have
performed the transmission shifting
procedure, and the key is in the
ACCESSORY (I) position. Store the
fuses in an obvious location (center
pocket, etc) as a reminder to re-
install the fuses before driving the
vehicle.On vehicles without navigation systemIf the radio fuse is removed, the
audio system will disable itself. The
next time you turn on the radio you
will see‘‘ENTER CODE ’’in the
frequency display. Use the preset
buttons to enter the code (see page
191).
When the audio system is disabled,
the clock setting in the audio system
will be canceled. You will need to
reset the clock (see page 192).
On vehicles with navigation systemThe navigation system will also
disable itself. The next time you turn
on the ignition switch, the system
will require you to enter‘‘ENTER
CODE ’’before it can be used. Refer
to the navigation system manual.
ACCESSORY SOCKET FUSE
RADIO FUSETowing Your Vehicle Behind a Motorhome240
2009 Fit
Page 244 of 352

Automatic transmissionIf you tow a Fit behind a motorhome,
the transmission fluid must be
changed every 2 years or 30,000
miles (48,000 km), whichever comes
first.
Towing Your Vehicle Behind a Motorhome
241
Driving
2009 Fit
Page 245 of 352

242
2009 Fit
Page 246 of 352
This section explains why it is
important to keep your vehicle well
maintained and how to follow basic
maintenance safety precautions.
This section also includes
instructions on how to read the
maintenance minder messages on
the information display, and
instructions for simple maintenance
tasks you may want to take care of
yourself.
If you have the skills and tools to
perform more complex maintenance
tasks on your vehicle, you may want
to purchase the service manual. See
page335for information on how to
obtain a copy, or see your dealer.Maintenance Safety
.....................
244
Maintenance Minder
..................
245
Fluid Locations
...........................
252
Adding Engine Oil
......................
253
Changing the Engine Oil and Filter
.......................................
254
Engine Coolant
...........................
256
Windshield Washers
...................
258
Transmission Fluid
.....................
259
Automatic Transmission Fluid
...................................
259
Manual Transmission Fluid
....
260
Brake and Clutch Fluid
...............
261
Lights
..........................................
262
Cleaning the Seat Belts
...............
267
Floor Mats
..................................
267
Audio Antenna
............................
268
Dust and Pollen Filter
.................
268
Wiper Blades
..............................
269
Tires
...........................................
273
Checking the Battery
..................
279
Vehicle Storage
...........................
281
Maintenance
243
Maintenance
2009 Fit
Page 247 of 352
All service items not detailed in this
section should be performed by a
certified technician or other qualified
mechanic.
Important Safety Precautions
To eliminate potential hazards, read
the instructions before you begin,
and make sure you have the tools
and skills required.●Make sure your vehicle is parked
on level ground, the parking brake
is set, and the engine is off.●To clean parts, use a commercially
available degreaser or parts
cleaner, not gasoline.●To reduce the possibility of fire or
explosion, keep cigarettes, sparks,
and flames away from the battery
and all fuel-related parts.●Wear eye protection and protective
clothing when working with the
battery or compressed air.
Improperly maintaining this
vehicle, or failing to correct a
problem before driving can
cause a crash in which you can
be seriously hurt or killed.
Always follow the inspection
and maintenance
recommendations and
schedules in this owner's
manual.
Potential Vehicle Hazards●Carbon Monoxide poison from
engine exhaust. Be sure there is
adequate ventilation whenever you
operate the engine.●Burns from hot parts. Let the
engine and exhaust system cool
down before touching any parts.
●Injury from moving parts. Do
not run the engine unless
instructed to do so.Failure to properly follow
maintenance instructions and
precautions can cause you to
be seriously hurt or killed.
Always follow the procedures
and precautions in this owner's
manual.
Some of the most important safety
precautions are given here. However,
we cannot warn you of every
conceivable hazard that can arise in
performing maintenance. Only you
can decide whether or not you
should perform a given task.
Maintenance Safety244
2009 Fit
Page 248 of 352
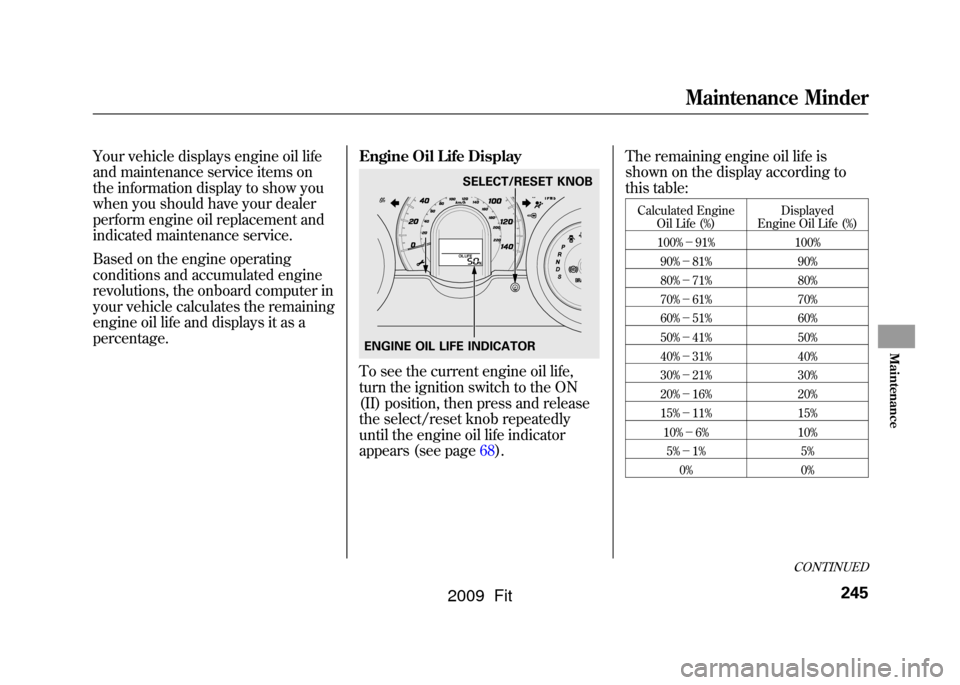
Your vehicle displays engine oil life
and maintenance service items on
the information display to show you
when you should have your dealer
perform engine oil replacement and
indicated maintenance service.
Based on the engine operating
conditions and accumulated engine
revolutions, the onboard computer in
your vehicle calculates the remaining
engine oil life and displays it as a
percentage.Engine Oil Life Display
To see the current engine oil life,
turn the ignition switch to the ON
(II) position, then press and release
the select/reset knob repeatedly
until the engine oil life indicator
appears (see page68).The remaining engine oil life is
shown on the display according to
this table:
Calculated Engine
Oil Life (%) Displayed
Engine Oil Life (%)
100% -91% 100%
90% -81% 90%
80% -71% 80%
70% -61% 70%
60% -51% 60%
50% -41% 50%
40% -31% 40%
30% -21% 30%
20% -16% 20%
15% -11% 15%
10% -6% 10%
5% -1% 5%
0% 0%
SELECT/RESET KNOB
ENGINE OIL LIFE INDICATOR
CONTINUED
Maintenance Minder
245
Maintenance
2009 Fit
Page 249 of 352
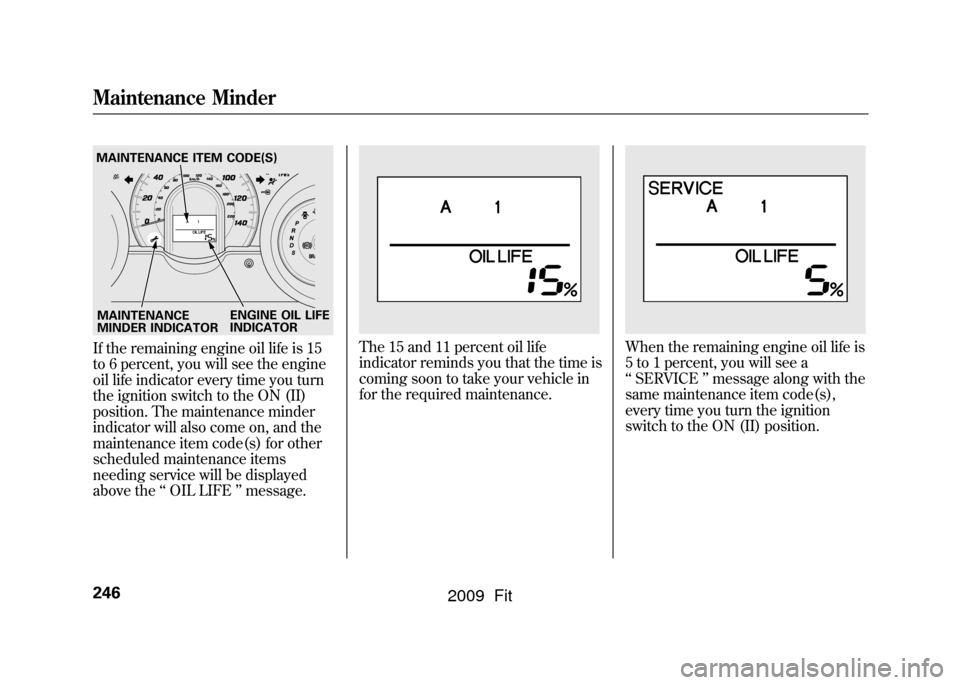
If the remaining engine oil life is 15
to 6 percent, you will see the engine
oil life indicator every time you turn
the ignition switch to the ON (II)
position. The maintenance minder
indicator will also come on, and the
maintenance item code(s) for other
scheduled maintenance items
needing service will be displayed
above the‘‘OIL LIFE ’’message.
The 15 and 11 percent oil life
indicator reminds you that the time is
coming soon to take your vehicle in
for the required maintenance.
When the remaining engine oil life is
5 to 1 percent, you will see a
‘‘SERVICE ’’message along with the
same maintenance item code(s),
every time you turn the ignition
switch to the ON (II) position.
MAINTENANCE
MINDER INDICATOR
MAINTENANCE ITEM CODE(S)
ENGINE OIL LIFE
INDICATORMaintenance Minder246
2009 Fit
Page 250 of 352
The maintenance item code or codes
indicate the main and sub items
required at the time of the oil change
(see page248).
You can switch the information
display from the engine oil life
display to the odometer or the trip
meter. Press and release the select/
reset knob on the instrument panel.
When the engine oil life is 15 to 1
percent, the maintenance minder
indicator (
) comes on every time
you turn the ignition switch to the
ON (II) position, then it goes out if
you switch the information display.
When you see this message, have
the indicated maintenance performed
by your dealer as soon as possible.
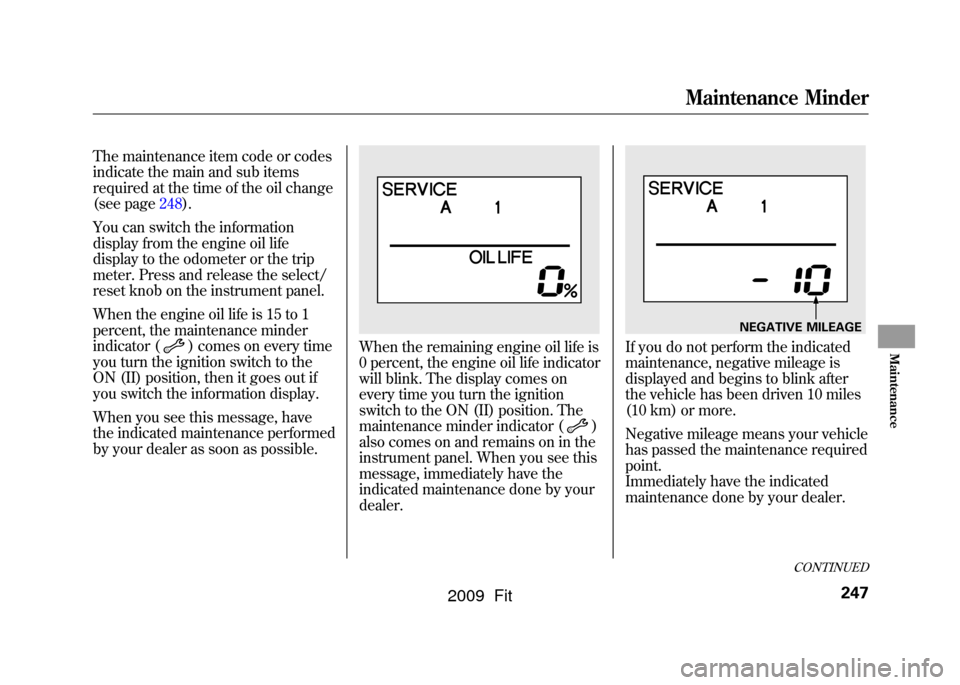
When the remaining engine oil life is
0 percent, the engine oil life indicator
will blink. The display comes on
every time you turn the ignition
switch to the ON (II) position. The
maintenance minder indicator (
)
also comes on and remains on in the
instrument panel. When you see this
message, immediately have the
indicated maintenance done by your
dealer.
If you do not perform the indicated
maintenance, negative mileage is
displayed and begins to blink after
the vehicle has been driven 10 miles
(10 km) or more.
Negative mileage means your vehicle
has passed the maintenance required
point.
Immediately have the indicated
maintenance done by your dealer.
NEGATIVE MILEAGE
CONTINUED
Maintenance Minder
247
Maintenance
2009 Fit