trip HONDA FIT 2017 3.G Quick Guide
[x] Cancel search | Manufacturer: HONDA, Model Year: 2017, Model line: FIT, Model: HONDA FIT 2017 3.GPages: 76, PDF Size: 8.56 MB
Page 6 of 76
4 || 5
S
AFETYSAFETY
Carbon Monoxide Gas
The engine exhaust from this vehicle contains carbon monoxide, a colorle\
ss,
odorless, and highly toxic gas. As long as you properly maintain your ve\
hicle and
follow the instructions set forth below, you will not accumulate dangerous levels
of carbon monoxide gas in the vehicle interior.
Have the exhaust system inspected for leaks whenever:
•
The exhaust system is making an unusual noise.
•
The exhaust system may have been damaged.
•
The vehicle is raised for an oil change.
When you operate a vehicle with the tailgate open, airflow can pull ex\
haust gas
into the interior and create a hazardous condition. If you must drive wi\
th the
tailgate open, open all the windows and set the climate control system a\
s shown below.
1.
Select the fresh air mode.
2.
Select the mode.
3.
Set the fan speed to high.
4.
Set the temperature control to a comfortable setting.
Adjust the climate control system in the same manner if you sit in your \
parked
vehicle with the engine running.
Carbon monoxide gas is toxic. Breathing it can cause unconsciousness and\
even kill you.
Avoid any enclosed areas or activities that expose you to carbon monoxide\
.
WARNING
An enclosed area such as a garage can quickly fill up with carbon mono\
xide gas.
Do not run the engine with the garage door closed. Even when the garage \
door is
open, drive out of the garage immediately after starting the engine.
Seat Belts
A seat belt is your best protection in all types of collisions. Airbags \
are designed to
supplement seat belts, not replace them. So even though your vehicle is \
equipped
with airbags, make sure you and your passengers always wear your seat belts and
wear them properly.
Lap/Shoulder Seat BeltsAll five seating positions are equipped with lap/shoulder seat belts w\
ith
emergency locking retractors. In normal driving, the retractor lets you \
move
freely while keeping some tension on the belt. During a collision or sud\
den stop,
the retractor locks to restrain your body. The rear seat belts also have a lockable
retractor for use with child seats.
The front seats are equipped with automatic seat belt tensioners to enha\
nce
safety. The tensioners automatically tighten the front seat belts during a mod\
erate
to severe frontal collision, sometimes even if the collision is not seve\
re enough to
inflate the front airbags.
Proper Use of Seat BeltsFollow these guidelines for proper use:
•
All occupants should sit upright, well back in the seat, and remain in t\
hat
position for the duration of the trip. Slouching and leaning reduces the\
effectiveness of the belt and can increase the chance of serious injury \
in a
crash.
•
Never place the shoulder part of a lap/shoulder seat belt under your arm\
or
behind your back. This could cause very serious injuries in a crash.
•
Two people should never use the same seat belt. If they do, they could be\
very
seriously injured in a crash.
•
Do not put any accessories on the seat belts. Devices intended to improv\
e
comfort or reposition the shoulder part of a seat belt can reduce the pr\
otective
capability and increase the chance of serious injury in a crash.
•
No one should sit in a seat with an inoperative seat belt or one that do\
es not
appear to be working correctly. Using a seat belt that is not working properly
may not protect the occupant in a crash. Have a dealer check the belt as\
soon
as possible.
Not wearing a seat belt properly increases the chance of a serious injur\
y or
death in a crash, even though your vehicle has airbags.
Be sure you and your passengers always wear seat belts and wear them
properly
.
WARNING
Page 14 of 76
20 || 21
S
AFETYSAFETY
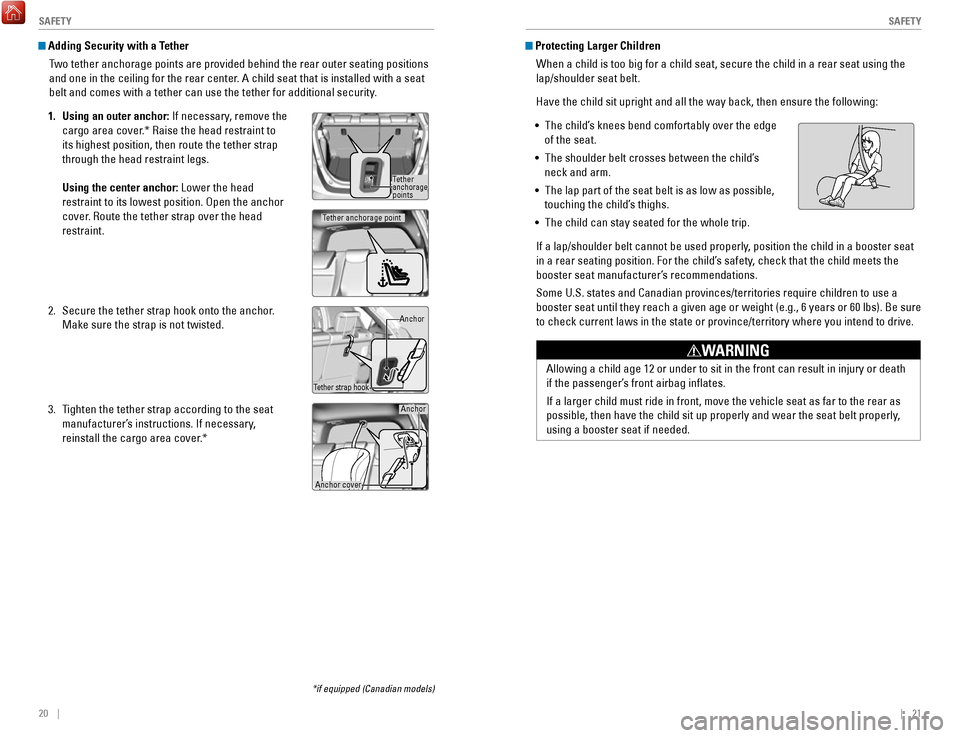
Adding Security with a Tether
Two tether anchorage points are provided behind the rear outer seating po\
sitions
and one in the ceiling for the rear center. A child seat that is installed with a seat
belt and comes with a tether can use the tether for additional security.
1.
Using an outer anchor: If necessary, remove the
cargo area cover
.* Raise the head restraint to
its highest position, then route the tether strap
through the head restraint legs.
Using the center anchor: Lower the head
restraint to its lowest position. Open the anchor
cover. Route the tether strap over the head
restraint.
2.
Secure the tether strap hook onto the anchor.
Make sure the strap is not twisted.
3.
Tighten the tether strap according to the seat
manufacturer’s instructions. If necessary
,
reinstall the cargo area cover.* Protecting Larger Children
When a child is too big for a child seat, secure the child in a rear sea\
t using the
lap/shoulder seat belt.
Have the child sit upright and all the way back, then ensure the followi\
ng:
•
The child’s knees bend comfortably over the edge
of the seat.
•
The shoulder belt crosses between the child’s
neck and arm.
•
The lap part of the seat belt is as low as possible,
touching the child’s thighs.
•
The child can stay seated for the whole trip.
If a lap/shoulder belt cannot be used properly, position the child in a booster seat
in a rear seating position. For the child’s safety
, check that the child meets the
booster seat manufacturer’s recommendations.
Some U.S. states and Canadian provinces/territories require children to \
use a
booster seat until they reach a given age or weight (e.g., 6 years or 6\
0 lbs). Be sure
to check current laws in the state or province/territory where you inten\
d to drive.
Allowing a child age 12 or under to sit in the front can result in injur\
y or death
if the passenger’s front airbag inflates.
If a larger child must ride in front, move the vehicle seat as far to th\
e rear as
possible, then have the child sit up properly and wear the seat belt pro\
perly,
using a booster seat if needed.
WARNING
Tether
anchorage
points
Tether strap hook Anchor
*if equipped (Canadian models)
Tether anchorage point
Anchor
Anchor cover
Page 18 of 76
28 || 29
V
EHICLE CONTROLSINSTRUMENT PANEL
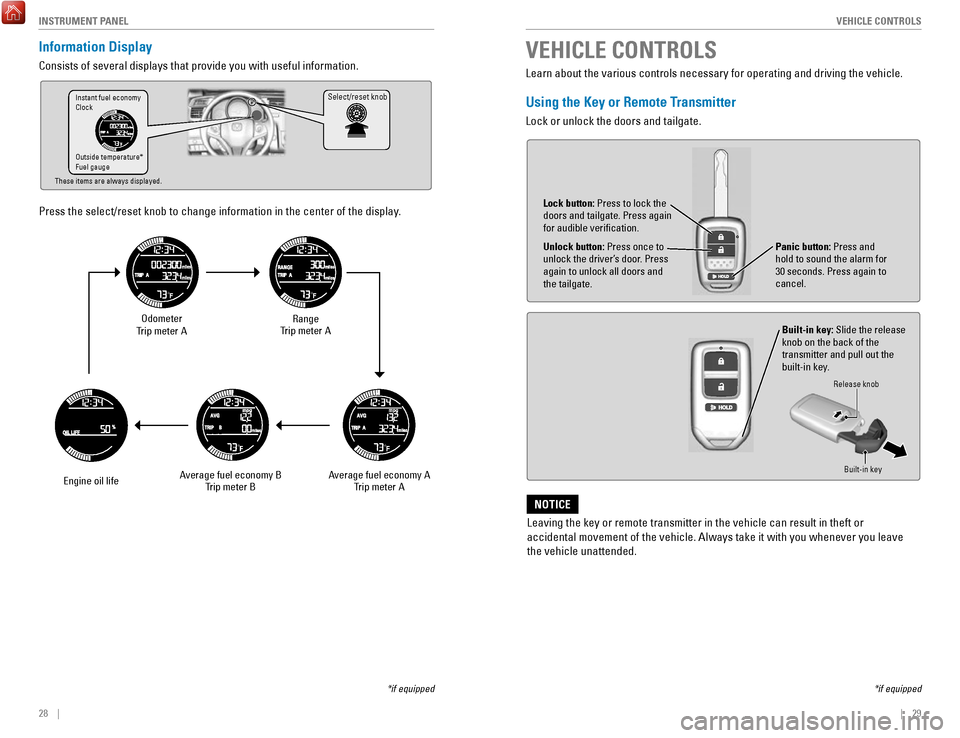
Information Display
Consists of several displays that provide you with useful information.
Press the select/reset knob to change information in the center of the d\
isplay.
Select/reset knob
Odometer
Trip meter A
Engine oil life Range
Trip meter A
Average fuel economy A Trip meter A
Average fuel economy B
Trip meter B
Instant fuel economy
Clock
Outside temperature*
Fuel gauge
These items are always displayed.
*if equipped
Learn about the various controls necessary for operating and driving the\
vehicle.
Using the Key or Remote Transmitter
Lock or unlock the doors and tailgate.
Unlock button: Press once to
unlock the driver’s door. Press
again to unlock all doors and
the tailgate.
Built-in key: Slide the release
knob on the back of the
transmitter and pull out the
built-in key.
Lock button: Press to lock the
doors and tailgate. Press again
for audible verification.
Panic button: Press and
hold to sound the alarm for
30 seconds. Press again to
cancel.
VEHICLE CONTROLS
Release knob
Built-in key
*if equipped
Leaving the key or remote transmitter in the vehicle can result in theft\
or
accidental movement of the vehicle. Always take it with you whenever you\
leave
the vehicle unattended.
NOTICE
Page 42 of 76
76 || 77
NAVIGATION
NAVIGATION
Learn how to enter a destination and operate the navigation system.
Basic Navigation Operation
A real-time navigation system uses GPS and a map database to show your current
location and help guide you to a desired destination. You can operate the system
using voice commands or the touchscreen.
To reduce the potential for driver distraction, certain manual functions \
may be
inoperable or grayed out while the vehicle is moving. Voice commands are always
available.
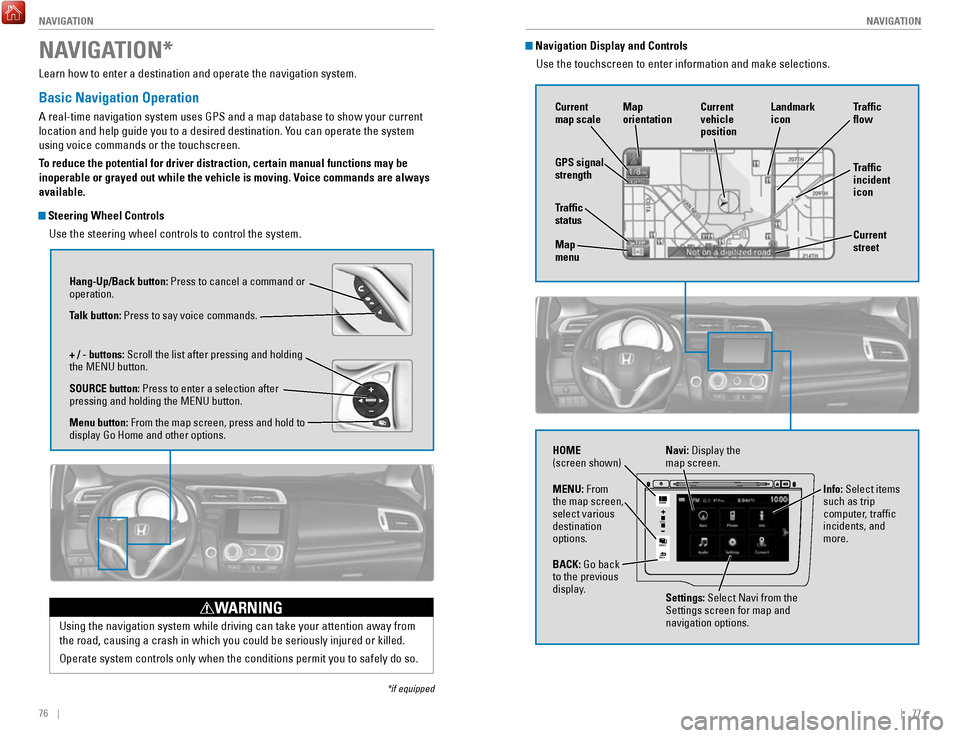
Steering Wheel Controls
Use the steering wheel controls to control the system.
NAVIGATION*
*if equipped
Using the navigation system while driving can take your attention away f\
rom
the road, causing a crash in which you could be seriously injured or kil\
led.
Operate system controls only when the conditions permit you to safely do\
so.
WARNING
Hang-Up/Back button: Press to cancel a command or
operation.
Talk button: Press to say voice commands.
+ / - buttons: Scroll the list after pressing and holding
the MENU button.
SOURCE button: Press to enter a selection after
pressing and holding the MENU button.
Menu button: From the map screen, press and hold to
display Go Home and other options.
Navigation Display and ControlsUse the touchscreen to enter information and make selections.
VO L
MENU
BACK
HOME
Navi: Display the
map screen.
HOME
(screen shown)
Info: Select items
such as trip
computer, traffic
incidents, and
more.
BACK: Go back
to the previous
display. Settings: Select Navi from the
Settings screen for map and
navigation options.
MENU: From
the map screen,
select various
destination
options.
GPS signal
strength
Traffic
incident
icon Traffic
flow
Current
map scale Current
vehicle
position
Map
orientation
Current
street
Traffic
status
Map
menu Landmark
icon
Page 65 of 76
122 || 123
MAINTENANCE
MAINTENANCE
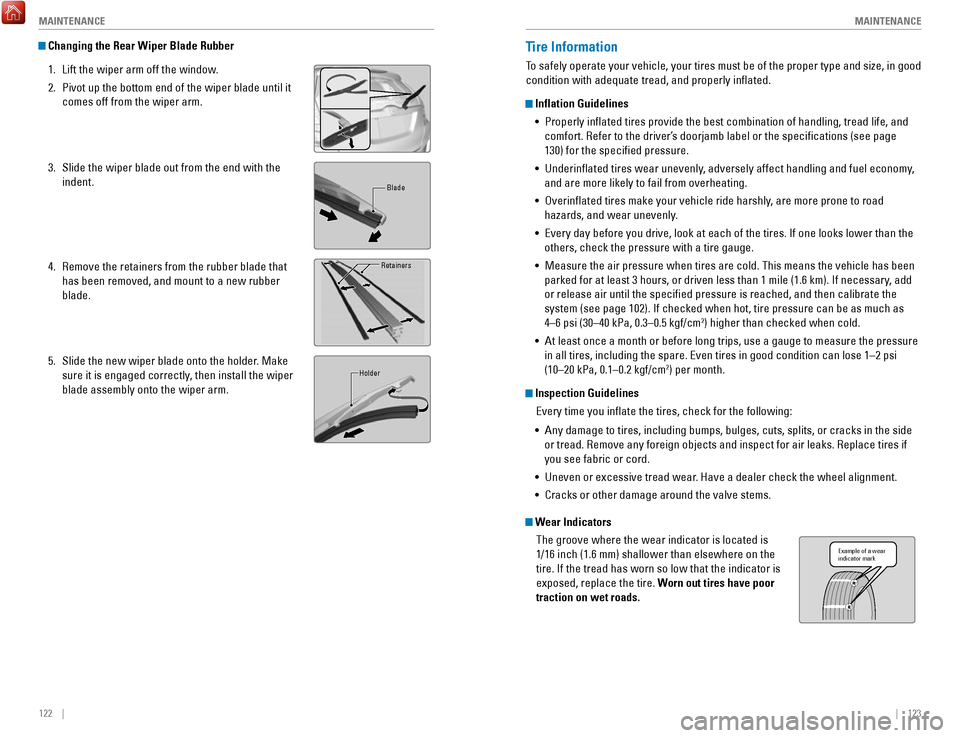
Changing the Rear Wiper Blade Rubber
1.
Lift the wiper arm off the window.
2.
Pivot up the bottom end of the wiper blade until it
comes off from the wiper arm.
3.
Slide the wiper blade out from the end with the
indent.
4.
Remove the retainers from the rubber blade that
has been removed, and mount to a new rubber
blade.
5.
Slide the new wiper blade onto the holder. Make
sure it is engaged correctly, then install the wiper
blade assembly onto the wiper arm.
Blade
Retainers
Holder
Tire Information
To safely operate your vehicle, your tires must be of the proper type and\
size, in good
condition with adequate tread, and properly inflated.
Inflation Guidelines •
Properly inflated tires provide the best combination of handling, trea\
d life, and
comfort. Refer to the driver’s doorjamb label or the specifications (see page
130) for the specified pressure.
•
Underinflated tires wear unevenly, adversely affect handling and fuel economy,
and are more likely to fail from overheating.
•
Overinflated tires make your vehicle ride harshly, are more prone to road
hazards, and wear unevenly.
•
Every day before you drive, look at each of the tires. If one looks lowe\
r than the
others, check the pressure with a tire gauge.
•
Measure the air pressure when tires are cold. This means the vehicle has been
parked for at least 3 hours, or driven less than 1 mile (1.6 km). If n\
ecessary
, add
or release air until the specified pressure is reached, and then calib\
rate the
system (see page 102). If checked when hot, tire pressure can be as mu\
ch as
4–6 psi (30–40 kPa, 0.3–0.5 kgf/cm
2) higher than checked when cold.
•
At least once a month or before long trips, use a gauge to measure the p\
ressure
in all tires, including the spare. Even tires in good condition can lose\
1–2 psi
(10–20 kPa, 0.1–0.2 kgf/cm
2) per month.
Inspection Guidelines
Every time you inflate the tires, check for the following:
•
Any damage to tires, including bumps, bulges, cuts, splits, or cracks in\
the side
or tread. Remove any foreign objects and inspect for air leaks. Replace \
tires if you see fabric or cord.
•
Uneven or excessive tread wear. Have a dealer check the wheel alignment.
•
Cracks or other damage around the valve stems.
Wear Indicators The groove where the wear indicator is located is
1/16 inch (1.6 mm) shallower than elsewhere on the
tire. If the tread has worn so low that the indicator is
exposed, replace the tire. Worn out tires have poor
traction on wet roads.
Example of a wear
indicator mark
Page 74 of 76
140 || 141
INDEX
VOICE COMMAND INDEX
Phone Commands
The system accepts these commands on most screens.
Info CommandsThe system accepts these commands on most screens.
•
Trip computer
•
Display traffic list*
•
Display traffic on my route* •
Display clock
•
Display wallpaper
On-screen Commands
The system accepts these commands on any screen where applicable. All
available commands are highlighted in yellow when you press the Talk button.
•
Next (or previous)
•
Up (or down)
•
Right (or left)
•
Return
•
OK (excluding Startup Confirmation screen)
•
Delete
*if equipped
• Dial/call by number
•
Dial/call by name
•
Call (phone number or name)
INDEX
ABS........................................................................\
...... 25
Accessory Power Socket ........................................ 47
Airbags........................................................................\
.. 9 About Your Airbags
................................................ 11
Advanced Airbags .................................................... 9
Airbag Care ............................................................. 14
Airbag System Components ................................. 13
Airbag System Indicators ..................................... 11
Front Airbags (SRS) .................................................. 9
Passenger Airbag Off Indicator ........................... 12
Side Airbags ............................................................ 10
Side Curtain Airbags .............................................. 10
SRS Indicator .......................................................... 11
Anti-Lock Brake System (ABS) ......................... 25,
91
Audio Commands
.................................................... 138
Audio Operation ........................................................ 47
Accessory Power Socket ..................................... 47
Auxiliary Input Jack ............................................... 48
Bluetooth Audio ................................................ 55,
63
Color Audio System
................................................ 50
Compact Disc (CD) ........................................... 52, 60
FM/AM Radio .................................................... 51,
58
HDMI Port
................................................................ 47
HDMI Video ............................................................. 65
HondaLink ................................................................ 57
iPod ..................................................................... 53,
61
Pandora
.................................................................... 64
SiriusXM Radio ....................................................... 59
Sound ....................................................................... 49
Steering Wheel Controls ....................................... 48
Touchscreen Operation ......................................... 56
USB Flash Drive ................................................ 54,
62
USB Port
.................................................................. 47
AUX Commands.......................................................
139
Auxiliary Input Jack
.................................................. 48
Battery ...................................................................... 120
Bluetooth Audio...................................................
55, 63
Bluetooth Audio Commands.................................. 139
Bluetooth Handsfreelink (HFL)
................................ 66
E-Mail ....................................................................... 74
HFL Controls ...................................................... 66,
69
HondaLink Assist
.................................................... 73
Making a Call .................................................... 68,
72
Pairing a Phone
................................................ 67,
71
Phonebook
......................................................... 68,
72
Siri Eyes Free
.......................................................... 75
SMS Text Messaging ............................................. 74
Speed Dial ......................................................... 68,
73
Talk Button Tips
...................................................... 70Brake Assist System.................................................
91
Brake Fluid ............................................................... 119
Brake system ....................................................... 24,
25
Braking........................................................................\
90 Brightness Control
.................................................... 35
Calibration ................................................................ 102
Carbon Monoxide Gas................................................
4
Changing a Flat Tire
................................................ 104
Changing Settings ..................................................... 46
Changing Wiper Blades ......................................... 121
Charging system........................................................ 24 Child Safety
................................................................ 15
Childproof Door Locks ........................................... 31
Installing a LATCH-Compatible Child Seat ......... 18
Child Seat ................................................................... 17
Adding Security with a Tether .............................. 20
Installing a LATCH-Compatible Child Seat ......... 18
Selecting a Child Seat ........................................... 17
Climate Control Commands ................................... 137
Climate Control System ............................................ 44
Clock........................................................................\
.... 45
Color Audio System
.................................................. 50
Compact Disc (CD) .............................................. 52,
60
Compact Disc (CD) Commands
............................. 138
Contact Us ................................................................ 133
Continuously Variable T
ransmission (CVT)
...........88
Coolant ...................................................................... 118
Cruise Control ............................................................ 93
CRUISE MAIN ............................................................ 27
CUSTOMER Information.........................................
132
Customized Features
................................................ 46
CVT ........................................................................\
...... 88
Dashboard and Other Controls ................................. 2
Destination ................................................................. 79
Detour ........................................................................\
. 82
Dialing a Number ................................................ 68,
72
Door Mirrors
.............................................................. 42
Door Operation .......................................................... 31
Doors ........................................................................\
... 30
Door/tailgate open .................................................... 26
DOT Tire Quality Grading ....................................... 127