HONDA HR-V 2018 Owner's Manual (in English)
Manufacturer: HONDA, Model Year: 2018,
Model line: HR-V,
Model: HONDA HR-V 2018
Pages: 503, PDF Size: 32.79 MB
HONDA HR-V 2018 Owner's Manual (in English)
HR-V 2018
HONDA
HONDA
https://www.carmanualsonline.info/img/13/34529/w960_34529-0.png
HONDA HR-V 2018 Owner's Manual (in English)
Trending: fuses, fuel tank capacity, navigation system, torque, fuel filter, headlight bulb, jack points
Page 411 of 503
409
uuMaintenance Under the Hood uBrake/Clutch* Fluid
Maintenance
Brake/Clutch* Fluid
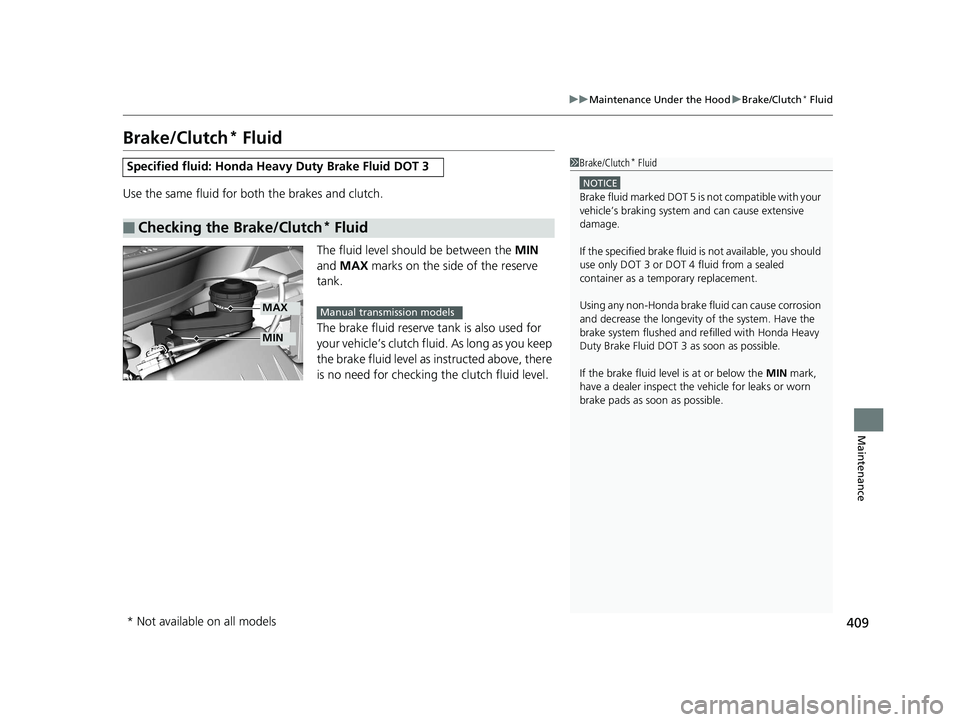
Use the same fluid for bo th the brakes and clutch.
The fluid level should be between the MIN
and MAX marks on the side of the reserve
tank.
The brake fluid reserve tank is also used for
your vehicle’s clutch fluid. As long as you keep
the brake fluid level as instructed above, there
is no need for checking the clutch fluid level.
Specified fluid: Honda He avy Duty Brake Fluid DOT 3
■Checking the Brake/Clutch* Fluid
1Brake/Clutch* Fluid
NOTICE
Brake fluid marked DOT 5 is not compatible with your
vehicle’s braking system and can cause extensive
damage.
If the specified brake fluid is not available, you should
use only DOT 3 or DOT 4 fluid from a sealed
container as a temporary replacement.
Using any non-Honda brake fluid can cause corrosion
and decrease the longevity of the system. Have the
brake system flushed and re filled with Honda Heavy
Duty Brake Fluid DOT 3 as soon as possible.
If the brake fluid level is at or below the MIN mark,
have a dealer inspect the vehicle for leaks or worn
brake pads as soon as possible.
MIN
MAXManual transmission models
* Not available on all models
18 HR-V-31T7A6200.book 409 ページ 2017年6月30日 金曜日 午後1時23分
Page 412 of 503
410
uuMaintenance Under the Hood uRefilling Window Washer Fluid
Maintenance
Refilling Window Washer Fluid
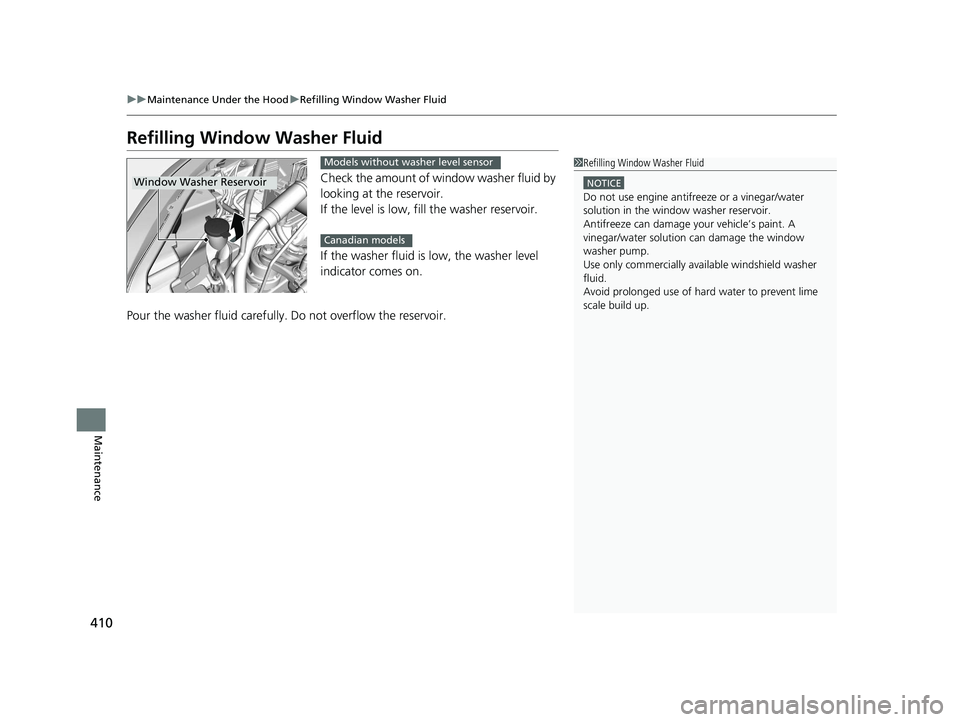
Check the amount of window washer fluid by
looking at the reservoir.
If the level is low, fill the washer reservoir.
If the washer fluid is low, the washer level
indicator comes on.
Pour the washer fluid carefully. Do not overflow the reservoir.
1Refilling Window Washer Fluid
NOTICE
Do not use engine antifreeze or a vinegar/water
solution in the window washer reservoir.
Antifreeze can damage y our vehicle’s paint. A
vinegar/water solution can damage the window
washer pump.
Use only commercially avai lable windshield washer
fluid.
Avoid prolonged use of hard water to prevent lime
scale build up.
Window Washer Reservoir
Models without washer level sensor
Canadian models
18 HR-V-31T7A6200.book 410 ページ 2017年6月30日 金曜日 午後1時23分
Page 413 of 503
411
Maintenance
Replacing Light Bulbs
Headlight Bulbs
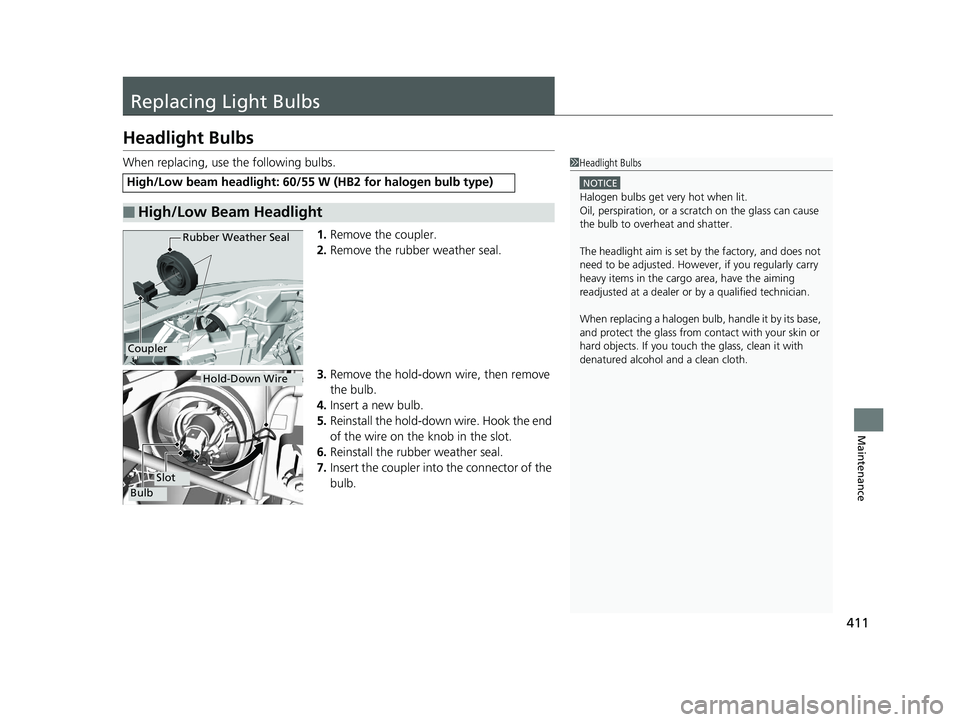
When replacing, use the following bulbs.1.Remove the coupler.
2. Remove the rubber weather seal.
3. Remove the hold-down wire, then remove
the bulb.
4. Insert a new bulb.
5. Reinstall the hold-down wire. Hook the end
of the wire on the knob in the slot.
6. Reinstall the rubber weather seal.
7. Insert the coupler into the connector of the
bulb.
High/Low beam headlight: 60/55 W (HB2 for halogen bulb type)
■High/Low Beam Headlight
1Headlight Bulbs
NOTICE
Halogen bulbs get very hot when lit.
Oil, perspiration, or a scratch on the glass can cause
the bulb to overhe at and shatter.
The headlight aim is set by the factory, and does not
need to be adjusted. Howeve r, if you regularly carry
heavy items in the cargo area, have the aiming
readjusted at a dealer or by a qualified technician.
When replacing a halogen bu lb, handle it by its base,
and protect the glass from c ontact with your skin or
hard objects. If you touch the glass, clean it with
denatured alcohol and a clean cloth.
Rubber Weather Seal
Coupler
Hold-Down Wire
Bulb
Slot
18 HR-V-31T7A6200.book 411 ページ 2017年6月30日 金曜日 午後1時23分
Page 414 of 503
412
uuReplacing Light Bulbs uFront Turn Signal/Parking Light Bulbs
Maintenance
Front Turn Signal/Parking Light Bulbs
When replacing, use the following bulbs.
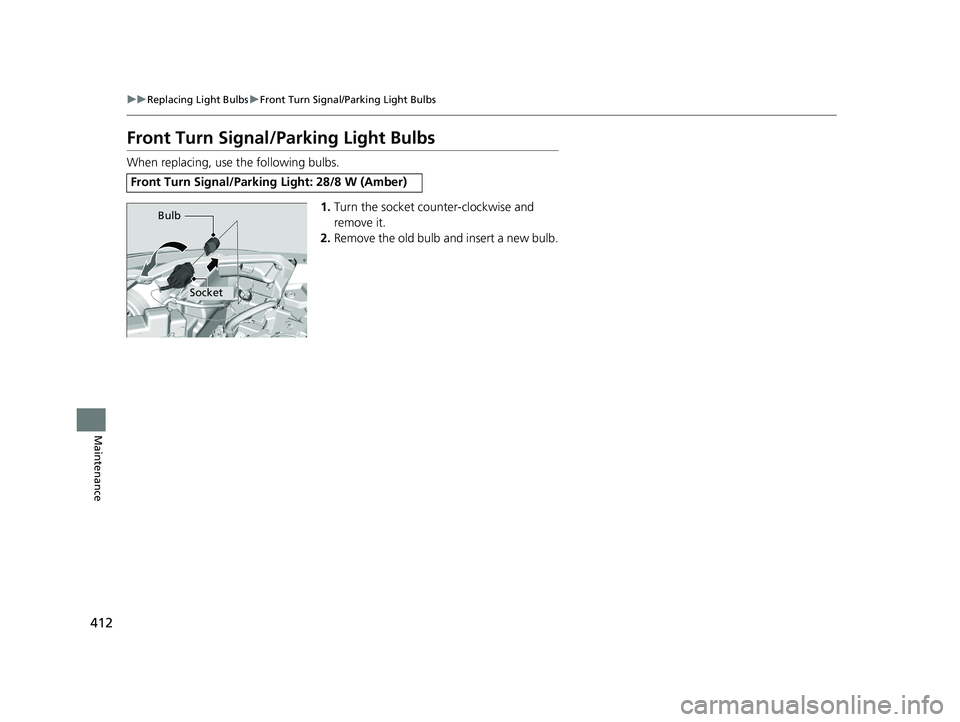
1.Turn the socket counter-clockwise and
remove it.
2. Remove the old bulb and insert a new bulb.
Front Turn Signal/Parking Light: 28/8 W (Amber)
Bulb
Socket
18 HR-V-31T7A6200.book 412 ページ 2017年6月30日 金曜日 午後1時23分
Page 415 of 503
413
uuReplacing Light Bulbs uFront Side Marker Light Bulbs
Continued
Maintenance
Front Side Marker Light Bulbs
When replacing, use the following bulbs.
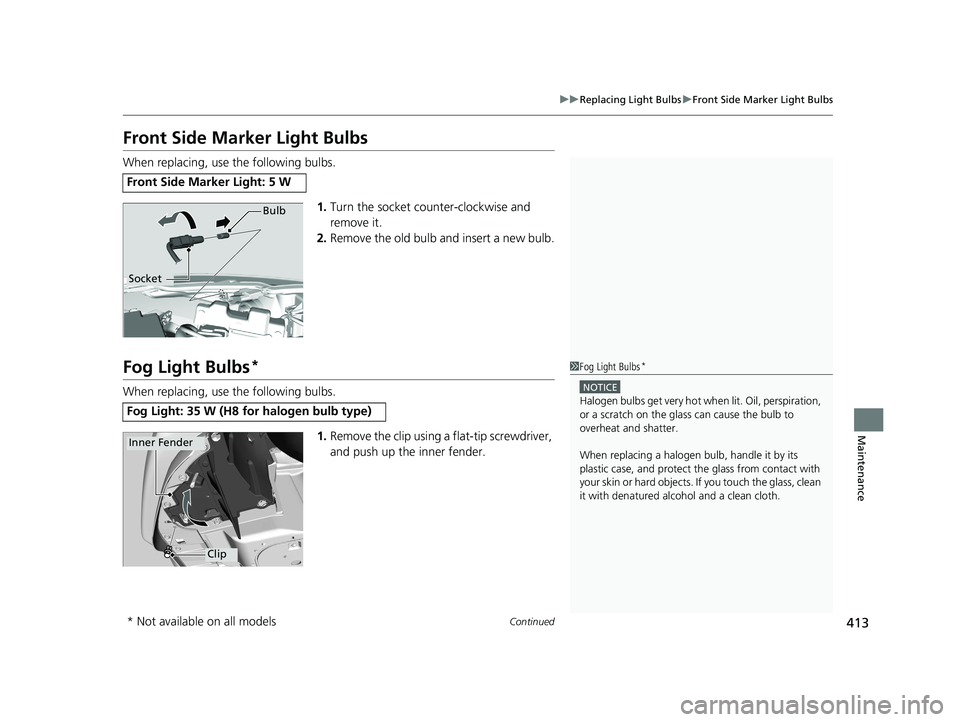
1.Turn the socket counter-clockwise and
remove it.
2. Remove the old bulb and insert a new bulb.
Fog Light Bulbs*
When replacing, use the following bulbs.
1.Remove the clip using a flat-tip screwdriver,
and push up the inner fender.
Front Side Marker Light: 5 W
Bulb
Socket
Fog Light: 35 W (H8 for halogen bulb type)
1 Fog Light Bulbs*
NOTICE
Halogen bulbs get very hot wh en lit. Oil, perspiration,
or a scratch on the glass can cause the bulb to
overheat and shatter.
When replacing a halogen bulb, handle it by its
plastic case, and protect th e glass from contact with
your skin or hard objects. If you touch the glass, clean
it with denatured alc ohol and a clean cloth.
Clip
Inner Fender
* Not available on all models
18 HR-V-31T7A6200.book 413 ページ 2017年6月30日 金曜日 午後1時23分
Page 416 of 503
uuReplacing Light Bulbs uSide Turn Signal/Emergency Indicator Lights*
414
Maintenance
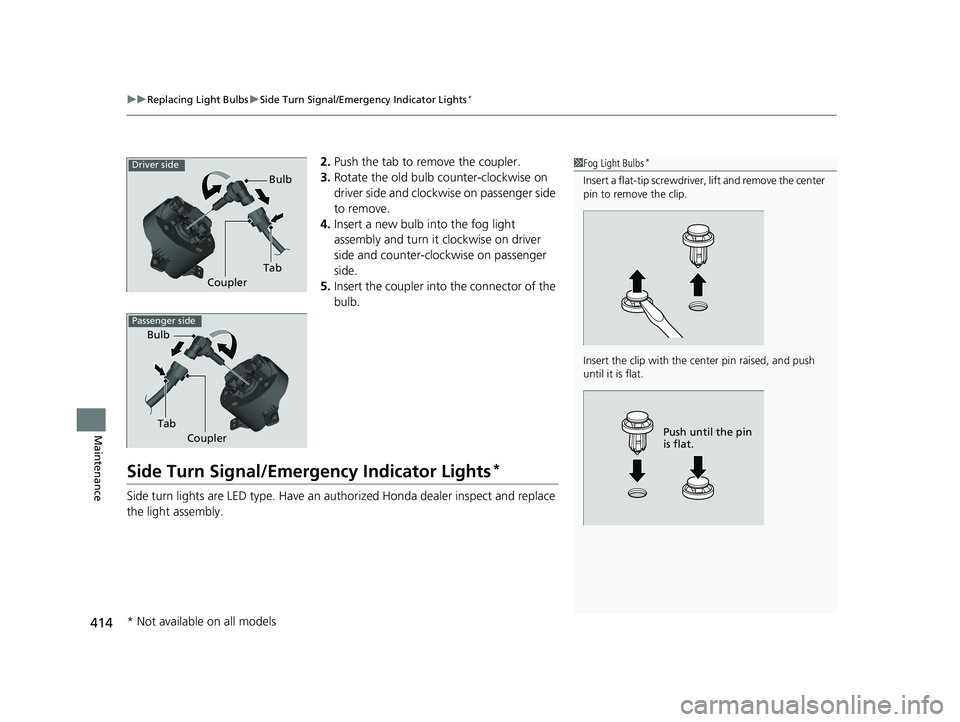
2. Push the tab to remove the coupler.
3. Rotate the old bulb counter-clockwise on
driver side and clockwise on passenger side
to remove.
4. Insert a new bulb into the fog light
assembly and turn it clockwise on driver
side and counter-clockwise on passenger
side.
5. Insert the coupler into the connector of the
bulb.
Side Turn Signal/Emergency Indicator Lights*
Side turn lights are LED type. Have an au thorized Honda dealer inspect and replace
the light assembly.
1 Fog Light Bulbs*
Insert a flat-tip screwdriver, lift and remove the center
pin to remove the clip.
Insert the clip with the center pin raised, and push
until it is flat.
Push until the pin
is flat.
Tab Bulb
Coupler
Driver side
Passenger side
Tab
Bulb
Coupler
* Not available on all models
18 HR-V-31T7A6200.book 414 ページ 2017年6月30日 金曜日 午後1時23分
Page 417 of 503
415
uuReplacing Light Bulbs uRear Turn Signal Light Bulbs
Maintenance
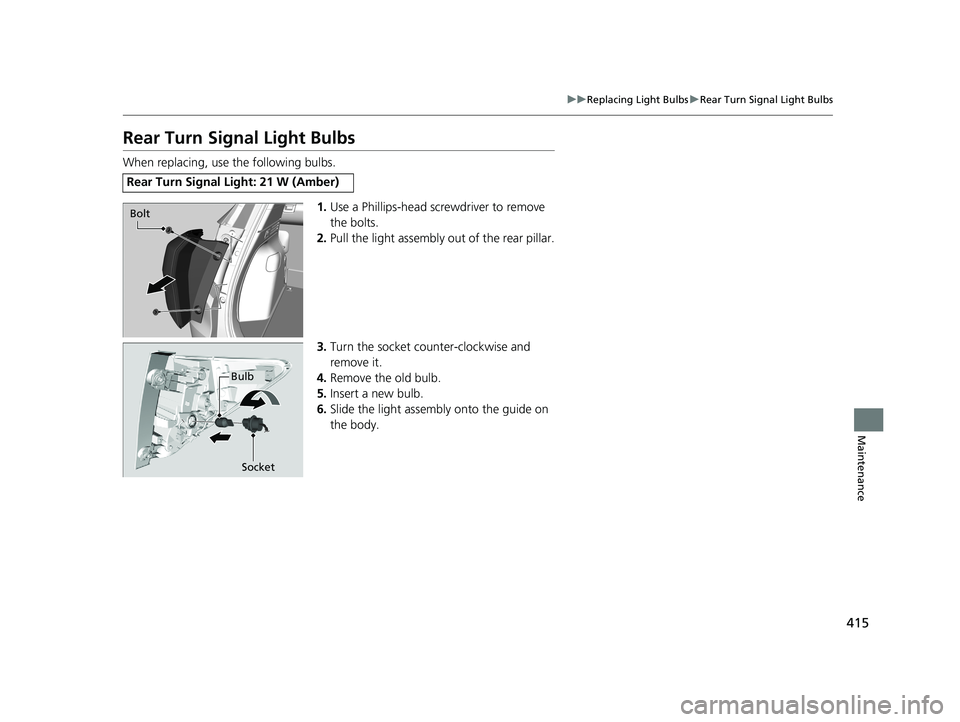
Rear Turn Signal Light Bulbs
When replacing, use the following bulbs.
1.Use a Phillips-head screwdriver to remove
the bolts.
2. Pull the light assembly out of the rear pillar.
3. Turn the socket counter-clockwise and
remove it.
4. Remove the old bulb.
5. Insert a new bulb.
6. Slide the light assembly onto the guide on
the body.
Rear Turn Signal Light: 21 W (Amber)
Bolt
Bulb
Socket
18 HR-V-31T7A6200.book 415 ページ 2017年6月30日 金曜日 午後1時23分
Page 418 of 503
416
uuReplacing Light Bulbs uBack-Up Light Bulbs
Maintenance
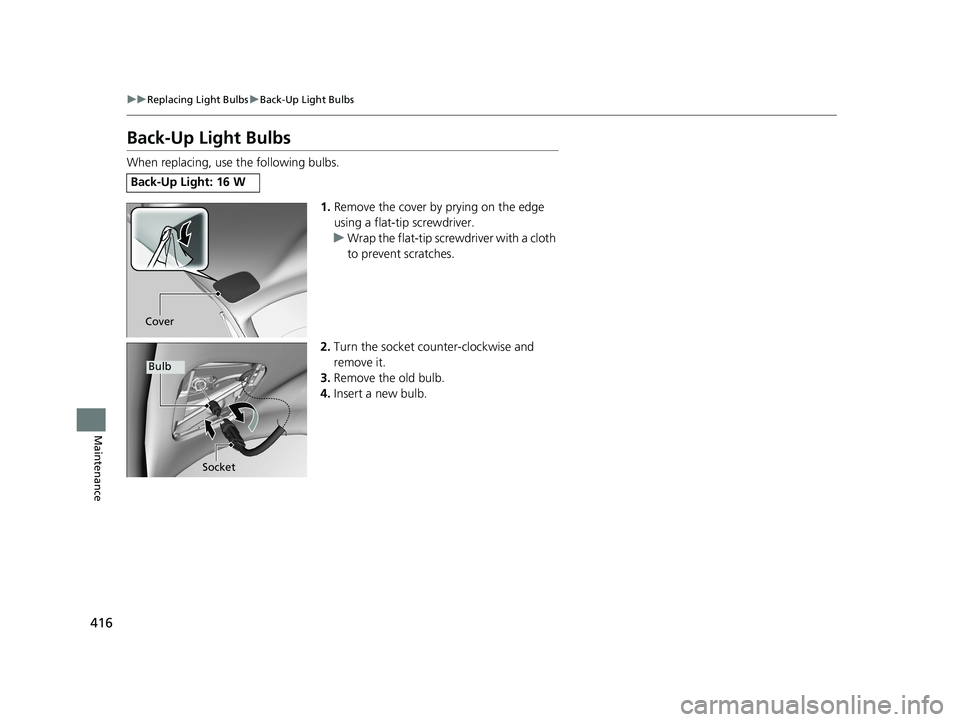
Back-Up Light Bulbs
When replacing, use the following bulbs.
1.Remove the cover by prying on the edge
using a flat-tip screwdriver.
u Wrap the flat-tip screwdriver with a cloth
to prevent scratches.
2. Turn the socket counter-clockwise and
remove it.
3. Remove the old bulb.
4. Insert a new bulb.
Back-Up Light: 16 W
Cover
Bulb
Socket
18 HR-V-31T7A6200.book 416 ページ 2017年6月30日 金曜日 午後1時23分
Page 419 of 503
417
uuReplacing Light Bulbs uBrake/Tail/Rear Side Marker Lights
Maintenance
Brake/Tail/Rear Side Marker Lights
Brake/tail/rear side marker lights are the LE D type. Have an authorized Honda dealer
inspect and replace the light assembly.
High-Mount Brake Light
High-mount brake light is a LED type. Have an authorized Honda dealer inspect and
replace the light assembly.
18 HR-V-31T7A6200.book 417 ページ 2017年6月30日 金曜日 午後1時23分
Page 420 of 503
418
uuReplacing Light Bulbs uRear License Plate Light Bulbs
Maintenance
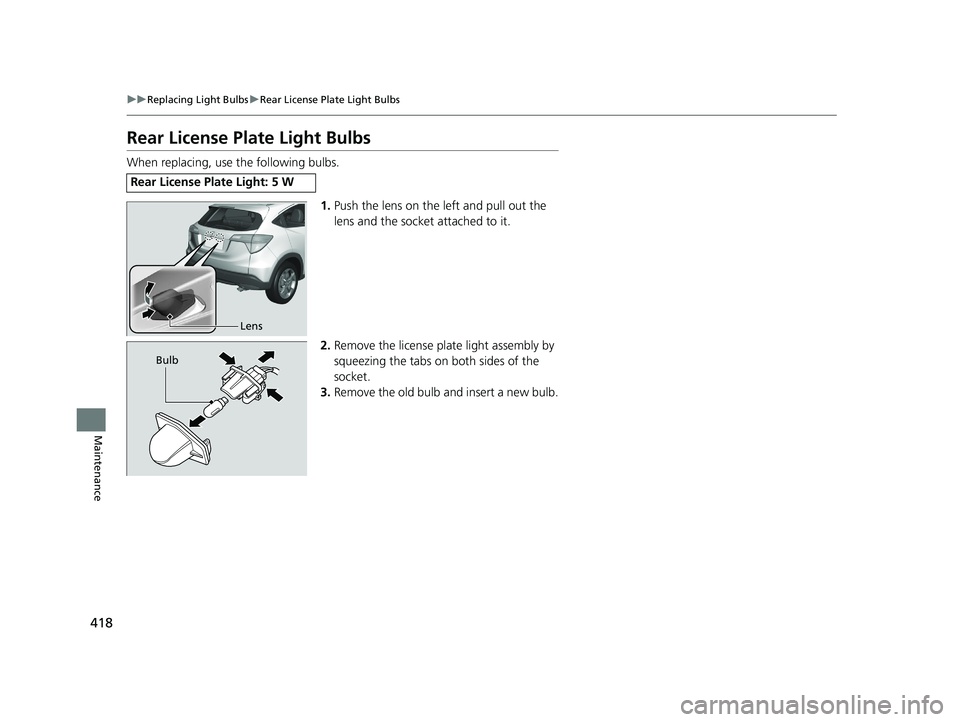
Rear License Plate Light Bulbs
When replacing, use the following bulbs.
1.Push the lens on the left and pull out the
lens and the socket attached to it.
2. Remove the license plate light assembly by
squeezing the tabs on both sides of the
socket.
3. Remove the old bulb and insert a new bulb.
Rear License Plate Light: 5 W
Lens
Bulb
18 HR-V-31T7A6200.book 418 ページ 2017年6月30日 金曜日 午後1時23分
Trending: brake pads replacement, spark plugs, glove box, snow chains, ad blue, fold seats, adding oil

