ignition HONDA HR-V 2018 (in English) Workshop Manual
[x] Cancel search | Manufacturer: HONDA, Model Year: 2018, Model line: HR-V, Model: HONDA HR-V 2018Pages: 503, PDF Size: 32.79 MB
Page 175 of 503
173
uuClimate Control System*uUsing Automatic Climate Control
Continued
Controls
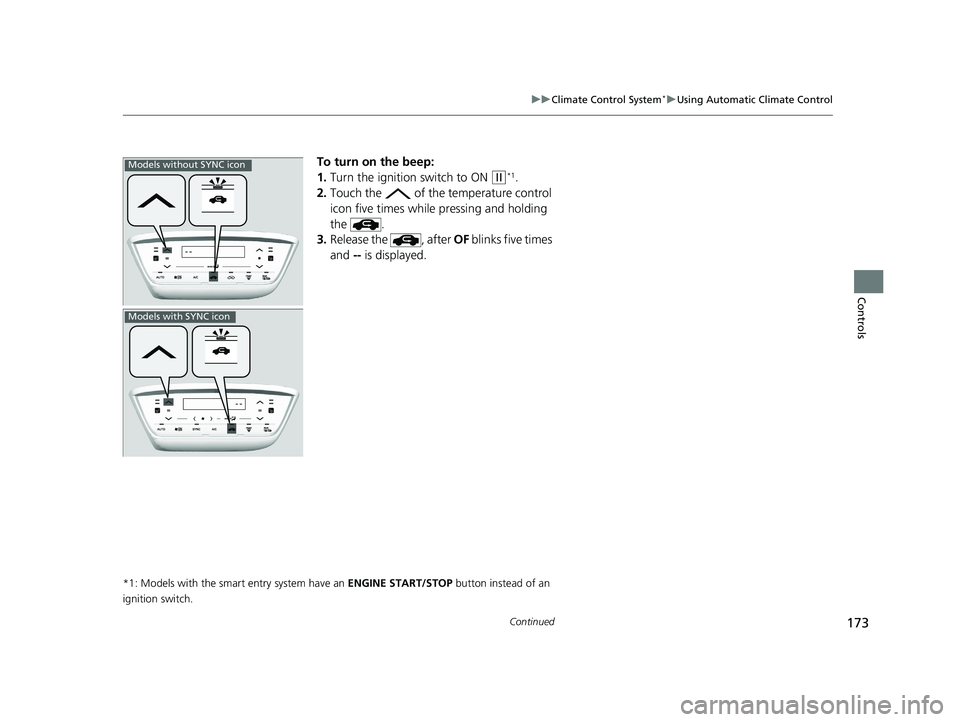
To turn on the beep:
1. Turn the ignition switch to ON
(w*1.
2. Touch the of the temperature control
icon five times while pressing and holding
the .
3. Release the , after OF blinks five times
and -- is displayed.
*1: Models with the smart entry system have an ENGINE START/STOP button instead of an
ignition switch.
Models without SYNC icon
Models with SYNC icon
18 HR-V-31T7A6200.book 173 ページ 2017年6月30日 金曜日 午後1時23分
Page 183 of 503
181
uuAudio System uAudio System Theft Protection
Features
Audio System Theft Protection
The audio system is disabled when it is disconnected from the power source, such as
when the battery is disconnected or goes dead. In certain conditions, the system
may display a cord entry screen. If this occurs, reactivate the audio system.
■Reactivating the audio system
1. Turn the ignition switch to ON
(w*1.
2. Turn on the audio system.
3. Press and hold the audio system powe r button for more than two seconds.
u The audio system is reac tivated when the audio co ntrol unit establishes a
connection with the vehicl e control unit. If the control unit fails to recognize
the audio unit, you must go to a dealer and have the audio unit checked.
*1: Models with the smart entry system have an ENGINE START/STOP button instead of an
ignition switch.
18 HR-V-31T7A6200.book 181 ページ 2017年6月30日 金曜日 午後1時23分
Page 186 of 503
184
Features
Audio System Basic Operation
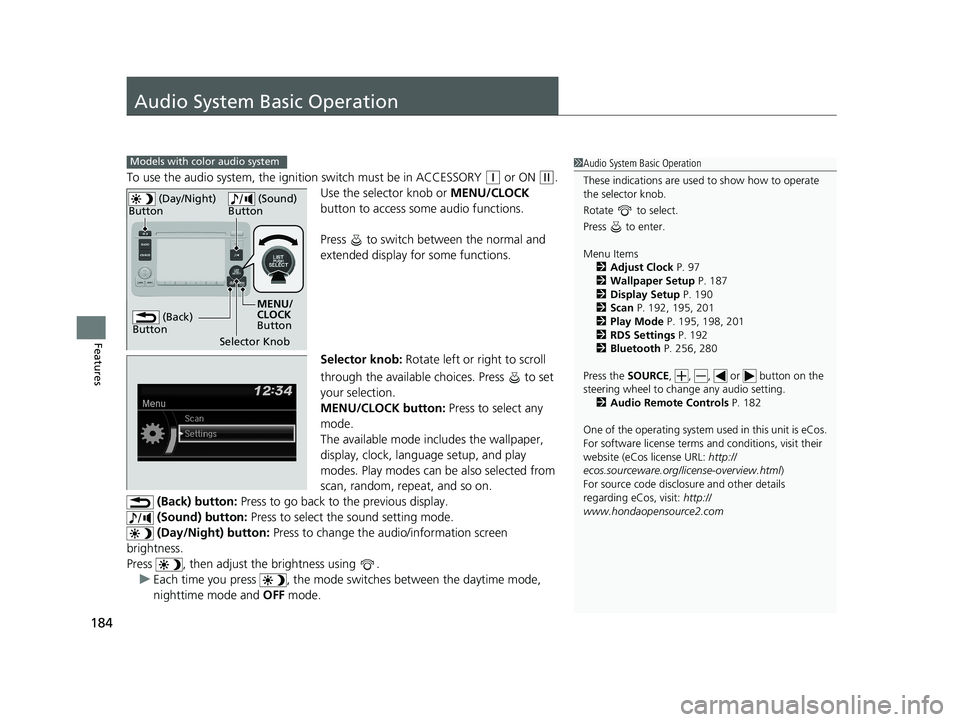
To use the audio system, the ignition switch must be in ACCESSORY (q or ON (w.
Use the selector knob or MENU/CLOCK
button to access some audio functions.
Press to switch between the normal and
extended display fo r some functions.
Selector knob: Rotate left or right to scroll
through the available choices. Press to set
your selection.
MENU/CLOCK button: Press to select any
mode.
The available mode includes the wallpaper,
display, clock, langu age setup, and play
modes. Play modes can be also selected from
scan, random, repeat, and so on.
(Back) button: Press to go back to the previous display.
(Sound) button: Press to select the sound setting mode.
(Day/Night) button: Press to change the audio/information screen
brightness.
Press , then adjust th e brightness using .
u Each time you press , the mode switches between the daytime mode,
nighttime mode and OFF mode.
Models with color audio system1Audio System Basic Operation
These indications are used to show how to operate
the selector knob.
Rotate to select.
Press to enter.
Menu Items 2 Adjust Clock P. 97
2 Wallpaper Setup P. 187
2 Display Setup P. 190
2 Scan P. 192, 195, 201
2 Play Mode P. 195, 198, 201
2 RDS Settings P. 192
2 Bluetooth P. 256, 280
Press the SOURCE, , , or button on the
steering wheel to cha nge any audio setting.
2 Audio Remote Controls P. 182
One of the operating system us ed in this unit is eCos.
For software license terms and conditions, visit their
website (eCos license URL: http://
ecos.sourceware.org/li cense-overview.html)
For source code disclo sure and other details
regarding eCos, visit: http://
www.hondaopensource2.com
(Back)
Button
Selector Knob MENU/
CLOCK
Button
(Day/Night)
Button
(Sound)
Button
18 HR-V-31T7A6200.book 184 ページ 2017年6月30日 金曜日 午後1時23分
Page 207 of 503
205
Features
Audio System Basic Operation
To use the audio system function, the ignition swit ch must be in ACCESSORY (q or
ON
(w*1.
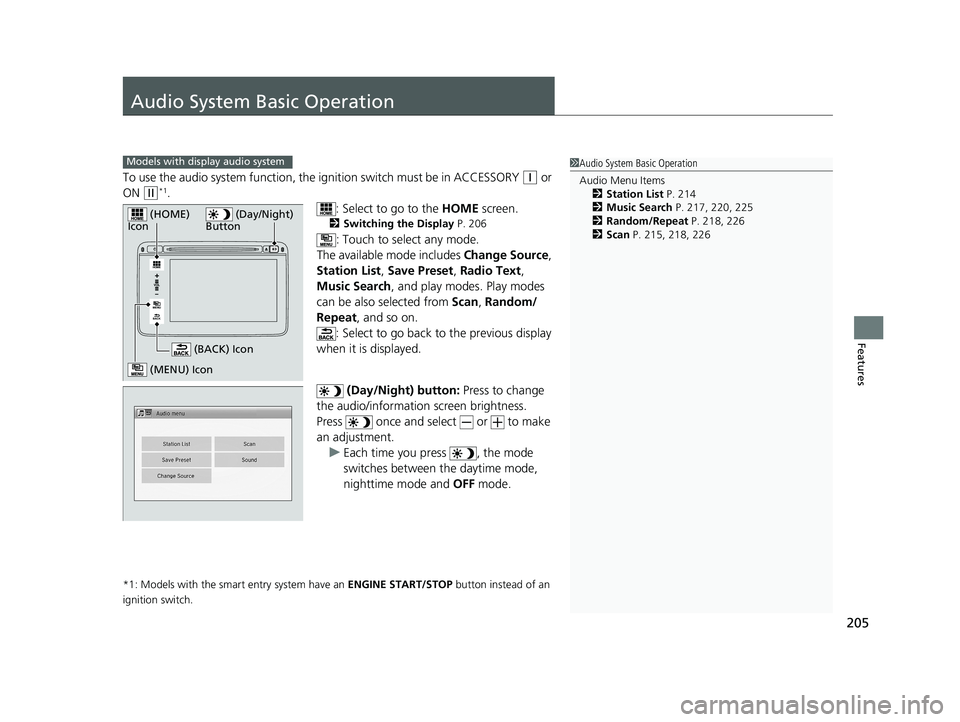
: Select to go to the HOME screen.
2Switching the Display P. 206
: Touch to select any mode.
The available mode includes Change Source,
Station List , Save Preset, Radio Text ,
Music Search , and play mode s. Play modes
can be also selected from Scan, Random/
Repeat , and so on.
: Select to go back to the previous display
when it is displayed.
(Day/Night) button: Press to change
the audio/information screen brightness.
Press once and select or to make
an adjustment. u Each time you press , the mode
switches between the daytime mode,
nighttime mode and OFF mode.
*1: Models with the smart entry system have an ENGINE START/STOP button instead of an
ignition switch.
1 Audio System Basic Operation
Audio Menu Items
2 Station List P. 214
2 Music Search P. 217, 220, 225
2 Random/Repeat P. 218, 226
2 Scan P. 215, 218, 226Models with display audio system
VOL
HOME
MENU
BACK
(Day/Night)
Button (HOME)
Icon
(MENU) Icon
(BACK) Icon
18 HR-V-31T7A6200.book 205 ページ 2017年6月30日 金曜日 午後1時23分
Page 254 of 503
252
Features
Customized Features
Use the audio/information screen to customize certain features.
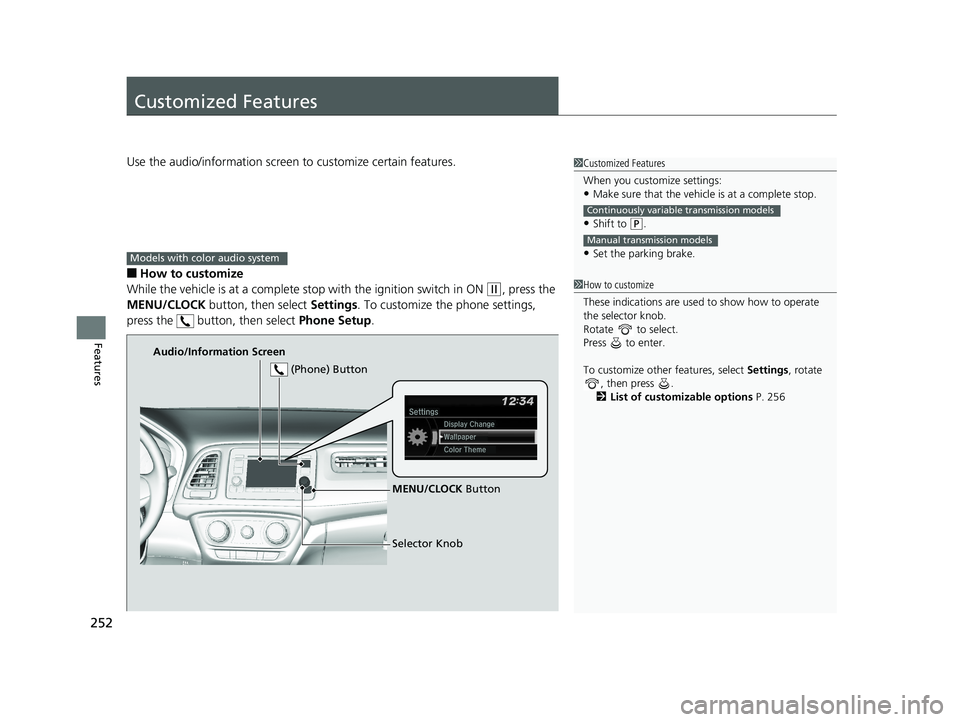
■How to customize
While the vehicle is at a complete st op with the ignition switch in ON
(w, press the
MENU/CLOCK button, then select Settings. To customize the phone settings,
press the button, then select Phone Setup.
1Customized Features
When you customize settings:
•Make sure that the vehicle is at a complete stop.
•Shift to (P.
•Set the parking brake.
Continuously variable transmission models
Manual transmission models
1 How to customize
These indications are used to show how to operate
the selector knob.
Rotate to select.
Press to enter.
To customize other features, select Settings, rotate
, then press .
2 List of customizable options P. 256
Models with color audio system
Audio/Information Screen
MENU/CLOCK Button
Selector Knob
(Phone) Button
18 HR-V-31T7A6200.book 252 ページ 2017年6月30日 金曜日 午後1時23分
Page 261 of 503
Continued259
uuCustomized Features u
Features
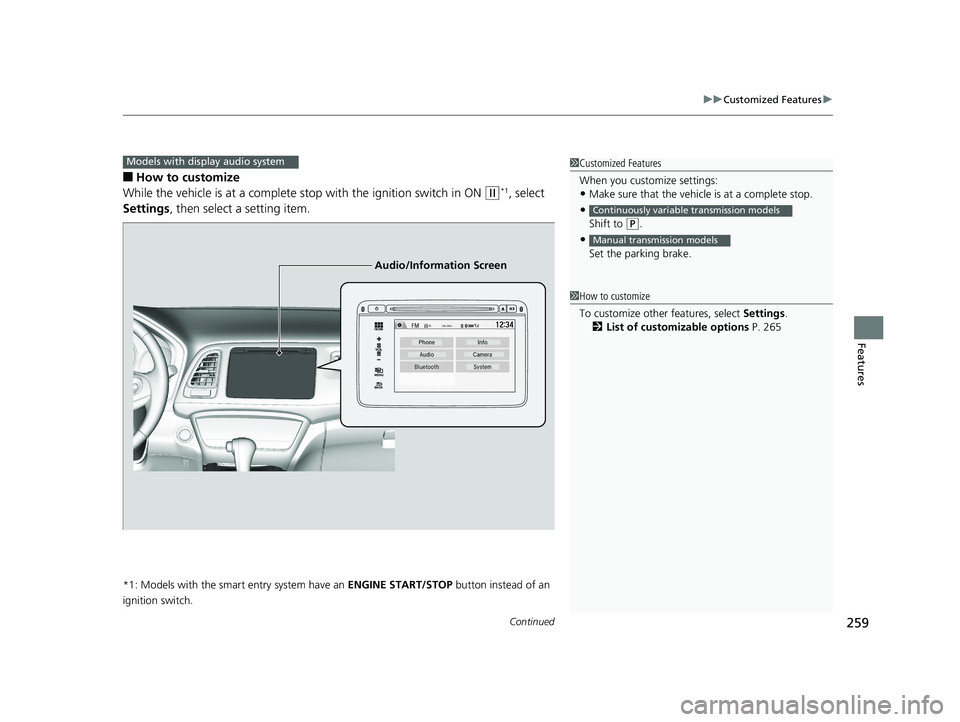
■How to customize
While the vehicle is at a complete st op with the ignition switch in ON
(w*1, select
Settings , then select a setting item.
*1: Models with the smart entry system have an ENGINE START/STOP button instead of an
ignition switch.
Models with display audio system1 Customized Features
When you customize settings:
•Make sure that the vehicle is at a complete stop.
•
Shift to (P.
•
Set the parking brake.
Continuously variable transmission models
Manual transmission models
1 How to customize
To customize other features, select Settings.
2 List of customizable options P. 265
VOL
HOME
MENU
BACK
Audio/Information Screen
18 HR-V-31T7A6200.book 259 ページ 2017年6月30日 金曜日 午後1時23分
Page 278 of 503
276
uuBluetooth ® HandsFreeLink ®u HFL Menus
Features
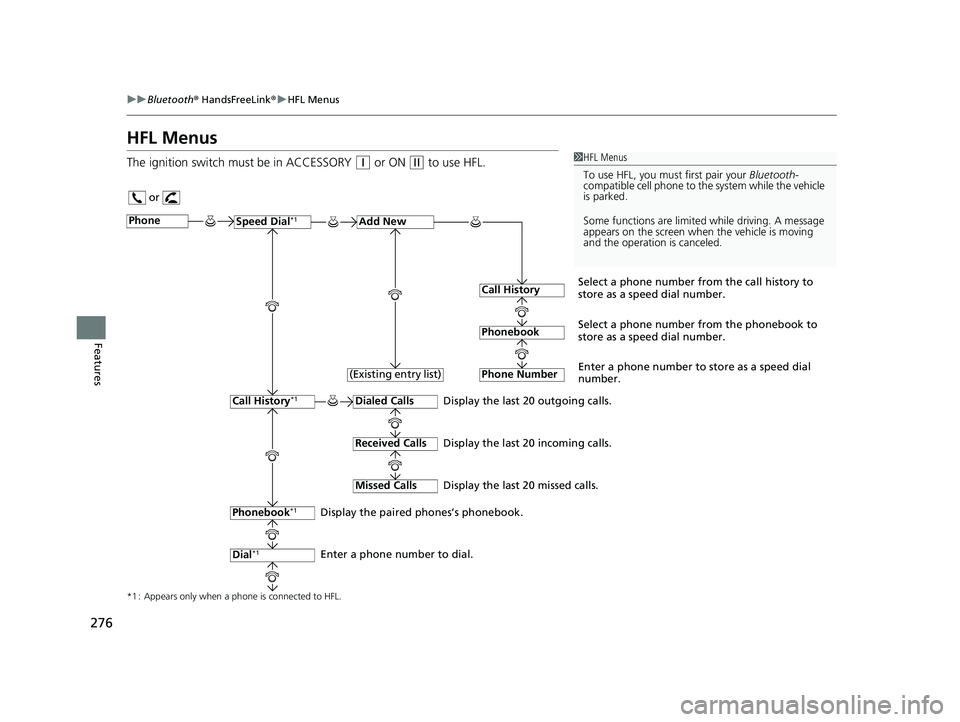
HFL Menus
The ignition switch must be in ACCESSORY (q or ON (w to use HFL.1HFL Menus
To use HFL, you must first pair your Bluetooth-
compatible cell phone to th e system while the vehicle
is parked.
Some functions are limited while driving. A message
appears on the screen when the vehicle is moving
and the operation is canceled.
or
Display the last 20 outgoing calls.
Display the last 20 incoming calls.
Display the last 20 missed calls.
*1 : Appears only when a phone is connected to HFL.
PhoneSpeed Dial*1Add New
Select a phone number from the call history to
store as a speed dial number.
Call History
PhonebookSelect a phone number from the phonebook to
store as a speed dial number.
Phone Number
Enter a phone number to store as a speed dial
number.
Dialed Calls
Received Calls
Missed Calls
Phonebook*1
Dial*1
Call History*1
Display the paired phones’s phonebook.
Enter a phone number to dial. (Existing entry list)
18 HR-V-31T7A6200.book 276 ページ 2017年6月30日 金曜日 午後1時23分
Page 302 of 503
300
uuBluetooth ® HandsFreeLink ®u HFL Menus
Features
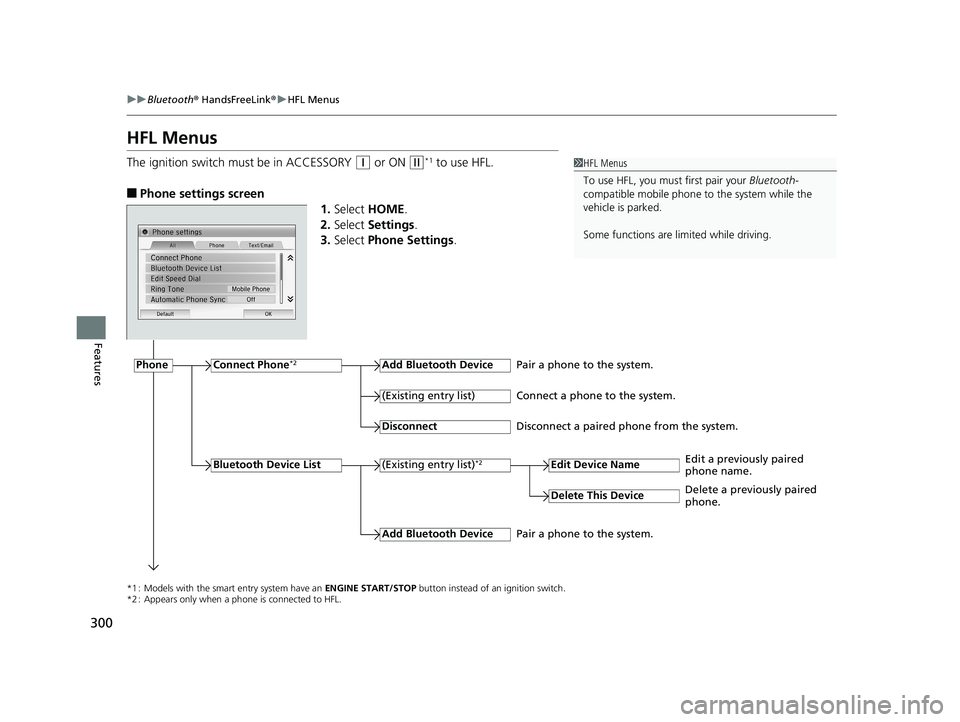
HFL Menus
The ignition switch must be in ACCESSORY (q or ON (w*1 to use HFL.
■Phone settings screen
1.Select HOME .
2. Select Settings .
3. Select Phone Settings .
1HFL Menus
To use HFL, you must first pair your Bluetooth-
compatible mobile phone to the system while the
vehicle is parked.
Some functions are li mited while driving.
*1 : Models with the smart entry system have an ENGINE START/STOP button instead of an ignition switch.
*2 : Appears only when a phone is connected to HFL.
PhoneConnect Phone*2Add Bluetooth Device
(Existing entry list)*2
(Existing entry list)
Disconnect
Edit Device Name
Add Bluetooth Device
Bluetooth Device List
Delete This Device
Pair a phone to the system.
Connect a phone to the system.
Disconnect a paired phone from the system.
Edit a previously paired
phone name.
Pair a phone to the system. Delete a previously paired
phone.
18 HR-V-31T7A6200.book 300 ページ 2017年6月30日 金曜日 午後1時23分
Page 336 of 503
334
uuTowing a Trailer uTowing Your Vehicle
Driving
Towing Your Vehicle
Your vehicle is not designed to be towed be hind a motorhome. If your vehicle needs
to be towed in an emergency, refe r to the emergency towing information.
2Emergency Towing P. 475
Your vehicle can be towed behind a motorhome.
Perform the following procedure before towing your vehicle.
1. Shift to
(N.
2. Release the parking brake.
3. Turn the ignition sw itch to ACCESSORY
(q*1.
u Make sure the steering wheel does not lock.
4. Turn off all the electric devices. Do not use any accessory power sockets.
u This can prevent the battery from running down.
*1: Models with the smart entry system have an ENGINE START/STOP button instead of an
ignition switch.
■When Your Vehicle is Towed Behind a Motorhome
1 Towing Your Vehicle
Do not exceed 65 mph (100 km/h).
Consult your towing parts sales or rental agency if
any other items are recommended or required for
your towing situation.
Manual transmission models
Continuously variable transmission models
Manual transmission models
Manual transmission models
18 HR-V-31T7A6200.book 334 ページ 2017年6月30日 金曜日 午後1時23分
Page 337 of 503
Continued335
uuTowing a Trailer uTowing Your Vehicle
Driving
■Extended towing
If you tow more than eight hours in one day, you should repeat the “When Your
Vehicle is Towed Behind a Motorhome” at least every eight hours.
You also need to perform the following procedure to prevent the battery from
running down.
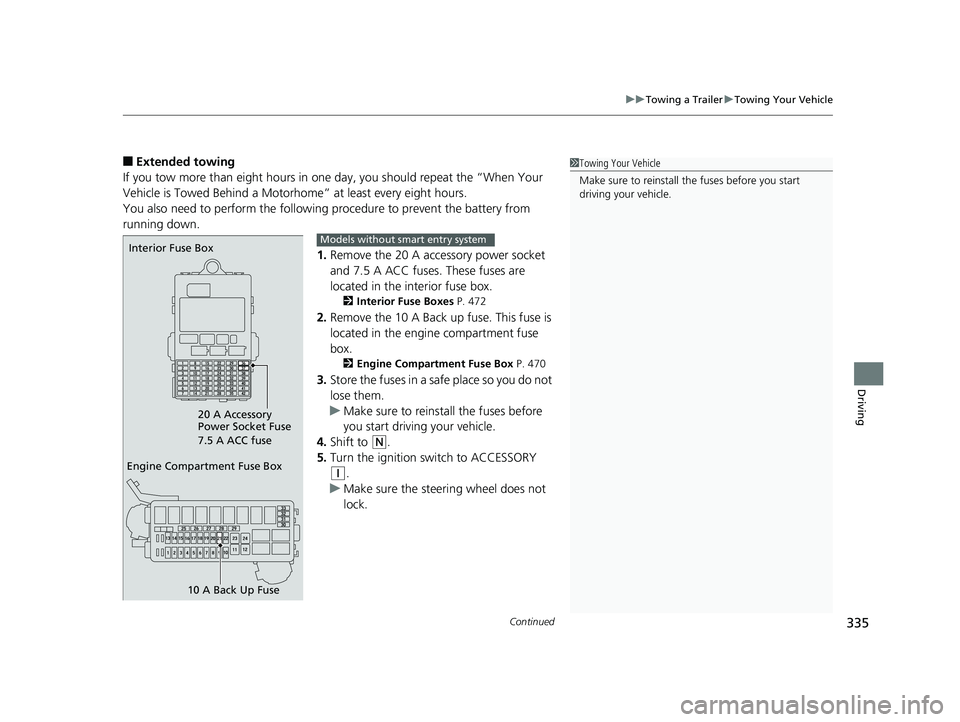
1.Remove the 20 A accessory power socket
and 7.5 A ACC fuses. These fuses are
located in the interior fuse box.
2 Interior Fuse Boxes P. 472
2.Remove the 10 A Back up fuse. This fuse is
located in the engine compartment fuse
box.
2 Engine Compartment Fuse Box P. 470
3.Store the fuses in a safe place so you do not
lose them.
u Make sure to reinstall the fuses before
you start driving your vehicle.
4. Shift to
(N.
5. Turn the ignition switch to ACCESSORY
(q.
u Make sure the steering wheel does not
lock.
1Towing Your Vehicle
Make sure to reinstall th e fuses before you start
driving your vehicle.
Engine Compartment Fuse Box
10 A Back Up Fuse
Interior Fuse Box
20 A Accessory
Power Socket Fuse
7.5 A ACC fuseModels without smart entry system
18 HR-V-31T7A6200.book 335 ページ 2017年6月30日 金曜日 午後1時23分