change HONDA INSIGHT 2020 Owner's Manual (in English)
[x] Cancel search | Manufacturer: HONDA, Model Year: 2020, Model line: INSIGHT, Model: HONDA INSIGHT 2020Pages: 675, PDF Size: 36.95 MB
Page 559 of 675
557
uuMaintenance MinderTMuTo Use Maintenance MinderTM
Continued
Maintenance
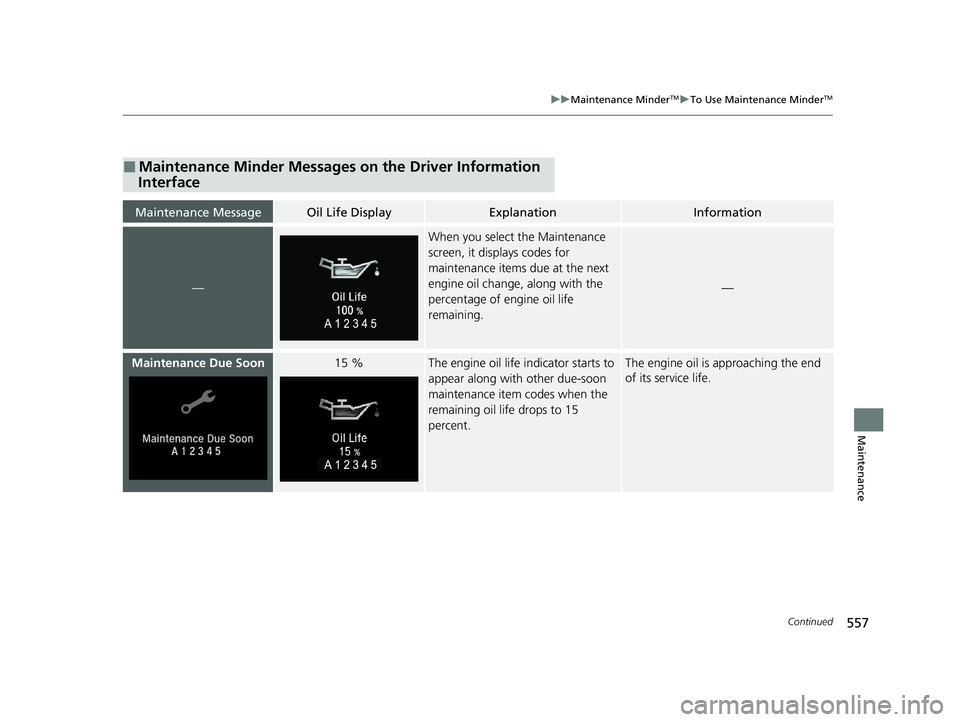
■Maintenance Minder Messages on the Driver Information
Interface
Maintenance MessageOil Life DisplayExplanationInformation
—
When you select the Maintenance
screen, it displays codes for
maintenance items due at the next
engine oil change, along with the
percentage of engine oil life
remaining.
—
Maintenance Due Soon15 %The engine oil life indicator starts to
appear along with other due-soon
maintenance item codes when the
remaining oil life drops to 15
percent.The engine oil is approaching the end
of its service life.
20 INSIGHT-31TXM6100.book 557 ページ 2019年4月24日 水曜日 午後2時2分
Page 561 of 675
559
uuMaintenance MinderTMuTo Use Maintenance MinderTM
Continued
Maintenance
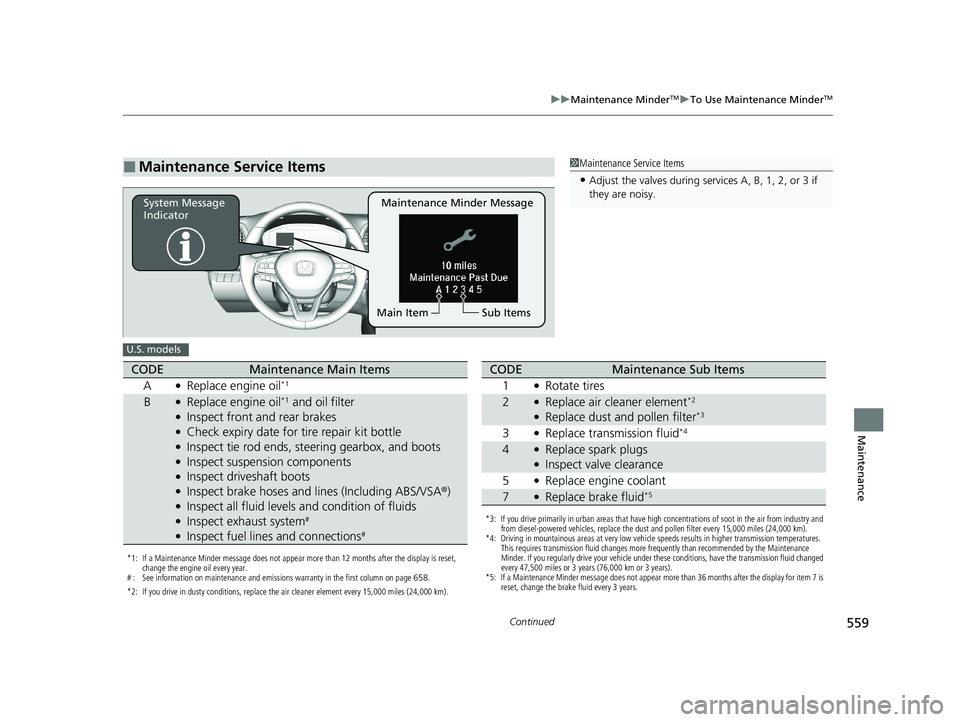
■Maintenance Service Items1Maintenance Service Items
•Adjust the valves during services A, B, 1, 2, or 3 if
they are noisy.
Maintenance Minder Message
System Message
Indicator
Sub Items
Main Item
U.S. models
*1: If a Maintenance Minder message does not appear more than 12 months after the display is reset,
change the engine oil every year.
# : See information on maintenance and emissions warranty in the first column on page 658.
*2: If you drive in dusty conditions, replace the air cleaner element every 15,000 miles (24,000 km).
CODEMaintenance Main Items
A
●Replace engine oil*1
B●Replace engine oil*1 and oil filter●Inspect front and rear brakes●Check expiry date for tire repair kit bottle●Inspect tie rod ends, steering gearbox, and boots●Inspect suspension components●Inspect driveshaft boots●Inspect brake hoses and li nes (Including ABS/VSA®)●Inspect all fluid levels and condition of fluids●Inspect exhaust system#
●Inspect fuel lines and connections#
*3: If you drive primarily in urban areas that have high concentrations of soot in the air from industry and
from diesel-powered vehicles, replace the dust and pollen filter every 15,000 miles (24,000 km).
*4: Driving in mountainous areas at very low vehicle speeds results in higher transmission temperatures. This requires transmission fluid changes more frequently than recommended by the Maintenance
Minder. If you regularly drive your vehicle under these conditions, have the transmission fluid changed
every 47,500 miles or 3 years (76,000 km or 3 years).
*5: If a Maintenance Minder message does not appear more than 36 months after the display for item 7 is reset, change the brake fluid every 3 years.
CODEMaintenance Sub Items
1
●Rotate tires
2●Replace air cleaner element*2
●Replace dust and pollen filter*3
3●Replace transmission fluid*4
4●Replace spark plugs●Inspect valve clearance
5
●Replace engine coolant
7●Replace brake fluid*5
20 INSIGHT-31TXM6100.book 559 ページ 2019年4月24日 水曜日 午後2時2分
Page 562 of 675
560
uuMaintenance MinderTMuTo Use Maintenance MinderTM
Maintenance
1Maintenance Service Items
•Adjust the valves during services A, 0, 9, 1, 2, or 3
if they are noisy.
Canadian models
*1: If a Maintenance Minder Message does not appear more than 12 months after the display is reset,
change the engine oil every year.
*2: If you drive in dusty conditions, replace the air cleaner element every 15,000 miles (24,000 km).
*3: If you drive primarily in urban areas that have high concentrations of soot in the air from industry and from diesel-powered vehicles, replace the dust and pollen filter every 15,000 miles (24,000 km).
*4: Driving in mountainous areas at very low vehicle speeds results in higher transmission temperatures. This requires transmission fluid changes more frequently than recommended by the Maintenance
Minder. If you regularly drive your vehicle under these conditions, have the transmission fluid changed
every 47,500 miles or 3 years (76,000 km or 3 years).
*5: If a Maintenance Minder Message does not appear more than 36 months after the display for item 7 is reset, change the brake fluid every 3 years.
# : See information on maintenance and emissions warranty in the first column on page 658.
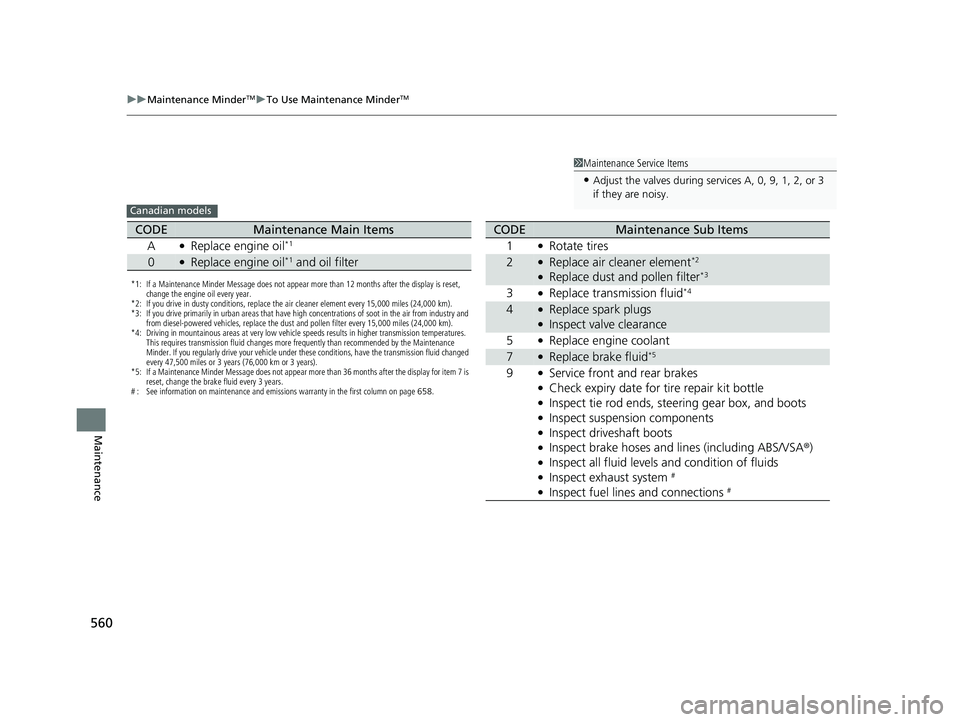
CODEMaintenance Main Items
A
●Replace engine oil*1
0●Replace engine oil*1 and oil filter
CODEMaintenance Sub Items
1
●Rotate tires
2●Replace air cleaner element*2
●Replace dust and pollen filter*3
3●Replace transmission fluid*4
4●Replace spark plugs●Inspect valve clearance
5
●Replace engine coolant
7●Replace brake fluid*5
9●Service front and rear brakes●Check expiry date for tire repair kit bottle●Inspect tie rod ends, steer ing gear box, and boots●Inspect suspension components●Inspect driveshaft boots●Inspect brake hoses and li nes (including ABS/VSA®)●Inspect all fluid levels and condition of fluids●Inspect exhaust system #
●Inspect fuel lines and connections #
20 INSIGHT-31TXM6100.book 560 ページ 2019年4月24日 水曜日 午後2時2分
Page 569 of 675
567
uuMaintenance Under the Hood uChanging the Engine Oil and Oil Filter
Continued
Maintenance
Changing the Engine Oil and Oil Filter
You must change the engine oil and oil fi lter regularly in order to maintain the
engine’s lubrication. The engine may be damaged if they are not changed regularly.
Turning the power system on automatically starts the engine if the High Voltage
battery charge level gauge shows two segments or less.
2 High Voltage Battery Charge Level Gauge P. 129
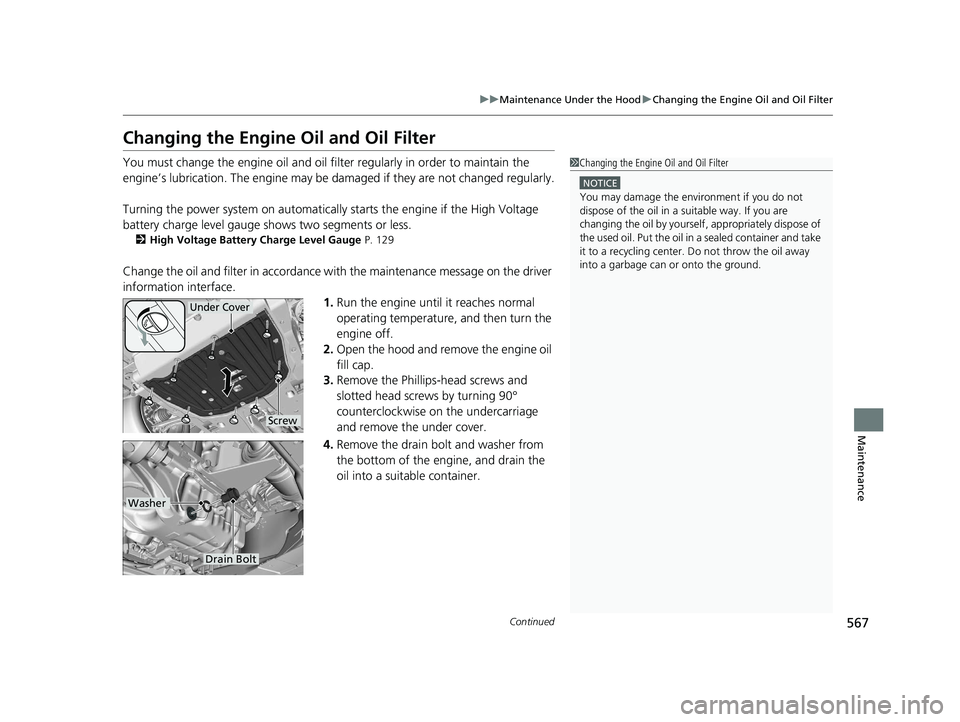
Change the oil and filter in accordance with the maintenance message on the driver
information interface.
1.Run the engine until it reaches normal
operating temperature, and then turn the
engine off.
2. Open the hood and remove the engine oil
fill cap.
3. Remove the Phillips-head screws and
slotted head screws by turning 90°
counterclockwise on the undercarriage
and remove the under cover.
4. Remove the drain bolt and washer from
the bottom of the engine, and drain the
oil into a suitable container.
1Changing the Engine Oil and Oil Filter
NOTICE
You may damage the environment if you do not
dispose of the oil in a suitable way. If you are
changing the oil by yourself , appropriately dispose of
the used oil. Put the oil in a sealed container and take
it to a recycling center. Do not throw the oil away
into a garbage can or onto the ground.
Under Cover
Screw
Drain Bolt
Washer
20 INSIGHT-31TXM6100.book 567 ページ 2019年4月24日 水曜日 午後2時2分
Page 570 of 675
uuMaintenance Under the Hood uChanging the Engine Oil and Oil Filter
568
Maintenance
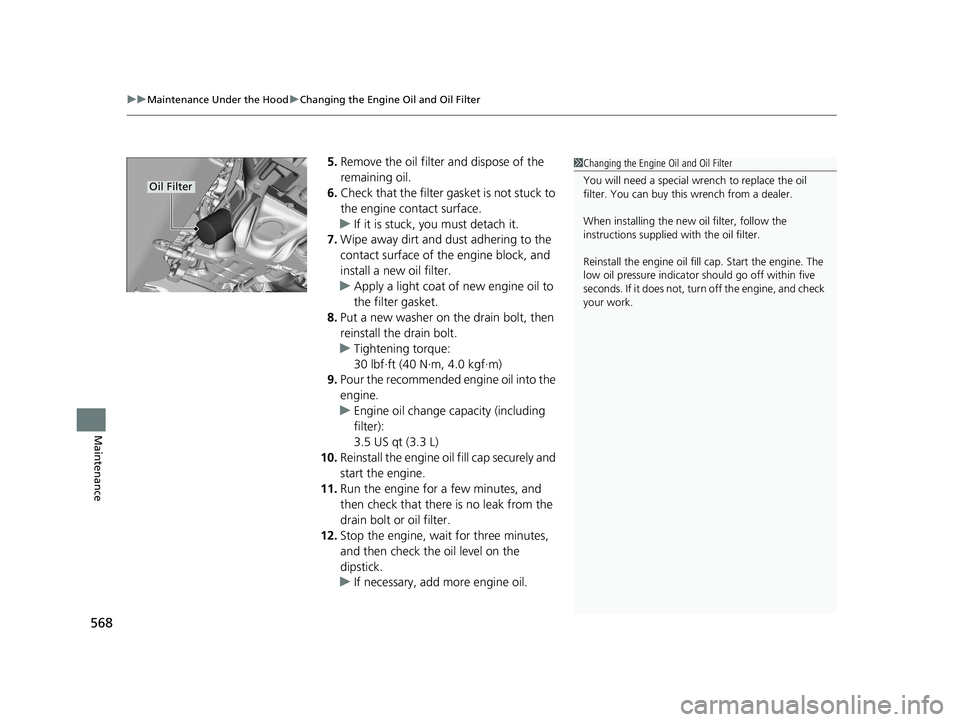
5. Remove the oil filter and dispose of the
remaining oil.
6. Check that the filter ga sket is not stuck to
the engine contact surface.
u If it is stuck, you must detach it.
7. Wipe away dirt and dust adhering to the
contact surface of the engine block, and
install a new oil filter.
u Apply a light coat of new engine oil to
the filter gasket.
8. Put a new washer on the drain bolt, then
reinstall the drain bolt.
u Tightening torque:
30 lbf∙ft (40 N∙m, 4.0 kgf∙m)
9. Pour the recommended engine oil into the
engine.
u Engine oil change capacity (including
filter):
3.5 US qt (3.3 L)
10. Reinstall the engine oi l fill cap securely and
start the engine.
11. Run the engine for a few minutes, and
then check that ther e is no leak from the
drain bolt or oil filter.
12. Stop the engine, wait for three minutes,
and then check the oil level on the
dipstick.
u If necessary, add more engine oil.1Changing the Engine Oil and Oil Filter
You will need a special wrench to replace the oil
filter. You can buy this wrench from a dealer.
When installing the new oil filter, follow the
instructions supplied with the oil filter.
Reinstall the engine oil fill cap. Start the engine. The
low oil pressure indicator should go off within five
seconds. If it does not, turn off the engine, and check
your work.
Oil Filter
20 INSIGHT-31TXM6100.book 568 ページ 2019年4月24日 水曜日 午後2時2分
Page 574 of 675
572
uuMaintenance Under the Hood uTransmission Fluid
Maintenance
Transmission Fluid
Have a dealer check the fluid level and replace if necessary.
Do not attempt to check or change the transmission fluid yourself.
Specified fluid: Honda ATF DW-11Transmission Fluid
NOTICE
Do not mix Honda ATF DW-1 with other
transmission fluids.
Using a transmission flui d other than Honda ATF
DW-1 may adversely af fect the operation and
durability of your vehicle’ s transmission, and damage
the transmission.
Any damage caused by using a transmission fluid that
is not equivalent to Honda ATF DW-1 is not covered
by Honda’s new vehi cle limited warranty.
20 INSIGHT-31TXM6100.book 572 ページ 2019年4月24日 水曜日 午後2時2分
Page 610 of 675
uuIf a Tire Goes Flat uChanging a Flat Tire
608
Handling the Unexpected
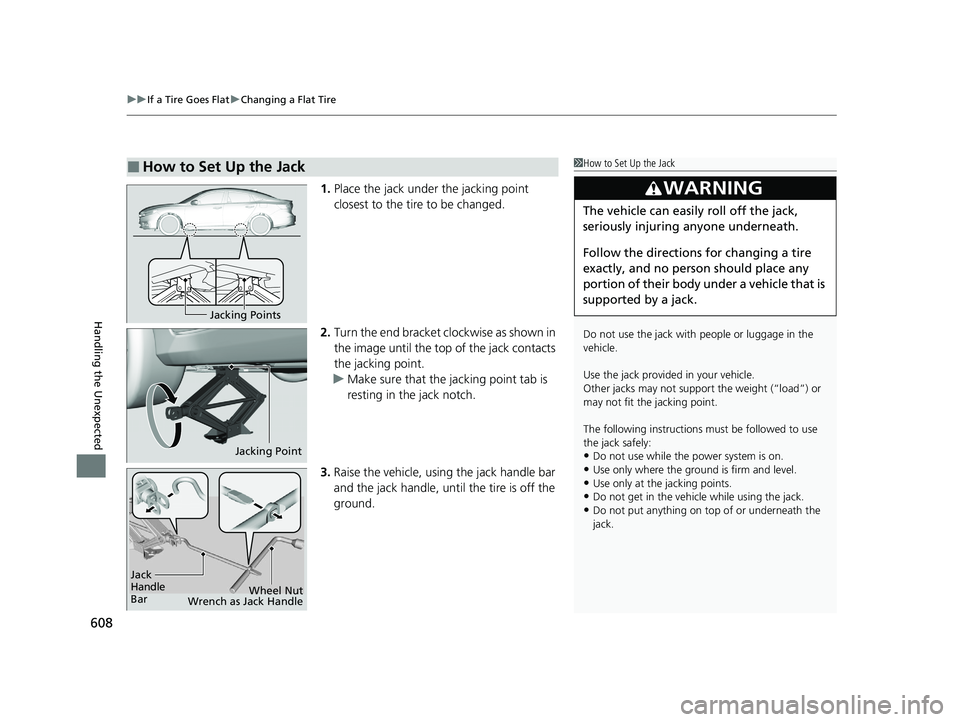
1. Place the jack under the jacking point
closest to the tire to be changed.
2. Turn the end bracket cl ockwise as shown in
the image until the top of the jack contacts
the jacking point.
u Make sure that the jacking point tab is
resting in the jack notch.
3. Raise the vehicle, using the jack handle bar
and the jack handle, until the tire is off the
ground.
■How to Set Up the Jack1How to Set Up the Jack
Do not use the jack with people or luggage in the
vehicle.
Use the jack provided in your vehicle.
Other jacks may not support the weight (“load”) or
may not fit the jacking point.
The following instructions must be followed to use
the jack safely:
•Do not use while the power system is on.
•Use only where the ground is firm and level.•Use only at the jacking points.
•Do not get in the vehicl e while using the jack.
•Do not put anything on top of or underneath the
jack.
3WARNING
The vehicle can easily roll off the jack,
seriously injuring anyone underneath.
Follow the directions for changing a tire
exactly, and no person should place any
portion of their body under a vehicle that is
supported by a jack.
Jacking Points
Jacking Point
Jack
Handle
Bar Wheel Nut
Wrench as Jack Handle
20 INSIGHT-31TXM6100.book 608 ページ 2019年4月24日 水曜日 午後2時2分
Page 628 of 675
626
uuPower System Won’t Start uIf the Remote Battery is Weak
Handling the Unexpected
If the Remote Battery is Weak
If the beeper sounds, the To Start, Hold Remote Near Start Button message
appears on the driver info rmation interface, and the POWER button flashes, the
READY indicator does not come on. Turn on the power system as follows:
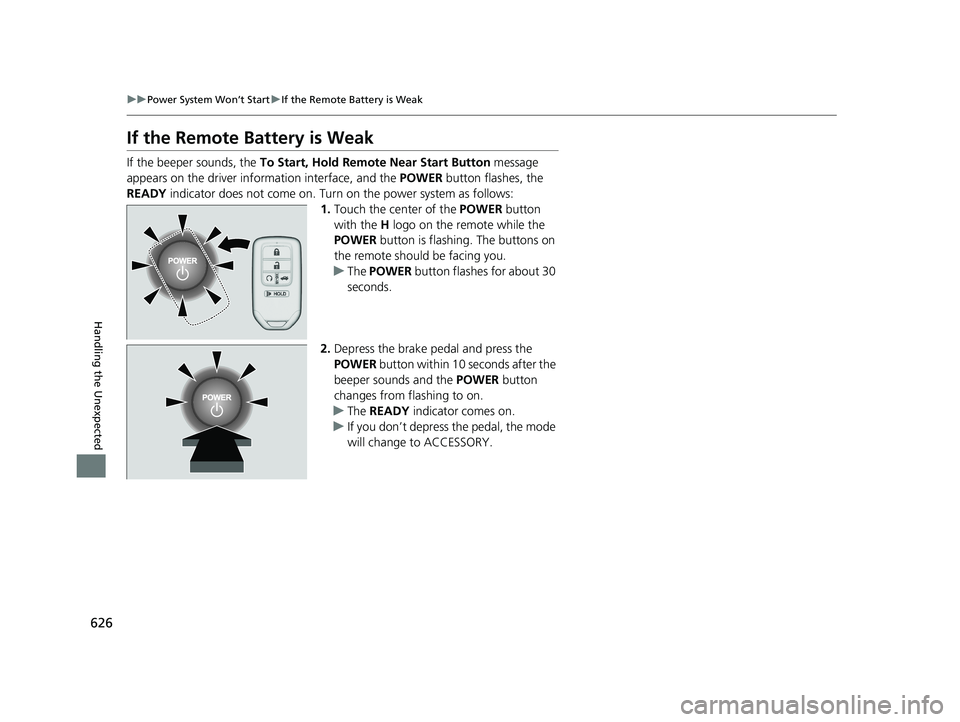
1.Touch the center of the POWER button
with the H logo on the remote while the
POWER button is flashing. The buttons on
the remote should be facing you.
u The POWER button flashes for about 30
seconds.
2. Depress the brake pedal and press the
POWER button within 10 seconds after the
beeper sounds and the POWER button
changes from flashing to on.
u The READY indicator comes on.
u If you don’t depress the pedal, the mode
will change to ACCESSORY.
20 INSIGHT-31TXM6100.book 626 ページ 2019年4月24日 水曜日 午後2時2分
Page 629 of 675
627
uuPower System Won’t StartuEmergency Power System Off
Handling the Unexpected
Emergency Power System Off
The POWER button may be used to turn the power system off due to an emergency
situation even while driving. If you must tu rn the power system off, do either of the
following operations:
• Press and hold the POWER button about for two seconds.
• Firmly press the POWER button three times.
The steering wheel will not lock. However, because turning off the power system
disables the power assist the power syst em provides to the steering and braking
systems, it will require significantly more physical effort and time to steer and slow
the vehicle. Use both feet on the brake pe dal to slow down the vehicle and stop
immediately in a safe place.
The transmission automa tically changes to
(P after the vehicle comes to a complete
stop. Then, the power mode changes to VEHICLE OFF.
1 Emergency Power System Off
Do not press the POWER button while driving unless
it is absolutely necessary for the power system to be
turned off.
If you press the POWER button while driving, the
beeper sounds.
20 INSIGHT-31TXM6100.book 627 ページ 2019年4月24日 水曜日 午後2時2分
Page 641 of 675
639
uuIndicator, Coming On/BlinkinguIf the Low Tire Pressure/TPMS Indicator Comes On or Blinks
Handling the Unexpected
If the Low Tire Pressure/TPMS Indicator Comes On or
Blinks
■Reasons for the indicator to come on or blink
A tire pressure is signif icantly low, or the TPMS has not been calibrated.
If there is a problem with the TPMS, the indicator blinks for about one
minute, and then stays on.
If the compact spare tire
* is installed, the indicator will either come on or
it will first blink for about one minute, then stay on.
■What to do when th e indicator comes on
Drive carefully and avoid abrupt cornering and hard braking.
Stop your vehicle in a safe place. Ch eck the tire pressure and adjust the
pressure to the specified level. The spec ified tire pressure is on a label on
the driver side doorjamb. u Calibrate the TPMS after the tire pressure is adjusted.
2 TPMS Calibration P. 472
If the compact spare tire* causes the indicator to come on, change the
tire to a full-size tire. The indicato r goes off after calibrating the TPMS.
■What to do when the indicator blinks, then remains on
Have the tire inspected by a dealer as soon as possible. If the compact
spare tire
* causes the indicator to first b link, and then stay on, change
the tire to a full-size tire. The indi cator goes off after calibrating the
TPMS.
1 If the Low Tire Pressure/TPMS Indicator Comes On or Blinks
NOTICE
Driving on an extremely unde rinflated tire can cause
it to overheat. An overheated tire can fail. Always
inflate your tires to the prescribed level.
* Not available on all models
20 INSIGHT-31TXM6100.book 639 ページ 2019年4月24日 水曜日 午後2時2分