ACC HONDA INSIGHT 2020 Owner's Manual (in English)
[x] Cancel search | Manufacturer: HONDA, Model Year: 2020, Model line: INSIGHT, Model: HONDA INSIGHT 2020Pages: 675, PDF Size: 36.95 MB
Page 603 of 675
601
Maintenance
Accessories and Modifications
Accessories
When installing accessories, check the following:
• Do not install accessories on the windsh ield. They can obstruct your view and
delay your reaction to driving conditions.
• Do not install any accessories over areas marked SRS Airbag, on the sides or backs
of the front seats, on front or side pillars, or near the side windows.
Accessories installed in these areas may interfere with proper operation of the
vehicle’s airbags or may be propelled into you or another occupant if the airbags
deploy.
• Be sure electronic accessories do not overload electrical circuits or interfere with
proper operation of your vehicle.
2 Fuses P. 641
•Before installing any electro nic accessory, have the installer contact a dealer for
assistance. If possible, have a deal er inspect the final installation.
1Accessories and Modifications
Honda Genuine accessor ies are recommended to
ensure proper operati on on your vehicle.
3WARNING
Improper accessories or modifications can
affect your vehicle’s handling, stability, and
performance, and cause a crash in which
you can be seriously hurt or killed.
Follow all instruction s in this owner’s
manual regarding accessories and
modifications.
3WARNING
Use of improperly designed, engineered or
manufactured high-voltage battery
assemblies could cause a fire in your
vehicle.
A vehicle fire could result in a crash or
injury.
Only use a genuine Honda high-voltage
battery assembly, or it s equivalent, in your
vehicle.
20 INSIGHT-31TXM6100.book 601 ページ 2019年4月24日 水曜日 午後2時2分
Page 604 of 675
602
uuAccessories and Modifications uModifications
Maintenance
Modifications
Do not modify your vehicle in a manner that may affect its handling, stability, or
reliability, or install non-genuine Honda parts or accessories that may have a similar
effect.
Even minor modifications to vehicle system s can affect overall vehicle performance.
Always make sure all equipment is prop erly installed and maintained, and do not
make any modification to your vehicle or its systems that might cause your vehicle
to no longer meet federal, state, prov ince, territory, and local regulations.
The on-board diagnostic port (OBD-II/SAE J1962 connector) installed on this vehicle
is intended to be used with automobile system diagnostic devices or with other
devices that Honda has approved. Use of any other type of device may adversely
affect the vehicle’s electronic systems or allow them to be compromised, possibly
resulting in a system malfunction, drained battery, or other unexpected problems.
Do not modify or attempt to repair your vehicle's high-voltage hybrid power system
or otherwise modify vehicle electrical systems. Disassembling or modifying electrical
equipment can result in a crash or a fire.
If you ever need to replace your vehicle’s high-voltage battery assembly outside of
warranty coverage, we highly recommend that you only use a genuine Honda high-
voltage battery assembly. Genuine Hond a high-voltage battery assemblies are
designed to work with your vehicle’s hybrid power system and have been designed,
engineered and manufactured to avoid ov ercharging situations. Non-genuine high-
voltage battery assemblies may not have be en similarly designed, engineered and
manufactured, and installation of such assemblies could result in overcharging, fires,
loss of power, or other conditions that may increase the likelihood of a crash or
injury.
20 INSIGHT-31TXM6100.book 602 ページ 2019年4月24日 水曜日 午後2時2分
Page 616 of 675
uuIf a Tire Goes Flat uTemporarily Repairing a Flat Tire
614
Handling the Unexpected
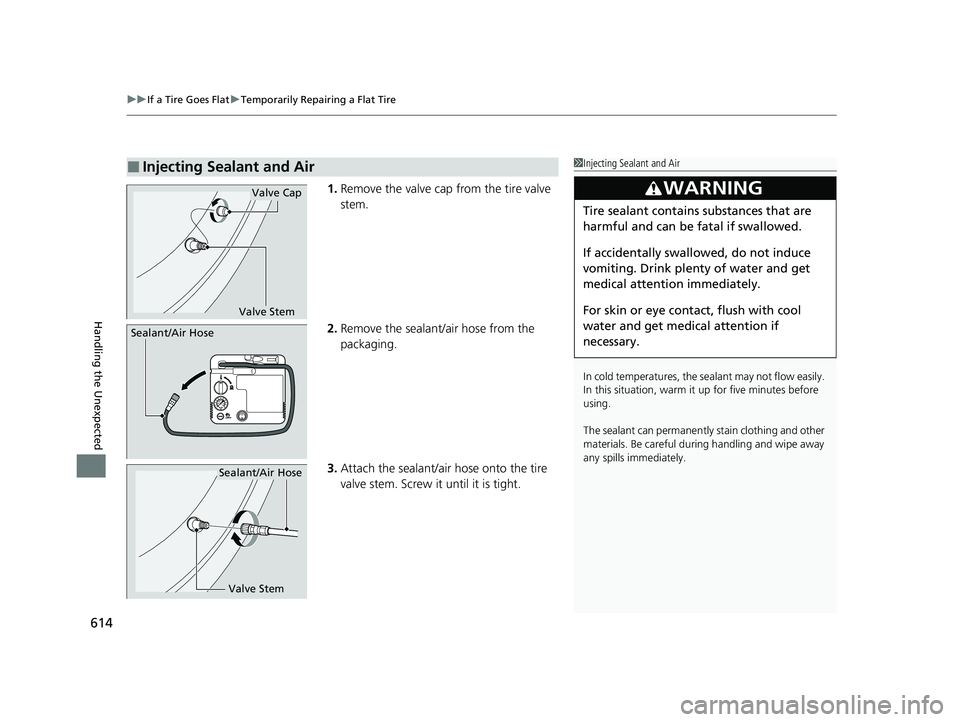
1. Remove the valve cap from the tire valve
stem.
2. Remove the sealant/air hose from the
packaging.
3. Attach the sealant/air hose onto the tire
valve stem. Screw it until it is tight.
■Injecting Sealant and Air1Injecting Sealant and Air
In cold temperatures, the sealant may not flow easily.
In this situation, warm it up for five minutes before
using.
The sealant can permanentl y stain clothing and other
materials. Be careful duri ng handling and wipe away
any spills immediately.
3WARNING
Tire sealant contains substances that are
harmful and can be fatal if swallowed.
If accidentally swallowed, do not induce
vomiting. Drink plenty of water and get
medical attention immediately.
For skin or eye contact, flush with cool
water and get medical attention if
necessary.
Valve Stem
Valve Cap
Sealant/Air Hose
Valve Stem
Sealant/Air Hose
20 INSIGHT-31TXM6100.book 614 ページ 2019年4月24日 水曜日 午後2時2分
Page 617 of 675
Continued615
uuIf a Tire Goes Flat uTemporarily Repairing a Flat Tire
Handling the Unexpected
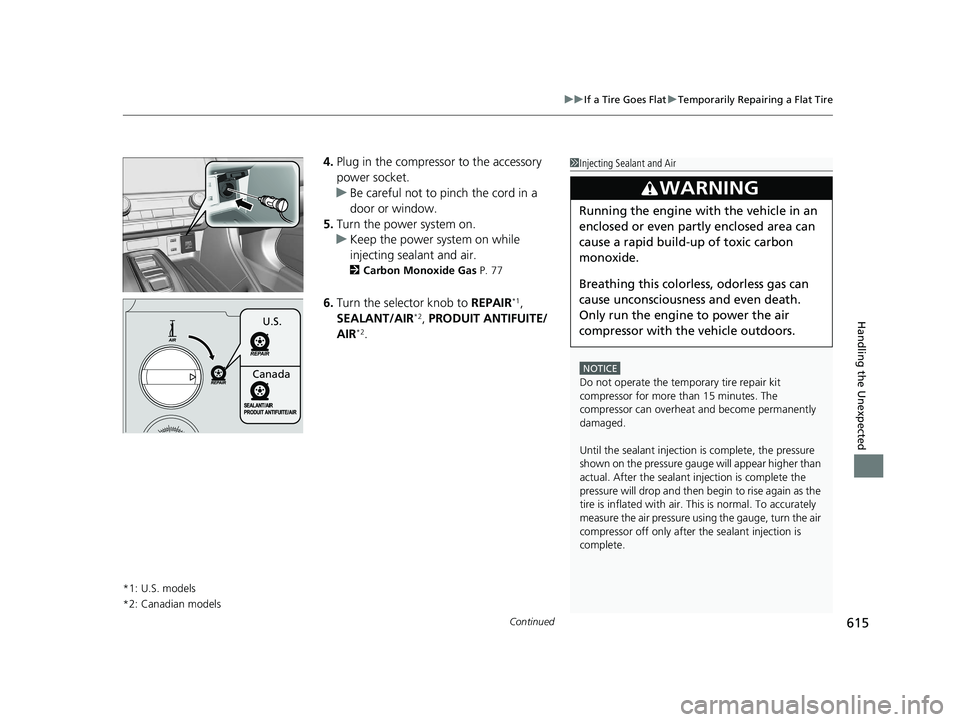
4. Plug in the compressor to the accessory
power socket.
u Be careful not to pinch the cord in a
door or window.
5. Turn the power system on.
u Keep the power system on while
injecting sealant and air.
2 Carbon Monoxide Gas P. 77
6.Turn the selector knob to REPAIR*1,
SEALANT/AIR*2, PRODUIT ANTIFUITE/
AIR*2.
*1: U.S. models
*2: Canadian models
1 Injecting Sealant and Air
NOTICE
Do not operate the temporary tire repair kit
compressor for more than 15 minutes. The
compressor can overheat and become permanently
damaged.
Until the sealant injection is complete, the pressure
shown on the pressure gauge will appear higher than
actual. After the sealant injection is complete the
pressure will drop and then begin to rise again as the
tire is inflated with air. This is normal. To accurately
measure the air pressure usin g the gauge, turn the air
compressor off only after the sealant injection is
complete.
3WARNING
Running the engine with the vehicle in an
enclosed or even partly enclosed area can
cause a rapid build-up of toxic carbon
monoxide.
Breathing this colorless, odorless gas can
cause unconsciousness and even death.
Only run the engine to power the air
compressor with th e vehicle outdoors.
U.S.
Canada
20 INSIGHT-31TXM6100.book 615 ページ 2019年4月24日 水曜日 午後2時2分
Page 618 of 675
uuIf a Tire Goes Flat uTemporarily Repairing a Flat Tire
616
Handling the Unexpected
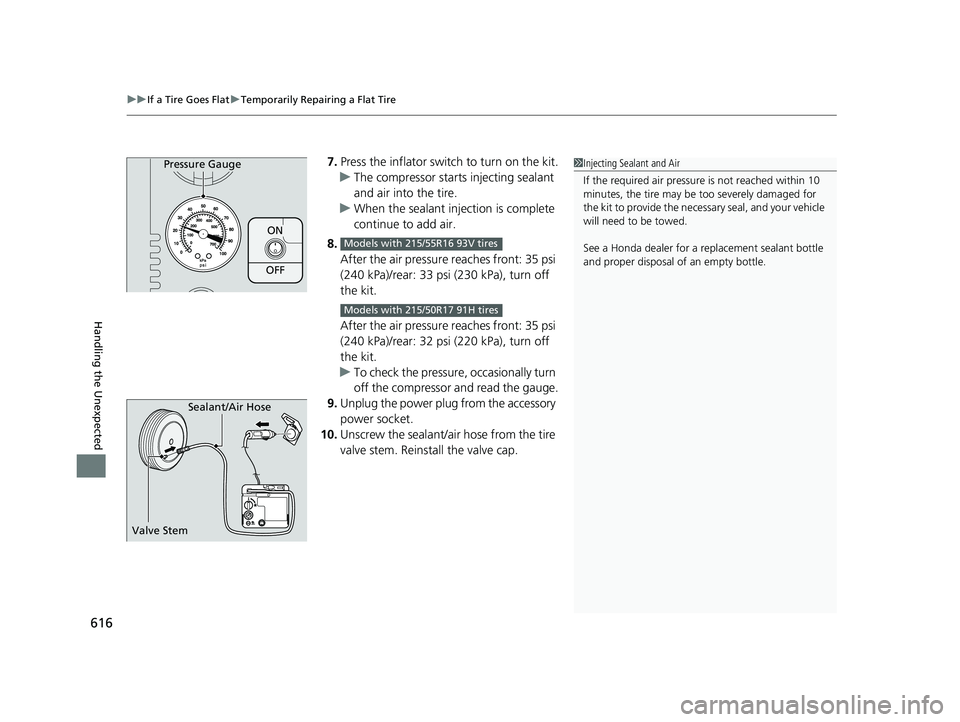
7. Press the inflator swit ch to turn on the kit.
u The compressor starts injecting sealant
and air into the tire.
u When the sealant injection is complete
continue to add air.
8. After the air pressure reaches front: 35 psi
(240 kPa)/rear: 33 psi (230 kPa), turn off
the kit.
After the air pressure reaches front: 35 psi
(240 kPa)/rear: 32 psi (220 kPa), turn off
the kit.
u To check the pressure, occasionally turn
off the compressor and read the gauge.
9. Unplug the power plug from the accessory
power socket.
10. Unscrew the sealant/air hose from the tire
valve stem. Reinstall the valve cap.
ON
OFF
Pressure Gauge
Models with 215/55R16 93V tires
Models with 215/50R17 91H tires
1Injecting Sealant and Air
If the required air pressure is not reached within 10
minutes, the tire may be too severely damaged for
the kit to provide the necessa ry seal, and your vehicle
will need to be towed.
See a Honda dealer for a replacement sealant bottle
and proper disposal of an empty bottle.
Sealant/Air Hose
Valve Stem
20 INSIGHT-31TXM6100.book 616 ページ 2019年4月24日 水曜日 午後2時2分
Page 625 of 675
623
uuIf a Tire Goes Flat uTemporarily Repairing a Flat Tire
Continued
Handling the Unexpected
7. Plug in the kit to the accessory power
socket.
u Be careful not to pinch the cord in a
door or window.
8. Turn the power system on.
u Keep the power system on while
injecting air.
2 Emergency Towing P. 647
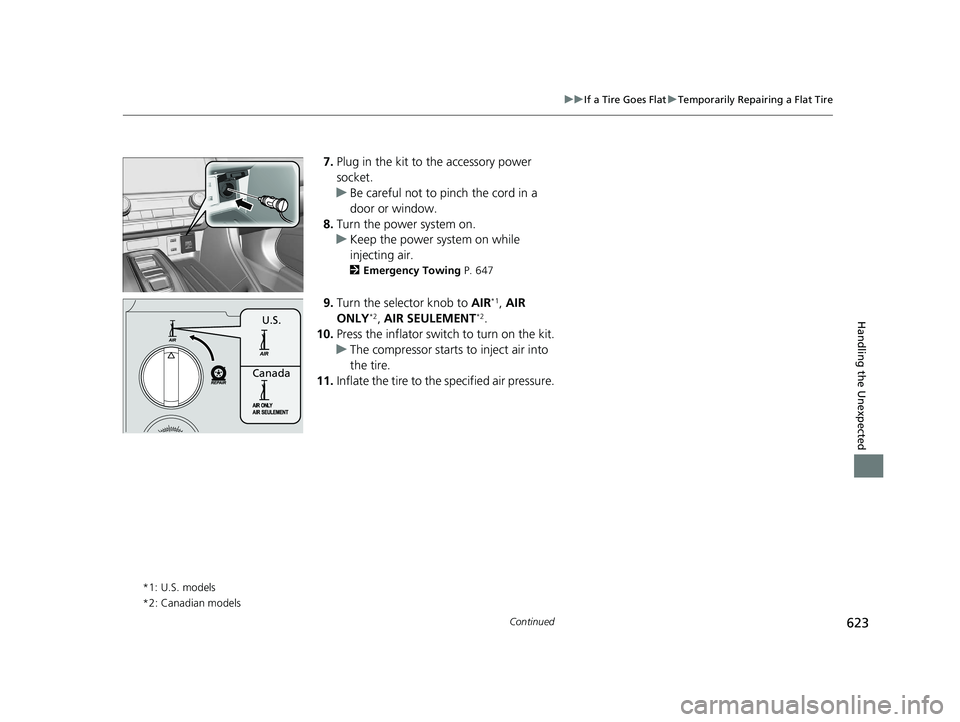
9.Turn the selector knob to AIR*1, AIR
ONLY*2, AIR SEULEMENT*2.
10. Press the inflator switch to turn on the kit.
u The compressor starts to inject air into
the tire.
11. Inflate the tire to the specified air pressure.
*1: U.S. models
*2: Canadian models
CanadaU.S.
20 INSIGHT-31TXM6100.book 623 ページ 2019年4月24日 水曜日 午後2時2分
Page 626 of 675
624
uuIf a Tire Goes Flat uTemporarily Repairing a Flat Tire
Handling the Unexpected
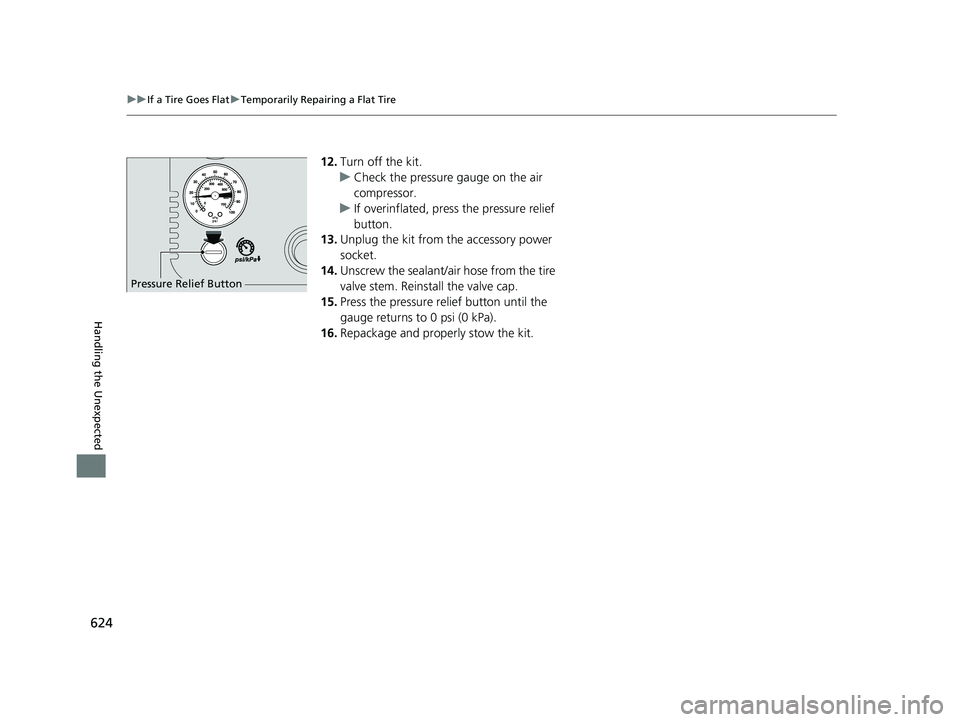
12. Turn off the kit.
u Check the pressure gauge on the air
compressor.
u If overinflated, press the pressure relief
button.
13. Unplug the kit from the accessory power
socket.
14. Unscrew the sealant/air hose from the tire
valve stem. Reinstall the valve cap.
15. Press the pressure relief button until the
gauge returns to 0 psi (0 kPa).
16. Repackage and properly stow the kit.
Pressure Relief Button
20 INSIGHT-31TXM6100.book 624 ページ 2019年4月24日 水曜日 午後2時2分
Page 628 of 675
626
uuPower System Won’t Start uIf the Remote Battery is Weak
Handling the Unexpected
If the Remote Battery is Weak
If the beeper sounds, the To Start, Hold Remote Near Start Button message
appears on the driver info rmation interface, and the POWER button flashes, the
READY indicator does not come on. Turn on the power system as follows:
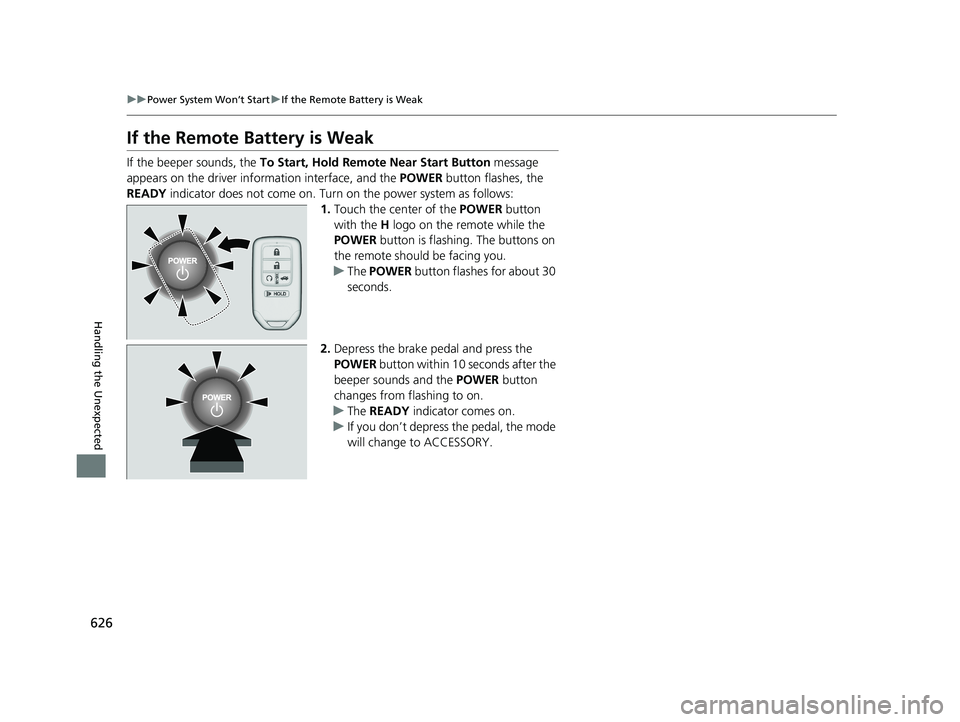
1.Touch the center of the POWER button
with the H logo on the remote while the
POWER button is flashing. The buttons on
the remote should be facing you.
u The POWER button flashes for about 30
seconds.
2. Depress the brake pedal and press the
POWER button within 10 seconds after the
beeper sounds and the POWER button
changes from flashing to on.
u The READY indicator comes on.
u If you don’t depress the pedal, the mode
will change to ACCESSORY.
20 INSIGHT-31TXM6100.book 626 ページ 2019年4月24日 水曜日 午後2時2分
Page 632 of 675
uuJump Starting u
630
Handling the Unexpected
Once your vehicle’s engine has started, re move the jumper cables in the following
order.
1. Disconnect the jumper cable from your vehicle’s ground.
2. Disconnect the other end of the jumper cable from the booster battery -
terminal.
3. Disconnect the jumper cable from your vehicle’s jump start box + terminal.
4. Disconnect the other end of the jumper cable from the booster battery +
terminal.
Have your vehicle inspected by a n earby service station or a dealer.
■What to Do After the Engine Starts1What to Do After the Engine Starts
The vehicle stability assist ® (VSA ®) system, vehicles
stability assist ® (VSA ®) OFF, adaptive cruise control
(ACC) with low speed follow, safety support and low
tire pressure/TPMS indicato rs may come on in amber
along with a message in the driver information
interface when you set the power mode to ON after
re-connecting a battery.
Drive a short distance at more than 12 mph (20 km/h).
Each indicator should go off. If any do not, have your
vehicle checked by a dealer.
20 INSIGHT-31TXM6100.book 630 ページ 2019年4月24日 水曜日 午後2時2分
Page 633 of 675
631Continued
Handling the Unexpected
Overheating
How to Handle Overheating
Overheating symptoms are as follows:
•Engine Temperature Too Hot. Do No t Drive. Allow Engine To Cool.
message appears on the driv er information interface.
• Steam or spray comes out of the engine compartment.
■First thing to do
1. Immediately park the vehicle in a safe place.
2. Turn off all accessories and turn on the hazard warning lights.
u No steam or spray present: Keep the power system on and open the hood.
u Steam or spray is present: Turn off the power system and wait until it
subsides. Then open the hood.
1 How to Handle Overheating
3WARNING
Steam and spray from an overheated
engine can seri ously scald you.
Do not open the hood if steam is coming
out.
20 INSIGHT-31TXM6100.book 631 ページ 2019年4月24日 水曜日 午後2時2分