Automatic HONDA INTEGRA 1994 4.G Workshop Manual
[x] Cancel search | Manufacturer: HONDA, Model Year: 1994, Model line: INTEGRA, Model: HONDA INTEGRA 1994 4.GPages: 1413, PDF Size: 37.94 MB
Page 6 of 1413
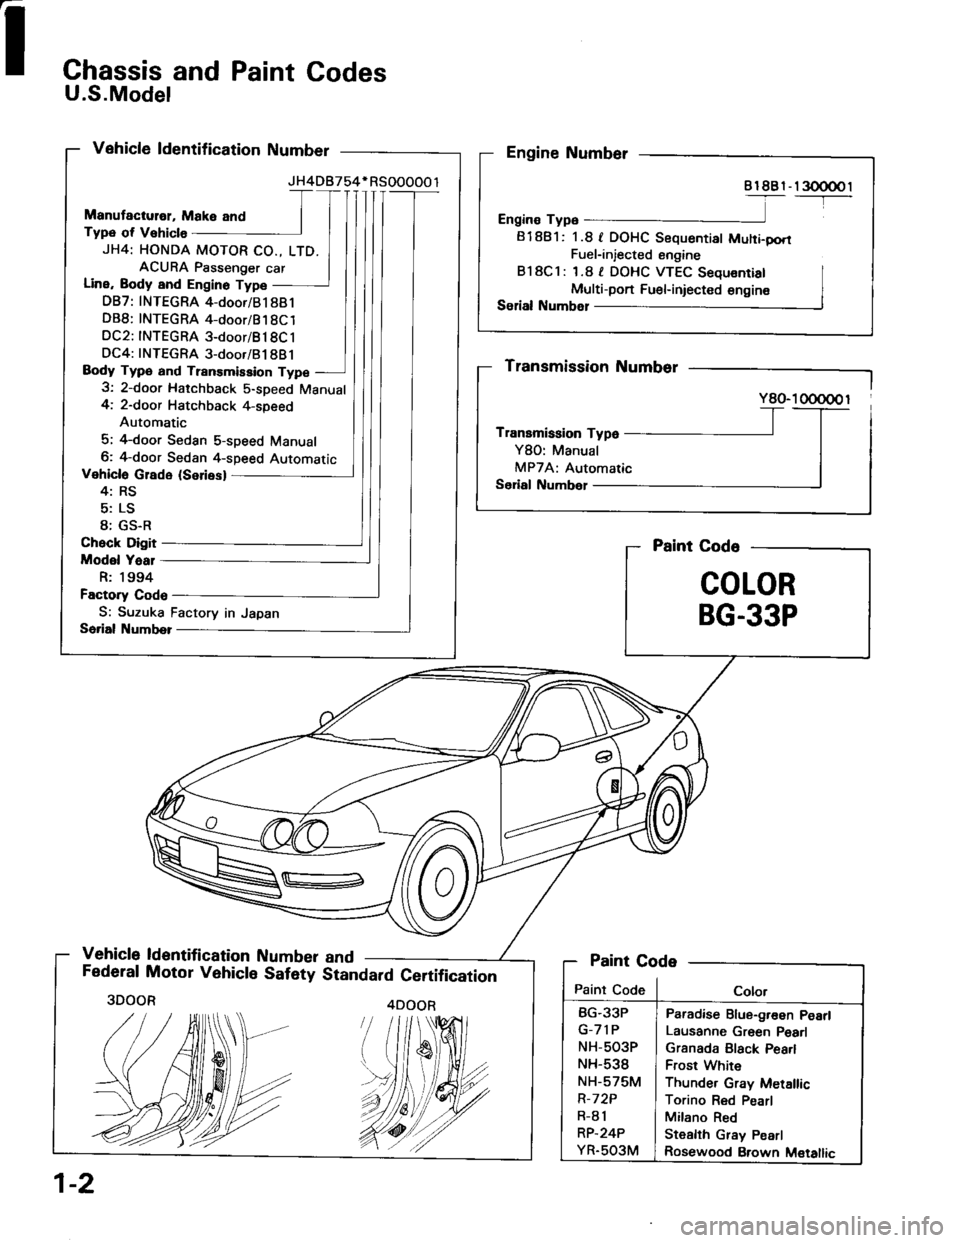
Chassis and Paint Codes
U.S.Model
Vehicle ldentification Number
Manutactulol, Make and
Typ€ of Vshicle
JH4: HONDA MOTOR CO., LTD.
ACURA Psssenger car
Line, Body and Engino Type
DB7: INTEGRA 4-door/B1 881
DB8: INTEGRA 4-door/81 8Cl
DC2: INTEGRA 3-door/B18C 1
DC4: INTEGRA 3-door/B1 8B j
Body Type and Trsnsmission Type
3: 2-door Hatchback S-speed Manual
4: 2-doot Hatchback 4-speed
Automatic
5; 4-door Sedan s-speed Manual
6: 4-door Sedan 4-speed Automatic
Vehicle Glado (Seriesl
4: RS
5: LS
8; GS-R
Check Digit
Model Yaal
R: 1994
Factory Code
S: Suzuka Factory in Japan
Serial Numb€l
Vehicle ld€ntification Number and
JH4DB754* RSOOOOO 1
I
Engine Number
8l8Br-r300@l-----T-----
Engine Typ6
81881: 1.8 f DOHC Sequentiat Muhi-pori
Fuel-injected engine
B l8Cl : 1.8 | DOHC VTEC Sequ€nrial
Multi-port Fu€l-iniected €ngin€
Se al Numbel
Paint Code
COLOR
BG.33P
Federal Motor Vehicle Safety Standard Certification
Transmission Numbsr
Y80- 1 000@ I
Transmission Type
Y80: Manual
MPTA: Automatic
Serial Numbel
Paint Code
Paint CodeColor
BG.33P
G-71P
NH-5O3P
NH-538
NH-575M
R-7 2P
R-81
RP.24P
YR.5O3M
Paradise Blue-g.€en PeErl
Lausanne Gr6en Pead
Grsnada Black Pea.l
Frost White
Thunder Grav Metallic
Torino Red Pearl
Milano Red
Stealth Gray Pearl
Rosewood Brown M€tallic
1-2
3DOOR4DOOR
Page 7 of 1413
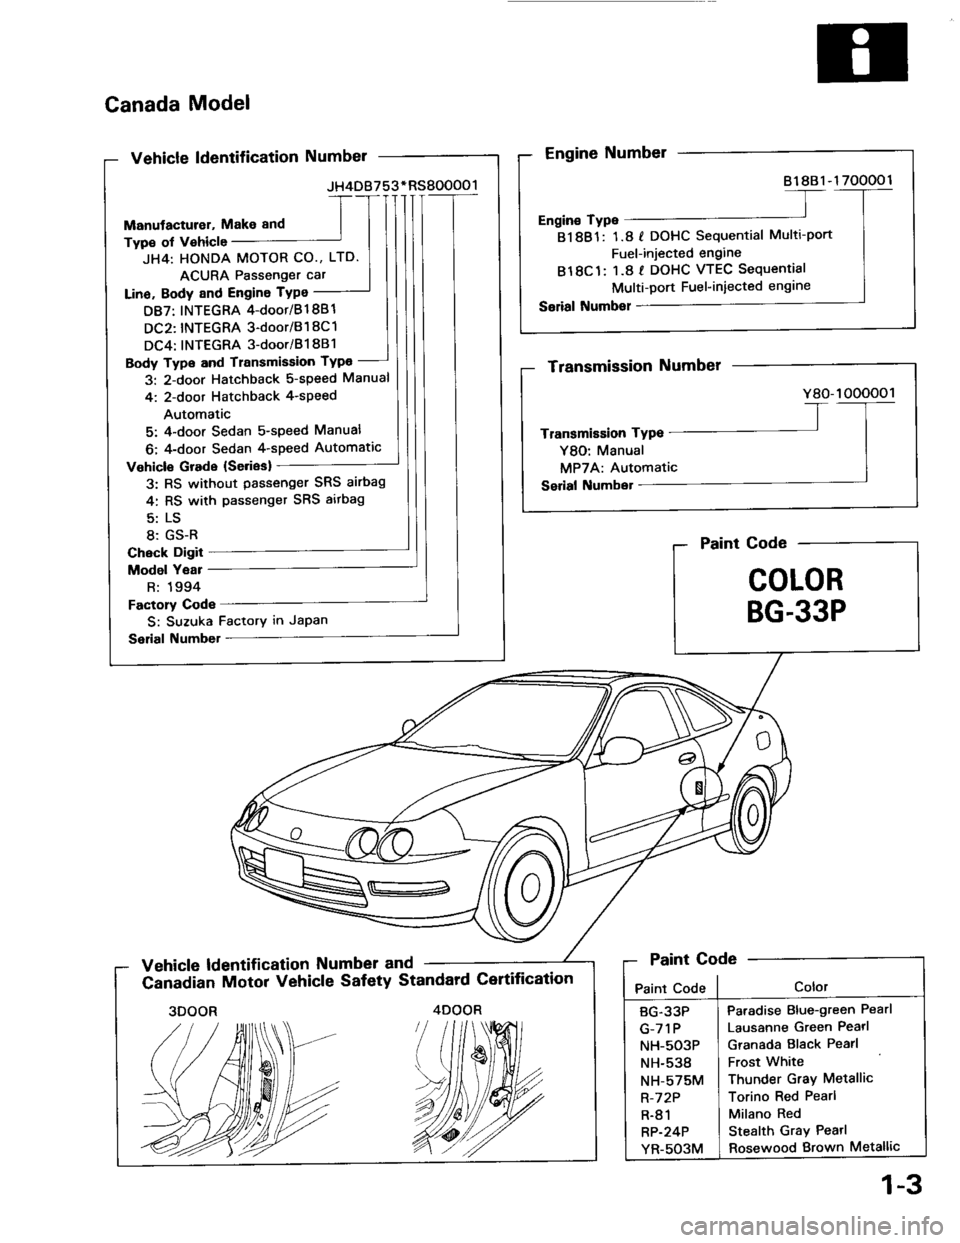
Canada Model
Vehicle ldentification Numbel
Manutacturer, Makeand
Type of v€hicle
JH4: HONDA MOTOR CO., LTD.
ACURA Passenger car
Lino. Body and Engine TYPo
D87: INTEGRA 4-doot/Bl 881
DC2: INTEGRA 3-dootBl 8C1
DC4: INTEGRA 3-doori B18B1
Body Type and Transmission TYPo
3: 2-door Hatchback 5-speed Manual
4'. 2-door Hatchback 4-speed
Automatic
5: 4-door Sedan s-speed Manual
6: 4-door Sedan 4-speed Automatic
Vehicle Grade {Sedes}
3: RS without passenger SRS airbag
4: RS with passenget SRS aitbag
8: GS-R
Check Digit
Model Yeat
R: 1994
Factory Code
S: Suzuka Factory in Japan
Serial Numbel
JH4DB753. RS800001
Engine Number
81881-1 700001
Engin€ Type
81881: 1.8 I DOHC Sequential Multi-port
Fuel-injected engine
B18C1: 1.8 I DOHC VTEC Sequential
Multi-Dort Fuel-iniected engrne
Serial Number
Paint Code
COLOR
BG.33P
Vehicle ldentification Number and
Canadian Motor Vehicle Safety Standard Certification
Transmission Number
Y80-1000001
Transmission Type
Y80: Manual
MPTA: Automatic
Serial Numbel
Paint Code
Paint CodeColor
Paradise Blue-green Pearl
Lausanne Green Pearl
Granada Elack Pearl
Frost White
Thunder Gray Metallic
Torino Red Pearl
Milano Red
Stealth Gray Pearl
Rosewood Brown Metallic
BG.33P
G-71P
NH-5O3P
NH-538
NH-575M
R-72P
R-81
RP-24P
YR-503M
3DOOR4DOOR
1-3
Page 14 of 1413
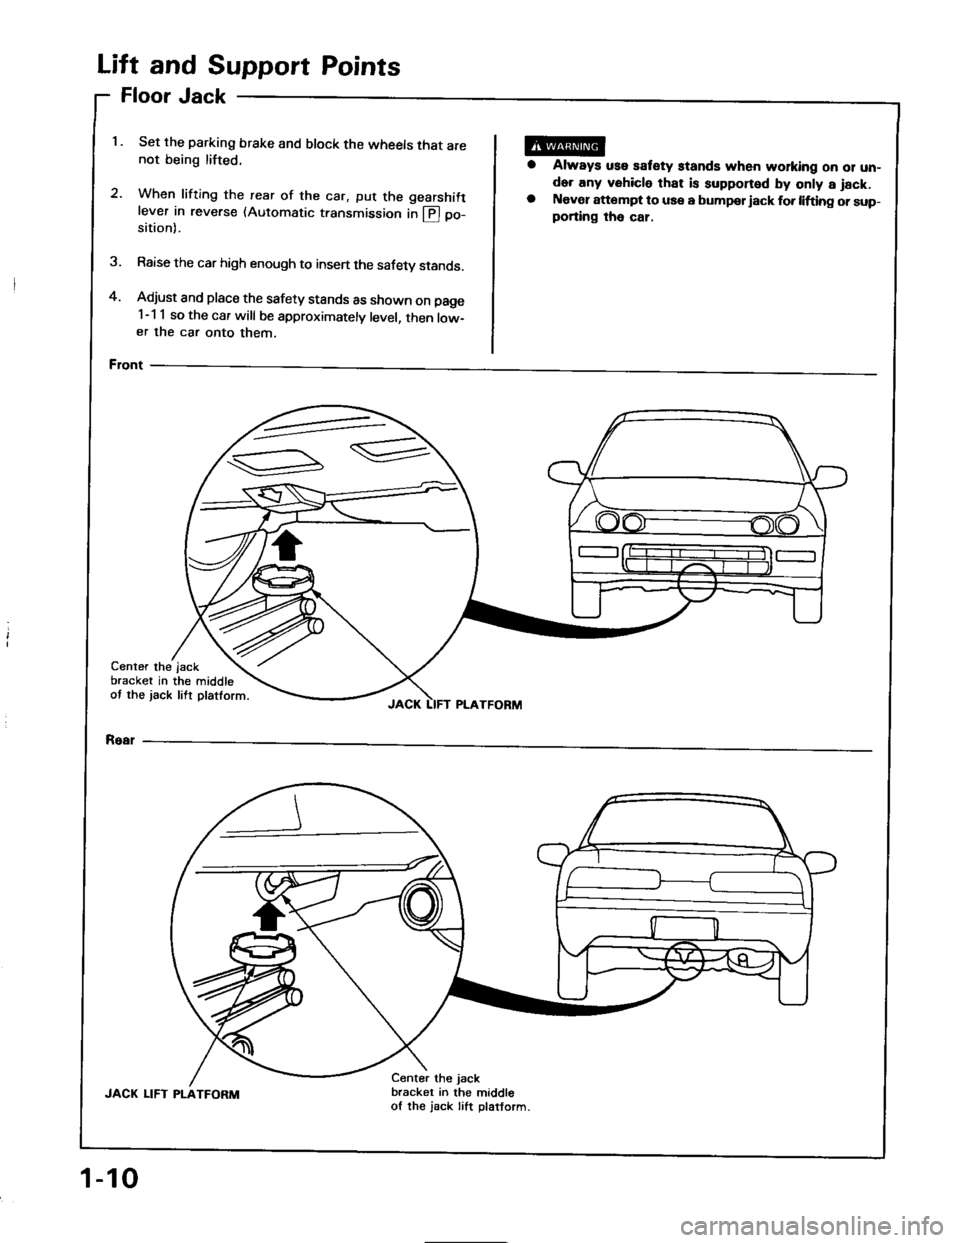
and Support Points
Jack
Set the parking brake and block the wheels that are
not being lifted.
2.When lifting the rearwhen tritrng the rear of the car, put the gearshift
lever in reverse (Automatic transmission in @ po-
of
sition).
Raise the car high enough to insen the safety stands.
Adjust and place the safety stands as shown on page
1-1 1 so the car will be approximately level, then low-
er the car onto them.
Front
oor
ft
FI
Li
4.
1.
a
Always uss satety stands when working oo 01 un-
der any vehicle that is supponed by only a jack.
Naver attompt to use a bumpor iack fo. lifting or sup-
porting tho car,
3.
Center the
bracket in
ot the jack
the middle
lift platform.
jsck
JACK LIFT PLATFORM
Rear
JACK LIFT PLATFORM
Center the jack
bracket in the middle
of the jack Iift platform.
1-10
Page 16 of 1413
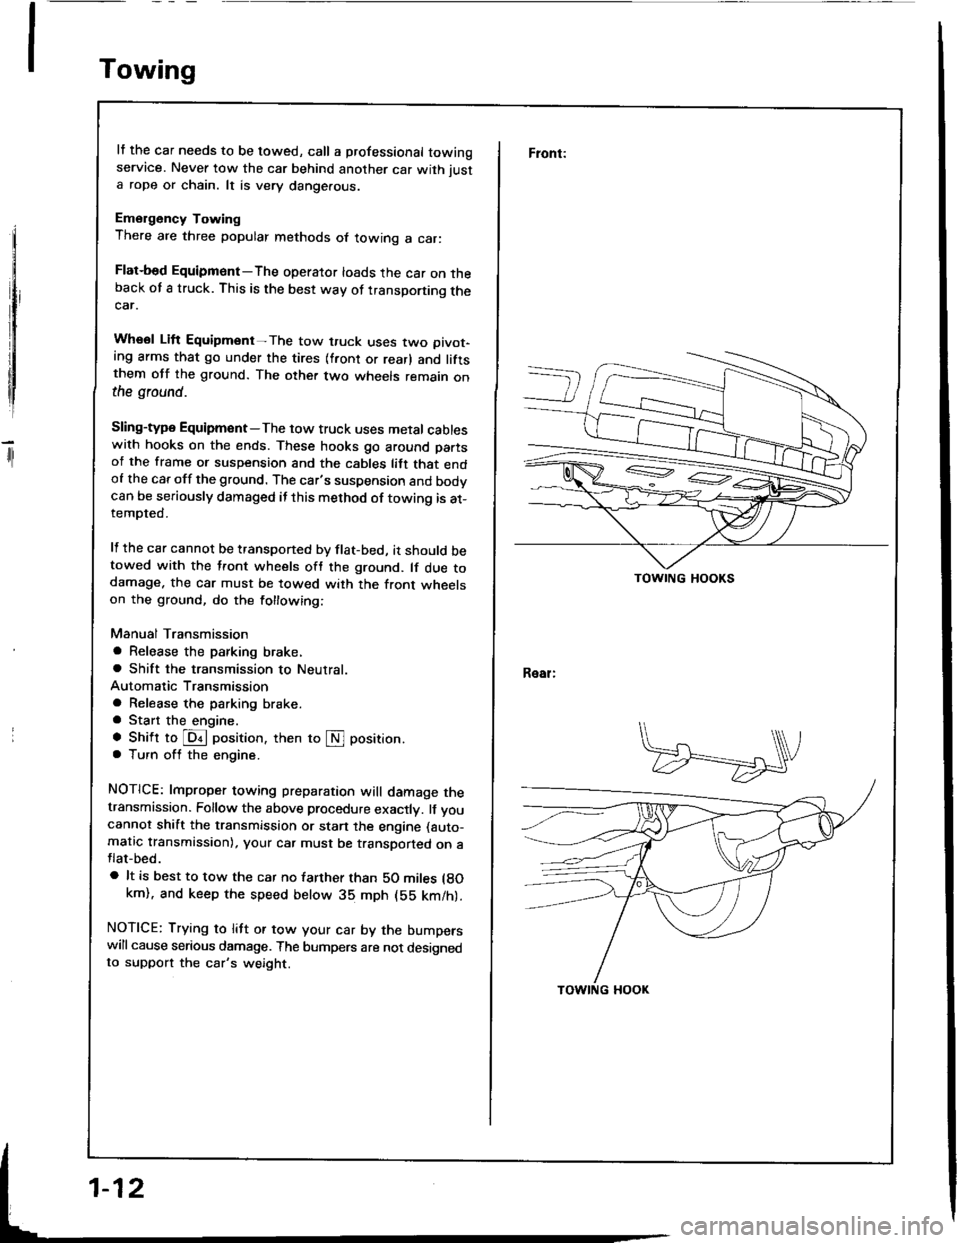
Towing
rl
It the car needs to be towed, call a professional towingservice. Never tow the car behind another car with just
a rope or chain. lt is very dange.ous.
Emergency Towing
There are three popular methods of towing a car:
Flat-bed Equipmont-The operator loads the car on theback of a truck. This is the best way of transporting thecar.
Whsol Lift Equipment-The tow truck uses two oivot-ing arms that go under the tires (front or rear) and liftsthem otf the ground. The other two wheels remain onthe ground.
Sling-type Equipmont-The tow truck uses metal cableswith hooks on the ends. These hooks go around partsof the frame or suspension and the cables lift that endof the car off the ground. The car's suspension and bodvcan be seriously damaged if this method of towing is at-tempted.
It the car cannot be transponed by flat-bed, it should betowed with the tfont wheels oft the ground. lf due todamage. the car must be towed with the front wheelson the ground, do the tollowing:
Manual Transmission
a Release the parking brake,a Shift the transmission to Neutral.
Automatic Transmission
a Release the parking brake.a Start the engine.
a Shift to @ oosition, then to S position.
a Turn off the engine.
NOTICE: lmproper towing preparation will damage thetransmission. Follow the above procedure exactly. lf you
cannot shift the transmission or stan the engine (auto-
matic transmission), your car must be transDorted on aflat-bed.
a lt is best to tow the car no tarther than SO miles lgokm). and keep the speed below 3b mph (bE km/h).
NOTICE: Trying to litt or tow your car by the bumperswill cause serious damage. The bumpers are not designedto support the car's weight.
Front:
Real:
TOWING HOOKS
Page 26 of 1413
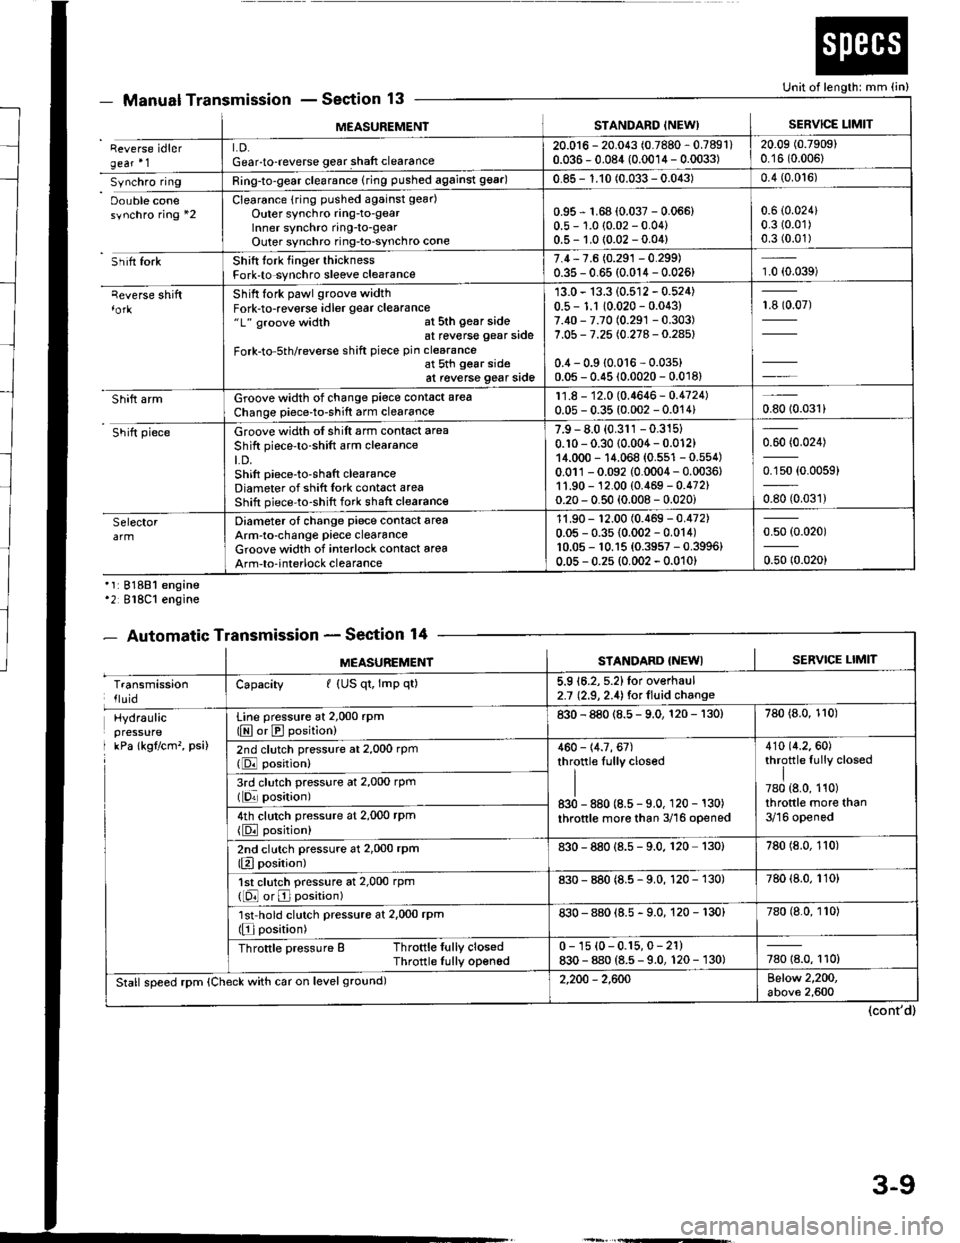
MEASUREMENISTANDARD INEW)SERVICE LIMIT
Reverse idlergear'1LD.Gear-to-reverse gear shaft clearance20.016 - 20.043 (0.7880 - 0.7891)0.036 - 0.084 (0.0014 - 0.0033)20.09 (0.7909)
0.16 (0.006)
Synchro ringRing-to-gear clearance (ring pushed against 99ar)0.85 - 1.10 (0.033 - 0.043)0.4 (0.0't6)
Oouble conesynchro ring *2Clearance {rin9 pushed against gear)
Outer synchro ring-to-gearlnner synchro ring-to-gearOuter synchro ring-to-synchro cone
0.95 r 1.68 (0.037 - 0.066)0.5 - 1.0 (0.02 - 0.04)0.5- 1.0 {0.02 -0.04)
0.6 (0.024)
0.3 (0.01)
0.3 (0.01)
Sh itt forkShift tork finger thicknessFork-to synchro sleeve clearance7.4,7.6 (0.291 - 0.299)0.35 - 0.65 (0.014 - 0.026)1.0 (0.039)
qeverse shiftShift fork pawl groove widthFork-to-reverse idler gear clearance"1" groove width at sth gear sideat reverse gear side
Fork-to-5th/reverse shift piece pin clearanceat 5th gear sideat reverse gear side
13.0 - 13.3 (0.512 - 0.524)0.5 - 1.1 10.020 - 0.043)7.40 - 7.70 (0.291 -0.303)
7.05 - 7.25 (0.278 - 0.28s)
0.4 - 0.9 {0.016 - 0.03s)0.05 - 0.45 (0.0020 - 0.018)
13907)
Shift armGroove width of change piece contact area
Change piece-to-shift arm clearance11.8 - 12.0 (0.4646- 0.4724)0.05 - 0.35 (0.002 - 0.014)0.8010.031)
Shift pieceGroove width of shift arm contact area
Shift piece'to-shift arm clearanceLD.Shift piece-to-shaft clearanceDiameter of shift Iork cont6ct areaShift piece-to-shift fork shaft clearance
7.9 - 8.0 (0.311 -0.315)
0.10 - 0.30 (0.004 - 0.012)14.000 - 14.068 {0.551 - 0.554)0.011-0.092 (0.0004 - 0.0036,1'1.90 - 12.00 (0.469 - 0.472)0.20 - 0.50 (0.008 - 0.020i
0.60 (0.024)
0.150 (0.0059)
oso to.oart
SelectorDiameter of change piece contact areaArm-to-change piece clearanceGroove widlh of interlock contact area
Arm-to-interlock clearance
11.90 - '�t2.00 (0.469 - 0.472)0.05 - 0.35 {0.002 - 0.014)10.05 - 10.15 {0.3957 - 0.3996}0.05 - 0.2s (0.002 - 0.010)
0.50 (0.020)
0.50 (0.020)
Manual TransmissionSection 13
'1:81881 engine'2 818C1 engine
- Automatic TransmissionSection 14
Unit of length: mm (in)
(cont'd)
- oEutrlrrl rr
MEASUREMENTSTANDARD {NEWISERVICE LIMIT
TransmissionlluidCapacity I (US qt, lmp qt)5.9 16.2, 5.2)for overhaul2.7 (2.9, 2.4) for lluid change
Hydraulicpressure
I kPa lkgflcm'�, psi)
Line pressure at 2,000 rpm(E or E position)830 - 880 (8.5 - 9.0, 120 - 130)780 {8.0, 110)
2nd clutch pressure at 2,000 rpm(DJ position)460 - 14.7, 67)throttle Iully closed
II830 - 880 (8.5 - 9.0, 120 - 130)
throttle more than 3/16 opened
410 {4.2.60)throttle fully closed
I780 {8.0, 110)throttle more than3/16 opened
3rd clutch pressure at 2,000 rpm(lqr posirion)
4th clutch pressure at 2,000 rPm
{E position)
2nd clutch pressure at 2,000 rPm(Elposition)830 - 880 {8.s - 9.0. 120 130)780 (8.0, 110)
1st clutch pressure at 2,000 rpm([O or E position)830 - 880 (8.5 - 9.0, 120 - 130)780 (8.0, 110)
'lst'hold clutch pressure at 2,000 rpm(Elposition)830 - 880 {8.5 - 9.0, 120 - 130}780 (8.0, 110)
Throttle pressure B Throttle fully closedThrotlle Iully opened0 - 1s {0-0.15,0- 21)830 - 880 (8.5 - 9.0, 120 - 130)780 18.0, 110)
Stall speed rpm (Check with car on level ground)2,200 - 2,600Below 2,200,above 2,600
3-9
Page 27 of 1413
![HONDA INTEGRA 1994 4.G Workshop Manual Standards and Service Limits
Automatic Transmis3ion (contdl - Sostion 14
MEASUFEMEYTSTANDARD {NEWISEBVICE UM]T
ClutchClutch initialcl6aranco lst, 2nd3rd, 4thlst-holdClutch rdtu.n spring troe length HONDA INTEGRA 1994 4.G Workshop Manual Standards and Service Limits
Automatic Transmis3ion (contdl - Sostion 14
MEASUFEMEYTSTANDARD {NEWISEBVICE UM]T
ClutchClutch initialcl6aranco lst, 2nd3rd, 4thlst-holdClutch rdtu.n spring troe length](/img/13/6067/w960_6067-26.png)
Standards and Service Limits
Automatic Transmis3ion (cont'dl - Sostion 14
MEASUFEME'YTSTANDARD {NEWISEBVICE UM]T
ClutchClutch initialcl6aranco lst, 2nd3rd, 4thlst-holdClutch rdtu.n spring troe length lst, 3rd, 4th2ndlst-holdClutch disc thicknosgClulch plale thickn$3
0.65 - 0.85 (0.026 - 0.03310.40 - 0.60 (0.016 - 0.024)0.5- 0.8 (0.020 - 0.031)31.0 {r.22}33.2 {1.31)34.6 ('�t.36)'1.8 - 2.0 {0.071 - 0.079)1.95 - 2.05 (0.077 - 0.08r)
29.0 (1.14)
31.2 11.23132.6 (1.28)
Until groov€6 worn outDiscoloration
Clutch ond platothictnoss MARK 1('l8t) MARK 2MARK 3MARK 4MARK 5MARK 6MABK 7MABK 8MARK 9MARK 10MAFK 1,IMARK 12MARK 13MAEK 14
2.05 - 2.10 (0.08'1 - 0.083)2.1s - 2.20 {0.085 - 0.087)2.25 - 2.30 (0.089 - 0.091)2.3s - 2.40 {0.093 - 0.091)2.45 - 2.50 (0.096 - 0.098)2.55 - 2.60 (0.100 - 0.102)2.65 - 2.70 (0.104 - 0.106)2.75 - 2.80 (0.108 - 0.110)2.85 - 2.90 (0.1 12 - 0.1 11)2.95 - 3.00 (0.116 - 0.118)3.05 - 3.'r0 {0.120 - 0.122}3.15 - 3.20 (0.124 - 0.126)3.25 - 3.30 (0.128 - 0.130)3.35 - 3.40 (0.132 - 0.1341
Discoloration
Discoloration
Clutch ond plato thickn$s MARK 1(2nd,3rd, ath) MARK 2MARK 3MARK 4MARK 5MARK 6MARK 7MARK 8MARK 9MARK 10
2.05 - 2.10 (0.081 - 0.083)2.15 - 2.20 {0.085 - 0.087)2.25 - 2.30 (0.089 - 0.091)2.35 - 2.40 {0.093 - 0.094)2.45 - 2.50 {0.096 - 0.098}2.55 - 2.60 {0.100 - 0.102}2.65 - 2.70 (0.104 - 0.106)2.75 - 2.80 {0.108 - 0.r 10)2.85 - 2.90 {0.112 - 0.1r4)2.95 - 3.00 10.116 - 0.1 r8)
Oiscoloration
II
I
I
Discoloration
Clutch ond pl.t6 thicknoss MARK 1(lst-hold) MARK 2MARK 3MARK 4NO MARKMARK 6MARK 7
2.05 - 2.10 {0.081 - 0.083)2.15 - 2.20 (0.085 - 0.087)2.25 - 2.30 {0.089 - 0.091}2.35 - 2.40 (0.093 - 0.09412.45 - 2.50 (0.096 - 0.098)2.55 - 2.60 10.100 - 0.102)2.65 - 2.70 (0.101- 0.106)
Discoloration
tI
I
Oiscolor6tion
Page 28 of 1413
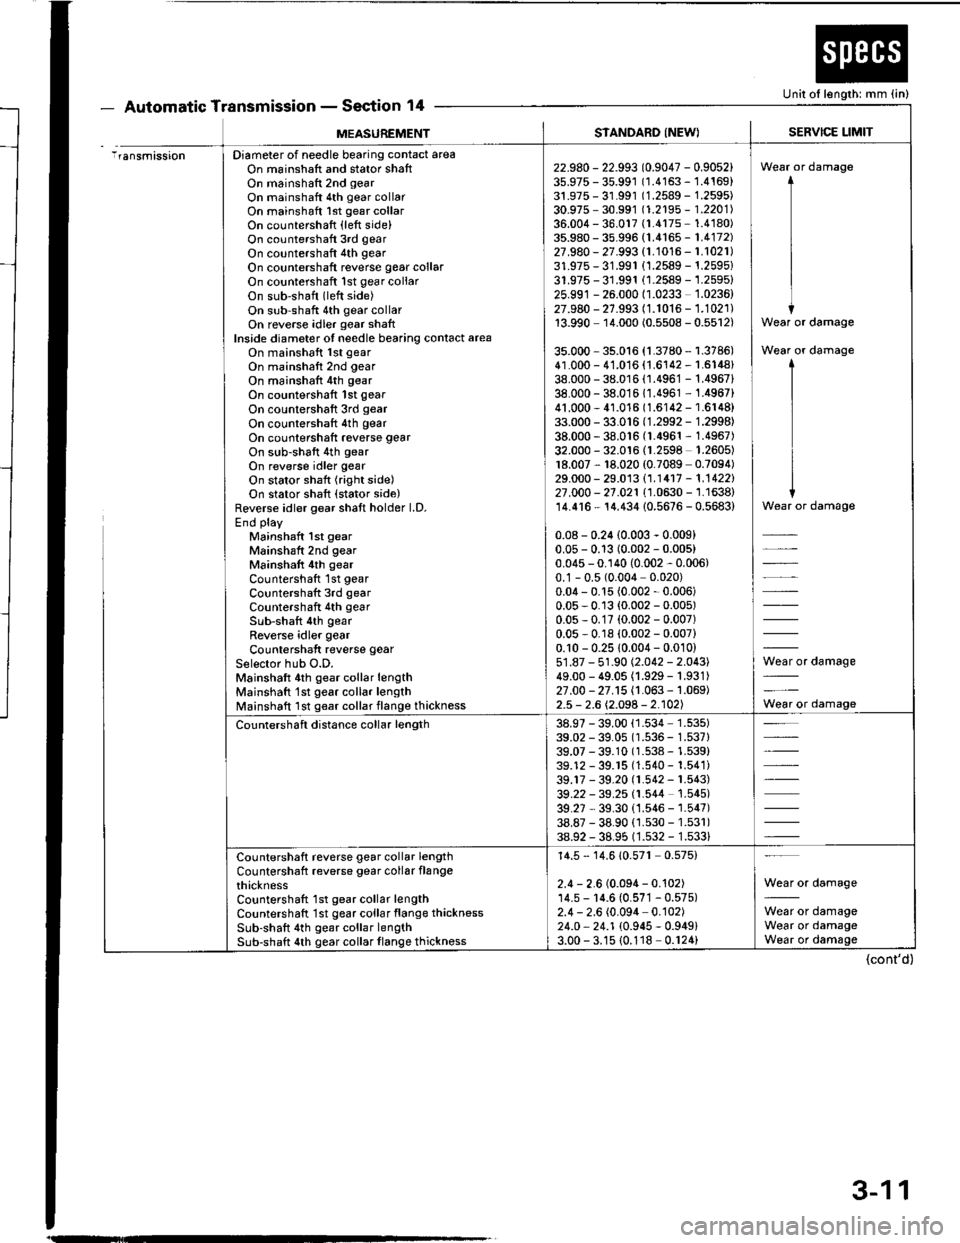
- AutomaticTransmissionSection 14Unit ol length: mm (in)- atcuarrurr r.t
MEASUREMENTSIANDARD {NEW}SERVICE LIMIT
iransmissionDiameter of needle bearing contact areaOn mainshatt and stator shaftOn mainshaft 2nd gear
On mainshaft 4th gear collarOn mainshaft lst gesr collarOn countershaft (left side)On countershatt 3rd gear
On countershaft 4th gear
On countershaft reverse gear collarOn countershaft lst gear collaron sub'shaft (left side)On sub-shaft 4th gear collarOn reverse idler gear shaftInside diameter of needle bearing conlact areaOn mainshaft lst gear
On mainshaft 2nd gear
On mainshalt 4th gear
On countershaft lst gear
On countershaft 3rd gear
On countershaft 4th gear
On countershaft reverse gear
On sub-shatt 4th gear
On reverse idler gear
On stator shaft (right side)On stator shaft {stator side)Reverse idler gear shaft holder l.D.End play
Mainshaft 1st gearMainshaft 2nd gear
Mainshatt 4th gear
Countershaft 1st gear
Countershaft 3rd gear
Countershaft 4th gear
Sub-shaft 4th gearReverse idler gear
Countershaft reverse gear
Selector hub O.D.Mainshaft 4th gear collar lengthMainshatt'lst gear collar lengthlvlainshaft Ist g€ar collarflange thickness
22.980 - 22.993 (0.9047 - 0.9052)35.975 - 35.991 0.4163 - 1.4169)31.975 - 31.99r (1.2589 - 1.2595)30.975 - 30.991 t1.2195 - 1 .2201136.004 - 36.017 {r.4r7s - 1.4'�l80)35.980 - 35.996 (1.4165 - 1.4172)27.980 - 27.993 {1.1016 - 1.1021)31.975-31.991 (1.2589 - 1.2595)31.975 -31.991 (1.2589 - 1.2595)25.991 - 26.000 (1.0233 1.0236)27.980 - 27.993 (1.1016 - 1.1021)13.990 11.000 (0.5508 - 0.5512)
35.000 - 35.016 (1.3780 - 1.3786)41.000 - 41.016 {1.6142 - r.6148}38.000 - 38.016 (1.4961 - 1.4967138.000 - 38.0161'�].4961 - 1.4967)41.000 - 41.016 (1.6142 - 1.6148)33.000 - 33.016 (1.2992 - 1.2998)38.000 - 38.016 0.4961 - 1.4967)32.000 - 32.016 fl.2598 1.2605)18.007, 18.020 {0.7089 0.7094)29.000 - 29.013 (1.14r7 - 1.1422)27.000 - 21.021 (1.0630 - '�j.1638)
14.416 - 14.434 10.5676 - 0.5683)
0.08 - 0.24 (0.003 - 0.009)0.05 - 0.13 (0.002 - 0.005)0.045 - 0.140 (0.002 - 0.006)0.1 - 0.5 (0.004 0.020)0.04 - 0.15 (0.002 - 0.006)0.05 - 0.13 (0.002 - 0.005)0.05 - 0.17 (0.002 - 0.007)0.05 - 0. r8 (0.002 - 0.007)0.10 - 0.25 10.004 - 0.010)51.87 - 51.90 (2.042 - 2.043)49.00 - 49.05 (1.929 - 1.931)27.00 - 27.15 (1.063 - '�|.069)
2.5 - 2.6 \2.098 - 2.102)
Wear or damage
Wear or damage
Wear or damage
*rd"-"g"
Wear or damage
Countershaft distance collar length38.97 - 39.0039.02 - 39.0539.07 - 39.1039.12 - 39.r539.17 - 39.2039.22 - 39.2539.27 - 39.3038.87 - 38.9038.92 - 38.95
1.534 1.535)'r.536 - 1.537)1.538 - 1.539)1.540 - 1.541)r.542 - 1.543)1.544 1.545)1.546 - 1.547)1.530 - 1.53r)'1.532 - 1.533)
Countershaft reverse gear collar lengthCountershaft reverse gear collar flangethicknessCountershaft 1st gear collar lengthCountershaft '1st gear collar flange thicknessSub-shaft 4th gear collar lengthSub-shaft 4th gear collar flange thickness
14.5 - 14.610.57r 0.575)
2.4 - 2.6 (0.094 - 0.102)'14.5 - 14.6 (0.57'�l - 0.575)2.4 - 2.6 (0.094 0.102)24.0, 24.1 {0.945 - 0.949}3.00 - 3.15 {0.118 0.r24)
Wear or damage
Wear or damageWear or damageWear or damage
(cont'd)
3-11
Page 29 of 1413
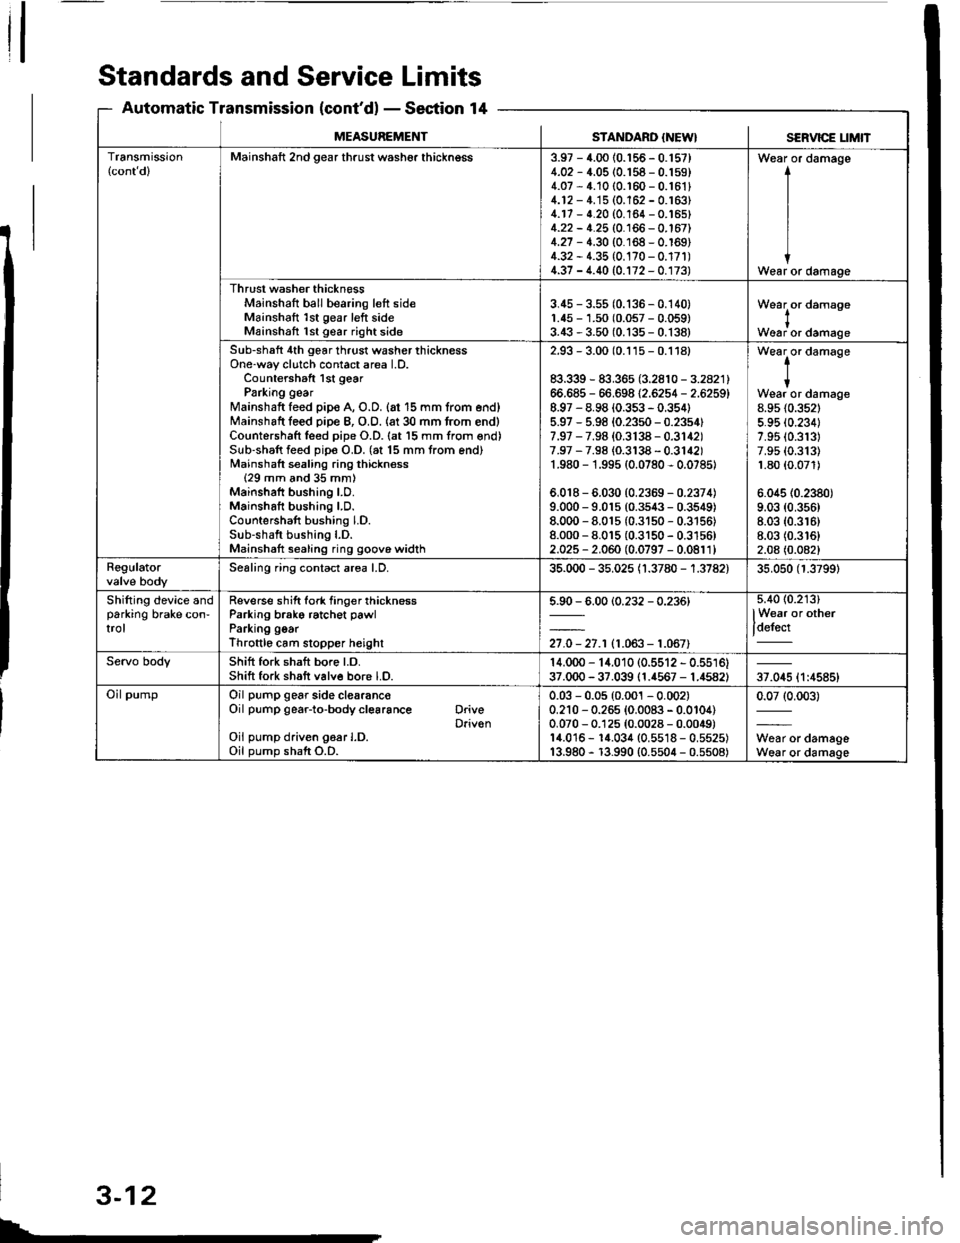
Standards and Service Limits
Automatic Transmission (cont'dl - Section 14
SERVICE t_tMtTMEASUREMENTSTANDARD {NEW}
Transmission(cont dlMainshaft 2nd gear thrust washer thickngss3.97 - 4.00 {0.156 - 0.'t57}4.02 - 4.05 (0.158 - 0.159)4.07 - 4.10 (0.r60 - 0.16114.12 - 4.'15 (0.162 - 0.163)4.17 - 4.20 (0.164 - 0.'�t65)4.22 - 4.25 (0.166 - 0.167)4.27 - 4.30 {0.168 - 0.169)4.32 - 1.35 {0.170 - 0.17r)4.37 - 4.40 (0.172 - 0.173)
Wear or damage
I
I
IWear or damage
Thrust washer thicknessMainshaft ball bearing left sideMainshaft 1st gear left sideMainshatt 1st gear right side
3.45 - 3.55 (0.136 - 0.140)1.45 - 1.50 (0.057 - 0.059)3.43 - 3.50 (0.135 - 0.138)
Wearlor damase
Woar or damage
Sub-shaft 4th gear thrust washer thicknessOne-way clutch contact area l.D.Countershaft lst gearParking gearMainshaft feed pip€ A, O.D. {at 15 mm trom end}Mainshaft leed piDe B, O.O. {at 30 mm from end)Countershaft leed pipe O.D. (at l5 mm from end)Sub-shaft feed pip€ O.D. (at 15 mm trom end)Mainshaft sealing ring thickness{29 mm and 35 mm)Mainshaft bushing LO.Mainshaft bushing LD.Countershaft bushing LD.Sub-shaft bushing l.D.Mainshatt sealing ring goove widlh
2.93 - 3.00 (0.115 - 0.1181
83.339 - 83.365 (3.2810 - 3.2821)66.685 - 66.698 12.6254 - 2.6259)8.97 - 8.98 {0.353 - 0.354)5.97 - 5.98 (0.23s0 - 0.2354f7.97 - 7.98 (0.3138 - 0.3142)7.97 - 7.98 {0.3138 - 0.3142)1.980 - 1.995 (0.0780 - 0.07851
6,018 - 6.030 (0.2359 - 0.2374)9.000 - 9.015 (0.3s43 - 0.3549)8.000 - 8.01s (0.31s0 - 0.3156)8.000 - 8.015 (0.3150 - 0.3156)2.025 - 2.060 (0.0797 - 0.0811)
t-
tWear or damage8.95 {0.352t5.95 (0.2341
7.95 (0.313)
7.9s (0.313)
1.80 {0.071)
6.045 (0.2380)
9.03 (0.356)
8.03 (0.3r6)
8.03 (0.3161
2.08 (0.0821
RegulatorSealing ring contact area LD.35.000 - 35.025 {1.3780 - 1.3782)35.050 (1.3799)
Shifting device andparking brake con-trol
Reverse shift fork tinger thicknessParking brako ratchet pawlParking goarThroftlo cam slopper heighl
5.90 - 6.00 {0.232 - 0.236)
27.0 - 27.r (1.063- 1.067)
5.4O {0.213)
lWear or other
t_'--'
Servo bodyShift fork shaft bore Lo.Shift fork shaft v6lve bore LO.14.000 - 14.010 (0.5512 - 0.5516)37.000 - 37.039 (1.{567 - 1.4582)37.045 {1:4585}
Oil pumpOil pump gear side clearanc€Oil pump gear-to-body cl€6rance DriveDriv€nOil pump driven g6ar I.D.Oil pump shaft O.D.
0.03 - 0.05 (0.001 - 0.002)0.210 - 0.265 {0.0083 - 0.0104)0.070 - 0.125 (0.0028 - 0.0049)14.016 - 1{.034 (0.5518 - 0.5525)13.980 - r3.990 {0.5504 - 0.5508)
0.07 (0.003)
W6ar or damageWear or damage
L
3-12
Page 30 of 1413
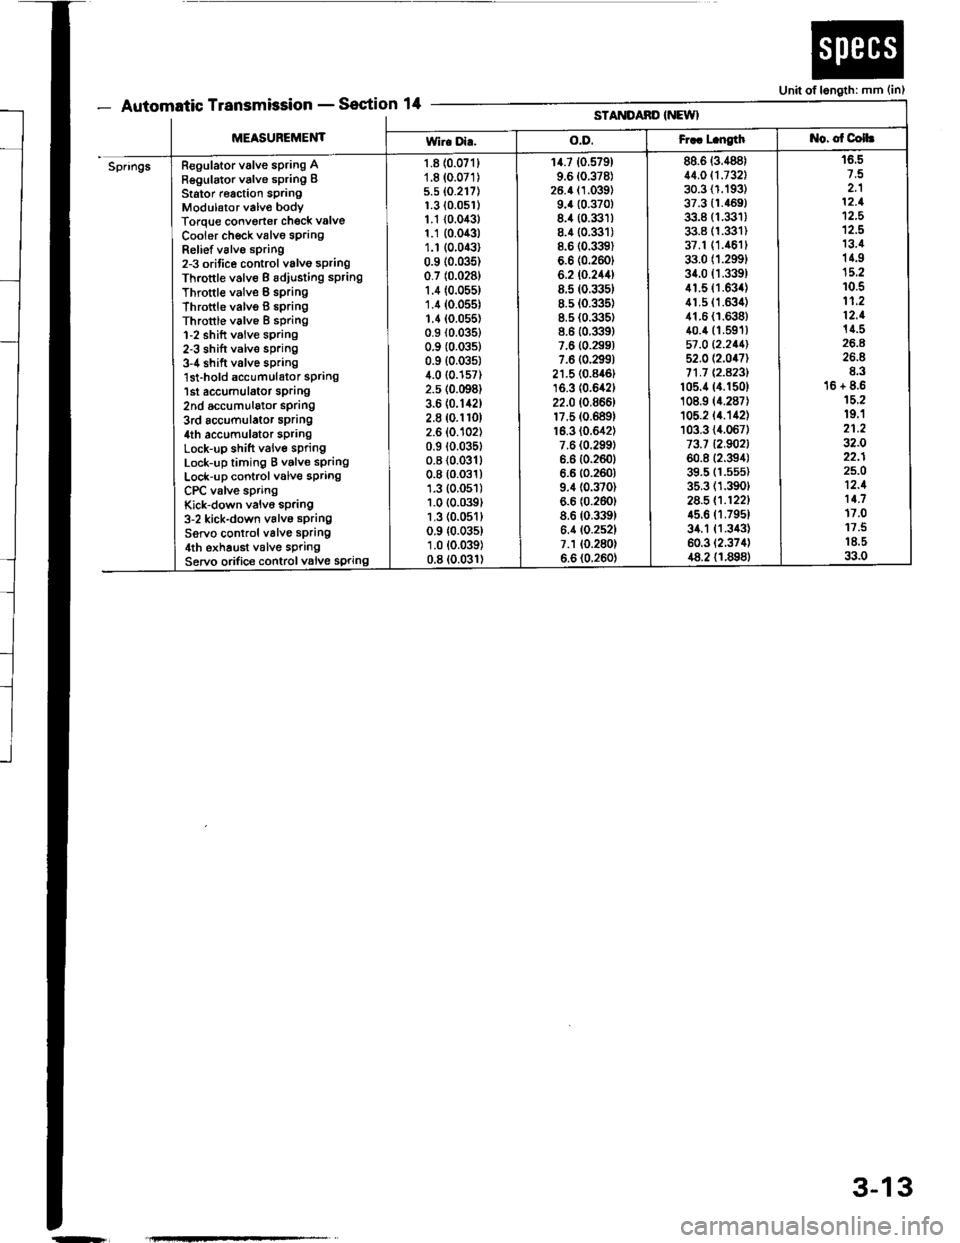
- Automatic TransmissionSection 14Unit of length: mm (in)
[t!'tttltttt tt -
MEASUREMENT
STANDAND INEWI
Wir. Di..o.D.Fr.. L.ngtht{o. of Colh
SpringsRegulator valve spring ARegulator valve spring IStator r€action springModulator valv€ bodyTorque convorter check valve
Cooier ch€ck valve sprangRelief v6lvo spring2-3 orifice control valvo springThrottle valve B adiusting sPring
Throttle valve B springThrottle valvo B 6pringThrottle valve I spring1-2 shift valve sprang2-3 shift valve spring3-4 shift valve spring'lst-hold accumulator spring1st accumulator sprang2nd accumulalor spdng3rd accumulator spring4th accumulator sPrangLock-up shift valve springLock-up timing B valve springLock-up control valve springCPC valve springKick-down valvo spring3-2 kick-down valvo springServo control valve spring4th exhaust v6lve springServo orifice controlvalve spring
1.8 {0.071}1.8 (0.071)
5.5 (0.217)
1.3 {0.0s1)1.1 {0.043}1.1 {0.043)1.r (0.043)
0.9 (0.035)
0.7 (0.0281
1.4 (0.055)
1.4 (0.055)
1.1(0.055)0.9 (0.0351
0.9 (0.0351
0.9 {0.035)4.0 {0.157)2.5 (0.098)
3.6 (0.142)
2.8 (0.1r0)
2.6 (0.102)
0.9 (0.035t
0.8 (0.0311
0.8 (0.031)
1.3 (0.051)
1.0 (0.039t
1.3 (0.051)
0.9 {0.035)1.0 (0.039)
0.8 (0.031)
14.7 (0.579)
9.6 (0.378)
26.4 (1.039)
9.4 {0.370}8.4 (0.331)
8.4 (0.3:]t)
8.6 (0.3l9)
6.6 (0.2601
6.2 (0.244)
8.5 (0.335)
8.5 (0.335)
8.5 (0.335)
8.6 (0.339)
7.6 (0.299)
7.6 (0.2991
21.5 (0.846t
16.3 (0.642)
22.0 (0.866)
17.5 (0.689)
16.3 (0.642)
7.6 {0.299)6.6 {0.260}6.6 (0.260)
9.4 (0.370)
6.6 (0.260)
8.6 (0.339)
6.4 (0.252)
7.1 (0.280)
6.6 (0.260)
88.6 (3.488)
11.011.732130.3 (1.193)
37.3 {1.469)33.8 (1.331)
33.8 (1.331)
37.1 (1.461t
33.0 (1.299)
34.0 fi.339)41.5 (1.634)
41.5 (1.63i1)
41.6 {1.638}40.4 (1.591)
57 ,0 12.211152.0 (2.047)
71.1 Q.A23l't05.4 (4.150)
108.9 (4.287)
105.2 (4.'�142)
103.3 {4.067)73.7 12.902160.8 (2.394)
39.5 (1.5s5)
35.3 (1.390)
2a.5 (.1221
45.6 (1.795t
34.1 {1.343)60.3 (2.374)
48.2 {1.898}
16.5
2.112.1't2,5
12.513.414.9
10.511.212.114.5
26.8E.316 + 8.615.219.'l21.232.022.125.O12.111.717.011.518.533.0
-r
3-13
Page 31 of 1413
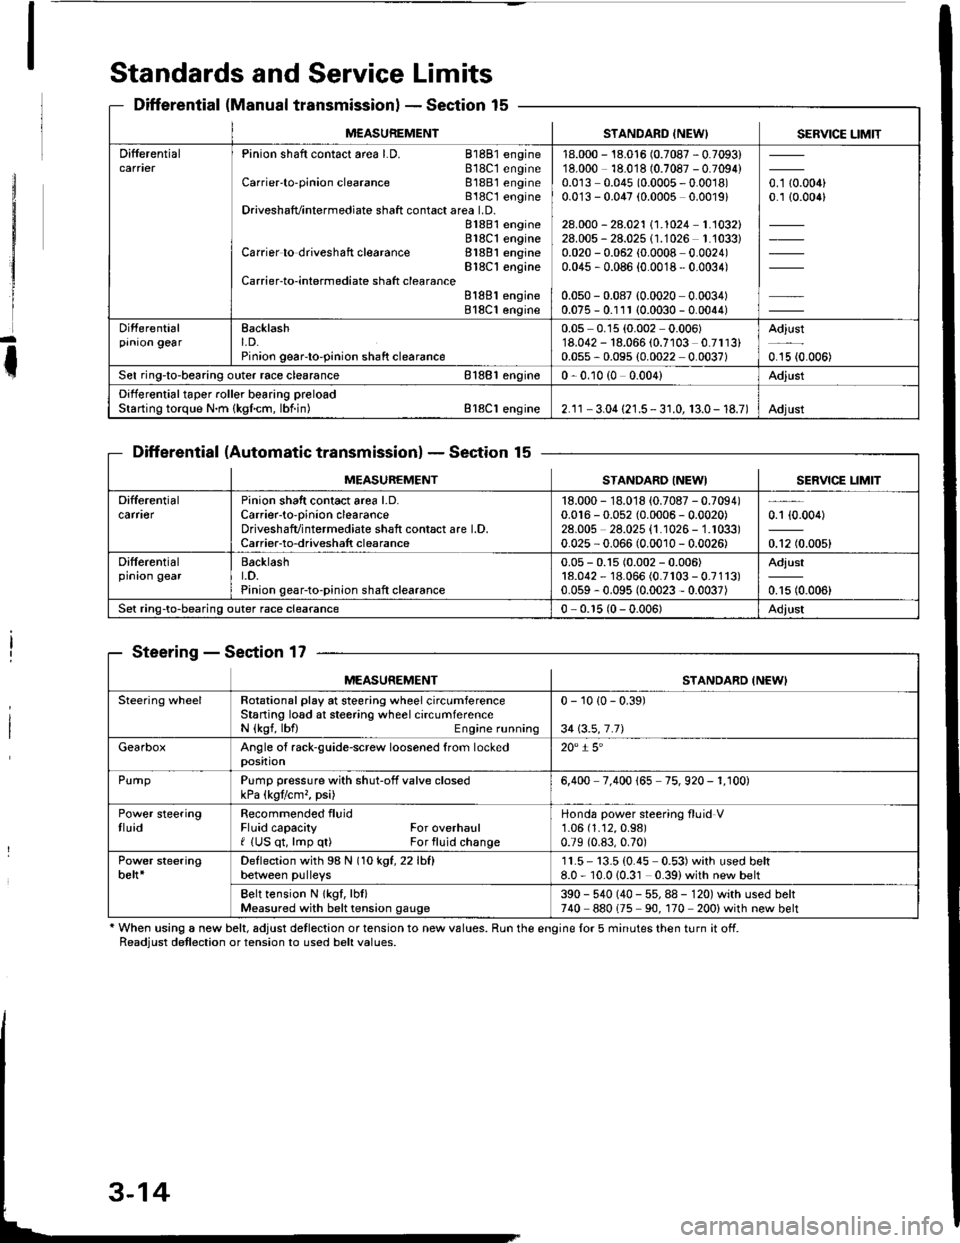
Standards and Service Limits
Differential (Manual transmissionlSection 15
Differential (Automatic transmissionlSection 15
Steering - Section 17
' When using a new belt, adjust detlection or tension to new values. Run the engine lor 5 minutes then turn it off.Readiust detlection or tension to used belt values.
M€ASUREMENTSTANDARD INEW) SERVICE LIMIT
DifferentialPinion shaft contact area LD. 81881 engine818C1 engineCarrier'to-pinion clearance 81881 engineB18C t engineDriveshafvintermediate shaft contact area LD.81881 engine818C1 engineCarrier to driveshaft clearance 81881 engineBlSC'l engineCarrier-to-intermediate shatt clearanceB188l engine818C1 engine
18.000 - 18.016 (0.7087 - 0.7093)18.000 18.018 (0.7087 - 0.7094)0.0r3 0.045 (0.0005 - 0.0018)0.0'13 - 0.047 (0.0005 0.0019)
28.000 - 28.021 \1.1024-1.1032128.005 - 28.025 (1.1026 1.'1033)0.020 - 0.062 (0.0008 0.0024)0.045 , 0.086 {0.0018 - 0.0034)
0.050 - 0.087 (0.0020 0.0034)0.075 - 0.111 (0.0030 - 0.0044)
o. t aron,0.1 {0.006}
Differentialprnron gearEacklasht. D.Pinion geaFto-pinion shaft clearance
0.05 0.15 (0.002 0.006)'18.042 - 18.066 (0.7103 0.7113)0.055 - 0.095 (0.0022 0.0037)
Adjust
0.15 {0.006)
Sel ring-to-bearing outer race clearance 81881 engin€0 - 0.10 (0 0.004)Adjust
Differential taper roller bearing preloadStarting torque N.m {kgfcm, lbf.in) Bl8Cl engine2.1r - 3.04 {21.5 - 3 r.0, 13.0- 18.7)Adjust
MEASUREMENTSTANDARO INEWISERVICE LIM]T
Difterentialcarfl€rPinion shatt contact area l.D.Carrier-to-oinion clearanceDriveshafvintermediate shaft contact are l.D.Carrier-to-driveshatt clearance
18.000 - 18.018 {0.7087 - 0.7094)0.016 - 0.052 {0.0006 - 0.0020)28.00s 28.025 {1.1026 - 1.1033)0.025 - 0.066 (0.0010 - 0.0026)
0.1 {0.004)
0.12 (0.005)
Differentialprnron gearBacklasht.D.Pinion gear-to-pinion shaft clearance
0.05 - 0.15 (0.002 - 0.006)18.042 - 18.066 (0.7r03 - 0.7113)0.059 - 0.095 (0.0023 - 0.0037)
Adjust
0.15 (0.006)
Set ring-to-bearing outer race clearance0 - 0.r5 (0 - 0.006)Adjust
MEASUREMENTSTANDARD INEWI
Steering wheelRotational play at steering wheel circumferenceStaning losd at steering wheel circumferenceN {kgf, lbfl Engine running
0 - 10 {0 - 0.39)
34 \3.5,7.71
GearboxAngle of rack-guide-screw loosened from lockedposition20" i 5'
PurnpPump pressure with shut-off valve closedkPa (kgtlcm,, psi)6,400 7.400 165 75. 920 - 1. r00)
Power steeringtluidRecommended fluidFluid capacity For overhaulf (US qt, lmp q0 For fluid change
Honda power steering fluid V1.06 (1.12,0.98)
0.79 (0.83,0.70)
Power steeringbelt*Deflection with 98 N (1okgt,22lhfl
between pulleys11.5- 13.5 (0.45 0.53)with used belt8.0 - 10.010.31 0.39)with new belt
Belt tension N lkgf, lbl)Measured with belt tension gauge390 - 540 (40 - 55, 88 - 120) with used belt740 880175 90. 170 200) with new belt