service HONDA INTEGRA 1994 4.G Repair Manual
[x] Cancel search | Manufacturer: HONDA, Model Year: 1994, Model line: INTEGRA, Model: HONDA INTEGRA 1994 4.GPages: 1413, PDF Size: 37.94 MB
Page 356 of 1413
Change Holder Assembly
Clearance Inspection {cont'd}
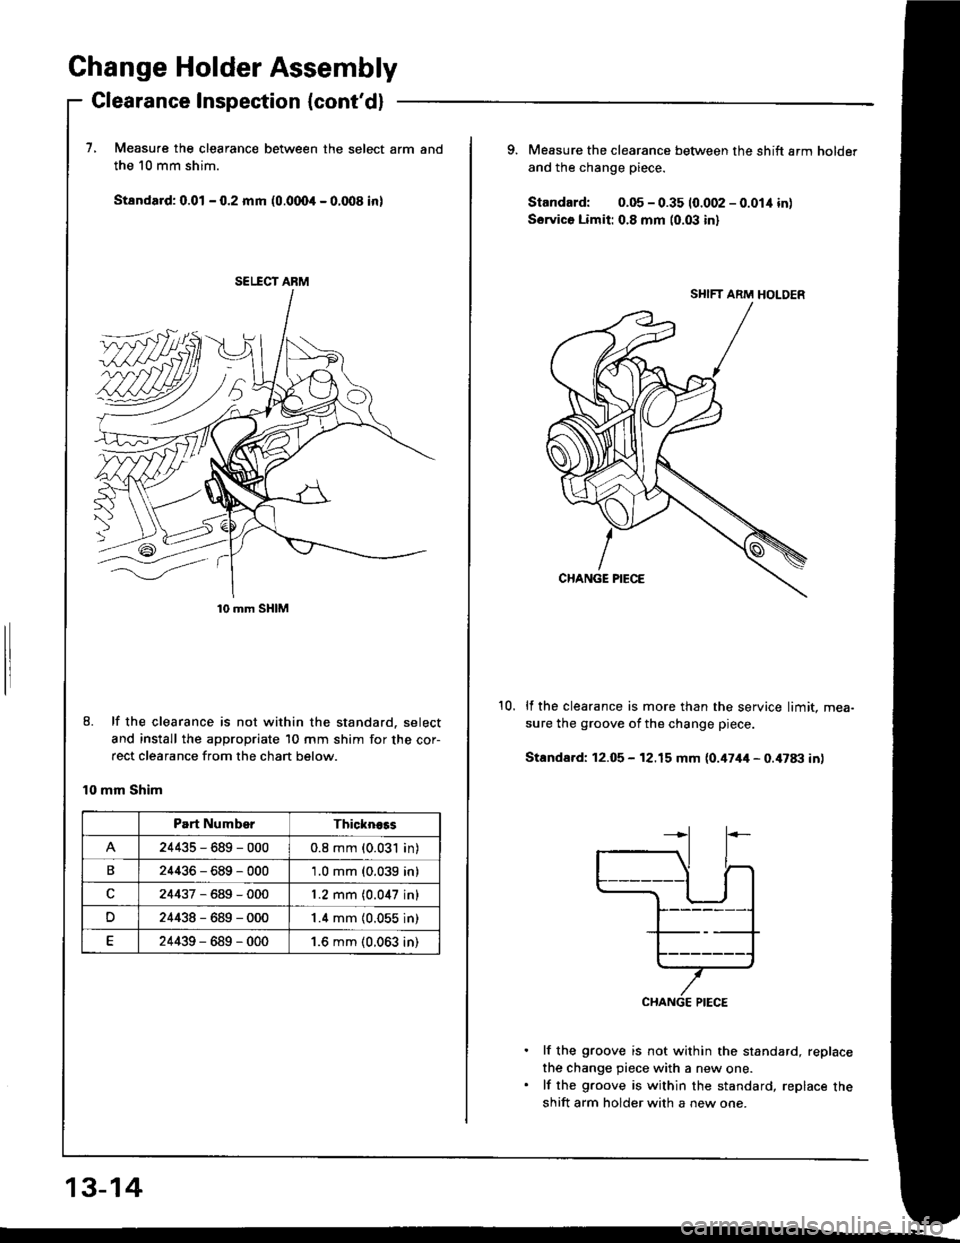
7, Measure the clearance between the select arm
the 10 mm shim.
Stsndard: 0.01 - 0.2 mm (0.0004 - 0.008 inl
8. lf the clearance is not within the standard. select
and install the appropriate 10 mm shim for the cor-
rect clearance from the chan below.
10 mm Shim
SETICT ABM
10 mm SHIM
Part NumbsrThickn€ss
24435-689-0000.8 mm (0.03'l in)
B24436-689-000'1.0 mm (0.039 in)
24437-689-0001.2 mm (0.047 inl
24438-689-0001.4 mm {0.055 in)
24439-689-0001.6 mm (0.063 in)
13-14
SHIFT ARM HOLDER
9. Measure the clearance between the shift arm holder
and the change piece.
Standard: 0.05 - 0.35 10.002 - 0.01i1 in)
Sorvico Limit: 0.8 mm (0.03 in)
ll the clearance is more than the service limit. mea-
sure the groove of the change piece.
Standafd: 12.05 - 12.15 mm {0.47ilil - 0.iU83 in)
lf the groove is not within the standard, replace
the change piece with a new one.
lf the groove is within the standard, replace the
shift arm holder with a new one.
10.
Page 357 of 1413
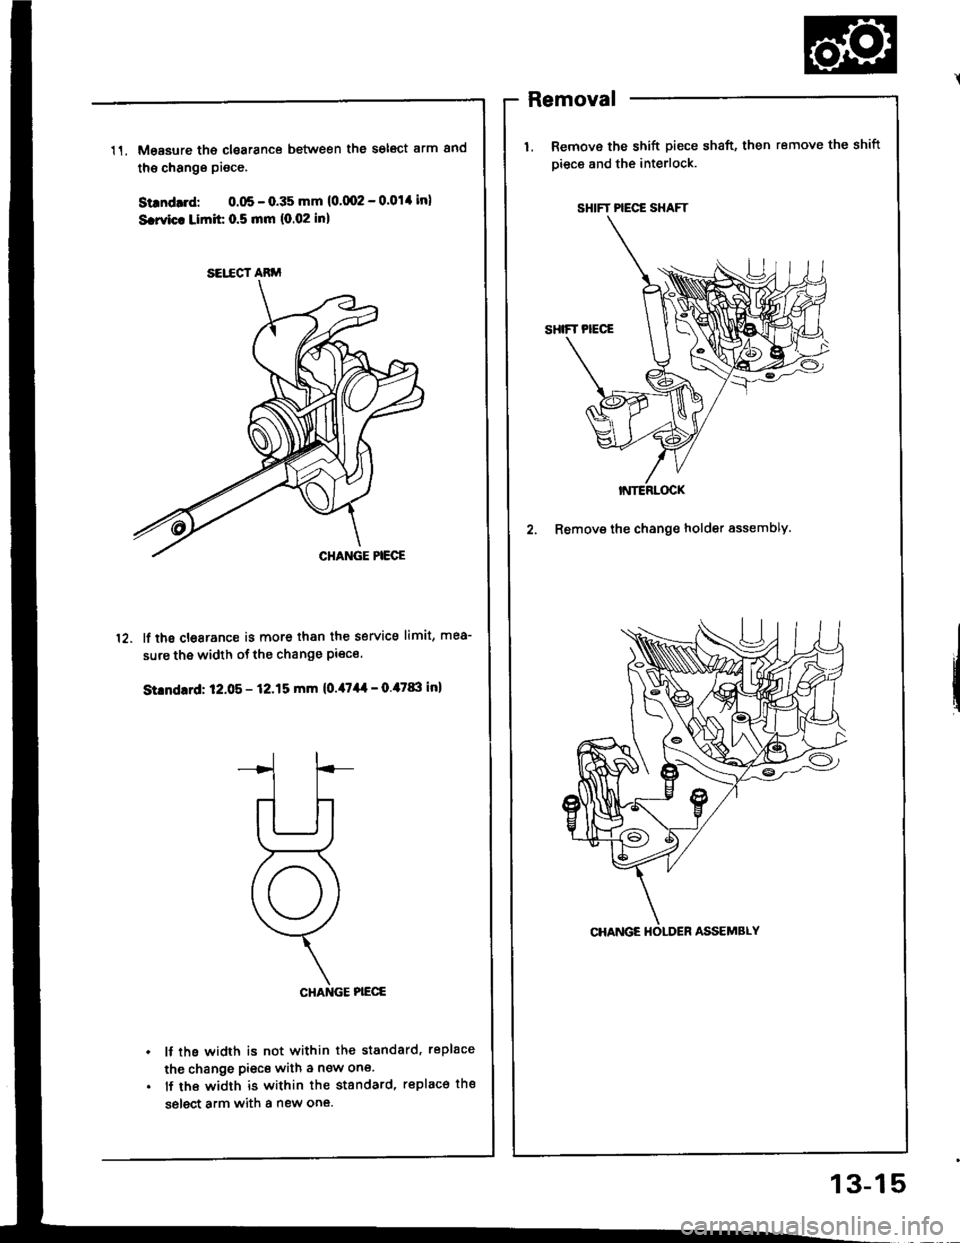
11.Moasure th€ clsarance between the s6l6ct arm 8nd
tho change piece.
Sundrrd: 0.05 - 0.35 mm (0'002 - 0'014 in)
S.rvic. Limit 0.5 mm 10.02 Inl
lf the clesrance is more than the service limit, mea-
sure the width ofthe change Piece.
Strndrrd: 12.05 - 12.15 mm {0./17,11 - o.'U&l in)
CHANGE PIECE
lf ths width is not within the standard, replace
the change piec€ with a n€w one.
lf the width is within the standard, replaco th€
select arm with a new one.
Removal
Removs the shift piece shaft, then remove the shift
pieca and the interlock.
SHIFT PIECE SHAFT
2. Remove the change holder assembly.
12.
SEI.ECT ARl,l
CHANGE HOLDER ASSEMBLY
13-15
Page 362 of 1413
Shift Fork Assembly
Clearance Inspection
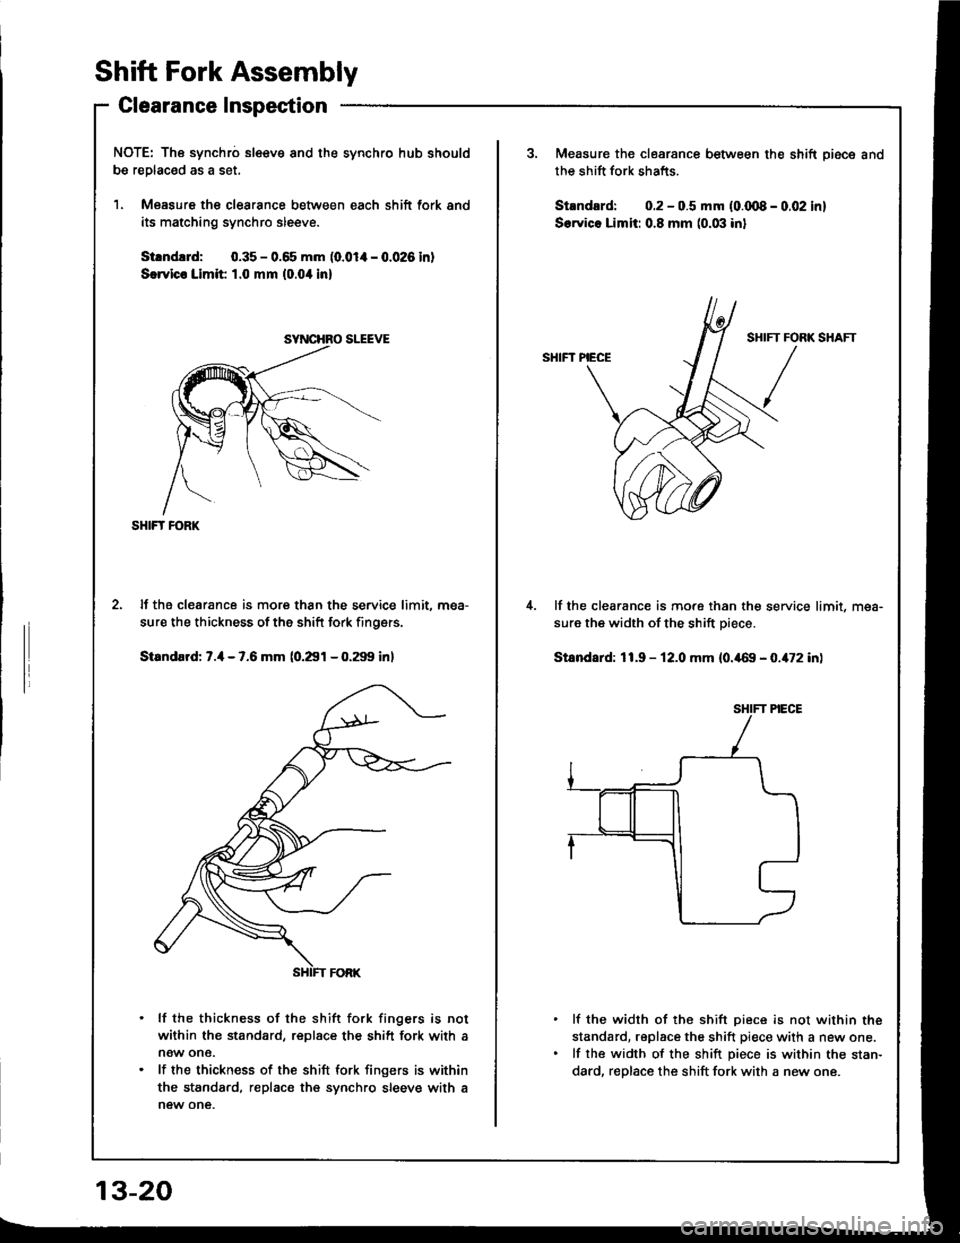
NOTE: The synchro sl€€v€ and the synchro hub should
be replac€d as a set,
1. Measure th€ clearance between each shift fork and
its matching synchro sleeve.
Strndud: 0.35 - 0.65 mm (0.014 - 0.026 in)
S€rvico Limit 1.0 mm (0.0'l in)
SHIFT FORK
lf the clearance is more than the service limit. mea-
sure the thickness of the shift fork finoers.
Standard: 7.4 - 7.6 mm (0.291 - 0.299 inl
lf the thickness of the shift fork fingers is not
within the standard, replace the shift fork with a
now one.
lf the thickness of the shift lork fingers is within
the standard, replace the synchro sleeve with a
new one.
SYNCHRO SLEEVE
13-20
Measure the clearance between the shift Diece and
the shift fork shafts.
Strndard: 0.2 - 0.5 mm {0.qt8 - 0.02 in]
S.rvico Limit: 0.8 mm (0.03 inl
SHIFT PIECE
lf the clearance is more than the service limit, mea-
sure the width of the shift piece.
Stsndard: 11.9 - 12.0 mm (0.469 - 0.472 in)
lf the width of the shift piece is not within the
standard, rsplace the shift piece with a new one.
lf the width of the shift piece is within the stan-
dard, replace the shift fork with a new one.
IFT FORK
/
Page 364 of 1413
Mainshaft Assembly
Clearance Inspection
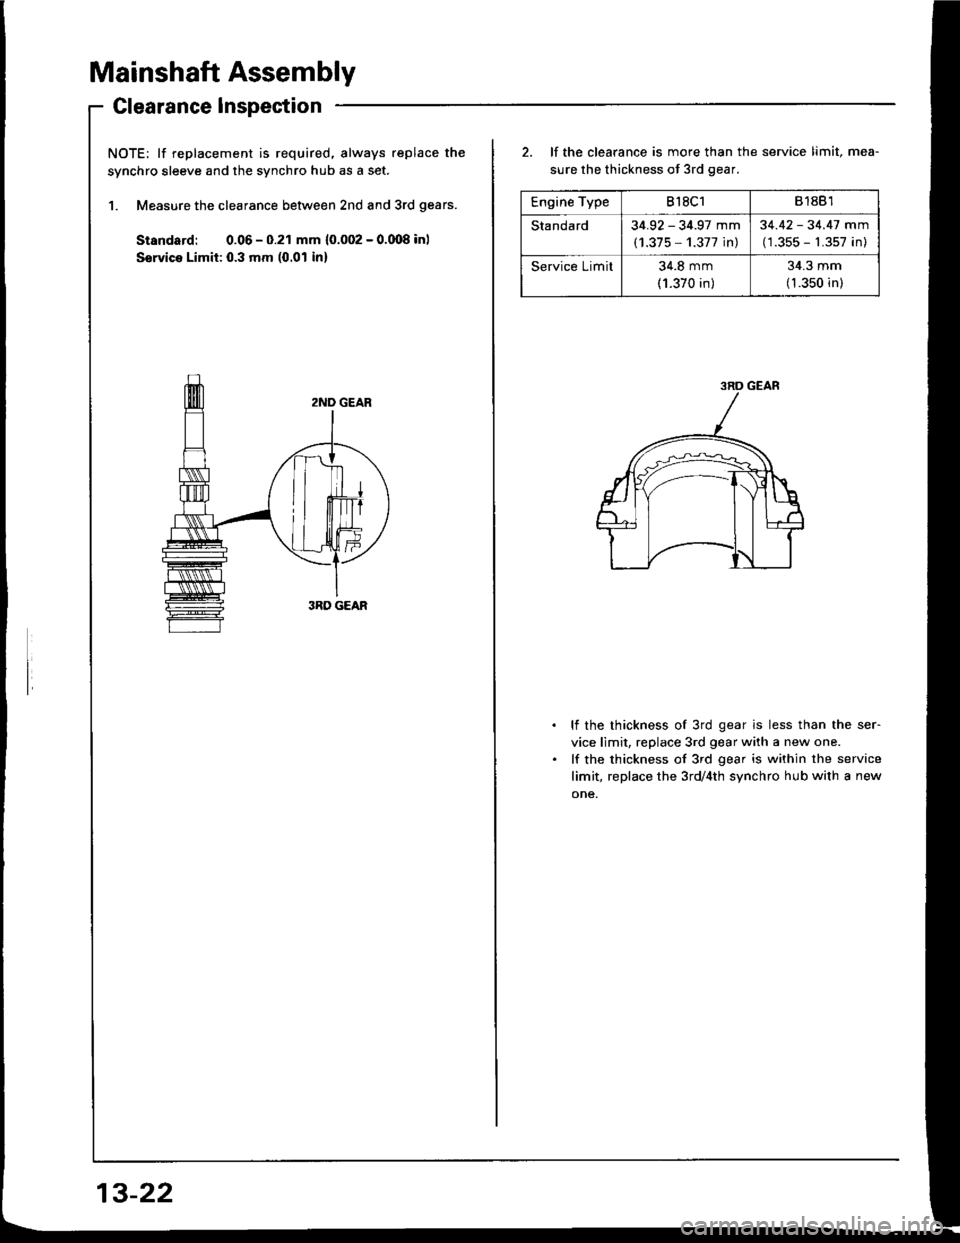
NOTE: lf replacement is required. always replace the
synchro sleeve and the synchro hub as a set.
1. Measure the clearance between 2nd and 3rd gears.
Standard: 0.06 - 0.21 mm {0.002 - 0.008 inl
Ssrvica Limit: 0.3 mm (0.01 in)
13-22
Engine Type818C181881
Standard34.92 - 34.97 mm
(1.375 - 1.377 in)
34.42 - 34.47 mm
(1.355 - 1.357 in)
Service Limit34.8 mm
(1.370 in)
34.3 mm(1.350 in)
2. lf the clearance is more than the service limit, mea-
sure the thickness of 3rd gear.
lf the thickness of 3rd gear is less than the ser-
vice limit, replace 3rd gear with a new one.
lf the thickness of 3rd gear is within the service
limit, replace the 3rd/4th synchro hub with a new
one.
3RD GEAR
Page 365 of 1413
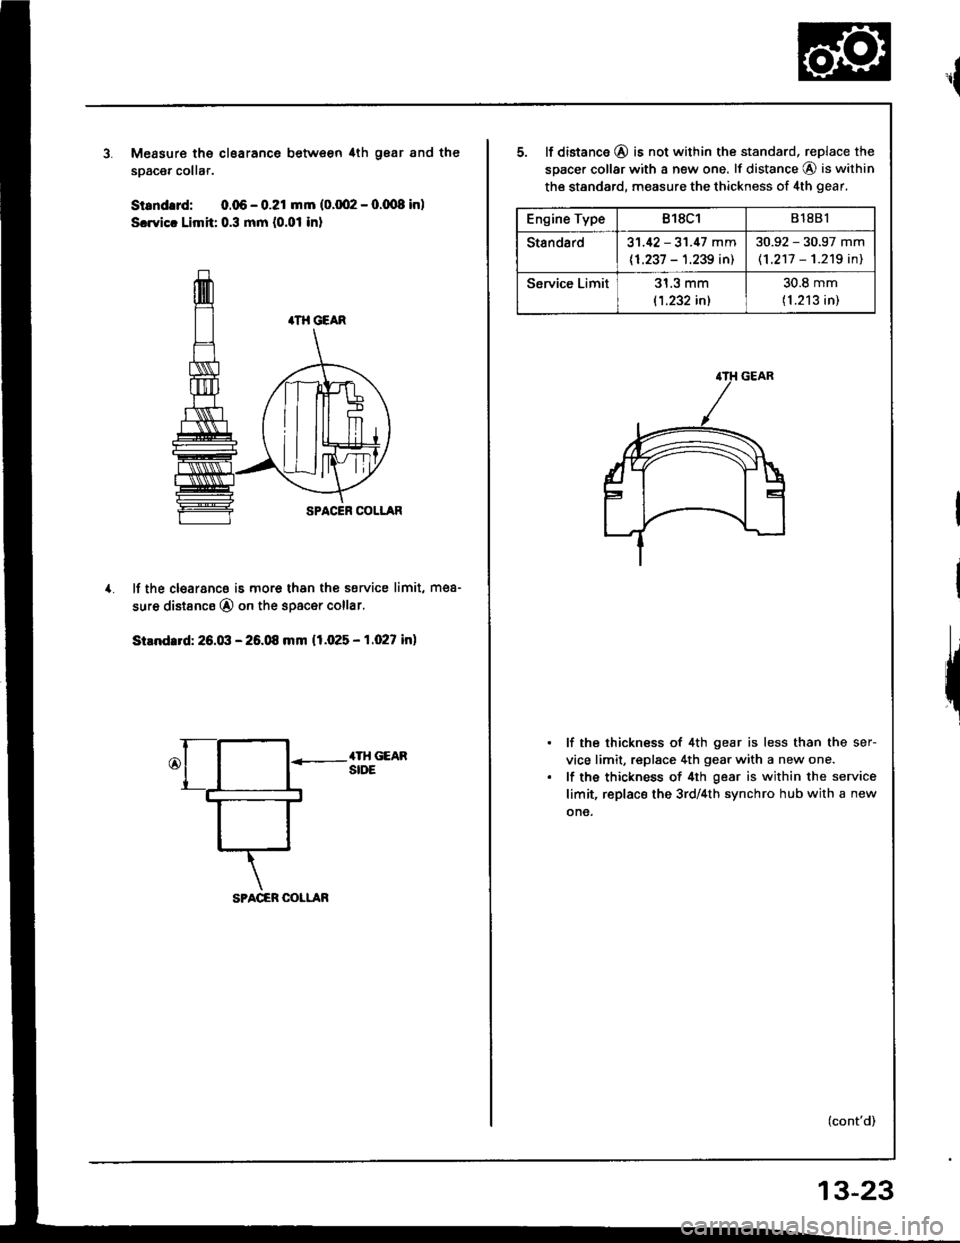
1.
Measure the clsarance betw€en,lth gear and the
soacer collar.
St.ndffd: 0.06 - 0.21 mm (0.002 - 0.(xt8 in)
Scwicr Limh: 0.3 mm (0.01 in)
lf the clearanc8 is more than the service limit, mea-
sure distance @ on the spacer collar
Stlnd.rd: 26.03 - 26.m mm 11.025 - 1.027 in)
SPACER GOLLAR
,,1
5. lf distance O is not within the standard, replace the
spacer collar with a n€w one. lf distance @ is within
th€ standard, measure the thickness of 4th gear.
lf the thickness of 4th gear is less than the ser-
vice limit, replace 4th gear with a new one.
lf the thickness of 4th gear is within the service
limit, replaco the 3rdl4th synchro hub with a new
one.
(cont'd)
Engine Type818C181881
Standard31.42 - 31.47 mm
(1.237 - 1.239 in)
30.92 - 30.97 mm
\1.211 - '1.2'19 inl
Service Limit31.3 mm
l'1.232 inl
30.8 mm
(1.213 in)
13-23
Page 366 of 1413
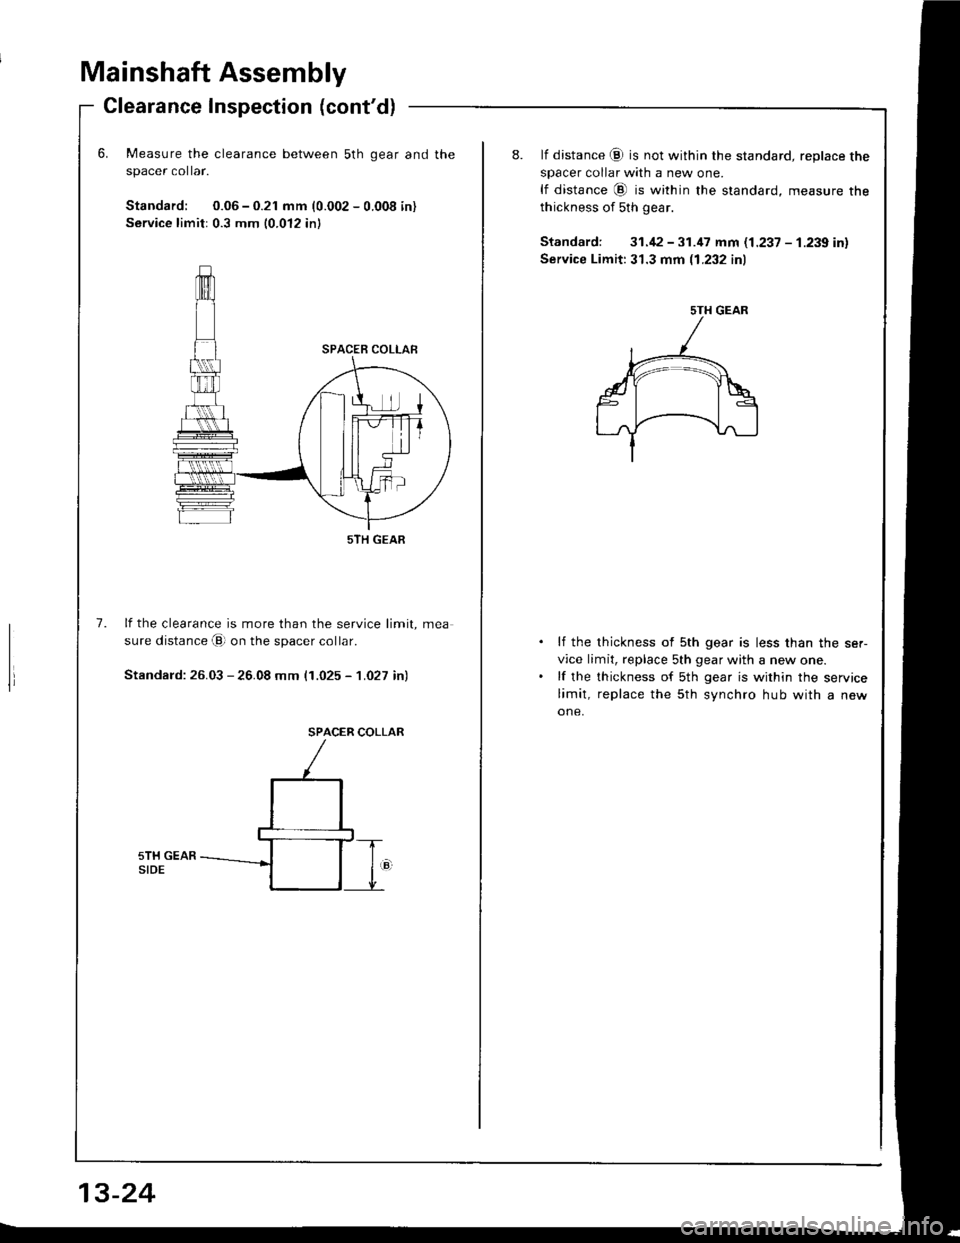
Mainshaft Assembly
Glearance Inspection (cont'd)
Measure the clearance between 5th gear and the
spacer co ar.
Standard: 0.06 - 0.21 mm (0.002 - 0.008 in)
Service limit: 0.3 mm 10.012 inl
lf the clearance is more than the service limit, mea
sure distance B on the spacer collar.
Standard: 26.03 - 26.08 mm (1.025 - 1.027 in)
SPACER COLLAR
sTH GEAR
13-24
8.lf distance @ is not within the standard, reDlace the
sDacer collar with a new one.
lf distance @ is within the standard, measure the
thickness of sth gear.
Standard: 31.12-31.47 mm (1.237 - 1.239 in)
Service Limit:31.3 mm (1.232 inl
lf the thickness of sth gear is less than the ser-
vice limit, replace sth gear with a new one.
lf the thickness of 5th gear is within the service
limit, replace the 5th synchro hub with a new
one,
sTH GEAR
Page 368 of 1413
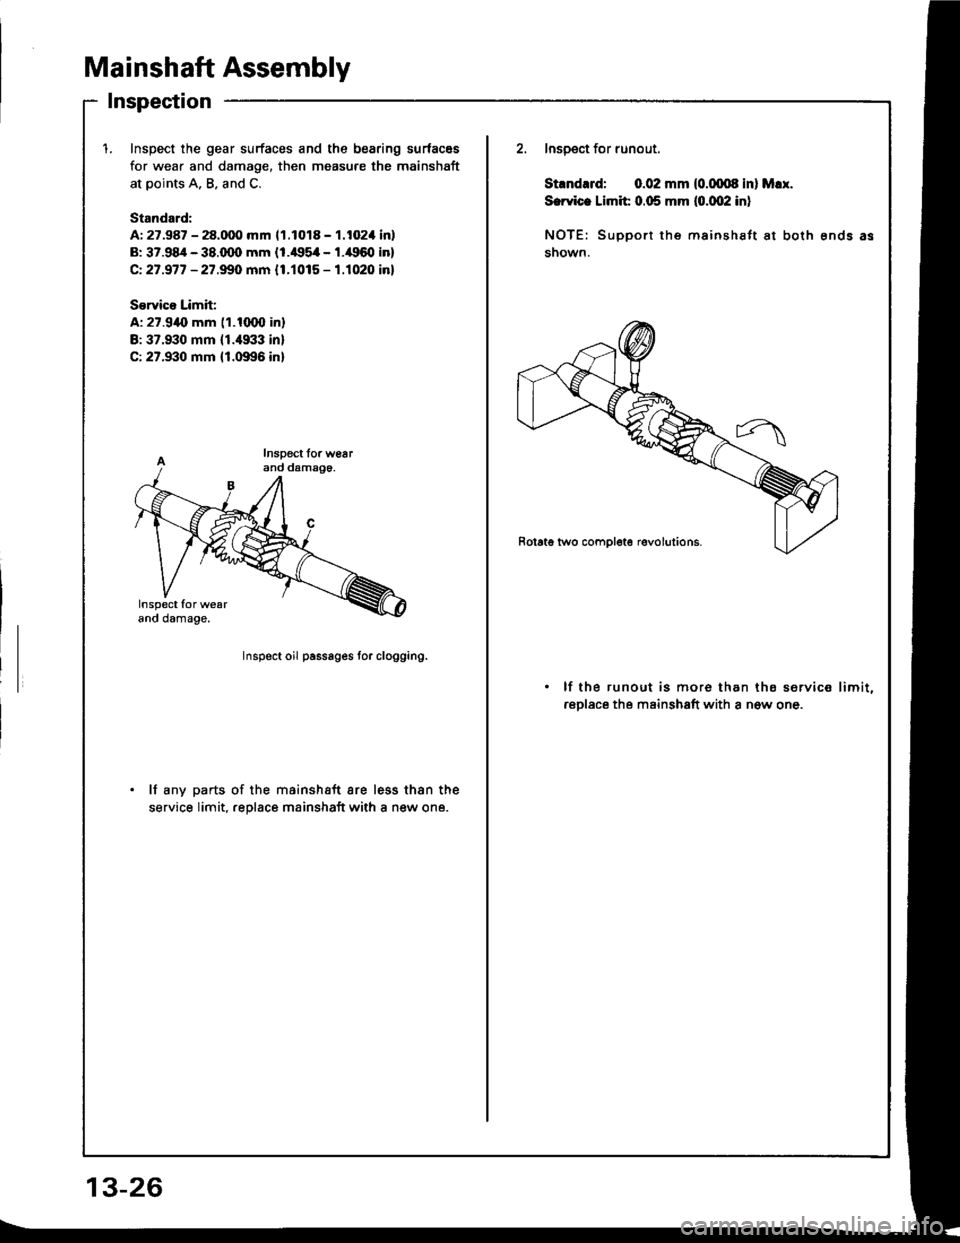
Mainshaft Assembly
Inspection
1.Inspect the gear surfaces and the bearing surfacss
for wear and damage, then measure the mainshaft
at points A, B. and C.
Standord:
A: 27.987 - 28.000 mm 11.1018 - 1.102'l inl
B: 37.98/r - 38.q)0 mm {1.il95il - l.il960 in}
Ct 27.977 - 27.99O mm {1.1015 - 1.1020 in}
S€rvico Limit;
A: 27.9{, mm (1.1(XXl in}
B:37.930 mm 11.4933 inl
C: 27.930 mm {1.0996 in}
2. Inspect for runout.
Stlnd.rd: 0.02 mm (0.(xxl8 inl M!I.
S.rvic. Limit 0.05 mm (o.qP inl
NOTE: SuDport the mainsh€ft at both ends as
shown.
Inspect oil passages tor clogging.
lf the runout is mor6 than ths service limit,
rsplace the mainshaft with a n6w one.
lf any parts of the mainshaft are less thsn the
service limit. .eolace mainshaft with a new one.
13-26
Page 371 of 1413
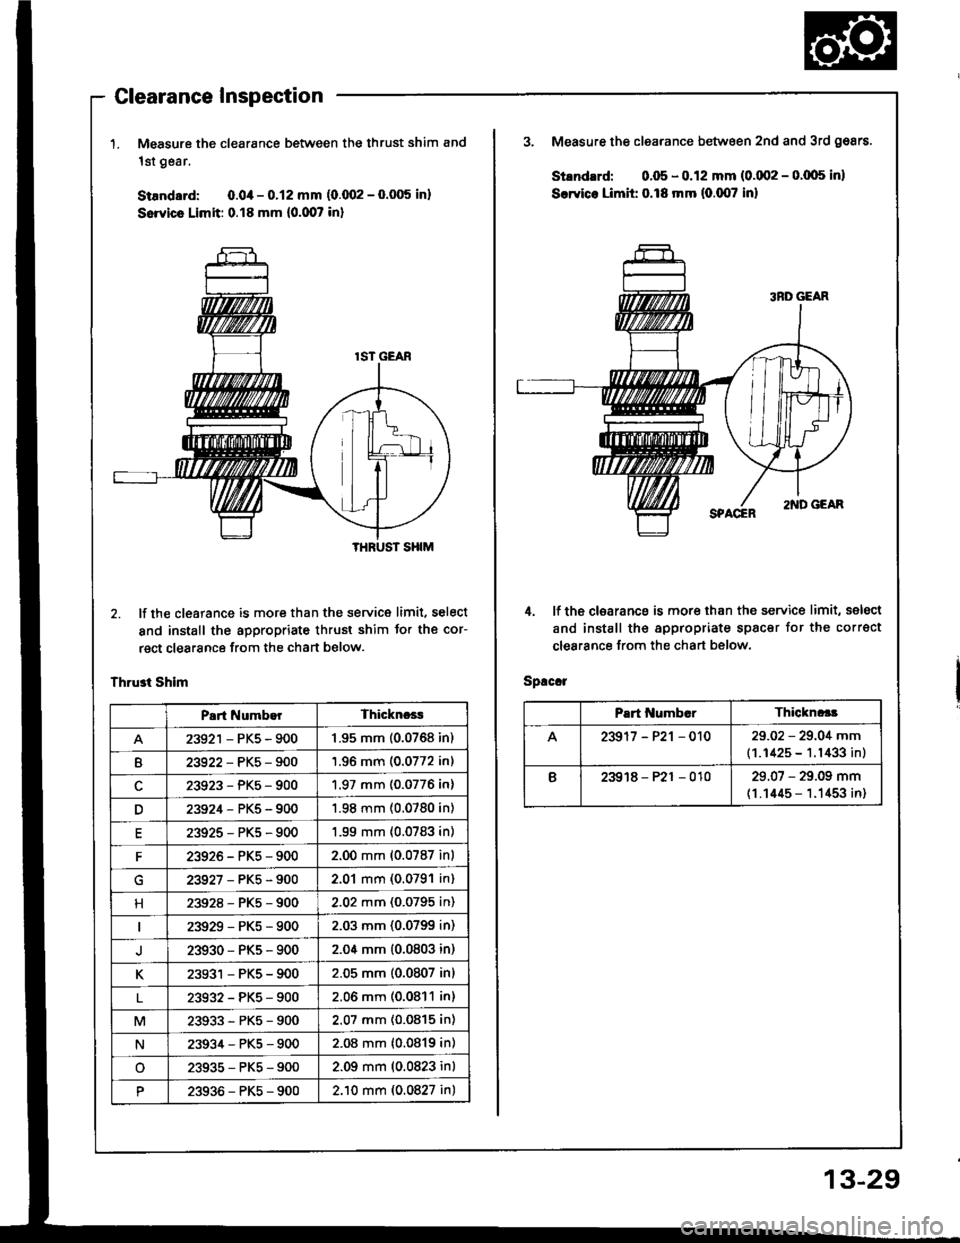
Glearance Inspection
'L Measure the clearance between the thrust shim and
1st gear,
StEndard: 0.0,1- 0.12 mm (0.fi12 - 0.005 inl
Servics Limit: 0.18 mm (0.007 in)
2. lf the cleatance is more than the service
and install the appropriate thrust shim
rect clearance from the chan below.
Thrust Shim
limit, select
to. the cor-
'HRUST SHIM
Part NumbarThicknces
23921 - PKs - 9001.95 mm (0.0768 in)
B23922-PKs-9001.96 mm (0.0772 in)
23923-PK5-9001.97 mm (0.0776 in)
D23924-PKs-9001.98 mm (0.0780 in)
E23925-PKs-9001.99 mm {0.0783 in)
F23926-PKs-9002.00 mm (0.0787 inl
23927-PKs-9002.01 mm (0.0791 in)
H23928-PKs-9002.02 mm (0.0795 in)
23929-PKs-9002.03 mm (0.0799 in)
23930-PKs-9002.04 mm {0.0803 in)
K23931 - PKs - 9002.05 mm (0.0807 inl
L23932-PK5-9002.06 mm (0.0811 in)
M23933-PKs-9002.07 mm (0.0815 in)
N23934-PKs-9002.08 mm (0.0819 in)
o23935-PKs-9002.09 mm (0.0823 inl
P23936-PKs-9002.10 mm (0.0827 in)
13-29
3. Measure the clearance between 2nd and 3rd g68rs.
Stlndlrd: 0.05 - 0.12 mm (0.002 - o.(x}5 inl
Scrvice Limlt 0.18 mm (0.007 inl
4. lf the closrance is more than the service limit, selsct
and install the appropriate spacer for the corr€ct
clearance from the chart below.
Spaccl
Part Numb"rThickncla
A23917-P21 - 01029.02 - 29.0,{ mm
(1.1425 - 1.1433 in)
B23918-P2r-01029.07 - 29.09 mm
(1.1445 - 1.1453 in)
Page 373 of 1413
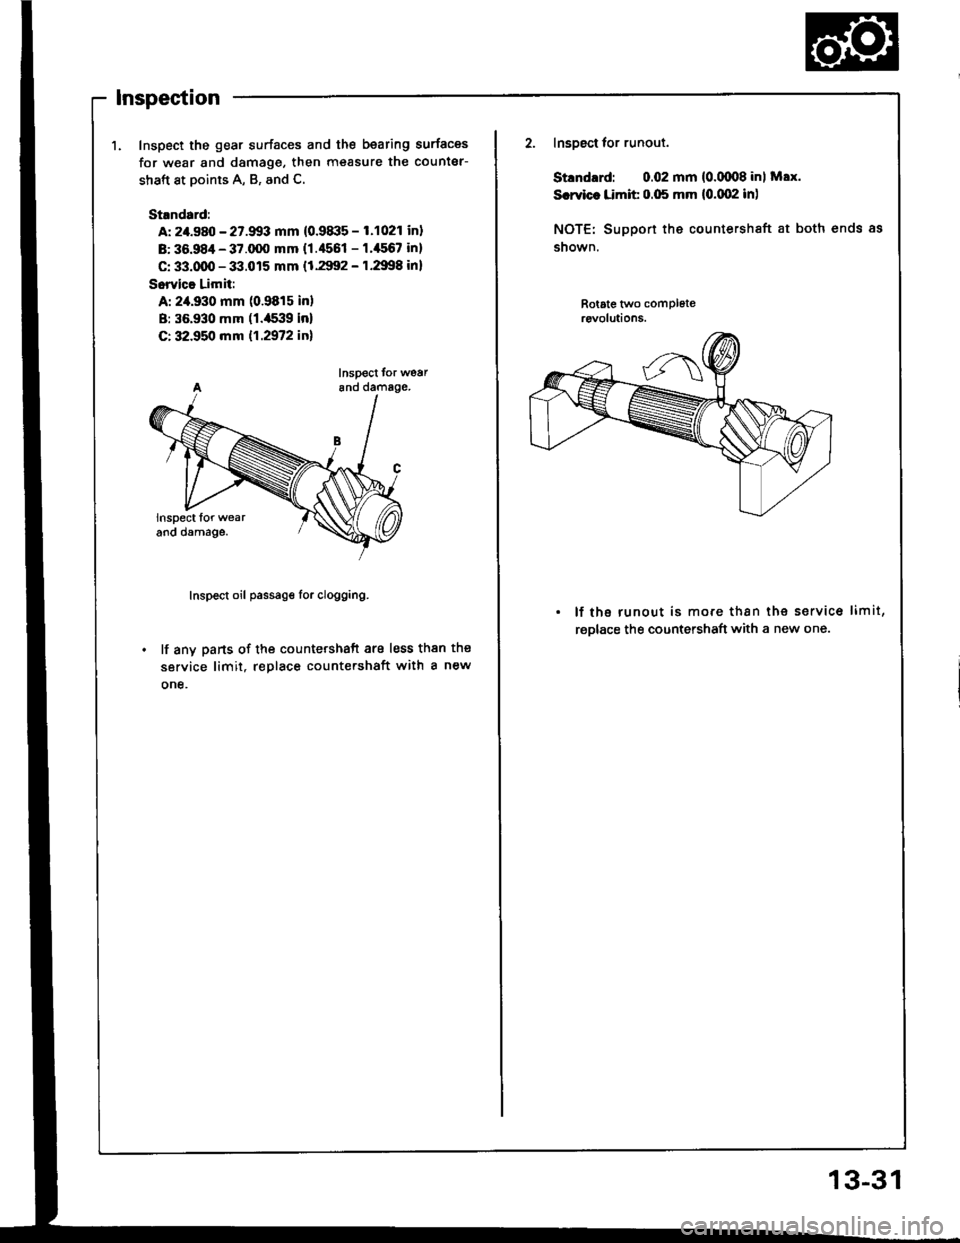
Inspection
1. Inspect the gear surfaces and the bearing surfaces
for w€ar and damage, then measure the counter-
shaft at points A, B, and C.
St.ndard:
A: 2/t.980 - 27.9!13 mm (0.91|:15 - 1.1021 inl
B: 36.984 - 37.q)O mm {1.4551 - 1.'156? in}
C: 33.qD - 33.015 mm (1.2992 - 1.2998 inl
Sorvica Limit:
A: 2,a.930 mm (0.9815 in)
B: 35.930 mm (1.a539 inl
C: 32.950 mm 11.2972 inl
Inspect tor wear6nd damage.
Inspect oil passage lor clogging.
lf any parts of the countershaft are less than the
service limit, replace count€rshaft with a new
one.
Inspgct tor runout.
Stlndrrd: 0.02 mm {0.(xn8 inl Max.
Srrvic. Limit 0.05 mm {0.(x)2 in)
NOTE: Suppon the countershaft at both ends as
snown.
Rotate tl/vo compl6t€rcvolutions.
. lf the runout is more than the servic6 limit,
rgDlace the countershaft with a new one.
13-31
Page 377 of 1413
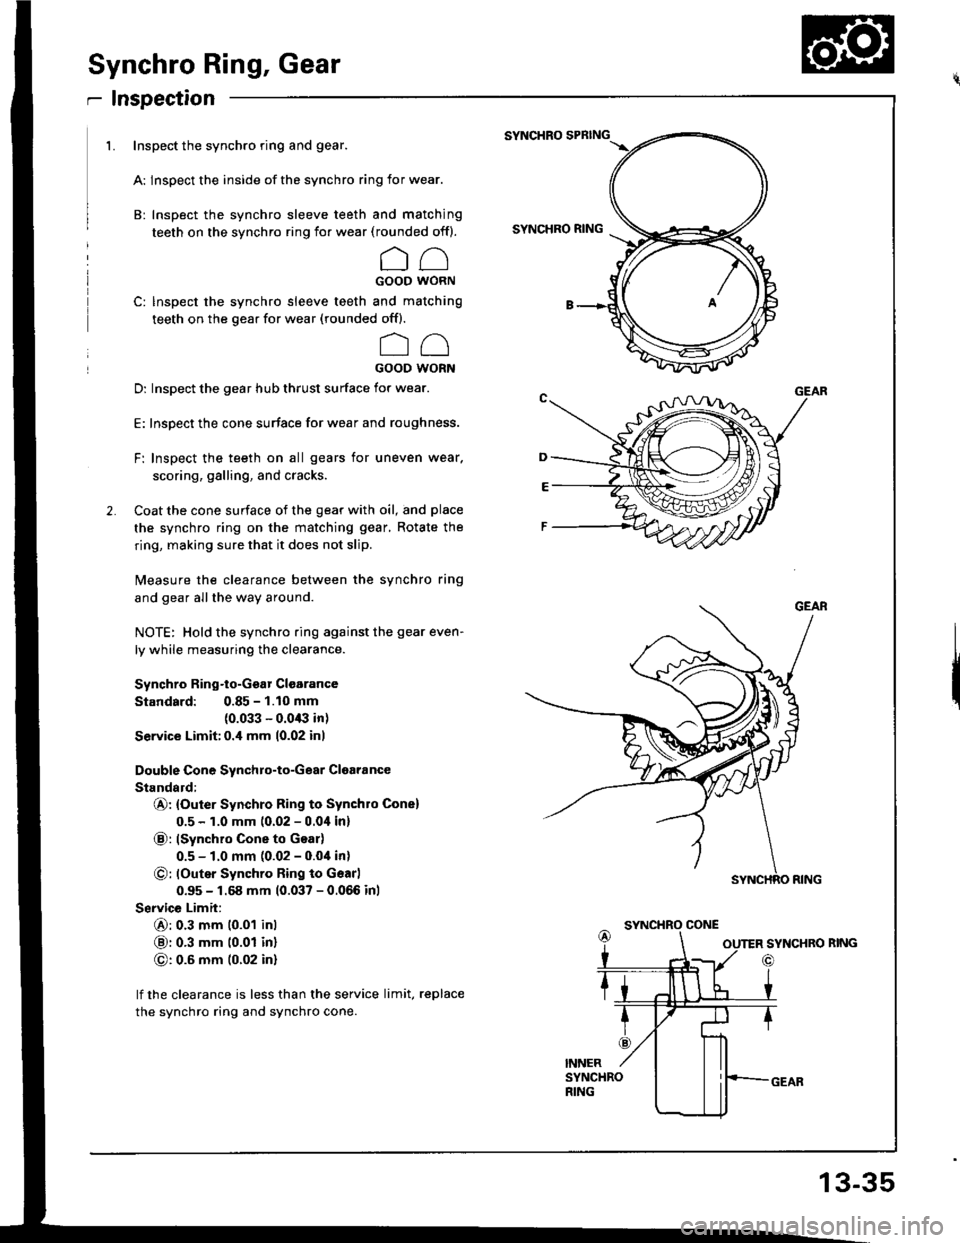
Synchro Ring, Gear
r Inspection
1. Inspect the synchro ring and gear.
A: lnspect the inside of the synchro ring for wear.
B: Inspect the synchro sleeve teeth and matching
teeth on the synchro ring for wear (rounded off).
CCGOOD WORN
C: Inspect the synchro sleeve teeth and matching
teeth on the gear for wear (rounded offl.
oo
GOOD WORN
D: Inspect the gear hub thrust surface for wear.
E: Inspect the cone surface for wear and roughness.
F: Inspect the teeth on all gears for uneven wear.
scoring, galling, and cracks.
Coat the cone surface of the gear with oil, and place
the synchro ring on the matching gear, Rotate the
ring, making sure that it does not slip.
Measure the clearance between the synchro ring
and gear allthe way around.
NOTE: Hold the synchro ring against the gear even-
ly while measuring the clearance.
Synchro Ring-to-Ggar Clgarance
Standard: 0.85 - 1.10 mm(0.033 - 0.0/B in)
Service Limit:0.i1 mm 10.02 inl
Double Cone Synchro-to-Gear Cloaiance
Standald:
@: {Outer Synchro Ring to Synchro Cone)
0.5 - 1.0 mm 10.02 - 0.0i1in)
@: lSynchro Cone to Goar)
0.5 - 1.0 mm (0.02 - 0.04 in)
O: loutsr Synchro Ring to Gsarl
0.95 - 1.68 mm (0.037 - 0.066 inl
Service Limit:
6): 0.3 mm 10.01 inl
@: 0.3 mm t0.01 inl
G): 0.6 mm (0.02 in)
lf the clearance is less than the service limit, replace
the synchro ring and synchro cone.
SYNCHRO SPBING
SYNCHRO RING
SYNCHRO CONE
SYNCHRO RING
o
13-35