engine HONDA INTEGRA 1994 4.G Manual Online
[x] Cancel search | Manufacturer: HONDA, Model Year: 1994, Model line: INTEGRA, Model: HONDA INTEGRA 1994 4.GPages: 1413, PDF Size: 37.94 MB
Page 174 of 1413
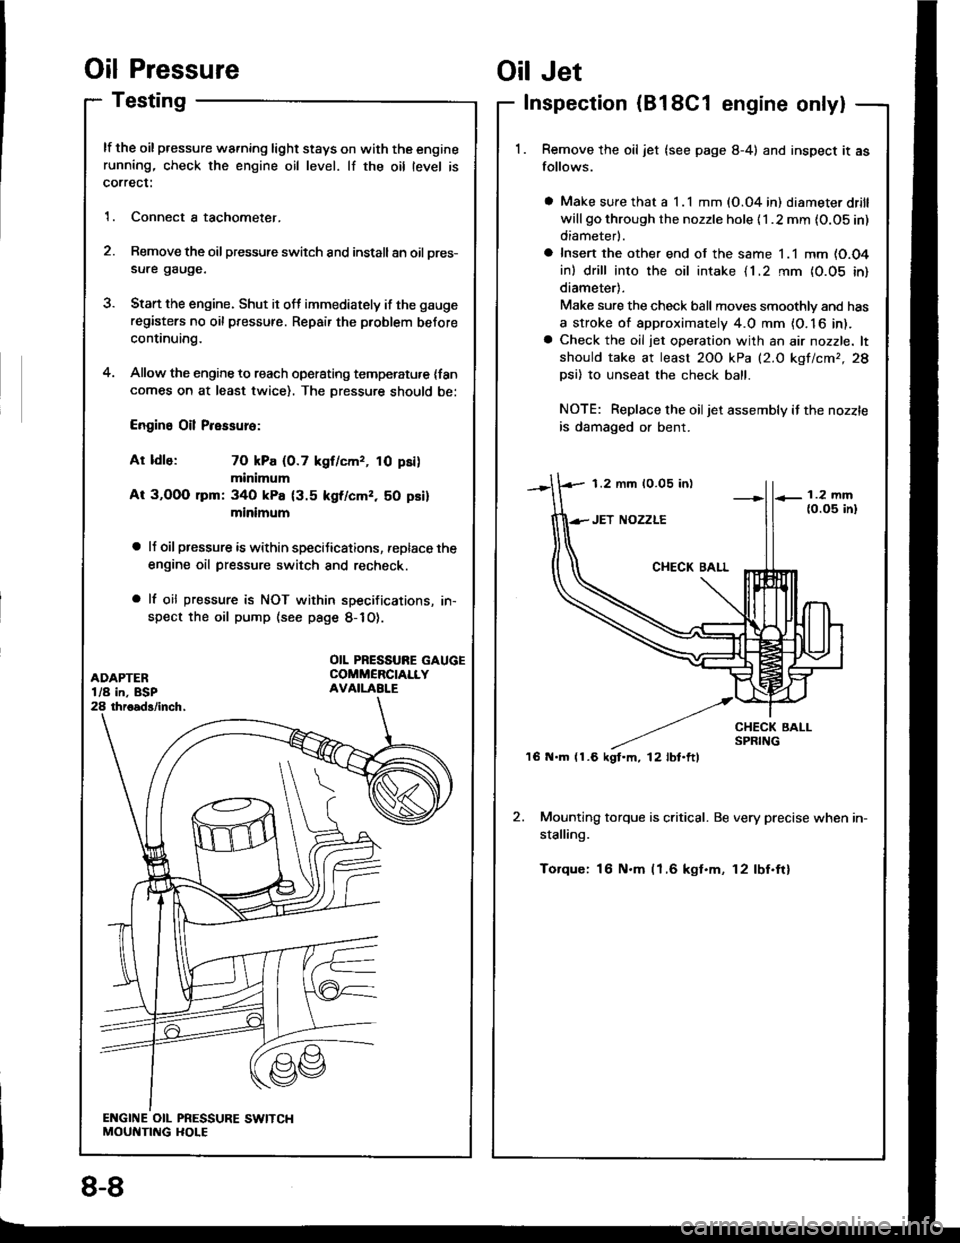
Oil Pressure
Testing
lf the oil pressure warning light stays on with the enginerunning, check the engine oil level. lf the oil level is
correct:
1. Connect a tachometer.
2. Remove the oil pressure switch and install an oil pres-
sure gauge.
3. Stan the engine. Shut it off immediately if the gauge
registers no oil pressure. Repair the problem before
continuing.
4. Allow the engine to reach operating temperatu,e {fancomes on at least twice). The Dressure should be:
Engine Oil Pressure:
At ldle: 70 kPa (0.7 kgf/cmr, 10 psi)
minimum
At 3,OOO lpm: 340 kPa {3.5 kgf/cmz, 50 psi}
minimum
a lJ oil pressure is within speciJications, replace the
engine oil pressure switch and recheck.
a lf oil pressure is NOT within specifications, in-
spect the oil pump (see page 8-1O).
1.2 mm 10.05 in)
'16 N.m (1.6 kgt.m, l2lbt.ftl
Oil Jet
Inspection (B18C1 engine only|
Remove the oil jet (see page 8-4) and inspect it as
follows.
a Make sure that a I .l mm (O.04 in) diameter drill
will go through the nozzle hole {1 .2 mm {O.OS in)
diameterl.
a Insert the other end of the same 1.1 mm (O.O4
in) drill into the oil intake {1.2 rnm {0.05 in}
diameter).
Make sure the check ball moves smoothlv and has
a stroke of approximately 4.0 mm {O. 16 in).a Check the oil jet operation with an air nozzle. lt
should take at least 2OO kPa (2.O kgf/cmr,28
Dsi) 10 unseat the check ball.
NOTE: Replace the oiljet assembly if the nozzle
is damaged or bent.
2. Mounting torque is critical. Be very precise when in-
stalling.
Torque: 16 N.m (1.6 kgt.m, 12lbf.ftl
OIL PRESSURE GAUGECOMMERCIALLYAVAILABI.E
8-8
Page 176 of 1413
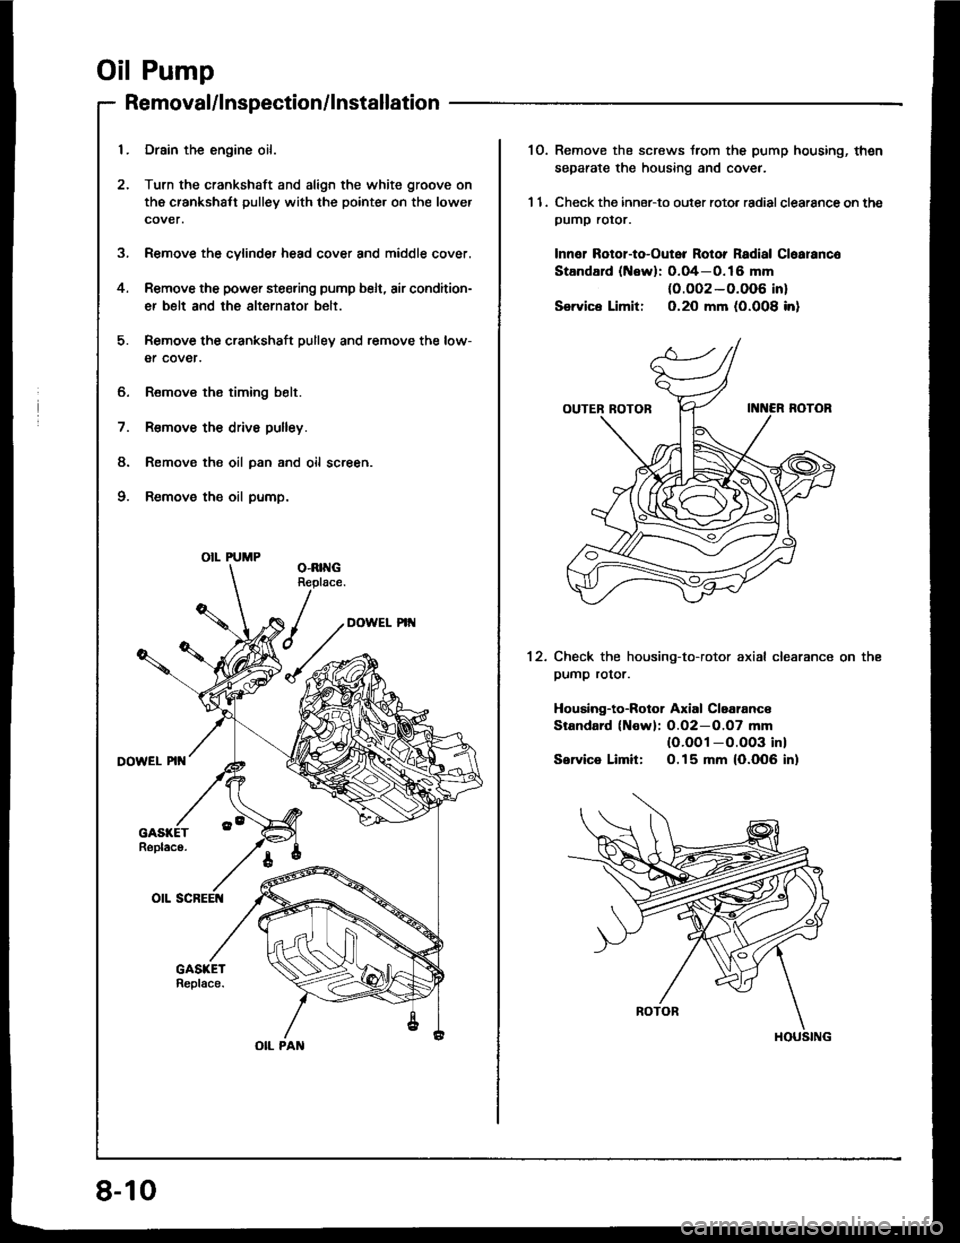
Oil Pump
5.
4.
Removal/lnspection/lnstallation
6. Remov€ the timing belt.
7. R€move the drive pulley.
8. Remov€ the oil pan and oil screen.
9. Remove the oil pump.
Drain the engine oil.
Turn the crankshatt and align the white groove on
the crankshalt pulley with the pointer on the lower
cover.
Remove the cylinder head cover and middle cover.
Remove the power steering pump belt, air condition-
er belt and the alternator belt.
Remove the crankshaft pulley and remove the low-
er cover.
OIL PUMP
OIL PAN
8-10
1O. Remove the screws trom the pump housing, thsn
separate the housing and coveJ.
1 1. Check the inner-to outer roto. radial clearance on thepumP rotor.
Innor Rotol-to-Outor Rotor Radial Cloaranco
StandErd (Newl: O.O4-O.16 mm(0.O02-0.006 in)
Service Limit: O.2O mm (0.008 inl
Check the housing-to-rotor axial clearance
pump rotor.
Housing-to-Botor Axial Claalanc€
Standard (Nowl: O.O2-O.O7 mm(O.OO1 -O.OO3 inl
Service Limit: O.15 mm (0.006 in)
on the12.
HOUSING
Page 177 of 1413
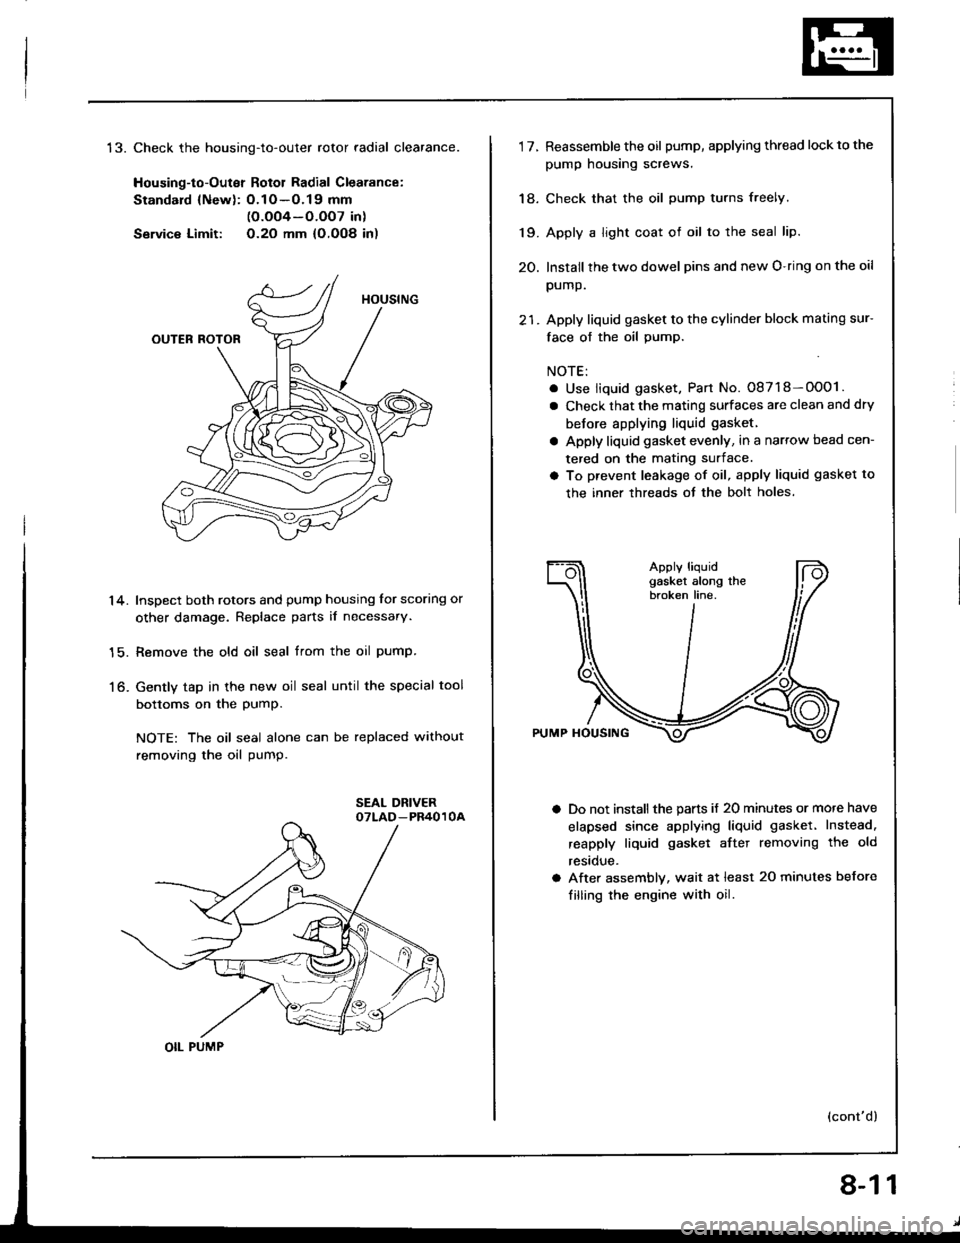
t5.Check the housing-to-outer rotor radial clearance.
Housing-to-Outer Rotol Radial Clearance:
Standard {Newl: O.1O -O.19 mm(O.oO4-O.OO7 in)
Servic€ Limit: O.2O mm {O,OO8 in)
Inspect both rotors and pump housing for scoring or
other damage. Replace parts il necessary.
Remove the old oil seal trom the oil pump.
Gently tap in the new oil seal until the special tool
bottoms on the PumP.
NOTE: The oil seal alone can be replaced without
removing the oil pump.
14.
15.
to-
OIL PUMP
8-11
1'lReassemble the oil pump, applying thread lockto the
pump housing screws.
Check that the oil pump turns freely.
Apply a light coat of oil to the seal lip.
Install the two dowel pins and new O-ring on the oil
pump.
Apply liquid gasket to the cylinder block mating sur-
face of the oil pump.
NOTE:
. Use liquid gasket, Part No. 08718-OOO1.
a Check that the mating surfaces are clean and dry
betore applying liquid gasket.
a Apply liquid gasket evenly, in a narrow bead cen-
tered on the mating surface.
a To prevent leakage of oil, apply liquid gasket to
the inner threads ot the bolt holes.
Do not install the parts if 20 minutes or more have
elapsed since applying liquid gasket. Instead.
reapply liquid gasket aftet removing the old
restclue.
After assembly, wait at least 20 minutes before
filling the engine with oil.
(cont'd)
18.
19.
20.
Page 178 of 1413
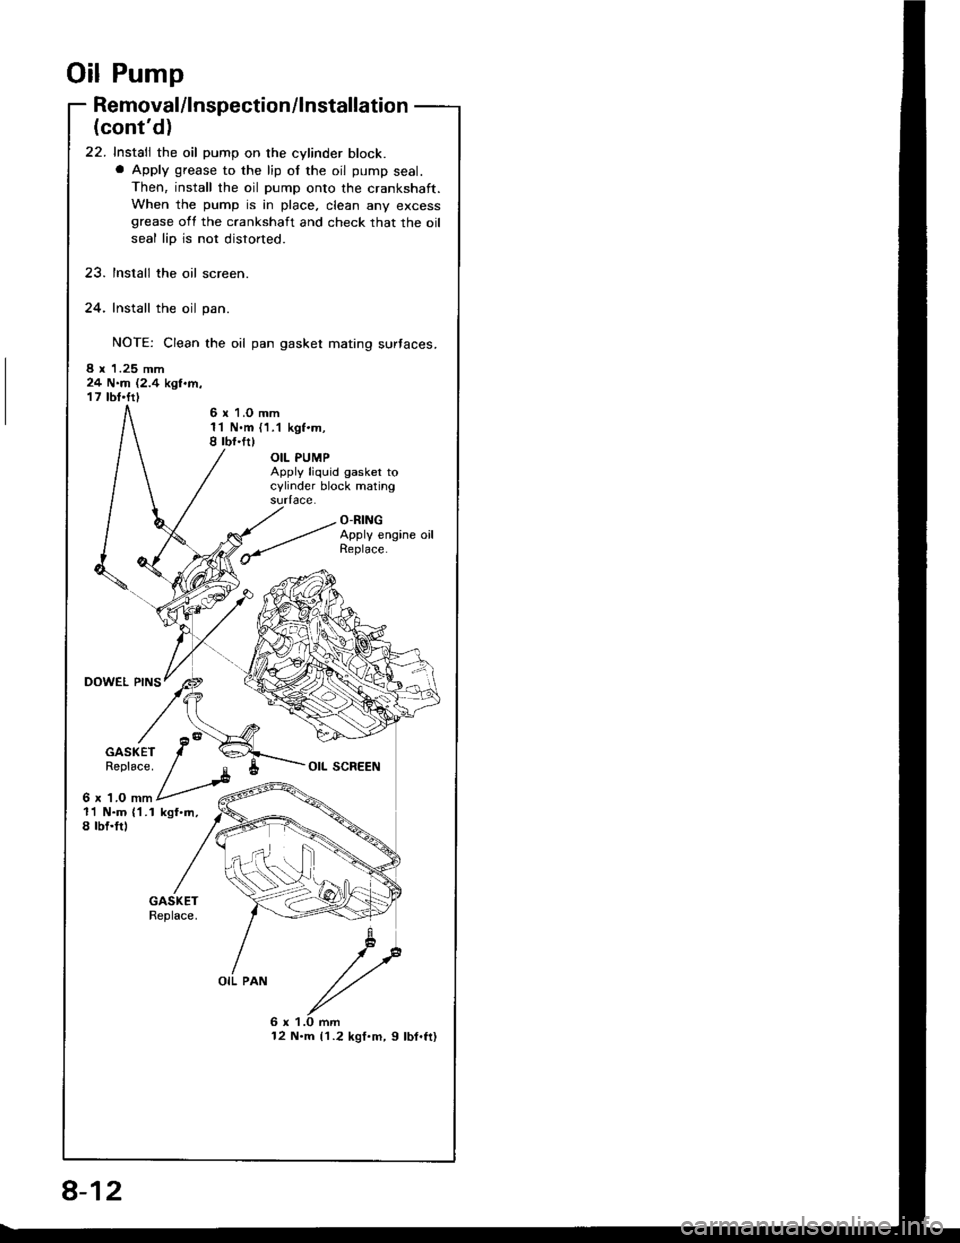
Oil Pump
DOWEL PINS
Removal/lnspection/lnstallation
(cont'd)
22. Install the oil pump on the cylinder block.a Apply grease to the lip of the oil pump seal.
Then, install the oil pump onto the crankshaft.
When the pump is in place, clean any excessgrease oll the crankshaft and check that the oil
seal lip is not distorted.
23. Install the oil screen.
24. Install the oil pan.
NOTE: Clean the oil pan gasket mating surtaces.
8 x 1.25 mm24 N.m (2.4 kgl.m,17 tbt.ftl
6 r 1.O mm1'l N.m {1.1 kgf.m,8 rbf.fr)
OIL PUMPApply liquid gasket tocylinder block matingsudace.
O-RINGApply engine oil
GASKETReplace.
6 x 1.O mm
OIL SCREEN
11 N.m ('l .1 kgf.m,8 tbf.trl
OIL PAN
6 x 1.O mm12 N.m {1.2 kgf.m, 9 lbf.ft}
8-12
Page 180 of 1413
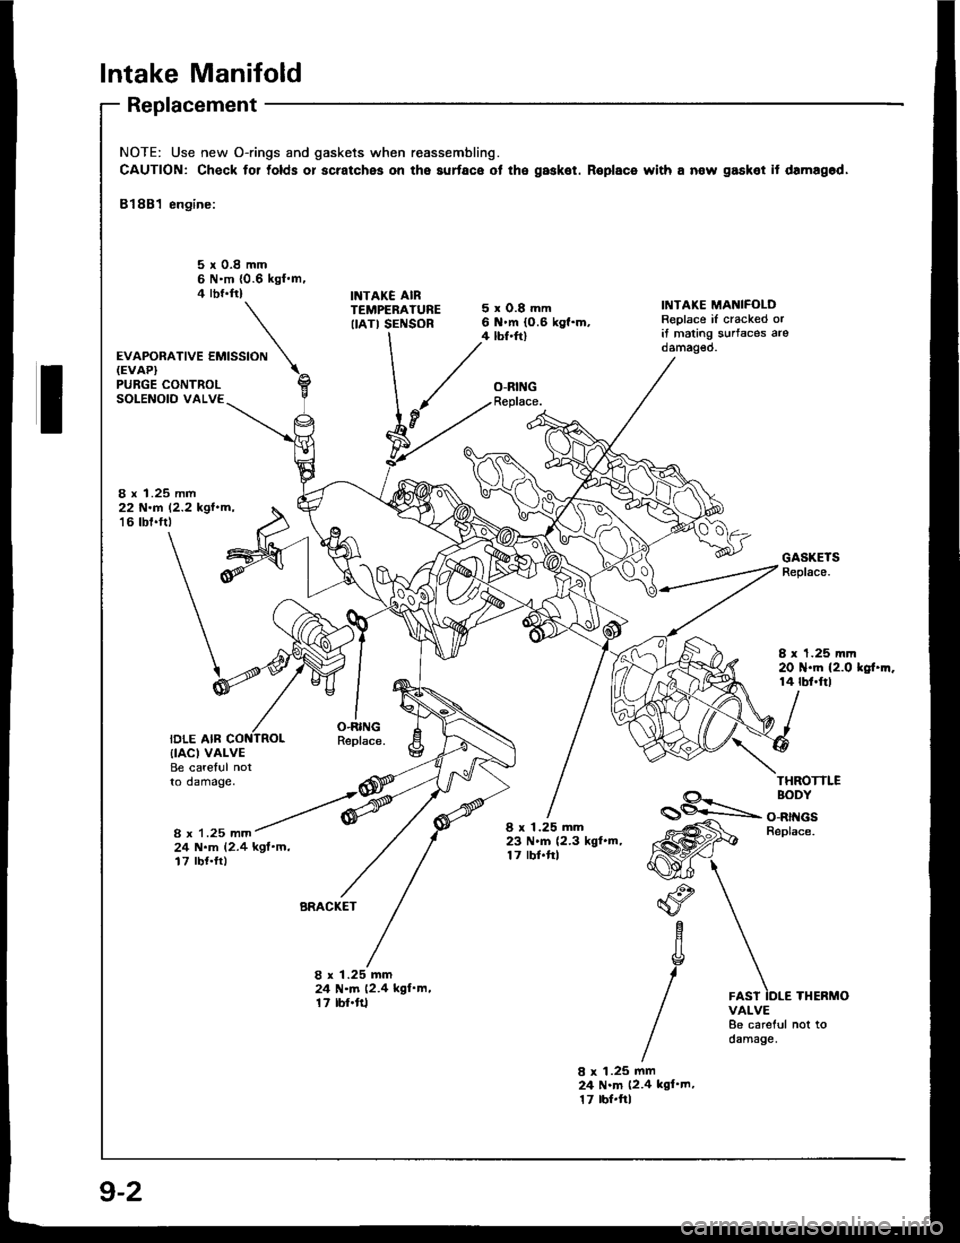
Intake Manifold
Replacement
NOTE: Use new O-rings and gaskets when reassembling.
CAUTION: Check for tolds or scratches on the aurface ot the gasket. Roplace with a now gasket it damagod,
81881 engine:
5r0.8mm6 N'm {0.6 kgl.m.4 rbr.ftlINTAKE AIRTEMPERATUREIIATI SENSOR
'*o*ot'u""'""N
5xO.8mm6 .m (0.6 kg{.m.4 tbf.ftl
O-RINGReplace.
IiITAKE MANIFOLDReplace iI cracked orit mating s!rtaces arodamag€o.
PURGE CONTROLSOLENOID VALVE
8 x 1.25 mm22 N.r 12.2 kgl.m,'16 tbt.ftt
IDLE AIR
GASKETSReplace.
I x 1.25 mm20 N.m (2.0 kgt.m.14 rbf.ftl
O.RINGReplace.{IACI VALVEBe careful notto damage.THROTTLE
8 x 1.25 mm
BODY
O-RINGSBeplace.
24 N.m (2.4 kgf'm,17 rbf.ft)
8 x 1.25 mm23 N.m (2.3 kgl.m,17 lbf.frl
BRACKET"o
aYc
g
/
1.25 mmN.m (2.4 kgl'm,rbf'ft1
8x2417
8 x 1.25 mm24 N.m (2.4 kgl'm.17 tbr.ftlTHERMOVALVE8e careful not todamage.
9-2
Page 183 of 1413
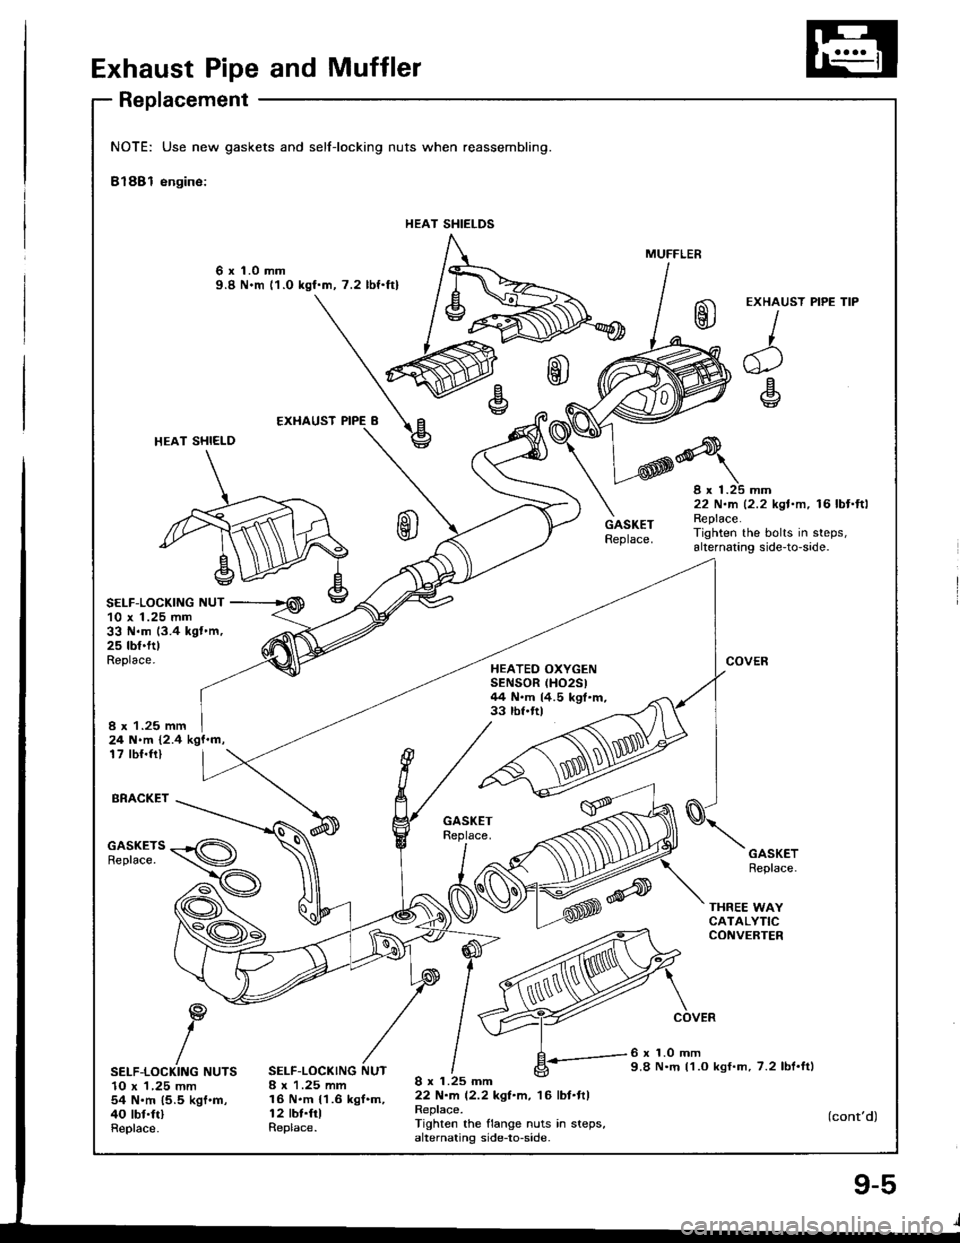
Exhaust Pipe and Muffler
Replacement
NOTE: Use new gaskets and
Bl88l engine:
selflocking nuts when reassembling.
HEAT SHIELDS
6 x 1.0 mm9.8 N.m l1.O kgf.m, 7.2 lbf.ftl
HEAT SHI€LD
SELF-LOCKIIIG NUT
,@\
10 x 1.25 mm33 N.m (3.4 kgt.m,25 tbf.fttReplace.HEATEO OXYGENSENSOR (HO2Sl
44 N.m 14.5 kgt.m,33 rbf.ftlI x 1.25 mm24 N.m 12.4 kgf.m,17 tbl.frl
BRACKET
GASKETSReplace.
SELF-LOCKING NUTS10 x 1,25 mm54 N'm 15.5 kgf'm,40 tbf.ftlReplace.
SELF-LOCKING NUT8 x 1.25 mm16 N.m {1.6 kgf.m,r2 tbt.frlReplace.
I x 1.25 mm22 N.m (2.2 kgl.m, r6lbt.ftlReplace.Tighten the flange nuts in steps,alternating side-to-side.
MUFFLER
EXHAUST
I,
^1
e
e
8 x 1.25 mm22 N.m 12.2 kgt.m, 16 lbf.ftlReplace.Tighten the bolts in steps,alternating side-to-side.
COVER
GASKETReplace.
THREE WAYCATALYTICCONVERTER
COVER
6 x 1.0 mm9.8 N.m l1.O kgf.m, 7.2 lbl.ttl
PIPE TIP
(cont'd)
Page 184 of 1413
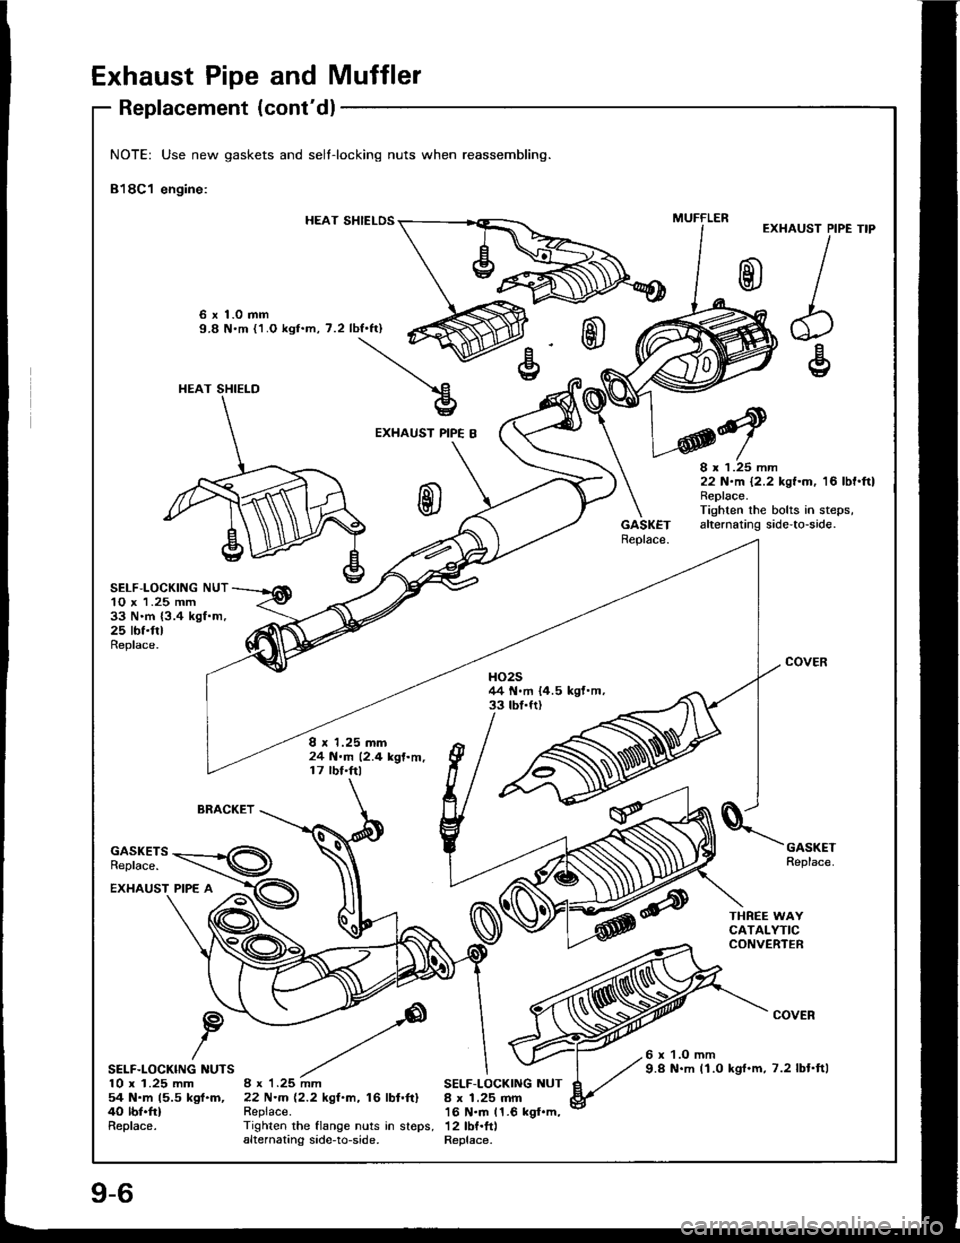
Exhaust Pipe and Muffler
Replacement (cont'dl
NOTE: Use new gaskets and selt-locking nuts when reassembling.
818C1 engine:
HEAT SHIELOSEXHAUST PIPE
I
h€
TIP
6 x 1.0 mm9.8 N'm {1.O kgt.m, 7.2 lbf.ft)
EXHAUST PIPE B
GASKETReplace.
8 x 1.25 mm22 N.m 12.2 kgf.m, 16 lbf'ftlReplace.Tighten the bolts in steps,alternating side'to-side.
SELF,LOCKING NUT10 x 1.25 mm33 N.m {3.4 kgf.m,25 tbf.frlReplace.
COVERHO2544 N.m {4.5 kgf.m,33 tbf.fr)
I r 1.25 mm24 N.m 12.4 kgf.m,17 lbf.ftl
BRACKET
GASKETSReplace.
GASKETReplace.
EXHAUST PIPE A
COVER
SELF.LOCKING NUTS10 x 1.25 mm54 N.m 15.5 kgl.m,40 lbf.frlReplace.
6 x 1.O mm9.8 N.m (1.0 kgf.m, 7.2 lbt'ft|8 x 1.25 mm22 N.m 12.2 kgf.m, 16 lbl.ftlRepiace.
SELF-LOCKING NUT8 x 1.25 mm16 N.m 11.6 kgf.m,Tighlen rhe flange nuts in sreps, 12lbf.ftlalternating side-to-side. Replace.
MUFFLER
HEAT SHIELD
Page 185 of 1413
Cooling
lllustrated Index
Radiator
Replacement ............................... 1 O-4
Engine Goolant Refilling and
Bleeding10-5
Cap Testing ............... 10-6
Pressure Testing ......... 10-6
Thermostat
Rep|acement ............................... 1 O-7
Testing .....1O'7
Water Pump
lllustrated Index ......... . 10-8
Inspection .10-9
Replacement ............................... 1 O-9
10-2
Page 186 of 1413
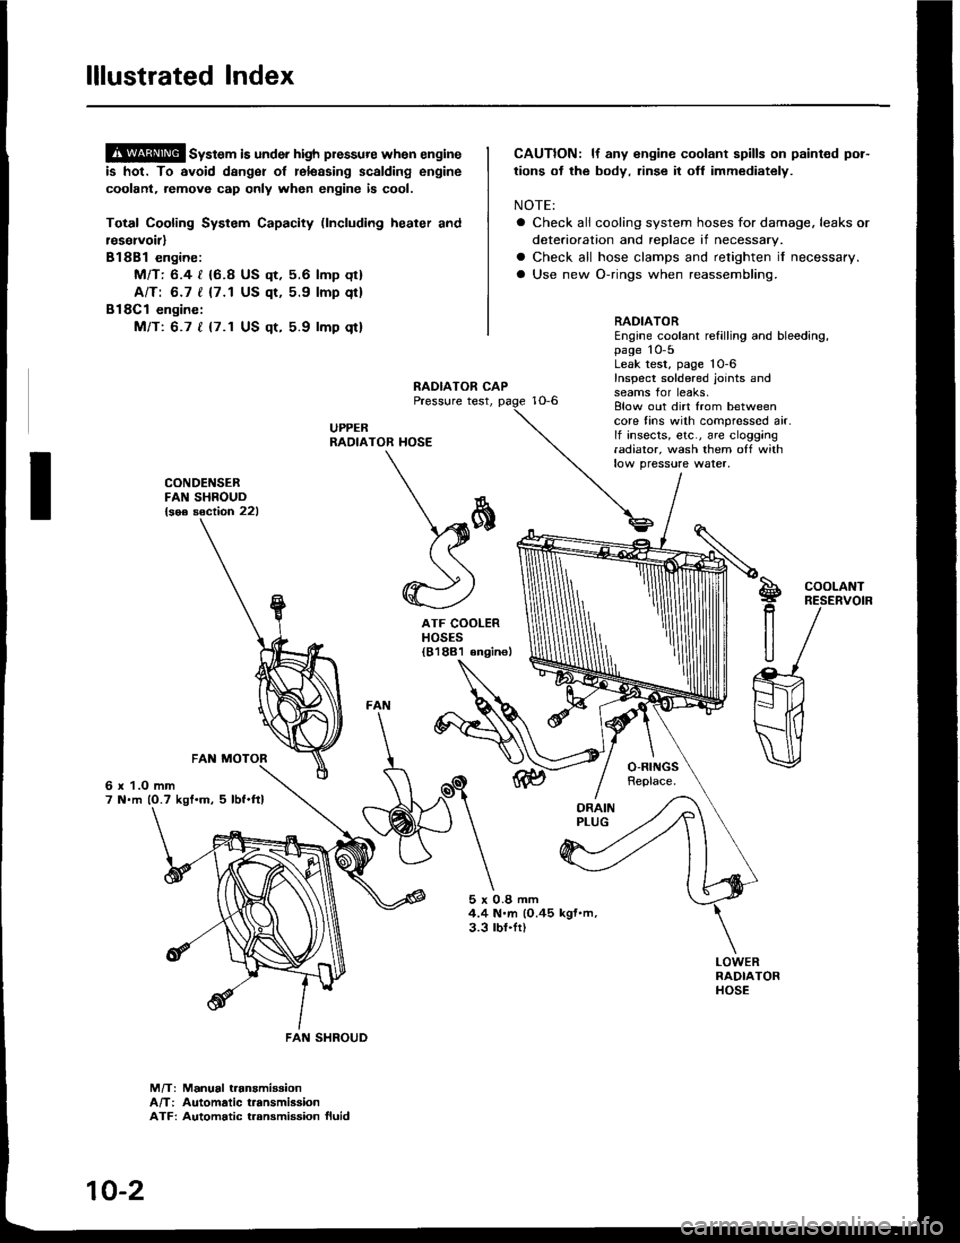
lllustrated Index
@ sy"t". is under high plessure when engine
is hot. To avoid dsnger of relsssing scalding engine
coolant. remove cap only when engine is cool.
Total Cooling System Capacity (lncluding heater and
r€servoirl
Bl8Bl engine:
Mfl: 6.4 | {6.8 US qt, 5.6 lmp qt}
AlTt 6.7 | {7.1 US qt, 5.9 lmp qt}
Bl8Cl engine:
Mfi: 6.7 t {7.1 US qt, 5.9 lmp qt}
CAUTION: lf any engine coolant spills on paint€d por-
tions ot the body, rinse it ofl immediately.
NOTE:
a Check all cooling system hoses for damage. leaks or
deterioration and replace if necessary.
a Check all hose clamps and retighten if necessary.
a Use new O-rings when reassembling.
CONDENSERFAN SHROUD{soe soction 221
6 x 1.O mm7 N.m (O.7 kgt.m. 5 lbf.ftl
ATF COOLERHOSES{81881 6ngine)
RADIATOREngine coolant refilling and bleeding,page 10-5Leak test, page 'l0-6
Inspect soldered joints andseams for leaks.Elow out dirt from betweencore fins with compressed air.lf insects, etc., are clogging.adiator, wash them off withlow pressure water,
S!
P
R
U
COOLANTRESERVOIR
5x0.8mm4.4 N.m (O.45 kgf.m,3.3 lbl.fr)
M/T: Manual t.anamiaaionA/T: Automatic t.ansmiasionATF: Automatic t.ansmission fluid
\*
*)
FAN SHROUD
10-2
Page 187 of 1413

ENGINE COMPARTMENT HOSE CONNECTIONS:
Bl88l engine:FAST IDLETHERMOVALVE
THERMOSTATHOUSIITGIDLE AIR CONTROLIIAC} VALVE
O'RINGReplace.
BREATHER PIPE
O-RINGReplace.
HEATER HOSES
818C1 engine:
ENGINE OILCOOLER
IAC VALVE
HEATER BYPASSPIPE
FAST IDLETHERMOVALVE
THERMOSTATHOUSING
BREATHER PIPE
HEATEB HOSES
10-3