rocker HONDA INTEGRA 1994 4.G Workshop Manual
[x] Cancel search | Manufacturer: HONDA, Model Year: 1994, Model line: INTEGRA, Model: HONDA INTEGRA 1994 4.GPages: 1413, PDF Size: 37.94 MB
Page 19 of 1413
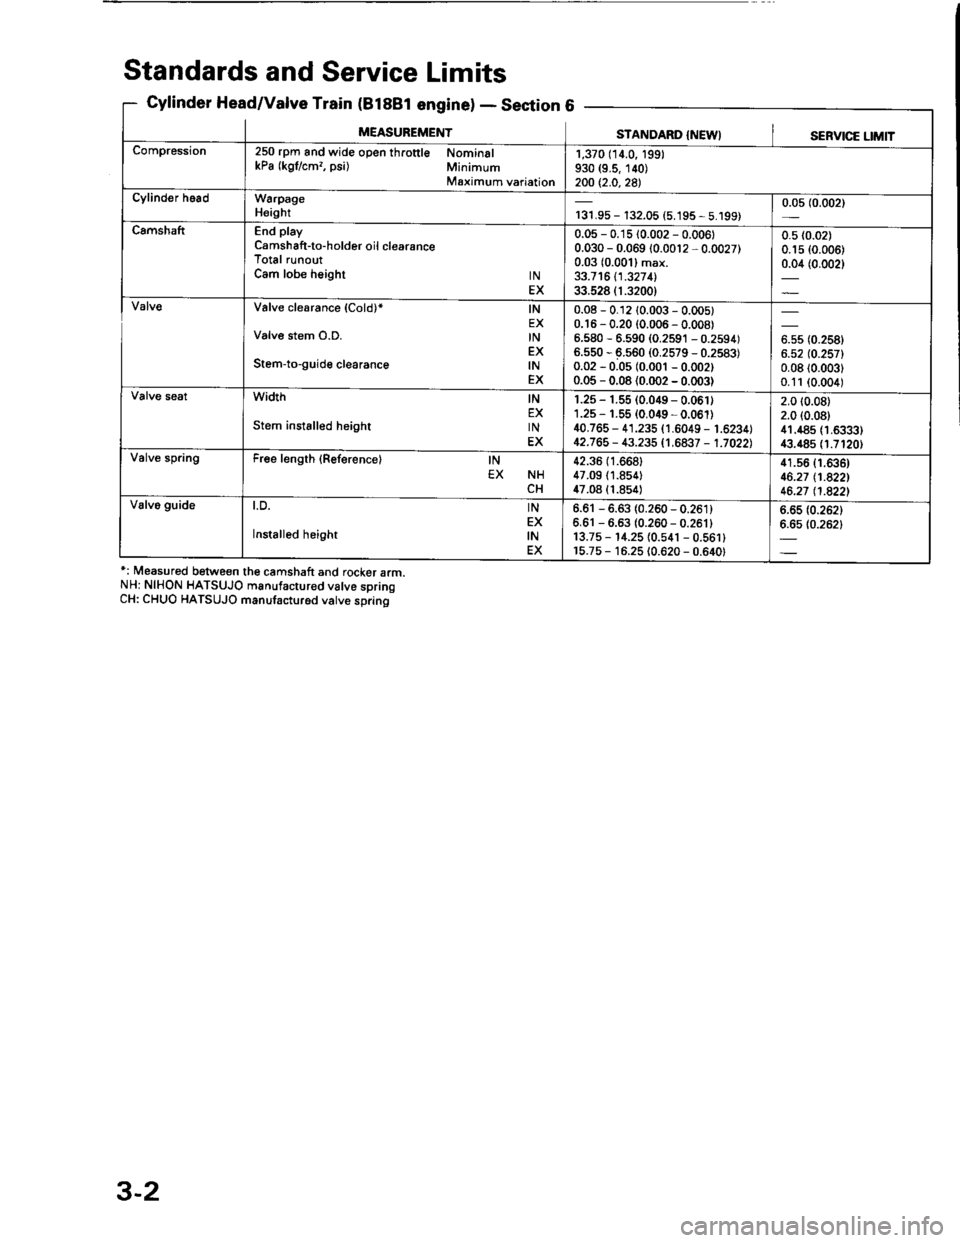
Standards and Service Limits
Cylinder Head/Valve Train (B188t enginelSecti6
*: Measured between the camshaft and rocker arm.
NH: NIHON HATSUJO manufactur€d valve spring
CH: CHUO HATSUJO manufacturod valve sDrino
- Declron
MEASUREMENTSTANDARD {NEWI '
SERVICE LIMIT
Compression250 rpm and wide open th.ottl€ Nominal
kPa (kgflcm?, psi) Minimum
Maximum variation
1,370 (14.0, 199)
930 (9.5, 140)
200 t2.0,2a)
Cylinder h.adW6rpage
Heightr31.95- 132.05 (5.195 - 5.199)
0.05 (0.002)
CamshaftEnd play
Camshaft-to-holder oil clearance
Total runout
Cam lobe height tN
EX
0.05 - 0.15 (0.002 - 0.0061
0.030 - 0.069 10.0012 - 0.0027)
0.03 (0.001) max.
33.7 16 11 .327 1l
33.528 (1.3200)
0.5 (0.02)
0.1s {0.006)
0.04 (0.002)
Valve clearance (Cold)* lN
EX
Valve stem O.D. tN
EX
Stem-to-guide clearance lN
EX
0.08 - 0.12 {0.003 - 0.005)
0.'r 6 - 0.20 (0.006 - 0.008)
6.580 - 6.590 (0.2591 - 0.2594)
6.550 - 6.s60 (0.2579 - 0.2583)
0.02 - 0.0s (0.001 - 0.002)
0.05 - 0.08 (0.002 - 0.003)
6.s5 (0.258)
6.52 (0.257)
0.0810.003)
0.11 (0.004)
width tN
EX
Stem instslled height tN
EX
r.25 - 1.55 (0.049 - 0.061)
1.25 - 1.55 {0.049 - 0.061)
40.765 - 41.235 (1.6049 - 1.6234)
12.763 - 43.235 t1,6a37 - 1.7022)
2.0 t0.08)
2.0 (0.08)
41.485 (1.6333)
43.485 (1.7120)
Valve springFree length {Reference} lN
EX NH
CH
42.36 (1.668)
47.09 {1.854}
47.08 (1.854)
41.s6 {1.636)
46.27 tl.A22l
46.21 l1.a22l
Valv6 guideLu. lN
EX
Installed height lN
6.61 - 6.63 (0.260 - 0.261)
6.61 - 6.6s (0.260- 0.261)
13.75 - 14.25 {0.541 - 0.561}
r5.75 - 16.25 10.620 - 0.640)
6.65 (0.262)
6.6510.2621
3-2
Page 76 of 1413
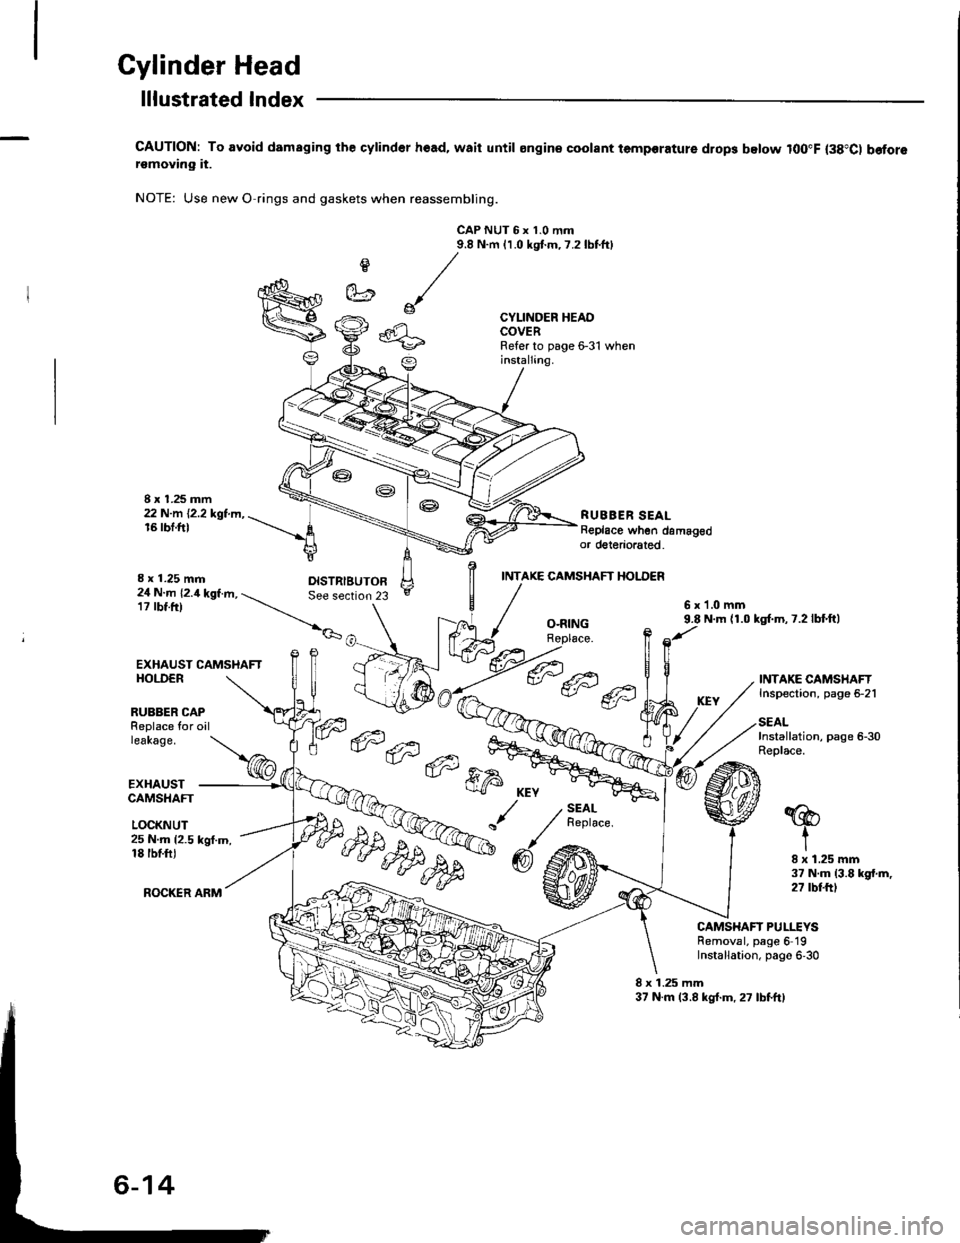
Cylinder Head
I x 1.25 mm22 N.m 12.2 kgt.m,16 rbf.ft)
lllustrated lndex
CAUTION: To avoid damaging the cylind6r hoad, waii until ongin€ coolant temporature drop3 below lOO"F (38"C) b€forersmoving it.
NOTE: Use new O rings and gaskets when reassembling.
CAP NUT 6 x 1.0 mtn9.8 N.m 11.0 kgtm,7.2lbtftl
e
et
CYLINDER HEADCOVERRefer to page 6-31 wheninstallang.
RUBBER SEALReplace when damagedor doteriorated.
I x 1.25 mm
EXHAUST CAMSHAFTHOI.DER
INTAKE CAMSHAFT HOI.DER
24 N.m 12.4 kgf.m, -. See section17 rbt.tr) --_r,_
__.|._6x1.0mm9.8 N.m {1.0 kgl.m,7.2lbf.ft)O-RINGRoplace.
RUBBER CAPReplace for oilleakage.
EXHAUSTCAMSHAFT
LOCKNUT
INTAKE CAMSHAFTInspection, page 5-21
SEALInstallation, page 6-30Replace.- 6tal --,
ffi;r
KEY
/./
"
@6
SEALReplace.'@
t25 N.m {2.5 kgf.m,18 tbtfiJ
ROCKER ARM
I x 1.25 mm37 N.m (3.8 kgt.m,27 rbtftt
CAMSHAFT PULLEYSRemoval, page 6 19Installation, page 6,30
8 x 1.25 mm37 N.m 13.8 kg{.m,27 lbfftl
Page 82 of 1413
Cylinder
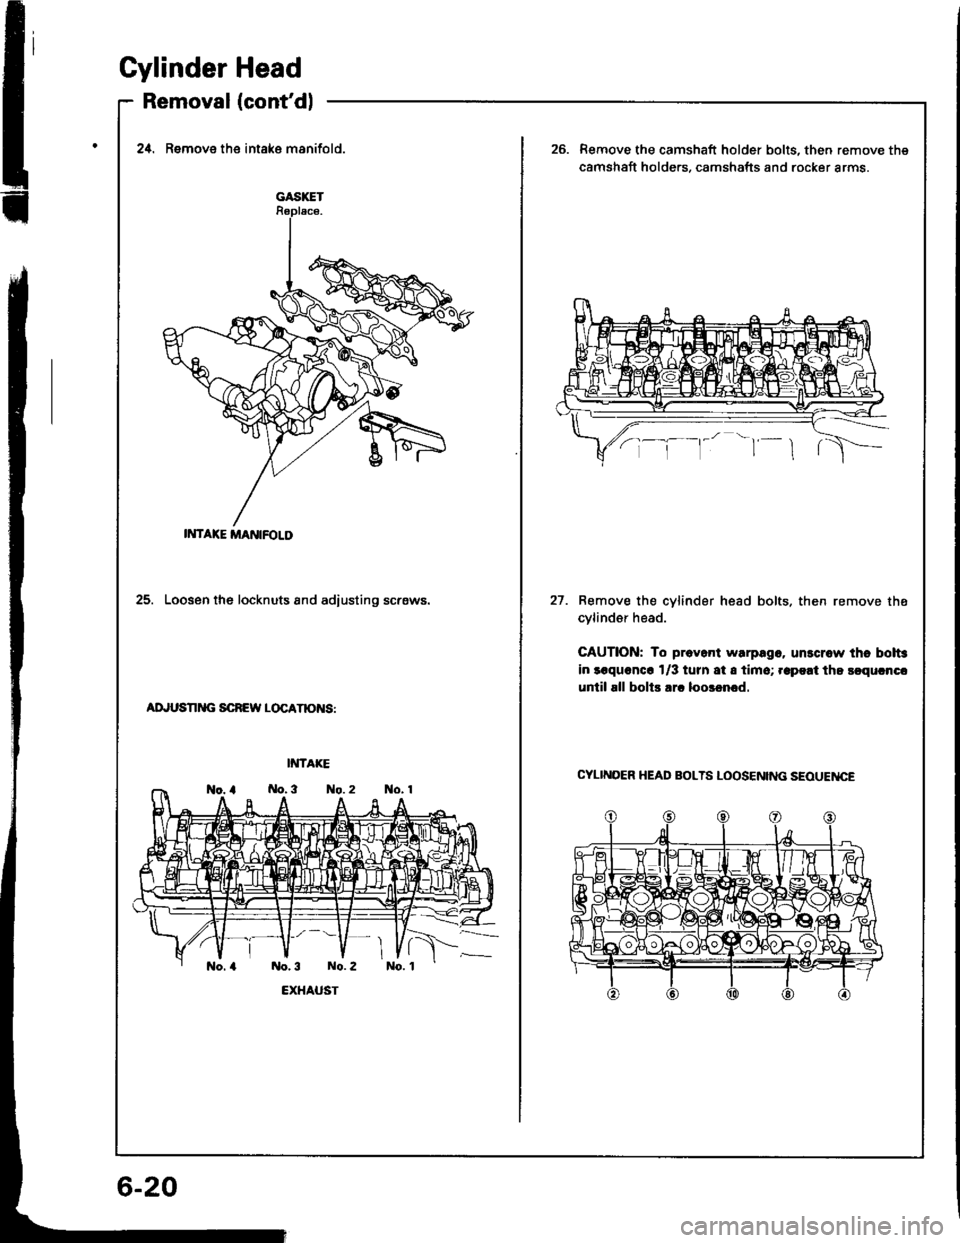
Removal
Head
(cont'dl
GASXET
IMTAXE MANIFOLD
2,0. Remove the intake msnifold.Remove the camshaft holder bolts, then remove the
camshaft holde.s. camshafts and rocker arms.
25. Loosen the locknuts and adiusting screws.27. Remove the cylinder head bolts. then remove the
cvlindsr head.
CAUTION: To preyant warpago. unlcr.w thc bolt3
in laquoncc 1/3 turn at I tim6; .apeat the $qurnca
until sll boltr arc loosrncd.
ADJUSNNG SCNEW LOCATN)NS:
CYLINOER HEAD BOLTS LOOSENING SEOUENCE
Page 83 of 1413
!
1.
2.
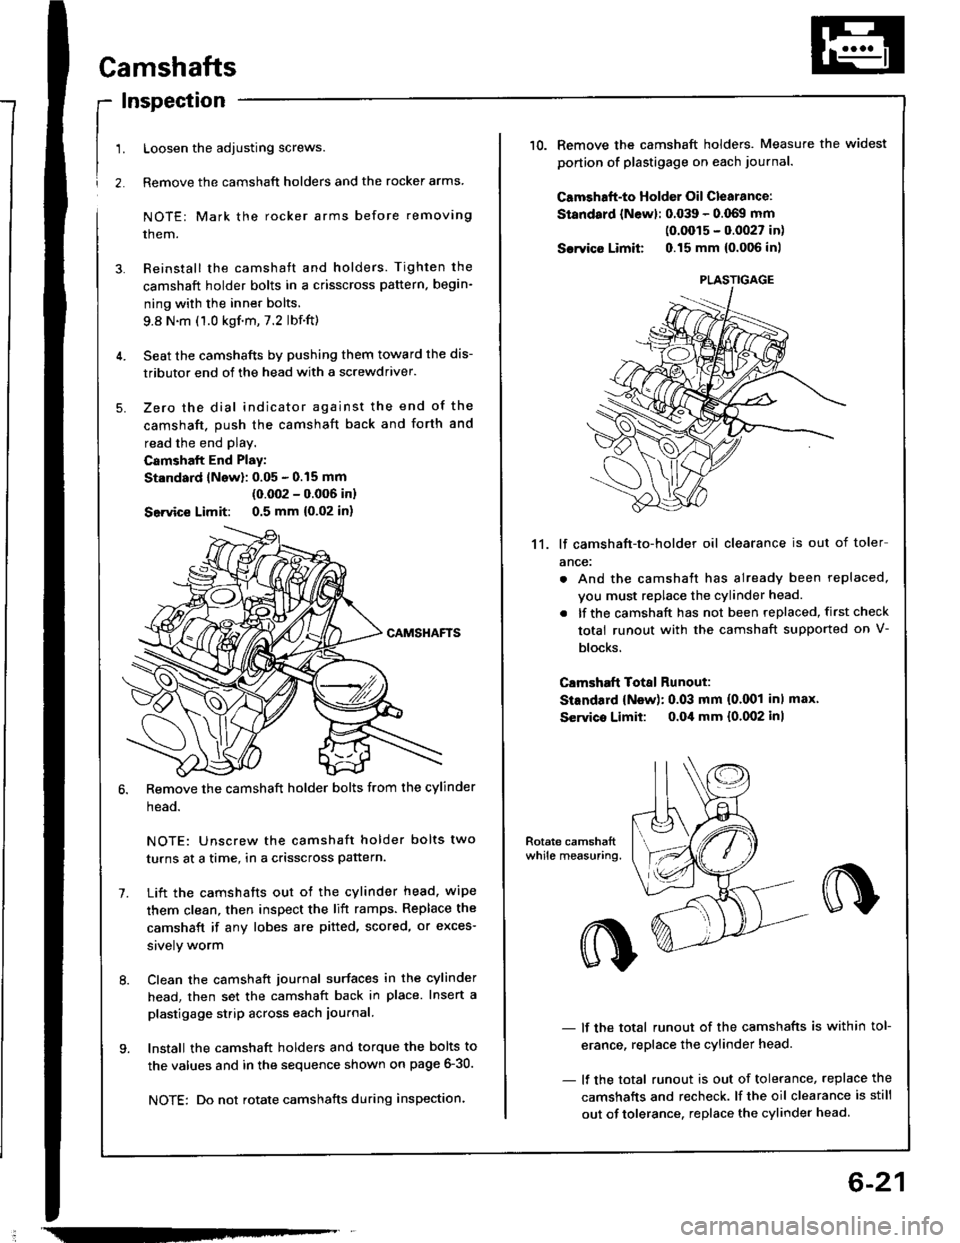
Camshafts
Inspection
Loosen the adjusting screws.
Remove the camshaft holders and the rocker arms
NOTE: Mark the rocker arms before removing
them.
Reinstall the camshaft and holders. Tighten the
camshaft holder bolts in a crisscross pattern, begin-
ning with the inner bolts.
9.8 N.m (1.0 kgf.m,7.2 lbf.ft)
Seat the camshafts by pushing them toward the dis-
tributor end of the head with a screwdriver.
Zero the dial indicator against the end of the
camshaft. push the camshaft back and forth and
read the end play.
Camshalt End Play:
St.ndard lNow): 0.05 - 0.15 mm
(0.002 - 0.006 inl
Seivice Limit: 0.5 mm {0,02 in)
Remove the camshaft holder bolts from the cylinder
head.
NOTE: Unscrew the camshaft holder bolts two
turns at a time, in a crisscross pattern.
Lift the camshafts out ot the cylinder head. wipe
them clean, then inspect the lift ramps. Replace the
camshaft if any lobes are pitted, scored, or exces-
srvely worm
Clean the camshaft journal surfaces in the cylinder
head, then set the camshaft back in place. Insert a
plastigage strip across each iournal.
Install the camshaft holders and torque the bolts to
the values and in the sequence shown on page 6-30.
NOTE: Do not rotate camshafts during inspection.
-
6-21
10.Remove the camshaft holders. Measure the widest
ponion of plastigage on each journa..
Camshaft-to Holder Oil Clearance:
Standard lNewl: 0.039 - 0.069 mm(0.0015 - 0.0027 in)
Sarvico Limit 0.15 mm {0.006 inl
11. lf camshaft-to-holder oil clearance is out of toler
ance:
. And the camshaft has already been replaced,
vou must replace the cylinder head.
. lf the camshaft has not been replaced, first check
total runout with the camshaft supported on V-
blocks.
Clmshaft Total Runout:
StEndard {New): 0.03 mm (0.001 inl max'
Servico Limit: o.Oil mm {0.002 inl
- lf the total runout of the camshafts is within tol-
erance, replace the cylinder head.
- lf the total runout is out of tolerance, replace the
camshafts and recheck. lf the oil clearance is still
out of tolerance. replace the cylinder head.
PLASTIGAGE
Page 91 of 1413
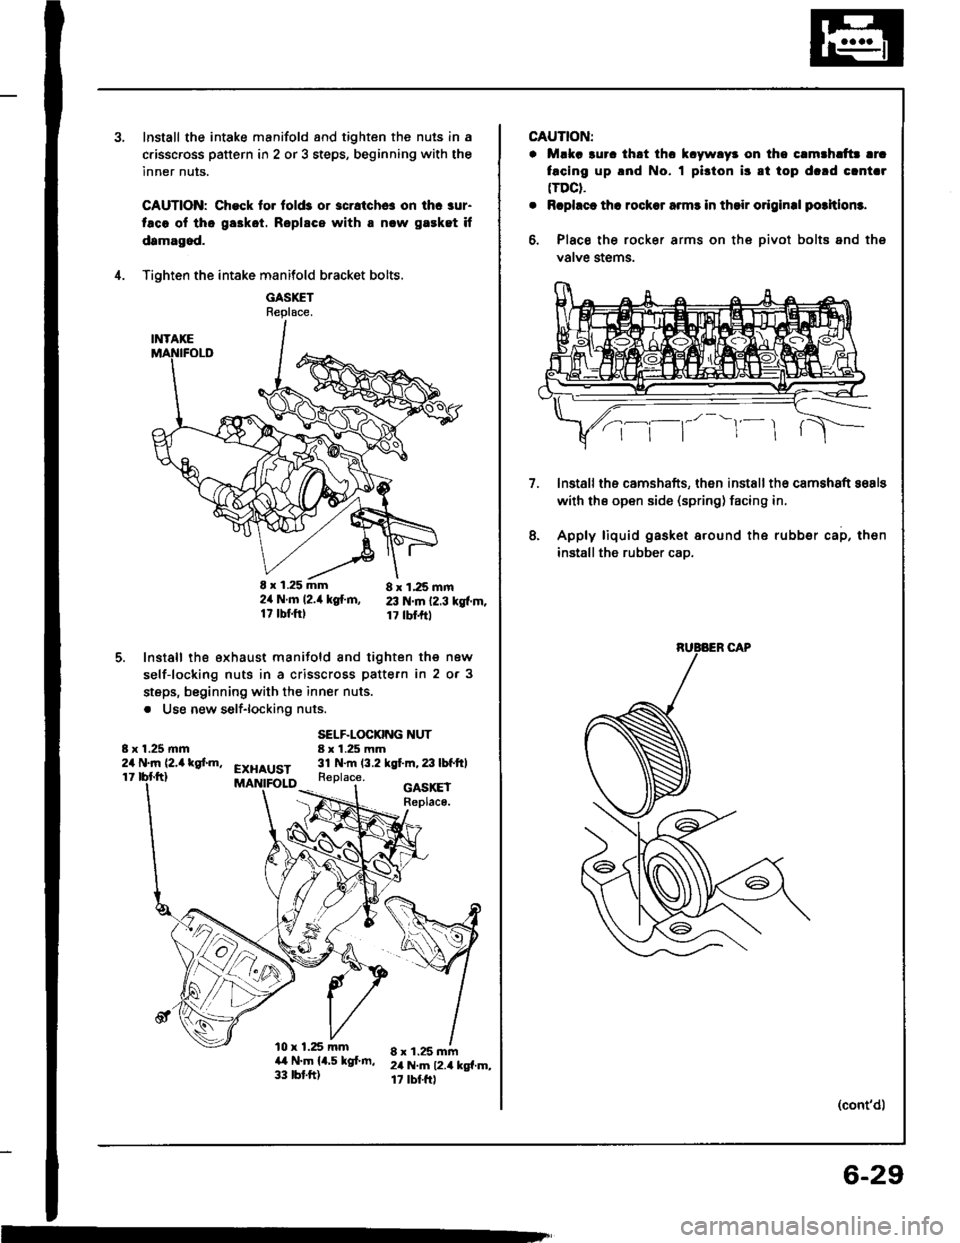
Install the intake manifold and tighten the nuls in a
c.isscross pattern in 2 or 3 steps, beginning with the
inner nuts.
CAUTION: Check to. fold3 or 3cratchc! on ihc aur-
taco ol tho ga3kot. Roplscs with a nlw gaeket if
damagod.
Tighten the intake manifold bracket bolts.
GASXETReplace.
E x 1.25 mm 8 x 1,25 mm2ir N.m l2.it kg{.m, 23 N.m 12.3 kgf.m.17 tbf.ftl 17 tbl.frt
Install the exhaust manifold and tighten the new
self-locking nuts in a crisscross pattern in 2 or 3
steps, beginning with the inner nuts.
. Use new self-lockiflg nuts.
4.
5.
8 x 1.25 mm24 N.m (2,a kgf.m,
SELF.LOCKING NUT8 x 1.25 mm31 N.m (3.2 kgt m,23lbfftlEXHAUST11Replace.
l0 x 1.25 mma,t N.m 14.5 kgf.m,33 tbt.ft)
GASKEIReplace.
8 x 1.25 mm2il N.m 12.4 kg{.m,17 rbtftl
m
CAUTION:
. Mlka 3uro thrt thc k.ywlyr on tho c.mthlttr lrc
facing up .nd No. I pi3ton i3 8t top d.rd clnt.r(TDCt.
. Rcphct th! rocksr armr in thsir o.iginal potltlom.
6, Place the rocker arms on the oivot bolts and ths
valve stems.
lnstallths camshafts, then installth€ camshaft sosls
with ths open side (spring) facing in.
Apply liquid gasket around the rubber cap, then
installthe rubber cao.
7.
8.
(cont'd)
6-29
Page 92 of 1413
Cylinder Head
Installation (cont'dl
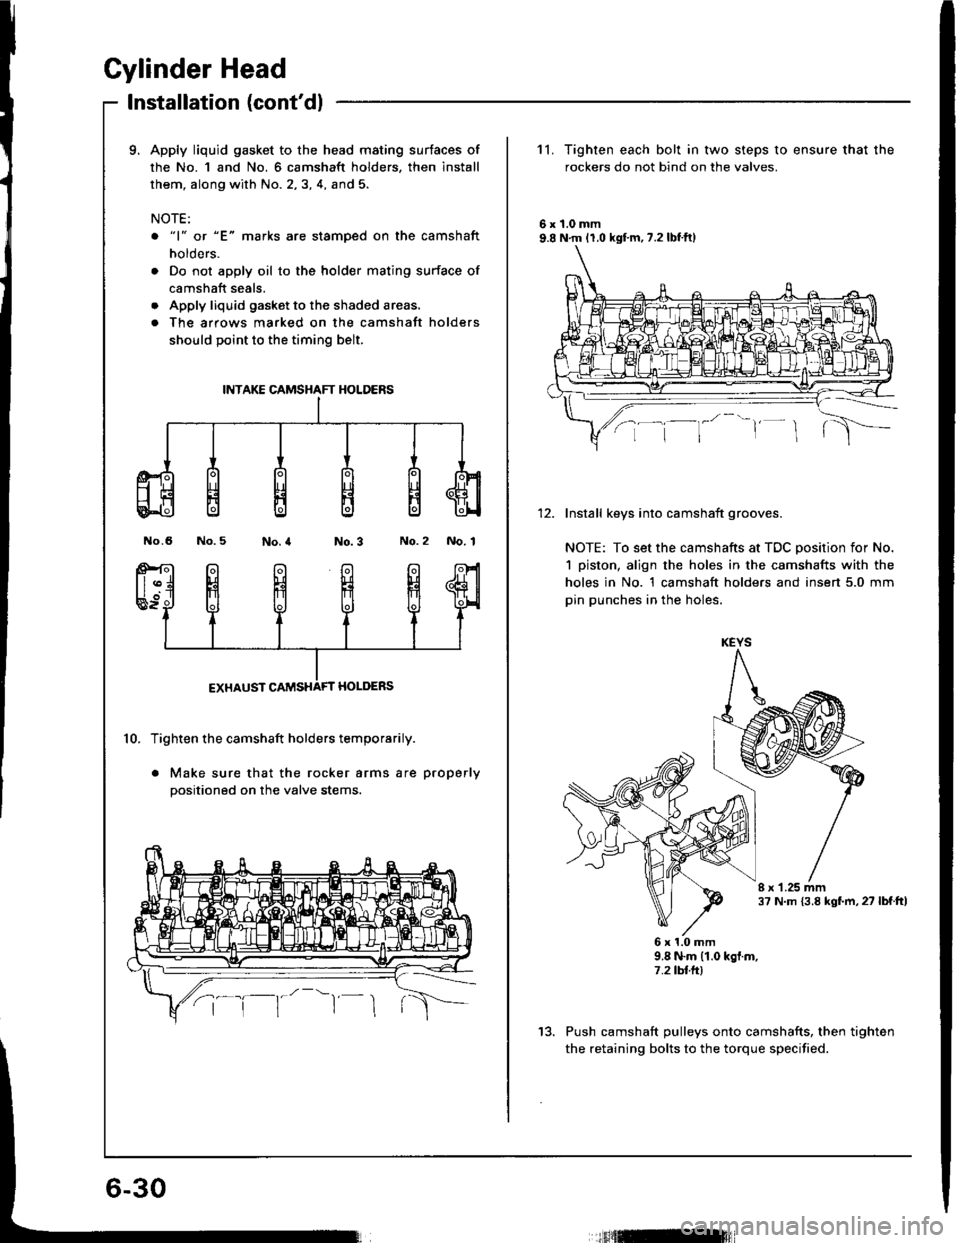
9. Apply liquid gasket to the head mating surtaces of
the No. 1 and No. 6 camshaft holders, then install
them, along with No. 2,3, 4, and 5.
NOTE:
o "1" or "E" marks are stamoed on the camshaft
holders.
. Do not apply oil to the holder mating surface of
camshaft seals.
. Apply liquid gasket to the shaded areas.
. The arrows marked on the camshatt holders
should point to the timing belt.
No.6 No.5No.2 No. 1
10. Tighten the camshaft holders temporarily.
. Make sure that the rocker arms are properly
positioned on the valve stems.
INTAKE CAMSHAFT HOLDERS
11. Tighten each bolt in two steps to ensure that the
rockers do not bind on the valves.
6r1.0mm9.8 N.m 11.0 kgf.m,7.2lbtft)
Install keys into camshaft grooves.
NOTE: To set the camshafts at TDC position for No.
1 piston, align the holes in the camshafts with the
holes in No. 1 camshaft holders and insert 5.0 mm
pin punches in the holes.
I r 1.25 mm37 N.m {3.8 kgf.m, 27 lbf.ttl
6x1.0mm9.8 N.m (1.0 kgf.m,7.2 tbtft)
Push camshaft pulleys onto camshafts, then tighten
the retaining bolts to the torque specified.
KEYS
13.
tfitml
Page 95 of 1413
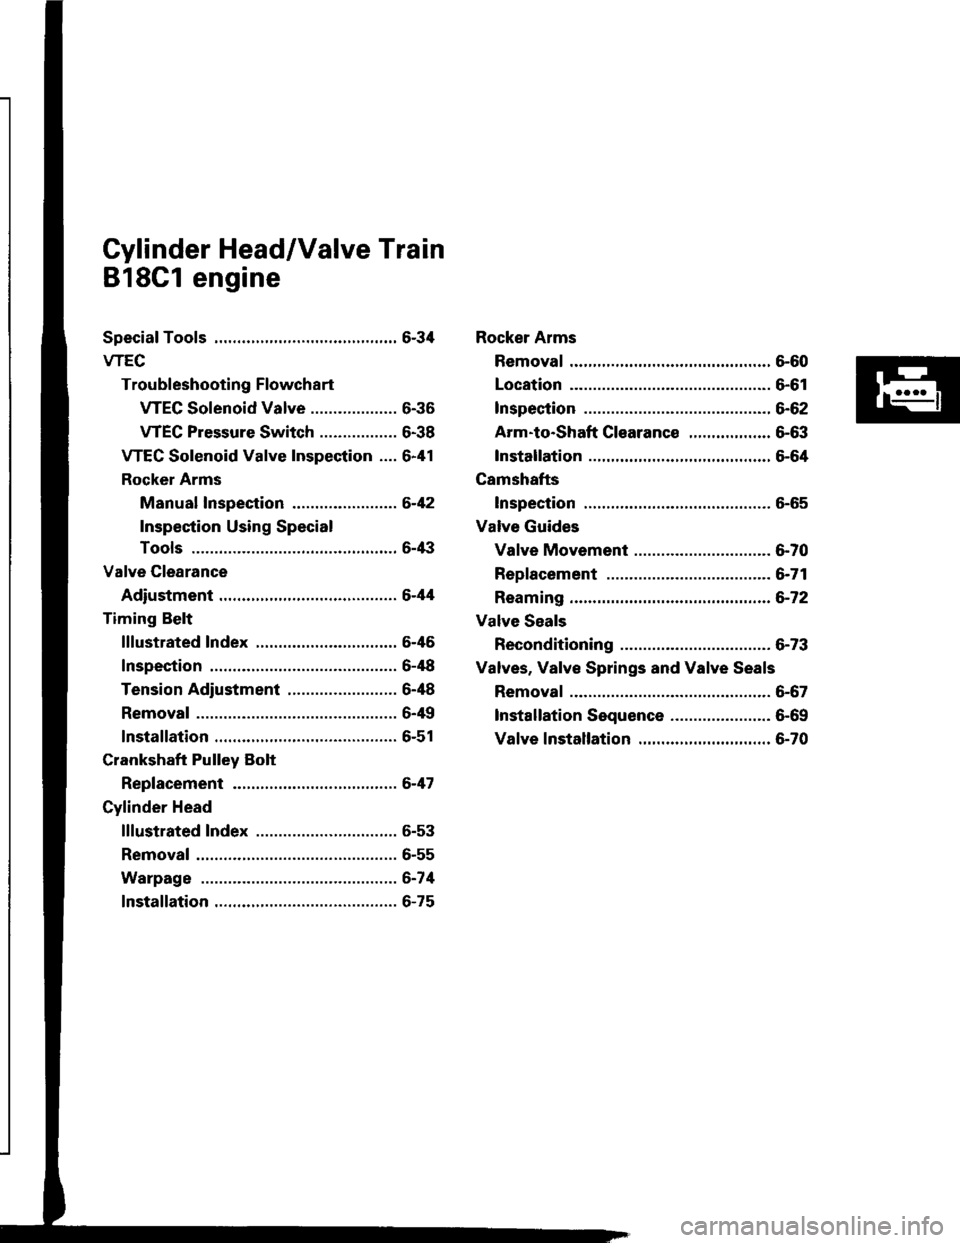
Cylinder Head/Valve Train
818C1 engine
Special Tools ............. 6-34
wEc
Troubleshooting Flowchart
WEC Solenoid Valve ................... 6-36
VTEC Pressure Switch ................. 6-38
VTEC Solenoid Valve Inspection .... 6-41
Rocker Arms
Manual Inspection .....,................. 6-42
Inspection Using Special
Tools ....................................,.....,.. 6-/|i|
Valve Glearance
Adiustment ............ 6-44
Timing Belt
lllustrated 1ndex ............................... 6-46
Inspection .............. 6-48
Tension Adiustment ........................ 6-48
Removal ................. 6-4{l
lnstallation ............. 6-51
Crankshaft Pulley Bolt
Replacement .........6-47
Cylinder Head
lllustrated Index ............................... 6-53
Removal .................6-55
Warpage ................6-74
lnstallation ............. 6-75
Rocker Arms
Removal ................. 6-60
Location ................. 6-61
lnspection .............. 6-62
Arm-to-Shaft G|earance .................. 6-63
Installation ............. 5-64
Camshafts
Inspection .............. 6-65
Valve Guides
Valve Movement .............................. 6-70
Replacement .........6-71
Reaming ................. 6-72
Valve Seals
Reconditioning ......6-73
Valves. Valve Springs and Valve Seals
Removal ................. 6-67
lnstallation Sequence ..........,.......,... 6-69
Valve lnstallation ............................. 6-70
Page 103 of 1413
VTEC
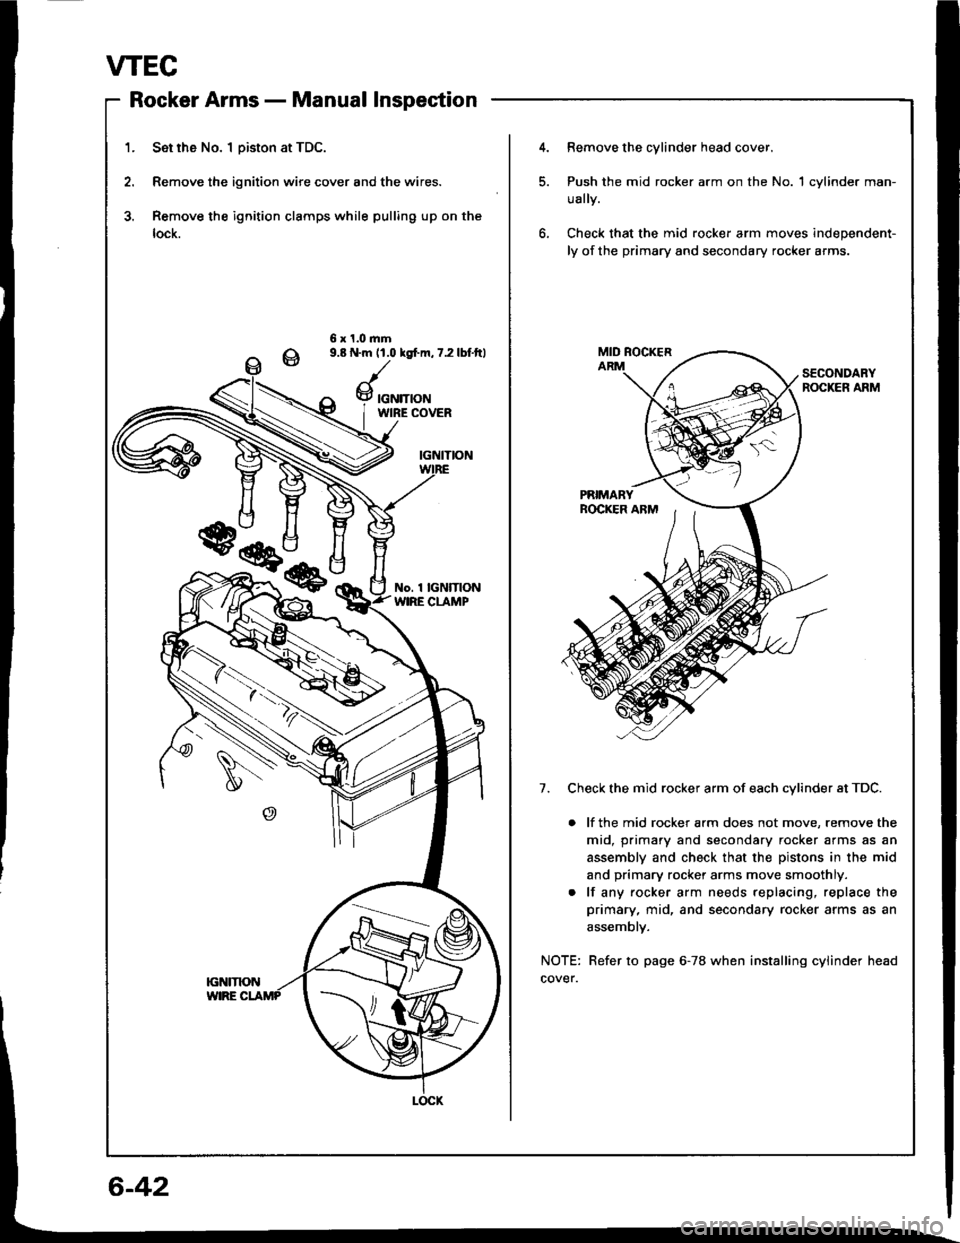
Rocker Armsnlrungf rtrrrri' - rYrorrtrcr rrrDPEUtrl,rl
1. Set rh6 No. I Diston at TDC.
2. Remove the ignition wire cover and the wires.
3. Remove the ignition clamps while pulling up on the
lock.
4.Remove the cylinder head cover.
Push the mid rocker arm on the No. 1 cylinder man-
ually.
Check that the mid rocker arm moves independent-
ly of the primary and secondary rocker arms.
6 x 1.0.nm9.8 N.m 11.0 lgfm, 7.2 lbf.ftl
SECONDARYROCKER ARM
7. Check the mid rocker arm of each cvlinder at TDC.
. lf the mid rocker arm does not move, remove the
mid, primary and secondary rocker arms as an
assembly and check that the pistons in the mid
and primary rocker arms move smoothly.
. lf any rocker arm needs replacing, replace the
primary, mid, and secondary rocker arms as an
assemblv.
NOTE: Refer to page 6-78 when installing cylinder head
cover.
w
Page 104 of 1413
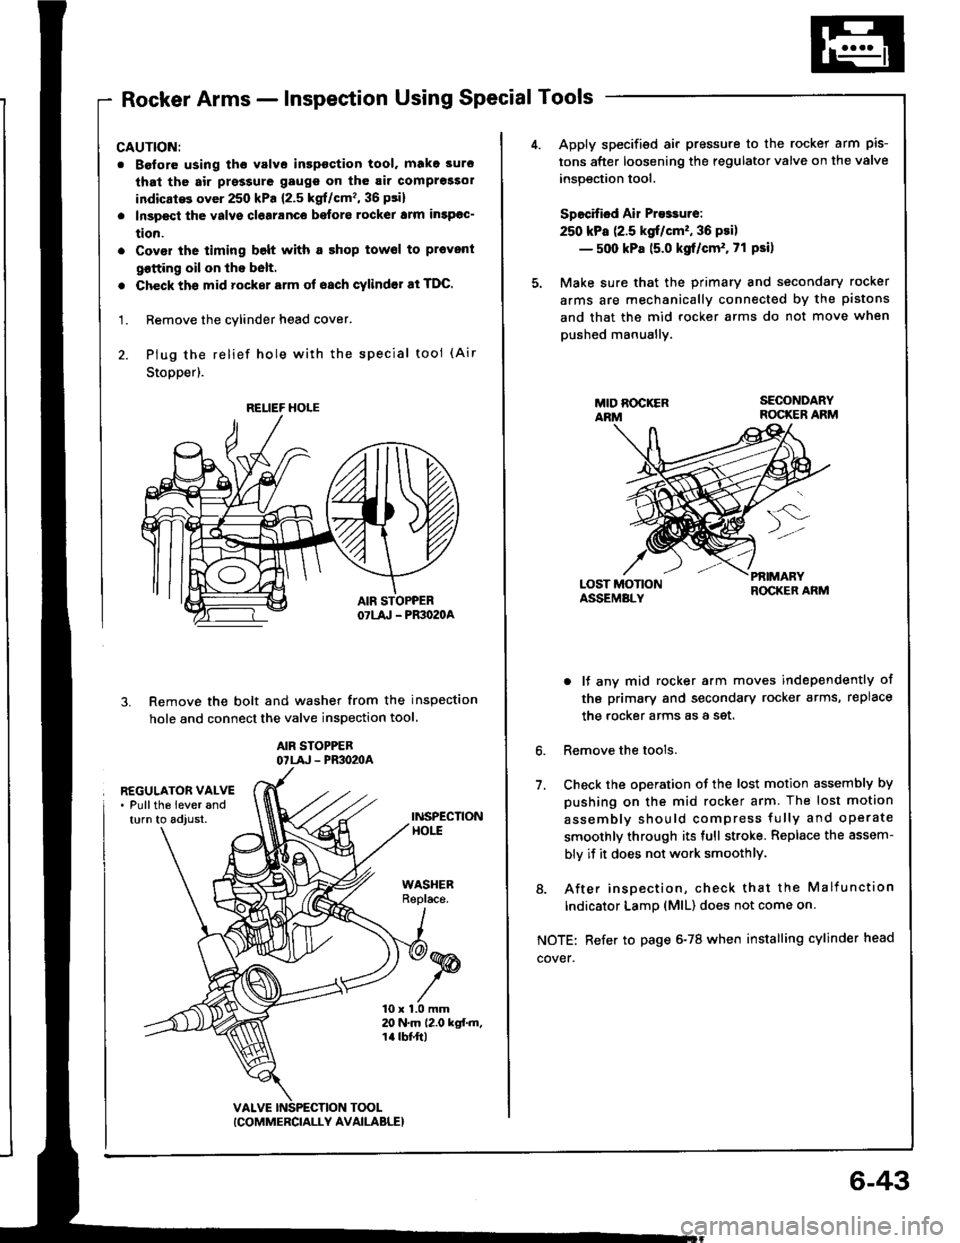
Rocker Arms - Inspection Using Special Tools
CAUTION:
. Boforo using tho valvo inspoction tool. make 3uro
that th6 air prsssure gaugs on th6 air comprossol
indicatG over 250 kPa {2.5 kgf/cm'�, 36 psi}
. Inspect the valvs clearanco befors rockel lrm insPoc-
tion.
. Covor the timing belt with a shop towsl to pl€vent
qotting oil on lhe b6lt.
. Check ths mid rocker srm of oach cylindor at TDC.
1. Remove the cylinder head cover.
2. Plug the relief hole wiih the special tool (Air
Stopper).
Remove the bolt and washer from the inspection
hole and connect the valve inspection tool
AIR STOPPEBOTLA' - PR3O2OA
3.
REGULATOR VALVE. Pullths lever andturn to adjust.INSPECTIONHOtt
WASHERReplace.
10 x 1.0 mm20 N.m 12.0 kgf.m,1a tbt'ft|
TOOL
RELIEF HOLE
ICOMMERCIALLY AVAILABLE}
6-43
Apply specified air pressure to the rocker arm pis-
tons after loosening the regulator valve on the valve
inspection tool.
Specified Air Presrure:
250 kPa (2.5 kgt/cm'�, 36 psi)
- 500 kPa 15.0 kgf/cm'. 71 Psi)
Make sure that the primary and secondary rocker
arms are mechanically connected by the pistons
and that the mid rocker arms do not move when
pushed manuallv.
LOST MOTIONASSEMALY
PfiIMARYROCKER ARM
6.
7.
o lf any mid rocker arm moves independently of
tho primary and secondary rocker arms, replace
the rocker arms as a set.
Remove the tools.
Check the oDeration of the lost motion assembly by
pushing on the mid rocker arm. The lost motion
assemblv should compress fully and operate
smoothly through its full stroke. Replace the assem-
bly if it does not work smoothlY.
8. After insoection, check that the Malfunction
Indicator LamD (MlL) does not come on
NOTE: Refer to page 6-78 when installing cylinder head
cover.
Page 115 of 1413
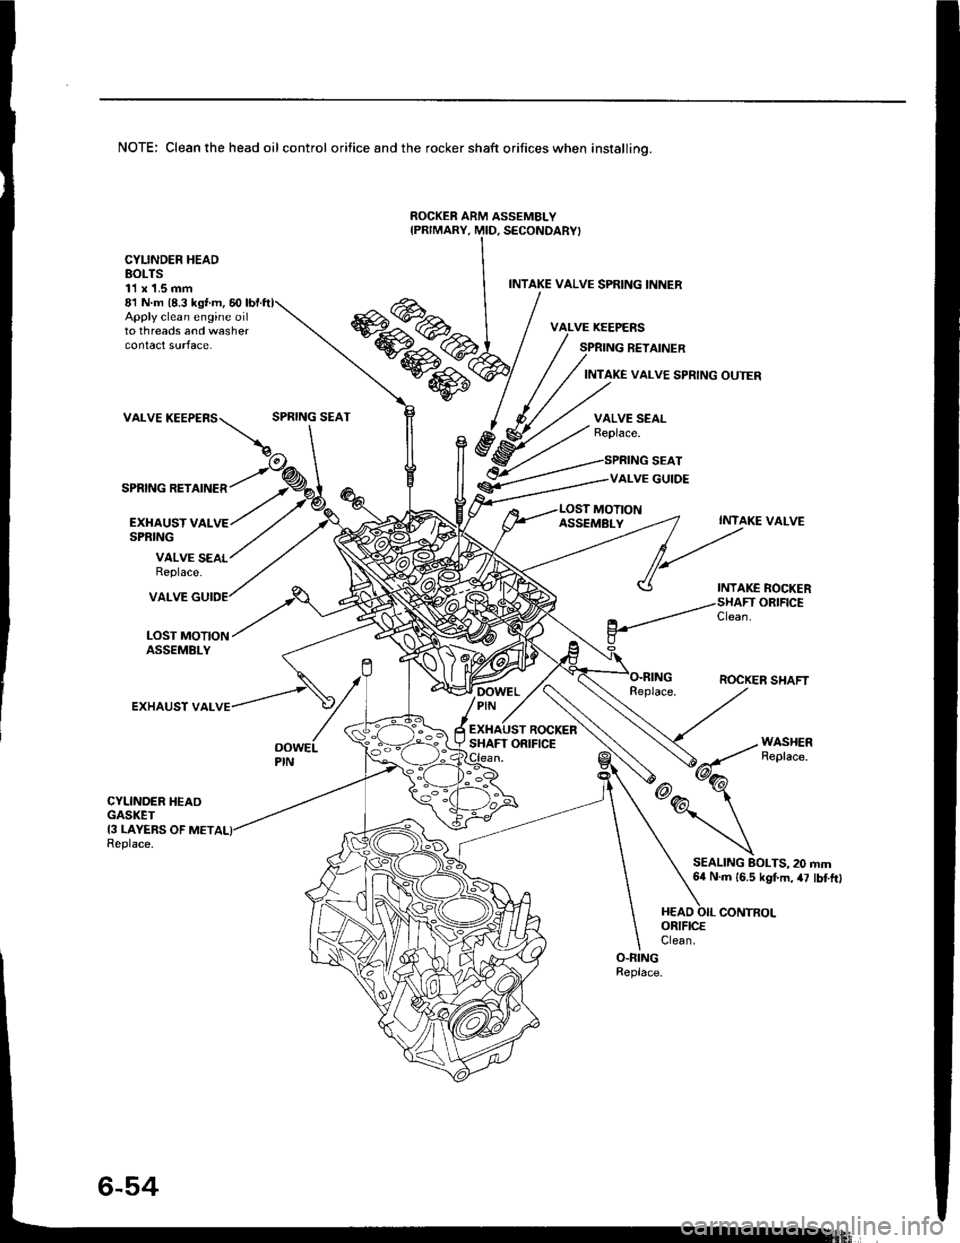
NOTE: Clean the head oil control orifice and the rocker shaft orifices when installino.
ROCKEB ARM ASSEMBLY
Apply clean engine oilto threads and washercontact surface.
81 N m (8.3 ks{ m, 60
VALVE
SPRING RETAINER
CYLINDER HEADBOLTS11 x 1.5 mm
EXI{AUST VALSPRING
INTAKE VALVE SPRING INNER
SPRING RETAINER
INTAKE VALVE SPRING OUTER
SPRING SEATVALVE SEALReplace.
SPRING SEAT
VALVE GUIDE
MOTION
VALVE SEALReplace.
ASSEMBLYINTAKE VALVE
INTAKE ROCKERORIFICE
LOST MOTIONASSEMBLY
VALVE
EXHAUST VAL
Clean.
ROCKER SHAFTDOWELPIN -,
ROCKERSHAFT ORIFICEOOWELPIN
CYLINDER HEAOGASKET13 LAYEBS OF METReplace.
SEALING BOLTS, 20 mm64 N.m 16.5 kgf.m, 47 lbtftl