rear view mirror HONDA INTEGRA 1998 4.G Workshop Manual
[x] Cancel search | Manufacturer: HONDA, Model Year: 1998, Model line: INTEGRA, Model: HONDA INTEGRA 1998 4.GPages: 1681, PDF Size: 54.22 MB
Page 816 of 1681

!
Body
Bumpers
Front Bumper Replacement ....................-..... 20-111
Rear Bumpar Replacemeni
Hatchback ................. 20-1/B
Sedan .................... ....20-111'Carpet
. Repfacemenl .,.,.,.,,..-....-.20-126
Consoles, Front and Rear
* Replacement ..................20-130
Dashboard
Component Removal/lnstallation ................ 20-133
Replacement Precautions ...........,................. 20-138
R€placement ....,.,...........20-139
Doors
Door Index Hatchback ................................... 20-2
Front Door Index Sedan .................,.,..,.,....,.. 20-18
Rear Door Index Sedan ........,.,........,.............. 20-30
Emblems
Installation .....................20-167
FenderwellTrim
+ Replacement., ................20.162
Fram€ Repair Chart .-..........20-170
Hatch
Replacoment .......,..........20-118
Adiustment .................... 20-150
Hatch Latch and Lock Cylinder
Replacement ..,.,..... ........ 20-158
Hstch Spoiler
Replacement ......... .......-.20.161
Hatch Weatherstrip/Trunk Lid Wsatherstrip
Replacement ..................20.163
Headliner
ReDlacement
Hatchbsck ,.,....,......,.. 20-98
Sedan .........................................................20-100
Hood
Replacsment ......... ......... 20.146
Adiustment ....................20-117
lnterior Trim
Reolacement
Hatchback ................. 20-91
Sedan .........................................................20-9,1
Mirrors
Power Mirror Reolacement ..........,................ 20-49
Mirrol Holder Removal ............................,..... 20.50
Mirror Holder Installation .............................. 20-50
Mirror Visor and Mirrot Covet
Replacement
Haichback ............20-51
Sedan .................................................... 20-51
Rearview Mirror Reolacement ..........-....-.-.... 20.52
Roof Molding Rep|acament ................................ 20.164
Door and Sid€ Moldings
Replacement .,..........,..... 20-165
Moonroot
lnd6x
Hatchback -................20-77
Sodan .........................................................20-8il
Opener and Latch
Replacement .......... ......,. 20-156
Opensr Cables
Replacamsnt .,.,...,.. ......., 20-154
Retainers and W€atherstrip
Replacement .................. 20-160
Seats
Front Seat Romoval ....................................... 20-103
Front Seat Replacement ...........................,.,.. 20-104
Front Soat Disassembly and Reassembly ...20-106
Torsion Bar ReDlacomant .....,...,......,.......,..,., 2O-1O7
Seat Eelt Switch Ha.ness Location ..,...,.,.,..,2O-1O7
Front Seat Cover Replacemont ..,....,..,..,.....,. 20-108
Rear Soat Roplscemont
Hatchback ................. 20.110
Sedan.........................................................20-112
R€al Seat Cover Replacomont ...................... 20-114
Seat Belts
Front Seat Beh Replacement
Hatchback..................20.117
Sedan20-r18
Rear S6at Bolt R€plac€ment
Hatchback .-......-.-......20-121
Sedan.......................-.-....-.-..........-.............20-122
fnspection ......-.-.,....-.-....20-121
Chifd Seat Anchor Plate ................................ 20-125
Side Sill Panol
Beplacom€nt .................. 20-166
Sub-frame ........................... 20.169
Trunk Lid
Replacement ......... ..,..,.,.20-151
Adiustmeni .................... 20-153
Trunk Lid Latch and Lock Cvlindot
Replac€ment ......... ......... 20-159
Trunk Trim
Replacement .,.,,.,........... 20-97
Windshield, Rear Window, Ouarter Glass
lndex
Hatchback ...........,,.20-53
!
S6dan ......................................................... 20.54
Page 867 of 1681
![HONDA INTEGRA 1998 4.G Workshop Manual Replacement (contd)
4. Remove the actuator, then remove the screws.
<: Screw locations
A<: Screw, 3 B<: Screw, 2C { : Screw, 1
.aqm I- r/
.0=-l .g}_,,]
5.Turn the mirror base as shown, then remove HONDA INTEGRA 1998 4.G Workshop Manual Replacement (contd)
4. Remove the actuator, then remove the screws.
<: Screw locations
A<: Screw, 3 B<: Screw, 2C { : Screw, 1
.aqm I- r/
.0=-l .g}_,,]
5.Turn the mirror base as shown, then remove](/img/13/6069/w960_6069-866.png)
Replacement (cont'd)
4. Remove the actuator, then remove the screws.
<: Screw locations
A<: Screw, 3 B<: Screw, 2C { : Screw, 1
.aqm I- r'/
'.0=-l .g}_,,]
5.Turn the mirror base as shown, then remove Ine mtr
ror cover
MIRROR AASE
6. Installation is the reverse oI the removal procedure.
ACTUATOR
MIRROR COVEB
Mirrors
Mirror Visor and Mirror CoverRearview Mirror Replacement
:
rl
rl
I
20-52
L
1. Pry the cover off using the end of a flat tip screw-
drive r.
CAUTION: To prevent damage to the mirror and
cover, wrap the end ol the screwdriver with a shop
towel.
2. Remove the screws, then remove the rearview
mirror.
REARVIEWMIRROR
3. lnstallation is the reverse of the removal orocedure.
SHOP TOWEL
Page 913 of 1681

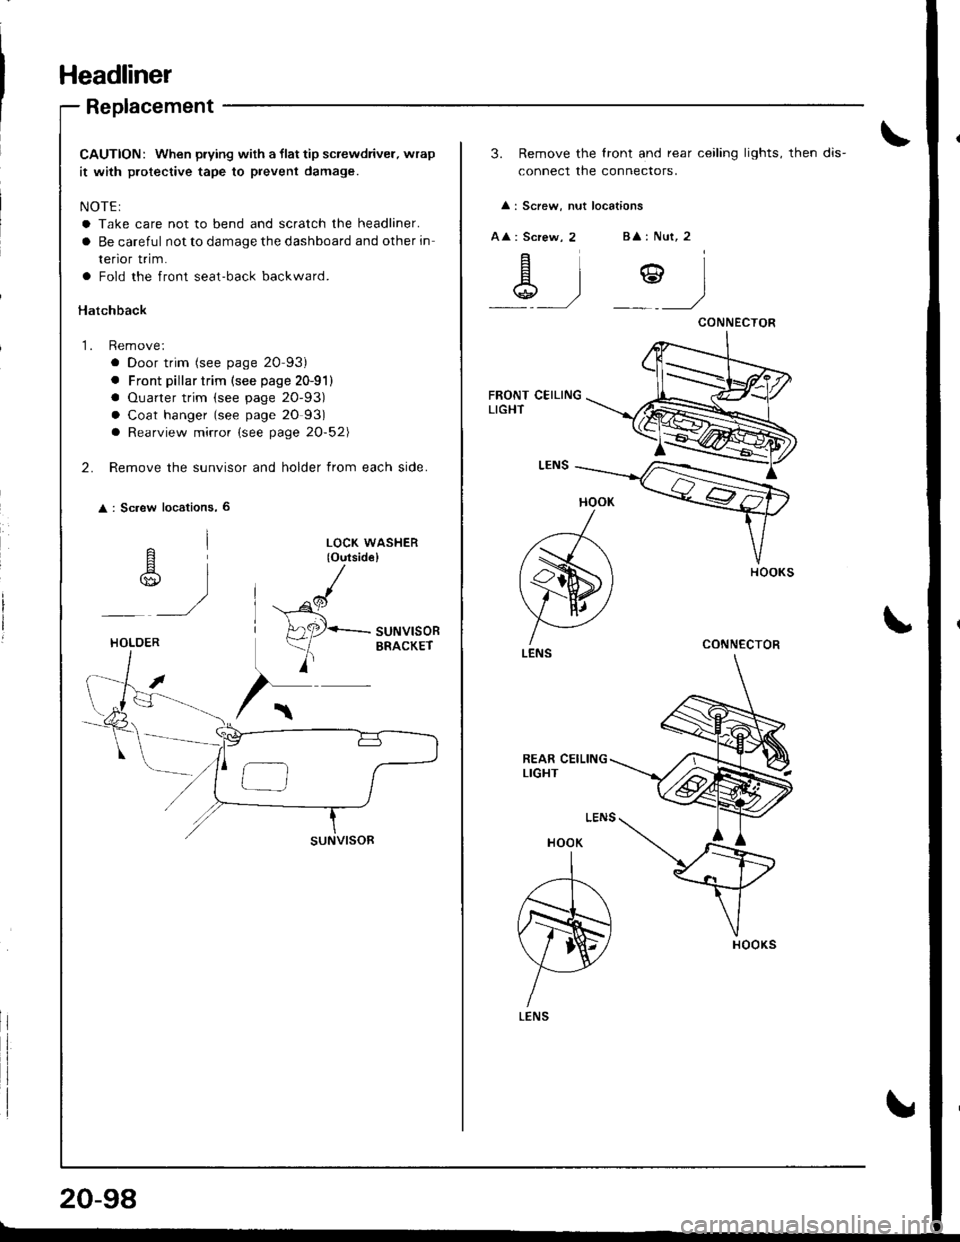
Headliner
Replacement
CAUTION: When prying with a llat tip screwdriver. wrap
it with protective tape to prevent damage.
NOTE:
a Take care not to bend and scratch the headliner.
a Be careful not to damage the dashboard and other in
renor rr|m.
a Fold the front seat-back backward.
Hatchback
1. Remove:
a Door trim (see page 20-93)
. Front pillar trim (see page 20-91)
a Ouarter trim (see page 20-93)
a Coat hanger (see page 20 93)
a Rearview mirror (see page 20-52\
2. Remove the sunvisor and holder from each side.
: Sc.ew locations, 6
^l
r$,,
)
LOCK WASHER(o{rtsid€}
^cl
H
A2P-suNvlsoR
)
ERACKErHOLOER
20-98
3. Remove the lront and rear ceiling lights, then dis-
connect the connectors.
: Screw, nut locations
A : Screw, 2B : Nut, 2
\g .)Y)
HOOK
)
(s)
V AI ./
LENS
HOOK
A
N)
YLENS
CONNECTOR
CONNECTOR
Page 915 of 1681

Headliner
Replacement (cont'd)
LEFT OUARTER PILLARTRIM PANEL
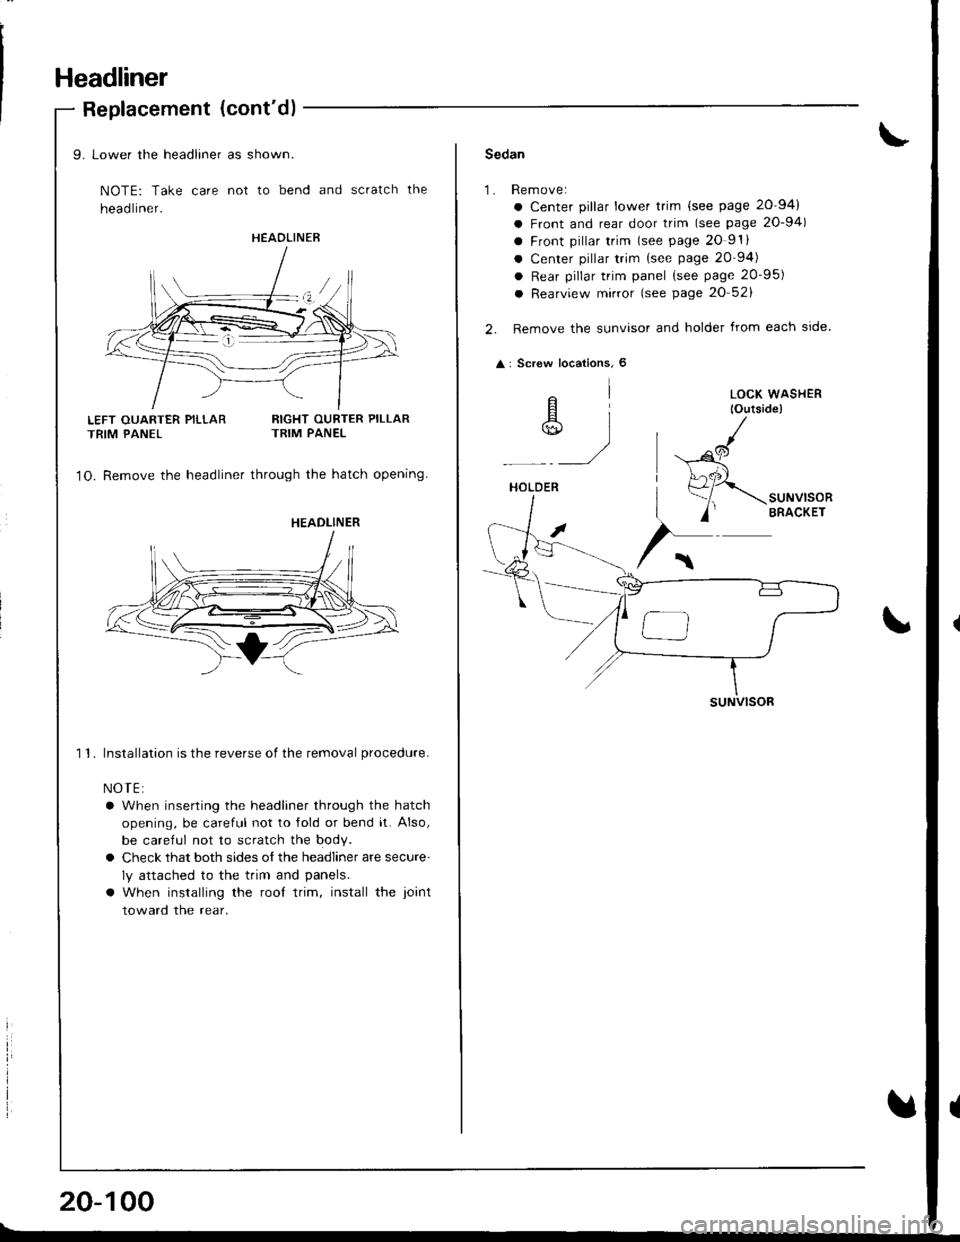
9. Lower the headliner as shown.
NOTE: Take care not to bend and scratch the
head liner.
RIGHT OURTER PILLARTRIM PANEL
1O. Remove the headliner through the hatch opening
1 1. Installation is the reverse of the removal procedure.
NOTE:
a When inserting the headliner through the hatch
opening, be careful not to lold or bend it. Also,
be careful not to scratch the body.
a Check that both sides o{ the headliner are secure'
ly attached to the trim and panels.
a When installing the rool trim, install the ioint
toward the rear.
HEAOLINER
HEADLINER
20-100
Sedan
1.Rem ove:
a Center pillar lower trim {see page 20-94)
a Front and rear door trim (see page 20-94)
a Front pillar trim lsee page 20 9'.
a Center pillar trim {see page 20 94)
a Rear pillar trim panel (see page 20-95)
a Rearview mirror (see page 20 52)
Remove the sunvisor and holder from each side.
: Screw locations, 6
elA]*)
HOLDER
suNVlsoR
LOCK WASHER
lOutside)
,al
(