HONDA ODYSSEY 1995 Owners Manual
Manufacturer: HONDA, Model Year: 1995, Model line: ODYSSEY, Model: HONDA ODYSSEY 1995Pages: 240, PDF Size: 2.44 MB
Page 111 of 240
Service Station Procedures
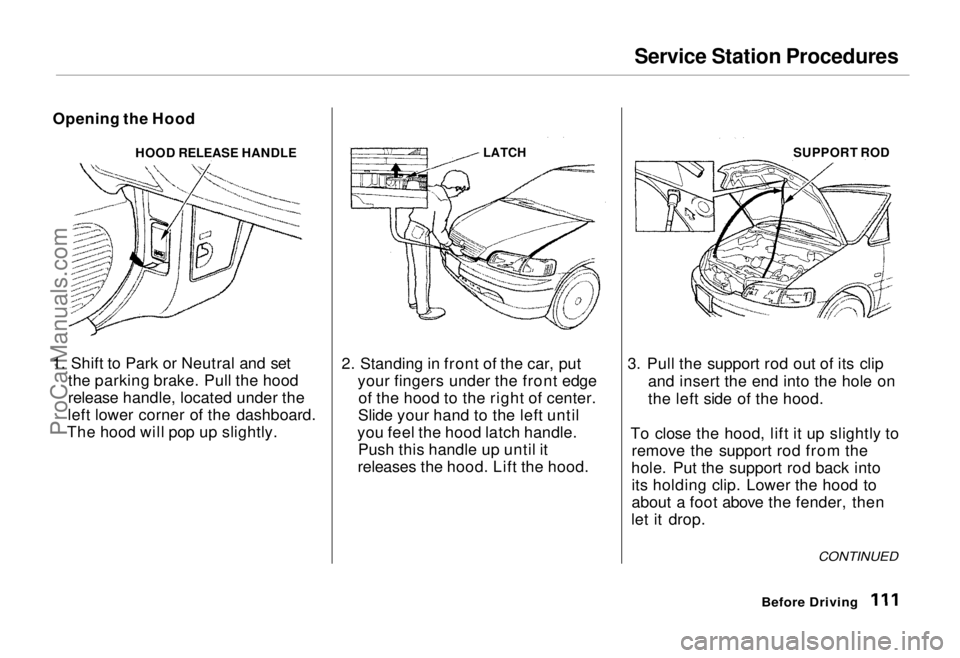
Opening the Hood HOOD RELEASE HANDLE
1. Shift to Park or Neutral and set the parking brake. Pull the hood
release handle, located under the
left lower corner of the dashboard.
The hood will pop up slightly.
LATCH
2. Standing in front of the car, put your fingers under the front edgeof the hood to the right of center.
Slide your hand to the left until
you feel the hood latch handle. Push this handle up until it
releases the hood. Lift the hood. SUPPORT ROD
3. Pull the support rod out of its clip and insert the end into the hole on
the left side of the hood.
To close the hood, lift it up slightly to remove the support rod from the
hole. Put the support rod back into its holding clip. Lower the hood to
about a foot above the fender, then
let it drop.
Before Driving
CONTINUEDProCarManuals.comMain Menu Table of Contents s t
Page 112 of 240
Service Station Procedures
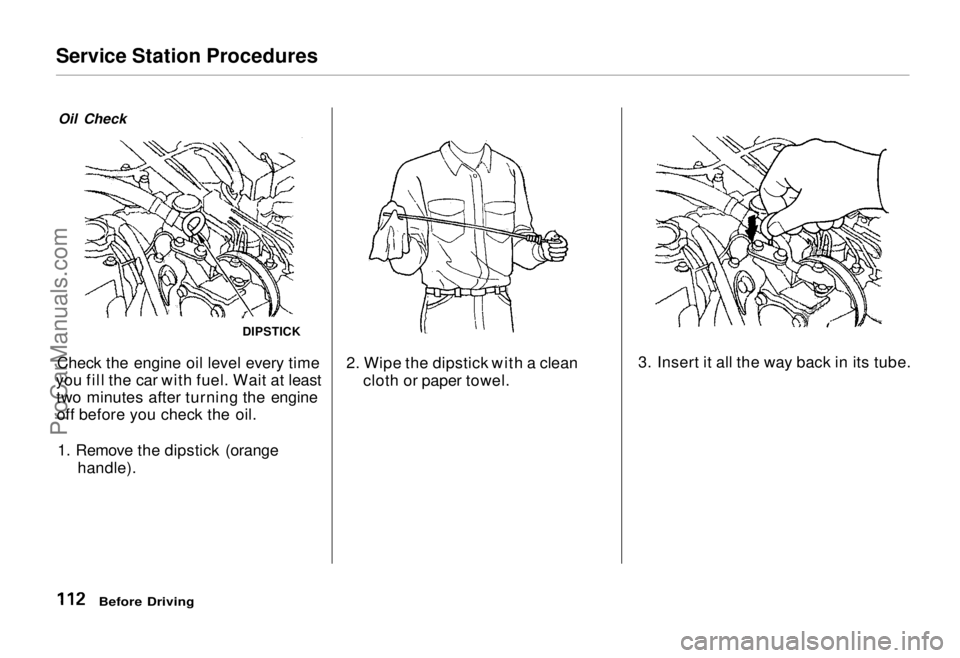
Oil Check
Check the engine oil level every time
you fill the car with fuel. Wait at least two minutes after turning the engineoff before you check the oil.
1. Remove the dipstick (orange handle). 2. Wipe the dipstick with a clean
cloth or paper towel. 3. Insert it all the way back in its tube.
Before Driving
DIPSTICKProCarManuals.comMain Menu Table of Contents s t
Page 113 of 240
Service Station Procedures
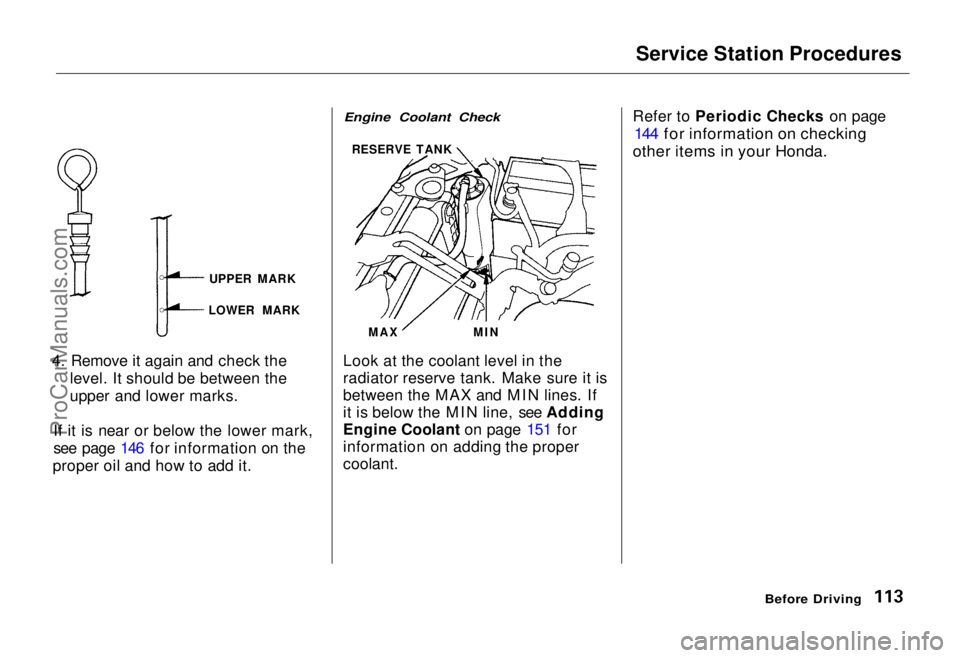
4. Remove it again and check the level. It should be between the
upper and lower marks.
If it is near or below the lower mark,
see page 146 for information on the
proper oil and how to add it. Look at the coolant level in the
radiator reserve tank. Make sure it is
between the MAX and MIN lines. If
it is below the MIN line, see Adding
Engine Coolant on page 151 for
information on adding the proper
coolant.Refer to Periodic Checks on page
144 for information on checking
other items in your Honda.
Before Driving
UPPER MARK
Engine Coolant Check
RESERVE TANK
MAX MIN
LOWER MARKProCarManuals.comMain Menu Table of Contents s t
Page 114 of 240
Fuel Economy
The condition of your car and your driving habits are the two most
important things that affect the fuel
mileage you get.
Vehicle Condition Always maintain your car according to the maintenance schedule. This
will keep it in top operating condition.
An important part of that mainte- nance is the Periodic Checks (see
page 144). For example an under-inflated tire causes more "rolling
resistance," which uses fuel. It also
wears out faster, so check the tire
pressure at least monthly. In winter,
the build-up of snow on your car's
underside adds weight and rolling
resistance. Frequent cleaning helps
your fuel mileage and reduces the chance of corrosion. Driving Habits
You can improve fuel economy by driving moderately. Rapid acceler-
ation, abrupt cornering, and hard
braking use more fuel.
Always drive in the highest gear that allows the engine to run and acceler-
ate smoothly.
Depending on traffic conditions, try
to maintain a constant speed. Every
time you slow down and speed up,
your car uses extra fuel. Use the cruise control, when appropriate, to
increase fuel economy. A cold engine uses more fuel than a
warm engine. It is not necessary to "warm-up" a cold engine by letting it
idle for a long time. You can drive away in about a minute, no matter
how cold it is outside. The engine
will warm up faster, and you get better fuel economy. To cut down on
the number of "cold starts," try tocombine several short trips into one.
The air conditioning puts an extra load on the engine which makes ituse more fuel. Turn off the A/C to
cut down on air conditioning use.Use the flow-through ventilation
when the outside air temperature is moderate.
Before DrivingProCarManuals.comMain Menu Table of Contents s t
Page 115 of 240

Accessories
Your Honda dealer has many Genuine Honda Accessories that
allow you to personalize your car.
These have all been approved for installation and use on your car, andare covered by warranty.
Some non-Honda accessories you
can buy in the "aftermarket" are
designed for universal applications.
Although they may fit your Honda, they may not be within factoryspecifications. For example, after-
market wheels may not meet Honda's specifications for width and offset.
They could cause suspension problems which would not be
covered by your warranty. Im-
properly-designed accessories can adversely affect your car's handling
and stability. Your car has several computer-
controlled systems, including the
SRS system, the engine's fuel
injection, and the Anti-lock brake system. Strong electronic inter-
ference can affect their operation.
Electronic communications equip-
ment, such as cellular telephones
and two-way radios are regulated by
the FCC (DOC in Canada) and should not interfere with your car's
systems. Improper installation, or
using electrical equipment not in-
tended for mobile use may interfere
with your car's operation. If you want to install a cellular telephone, other
mobile communications equipment
or even add-on stereo amplifiers,
please discuss it first with your Honda dealer. In many cases, improper installation
is the real cause of problems with
aftermarket accessories. Have these
accessories installed by qualified
technicians who are familiar with
your Honda. If possible, have your Honda dealer inspect the final
installation.
Before DrivingProCarManuals.comMain Menu Table of Contents s t
Page 116 of 240
Loading Cargo
The maximum load you can carry in your Honda is 535 kg (1,150 Ibs). Itincludes the total weight of all
passengers and their belongings, any accessories, and the tongue weight
of a trailer. This 535 kg (1,150 Ibs)
figure is shown as the Vehicle Capacity Weight on the tire infor-
mation label attached to the driver's
doorjamb.
To figure out how much cargo you
can carry:
Figure the total "occupant weight"
you will be transporting. To do this,
multiply the number of people (driver and all passengers) by 70
kg
(150
Ibs).
Subtract this number from the
Vehicle Capacity Weight (535 kg/
1,150 Ibs).
If you are towing a trailer, subtract
the tongue weight. See Towing a
Trailer on page 128.
This final number is the total weight of cargo you can load in or on the car.
With seven occupants (driver and six
passengers), the maximum recom -
mended weight
for cargo is 45 kg
(100 Ibs).
Where you store this cargo, and how well you secure it, are just asimportant as how much it weighs.
Make sure you load cargo so it will not shift while driving. Items stored
in the cargo area behind the thirdseat should be placed as far forward
as possible. You could store addi-
tional items on the floor behind the
front seats. Make sure they cannot roll under the front seat and
interfere with the pedals.
For greater cargo capacity, the thirdseat can be folded into the floor and
the second row seats can either be
removed or folded up (depending on
model). Passengers should never sit in the open cargo area while the car
is moving. They should sit in one of
the seats and wear their seat belts.
If you must carry large objects that
prevent you from closing the tailgate,
be aware that exhaust gas can enter
the interior. See Carbon Monoxide
Hazard on page 29.
Before DrivingProCarManuals.comMain Menu Table of Contents s t
Page 117 of 240
Driving
This section gives you tips on starting the engine under various
conditions, and how to operate the
automatic transmission. It also includes important information on
your car's braking system and facts
you need if you are planning to tow a trailer.
Preparing to Drive......................... 118
Starting the Engine........................ 119
Starting in Cold Weather at High Altitude ..................... 119
Automatic Transmission............... 120 Shift Lever Positions................. 120
Maximum Speeds...................... 123
Shift Lock Release..................... 123
The Braking System...................... 124 Brake Wear Indicators.............. 124
Brake System Design................ 124
Anti-lock Brakes........................ 125
Driving in Bad Weather................ 126
Towing a Trailer............................ 128
DrivingProCarManuals.comMain Menu s t
Page 118 of 240
Preparing to Drive
You should do the following checks and adjustments every day before
you drive your car.
1. Make sure all windows, mirrors, and outside lights are clean and
unobstructed. Remove frost, snow,
or ice.
2. Check that the hood and tailgate are fully closed.
3. Visually check the tires. If a tire looks low, use a gauge to check its
pressure.
4. Check that any items you may be carrying with you inside are stored
properly or fastened down
securely. 5. Check the adjustment of the seat
(see page 56).
6. Check the adjustment of the inside and outside mirrors (see
page 66).
7. Check the adjustment of the steering wheel (see page 46).
8. Make sure the doors are securely closed and locked.
9. Fasten your seat belt. Check that your passengers have fastened
their seat belts (see page 7). 10. Turn the ignition ON (II). Check
the indicator lights in the instru-
ment panel.
11. Start the engine (see page 119).
12. Check the gauges and indicator lights in the instrument panel (see
page 35).
DrivingProCarManuals.comMain Menu Table of Contents s t
Page 119 of 240

Starting the Engine
1. Apply the parking brake.
2. In cold weather, turn off all electrical accessories to reduce
the drain on the battery.
3. Make sure the shift lever is in Park. Press on the brake pedal.
4. Without touching the accelerator pedal, turn the ignition key to theSTART (III) position. If the enginedoes not start right away, do not
hold the key in START (III) for
more than 15 seconds at a time.
Pause for at least 10 seconds
before trying again.
5. If the engine does not start within 15 seconds, or starts but stalls
right away, repeat step 4 with the accelerator pedal pressed half-way
down. If the engine starts, release
pressure on the accelerator pedal so the engine does not race. 6. If the engine still does not start,
press the accelerator pedal all the
way down and hold it there while starting in order to clear flooding.
As before, keep the ignition key in the START (III) position for nomore than 15 seconds. Return tostep 5 if the engine does not start.
If it starts, lift your foot off the
accelerator pedal so the engine
does not race.
Starting in Cold Weather at High
Altitude (Above 2,400 meters/ 8,000 feet)
An engine is harder to start in cold weather. The thinner air found athigh altitude above 2,400 meters (8,000 feet) adds to the problem.
Use the following procedure:
1. Turn off all electrical accessories to reduce the drain on the battery. 2. Push the accelerator pedal half-
way to the floor and hold it there
while starting the engine. Do nothold the ignition key in START (III) for more than 15 seconds.
When the engine starts, release the accelerator pedal gradually as
the engine speeds up and smoothsout.
3. If the engine fails to start in step 2, push the accelerator pedal to the
floor and hold it there while youtry to start the engine for no more
than 15 seconds. If the engine does not start, return to step 2.
DrivingProCarManuals.comMain Menu Table of Contents s t
Page 120 of 240
Automatic Transmission
Your Honda's transmission has fourforward speeds, and is electronically
controlled for smoother shifting. Italso has a "lock-up" torque converter
for better fuel economy. You may
feel what seems like another shift
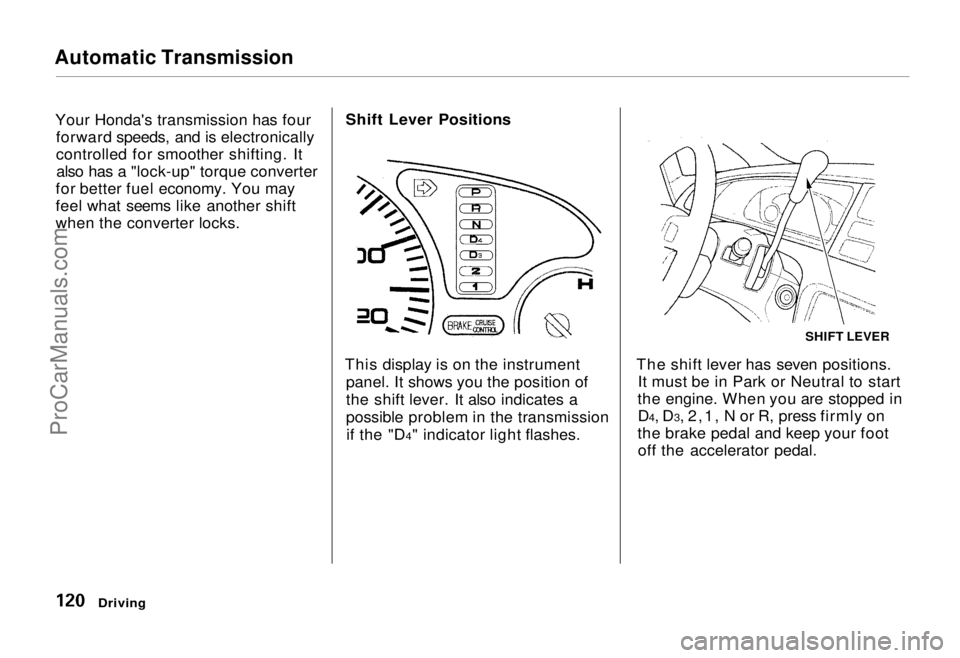
when the converter locks. Shift Lever Positions
This display is on the instrument panel. It shows you the position of
the shift lever. It also indicates a
possible problem in the transmissionif the "D4" indicator light flashes. The shift lever has seven positions.
It must be in Park or Neutral to start
the engine. When you are stopped in D4, D3, 2,1, N or R, press firmly on
the brake pedal and keep your foot off the accelerator pedal.
Driving
SHIFT LEVERProCarManuals.comMain Menu Table of Contents s t