HONDA ODYSSEY 1995 Manual Online
Manufacturer: HONDA, Model Year: 1995, Model line: ODYSSEY, Model: HONDA ODYSSEY 1995Pages: 240, PDF Size: 2.44 MB
Page 81 of 240

Heating and Cooling
To Heat and Dehumidify with Air
Conditioning
Air conditioning removes moisture from the air as it operates. Whenused in combination with the heater,
it makes the interior warm and dry.
1. Switch the fan on.
2. Turn on the air conditioning. 3. Select and any desired
mode button.
4. Adjust the temperature control lever so the mixture of heated andcooled air feels comfortable.
This setting is suitable for all driving conditions whenever the outside
temperature is above 32° F (0°C).
CONTINUED
Comfort and Convenience Features
RECIRCULATION AIR BUTTON
FRESH AIR
BUTTON
MODE BUTTONS
TEMPERATURE CONTROL LEVER FAN CONTROL
LEVER
AIR CONDITIONING
SWITCHProCarManuals.comMain Menu Table of Contents s t
Page 82 of 240

Heating and Cooling
To Defog and Defrost
To remove fog from the inside of the windows:
1. Switch the fan on.
2. Turn on the air conditioning. 3. Select and
4. Adjust the temperature control lever so the airflow from the
defroster vents feels warm.
5. Turn on the rear window defogger to help clear the rear window.
To remove exterior frost or ice from the windshield and side windowsafter the car has been sitting out in
cold weather:
1. Start the engine. 2. Select and
3. Switch the fan and temperature
controls to maximum. To rapidly remove exterior frost or
ice from the windshield (on very cold days), first select Once the
windshield is clear, select to
avoid fogging the windows.
These settings direct all the air flow to the defroster vents at the base ofthe windshield and the side windowdefroster vents. The air flow will get
warmer and clear the windows faster as the engine warms up. You can
close the side vents with the dial
beside each vent. This will send more warm air to the windshielddefroster vents.
For safety, make sure you have a
clear view through all the windows
before driving away.
To Turn Everything Off
To shut off the system temporarily, slide the fan speed and temperature
control levers all the way to the left.
You should shut the system com- pletely off only for the first few
minutes of driving in cold weather,until the engine coolant warms up
enough to operate the heater. Keep
the fan on at all other times so stale air does not build up in the interior.
Comfort and Convenience FeaturesProCarManuals.comMain Menu Table of Contents s t
Page 83 of 240
Heating and Cooling
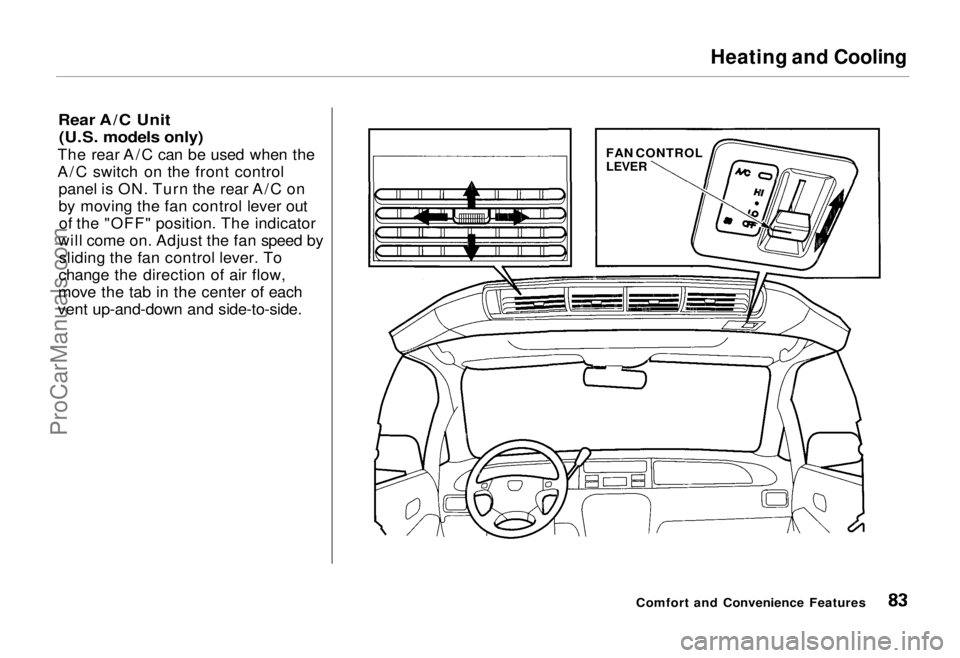
Rear A/C Unit (U.S. models only)
The rear A/C can be used when the
A/C switch on the front control panel is ON. Turn the rear A/C on
by moving the fan control lever outof the "OFF" position. The indicator
will come on. Adjust the fan speed by sliding the fan control lever. To
change the direction of air flow,
move the tab in the center of each
vent up-and-down and side-to-side.
Comfort and Convenience Features
FAN CONTROL
LEVERProCarManuals.comMain Menu Table of Contents s t
Page 84 of 240

Audio System
AM/FM/Cassette Stereo Audio
System
For U.S. LX and Canadian models
Your Honda audio system is easy to use, and will give clear AM/FM
reception. The preset buttons allow
you to select six stations on AM andtwelve stations on FM.
The cassette system uses Dolby B ®
* noise reduction to give
excellent sound reproduction. The
system also senses when a metal or
chromium-dioxide (CrO2) tape is
being played and adjusts accordingly.
* Dolby noise reduction manufac-
tured under license from Dolby Laboratories Licensing Corporation.
"DOLBY" and the double-D symbol are trademarks of Dolby
Laboratories Licensing Corporation. PWR/VOL KNOB
CASSETTE SLOT
AM/FM
BUTTON
PRESET
BUTTONS
Comfort and Convenience FeaturesProCarManuals.comMain Menu Table of Contents s t
Page 85 of 240
 or ON (II) to operate the audio system. Turn the
system on by pushing the PWR/
VOL knob. The radio comes on and displays")
Audio System
Operating the Radio
The ignition switch must be in
ACCESSORY (I) or ON (II) to operate the audio system. Turn the
system on by pushing the PWR/
VOL knob. The radio comes on and displays the frequency of the station
it was last tuned to.
Adjust the volume by turning the PWR/VOL knob.
Select the band you want to listen to
by pressing the AM/FM button. You
will see the selected band and the
frequency in the display.
ST will be displayed under the fre- quency if the station is broadcasting
in FM stereo. The AM stereo feature
is not available. Finding the Radio Station
You can use any of three methods to find radio stations on the selected
band: TUNE, SEEK, or the Preset
buttons.
The TUNE function lets you find a
desired frequency. Push the TUNE/ SEEK button ( ) to change to a
higher frequency, and ( ) to
change to a lower frequency.
To change the frequency up or down a single increment, push and release
the appropriate TUNE/SEEK button.
Comfort and Convenience Features
PWR/VOL KNOB
AM/FM
BUTTON
PRESET
BUTTONS
STEREO INDICATOR
TUNE/SEEK
BUTTONS
CONTINUEDProCarManuals.comMain Menu Table of Contents s t
Page 86 of 240

Audio System
The SEEK function searches the
band for stations with a strong signal.Depending on which TUNE/SEEK
button you push, the system searches up or clown from the
current frequency. Push the switch
until you hear a beep, then release it.
The system searches until it finds a station with a strong signal, thenstops. If you do not want to listen to
that station, push TUNE/SEEK
again.
Presetting
The preset buttons allow you to store radio frequencies for later selection.
Each button will store one frequency
on the AM band, and two on the FM
band.
To store a frequency:
1. Select the desired band, AM or FM. FM1 and FM2 let you store
two frequencies with each Preset
button. 2. Use the TUNE or SEEK function
to tune the radio to a desired
station.
3. Pick the Preset button you want for that station. Press the buttonand hold it until you hear a beep.
4. Repeat steps 1 to 3 to store a total of six stations on AM and twelve
on FM.
Once that station's frequency is
stored, simply press and release the
proper preset button to tune to it. If
you want to change any preset button's selection, store another fre-quency as described. The frequen-
cies you preset will be lost if your
car's battery goes dead or is discon-
nected.
Comfort and Convenience Features TUNE/SEEK
BUTTONS
AM/FM BUTTON
PRESET
BUTTONSProCarManuals.comMain Menu Table of Contents s t
Page 87 of 240

Audio System
Adjusting the Sound Use the Balance and Fader controls
to adjust the sound "direction". The
Balance control moves it left-to-right.
The Fader control moves it front-to-
back.
To use either control, push on the knob to get it to pop out. Adjust the
front-to-back sound to your liking
with the outside ring.
Adjust side-to-side sound balance with the knob. Push the knob back in
when you are done. The illumination for the radio con-
trols comes on with the instrument
panel lights, even if the radio is off.
You can use the Balance control to turn off the radio panel illumination even with the radio on. Push the
control knob so it pops out, then pull
it out slightly further. Check this
control if the control panel lights do
not come on with the instrument
panel lights. Use the Bass and Treble controls to
adjust the tone quality to your liking.
Push on the knob to get the controls
to pop out. Adjust the bass level with
the outer ring and the treble level
with the knob. When finished, push the knobs back in so there is lesschance of accidentally changing your
settings.
Comfort and Convenience Features
BASS
CONTROL
TREBLE
CONTROL
FADER
CONTROL BALANCE
CONTROLProCarManuals.comMain Menu Table of Contents s t
Page 88 of 240

Audio System
Radio Frequencies
Your Honda's radio can tune in all
frequencies in both the AM and FM
bands.
Those bands cover these frequen-
cies:
AM band:530 to 1,710 kilohertz
FM band:
87.7 to 107.9 megahertz
Radio stations on the AM band are
assigned frequencies at least 10
kilohertz apart (530, 540, 550).
Those on the FM band are assigned frequencies at least 0.2 megahertz
apart (87.9, 88.1, 88.3). Stations must use these exact
frequencies. It is fairly common forstations to round-off the frequency in
their advertising, so your radio will show a frequency of 100.9 even
though the announcer may call the
station "FM101."
Comfort and Convenience Features PWR/VOL KNOB
AM/FMBUTTON
PRESET
BUTTONS
TUNE/SEEK
BUTTONS
STEREO INDICATORProCarManuals.comMain Menu Table of Contents s t
Page 89 of 240

Audio System
Operating the Cassette Player
Turn the system ON. Insert the cassette into the slot with the tapeopening to the right. Push the
cassette in most of the way. The
drive will pull it in the rest of the way
and begin to play. The or will light to show you
which side of the cassette is playing. The indicates the side you
inserted facing upward is now
playing. To play the other side of the
tape, press the PROG/PLAY button.
The system also has an Auto-reverse feature. It will automatically reverse
direction when it reaches the end of
the cassette. PWR/VOL KNOB
TAPE DIRECTION
INDICATOR
DOLBY BUTTON
Dolby ®
noise reduction turns on
when you insert a cassette. If the
tape was not recorded with Dolby
"B" noise reduction, turn it off by pressing the button.
To remove the cassette from the
drive, press the EJECT button.
Comfort and Convenience Features
FF/REW/SKIP
BUTTONS
CASSETTE
SLOT
EJECT
BUTTON PROG/PLAY
BUTTONProCarManuals.comMain Menu Table of Contents s t
Page 90 of 240

Audio System
Cassette Search Functions
Once a cassette is playing, you can
use the FF, REW, RPT, or SKIP
function to look for desired songs or
passages.
To rewind the tape, push the button. You will see REW in
the display. To fast forward the tape, push the button. You will see
FF displayed. To stop rewind or fast
forward, press the PROG/PLAY
button, If the system reaches the
end of the cassette while in fast
forward or rewind, it automatically stops that function, reverses
direction, and begins to play.
Press the RPT button to replay the
current passage. You will see RPT
displayed. When the system reaches
the end of the song or passage that
is being played, it automatically goes
into rewind. When it senses the
beginning of that passage, it goes
back to play. The system will FF/REW/SKIP
BUTTONS
RPT BUTTON
PROG/PLAY
BUTTON
continue repeating this passage until
you turn off RPT by pressing the button again.
Comfort and Convenience FeaturesProCarManuals.comMain Menu Table of Contents s t