ECO mode HONDA ODYSSEY 1995 Owners Manual
[x] Cancel search | Manufacturer: HONDA, Model Year: 1995, Model line: ODYSSEY, Model: HONDA ODYSSEY 1995Pages: 240, PDF Size: 2.44 MB
Page 7 of 240
The Seat Belt System and How It Works
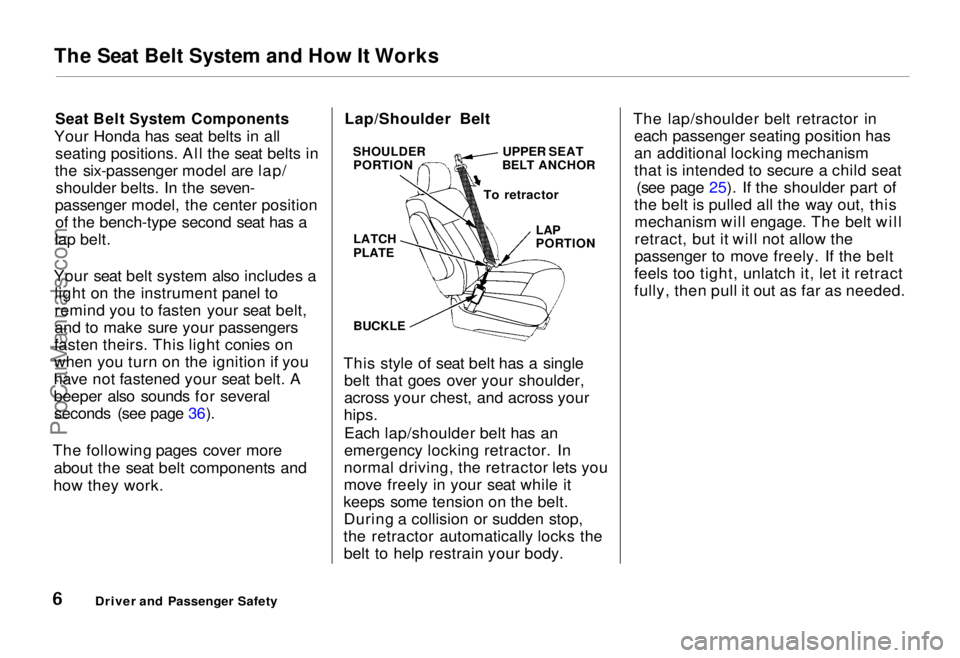
Seat Belt System Components
Your Honda has seat belts in all seating positions. All the seat belts in
the six-passenger model are lap/ shoulder belts. In the seven-
passenger model, the center position of the bench-type second seat has a
lap belt.
Your seat belt system also includes a light on the instrument panel to
remind you to fasten your seat belt,
and to make sure your passengers
fasten theirs. This light conies on
when you turn on the ignition if you
have not fastened your seat belt. A
beeper also sounds for several seconds (see page 36).
The following pages cover more about the seat belt components and
how they work. Lap/Shoulder Belt
This style of seat belt has a single belt that goes over your shoulder,
across your chest, and across your
hips.
Each lap/shoulder belt has an
emergency locking retractor. In
normal driving, the retractor lets you
move freely in your seat while it
keeps some tension on the belt. During a collision or sudden stop,
the retractor automatically locks the belt to help restrain your body. The lap/shoulder belt retractor in
each passenger seating position has
an additional locking mechanism
that is intended to secure a child seat (see page 25). If the shoulder part of
the belt is pulled all the way out, this mechanism will engage. The belt will
retract, but it will not allow the
passenger to move freely. If the belt
feels too tight, unlatch it, let it retract
fully, then pull it out as far as needed.
Driver and Passenger Safety
SHOULDER
PORTION
LATCH
PLATE
UPPER SEAT
BELT ANCHOR
LAP
PORTION
BUCKLE
To retractorProCarManuals.comMain Menu Table of Contents s t
Page 21 of 240
Child Safety
Children depend on adults to protect
them. To help make sure we do, every state and Canadian province
has laws requiring infants and young children to be properly restrained
whenever they ride in a car.
Where Should Children Sit?
According to accident statistics, children of all sizes and ages aresafer when they are properly
restrained in the rear seat rather
than the front seat.
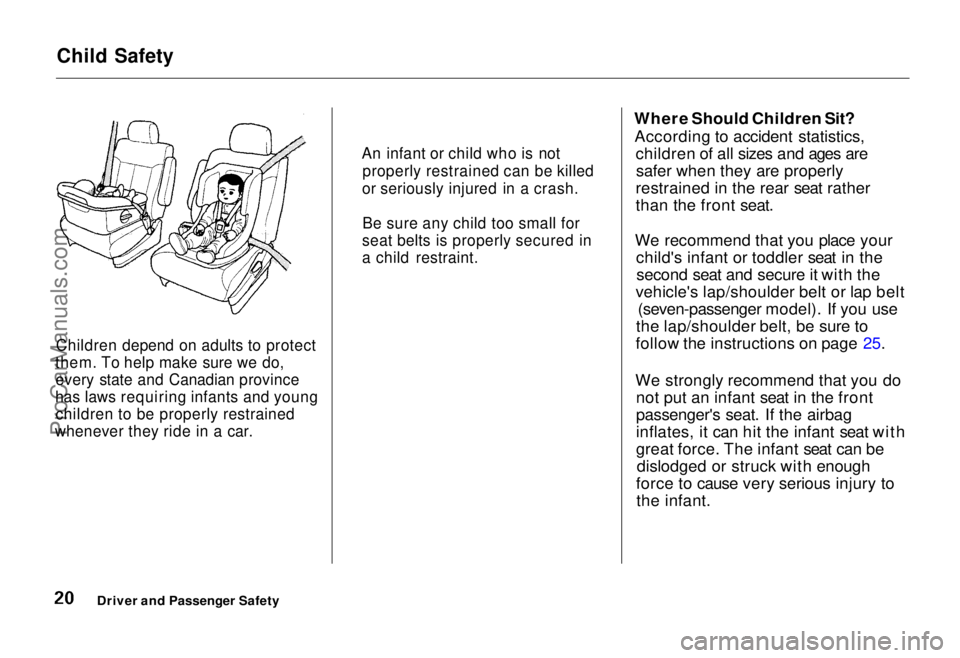
We recommend that you place your child's infant or toddler seat in thesecond seat and secure it with the
vehicle's lap/shoulder belt or lap belt (seven-passenger model). If you use
the lap/shoulder belt, be sure to
follow the instructions on page 25.
We strongly recommend that you do not put an infant seat in the front
passenger's seat. If the airbag
inflates, it can hit the infant seat with
great force. The infant seat can bedislodged or struck with enough
force to cause very serious injury to the infant.
Driver and Passenger Safety
An infant or child who is not
properly restrained can be killed
or seriously injured in a crash.
Be sure any child too small for
seat belts is properly secured in
a child restraint.ProCarManuals.comMain Menu Table of Contents s t
Page 24 of 240
Child Safety
We recommend that you place your child's infant seat in the second seat
and secure it with the vehicle's lap/ shoulder belt or lap belt (seven-
passenger model). If you use the
lap/shoulder belt, be sure to follow
the instructions on page 25.
We strongly recommend that you do not put an infant seat in the front
passenger's seat. If the airbag
inflates, it can hit the infant seat with
great force. The infant seat can be dislodged or struck with enough
force to cause very serious injury to the infant. Restraining a Child Who Weighs
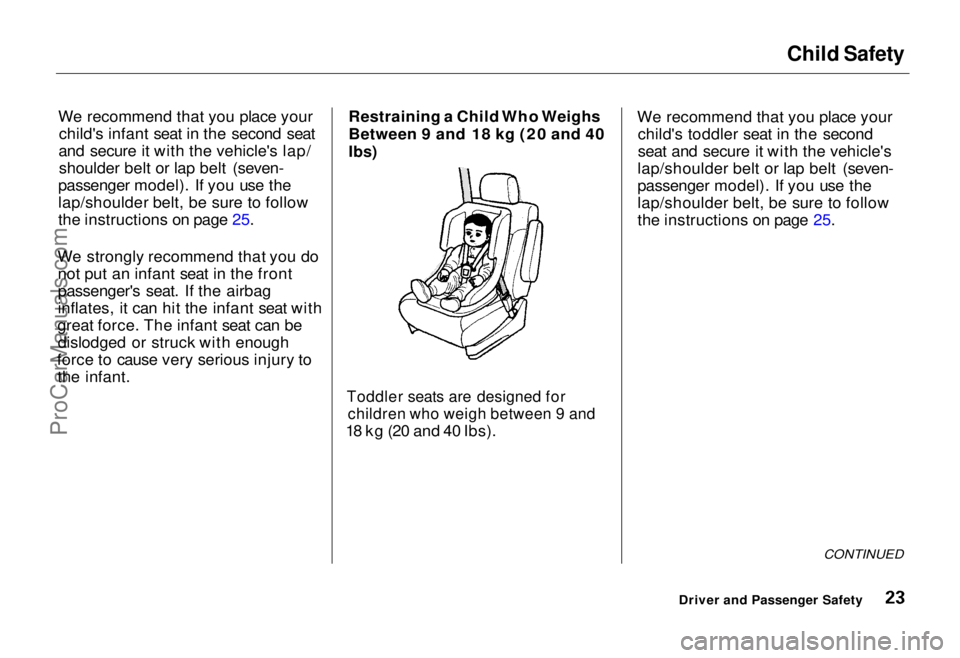
Between 9 and 18 kg (20 and 40
Ibs)
Toddler seats are designed for children who weigh between 9 and
18 kg (20 and 40 Ibs). We recommend that you place your
child's toddler seat in the second
seat and secure it with the vehicle's
lap/shoulder belt or lap belt (seven-
passenger model). If you use the
lap/shoulder belt, be sure to follow
the instructions on page 25.
CONTINUED
Driver and Passenger SafetyProCarManuals.comMain Menu Table of Contents s t
Page 27 of 240
Child Safety
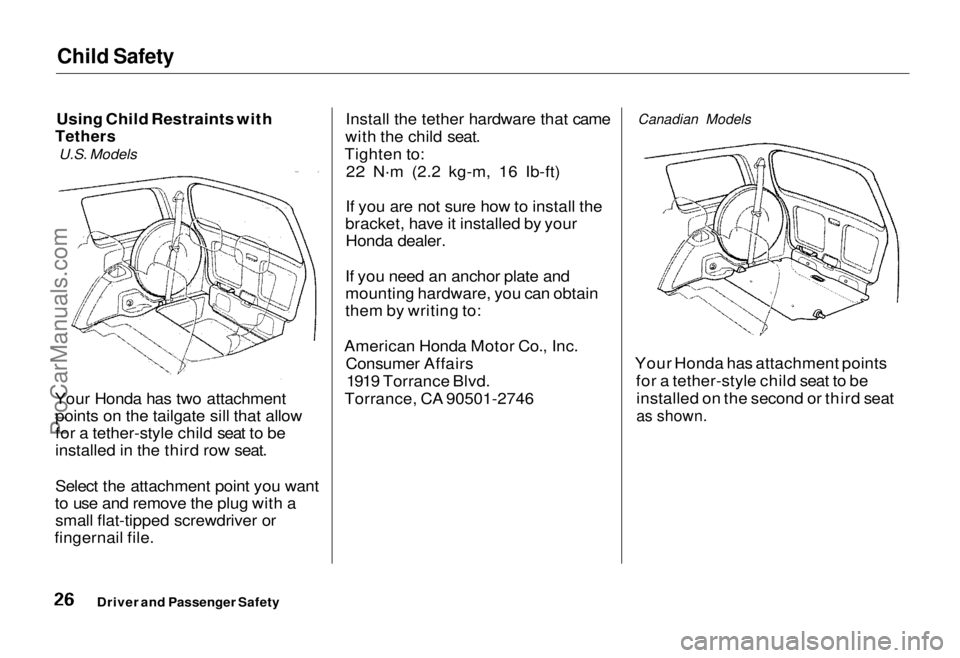
Using Child Restraints with
Tethers
U.S. Models
Your Honda has two attachment points on the tailgate sill that allow
for a tether-style child seat to be
installed in the third row seat.
Select the attachment point you want
to use and remove the plug with a small flat-tipped screwdriver or
fingernail file. Install the tether hardware that came
with the child seat.
Tighten to:
22 N .
m (2.2 kg-m, 16 Ib-ft)
If you are not sure how to install the
bracket, have it installed by your Honda dealer.
If you need an anchor plate and
mounting hardware, you can obtain
them by writing to:
American Honda Motor Co., Inc. Consumer Affairs1919 Torrance Blvd.
Torrance, CA 90501-2746
Canadian Models
Your Honda has attachment points for a tether-style child seat to beinstalled on the second or third seat
as shown.
Driver and Passenger Safety
ProCarManuals.comMain Menu Table of Contents s t
Page 28 of 240

Child Safety
Second Seat Installation:
There are three attachment points available for the seven-passenger
model, and two attachment points
available for the six-passenger model.
To install a child seat in the second seat, fold the third seat into the floor
recess (see page 62). You will find a
U-shaped slit
in the carpeting at each
attachment point. Select the attach-
ment point you want to use, and pull
up the carpeting at the slit.
Third Seat Installation:
There are two attachment points onthe tailgate sill. Select the attach-
ment point you want use, and
remove the plug with a small flat-
tipped screwdriver or a fingernail file.
Install the tether hardware that came
with the child seat.
Tighten to:
22 N .
m (2.2 kg-m, 16 Ib-ft)
If you are not sure how to install the
bracket, have it installed by your Honda dealer. Storing a Child Seat
When you are not using an infant seat or other child restraint, either
remove it or make sure it is properly secured so it cannot be thrown
around the car during a crash.
Driver and Passenger Safety
ProCarManuals.comMain Menu Table of Contents s t
Page 33 of 240
Instruments and Controls
This section gives information about the controls and displays thatcontribute to the daily operation of
your Honda. All the essential controls are within easy reach.
Control Locations............................ 34
Indicator Lights................................ 35
Gauges............................................. 39
Speedometer............................... 39
Trip Meter................................... 39
Odometer..................................... 39
Temperature Gauge................... 40
Fuel Gauge.................................. 40
Maintenance Required
Indicator................................... 40
Controls Near the Steering Wheel...................................... 41
Headlights...................................
42
Daytime Running
Lights............ 42
Instrument Panel Brightness.... 43
Turn Signals................................. 43
Windshield Wipers...................... 44
Windshield Washers................... 44 Rear Window Wiper and Washer...................................... 45
Hazard Warning.......................... 45
Rear Window Defogger.............. 45
Steering Wheel Adjustment....... 46
Steering Wheel Controls ................ 48 Cruise Control.............................. 48
Horn............................................. 51
Keys and Locks................................ 51
Keys............................................... 51
Ignition Switch............................. 52
Power Door Locks....................... 53Remote Transmitter.................... 54
Childproof Door Locks............... 54
Tailgate......................................... 55 Glove Box..................................... 55
Seats................................................. 56
Passenger Seating...................... 56
Seat Adjustments........................ 56
Driver's Seat Power HeightAdjustment.............................. 57
Head Restraints.......................... 58
Third Seat Access....................... 58 Removing the Second Seats
in the Six-Passenger Model.... 59
Folding the Second Seats in the Seven-Passenger
Model................................... 60
Reclining the Second Seat.......... 61
Folding the Third Seat in All Models...........................
62
Power Windows.............................. .
64
Sunroof............................................. 65
Mirrors............................................. 66
Adjusting the Power Mirrors.....
67
Parking Brake.................................
68
Digital Clock..................................... 68
Beverage Holder.............................. 69 Dashboard Compartment............... 70
Center Poket.................................... 71
Coin Box........................................... 71
Vanity Mirror................................... 71
Cigarette Lighter............................. 72
Ashtrays........................................... 72
Interior Lights.................................. 73
Ceiling Lights.............................. 73
Spotlights..................................... 73
Tailgate Light............................... 74 Courtesy Lights........................... 74
Instruments and ControlsProCarManuals.comMain Menu s t
Page 38 of 240
Indicator Lights
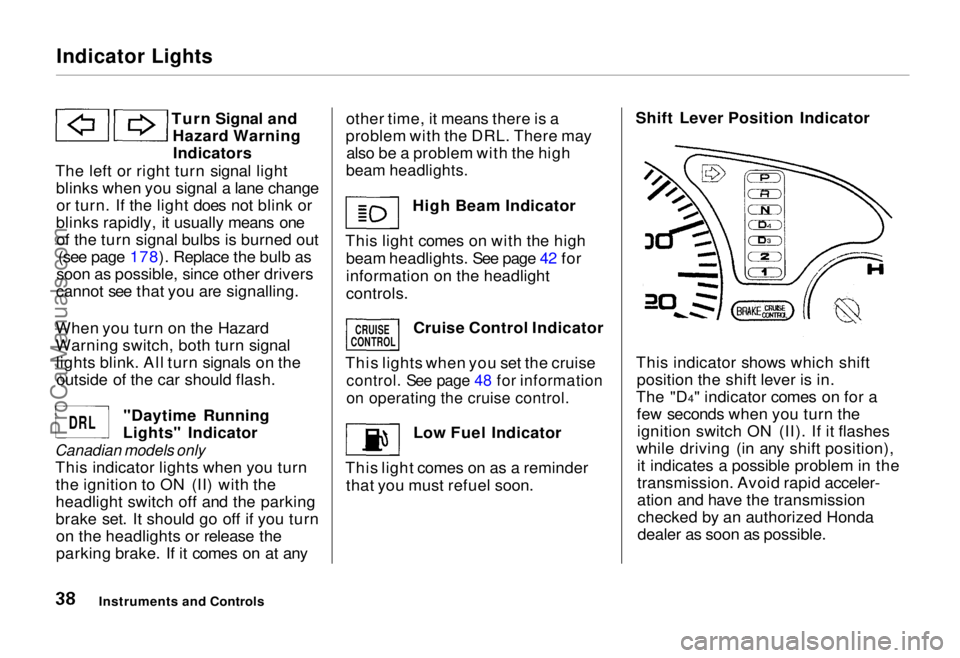
Turn Signal andHazard WarningIndicators
The left or right turn signal light blinks when you signal a lane changeor turn. If the light does not blink or
blinks rapidly, it usually means one of the turn signal bulbs is burned out (see page 178). Replace the bulb as
soon as possible, since other drivers
cannot see that you are signalling.
When you turn on the Hazard
Warning switch, both turn signal lights blink. All turn signals on theoutside of the car should flash.
"Daytime Running
Lights" Indicator
Canadian models only
This indicator lights when you turnthe ignition to ON (II) with the
headlight switch off and the parking
brake set. It should go off if you turnon the headlights or release the
parking brake. If it comes on at any other time, it means there is a
problem with the DRL. There may also be a problem with the high
beam headlights.
High Beam Indicator
This light comes on with the high beam headlights. See page 42 for
information on the headlight
controls.
Cruise Control Indicator
This lights when you set the cruise
control. See page 48 for information
on operating the cruise control.
Low Fuel Indicator
This light comes on as a reminder that you must refuel soon. Shift Lever Position Indicator
This indicator shows which shift position the shift lever is in.
The "D4" indicator comes on for a few seconds when you turn theignition switch ON (II). If it flashes
while driving (in any shift position), it indicates a possible problem in the
transmission. Avoid rapid acceler-
ation and have the transmissionchecked by an authorized Honda
dealer as soon as possible.
Instruments and Controls
CRUISE
CONTROL
DRL
ProCarManuals.comMain Menu Table of Contents s t
Page 42 of 240
Controls Near the Steering Wheel
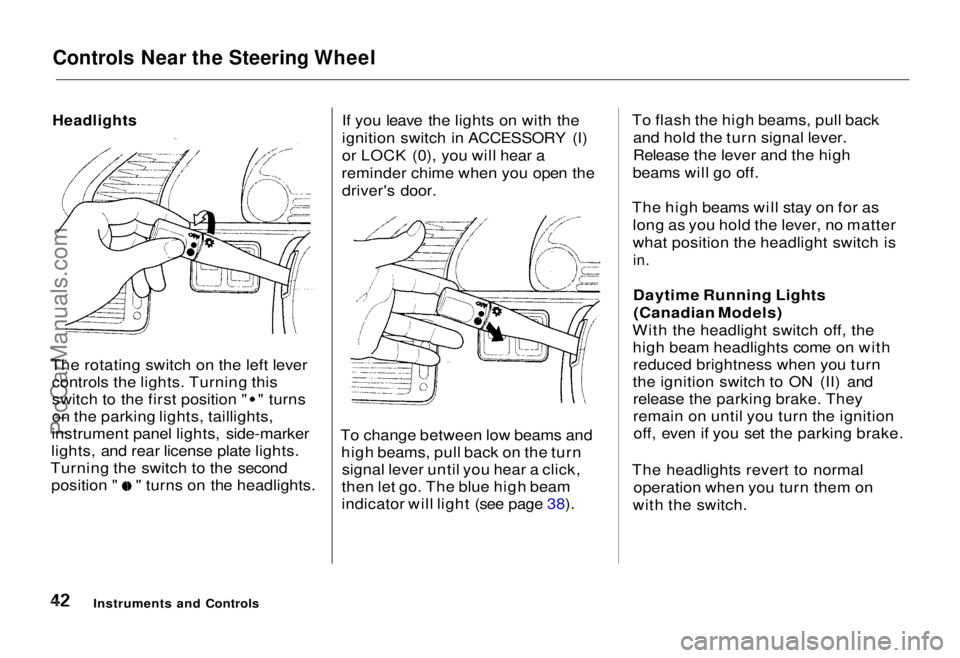
The rotating switch on the left lever controls the lights. Turning this switch to the first position " " turns
on the parking lights, taillights,
instrument panel lights, side-marker
lights, and rear license plate lights.
Turning the switch to the second position " " turns on the headlights. If you leave the lights on with the
ignition switch in ACCESSORY (I)
or LOCK (0), you will hear a
reminder chime when you open the driver's door.
To change between low beams and high beams, pull back on the turnsignal lever until you hear a click,
then let go. The blue high beam
indicator will light (see page 38). To flash the high beams, pull back
and hold the turn signal lever.
Release the lever and the high
beams will go off.
The high beams will stay on for as long as you hold the lever, no matter
what position the headlight switch is
in.
Daytime Running Lights(Canadian Models)
With the headlight switch off, the high beam headlights come on withreduced brightness when you turn
the ignition switch to ON (II) and release the parking brake. They
remain on until you turn the ignitionoff, even if you set the parking brake.
The headlights revert to normal operation when you turn them on
with the switch.
Instruments and Controls
HeadlightsProCarManuals.comMain Menu Table of Contents s t
Page 44 of 240
Controls Near the Steering Wheel
Windshield Wipers
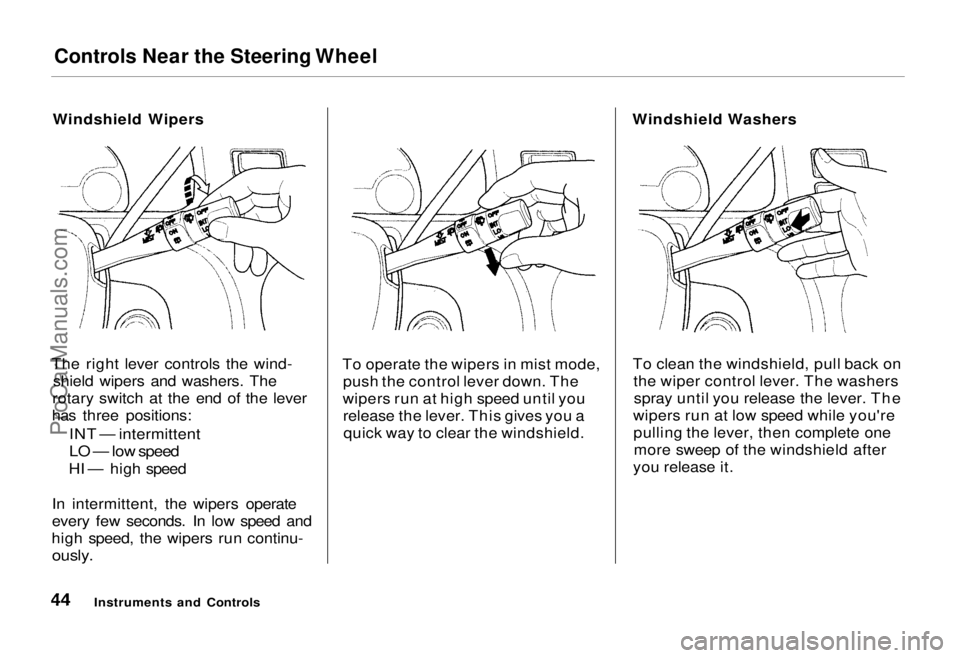
The right lever controls the wind- shield wipers and washers. The
rotary switch at the end of the lever
has three positions:
INT — intermittent
LO — low speed
HI — high speed
In intermittent, the wipers operate
every few seconds. In low speed and
high speed, the wipers run continu-
ously.
To operate the wipers in mist mode,
push the control lever down. The
wipers run at high speed until you release the lever. This gives you aquick way to clear the windshield. Windshield Washers
To clean the windshield, pull back on the wiper control lever. The washersspray until you release the lever. The
wipers run at low speed while you're pulling the lever, then complete onemore sweep of the windshield after
you release it.
Instruments and ControlsProCarManuals.comMain Menu Table of Contents s t
Page 54 of 240
Keys and Locks
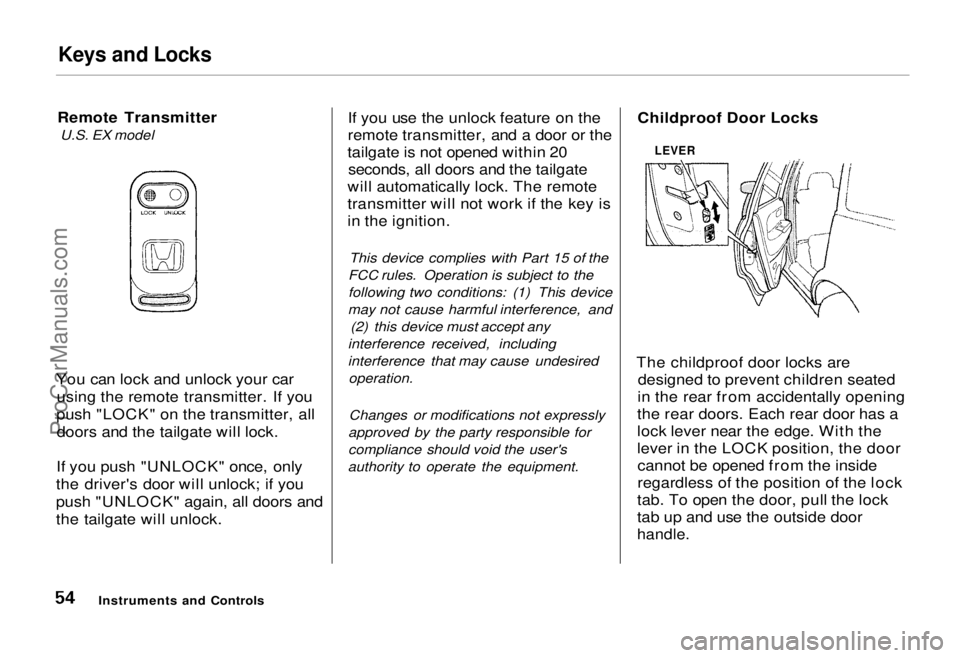
Remote Transmitter U.S. EX model
You can lock and unlock your car using the remote transmitter. If you
push "LOCK" on the transmitter, all doors and the tailgate will lock.
If you push "UNLOCK" once, only
the driver's door will unlock; if you
push "UNLOCK" again, all doors and
the tailgate will unlock. If you use the unlock feature on the
remote transmitter, and a door or the
tailgate is not opened within 20 seconds, all doors and the tailgate
will automatically lock. The remote
transmitter will not work if the key is
in the ignition.
This device complies with Part 15 of the
FCC rules. Operation is subject to the
following two conditions: (1) This device
may not cause harmful interference, and (2) this device must accept any
interference received, including
interference that may cause undesired operation.
Changes or modifications not expressly
approved by the party responsible for
compliance should void the user's
authority to operate the equipment. Childproof Door Locks
The childproof door locks are designed to prevent children seated
in the rear from accidentally opening
the rear doors. Each rear door has a
lock lever near the edge. With the
lever in the LOCK position, the door cannot be opened from the inside
regardless of the position of the lock
tab. To open the door, pull the lock
tab up and use the outside door
handle.
Instruments and Controls
LEVERProCarManuals.comMain Menu Table of Contents s t