cooling HONDA ODYSSEY 1998 User Guide
[x] Cancel search | Manufacturer: HONDA, Model Year: 1998, Model line: ODYSSEY, Model: HONDA ODYSSEY 1998Pages: 272, PDF Size: 2.67 MB
Page 100 of 272

Heating and Cooling
To remove exterior frost or ice from the windshield and side windowsafter the vehicle has been sitting out
in cold weather:
1. Start the engine. 2. Select and
3. Switch the fan and temperature
controls to maximum.
To rapidly remove exterior frost or ice from the windshield (on very cold days), first select Once the
windshield is clear, select to
avoid fogging the windows.
Comfort and Convenience Features MODE BUTTONS
RECIRCULATION
BUTTON FRESH AIR BUTTON
TEMPERATURE
CONTROL LEVER FAN CONTROL
LEVER
AIR CONDITIONING
SWITCHProCarManuals.comMain Menu Table of Contents s t
Page 101 of 272

Heating and Cooling
These settings direct all the air flow
to the defroster vents at the base of
the windshield and the side window defroster vents. The air flow will get
warmer and clear the windows faster as the engine warms up. You can
close the corner vents with the dial
beside each vent. This will send
more warm air to the windshield defroster vents.
For safety, make sure you have a
clear view through all the windows
before driving away.
To Turn Everything Off
To shut off the system temporarily, slide the fan speed and temperature
control levers all the way to the left. You should shut the system
completely off only for the first few
minutes of driving in cold weather,
until the engine coolant warms up
enough to operate the heater. Keep
the fan on at all other times so stale air does not build up in the interior.
Comfort and Convenience Features
MODE BUATTONS
RECIRCULATION BUTTON
FRESH AIR
BUTTON
TEMPERATURE CONTROL LEVER
FAN CONTROL
LEVER
AIR CONDITIONING
SWITCHProCarManuals.comMain Menu Table of Contents s t
Page 102 of 272
Heating and Cooling
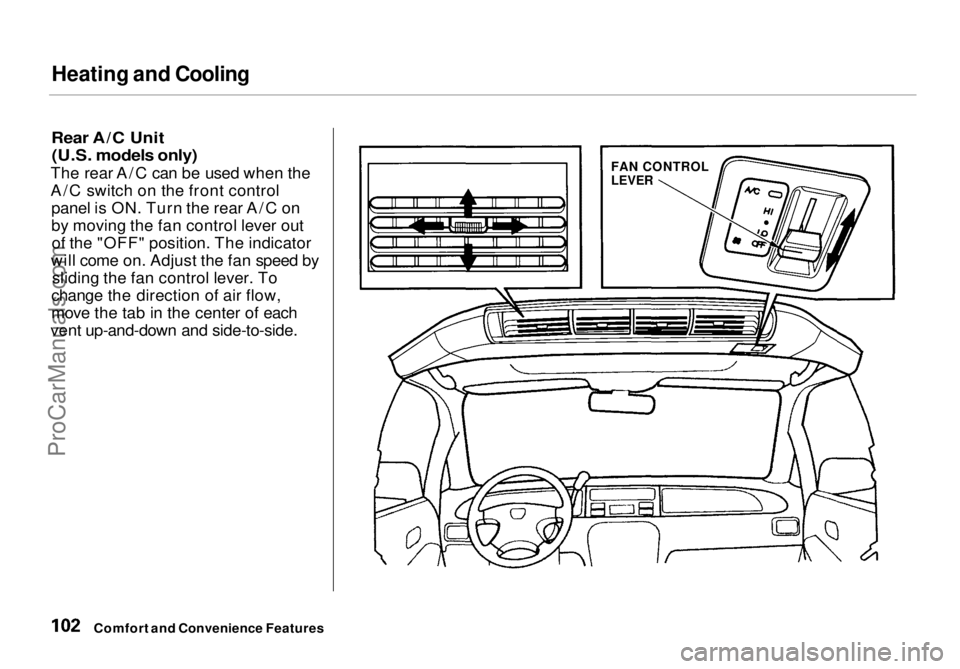
Rear A/C Unit (U.S. models only)
The rear A/C can be used when the
A/C switch on the front control panel is ON. Turn the rear A/C on
by moving the fan control lever outof the "OFF" position. The indicator
will come on. Adjust the fan speed by sliding the fan control lever. To
change the direction of air flow,
move the tab in the center of each
vent up-and-down and side-to-side.
Comfort and Convenience Features
FAN CONTROL
LEVERProCarManuals.comMain Menu Table of Contents s t
Page 158 of 272

Maintenance
This section explains why it is important to keep your vehicle well
maintained and to follow basic
maintenance safety precautions.
This section also includes Maintenance Schedules for normaldriving and severe driving conditions,
a Maintenance Record, and instruc-
tions for simple maintenance tasks
you may want to take care of
yourself.
If you have the skills and tools to per-
form more complex maintenance tasks on your Honda, you may want
to purchase the Service Manual. See
page 235 for information on how to obtain a copy, or see your Honda
dealer.
Maintenance Safety....................... 160
Important Safety Precautions.. 161
Maintenance Schedule.................. 162
Required Maintenance Record.... 169 Owner Maintenance Checks........ 171
Fluid Locations............................... 172
Engine Oil....................................... 173 Adding Oil................................... 173Recommended Oil..................... 173
Synthetic Oil............................... 174
Additives..................................... 175
Changing the Oil and Filter...... 175
Cooling System.............................. 177
Adding Engine Coolant............. 177Replacing Engine Coolant........ 179
Windshield Washers..................... 181
Automatic Transmission Fluid..... 182
Brake Fluid..................................... 183
Brake System............................. 183
Power Steering............................... 184
Air Cleaner Element...................... 185 Spark Plugs..................................... 187
Replacement............................... 187
Specifications............................. 188
Battery............................................ 189
Wiper Blades.................................. 191 Air Conditioning System............... 194
Drive Belts...................................... 195
Timing Belt..................................... 195
Tires................................................ 196 Inflation....................................... 196
Inspection................................... 198
Maintenance............................... 198
Tire Rotation.............................. 199
Replacing Tires and Wheels .... 199
Wheels and Tires....................... 200
Winter Driving........................... 200
Snow Tires.............................. 201
Tire Chains............................. 201
Lights.............................................. 202 Headlight Aiming...................... 204
Replacing Bulbs......................... 206
Storing Your Vehicle..................... 211
MaintenanceProCarManuals.comMain Menu s t
Page 176 of 272

Cooling System
Adding Engine Coolant
If the coolant level in the reserve
tank is at or below the MIN line, add coolant to bring it up to the MAX line.
Inspect the cooling system for leaks.
This coolant should always be a mixture of 50 percent antifreeze and50 percent water. Never add straight
antifreeze or plain water. Always use Genuine Honda
antifreeze/coolant. If it is not
available, you may use another
major-brand non-silicate coolant as a
temporary replacement. Make sure it
is a high-quality coolant
recommended for aluminum engines.
However, continued use of any non-
Honda coolant can result in
corrosion, causing the cooling
system to malfunction or fail. Have
the cooling system flushed and
refilled with Honda antifreeze/
coolant as soon as possible. If the reserve tank is completely
empty, you should also check the
coolant level in the radiator.
CONTINUED
Maintenance
Removing the radiator cap
while the engine is hot can cause the coolant to spray out,
seriously scalding you.
Always let the engine and radiator cool down before
removing the radiator cap.
RESERVE TANKProCarManuals.comMain Menu Table of Contents s t
Page 177 of 272

Cooling System
1. Make sure the engine and radiator
are cool.
2. Turn the radiator cap counter- clockwise, without pressing down
on it, until it stops. This relieves
any pressure remaining in the
cooling system.
3. Remove the radiator cap by pushing down and turning
counterclockwise.
4. The coolant level should be up to
the base of the filler neck. Addcoolant if it is low.
5. Put the radiator cap back on. Tighten it fully.
6. Pour coolant into the reserve tank. Fill it to halfway between the MAXand MIN marks. Put the cap back
on the reserve tank.
Do not add any rust inhibitors or
other additives to your vehicle's
cooling system. They may not be
compatible with the coolant or
engine components.
Maintenance RADIATOR CAP
RESERVE TANKProCarManuals.comMain Menu Table of Contents s t
Page 178 of 272

Cooling System
Replacing Engine Coolant
The cooling system should be completely drained and refilled with
new coolant according to the time
and distance recommendations in
the maintenance schedule. Only use Genuine Honda antifreeze/coolant.
Draining the coolant requires access
to the underside of the vehicle. Unless you have the tools and
knowledge, you should have this
maintenance done by a skilled
mechanic.
1. Slide the heater temperature
control lever to maximum heat.
Open the hood. Make sure the
engine and radiator are cool to the
touch.
2. Remove the radiator cap. 3. Loosen the drain plug on the
bottom of the radiator. Thecoolant will drain through the
splash guard. Remove the drain
bolt and washer from the engine
block.
CONTINUED
Maintenance
DRAIN PLUG
DRAIN BOLTProCarManuals.comMain Menu Table of Contents s t
Page 179 of 272

Cooling System
4. Remove the reserve tank from its holder by pulling it straight up.Drain the coolant, then put the
tank back in its holder.
5. When the coolant stops draining, tighten the drain plug in the
bottom of the radiator. Put a new
washer on the drain bolt, then reinstall the drain bolt in the
engine block. Tighten it securely. Tightening torque:
61 lbf.ft (83 N.m, 8.5 kgf.m)
6. Mix
the recommended antifreeze
with an equal amount of purified or distilled water in a clean
container. The cooling system
capacity is:
1.66 US gal (6.3 ,1.39 Imp gal)
7. Pour coolant into the radiator up
to the base of the filler neck. 8. Loosen the bleeder bolt on top of
the engine. Tighten it again whencoolant comes out in a steadystream with no bubbles.
9. Refill the radiator to the base of the filler neck. Start the engineand let it run until it warms up (the
radiator cooling fan comes on at
least twice).
Maintenance
RESERVE TANK RESERVE
TANK CAP
HOLDER FILLER NECK
Fill up to here BLEEDER BOLT
ProCarManuals.comMain Menu Table of Contents s t
Page 180 of 272

Cooling System, Windshield Washers
10. Turn off the engine. Check the level in the radiator, add coolant ifneeded. Install the radiator cap,
and tighten it fully.
11. Fill the reserve tank to the MAX mark. Install the reserve tank cap. Windshield Washers
Check the level in the windshield
washer reservoir at least monthly during normal usage. In bad weather,
when you use the washers often, check the level every time you stop
for fuel.
The windshield washer reservoir is located behind the driver's side
headlight. Check the reservoir's fluid
level by removing the cap and
looking at the level gauge attached
to the cap.
Fill the reservoir with a good-quality
windshield washer fluid. This increases the cleaning capability and
prevents freezing in cold weather.
Do not use engine antifreeze or a vinegar/water solution in thewindshield washer reservoir.
LEVEL GAUGE
Antifreeze can damage your vehicle's
paint, while a vinegar/water solution
can damage the windshield washer
pump.
Use only commercially-available
windshieId washer fluid.
Maintenance
RESERVE TANK
NOTICEProCarManuals.comMain Menu Table of Contents s t
Page 193 of 272

Air Conditioning System
Your vehicle's air conditioning is a sealed system. Any major mainte-
nance, such as recharging, should be done by a qualified mechanic. You
can do a couple of things to make sure the air conditioning works
efficiently.
Periodically check the engine's
radiator and air conditioning condenser for leaves, insects, and
dirt stuck to the front surface. These
block the air flow and reduce cooling efficiency. Use a light spray from a
hose or a soft brush to remove them.
The condenser and radiator fins bend
easily. Only use a low-pressure spray
or soft-bristle brush to clean them.
AIR CONDITIONING
CONDENSER
Run the air conditioning at least once a week during the cold weather
months. Run it for at least ten
minutes while you are driving at asteady speed with the engine at
normal operating temperature. This
circulates the lubricating oil con-
tained in the refrigerant. If the air conditioning does not get as
cold as before, have your dealer
check the system. Recharge the
system with Refrigerant HFC-134a (R-134a). (See Specifications on page 248.
)
Whenever you
have the air conditioning
system serviced, make sure the service
facility uses a refrigerant recycling
system. This system captures the
refrigerant for reuse. Releasing
refrigerant into the atmosphere can
damage the environment.
Maintenance
NOTICE
NOTICEProCarManuals.comMain Menu Table of Contents s t