HONDA ODYSSEY 2000 RA6-RA9 / 2.G Owners Manual
Manufacturer: HONDA, Model Year: 2000, Model line: ODYSSEY, Model: HONDA ODYSSEY 2000 RA6-RA9 / 2.GPages: 352, PDF Size: 4.43 MB
Page 191 of 352
Break-i
n Period , Gasolin e
Break-i n Perio d
Help assure your vehicle's future
reliability and performance by paying
extra attention to how you drive
during the first 600 miles (1,000 km).
During this period: Avoid full-throttle starts and rapid
acceleration.
Avoid hard braking. New brakes need to be broken-in by moderate
use for the first 200 miles (300
km). You should follow these same re-
commendations with an overhauled
or exchanged engine, or when the
brakes are replaced.
We also recommend that you should not tow a trailer during the first 500
miles (800 km). Gasoline
Your Honda is designed to operate on unleaded gasoline with a pump
octane number of 86 or higher. Use
of a lower octane gasoline can cause
a persistent, heavy metallic rapping
noise in the engine that can lead to
mechanical damage.
We recommend gasolines containing detergent additives that help prevent
fuel system and engine deposits.
Using gasoline containing lead will
damage your vehicle's emissions
controls. This contributes to air
pollution.
Befor e Drivin g
Page 192 of 352
Gasoline, Servic e Statio n Procedure s
In Canada, some gasolines contain
an octane-enhancing additive called
MMT. If you use such gasolines,
your emission control system performance may deteriorate and
the Malfunction Indicator Lamp on
your instrument panel may turn on. If this happens, contact yourauthorized Honda dealer for service.Fillin g th e Fue l Tan k
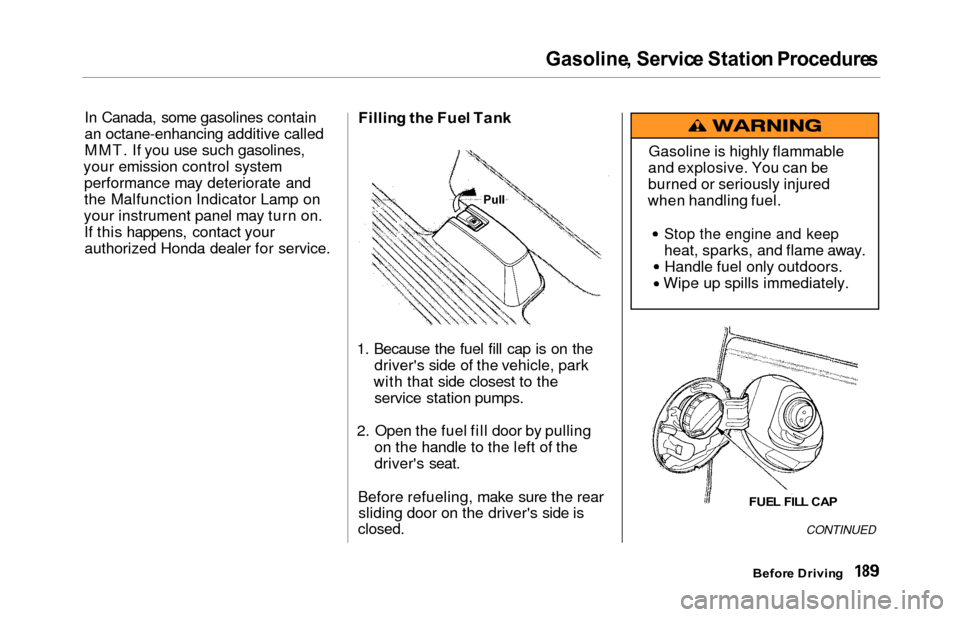
1. Because the fuel fill cap is on the
driver's side of the vehicle, park
with that side closest to the service station pumps.
2. Open the fuel fill door by pulling on the handle to the left of the
driver's seat.
Before refueling, make sure the rear sliding door on the driver's side is
closed.CONTINUED
Befor e Drivin g
Gasoline is highly flammable
and explosive. You can be
burned or seriously injured
when handling fuel.
Stop the engine and keep
heat, sparks, and flame away. Handle fuel only outdoors.
Wipe up spills immediately.
FUE L FIL L CA P
Pull
Page 193 of 352
Service Statio n Procedure s
3. Remove the fuel fill cap slowly.
You may hear a hissing sound aspressure inside the tank escapes.
Place the cap in the holder on the
fuel fill door.
4. Stop filling the tank after the fuel nozzle automatically clicks off. Do
not try to "top off" the tank, leavesome room for the fuel to expand
with temperature changes.
5. Screw the fuel fill cap back on, tighten it until it clicks several
times. If you do not properly
tighten the cap, the Malfunction
Indicator Lamp may come on (seepage 309 ).
6. Push the fuel fill door closed until it latches.Openin g th e Hoo d
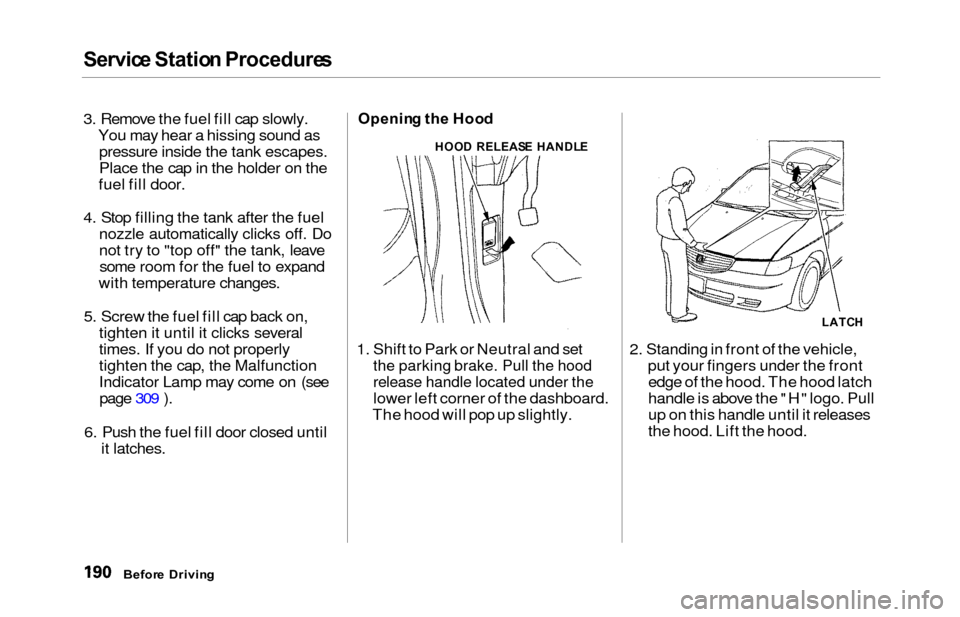
1. Shift to Park or Neutral and set
the parking brake. Pull the hood
release handle located under the
lower left corner of the dashboard.
The hood will pop up slightly. 2. Standing in front of the vehicle,
put your fingers under the frontedge of the hood. The hood latch
handle is above the "H" logo. Pull
up on this handle until it releases
the hood. Lift the hood.
Befor e Drivin g
HOOD RELEAS E HANDL E
LATCH
Page 194 of 352
Servic
e Statio n Procedure s
If you can open the hood without
lifting the hood latch handle, or the
hood latch handle moves stiffly or does not spring back as before, the
mechanism should be cleaned and
lubricated (see page 254).
SUPPOR
T RO D
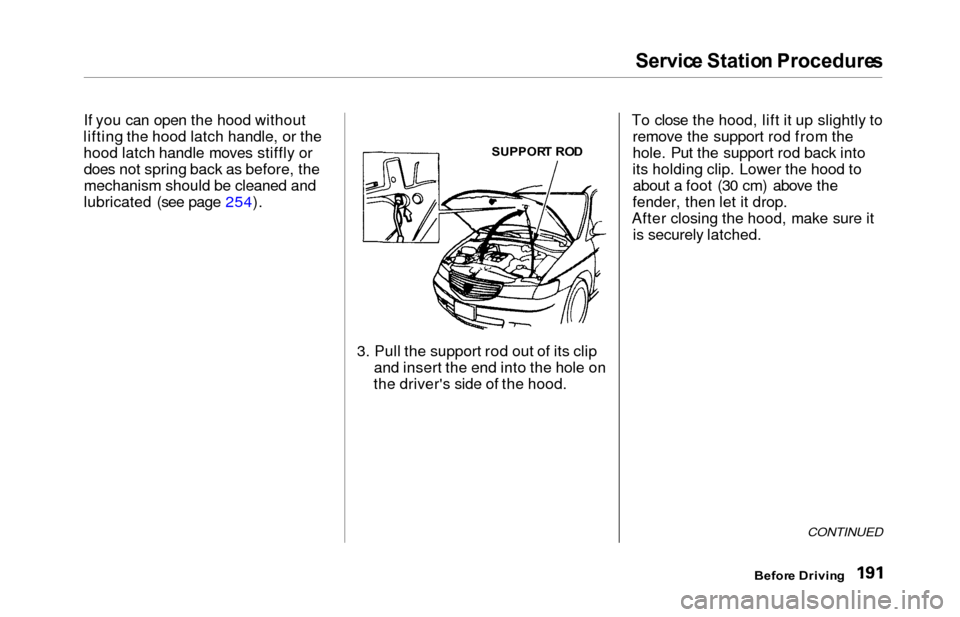
3. Pull the support rod out of its clip and insert the end into the hole on
the driver's side of the hood. To close the hood, lift it up slightly to
remove the support rod from the
hole. Put the support rod back into
its holding clip. Lower the hood toabout a foot (30 cm) above the
fender, then let it drop.
After closing the hood, make sure it is securely latched.
CONTINUED
Befor e Drivin g
Page 195 of 352
Service Statio n Procedure s
Oil Check
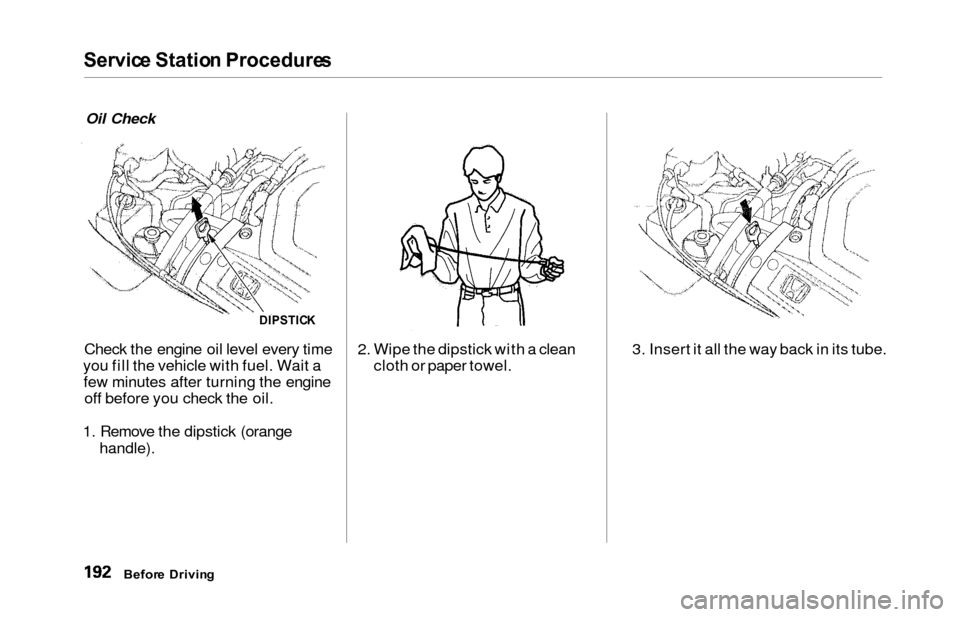
Check the engine oil level every time
you fill the vehicle with fuel. Wait a few minutes after turning the engine off before you check the oil.
1. Remove the dipstick (orange
handle).
2. Wipe the dipstick with a clean cloth or paper towel. 3. Insert it all the way back in its tube.
Befor
e Drivin g
DIPSTIC K
Page 196 of 352
Service Statio n Procedure s
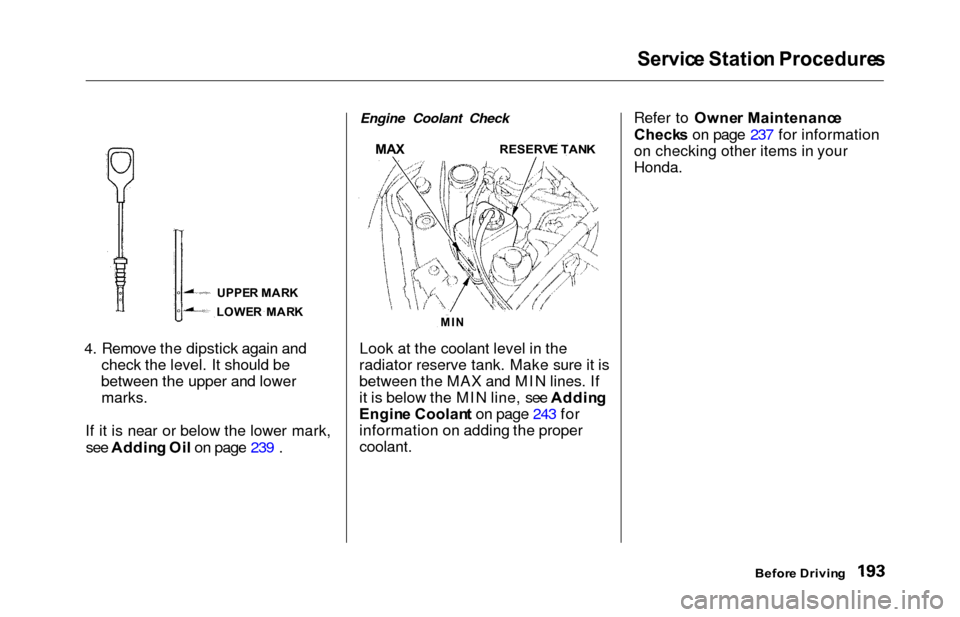
4. Remove the dipstick again and
check the level. It should be
between the upper and lower marks.
If it is near or below the lower mark, see Addin g Oi l on page 239 .
Engine Coolant Check
MA X RESERV E TAN K
Look at the coolant level in the
radiator reserve tank. Make sure it is
between the MAX and MIN lines. If
it is below the MIN line, see Addin g
Engin e Coolan t on page 243 for
information on adding the proper
coolant. Refer to Owne
r Maintenanc e
Check s on page 237 for information
on checking other items in your
Honda.
Befor e Drivin g
MIN
UPPE R MAR K
LOWE R MAR K
Page 197 of 352
Fuel Econom y
The condition of your vehicle and
your driving habits are the two most important things that affect the fuelmileage you get.
Vehicl e Conditio n
Always maintain your vehicle accord- ing to the maintenance schedule.
This will keep it in top operating
condition.
An important part of that mainte- nance is the Owne r Maintenanc e
Check s (see page 237 ). For
example, an underinflated tire
causes more "rolling resistance,"
which uses fuel. It also wears out faster, so check the tire pressure atleast monthly.
In winter, the build-up of snow on
your vehicle's underside adds weight and rolling resistance. Frequent
cleaning helps your fuel mileage and
reduces the chance of corrosion. Drivin
g Habit s
You can improve fuel economy by driving moderately. Rapid acceler-ation, abrupt cornering, and hard
braking use more fuel.
Always drive in the highest gear that allows the engine to run and acceler-
ate smoothly.
Depending on traffic conditions, try
to maintain a constant speed. Every
time you slow down and speed up,
your vehicle uses extra fuel. Use the cruise control, when appropriate, toincrease fuel economy. A cold engine uses more fuel than a
warm engine. It is not necessary to"warm-up" a cold engine by letting itidle for a long time. You can drive
away in about a minute, no matter
how cold it is outside. The engine
will warm up faster, and you get better fuel economy. To cut down on
the number of "cold starts," try to
combine several short trips into one.
The air conditioning puts an extra load on the engine which makes ituse more fuel. Turn off the A/C to
cut down on air conditioning use. Use the flow-through ventilation
when the outside air temperature is
moderate.
Befor e Drivin g
Page 198 of 352
Accessorie
s an d Modification s
Modifying your vehicle, or installing
some non-Honda accessories, can
make your vehicle unsafe. Before
you make any modifications or add any accessories, be sure to read the
following information.
Accessorie s
Your dealer has Genuine Honda accessories that allow you to
personalize your vehicle. These accessories have been designed and
approved for your vehicle, and are
covered by warranty.
Non-Honda accessories are usually
designed for universal applications.
Although aftermarket accessories may fit on your vehicle, they may not
meet factory specifications, andcould adversely affect your vehicle's
handling and stability. (See "Modifications" on page 196 for
additional information.) When properly installed, cellular
phones, alarms, two-way radios, and
low-powered audio systems should
not interfere with your vehicle's
computer-controlled systems, such
as the SRS and anti-lock brake
system.
However, if electronic accessories
are improperly installed, or exceed
your vehicle's electrical system capacity, they can interfere with the operation of your vehicle, or even
cause the airbags to deploy.
Before installing any accessory:
Make sure the accessory does notobscure any lights, or interfere
with proper vehicle operation or performance.
Be sure electronic accessories do
not overload electrical circuits (see page 311). Have the installer contact your
Honda dealer for assistance before
installing any electronic accessory.
If possible, have your dealer inspect
the final installation.
Before Drivin g
Improper accessories or
modifications can affect your
vehicle's handling, stability and performance, and cause a
crash in which you can be hurt
or killed.
Follow all instructions in this
owner's manual regarding
accessories and modifications.
Page 199 of 352
Accessories an d Modification s
Modification s
Do not remove any original
equipment or modify your vehicle in
any way that would alter its design or
operation. This could make your
vehicle unsafe and illegal to drive.
For example, do not make any
modifications that would change the
ride height of your vehicle, or install
wheels and tires with a different overall diameter.
Such modifications can adversely
affect handling, and interfere with
the operation of the vehicle's anti-
lock brakes and other systems. In addition, any modifications that
decrease ground clearance increase
the chance of undercarriage parts striking a curb, speed bump, or other
raised object, which could cause
your airbags to deploy.
Do not modify your steering wheel
or any other part of your
Supplemental Restraint System. Modifications could make the
system ineffective. Additiona
l Safet y Precautio n
Do not attach or place objects on the
airbag covers. Any object attached to
or placed on the covers marked "SRS
AIRBAG," in the center of the steering wheel and on top of the
dashboard, could interfere with the
proper operation of the airbags. Or,
if the airbags inflate, the objects
could be propelled inside the vehicle and hurt someone.
Befor e Drivin g
Page 200 of 352
Carryin
g Carg o
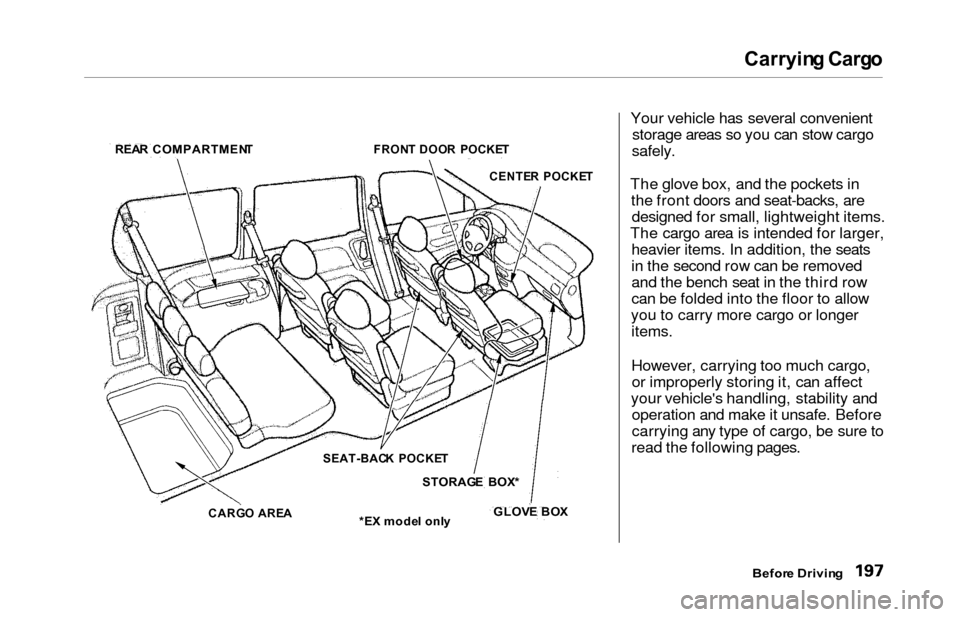
Your vehicle has several convenient storage areas so you can stow cargo
safely.
The glove box, and the pockets in the front doors and seat-backs, aredesigned for small, lightweight items.
The cargo area is intended for larger, heavier items. In addition, the seats
in the second row can be removed
and the bench seat in the third row
can be folded into the floor to allow
you to carry more cargo or longer items.
However, carrying too much cargo,or improperly storing it, can affect
your vehicle's handling, stability and operation and make it unsafe. Before
carrying any type of cargo, be sure to
read the following pages.
Before Drivin g
REA
R COMPARTMEN T
FRONT DOO R POCKE T
CENTE R POCKE T
SEAT-BAC K POCKE T
STORAG E BOX *
GLOV E BO X
*E X mode l onl y
CARG
O ARE A