bulb HONDA ODYSSEY 2002 RA6-RA9 / 2.G Owners Manual
[x] Cancel search | Manufacturer: HONDA, Model Year: 2002, Model line: ODYSSEY, Model: HONDA ODYSSEY 2002 RA6-RA9 / 2.GPages: 399, PDF Size: 4.97 MB
Page 70 of 399
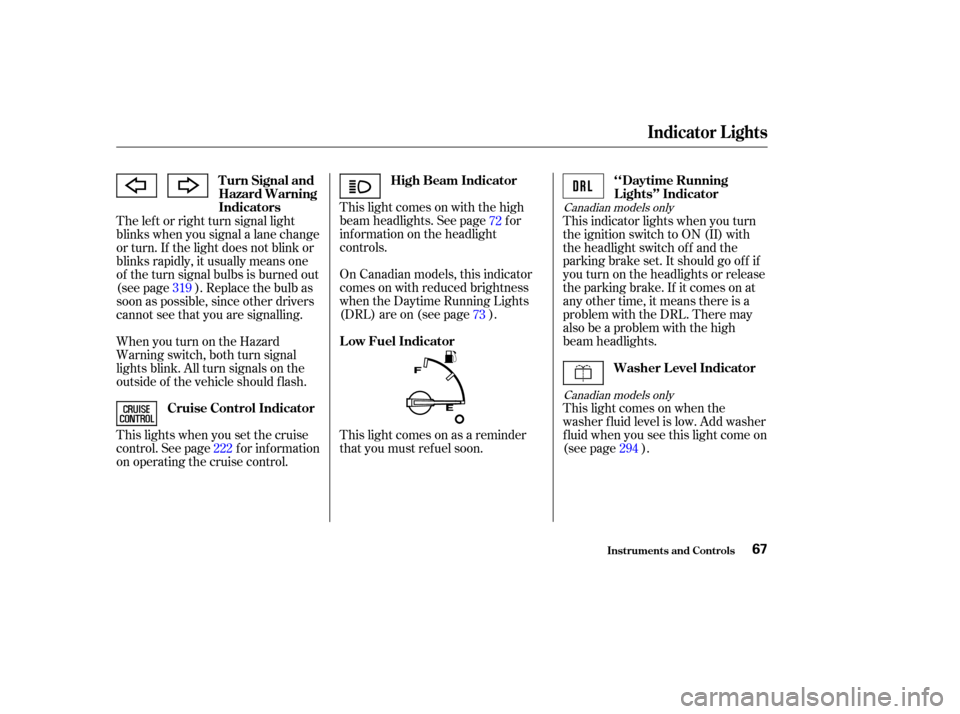
This light comes on with the high
beam headlights. See page for
inf ormation on the headlight
controls.
On Canadian models, this indicator
comes on with reduced brightness
when the Daytime Running Lights
(DRL) are on (see page ).This light comes on when the
washer f luid level is low. Add washer
f luid when you see this light come on
(see page ). This indicator lights when you turn
the ignition switch to ON (II) with
the headlight switch of f and the
parking brake set. It should go of f if
youturnontheheadlightsorrelease
the parking brake. If it comes on at
any other time, it means there is a
problem with the DRL. There may
also be a problem with the high
beam headlights.
This light comes on as a reminder
that you must ref uel soon.
The lef t or right turn signal light
blinks when you signal a lane change
or turn. If the light does not blink or
blinks rapidly, it usually means one
of the turn signal bulbs is burned out
(see page ). Replace the bulb as
soon as possible, since other drivers
cannot see that you are signalling.
WhenyouturnontheHazard
Warning switch, both turn signal
lights blink. All turn signals on the
outside of the vehicle should f lash.
This lights when you set the cruise
control. See page f or inf ormation
on operating the cruise control.
319
222 72
73
294Canadian models only
Canadian models only
High Beam Indicator Washer Level Indicator ‘‘Daytime Running
Lights’’ Indicator
Low Fuel Indicator
Turn Signal and
Hazard Warning
Indicators
Cruise Control Indicator
Indicator L ights
Inst rument s and Cont rols67
Page 274 of 399
This section explains why it is
important to keep your vehicle well
maintained and to f ollow basic
maintenance saf ety precautions.
This section also includes
Maintenance Schedules f or normal
driving and severe driving conditions,
a Maintenance Record, and instruc-
tions f or simple maintenance tasks
you may want to take care of
yourself .
If you have the skills and tools to per-
f orm more complex maintenance
tasks on your Honda, you may want
to purchase the Service Manual. See
page f or inf ormation on how to
obtain a copy, or see your Honda
dealer.......................
Maintenance Saf ety .272
.
Important Safety Precautions . 273
.................
Maintenance Schedule . 274
...
Required Maintenance Record . 281
.......
Owner Maintenance Checks . 283
..............................
Fluid Locations .284
......................................
Engine Oil .285
..................................
Adding Oil .285
....................
Recommended Oil .285
..............................
Synthetic Oil .286
....................................
Additives .287
.....
Changing the Oil and Filter . 287
.............................
Cooling System .289
............
Adding Engine Coolant . 289
.......
Replacing Engine Coolant . 291
....................
Windshield Washers .294
....
Automatic Transmission Fluid . 295
....................................
Brake Fluid .296
............................
Brake System .296
..............................
Power Steering .297
.....................
Air Cleaner Element .298
....................................
Hood Latch .300
....................................
Spark Plugs .300
..............................
Replacement .300
............................
Specif ications .302
...........................................
Battery .303 .................................
Wiper Blades .305
..............
Air Conditioning System . 307
..................
Dust and Pollen Filter . 308
.....................................
Drive Belts .308
....................................
Timing Belt .309
...............................................
Tires .309
......................................
Inf lation .309
..................................
Inspection .311
..............................
Maintenance .312
.............................
Tire Rotation .312
...
Replacing Tires and Wheels . 313
......................
Wheels and Tires .314
..........................
Winter Driving .314
.............................
Snow Tires .315
............................
Tire Chains .315
.............................................
Lights .316
.....................
Headlight Aiming .318
........................
Replacing Bulbs .318
....................
Storing Your Vehicle .327
385
Maintenance
Maint enance271
Page 319 of 399
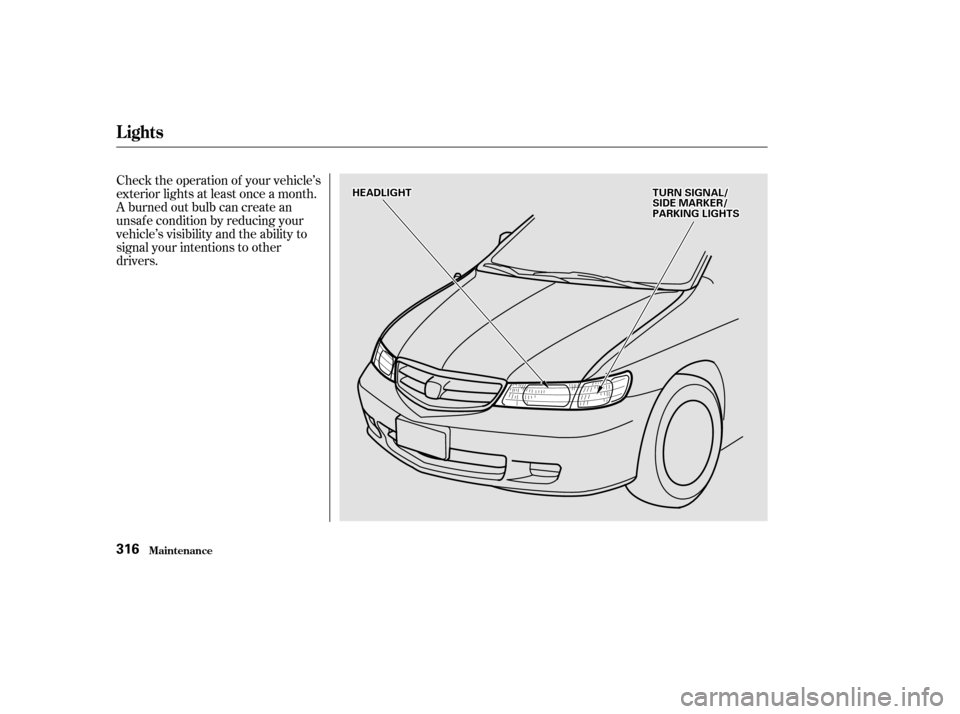
Check the operation of your vehicle’s
exterior lights at least once a month.
A burned out bulb can create an
unsaf e condition by reducing your
vehicle’s visibility and the ability to
signal your intentions to other
drivers.
Lights
Maint enance316
H HE
EA
A D
DL
LIIGGH HT
T T
TU
UR RNN S
SIIGGN NAAL
L//
S
SI IDD E
E M
M A
AR
RKKEER
R/ /
P
P A
A R
RKKIINNG G L
LIIGGH HT
TS
S
Page 320 of 399
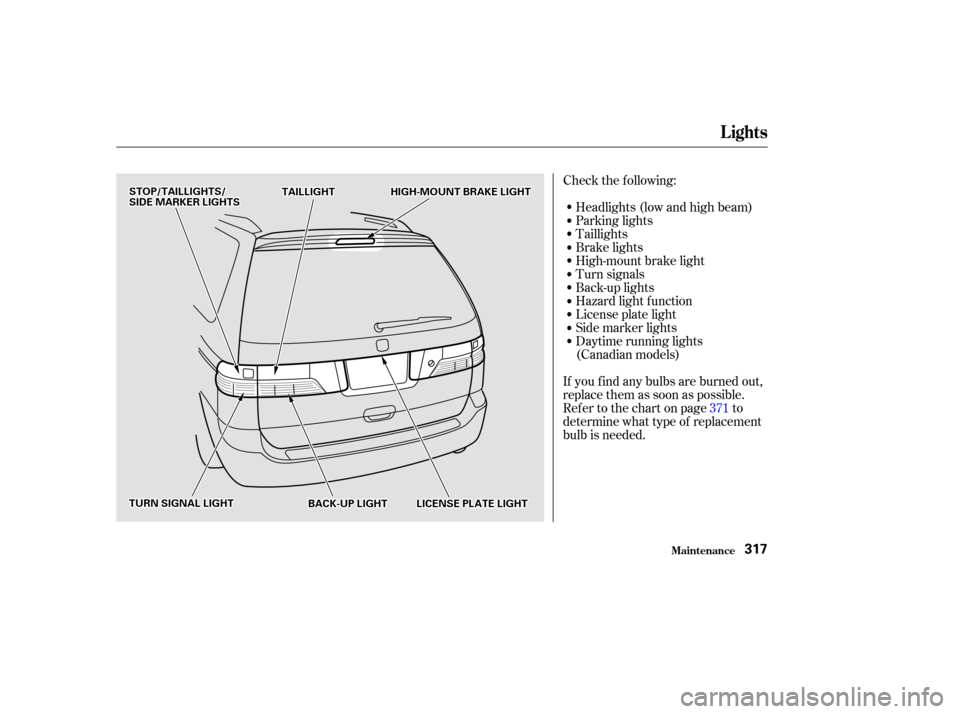
Check the f ollowing:Headlights (low and high beam)
Parking lights
Taillights
Brake lights
High-mount brake light
Turn signals
Back-up lights
Hazard light f unction
License plate light
Side marker lights
Daytime running lights
(Canadian models)
If you f ind any bulbs are burned out,
replace them as soon as possible.
Refer to the chart on page to
determine what type of replacement
bulb is needed. 371
Lights
Maint enance317
H H
I
IGGH H-
-M
M O
OUUNNTT B
BRRAA K
KEE L
LIIGGH HT
T
S
ST
TO
OP P/
/T
T A
A I
ILLL LIIGGH HT
TS
S/ /
S
SI IDD E
E M
M A
AR
RKKEER
R L
LIIGGH HT
TS
S
B
BAA C
CKK--U
UP P L
LIIGGH HT
T
T
T
U
UR RNN S
SIIGGN NAAL
L L
LIIGGH HT
T T
T
A
A I
ILLL LIIGGH HT
T
L
LIICCE EN
NS SEE P
PL
LAA T
TE
E L
LIIGGH HT
T
Page 321 of 399
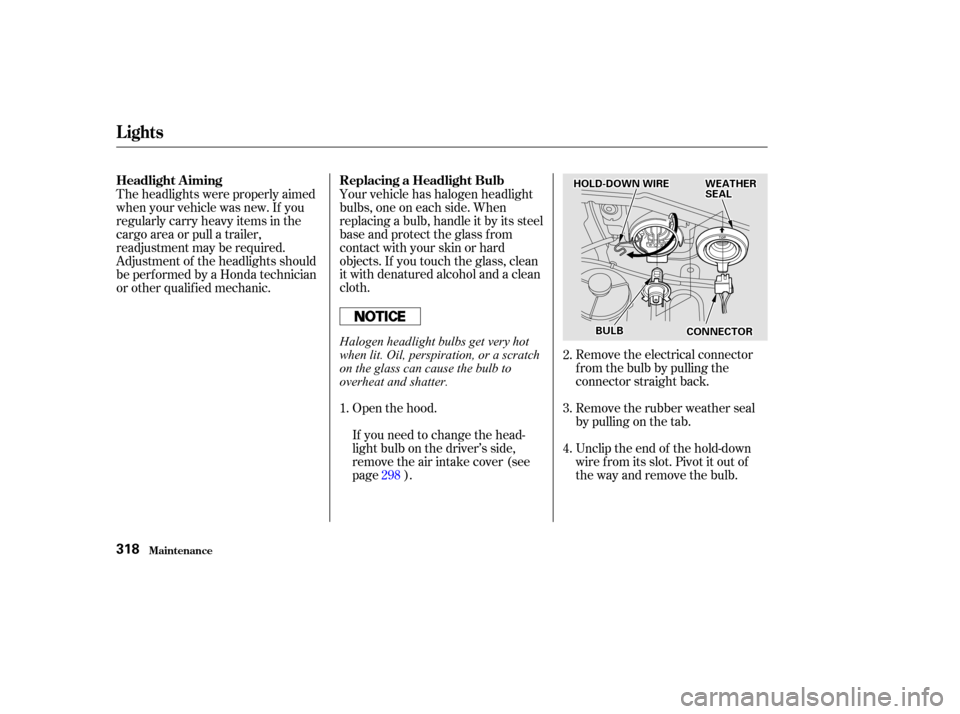
Unclip the end of the hold-down
wire f rom its slot. Pivot it out of
the way and remove the bulb. Remove the rubber weather seal
by pulling on the tab. Remove the electrical connector
f rom the bulb by pulling the
connector straight back.
Your vehicle has halogen headlight
bulbs, one on each side. When
replacing a bulb, handle it by its steel
base and protect the glass from
contactwithyourskinorhard
objects. If you touch the glass, clean
it with denatured alcohol and a clean
cloth.
Open the hood.
If you need to change the head-
light bulb on the driver’s side,
remove the air intake cover (see
page ).
Theheadlightswereproperlyaimed
when your vehicle was new. If you
regularly carry heavy items in the
cargo area or pull a trailer,
readjustment may be required.
Adjustment of the headlights should
be perf ormed by a Honda technician
or other qualif ied mechanic.
1.2.
3.
4.
298
Lights
Maint enance
Replacing a Headlight Bulb
Headlight A iming
318
H H O
OL LDD -
-D
D O
OW WN N W
WIIRRE E W
WEEA
A T
TH
H E
ER
R
S
SE EA
A L
L
C
CO ON NNNEEC
CT TO
OR R
B
BU
UL LBB
Halogen headlight bulbs get very hot
when lit. Oil, perspiration, or a scratch
on the glass can cause the bulb to
overheat and shatter.
Page 322 of 399
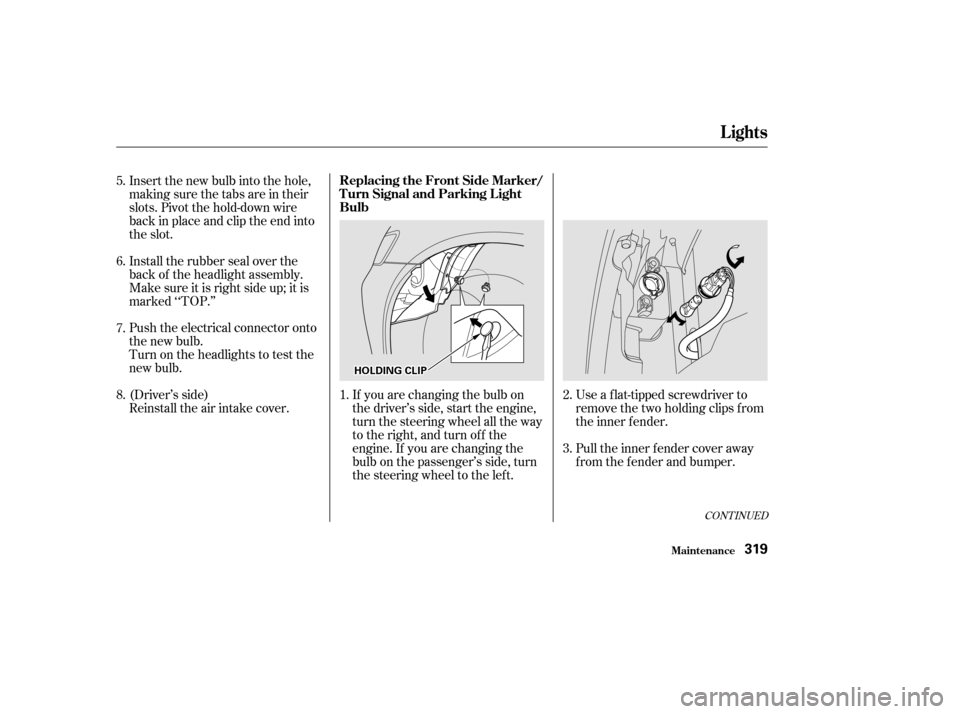
Use a f lat-tipped screwdriver to
remove the two holding clips f rom
the inner f ender.
Pull the inner f ender cover away
f rom the f ender and bumper.
If you are changing the bulb on
the driver’s side, start the engine,
turn the steering wheel all the way
to the right, and turn off the
engine. If you are changing the
bulb on the passenger’s side, turn
the steering wheel to the left.
Insert the new bulb into the hole,
making sure the tabs are in their
slots. Pivot the hold-down wire
back in place and clip the end into
the slot.
Install the rubber seal over the
back of the headlight assembly.
Make sure it is right side up; it is
marked ‘‘TOP.’’
Push the electrical connector onto
the new bulb.
Turn on the headlights to test the
new bulb.
(Driver’s side)
Reinstall the air intake cover.
1.
2.
3.
5.
6.
7.
8.
CONT INUED
Lights
Maint enance
Replacing the Front Side Marker/
Turn Signal and Parking L ight
Bulb
319
H H
O
OL LDD I
INNG G C
CLLIIPP
Page 323 of 399
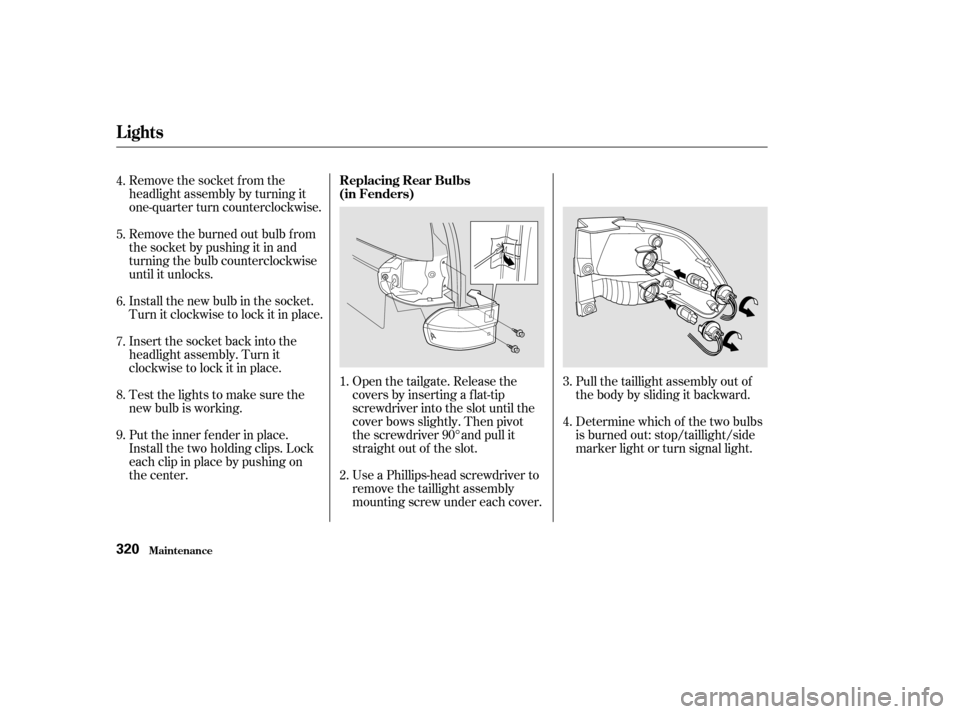
Remove the socket from the
headlight assembly by turning it
one-quarter turn counterclockwise.
Remove the burned out bulb f rom
thesocketbypushingitinand
turning the bulb counterclockwise
until it unlocks.
Install the new bulb in the socket.
Turn it clockwise to lock it in place.
Insert the socket back into the
headlight assembly. Turn it
clockwise to lock it in place.
Testthelightstomakesurethe
new bulb is working.
Put the inner f ender in place.
Install the two holding clips. Lock
each clip in place by pushing on
the center.Determine which of the two bulbs
is burned out: stop/taillight/side
marker light or turn signal light. Pull the taillight assembly out of
thebodybyslidingitbackward.
Use a Phillips-head screwdriver to
remove the taillight assembly
mounting screw under each cover. Open the tailgate. Release the
covers by inserting a f lat-tip
screwdriver into the slot until the
cover bows slightly. Then pivot
the screwdriver 90° and pull it
straight out of the slot.
1.
2. 3.
4.
4.
5.
6.
7.
8.
9.
Lights
Maint enance
Replacing Rear Bulbs
(in Fenders)
320
Page 324 of 399
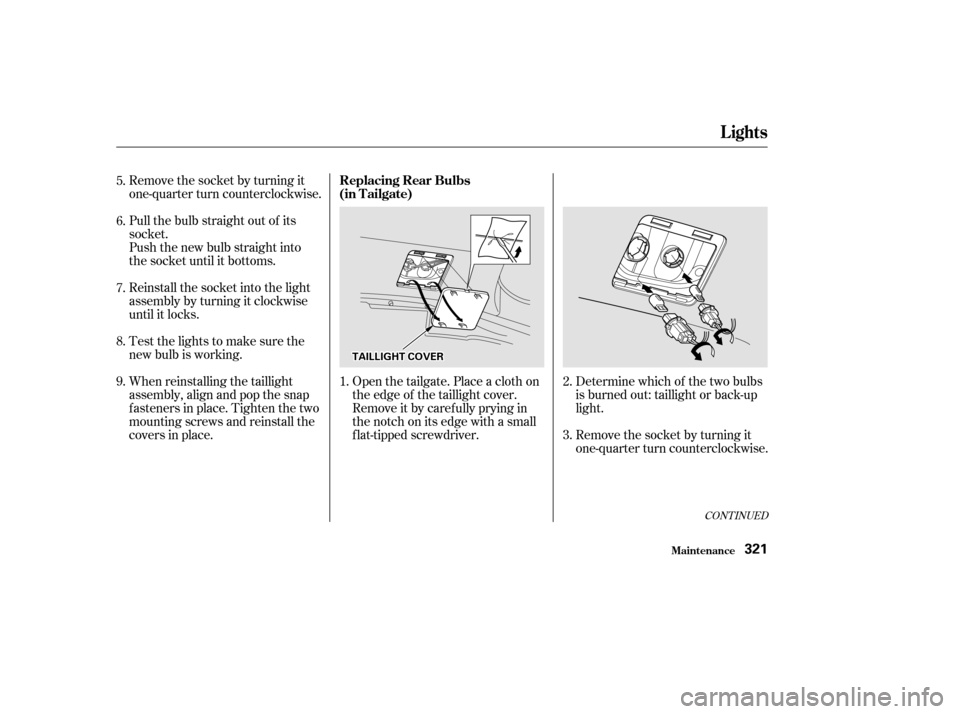
Remove the socket by turning it
one-quarter turn counterclockwise.
Pull the bulb straight out of its
socket.
Push the new bulb straight into
the socket until it bottoms.
Reinstall the socket into the light
assembly by turning it clockwise
until it locks.
Testthelightstomakesurethe
new bulb is working.
When reinstalling the taillight
assembly, align and pop the snap
f asteners in place. Tighten the two
mounting screws and reinstall the
covers in place.Open the tailgate. Place a cloth on
the edge of the taillight cover.
Remove it by caref ully prying in
the notch on its edge with a small
f lat-tipped screwdriver.Determine which of the two bulbs
is burned out: taillight or back-up
light.
Remove the socket by turning it
one-quarter turn counterclockwise.
2.
3.
5.
6.
7.
8.
9.
1.
CONT INUED
Lights
Maint enance
Replacing Rear Bulbs
(in Tailgate)
321
T TA
A I
ILLL LIIGGH HT
T C
COOV VE
ER
R
Page 325 of 399
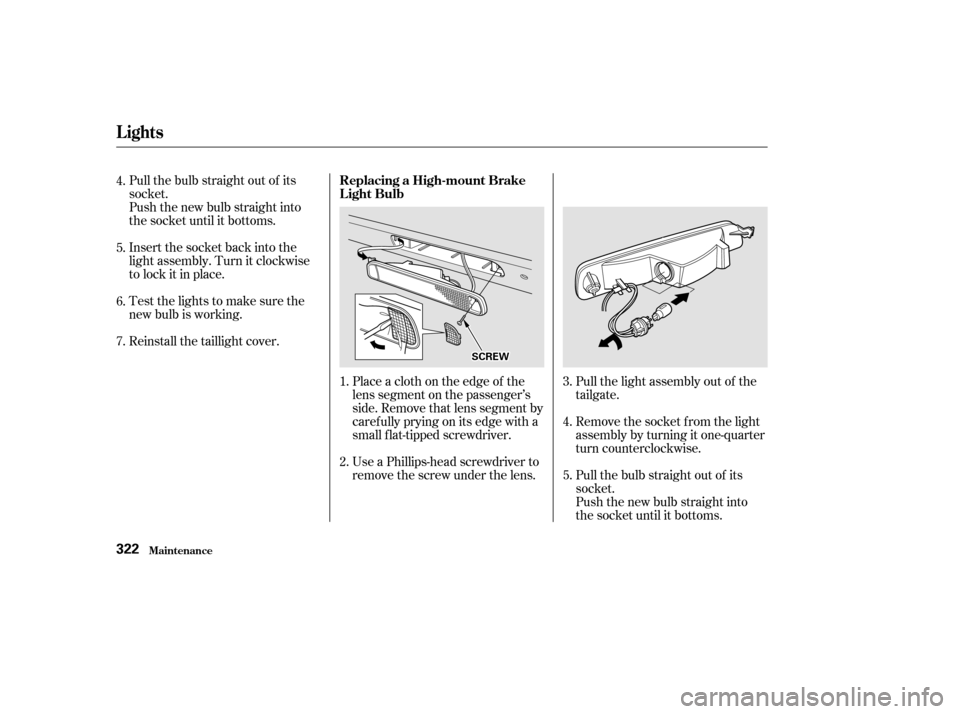
Pull the bulb straight out of its
socket.
Push the new bulb straight into
the socket until it bottoms.
Insert the socket back into the
light assembly. Turn it clockwise
to lock it in place.
Testthelightstomakesurethe
new bulb is working.
Reinstall the taillight cover.Pull the light assembly out of the
tailgate.
Remove the socket f rom the light
assembly by turning it one-quarter
turn counterclockwise.
Pull the bulb straight out of its
socket.
Push the new bulb straight into
the socket until it bottoms.
Place a cloth on the edge of the
lens segment on the passenger’s
side. Remove that lens segment by
caref ully prying on its edge with a
small f lat-tipped screwdriver.
Use a Phillips-head screwdriver to
remove the screw under the lens.
1.
2.
3.
4.
5.
6.
7.
4.
5.
Lights
Maint enance
Replacing a High-mount Brake
Light Bulb
322
S SCCRREEW
W
Page 326 of 399
CONT INUED
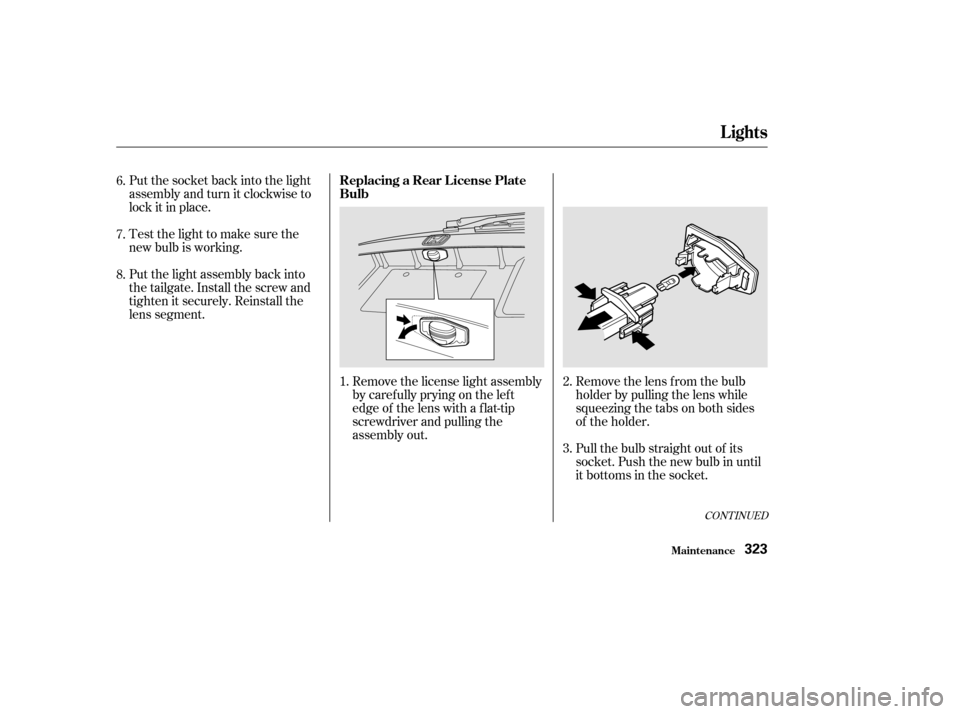
Put the socket back into the light
assembly and turn it clockwise to
lock it in place.
Test the light to make sure the
new bulb is working.Remove the license light assembly
by caref ully prying on the lef t
edge of the lens with a f lat-tip
screwdriver and pulling the
assembly out.Remove the lens f rom the bulb
holder by pulling the lens while
squeezing the tabs on both sides
of the holder.
Pull the bulb straight out of its
socket. Push the new bulb in until
it bottoms in the socket.
Put the light assembly back into
the tailgate. Install the screw and
tighten it securely. Reinstall the
lens segment.
2.
3.
6.
7.
8.
1.
Lights
Maint enance
Replacing a Rear License Plate
Bulb
323